Dessert Tacos: Prepare to ditch everything you thought you knew about tacos because we’re about to embark on a sweet adventure! Forget savory fillings and spicy salsas; these aren’t your average Tuesday night dinner. We’re talking about a dessert revolution, a handheld masterpiece of sugary goodness that will redefine your dessert game.
While the exact origins of the Dessert Taco are shrouded in a bit of mystery (did it spring forth from a late-night craving or a culinary stroke of genius?), its popularity is undeniable. It cleverly marries the fun, familiar format of a taco with the irresistible allure of sweet treats. Think of it as a blank canvas for your dessert dreams!
What makes these sweet tacos so universally loved? It’s the delightful combination of textures and flavors. The crispy or soft taco shell provides the perfect vessel for creamy fillings, crunchy toppings, and drizzles of decadent sauces. Plus, they’re incredibly customizable! Whether you’re a chocolate lover, a fruit fanatic, or a sprinkle enthusiast, you can create a Dessert Taco that perfectly suits your taste. They’re also incredibly fun to make and eat, making them a perfect treat for parties, family gatherings, or just a special indulgence for yourself. So, grab your ingredients, and let’s get ready to build some seriously delicious dessert tacos!

Ingredients:
- For the Waffle Taco Shells:
- 2 cups all-purpose flour
- 2 tablespoons granulated sugar
- 4 teaspoons baking powder
- 1/2 teaspoon salt
- 1 3/4 cups milk
- 1/2 cup vegetable oil
- 2 large eggs, lightly beaten
- 1 teaspoon vanilla extract
- Non-stick cooking spray
- For the Chocolate Filling:
- 1 cup heavy cream
- 8 ounces semi-sweet chocolate, chopped
- 1 tablespoon unsalted butter
- 1 teaspoon vanilla extract
- Pinch of salt
- For the Strawberry Salsa:
- 1 pound fresh strawberries, hulled and diced
- 1/4 cup red onion, finely diced
- 1 tablespoon fresh lime juice
- 1 tablespoon fresh mint, chopped
- 1 tablespoon granulated sugar (adjust to taste)
- For the Toppings (Get Creative!):
- Whipped cream
- Chocolate shavings
- Sprinkles
- Chopped nuts (pecans, walnuts, almonds)
- Shredded coconut
- Caramel sauce
- Chocolate sauce
- Maraschino cherries
Preparing the Waffle Taco Shells:
Okay, let’s get started with the most important part – the waffle taco shells! These are what make this dessert truly special, and trust me, they’re easier to make than you think. I promise!
- Combine the Dry Ingredients: In a large bowl, whisk together the flour, sugar, baking powder, and salt. Make sure everything is well combined so that the baking powder is evenly distributed. This will ensure your waffles rise nicely and have a light, airy texture.
- Combine the Wet Ingredients: In a separate bowl, whisk together the milk, vegetable oil, eggs, and vanilla extract. Whisk until the eggs are fully incorporated and the mixture is smooth.
- Combine Wet and Dry: Pour the wet ingredients into the dry ingredients and gently whisk until just combined. Be careful not to overmix! A few lumps are okay; overmixing can lead to tough waffles. We want them light and crispy!
- Heat Your Waffle Iron: Preheat your waffle iron according to the manufacturer’s instructions. Most waffle irons have an indicator light that will tell you when it’s ready. Make sure it’s nice and hot before you start cooking.
- Grease the Waffle Iron: Lightly spray the waffle iron with non-stick cooking spray. This will prevent the waffles from sticking and make them easier to remove. I usually give it a quick spray before each waffle.
- Pour the Batter: Pour the waffle batter onto the hot waffle iron. The amount of batter you use will depend on the size of your waffle iron. You want to use enough batter to cover the surface of the iron, but not so much that it overflows. I usually start with about 1/2 cup of batter per waffle and adjust from there.
- Cook the Waffles: Close the waffle iron and cook the waffles according to the manufacturer’s instructions. This usually takes about 3-5 minutes, or until the waffles are golden brown and crispy. Keep an eye on them, as cooking times can vary depending on your waffle iron.
- Shape the Taco Shells: This is where the magic happens! As soon as you remove the waffle from the iron, gently drape it over a taco shell mold or a heat-safe object shaped like a taco shell (like a rolled-up piece of aluminum foil). You need to work quickly while the waffle is still pliable. Let the waffle cool and harden in the taco shape for a few minutes. If you don’t have a taco shell mold, you can carefully fold the waffle in half and hold it in place until it cools and sets.
- Repeat: Repeat steps 5-8 until all the batter is used. Store the waffle taco shells in an airtight container at room temperature until ready to assemble.
Making the Chocolate Filling:
Now, let’s move on to the decadent chocolate filling. This is a simple chocolate ganache, but it’s incredibly rich and delicious. It’s the perfect complement to the crispy waffle shells and the fresh strawberry salsa.
- Heat the Heavy Cream: In a small saucepan, heat the heavy cream over medium heat until it just begins to simmer. Be careful not to boil the cream, as this can cause it to scorch.
- Pour Over Chocolate: Remove the saucepan from the heat and pour the hot cream over the chopped chocolate in a heatproof bowl. Let the mixture sit for about a minute to allow the heat from the cream to melt the chocolate.
- Whisk Until Smooth: Gently whisk the chocolate and cream together until the chocolate is completely melted and the mixture is smooth and glossy. Be patient, as it may take a few minutes for the chocolate to fully melt.
- Add Butter and Vanilla: Stir in the butter and vanilla extract until they are fully incorporated. The butter will add richness and shine to the ganache, while the vanilla extract will enhance the chocolate flavor.
- Add a Pinch of Salt: Add a pinch of salt to balance the sweetness of the chocolate.
- Chill the Ganache: Cover the bowl with plastic wrap, pressing the plastic wrap directly onto the surface of the ganache to prevent a skin from forming. Refrigerate the ganache for at least 2 hours, or until it is firm enough to pipe or spread.
Preparing the Strawberry Salsa:
This strawberry salsa is the perfect sweet and tangy counterpoint to the rich chocolate filling. It’s fresh, vibrant, and adds a burst of flavor to the dessert tacos. Plus, it’s super easy to make!
- Dice the Strawberries: Hull the strawberries and dice them into small, even pieces. The smaller the pieces, the easier it will be to eat the salsa in the tacos.
- Dice the Red Onion: Finely dice the red onion. Red onion adds a nice bite to the salsa, but you don’t want it to be overpowering. Dicing it finely will help to mellow out the flavor.
- Chop the Mint: Chop the fresh mint. Mint adds a refreshing aroma and flavor to the salsa.
- Combine Ingredients: In a medium bowl, combine the diced strawberries, red onion, mint, lime juice, and sugar.
- Mix Gently: Gently mix all the ingredients together until they are well combined. Be careful not to mash the strawberries.
- Adjust Sweetness: Taste the salsa and adjust the amount of sugar to your liking. You may need to add more sugar depending on the sweetness of the strawberries.
- Refrigerate: Cover the bowl and refrigerate the salsa for at least 30 minutes to allow the flavors to meld. This will also help to chill the salsa, which is especially refreshing on a warm day.
Assembling the Dessert Tacos:
Alright, we’ve made all the components, now for the fun part – assembling the dessert tacos! This is where you can really get creative and customize your tacos to your liking. Let your imagination run wild!
- Prepare Your Work Station: Gather all your ingredients and toppings and arrange them on a clean work surface. This will make it easier to assemble the tacos quickly and efficiently.
- Fill the Taco Shells: Spoon or pipe the chilled chocolate filling into the waffle taco shells. Be generous with the filling, but don’t overfill the shells, or they will be difficult to eat.
- Top with Strawberry Salsa: Spoon the strawberry salsa over the chocolate filling. Again, be generous, but don’t overfill the shells.
- Add Toppings: Now for the best part – the toppings! Add your favorite toppings to the tacos. Some suggestions include whipped cream, chocolate shavings, sprinkles, chopped nuts, shredded coconut, caramel sauce, chocolate sauce, and maraschino cherries.
- Serve Immediately: Serve the dessert tacos immediately. They are best enjoyed fresh, as the waffle shells can become soggy if they sit for too long.
Tips and Variations:
- Waffle Flavor Variations: Experiment with different flavors of waffle batter. You could add chocolate chips, cinnamon, or even a hint of citrus zest to the batter.
- Fruit Salsa Variations: Try using different fruits in the salsa. Mango, pineapple, or even a combination of fruits would be delicious.
- Shaping the Waffles: If you don’t have a taco shell mold, you can carefully fold the waffle in half and hold it in place until it cools and sets.
- Chocolate Ganache Consistency: The chilling time for the chocolate ganache may vary depending on your refrigerator. Check the consistency after 2 hours and chill longer if needed.
- Serving: These tacos are best served immediately after assembly to prevent the waffle shells from becoming soggy.
Conclusion:
So, there you have it! These Dessert Tacos are truly a must-try recipe, and I’m not just saying that because I created it. The combination of the crispy, cinnamon-sugar shell with the creamy, dreamy filling and the burst of fresh fruit is simply irresistible. It’s a dessert that’s fun to make, fun to eat, and guaranteed to impress anyone you share it with. Seriously, prepare for the “oohs” and “aahs” when you present these beauties!
But beyond the initial wow factor, these Dessert Tacos offer a delightful textural experience. The crunch of the shell against the smooth filling is just perfect. And the best part? They’re incredibly versatile!
Think of these as a blank canvas for your dessert creativity. Feeling like chocolate? Add some chocolate shavings or a drizzle of chocolate sauce. Craving something tropical? Mango and pineapple would be amazing additions. Want to make them even more decadent? A dollop of whipped cream or a scoop of ice cream takes them to the next level.
Serving Suggestions and Variations:
* For a party: Set up a Dessert Taco bar! Provide the shells, a few different filling options (chocolate mousse, vanilla pudding, cheesecake filling), and a variety of toppings (fresh fruit, sprinkles, chocolate chips, nuts). Let your guests create their own masterpieces.
* For a quick dessert: Keep pre-made shells on hand and whip up a simple filling like sweetened cream cheese or Greek yogurt. Top with berries and you’ve got a healthy-ish and delicious dessert in minutes.
* For a themed party: Tailor the fillings and toppings to match your theme. For a Mexican fiesta, use cinnamon ice cream and top with churro crumbles. For a summer barbecue, use grilled peaches and a drizzle of honey.
* For a vegan option: Use vegan tortillas, a plant-based filling like coconut whipped cream or cashew cream, and your favorite vegan toppings.
I truly believe that these Dessert Tacos will become a new favorite in your household. They’re perfect for any occasion, from a casual weeknight treat to a special celebration. They’re also a great way to get kids involved in the kitchen. Let them help with the filling and decorating – they’ll love it!
I’ve poured my heart into perfecting this recipe, and I’m so excited for you to try it. I’m confident that you’ll love the unique combination of flavors and textures. It’s a dessert that’s both familiar and surprising, comforting and exciting.
So, what are you waiting for? Gather your ingredients, preheat your oven, and get ready to create some Dessert Taco magic! Don’t be afraid to experiment with different fillings and toppings to find your perfect combination.
And most importantly, don’t forget to share your experience with me! I’d love to see your creations and hear what you think. Tag me in your photos on social media, or leave a comment below. I can’t wait to see what you come up with! Happy baking (or should I say, happy taco-ing?)! I hope you enjoy this Dessert Tacos recipe as much as I do.
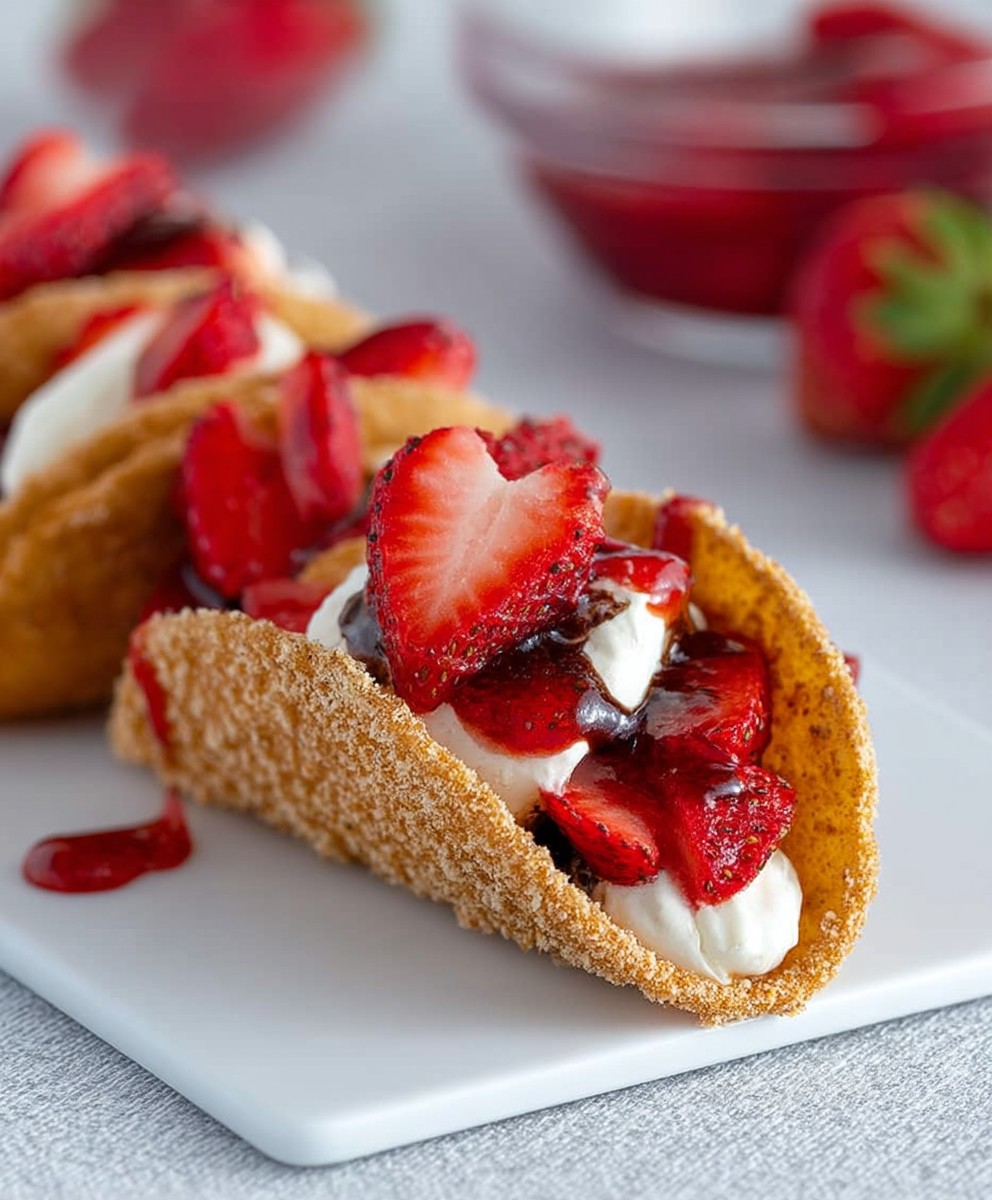
Dessert Tacos: The Ultimate Guide to Sweet Taco Creations
Crispy waffle taco shells filled with rich chocolate ganache and topped with a refreshing strawberry salsa. A fun and delicious dessert!
Ingredients
Instructions