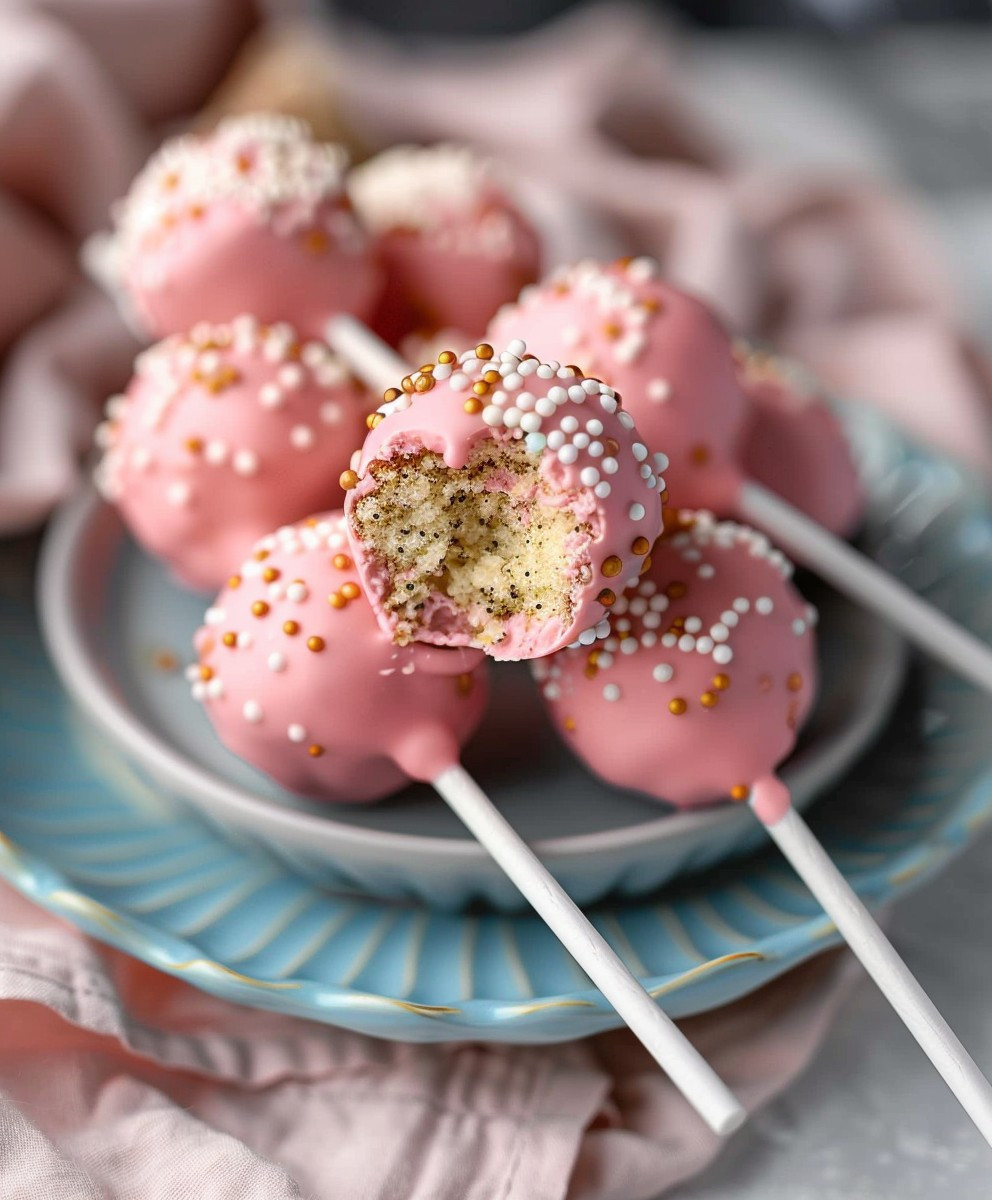
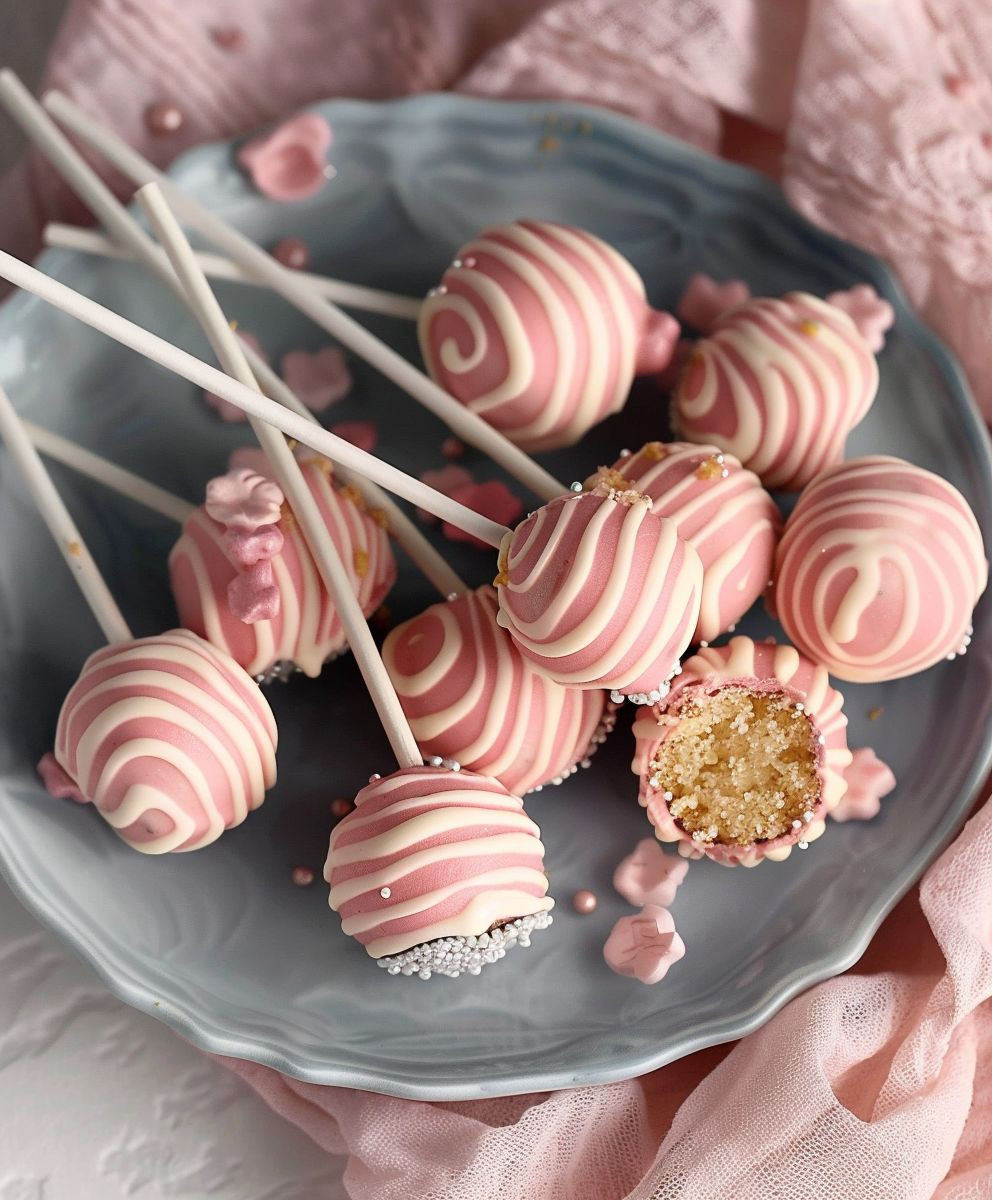
Birthday Cake Pops
Birthday Cake Pops: These aren’t just your average cake; they’re a delightful explosion of flavor and fun, perfect for celebrating any special occasion. I’ve always loved the idea of cake pops – the perfect blend of moist cake and rich, creamy coating, all in one bite-sized package. But what truly sets these Birthday Cake Pops apart is their versatility and ease of customization. You can tailor them to any birthday theme, from superheroes to princesses, making them a truly unique and memorable treat.
While the precise origins of cake pops are a bit murky, the concept of dipping cake into chocolate and creating bite-sized treats has been around for centuries in various forms. Think of traditional truffles or even certain types of confectionery from different cultures. However, the modern cake pop, as we know it, with its lollipop-like stick, is a relatively recent invention, gaining immense popularity in the early 2000s. This delightful treat quickly became a staple at parties and celebrations worldwide.
Why Everyone Loves Birthday Cake Pops
The magic of Birthday Cake Pops lies in their irresistible combination of textures and flavors. The soft, moist cake contrasts beautifully with the smooth, often decadent chocolate coating. They’re incredibly convenient too; perfect for serving a crowd without the fuss of cutting a traditional cake. And let’s be honest, the fun factor is undeniable! The adorable lollipop-like presentation makes them instantly appealing to both children and adults. Whether you’re celebrating a birthday, a holiday, or just want a delicious sweet treat, these Birthday Cake Pops are sure to be a hit.
Ingredients:
- 1 box (15.25 ounces) yellow cake mix
- 1 cup water
- 1/3 cup vegetable oil
- 3 large eggs
- 1 cup (2 sticks) unsalted butter, softened
- 3 cups powdered sugar
- 1/4 cup milk
- 1 teaspoon vanilla extract
- Pinch of salt
- 6 ounces white chocolate candy melts
- 6 ounces milk chocolate candy melts
- Assorted sprinkles
- Lollipop sticks
- Styrofoam block for display
Preparing the Cake
- Preheat your oven to 350°F (175°C). Grease and flour a 9×13 inch baking pan. I like to use baking spray with flour for an even coating.
- In a large bowl, combine the cake mix, water, oil, and eggs. Beat with an electric mixer on medium speed for about 2 minutes, until the batter is smooth and well combined. Don’t overmix!
- Pour the batter into the prepared pan and bake for 25-30 minutes, or until a wooden skewer inserted into the center comes out clean. Every oven is a little different, so keep an eye on it!
- Once baked, let the cake cool completely in the pan before frosting. This is crucial for easy handling later on. I usually let mine cool completely on a wire rack for about an hour.
Making the Frosting
- In a large bowl, beat the softened butter with an electric mixer until it’s light and fluffy. This usually takes about 3-5 minutes. The fluffier the butter, the fluffier the frosting!
- Gradually add the powdered sugar, one cup at a time, beating well after each addition. Scrape down the sides of the bowl as needed.
- Add the milk and vanilla extract. Beat until the frosting is smooth and creamy. If it seems too thick, add a teaspoon of milk at a time until you reach your desired consistency. If it’s too thin, add a little more powdered sugar.
- Add a pinch of salt to enhance the sweetness. Trust me on this one!
Crumbling and Mixing
- Once the cake is completely cool, crumble it into a large bowl using your hands or a fork. I find breaking it into smaller pieces first makes it easier to crumble.
- Add the frosting to the crumbled cake and mix thoroughly until everything is evenly combined. You want a moist, but not soggy, mixture. If it seems too dry, add a tablespoon of milk at a time until you get the right consistency.
- Important Tip: If you’re making these ahead of time, cover the mixture tightly with plastic wrap and refrigerate for at least 30 minutes before proceeding. This helps the mixture firm up, making it easier to roll into balls.
Shaping the Cake Pops
- Roll the cake mixture into 1-inch balls. I find it helpful to use a small cookie scoop for consistent sizing. Place the balls on a baking sheet lined with parchment paper.
- Once all the balls are rolled, place them in the freezer for at least 30 minutes to firm up. This prevents them from melting and makes dipping much easier.
Melting the Chocolate and Dipping
- Melt the white chocolate candy melts according to the package directions. I usually use a microwave-safe bowl and melt in 30-second intervals, stirring in between, until smooth.
- Insert a lollipop stick about halfway into each frozen cake pop ball. Make sure the stick is firmly inserted.
- Dip each cake pop into the melted white chocolate, ensuring it’s fully coated. Gently tap the stick against the side of the bowl to remove any excess chocolate.
- Immediately sprinkle with your desired sprinkles while the chocolate is still wet. Get creative!
- Place the dipped cake pops on the parchment-lined baking sheet and let the chocolate set completely. This usually takes about 30 minutes.
- Repeat steps 1-5 with the milk chocolate candy melts, using different sprinkles or decorations if desired. You can even get fancy and drizzle melted chocolate over the already-decorated pops.
Displaying Your Cake Pops
- Once the chocolate is completely set, carefully insert the cake pops into a Styrofoam block for display. This makes a beautiful and easy-to-transport presentation.
- Pro Tip: For an extra touch, you can add a ribbon or decorative paper to the Styrofoam block.
Conclusion:
So there you have it – my foolproof recipe for the most delicious Birthday Cake Pops! I truly believe this recipe is a must-try for several reasons. First, the flavor is simply unbeatable. That perfect balance of moist, melt-in-your-mouth cake and rich, creamy frosting is something special. It’s the kind of flavor that brings back childhood memories and creates new ones. Second, the recipe itself is incredibly versatile. You can easily adapt it to suit any occasion or preference, making it a go-to recipe for birthdays, holidays, or just a fun weekend baking project.
And let’s not forget the presentation! These cake pops are not just delicious; they’re also stunning. The possibilities for decoration are endless. You can dip them in vibrant colors, sprinkle them with colorful jimmies, or even drizzle them with melted chocolate and add intricate designs. They’re guaranteed to impress your guests and make any celebration extra special. I’ve found that even the most novice bakers can achieve professional-looking results with a little patience and attention to detail.
Serving Suggestions & Variations:
While these Birthday Cake Pops are delightful on their own, I have a few serving suggestions to elevate your experience. Consider arranging them on a pretty cake stand or tiered server for a truly impressive display. You can also add a small flag or personalized tag to each pop for a special touch. For a sophisticated presentation, serve them alongside a scoop of vanilla ice cream or a dollop of whipped cream. The contrast in textures and temperatures is simply divine!
Feeling adventurous? Why not experiment with different cake flavors? A chocolate cake base would be decadent, while a red velvet cake would add a touch of elegance. You could also get creative with the frosting. A cream cheese frosting would complement a carrot cake base beautifully, or you could try a peanut butter frosting for a unique twist. The possibilities are truly endless!
For a festive touch, consider incorporating seasonal ingredients or colors. For a summer celebration, use bright, fruity flavors and pastel colors. For a winter gathering, opt for warm spices like cinnamon and nutmeg and use rich, dark colors. You can even tailor the decorations to match the theme of your party, making these Birthday Cake Pops the perfect centerpiece.
Don’t Forget the Sprinkles!
And of course, no Birthday Cake Pop is complete without a generous sprinkling of sprinkles! Experiment with different types and colors to create a truly unique look. You can even use edible glitter for an extra touch of sparkle and glamour. The key is to have fun and let your creativity shine!
Share Your Creations!
I would love to see your Birthday Cake Pop creations! Once you’ve tried this recipe, please share your photos and experiences with me on social media. Use the hashtag #BirthdayCakePops so I can find your amazing creations. I can’t wait to see what delicious and beautiful treats you come up with. Happy baking!
Remember, baking should be fun and enjoyable. Don’t be afraid to experiment and make this recipe your own. With a little practice, you’ll be creating stunning and delicious Birthday Cake Pops in no time. So grab your ingredients, put on your apron, and get ready to bake some magic! I promise you won’t regret it.
Birthday Cake Pops: A Deliciously Easy Recipe
Bite-sized cake pops made with yellow cake mix, frosted, dipped in white and milk chocolate, and covered in sprinkles. Easy recipe, yields about 24.
Ingredients
Instructions
Recipe Notes
- Don’t overmix the cake batter.
- The fluffier the butter, the fluffier the frosting.
- Refrigerating the cake pop mixture before shaping makes it easier to handle.
- Freezing the cake pops before dipping prevents melting.
- Get creative with your sprinkles and chocolate combinations!