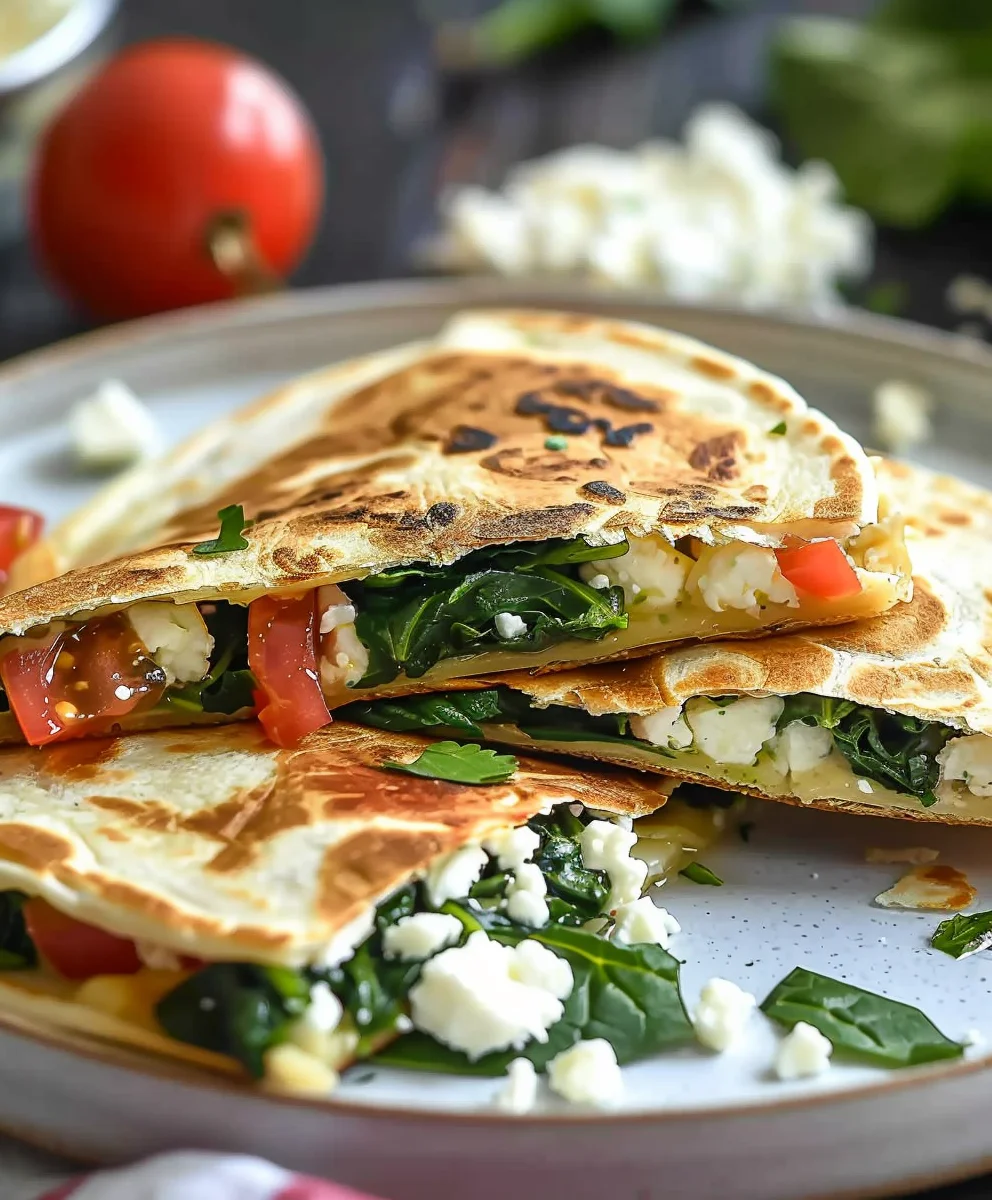
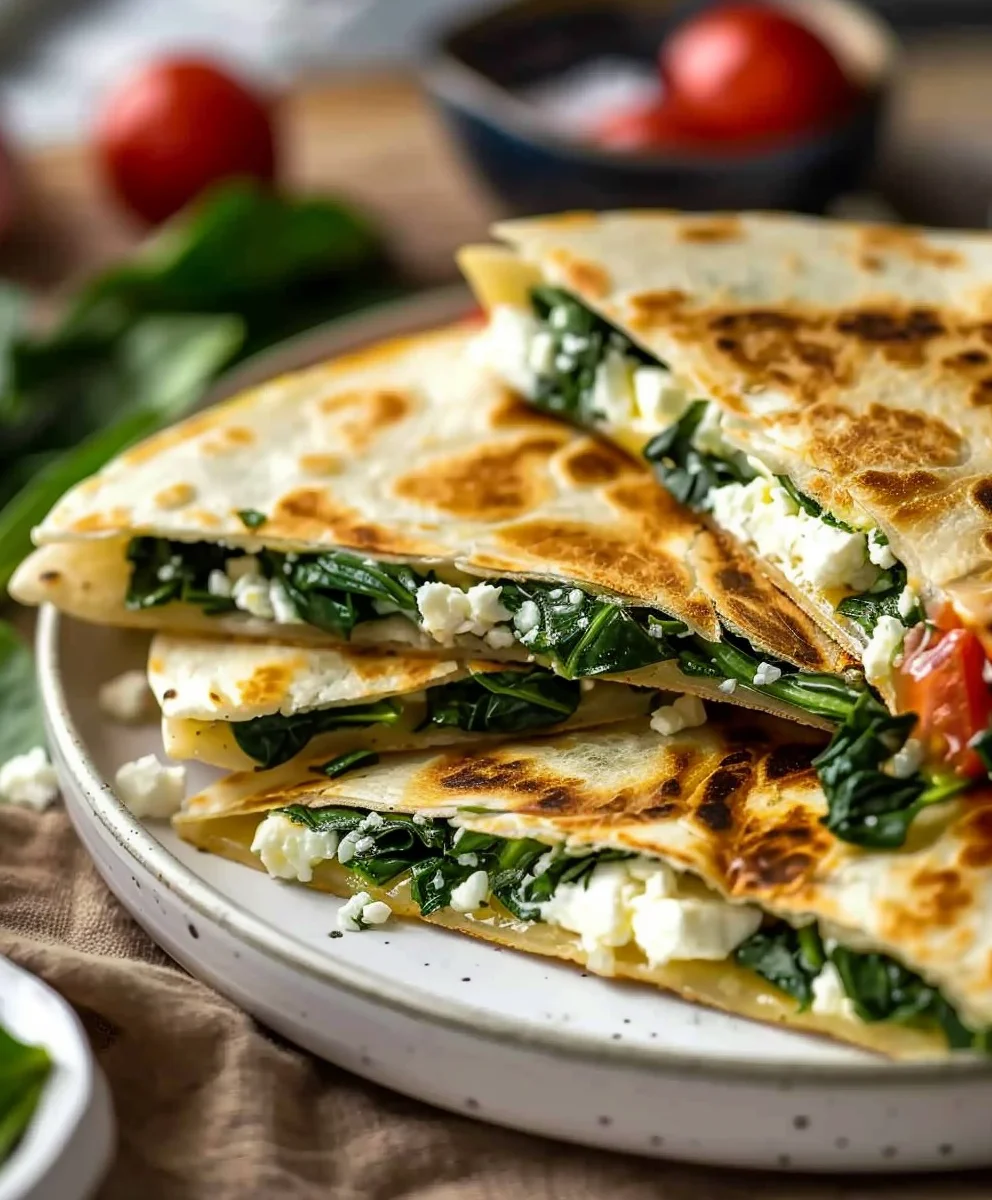
Spinach And Feta Quesadillas are a culinary revelation, transforming simple ingredients into a dish that feels both effortlessly gourmet and incredibly comforting. Forget the ordinary; this recipe elevates the humble quesadilla, marrying traditional Mexican ingenuity with vibrant Mediterranean flavors for an unforgettable meal that’s sure to become a cherished favorite.
While the classic quesadilla, celebrated for its delicious simplicity and versatility with melted cheese, originated in Mexico, our version takes a delightful and widely appreciated detour. This innovative twist embraces the universal appeal of warm, flavorful fillings encased in a crisp tortilla, introducing a symphony of fresh spinach and tangy feta that truly sets it apart from its traditional counterparts.
Why do people fall in love with these quesadillas?
I’ve consistently observed that people absolutely adore these Spinach And Feta Quesadillas for their unbeatable combination of flavors and textures. The earthy, slightly sweet spinach pairs exquisitely with the salty, piquant feta, all brought together by a generous helping of creamy, melted cheese. Encased within a golden-brown, perfectly crisp tortilla, each bite offers a delightful contrast – a warm, gooey interior against a satisfying crunch. It’s not just a quick and convenient option for a busy weeknight or a delightful lunch; it’s a surprisingly sophisticated yet accessible dish that satisfies cravings and impresses guests. The ease of preparation, coupled with its irresistible taste, makes it a frequent request in my kitchen!

Ingredients:
- 8 large (10-inch or 12-inch) flour tortillas
- 1 tablespoon olive oil, plus more for cooking
- 1 large yellow onion, finely diced
- 3-4 cloves garlic, minced
- 10-12 ounces fresh spinach, thoroughly washed and dried (or 2 x 10-ounce packages frozen chopped spinach, thawed and very well drained)
- 8 ounces feta cheese, crumbled
- 1 ½ cups shredded Monterey Jack cheese (or a Mexican blend, or mozzarella), for ultimate meltiness
- ¼ teaspoon red pepper flakes (optional, for a little kick)
- Salt to taste
- Freshly ground black pepper to taste
- 2-3 tablespoons unsalted butter, for cooking the tortillas
- Optional for serving: salsa, sour cream, guacamole, fresh cilantro, lime wedges
Preparing the Spinach and Feta Filling
-
Sautéing the Aromatics:
Let’s get started by preparing our flavorful base. Heat 1 tablespoon of olive oil in a large non-stick skillet or a Dutch oven over medium heat. Once the oil is shimmering, add the finely diced yellow onion. Cook the onion gently, stirring occasionally, for about 5 to 7 minutes until it becomes beautifully translucent and soft, releasing its sweet aroma. We don’t want any browning here, just a gentle softening to unlock its flavors.
-
Infusing with Garlic:
Next up, it’s time for the garlic! Add the minced garlic to the softened onions. Continue to cook for another 1 to 2 minutes, stirring constantly to prevent it from burning. You’ll notice a wonderful, pungent aroma filling your kitchen – that’s how you know it’s working its magic. Be careful not to let the garlic brown, as burnt garlic can taste bitter and will negatively impact the delicate flavors of our Spinach And Feta Quesadillas.
-
Wilt the Fresh Spinach:
If you’re using fresh spinach, this is the stage where we’ll incorporate it. Add the washed and dried fresh spinach to the skillet in batches if necessary. It might seem like a mountain of spinach at first, but trust me, it will cook down significantly. Stir it frequently with the onions and garlic, allowing it to wilt completely. This usually takes about 3 to 5 minutes. Once all the spinach has wilted and is tender, remove the skillet from the heat.
-
Draining Excess Moisture (Crucial Step!):
This next step is absolutely critical for the success of your Spinach And Feta Quesadillas. Whether you’ve just wilted fresh spinach or thawed frozen spinach, you must drain it very, very well. Spinach holds a lot of water, and if not removed, it will make your quesadillas soggy, preventing them from getting that desirable crispy texture. Transfer the cooked spinach mixture to a fine-mesh colander. Using the back of a spoon, or even better, your clean hands, press firmly on the spinach to squeeze out as much liquid as possible. You’ll be surprised by how much water comes out! Continue pressing until no more liquid drips. Alternatively, you can place the spinach in a clean kitchen towel and wring it out vigorously. This step takes a little effort, but it’s truly worth it for a perfectly textured filling.
-
Creating the Creamy Feta and Spinach Filling:
Once the spinach is thoroughly drained, transfer it back into the large skillet (which you’ve just cleaned, or a mixing bowl). Add the crumbled feta cheese and 1 cup of the shredded Monterey Jack cheese to the spinach mixture. Season generously with salt, freshly ground black pepper, and the optional red pepper flakes if you desire a little warmth. Stir everything together until all the ingredients are well combined and the cheeses are evenly distributed throughout the spinach. The warmth from the spinach will slightly soften the cheeses, making them easier to mix. Taste the filling at this point and adjust seasonings as needed. Remember, feta is salty, so add additional salt cautiously. This is our star filling for the Spinach And Feta Quesadillas!
Assembling Your Spinach And Feta Quesadillas
-
Setting Up Your Workspace:
Before we begin assembling, make sure you have all your components ready. Your flavorful spinach and feta filling should be prepared and cooled slightly. You should also have your large flour tortillas, the remaining ½ cup of shredded Monterey Jack cheese, and your butter ready for cooking.
-
Preparing the First Tortilla:
Lay one flour tortilla flat on a clean, dry surface or a large cutting board. We’re going to create a delightful cheesy layer that helps bind everything together and makes for extra delicious Spinach And Feta Quesadillas.
-
Layering with Cheese and Filling:
Sprinkle about 1-2 tablespoons of the remaining shredded Monterey Jack cheese evenly over one half of the tortilla. This extra cheese layer acts like a delicious glue. Then, spoon approximately ½ cup of the spinach and feta filling over the same half of the tortilla, spreading it out evenly, leaving a small border around the edge. Make sure not to overfill, as this can make the quesadilla difficult to fold and prone to spilling during cooking. You want a generous but manageable amount of our fantastic filling.
-
Adding More Melty Goodness:
Now, sprinkle another tablespoon or so of the remaining shredded Monterey Jack cheese directly on top of the spinach filling. This ensures maximum cheese pull and an incredibly satisfying texture in every bite of your Spinach And Feta Quesadillas.
-
Folding the Quesadilla:
Carefully fold the empty half of the tortilla over the filled half, creating a neat half-moon shape. Gently press down on the edges to seal the filling inside. If any filling squeezes out, just tuck it back in. Repeat this process for all remaining tortillas and filling, creating an assembly line. You can stack them carefully on a plate with parchment paper in between if you’re making a large batch and cooking them one by one.
Cooking the Perfect Spinach And Feta Quesadillas
-
Preheating Your Pan:
Heat a large, non-stick skillet or a cast-iron pan over medium heat. It’s important to give your pan enough time to preheat evenly. A properly heated pan ensures that your quesadilla cooks through and gets that beautiful golden-brown crispness without burning. We’re aiming for that perfect balance of heat.
-
Butter for Golden Perfection:
Once the pan is hot, add about ½ to 1 teaspoon of unsalted butter. Allow the butter to melt and swirl it around to coat the bottom of the pan evenly. The butter is key to achieving that rich, golden-brown crust and a delicious buttery flavor for your Spinach And Feta Quesadillas. If you prefer, a light drizzle of olive oil can also be used, but butter truly elevates the taste.
-
Cooking the First Side:
Carefully place one assembled half-moon quesadilla into the hot pan. Cook for about 3 to 5 minutes, or until the bottom side is a beautiful golden brown and starts to crisp up. You might even see the cheese inside beginning to melt and bubble through the tortilla, which is a fantastic sign! Keep an eye on it to ensure it doesn’t burn; every stove varies in heat distribution.
-
Flipping and Finishing:
Using a wide spatula, gently flip the quesadilla over to the other side. Add another ½ teaspoon of butter to the pan if needed to ensure even browning. Continue to cook for another 3 to 5 minutes, or until this second side is also golden brown and crispy, and all the cheese inside is fully melted and gooey. You want the entire Spinach And Feta Quesadilla to feel warm and pliable, indicating that the filling is hot throughout. The key is medium heat; too high and it burns, too low and it gets tough and doesn’t crisp.
-
Removing and Resting:
Once cooked to perfection, carefully remove the quesadilla from the pan and place it on a cutting board. Repeat the cooking process with the remaining quesadillas, adding more butter to the pan as needed for each one. If you are making multiple quesadillas, you can keep the finished ones warm in a preheated oven at a low temperature (around 200°F or 90°C) while you finish cooking the rest.
-
Slicing and Serving:
For serving, allow each Spinach And Feta Quesadilla to rest for a minute or two on the cutting board before slicing. This allows the cheese to set slightly, preventing it from oozing out excessively when cut. Cut each quesadilla into 2 or 3 wedges using a sharp knife or a pizza cutter. Serve immediately while warm and cheesy, accompanied by your favorite toppings such as a dollop of cool sour cream, a spoonful of vibrant salsa, creamy guacamole, a sprinkle of fresh cilantro, or a squeeze of fresh lime juice for that extra zing. These Spinach And Feta Quesadillas are truly best enjoyed fresh off the pan!
Serving Suggestions and Variations
-
Classic Accompaniments:
Spinach And Feta Quesadillas pair wonderfully with traditional Mexican-inspired sides. A generous dollop of sour cream or Greek yogurt (for a healthier twist) provides a cool contrast to the warm, savory filling. Freshly made pico de gallo or your favorite store-bought salsa adds a burst of freshness and tang. Creamy guacamole or sliced avocado offers a rich, buttery texture that complements the feta beautifully. Don’t forget a sprinkle of fresh cilantro for a bright, herbaceous note, and a wedge of lime for a citrusy finish – it truly awakens all the flavors!
-
Make It a Meal:
To turn these delicious Spinach And Feta Quesadillas into a more substantial meal, consider serving them alongside a simple green salad with a light vinaigrette. A bowl of black beans or refried beans on the side also makes for a hearty and satisfying plate. For an even more complete experience, a side of Mexican rice or cilantro-lime rice would be a fantastic addition, creating a well-rounded and delightful dinner.
-
Adding Protein Power:
While these Spinach And Feta Quesadillas are incredibly satisfying on their own, you can easily boost the protein content. Cooked and shredded chicken (rotisserie chicken works great for a shortcut!), seasoned ground beef, or even some sautéed shrimp would make excellent additions to the spinach and feta filling. Simply mix them in with the cooled spinach mixture before assembling. This transforms them into an even more robust and filling dish, perfect for active individuals or those looking for a heartier option.
-
Exploring Other Cheeses:
Don’t be afraid to experiment with different cheeses to customize the flavor profile of your Spinach And Feta Quesadillas. While Monterey Jack offers incredible meltiness, you could swap it for sharp cheddar for a more robust flavor, pepper jack for an extra spicy kick, or even a mix of Gruyère and fontina for a sophisticated, nutty, and extra-creamy texture. Each cheese will bring its own unique character to the quesadilla, so have fun finding your favorite combination.
-
Vegetable Enhancements:
Beyond spinach, there are many other vegetables that would be fantastic in these quesadillas. Consider adding sautéed mushrooms, diced bell peppers (red or yellow for sweetness), finely chopped zucchini, or even roasted red peppers (drained and chopped). Just make sure any added vegetables are cooked thoroughly and, importantly, have any excess moisture removed before mixing them into the filling. This ensures your quesadillas remain crispy and delicious, avoiding any sogginess from watery ingredients.
-
A Touch of Spice:
If you love heat, feel free to increase the red pepper flakes in the filling. For a more direct spicy element, finely chop some fresh jalapeños or serrano peppers and sauté them with the onions and garlic at the beginning of the filling preparation. Remember to remove the seeds and membranes for a milder heat, or leave some in for a fiery punch!
-
Make-Ahead Tips:
The spinach and feta filling can be prepared a day or two in advance and stored in an airtight container in the refrigerator. This makes assembling the Spinach And Feta Quesadillas on a busy weeknight incredibly quick and convenient. You can also assemble the quesadillas ahead of time and stack them with parchment paper in between, then cook them just before serving. This preparation strategy is a fantastic time-saver for entertaining or for quick family meals.
Conclusion:
And there you have it, my friends! We’ve journeyed through the simple yet utterly satisfying process of creating what I genuinely believe will become a staple in your kitchen: the incredible Spinach And Feta Quesadillas. I truly cannot emphasize enough just how much of a game-changer this recipe has been for my own meal planning. It’s the kind of dish that effortlessly transitions from a quick, energizing lunch to a cozy, comforting dinner, or even a delightful appetizer when you’re entertaining. Its beauty lies not just in its vibrant flavors but also in its remarkable ease of preparation. Think about it: a handful of fresh, wholesome ingredients, a few minutes on the stovetop, and you’re rewarded with a culinary masterpiece that tastes far more complex than the effort it demands. The creamy, tangy feta perfectly complements the earthy, slightly bitter notes of the spinach, all enveloped within a warm, crispy tortilla. It’s a symphony of textures and tastes that truly hits all the right notes, making it an absolute must-try for anyone seeking a quick, delicious, and relatively healthy meal option.
I often find myself reaching for this recipe when I’m short on time but still crave something nourishing and packed with flavor. It’s a testament to the power of simple ingredients coming together to create something extraordinary. Furthermore, these quesadillas aren’t just about convenience; they’re also a fantastic way to sneak in some greens, making them a parent-approved option for even the pickiest eaters. The mildness of the spinach, when combined with the salty feta, often goes unnoticed by little ones, who are usually just thrilled to be eating something warm and cheesy. For adults, it’s a guilt-free indulgence that feels luxurious without any of the heavy lifting. I promise you, once you taste that first bite – the crispy exterior giving way to the molten cheese and tender spinach – you’ll understand exactly why I’m so passionate about these delectable bundles of joy.
Elevate Your Quesadilla Experience: Serving Suggestions & Creative Variations
While these Spinach And Feta Quesadillas are absolutely divine on their own, a little accompaniment can elevate the experience even further. For a classic approach, I love serving them alongside a generous dollop of cool sour cream or plain Greek yogurt, perhaps with a sprinkle of fresh chives. A vibrant homemade salsa, bursting with ripe tomatoes, onions, cilantro, and a hint of jalapeño, adds a fresh, zesty kick that cuts beautifully through the richness of the cheese. And, of course, no quesadilla feast is complete without a side of creamy, tangy guacamole – I mean, is there anything it doesn’t make better? For a more substantial meal, consider pairing them with a simple side salad dressed with a light vinaigrette, a bowl of hearty black bean soup, or even some seasoned rice. They also make fantastic additions to a mezze platter when cut into smaller wedges, offering a warm, savory counterpoint to olives, hummus, and pita bread.
But the fun doesn’t stop there! One of the greatest aspects of this recipe is its incredible versatility. Don’t be afraid to get creative and make it your own. For a protein boost, consider adding some shredded cooked chicken, crumbled cooked sausage, or even a handful of seasoned black beans to the spinach and feta mixture. If you want to amp up the vegetable content, sautéed mushrooms, diced bell peppers, or caramelized onions would all be fantastic additions. You could also experiment with different cheeses – a mix of mozzarella and feta creates a super gooey texture, while a touch of goat cheese adds an extra layer of tanginess. A pinch of red pepper flakes will introduce a subtle warmth, or a dash of your favorite hot sauce can really turn up the heat. Fresh herbs like dill or oregano can also lend a wonderful aromatic quality. Feel free to adapt this recipe to whatever ingredients you have on hand or whatever flavors you’re craving; that’s the true spirit of home cooking!
Your Turn to Experience the Magic!
Now that you’ve got all the tips, tricks, and inspiration, it’s your turn to head into the kitchen and whip up a batch of these glorious Spinach And Feta Quesadillas. I promise you won’t regret it! This recipe is more than just food; it’s an invitation to create something delicious, to share with loved ones, or simply to treat yourself to a moment of culinary joy. It’s perfect for those busy weeknights when you need something quick and satisfying, or for a relaxed weekend lunch. I’m truly excited for you to experience the delightful flavors and the sheer ease of preparing this dish. So, grab your skillet, gather your ingredients, and let the magic happen! I would absolutely love to hear about your experience. Did you add any unique twists? What did you serve them with? Please share your thoughts, photos, and any brilliant variations you come up with in the comments section below. Your insights not only inspire me but also help our wonderful community of home cooks discover new favorites. Happy cooking, and enjoy every single bite of your homemade Spinach And Feta Quesadillas!
Easy Spinach Feta Quesadillas – Delicious & Healthy Lunch
Spinach And Feta Quesadillas are a culinary revelation, transforming simple ingredients into a dish that feels both effortlessly gourmet and incredibly comforting. Forget the ordinary; this recipe elevates the humble quesadilla, marrying traditional Mexican ingenuity with vibrant Mediterranean flavors for an unforgettable meal that’s sure to become a cherished favorite.
Ingredients
-
4 medium tortillas (flour, whole wheat, or gluten-free)
-
2 cups fresh spinach, chopped
-
1 cup feta cheese, crumbled
-
2 tablespoons olive oil or butter, for cooking
-
¼ cup sun-dried tomatoes, chopped
-
¼ cup black olives, sliced
-
½ cup cooked grilled chicken, diced
Instructions
-
Step 1
In a pan over medium heat, wilt 2 cups of fresh chopped spinach for 2-3 minutes. Transfer to a colander and press firmly to remove as much excess water as possible. -
Step 2
In a bowl, combine the thoroughly drained spinach, 1 cup crumbled feta cheese, ¼ cup chopped sun-dried tomatoes, ¼ cup sliced black olives, and ½ cup diced cooked grilled chicken. Mix all ingredients thoroughly. -
Step 3
Lay one tortilla flat. Spoon about ¼ of the prepared filling evenly over one half of the tortilla, leaving a small border. Fold the empty half of the tortilla over the filling to form a half-moon shape. Gently press the edges to seal. Repeat this process for the remaining 3 tortillas. -
Step 4
Heat 1 tablespoon of olive oil or butter in a large non-stick skillet over medium heat. Once hot, carefully place an assembled quesadilla into the pan. Cook for 3-5 minutes until the bottom side is golden brown and crispy. -
Step 5
Carefully flip the quesadilla to the other side. Add another ½ teaspoon of butter or oil to the pan if needed. Continue to cook for another 3-5 minutes until the second side is golden brown, and the filling is hot and well-heated. Repeat for all remaining quesadillas. -
Step 6
Remove cooked quesadillas from the pan and let them rest on a cutting board for a minute. Slice each quesadilla into 2 or 3 wedges using a sharp knife or pizza cutter. Serve immediately while warm, accompanied by optional toppings such as salsa, sour cream, or guacamole.
Important Information
Nutrition Facts (Per Serving)
It is important to consider this information as approximate and not to use it as definitive health advice.
Allergy Information
Please check ingredients for potential allergens and consult a health professional if in doubt.