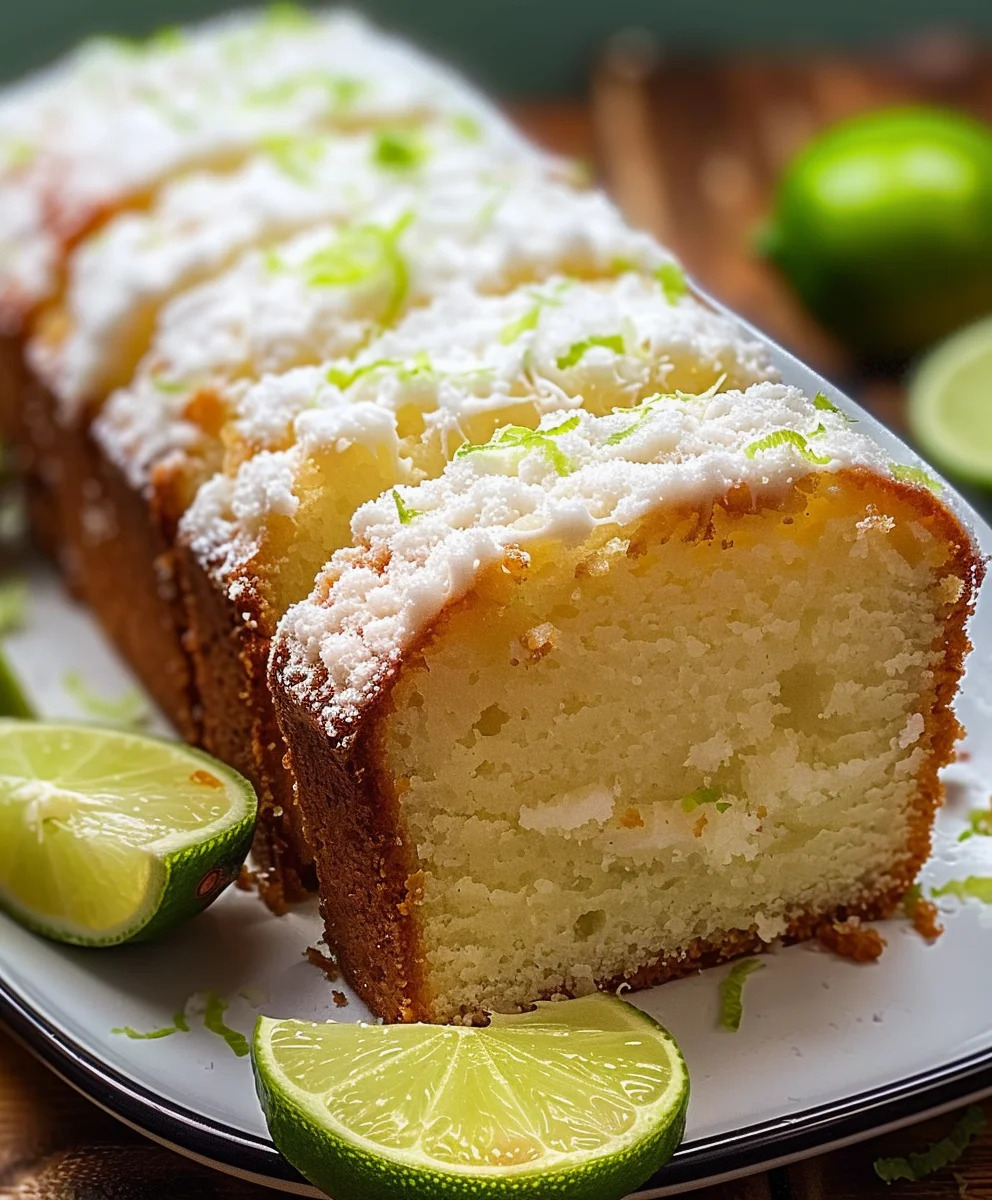
Key Lime Pound Cake Recipe is more than just a dessert; it’s a vibrant journey to the sun-drenched Florida Keys with every single bite. I still remember the first time I tasted a perfectly baked Key Lime Pound Cake – the way its rich, buttery crumb melted in my mouth, followed by that invigorating, zesty tang that is unmistakably Key lime. It was an instant favorite, a revelation that combined the comforting density of a classic pound cake with the lively, bright flavors we typically associate with its pie cousin.
While the iconic Key Lime Pie holds a revered place in culinary history, famously originating from the Florida Keys, this pound cake offers a delightful twist, bringing that beloved citrus essence into a different, equally adored format. People absolutely adore this dish not just for its exquisite balance of sweet and tart, but also for its incredibly moist texture and versatility. It’s perfect for a sophisticated afternoon tea, a refreshing dessert after dinner, or even a delightful brunch treat. I believe this Key Lime Pound Cake Recipe truly encapsulates the joy of a homemade classic, elevated by that irresistible burst of tropical sunshine.

Ingredients:
- For the Key Lime Pound Cake:
- 3 cups (360g) all-purpose flour, spooned and leveled
- 1 teaspoon baking powder
- 1/2 teaspoon salt
- 1 cup (226g) unsalted butter, softened to room temperature
- 2 cups (400g) granulated sugar
- 4 large eggs, at room temperature
- 1 teaspoon pure vanilla extract
- 1/2 cup (120ml) full-fat sour cream, at room temperature
- 1/4 cup (60ml) fresh key lime juice, plus more for zest (from about 6-8 key limes)
- 2 tablespoons finely grated key lime zest (from about 6-8 key limes)
- For the Key Lime Glaze:
- 1 1/2 cups (180g) powdered sugar (confectioners’ sugar), sifted
- 3 tablespoons fresh key lime juice
- 1 tablespoon milk (any kind will do, whole milk for richness)
- 1/2 teaspoon finely grated key lime zest (optional, for extra zing)
- For Garnishing (Optional):
- Extra key lime zest or thin key lime slices
Equipment You’ll Need:
Before we dive into the fun part, let’s make sure you have all your kitchen companions ready. For this “Key Lime Pound Cake Recipe”, you’ll want to gather:
- A 10-12 cup Bundt pan: The classic choice for pound cakes, providing that beautiful fluted shape.
- Large mixing bowls (at least two): One for dry ingredients, one for wet, and a few smaller ones for separating eggs or holding pre-measured ingredients.
- An electric mixer (stand mixer with paddle attachment or a hand mixer): This is essential for achieving that light, fluffy texture we’re aiming for.
- Rubber spatula: Indispensable for scraping down the sides of the bowl and gently folding ingredients.
- Whisk: For combining dry ingredients.
- Citrus zester and juicer: To get every drop of that wonderful key lime flavor.
- Measuring cups and spoons: Accuracy is key in baking!
- Wire cooling rack: Crucial for cooling the cake properly after baking.
- Small saucepan or microwave-safe bowl: For the glaze.
- Pastry brush (optional): For applying the glaze evenly, though a spoon works just as well.
Preparing Your Bundt Pan and Oven:
This is where we lay the groundwork for a perfectly baked “Key Lime Pound Cake Recipe” that releases effortlessly from its pan. No one wants a beautiful cake stuck to the metal!
- Preheat Your Oven: I always start by preheating my oven to 325°F (160°C). This ensures that when your beautiful batter is ready, it goes into an oven that’s already at the perfect, consistent temperature. Patience here prevents a dense or unevenly baked cake.
- Prepare Your Bundt Pan: This step is absolutely crucial for a flawless release. I like to use a baking spray with flour (like Baker’s Joy or Pam Baking), making sure to coat every nook and cranny of the Bundt pan thoroughly. If you don’t have baking spray, you can generously grease the pan with softened butter or shortening, then dust it evenly with flour, tapping out any excess. Don’t skimp on this! A well-greased and floured pan is your best friend. Set it aside, ready to embrace that delicious batter.
Crafting the Pound Cake Batter:
Now, let’s get to the heart of our “Key Lime Pound Cake Recipe”: creating a rich, tender, and incredibly flavorful batter. This section requires a bit of attention to detail, but trust me, the results are so worth it.
- Combine Dry Ingredients: In a medium bowl, whisk together the 3 cups of all-purpose flour, 1 teaspoon of baking powder, and 1/2 teaspoon of salt. Whisking ensures these dry ingredients are evenly distributed, which is important for the cake’s rise and texture. Set this bowl aside for a moment.
- Cream Butter and Sugar: In the large bowl of your electric mixer, fitted with the paddle attachment, or with a hand mixer, beat the softened 1 cup of unsalted butter on medium speed for about 1-2 minutes until it’s light and creamy. Then, gradually add the 2 cups of granulated sugar, beating on medium-high speed for another 3-5 minutes. This creaming process is vital; it incorporates air into the butter and sugar, which contributes significantly to the pound cake’s signature light yet dense texture. You’re looking for a mixture that’s pale yellow and visibly fluffy.
- Add Eggs One at a Time: Reduce the mixer speed to medium-low. Add the 4 large eggs, one at a time, beating well after each addition. It’s important to give each egg enough time to fully incorporate into the butter mixture before adding the next. Scrape down the sides of the bowl with your rubber spatula after each egg to ensure everything is well combined. This prevents the mixture from curdling and ensures a smooth, homogeneous batter.
- Introduce Vanilla and Key Lime Zest: Once all the eggs are incorporated, beat in the 1 teaspoon of pure vanilla extract and the 2 tablespoons of finely grated key lime zest. Oh, the aroma at this stage is just incredible! The zest will infuse the entire cake with that vibrant, fragrant key lime flavor.
- Alternate Dry and Wet Ingredients: This is a classic pound cake technique that helps achieve the perfect texture.
- With the mixer on low speed, add about one-third of your dry ingredient mixture to the wet ingredients. Mix just until combined – we don’t want to overmix!
- Next, add half of the 1/2 cup of sour cream. Mix just until incorporated.
- Then, add another third of the dry ingredients. Mix until combined.
- Follow with the remaining half of the sour cream, along with the 1/4 cup of fresh key lime juice. Mix until combined.
- Finally, add the last third of the dry ingredients. Mix until just combined.
My personal tip here: Be gentle with the mixing, especially at the end. Overmixing can develop the gluten in the flour, leading to a tough, dry cake. As soon as you see no more streaks of flour, stop mixing. A few small lumps are perfectly fine and often lead to a more tender crumb.
- Final Scrape and Transfer: Give the batter one final gentle scrape down with your rubber spatula, ensuring everything from the bottom and sides of the bowl is incorporated. Pour the luscious batter evenly into your prepared Bundt pan. Use your spatula to gently spread it out and level the top. I like to tap the pan lightly on the counter a couple of times to release any large air bubbles, which helps prevent holes in the finished cake.
Baking the Key Lime Pound Cake:
The waiting game begins! Baking is where the magic happens, transforming our beautiful batter into a golden, fragrant “Key Lime Pound Cake Recipe”.
- Bake to Golden Perfection: Place the Bundt pan into your preheated 325°F (160°C) oven. The baking time for a pound cake is usually quite long due to its density. I typically bake mine for 60-75 minutes. However, oven temperatures can vary, so it’s always best to keep an eye on it and use visual cues.
- Check for Doneness: The cake is ready when a wooden skewer or a long toothpick inserted into the thickest part of the cake (usually near the center, avoiding the tube) comes out clean or with just a few moist crumbs attached, but no wet batter. The top of the cake should be a beautiful golden brown and should spring back slightly when gently pressed. If you notice the top browning too quickly, you can loosely tent it with aluminum foil during the last 15-20 minutes of baking.
- Initial Cooling in the Pan: Once baked, remove the cake from the oven and let it cool in the Bundt pan on a wire rack for exactly 15 minutes. This short cooling period in the pan is crucial as it allows the cake to firm up slightly, making it less prone to breaking when inverted. Do not skip this step, but also don’t let it cool too long in the pan, or it might stick.
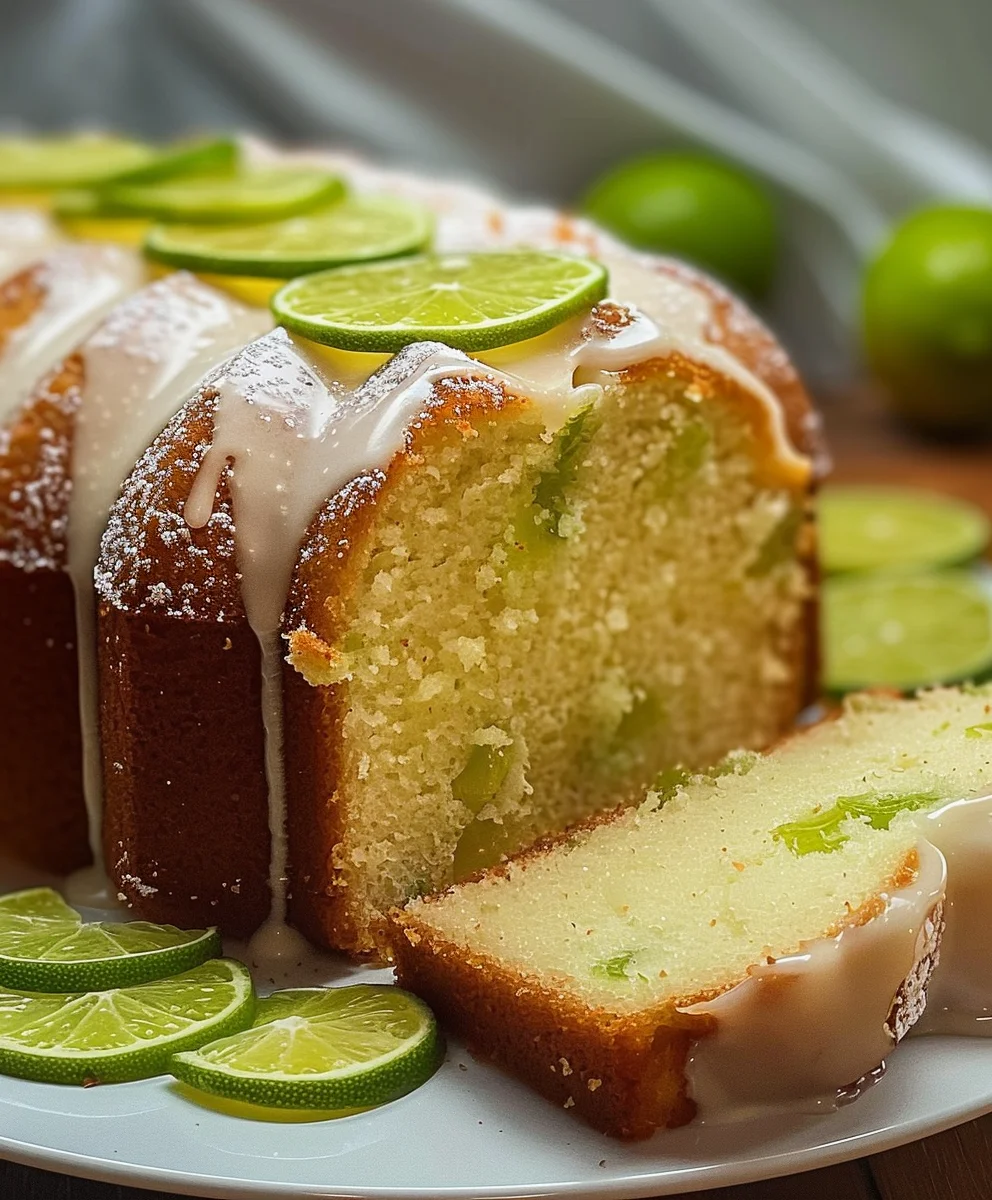
- Invert and Cool Completely: After 15 minutes, carefully invert the cake onto the wire cooling rack. Lift the Bundt pan away. If you prepared your pan well, it should slide right out! Allow the cake to cool completely on the wire rack before you even think about glazing it. This can take anywhere from 1 to 2 hours, sometimes longer. It’s paramount that the cake is completely cool before glazing, otherwise, the glaze will simply melt and run off, rather than setting up nicely.
Preparing the Key Lime Glaze:
While your stunning “Key Lime Pound Cake Recipe” is cooling, let’s whip up a simple, zesty glaze that will add a beautiful sheen and an extra pop of key lime flavor. This is really straightforward!
- Whisk Glaze Ingredients: In a small bowl, whisk together the 1 1/2 cups of sifted powdered sugar, 3 tablespoons of fresh key lime juice, and 1 tablespoon of milk. If you’re using the optional 1/2 teaspoon of key lime zest, add it now too.
- Achieve the Right Consistency: Whisk until the mixture is smooth and free of lumps. You’re aiming for a consistency that is thick enough to coat the back of a spoon but still pourable. If it’s too thick, add a tiny splash more key lime juice or milk, a teaspoon at a time, until you reach the desired consistency. If it’s too thin, stir in a little more sifted powdered sugar. I find a slightly thicker glaze creates a more substantial, delicious coating.
Glazing and Finishing:
The final touches! This is where our “Key Lime Pound Cake Recipe” gets its elegant presentation and an extra layer of irresistible key lime goodness.
- Glaze the Cooled Cake: Once your pound cake is completely cool to the touch, place the wire rack with the cake over a baking sheet or a piece of parchment paper. This will catch any drips from the glaze, making cleanup a breeze. Slowly and evenly pour the key lime glaze over the top of the cake, allowing it to drip down the sides. I like to use a spoon to guide the glaze into the flutes and ensure good coverage.
- Allow Glaze to Set: Let the glazed cake sit at room temperature for at least 15-30 minutes, or until the glaze has set and hardened slightly. This makes for easier slicing and prevents messy hands.
- Garnish and Serve: If desired, sprinkle a little extra key lime zest over the top of the glazed cake for a final flourish and an aromatic burst. You can also add thin slices of key lime for a beautiful visual touch.
- Slice and Enjoy: Now for the best part! Slice into your magnificent “Key Lime Pound Cake Recipe” and savor every tender, zesty bite. It’s absolutely divine with a cup of coffee or tea, or as a light dessert after a meal.
My Personal Tips for the Best Key Lime Pound Cake:
Having baked countless pound cakes, I’ve gathered a few personal insights that I believe truly elevate this “Key Lime Pound Cake Recipe” from good to absolutely phenomenal. These are my little secrets to ensuring your cake is consistently perfect every time.
-
Room Temperature Ingredients are Non-Negotiable:
I cannot stress this enough! For the butter, eggs, and sour cream, having them at true room temperature (around 68-70°F or 20-21°C) is absolutely critical. Room temperature butter creams beautifully with sugar, creating those tiny air pockets that give pound cake its signature texture. Cold eggs won’t emulsify properly with the butter mixture, potentially leading to a curdled batter and a denser cake. Room temperature sour cream blends smoothly, ensuring a consistent batter without lumps. If you’re short on time, you can quickly warm eggs by placing them in a bowl of warm (not hot!) water for 5-10 minutes, and slice butter into smaller pieces to help it soften faster.
-
Don’t Overmix the Batter:
Once you start adding the flour, switch to the lowest speed on your mixer or even finish the last few stirs by hand with a spatula. Overmixing develops the gluten in the flour, which leads to a tough, chewy cake rather than a tender, delicate crumb. Mix just until the flour streaks disappear. A few tiny lumps are perfectly acceptable – they will bake out!
-
Fresh Key Lime Juice and Zest Make All the Difference:
While regular lime juice can be a substitute, true key lime juice and zest offer a unique, more aromatic, and slightly tarter flavor profile that is distinct and truly shines in this “Key Lime Pound Cake Recipe”. Invest in fresh key limes; the effort is minimal compared to the incredible depth of flavor they impart. Zest before juicing – it’s much easier! And be sure to only get the green part of the peel, avoiding the bitter white pith.
-
The Bundt Pan Preparation is Key to Success:
I know I mentioned it before, but it bears repeating: thoroughly greasing and flouring your Bundt pan is the make-or-break step for easy release. My go-to is baking spray with flour, but butter and flour work just as well if done meticulously. Get into every crevice! There’s nothing more heartbreaking than a cake stuck in the pan.
-
Cooling Time Matters:
Resist the urge to unmold the cake too early or glaze it while it’s still warm. Cooling for 15 minutes in the pan allows the cake to set and firm up before inversion. Then, cooling completely on a wire rack ensures the glaze sets beautifully and doesn’t just melt into the cake, making it soggy. Patience here truly pays off with a perfectly textured and glazed cake.
-
Experiment with Glaze Thickness:
The glaze recipe provides a good starting point, but you might prefer yours a little thicker or thinner. Adjust by adding powdered sugar (for thicker) or a tiny bit more key lime juice or milk (for thinner). A thicker glaze will give you a more substantial, opaque coating, while a thinner one will be more translucent and soak into the cake slightly, adding moisture.
-
Storage for Freshness:
This “Key Lime Pound Cake Recipe” tastes fantastic on the day it’s baked, but it also keeps wonderfully. Store any leftovers at room temperature in an airtight container for up to 3-4 days. For longer storage, you can slice it and freeze individual pieces, well-wrapped, for up to 2-3 months. Thaw at room temperature for a quick, delicious treat!
Conclusion:
And there you have it! We’ve journeyed through the simple steps to create what I genuinely believe will become a new favorite in your baking repertoire. This isn’t just any cake; it’s a celebration of vibrant flavors and luxurious textures, perfectly encapsulating the essence of a sun-drenched escape. I promise you, once you slice into this beauty, you’ll understand why it’s an absolute must-try. The magic lies in its impeccable balance: a dense, tender crumb that practically melts in your mouth, infused with that unmistakable, zesty punch of key lime, mellowed by just the right amount of sweetness. It’s comforting yet exhilarating, familiar yet uniquely refreshing. Every bite is a delightful contrast, hitting all the right notes on your palate – sweet, tart, and incredibly moist. It’s the kind of cake that makes you close your eyes and savor the moment, a truly transcendent dessert experience that manages to be both sophisticated and utterly approachable. I’ve found myself reaching for another slice more times than I can count, and I have a feeling you will too.
Elevate Your Serving Experience:
While this pound cake is undeniably spectacular on its own, it’s also incredibly versatile when it comes to serving. For a minimalist approach that truly lets the cake shine, a simple dusting of powdered sugar through a fine-mesh sieve is all you need. The delicate white against the pale green-yellow hue of the cake is visually appealing and signals a treat. For something a little more indulgent, a dollop of freshly whipped cream, perhaps infused with a touch of vanilla or even a tiny splash of lime juice to echo the cake’s flavor, would be divine. Berries, especially raspberries or blueberries, offer a wonderful textural and color contrast, their tartness complementing the lime beautifully. Imagine a scoop of vanilla bean ice cream melting ever so slightly alongside a warm slice – pure bliss! Don’t be afraid to experiment. A drizzle of raspberry coulis or even a light coconut cream sauce could transform it into an even more tropical delight. For those who appreciate a good cup of coffee or tea, this cake is the ultimate companion, making any afternoon snack feel like a special occasion.
Creative Twists and Future Adventures:
But wait, the fun doesn’t stop there! While the classic rendition is perfect, you can always put your own spin on it. Consider incorporating a handful of toasted coconut flakes into the batter for an added layer of texture and tropical flavor. Or, for an extra zing, grate a little more fresh lime zest right over the top just before serving. If you’re feeling adventurous and want to try a different citrus, while it wouldn’t technically be a key lime pound cake anymore, a blood orange or Meyer lemon variation could also be absolutely spectacular, offering a slightly different aromatic profile. You could also experiment with your glaze: instead of a simple lime glaze, perhaps a cream cheese frosting with a hint of lime, or a white chocolate glaze with a touch of key lime for a richer finish. The possibilities are truly endless, inviting you to make this recipe uniquely yours, reflecting your own culinary flair and taste preferences. This adaptable recipe encourages creativity, making it a joy to revisit time and time again.
Your Baking Journey Begins Now!
I truly hope I’ve inspired you to roll up your sleeves and give this incredible recipe a try. Baking, for me, is such a rewarding experience, and sharing delicious food is one of life’s greatest pleasures. Imagine the smiles on the faces of your friends and family as they taste this homemade delight. There’s a special kind of satisfaction that comes from creating something so delicious from scratch, and I’m confident that this particular Key Lime Pound Cake Recipe will bring you immense joy. So, gather your ingredients, follow the steps, and immerse yourself in the wonderful process of baking. Once you’ve pulled that golden-brown, fragrant cake from the oven, I would absolutely love to hear about your experience. Did you add any unique touches? What did your guests think? Share your successes, your favorite serving suggestions, or any variations you came up with in the comments below or on social media. Your feedback and stories are what make this community so vibrant and inspiring. Happy baking, my friends, and enjoy every single delightful bite!
Key Lime Pound Cake Recipe
Experience a tangy citrus delight with this Key Lime Pound Cake. A moist, buttery cake infused with bright lime flavor, topped with a zesty Key lime glaze. Perfect for any occasion.
Ingredients
-
1 cup butter, softened
-
2 cups sugar
-
4 large eggs
-
3 cups all-purpose flour
-
1/2 tsp baking soda
-
1 cup buttermilk
-
1/4 cup lime juice
-
1 tsp lime zest
-
For Key Lime Glaze:
-
1 1/2 cups powdered sugar, sifted
-
3 tbsp fresh key lime juice
-
1 tbsp milk
-
1/2 tsp key lime zest (optional)
Instructions
-
Step 1
Preheat oven to 325°F (160°C). Thoroughly grease and flour a 10-12 cup Bundt pan. -
Step 2
Whisk together 3 cups all-purpose flour and 1/2 tsp baking soda. -
Step 3
In an electric mixer, cream 1 cup softened butter until light. Gradually add 2 cups sugar and beat 3-5 minutes until pale and fluffy. -
Step 4
Add 4 large eggs one at a time, beating well after each. Stir in 1 tsp lime zest. -
Step 5
Alternately add the flour mixture and a combination of 1 cup buttermilk and 1/4 cup lime juice to the butter mixture, beginning and ending with dry. Mix on low speed just until combined; do not overmix. -
Step 6
Pour batter into the prepared Bundt pan, level, and tap gently to release air bubbles. -
Step 7
Bake for 60-75 minutes, or until a skewer inserted into the center comes out clean. -
Step 8
Cool in the pan for 15 minutes, then invert onto a wire rack to cool completely (1-2 hours). -
Step 9
For the Key Lime Glaze: Whisk 1 1/2 cups sifted powdered sugar, 3 tbsp fresh key lime juice, 1 tbsp milk, and optional 1/2 tsp key lime zest until smooth and pourable. -
Step 10
Pour glaze evenly over the completely cooled cake. Let glaze set for 15-30 minutes before slicing and serving. Garnish with extra zest or lime slices if desired.
Important Information
Nutrition Facts (Per Serving)
It is important to consider this information as approximate and not to use it as definitive health advice.
Allergy Information
Please check ingredients for potential allergens and consult a health professional if in doubt.