• Skip to primary navigation
  • Skip to main content
  • Skip to primary sidebar
Homesmad

Homesmad

  • Home
  • Breakfast & Brunch
  • Appetizers & Snacks
  • Dinner
  • Dessert
  • About
  • Privacy Policy
  • Contact
Homesmad
  • Home
  • Breakfast & Brunch
  • Appetizers & Snacks
  • Dinner
  • Dessert
  • About
  • Privacy Policy
  • Contact

Decadent Pistachio Mousse with Rich Chocolate Ganache

October 9, 2025 by Lily author

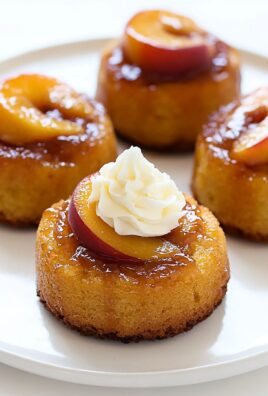
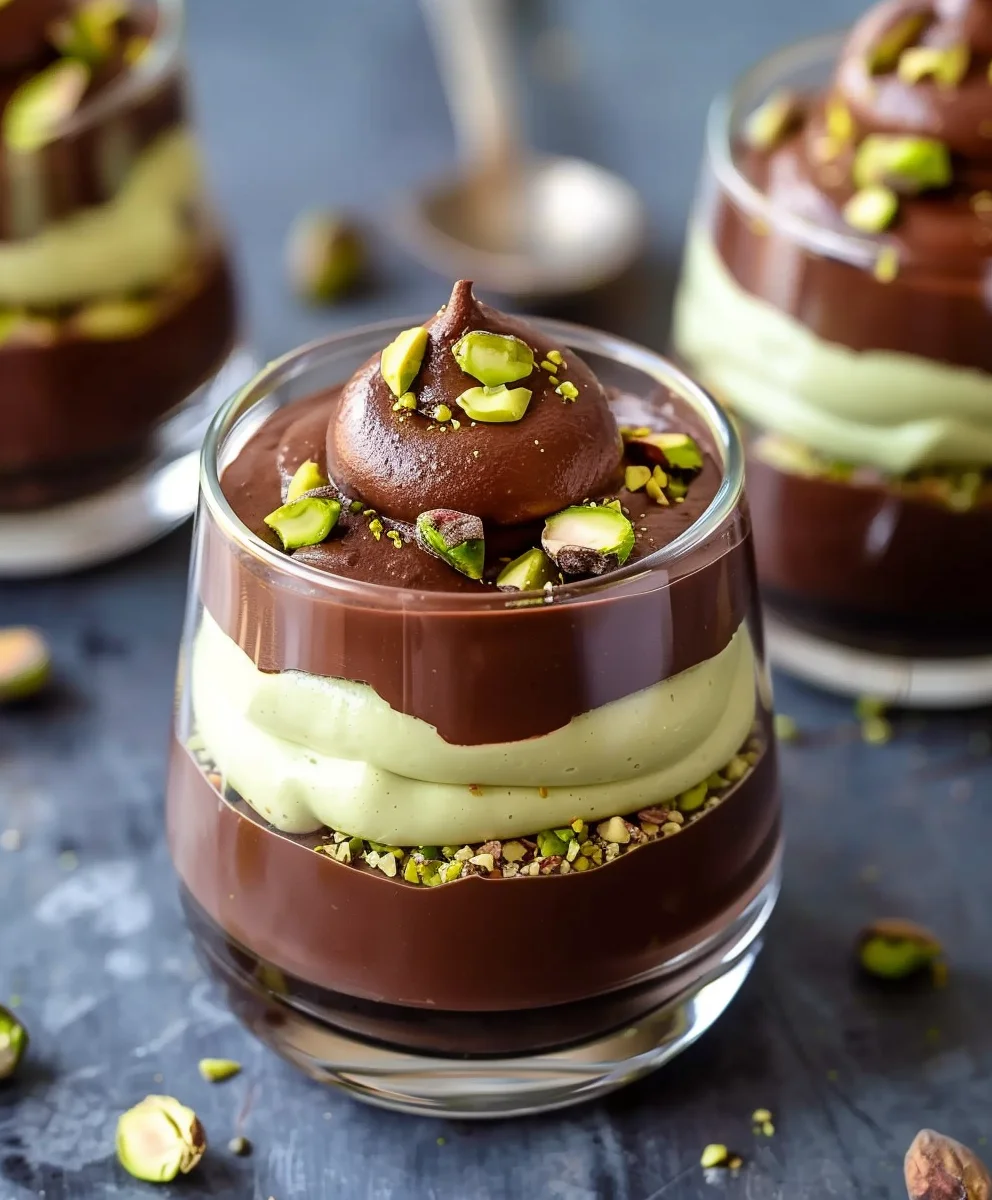
Pistachio Mousse With Chocolate Ganache is a dessert that promises to transform any ordinary moment into an extraordinary culinary experience. Imagine a symphony of flavors and textures: the delicate, vibrant green of a perfectly whipped pistachio mousse, light as air, resting gracefully beneath a velvety blanket of rich, dark chocolate ganache. I’ve always been captivated by desserts that offer both visual splendor and an unforgettable taste, and this dish truly embodies that exquisite balance.

Pistachios, revered since ancient times in the Middle East for their distinctive flavor and beautiful color, pair harmoniously with the classic French technique of mousse-making, which lends an unparalleled lightness. The addition of a smooth, decadent chocolate ganache, another French culinary gem, elevates this dessert to a realm of pure indulgence. People adore this dish not only for its stunning presentation, making it a showstopper at any dinner party, but also for its complex yet approachable flavor profile. The creamy, nutty notes of the pistachio contrast beautifully with the bittersweet depth of the chocolate, creating a delightful dance on the palate.

This particular combination, a delicate Pistachio Mousse With Chocolate Ganache, offers a sophisticated yet comforting treat that is surprisingly accessible to create at home. It’s the perfect end to a special meal, a delightful afternoon indulgence, or simply a testament to the joy of exquisite homemade desserts. Get ready to impress yourself and your loved ones with this truly elegant creation!

Decadent Pistachio Mousse with Rich Chocolate Ganache this RECIPE

Ingredients:

  • For the Pistachio Paste (Homemade – yields about 1/2 cup):
    • 1 cup (approximately 120g) shelled raw pistachios, unsalted
    • 1 tablespoon (15ml) neutral oil (like grapeseed or avocado oil), optional, for a smoother paste
    • 1-2 tablespoons (15-30ml) water, as needed
    • A tiny pinch of salt (about 1/8 teaspoon)
    • 1-2 drops green food coloring, optional (for more vibrant color)
  • For the Pistachio Mousse:
    • 2 teaspoons (10g) powdered gelatin
    • 4 tablespoons (60ml) cold water, for blooming gelatin
    • 3 large egg yolks
    • 1/2 cup (100g) granulated sugar
    • 1 cup (240ml) whole milk
    • 1/2 cup (120g) homemade or high-quality store-bought pistachio paste (as prepared above)
    • 1 and 3/4 cups (420ml) heavy cream (cold)
    • 1/2 teaspoon pure vanilla extract
    • A tiny pinch of salt
  • For the Rich Chocolate Ganache:
    • 6 ounces (170g) high-quality dark chocolate (60-70% cocoa solids), finely chopped
    • 3/4 cup (180ml) heavy cream
    • 1 tablespoon (14g) unsalted butter, cut into small pieces (optional, for extra shine and smoothness)
  • For Garnish (Optional):
    • 2 tablespoons finely chopped roasted pistachios
    • Chocolate shavings or curls
    • Fresh berries (raspberries, strawberries)

Phase 1: Preparing Your Own Vibrant Pistachio Paste

My dear friends, while you can certainly use a good quality store-bought pistachio paste for this recipe, I always encourage you to make your own if time permits. The flavor is simply unmatched, and the freshness truly elevates the final dish. It’s an extra step, but one that is incredibly rewarding and worth every bit of effort for our Pistachio Mousse With Chocolate Ganache.

  1. Blanch the Pistachios: Bring a small pot of water to a rolling boil. Add your shelled raw pistachios and boil for exactly 1 minute. This helps to loosen the skins. Immediately drain the pistachios and transfer them to an ice bath to stop the cooking process and preserve their vibrant color.
  2. Peel the Pistachios: Once cooled, drain the pistachios from the ice bath. Now comes the slightly meditative part! Gently pinch each pistachio between your thumb and forefinger to slip off the skins. This might take a little patience, but the beautiful green kernel underneath is our prize. Discard the skins. Removing the skins is crucial for a smooth, vibrant green paste and to avoid any bitter notes.
  3. Toast for Depth: Spread the peeled pistachios in a single layer on a baking sheet. Preheat your oven to 300°F (150°C). Toast the pistachios for 5-7 minutes. Keep a very close eye on them; we want them just lightly toasted to bring out their nutty aroma, not browned. Over-toasting can make them lose their beautiful green color. Let them cool completely.
  4. Blend into Paste: Transfer the cooled, peeled, and lightly toasted pistachios to a food processor or a high-speed blender. Begin processing. Initially, they will turn into a coarse meal, then a finer meal, and eventually, the natural oils will start to release, forming a thick, clumpy butter.
  5. Achieve Smoothness: Continue processing. You might need to stop occasionally and scrape down the sides of the bowl. If the paste is too thick or isn’t coming together smoothly, add the neutral oil and/or water, one teaspoon at a time, until you achieve a smooth, spreadable consistency, similar to a thick nut butter. Add the tiny pinch of salt. If you desire a more intensely green color, now is the time to add 1-2 drops of green food coloring and process briefly to incorporate.
  6. Storage: Transfer the homemade pistachio paste to an airtight container. It can be stored in the refrigerator for up to 2 weeks.

Phase 2: Crafting the Luxurious Pistachio Mousse

This is where the magic truly begins! The mousse is the heart of our Pistachio Mousse With Chocolate Ganache, and we want it to be light, airy, and bursting with authentic pistachio flavor.

  1. Bloom the Gelatin: In a small, heatproof bowl, sprinkle the powdered gelatin over the cold water. Stir briefly to ensure all granules are moistened. Let it sit for 5-10 minutes, allowing the gelatin to “bloom” and absorb the water. It will become thick and jelly-like.
  2. Prepare the Crème Anglaise Base: In a medium saucepan, whisk together the egg yolks and granulated sugar until light in color and well combined. This is a crucial step for a smooth custard.
  3. Scald the Milk: In another small saucepan, gently heat the whole milk over medium heat until it just begins to simmer around the edges – you’ll see tiny bubbles forming. Do not let it boil vigorously.
  4. Temper the Egg Yolks: Slowly pour about half of the hot milk into the egg yolk mixture, whisking constantly and vigorously. This “tempers” the egg yolks, preventing them from scrambling. Once combined, pour the tempered egg yolk mixture back into the saucepan with the remaining hot milk.
  5. Cook the Custard: Return the saucepan to medium-low heat. Cook, stirring constantly with a whisk or a heatproof spatula, until the mixture thickens slightly and coats the back of a spoon. If you run your finger across the spoon, the line should hold. This usually takes about 5-8 minutes. Do not let it boil, as this can curdle the eggs. An instant-read thermometer should register between 170-175°F (77-79°C).
  6. Dissolve Gelatin and Add Pistachio Paste: Remove the custard from the heat. Add the bloomed gelatin to the hot custard and whisk until it is completely dissolved and no granules remain. Stir in your beautiful pistachio paste, vanilla extract, and the pinch of salt. Whisk until everything is smoothly incorporated and the mixture is a uniform green color.
  7. Cool the Base: Pour the pistachio custard base into a clean bowl. Place a piece of plastic wrap directly on the surface of the custard to prevent a skin from forming. Let it cool completely to room temperature, or even slightly cooler. You can place it in an ice bath for faster cooling, stirring occasionally. It’s important it’s cool before mixing with the whipped cream, otherwise, the cream will melt.
  8. Whip the Cream: In a large, very clean mixing bowl (preferably chilled) using an electric mixer with a whisk attachment, whip the very cold heavy cream on medium-high speed until it forms soft to medium peaks. We want it light and airy, but not overly stiff.
  9. Combine Mousse Components: Once the pistachio custard base is cool, gently fold about a third of the whipped cream into the pistachio base using a spatula. This lightens the base and makes it easier to incorporate the remaining cream. Then, add the remaining whipped cream and gently fold until just combined. Be careful not to overmix, as this will deflate the mousse and lose its airy texture.
  10. Portion and Chill: Carefully spoon the pistachio mousse into individual serving glasses, ramekins, or a larger serving bowl. Smooth the tops. Cover loosely with plastic wrap and refrigerate for at least 4 hours, or preferably overnight, to allow the mousse to set completely and for the flavors to meld.

Phase 3: Developing the Rich Chocolate Ganache

A good chocolate ganache is the perfect counterpoint to the delicate pistachio mousse. It adds a layer of intense chocolate flavor and a luxurious texture that makes our Pistachio Mousse With Chocolate Ganache truly indulgent.

  1. Prepare Chocolate: Ensure your dark chocolate is very finely chopped. This helps it melt evenly and quickly. Place the chopped chocolate in a medium heatproof bowl.
  2. Heat Cream: In a small saucepan, heat the heavy cream over medium heat until it just begins to simmer around the edges. Do not let it boil vigorously.
  3. Pour and Melt: Immediately pour the hot cream over the chopped chocolate. Let it sit undisturbed for 5 minutes. This allows the heat from the cream to begin melting the chocolate without scorching it.
  4. Emulsify: After 5 minutes, starting from the center of the bowl, gently whisk the chocolate and cream together. Gradually expand your whisking motion outwards until all the chocolate is melted and the mixture is smooth, glossy, and homogeneous. This creates a beautiful emulsion.
  5. Add Butter (Optional): If using, add the small pieces of unsalted butter to the ganache and whisk until fully incorporated and melted. The butter will give your ganache an extra sheen and a silky mouthfeel.
  6. Cool the Ganache: Allow the ganache to cool at room temperature for at least 30-45 minutes. We want it to be cool enough to pour over the mousse without melting it, but still pourable. It should be thick but not fully set. Stir occasionally during cooling to prevent a skin from forming.

Phase 4: Assembling and Final Chilling

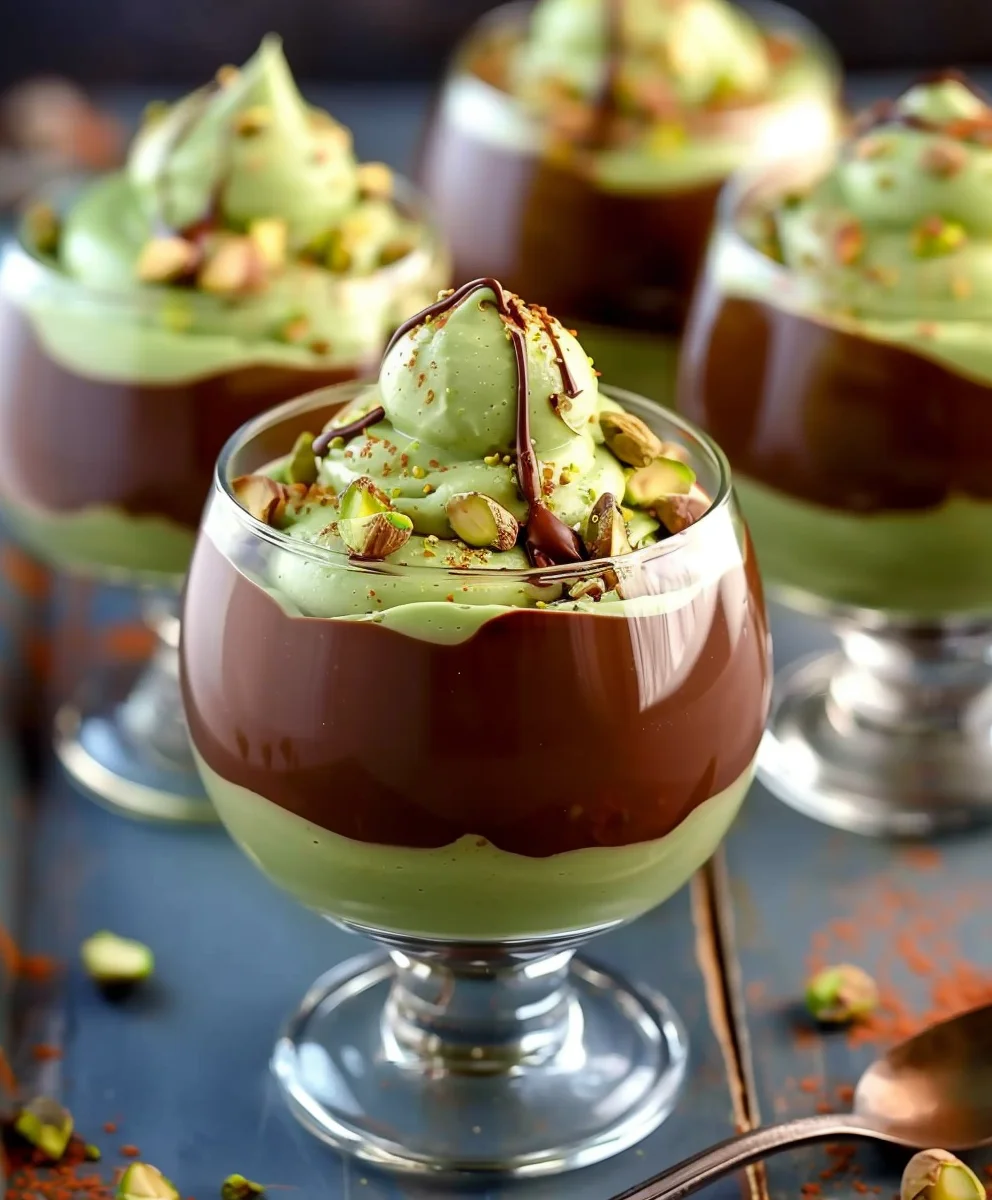
Now for the grand finale of putting together our elegant Pistachio Mousse With Chocolate Ganache. The layering is what makes this dessert so visually appealing and texturally interesting.

  1. Check Mousse Firmness: Ensure your pistachio mousse is fully set and firm to the touch after its initial chilling. This is important to prevent the ganache from sinking into it.
  2. Pour Ganache: Carefully pour the slightly cooled, thickened chocolate ganache over the set pistachio mousse in each serving vessel. Pour it gently, covering the entire surface of the mousse. You can also tilt the glasses slightly to ensure an even layer if you wish.
  3. Final Chill: Return the desserts to the refrigerator for at least another 2-3 hours, or until the chocolate ganache is fully set. This final chill is essential for the structure and stability of the dessert. Patience is key here, as a perfectly set dessert is a delightful experience.

Phase 5: Garnish and Serving Perfection

The presentation is the final flourish that makes this Pistachio Mousse With Chocolate Ganache truly irresistible. Make it beautiful!

  1. Garnish Just Before Serving: Once the ganache is firm, it’s time to add your finishing touches. Sprinkle a small amount of finely chopped roasted pistachios around the edge or in the center of each dessert.
  2. Add Chocolate Accents: For an extra touch of elegance, adorn with a few delicate chocolate shavings or curls. You can create these by gently scraping a bar of chocolate with a vegetable peeler or a sharp knife.
  3. Fresh Fruit Brightness: If you enjoy a touch of tartness, a few fresh raspberries or a sliced strawberry can provide a wonderful color contrast and a refreshing burst of flavor against the richness of the mousse and ganache.
  4. Serve Chilled: Serve your beautiful Pistachio Mousse With Chocolate Ganache chilled, straight from the refrigerator. The contrast in temperatures between the cool mousse and the slightly warmer ganache (as it softens slightly at room temperature) is part of its charm.
  5. Enjoy the Symphony of Flavors: Take a moment to appreciate the vibrant green, the deep brown, and the delicate textures. The creamy, nutty pistachio mousse, paired with the rich, slightly bitter chocolate ganache, creates a harmonious symphony of flavors that is truly a delight for the senses. This dessert is perfect for special occasions, or simply when you want to treat yourself to something extraordinary.

Decadent Pistachio Mousse with Rich Chocolate Ganache

Conclusion:

And there you have it, my dear friends! We’ve journeyed through the steps to create something truly extraordinary, a dessert that isn’t just a treat but an experience. I genuinely believe that this particular recipe for Pistachio Mousse With Chocolate Ganache is an absolute must-try for anyone who appreciates the finer things in life, especially when it comes to sweet indulgence. What makes it stand out from the crowd? Well, for starters, it’s the exquisite balance of flavors. The delicate, nutty notes of the pistachio mousse, light as air and incredibly creamy, dance harmoniously with the deep, rich, and slightly bitter undertones of the velvety chocolate ganache. It’s not overly sweet; instead, it offers a sophisticated sweetness that caters to a more refined palate. The textures are equally captivating: the mousse melts in your mouth with an almost ethereal quality, while the ganache provides a smooth, decadent counterpoint, adding a layer of luxurious richness that truly elevates each spoonful. This isn’t just a dessert; it’s a statement. It’s elegant enough for the most special of occasions – think holiday dinners, anniversary celebrations, or a fancy dinner party – yet it’s surprisingly approachable to make, and the reward for your efforts is immeasurable. The vibrant green of the pistachio against the deep brown of the chocolate creates a visual masterpiece that will undoubtedly impress anyone lucky enough to receive a serving. It’s a dessert that speaks of thoughtfulness, skill, and a passion for flavor, promising to leave a lasting impression long after the last bite has been savored. Every component, from the perfectly whipped mousse to the glossy, smooth ganache, contributes to a symphony of taste and texture that is simply irresistible, making it a truly unforgettable culinary delight.

But the joy of this dessert doesn’t end with its perfect creation; it extends to how you choose to present and personalize it. While serving your Pistachio Mousse With Chocolate Ganache in individual elegant glasses or small ramekins is always a winner, showcasing its beautiful layers, don’t shy away from getting creative. For a classic touch, a sprinkle of finely chopped pistachios or delicate chocolate shavings on top adds both visual appeal and a delightful textural crunch. A single fresh raspberry or a tiny sprig of mint can introduce a pop of color and a fresh aroma that complements the richness perfectly. If you’re feeling adventurous, consider a few delightful variations: perhaps a hint of orange zest grated into the chocolate ganache for a bright, citrusy lift, or a whisper of almond extract added to the mousse for another layer of nutty complexity. For those who love a bit of extra texture at the bottom, a crumbled layer of amaretti biscuits or shortbread could provide a wonderful base, absorbing some of the mousse’s moisture and adding a delightful chew. You could even transform this into a show-stopping cake component, layering the mousse and ganache between delicate sponge cake layers for a celebration cake that will be talked about for years. Think seasonally too! In summer, a few fresh berries alongside would be exquisite. In colder months, a tiny dusting of cocoa powder or even a spiced whipped cream on top could add a comforting touch. The versatility of this dessert means it can adapt to your preferences and the occasion, making it truly yours and ensuring it fits any theme or mood you desire for your gathering.

I truly hope that walking through this recipe has inspired you, just as creating it inspires me every time. This isn’t just a recipe; it’s an invitation to create something beautiful, something delicious, and something truly memorable for yourself and your loved ones. I urge you not to hesitate any longer! Gather your ingredients, set aside some time, and embark on this delightful culinary adventure. You’ll find the process incredibly rewarding, and the end result will be nothing short of spectacular. And once you’ve had the pleasure of tasting your homemade masterpiece, please, please share your experience with me! I absolutely adore hearing about your kitchen triumphs. Did you try a unique variation? Did it become the star of your dinner party? Share your photos, your thoughts, and your personal twists in the comments below. Let’s build a community around the joy of creating and savoring exquisite desserts. Your feedback and stories are what truly bring these recipes to life for me and for other aspiring home chefs, encouraging us all to keep exploring the wonderful world of flavors. Happy baking, and get ready to fall in love with your own incredible creation!


Decadent Pistachio Mousse with Rich Chocolate Ganache

Decadent Pistachio Mousse with Rich Chocolate Ganache

A delicate, vibrant green pistachio mousse, light as air, resting gracefully beneath a velvety blanket of rich, dark chocolate ganache, offering a sophisticated yet comforting treat.

Prep Time
55 Minutes

Cook Time
10 Minutes

Total Time
7 Hours

Servings
6 servings

Ingredients

  • 200g (7 oz) dark chocolate (60–70% cocoa), chopped
  • 200ml (¾ cup + 1 tbsp) heavy cream
  • 150g (1 ¼ cups) shelled pistachios, unsalted
  • 3 tbsp granulated sugar
  • 1 tsp pure vanilla extract
  • 250ml (1 cup) heavy cream, cold
  • 100g (½ cup) mascarpone cheese or cream cheese, softened

Instructions

  1. Step 1
    Blanch 150g shelled pistachios in boiling water for 1 minute, then transfer to an ice bath. Peel off skins. Toast peeled pistachios on a baking sheet at 150°C (300°F) for 5-7 minutes until lightly fragrant; cool completely. Process toasted pistachios in a food processor until a smooth paste forms, adding a touch of water if needed.
  2. Step 2
    In a bowl, combine 100g softened mascarpone cheese (or cream cheese), 3 tbsp granulated sugar, 1 tsp pure vanilla extract, and the prepared pistachio paste. Mix until smooth. In a separate chilled bowl, whip 250ml cold heavy cream to soft peaks. Gently fold the whipped cream into the pistachio-mascarpone mixture until just combined. Spoon mousse into individual serving glasses or ramekins. Chill for at least 2-3 hours to set.
  3. Step 3
    Place 200g chopped dark chocolate in a heatproof bowl. Heat 200ml heavy cream in a small saucepan until it just begins to simmer. Pour the hot cream over the chopped chocolate and let it sit undisturbed for 5 minutes. Whisk from the center outwards until all the chocolate is melted and the mixture is smooth and glossy. Allow the ganache to cool at room temperature for 30-45 minutes until thickened but still pourable.
  4. Step 4
    Pour the cooled, thickened chocolate ganache over the set pistachio mousse in each serving vessel, covering the surface. Return the desserts to the refrigerator for at least another 2-3 hours, or until the chocolate ganache is fully set.
  5. Step 5
    Before serving, garnish with finely chopped pistachios, chocolate shavings, or fresh berries as desired. Serve chilled.

Important Information

Nutrition Facts (Per Serving)

It is important to consider this information as approximate and not to use it as definitive health advice.

Allergy Information

Please check ingredients for potential allergens and consult a health professional if in doubt.

« Previous Post
Best Key Lime Pound Cake Recipe – Tangy Citrus Delight
Next Post »
Grilled Veggie Mozzarella Sandwiches: Quick & Cheesy Lunch

If you enjoyed this…

Mini Peach Upside Down Cakes: A Delicious Twist on a Classic Dessert

Blue Hawaiian Cocktail

Blue Hawaiian Cocktail

Peach Cobbler Egg Rolls: A Delicious Dessert Recipe

Primary Sidebar

Browse by Diet

BreakfastDinnerLunchDessertAppetizer

Sweet Peach Yogurt Parfait Delight

One of my fondest memories is from a lazy summer afternoon spent at my grandmother’s house. The sun filtered through the kitchen window, casting a warm glow over the table where she would create her culinary magic. It was during one of those blissful moments that I first tasted her Peach Yogurt Parfait with Honey and Granola. The sweet aroma of ripe peaches mingling with creamy yogurt and the crunch of granola was nothing short of heavenly. It felt like summer captured in a bowl, and I still remember the joy of diving in with a spoon, each layer revealing a new burst of flavor.

When I think about that parfait, I can almost hear the gentle hum of the bees outside, reminding me of the floral notes that honey brings to every bite. The vibrant yellows and soft oranges of the peaches contrast beautifully with the creamy white yogurt and the golden crunch of granola. It’s a dish that not only looks delightful but also tastes like a celebration of fresh, wholesome ingredients.

What makes my version of this Peach Yogurt Parfait special is the careful balance of flavors and textures. I use ripe, juicy peaches, drizzled with locally sourced honey, and a homemade granola that’s bursting with nuts and seeds for an extra crunch. It’s a simple dish, but every layer is crafted with love and attention.

Let me show you exactly how to make this delightful parfait, so you can bring a bit of that summer magic into your kitchen!

Sweet Peach Yogurt Parfait Delight

Why You’ll Love This Recipe

  • Delightfully creamy texture from the Greek yogurt, paired with the juicy sweetness of fresh peaches.
  • Ready in under 20 minutes, making it a quick and satisfying breakfast or snack option.
  • Budget-friendly, using common ingredients that you may already have in your pantry.
  • Customizable with your favorite granola and nuts, allowing you to tailor each parfait to your taste.
  • Perfectly balanced flavors with the bright acidity of lemon juice and the sweetness of honey enhancing the peaches.

Ingredients

  • For the Parfait:
  • 2 cups plain Greek yogurt (or vanilla yogurt for a sweeter option)
  • 2 large ripe peaches, diced (about 2 cups)
  • 1 tablespoon fresh lemon juice (to prevent browning of peaches)
  • 2 tablespoons honey (plus more for drizzling)
  • 1 teaspoon vanilla extract (optional for extra flavor)
  • For the Granola:
  • 1 cup granola (store-bought or homemade; see notes for a simple granola recipe)
  • 1/4 cup sliced almonds (optional for added crunch)
  • 1/4 cup shredded coconut (optional for added flavor)

Let’s dive into some key ingredients that make this Peach Yogurt Parfait so delightful! First, the Greek yogurt is not only creamy but also packed with protein, making it a satisfying option for breakfast or a snack. If you’re looking for a sweeter option, you can easily substitute it with vanilla yogurt, though it may alter the overall flavor balance. Next, the ripe peaches are the star of the show; their natural sweetness shines through, so I recommend choosing peaches that yield slightly to pressure, indicating they’re perfectly ripe. If peaches aren’t in season, feel free to use nectarines or even frozen peaches—just thaw them before use. Finally, honey adds a lovely floral sweetness that ties everything together. If you prefer, maple syrup can serve as a delicious substitute.

Step-by-Step Instructions

  1. Start by preparing the peaches. Wash them thoroughly, then slice and dice them into bite-sized pieces. In a medium bowl, toss the diced peaches with 1 tablespoon of fresh lemon juice to prevent browning. Set aside for about 5 minutes while the lemon juice works its magic.
  2. In a separate bowl, combine the Greek yogurt, 2 tablespoons of honey, and 1 teaspoon of vanilla extract if using. Stir the mixture until smooth and thoroughly blended. This should take about a minute. Avoid overmixing to maintain the creaminess of the yogurt.
  3. Now it’s time to layer your parfait. Grab a clear glass or bowl to showcase your beautiful creation. Start with a generous spoonful of the yogurt mixture at the bottom—about 1/4 cup will do. Use a spoon to spread it evenly.
  4. Add a layer of the diced peaches over the yogurt, ensuring they cover the yogurt completely. You might want to use about half of what you have prepared—roughly 1 cup. This layer should be visually appealing, so arrange the peaches neatly.
  5. Sprinkle 1/4 cup of granola over the peaches. This adds a delightful crunch. Make sure to distribute it evenly to ensure every bite has that satisfying texture. Avoid packing it down too tightly, as you want it to maintain its crunch.
  6. Repeat the layers: spoon in another 1/4 cup of yogurt, followed by another cup of peaches, and another sprinkle of granola. You should have at least two layers, but feel free to add more depending on your glass size.
  7. Finish off your parfait with a drizzle of honey on top for added sweetness and a touch of elegance. If you’re using sliced almonds or shredded coconut, sprinkle them on top now. It adds a lovely visual contrast and extra flavor.
  8. Serve immediately or refrigerate for up to 30 minutes before serving to allow the flavors to meld together. However, I recommend enjoying it fresh to maintain the granola’s crunch.

Pro Tips for the Best Peach Yogurt Parfait With Honey And Granola

  • Make sure to choose ripe peaches for the best flavor and texture. A common mistake is using unripe fruit, which can lead to a less enjoyable parfait. Look for peaches that are fragrant and slightly soft to the touch.
  • Use a clear glass to assemble your parfait; this not only makes for a beautiful presentation but also allows you to see the colorful layers, which adds to the enjoyment of eating it.
  • For an even creamier texture, consider whipping the Greek yogurt with a hand mixer for a couple of minutes before layering. This small adjustment makes a huge difference in mouthfeel.
  • Be mindful of the granola-to-yogurt ratio. Too much granola can overwhelm the parfait, while too little can make it feel too creamy. Aim for about 1/4 cup of granola per layer for the perfect balance.
  • If you’re making this for a gathering, consider preparing the yogurt and peaches ahead of time and layering them just before serving. This ensures the granola stays crunchy!

Variations & Serving Ideas

There are so many ways to get creative with your Peach Yogurt Parfait! For a tropical twist, swap out the peaches for mangoes or pineapples and top with coconut flakes. If you prefer a berry flavor, mix in some blueberries or strawberries with the peaches for added color and taste. For a nutty version, incorporate chopped walnuts or pecans instead of almonds.

As for serving ideas, this parfait pairs beautifully with a side of scrambled eggs for a hearty breakfast or fresh fruit salad for a light lunch. You might also enjoy it alongside whole grain toast with almond butter for an energizing snack. The contrast of flavors and textures will elevate your meal experience!

Storage, Make-Ahead & Reheating

The Peach Yogurt Parfait is best enjoyed fresh, but you can prepare some components ahead of time. Store the layered parfait in an airtight container in the refrigerator for up to 24 hours. However, be cautious; the granola may lose its crunch if stored too long. You can freeze the yogurt and peach mixture for up to 2 months; just remember to thaw it in the refrigerator overnight before serving.

If you plan to enjoy this dish the next day, it can taste even better as the flavors meld together. Just remember to add the granola right before serving to keep its delightful crunch!

Frequently Asked Questions

Can I make Peach Yogurt Parfait With Honey And Granola ahead of time?

Yes — in fact, it tastes even better the next day as the flavors meld. However, I recommend waiting to add the granola until just before serving to maintain its crunch.

What can I substitute for Greek yogurt?

If you prefer a lighter option, you can substitute Greek yogurt with regular yogurt or a dairy-free alternative like coconut yogurt. Just remember that this may alter the creaminess and flavor profile slightly.

Can I use frozen peaches for this parfait?

Absolutely! Just make sure to thaw the frozen peaches before using them. They will still add great flavor, though the texture may be slightly softer than fresh peaches.

How do I make the parfait vegan?

To make a vegan version, substitute the Greek yogurt with a plant-based yogurt alternative, and replace honey with maple syrup or agave nectar. This keeps the parfait sweet while adhering to a vegan diet.

What other fruits can I use in this recipe?

You can mix and match fruits based on your preference. Try using strawberries, blueberries, raspberries, or even bananas. Just make sure to adjust the lemon juice as needed to prevent browning.

Sweet Peach Yogurt Parfait Delight

Final Thoughts

The Peach Yogurt Parfait with Honey and Granola is a delightful blend of creamy yogurt, sweet peaches, and crunchy granola that creates a satisfying and nourishing treat. Each layer bursts with flavor, making it a perfect choice for breakfast or a light dessert.

This is the kind of recipe I come back to again and again, especially when I want something refreshing and wholesome to start my day. The harmony of sweet and tart flavors, combined with the delightful crunch, never fails to lift my spirits!

I encourage you to give this parfait a try and indulge in its comforting goodness. Feel free to share your results or even add your own twist—perhaps a sprinkle of cinnamon or a handful of nuts. Enjoy creating your perfect parfait!

Print
clock clock iconcutlery cutlery iconflag flag iconfolder folder iconinstagram instagram iconpinterest pinterest iconfacebook facebook iconprint print iconsquares squares iconheart heart iconheart solid heart solid icon

Peach Yogurt Parfait


  • Author: Lily author
  • Total Time: 15 minutes
  • Yield: 4 servings 1x
Pin Recipe
Print Recipe

Description

This Peach Yogurt Parfait combines creamy Greek yogurt, juicy peaches, and crunchy granola for a delightful treat. It’s a perfect breakfast or snack that captures the essence of summer in every bite.


Ingredients

Scale
  • For the Parfait:
  • 2 cups plain Greek yogurt (or vanilla yogurt for a sweeter option)
  • 2 large ripe peaches, diced (about 2 cups)
  • 1 tablespoon fresh lemon juice (to prevent browning of peaches)
  • 2 tablespoons honey (plus more for drizzling)
  • 1 teaspoon vanilla extract (optional for extra flavor)
  • For the Granola:
  • 1 cup granola (store-bought or homemade; see notes for a simple granola recipe)
  • 1/4 cup sliced almonds (optional for added crunch)
  • 1/4 cup shredded coconut (optional for added flavor)

Instructions

  1. Start by preparing the peaches. Wash them thoroughly, then slice and dice them into bite-sized pieces. In a medium bowl, toss the diced peaches with 1 tablespoon of fresh lemon juice to prevent browning. Set aside for about 5 minutes while the lemon juice works its magic.
  2. In a separate bowl, combine the Greek yogurt, 2 tablespoons of honey, and 1 teaspoon of vanilla extract if using. Stir the mixture until smooth and thoroughly blended. This should take about a minute. Avoid overmixing to maintain the creaminess of the yogurt.
  3. Now it’s time to layer your parfait. Grab a clear glass or bowl to showcase your beautiful creation. Start with a generous spoonful of the yogurt mixture at the bottom—about 1/4 cup will do. Use a spoon to spread it evenly.
  4. Add a layer of the diced peaches over the yogurt, ensuring they cover the yogurt completely. You might want to use about half of what you have prepared—roughly 1 cup. This layer should be visually appealing, so arrange the peaches neatly.
  5. Sprinkle 1/4 cup of granola over the peaches. This adds a delightful crunch. Make sure to distribute it evenly to ensure every bite has that satisfying texture. Avoid packing it down too tightly, as you want it to maintain its crunch.
  6. Repeat the layers: spoon in another 1/4 cup of yogurt, followed by another cup of peaches, and another sprinkle of granola. You should have at least two layers, but feel free to add more depending on your glass size.
  7. Finish off your parfait with a drizzle of honey on top for added sweetness and a touch of elegance. If you’re using sliced almonds or shredded coconut, sprinkle them on top now. It adds a lovely visual contrast and extra flavor.
  8. Serve immediately or refrigerate for up to 30 minutes before serving to allow the flavors to meld together. However, I recommend enjoying it fresh to maintain the granola’s crunch.
  • Prep Time: 15 mins
  • Cook Time: 0 mins
  • Category: Breakfast
  • Method: No-cook
  • Cuisine: American

Nutrition

  • Serving Size: 1 parfait
  • Calories: 250
  • Sugar: 20 g
  • Sodium: 50 mg
  • Fat: 5 g
  • Saturated Fat: 2 g
  • Unsaturated Fat: 3 g
  • Trans Fat: 0 g
  • Carbohydrates: 40 g
  • Fiber: 3 g
  • Protein: 10 g
  • Cholesterol: 10 mg

Keywords: Choose ripe peaches for the best flavor and texture. Use a clear glass for a beautiful presentation. For creaminess, consider whipping the yogurt before layering. Be mindful of the granola-to-yogurt ratio. Prepare yogurt and peaches ahead of time for gatherings, layering just before serving.

Did you make this recipe?

Share a photo and tag us — we can't wait to see what you've made!

Sun-Kissed Frozen Orange Cream Slush

As a child, summer days felt like they lasted forever. I remember the sticky heat wrapping around me as I played outside, my laughter mingling with the sounds of the neighborhood. But nothing could cool me down quite like the moment I’d spot my grandmother, laboring over her blender, whipping up her famous Frozen Orange Creamsicle Slush. That vibrant orange treat, with its frosty texture and sweet citrus aroma, was like a burst of sunshine in a cup. Just one sip, and I could feel the coolness wash over me, sparking pure joy.

This Frozen Orange Creamsicle Slush has a way of making you feel like a kid again. Its creamy, dreamy consistency is a delightful balance of bright orange and soft vanilla, inviting you to dive right in. The refreshing tang of orange dances on your tongue, while the smooth creaminess envelops you in a comforting embrace. It’s a nostalgic treat that’s perfect for hot summer afternoons or anytime you need a little pick-me-up.

What makes my version of this slush stand out is the addition of a hint of vanilla bean, which elevates the flavor and adds an extra layer of richness. Plus, it’s super easy to whip up with just a few simple ingredients that you probably already have on hand! So, if you’re ready to relive those sun-soaked memories, let me show you exactly how to make it.

Sun-Kissed Frozen Orange Cream Slush

Why You’ll Love This Recipe

  • Each slush is a perfect blend of creamy vanilla and zesty orange, creating a nostalgic flavor reminiscent of summer days.
  • This refreshing treat is ready in under 15 minutes, making it an ideal quick dessert for unexpected guests or hot afternoons.
  • With just 8 simple ingredients, it’s budget-friendly, ensuring you don’t have to break the bank to enjoy a delicious slush.
  • The slush has a perfectly smooth texture, thanks to the combination of ice and ice cream, providing a delightful contrast to the bright citrus flavors.
  • It’s highly customizable; you can easily adjust the sweetness and add fresh herbs for a unique twist that suits your taste.

Ingredients

  • 2 cups orange juice (freshly squeezed or store-bought)
  • 1 cup vanilla ice cream
  • 1 cup crushed ice
  • 1/2 cup milk (whole or 2%)
  • 1/4 cup granulated sugar (adjust based on sweetness preference)
  • 1 teaspoon vanilla extract
  • Zest of 1 orange (for added flavor)
  • Fresh orange slices and mint leaves (for garnish)

The star of this Frozen Orange Creamsicle Slush is the orange juice, which provides the vibrant, citrusy base. Freshly squeezed juice will yield the brightest flavor, but store-bought options can be just as convenient. If you’re opting for store-bought, choose 100% pure juice with no added sugars for the best results. Another essential ingredient is the vanilla ice cream; it adds creaminess and sweetness. You can substitute it with dairy-free ice cream if you’re looking for a vegan option. Whole or 2% milk complements the ice cream, creating a smooth blend. If you want a lower-calorie version, almond or oat milk can be good alternatives.

Lastly, the granulated sugar can be adjusted based on your sweetness preference. If you prefer a more natural sweetener, consider using honey or agave syrup. The orange zest enhances the flavor profile, providing an aromatic pop that brings the whole slush together. Don’t skip it! It adds an extra layer of brightness that makes this slush truly special.

Step-by-Step Instructions

  1. Start by preparing your ingredients. Gather 2 cups of orange juice, 1 cup of vanilla ice cream, and 1 cup of crushed ice. Make sure the ice is finely crushed, as larger chunks can make blending difficult.
  2. In a blender, combine the orange juice, vanilla ice cream, crushed ice, and 1/2 cup of milk. Add 1/4 cup of granulated sugar and 1 teaspoon of vanilla extract. If you like a sweeter slush, consider adding a bit more sugar at this stage.
  3. Add the zest of 1 orange to the blender. This step is crucial for enhancing the citrus flavor of your slush. Make sure not to include the bitter white pith—only the flavorful zest.
  4. Blend the mixture on medium-high speed for about 30-45 seconds. Stop once the ingredients are fully combined and the slush has a smooth, even consistency. If you notice large chunks of ice, blend for an additional 10-15 seconds. Avoid over-blending, as this can make the slush too liquidy.
  5. Once blended, taste the slush. If it needs more sweetness, add a little more sugar and blend for a few more seconds. If it’s too thick, you can add a splash of milk to reach your desired consistency.
  6. Pour the slush into glasses. This recipe typically serves 4, but you can easily double it for larger gatherings. Use a spoon to help guide the slush into the glasses if needed.
  7. Garnish each serving with fresh orange slices and mint leaves. The mint not only adds a pop of color but also a refreshing aroma that complements the citrus flavors beautifully.
  8. Serve immediately and enjoy! If you’ve made extra, you can refrigerate it for a short time, but it’s best enjoyed fresh.

Pro Tips for the Best Frozen Orange Creamsicle Slush

  • Don’t skip the orange zest! It’s a game-changer for flavor. Always zest before juicing to make it easier.
  • Use a high-powered blender for the best texture. A standard blender may struggle with ice, leading to uneven consistency. If you have a food processor, that can work too, but ensure the ice is finely crushed.
  • Adjust the ice-to-liquid ratio carefully. If your slush is too thick, it won’t blend well. Start with less ice and add more until you reach your preferred texture.
  • Be cautious with the sugar! Always start with the lower amount, as you can easily add more, but it’s hard to fix an overly sweet slush.
  • For a fun twist, consider adding a splash of coconut milk or a handful of fresh fruit like strawberries or pineapple. This not only enhances the flavor but also adds a beautiful color contrast.

Variations & Serving Ideas

There are countless ways to put a spin on your Frozen Orange Creamsicle Slush. Consider making a tropical version by adding in some pineapple juice or coconut milk for a delightful tropical twist. If you’re feeling adventurous, try incorporating a handful of frozen mango or peach slices for added sweetness. For a lighter version, swap out the vanilla ice cream for Greek yogurt for a creamy yet tangy alternative.

As for serving ideas, this refreshing slush pairs wonderfully with light summer dishes like grilled chicken skewers, fish tacos, or a simple salad topped with citrus vinaigrette. The bright, zesty flavors of the slush complement these dishes perfectly, making them an ideal pairing for a sunny day.

Storage, Make-Ahead & Reheating

This Frozen Orange Creamsicle Slush is best enjoyed fresh, but if you have leftovers, you can store them in an airtight container in the fridge for up to 2 days. Just keep in mind that the slush may lose some of its texture over time as the ice melts. It doesn’t freeze well, as the ice will turn into a solid block. If you must freeze it, blend again after thawing to restore the slushy consistency. This treat is best the day you make it, as the flavors meld together beautifully overnight, enhancing its deliciousness.

Frequently Asked Questions

Can I make Frozen Orange Creamsicle Slush ahead of time?

Yes — in fact, it tastes even better the next day as the flavors meld. However, it’s best to enjoy it fresh, as the texture can change if stored for too long. If you need to prepare it ahead, keep it in the fridge and re-blend before serving.

What kind of orange juice should I use?

For the best flavor, use freshly squeezed orange juice. However, if you’re short on time, opt for 100% pure store-bought juice without added sugars. This will ensure that your slush remains flavorful and refreshing.

Can I substitute the vanilla ice cream?

Absolutely! If you’re looking for a dairy-free option, coconut milk ice cream or a non-dairy vanilla ice cream can work wonderfully. They will still provide the creamy texture and sweetness you desire.

How can I adjust the sweetness of my slush?

You can easily adjust the sweetness by modifying the amount of sugar added. Start with 1/4 cup and taste the mixture before blending. If you prefer it sweeter, add more sugar gradually until it reaches your desired level.

What should I do if my slush is too thick?

If your slush is too thick, simply add a splash of milk or orange juice and blend again. This will help achieve a more drinkable consistency while maintaining the slushy texture. Adjust gradually to reach your preferred thickness.

Sun-Kissed Frozen Orange Cream Slush

Final Thoughts

The Frozen Orange Creamsicle Slush is a delightful blend of refreshing citrus and creamy goodness, making it a perfect treat for warm days or any time you crave a taste of nostalgia. The way the bright orange flavor dances with the creamy texture truly elevates this slush, transforming it into a satisfying escape from the everyday.

This is the kind of recipe I come back to again and again, especially when I’m looking to cool down or impress guests at a summer gathering. It’s simple to make and always brings smiles all around! I encourage you to try this recipe for yourself—don’t hesitate to share your results or even put your own spin on it. Happy slushing!

Print
clock clock iconcutlery cutlery iconflag flag iconfolder folder iconinstagram instagram iconpinterest pinterest iconfacebook facebook iconprint print iconsquares squares iconheart heart iconheart solid heart solid icon

Frozen Orange Creamsicle Slush


  • Author: Lily author
  • Total Time: 15 minutes
  • Yield: 4 servings 1x
Pin Recipe
Print Recipe

Description

This Frozen Orange Creamsicle Slush is a refreshing treat that combines creamy vanilla and zesty orange flavors. Perfect for hot summer days, it brings back nostalgic memories with every sip.


Ingredients

Scale
  • 2 cups orange juice (freshly squeezed or store-bought)
  • 1 cup vanilla ice cream
  • 1 cup crushed ice
  • 1/2 cup milk (whole or 2%)
  • 1/4 cup granulated sugar (adjust based on sweetness preference)
  • 1 teaspoon vanilla extract
  • Zest of 1 orange (for added flavor)
  • Fresh orange slices and mint leaves (for garnish)

Instructions

  1. Start by preparing your ingredients. Gather 2 cups of orange juice, 1 cup of vanilla ice cream, and 1 cup of crushed ice. Make sure the ice is finely crushed, as larger chunks can make blending difficult.
  2. In a blender, combine the orange juice, vanilla ice cream, crushed ice, and 1/2 cup of milk. Add 1/4 cup of granulated sugar and 1 teaspoon of vanilla extract. If you like a sweeter slush, consider adding a bit more sugar at this stage.
  3. Add the zest of 1 orange to the blender. This step is crucial for enhancing the citrus flavor of your slush. Make sure not to include the bitter white pith—only the flavorful zest.
  4. Blend the mixture on medium-high speed for about 30-45 seconds. Stop once the ingredients are fully combined and the slush has a smooth, even consistency. If you notice large chunks of ice, blend for an additional 10-15 seconds. Avoid over-blending, as this can make the slush too liquidy.
  5. Once blended, taste the slush. If it needs more sweetness, add a little more sugar and blend for a few more seconds. If it’s too thick, you can add a splash of milk to reach your desired consistency.
  6. Pour the slush into glasses. This recipe typically serves 4, but you can easily double it for larger gatherings. Use a spoon to help guide the slush into the glasses if needed.
  7. Garnish each serving with fresh orange slices and mint leaves. The mint not only adds a pop of color but also a refreshing aroma that complements the citrus flavors beautifully.
  8. Serve immediately and enjoy! If you’ve made extra, you can refrigerate it for a short time, but it's best enjoyed fresh.
  • Prep Time: 15 min
  • Cook Time: 0 min
  • Category: Dessert
  • Method: Blending
  • Cuisine: American

Nutrition

  • Serving Size: 1 serving
  • Calories: 200
  • Sugar: 30 g
  • Sodium: 50 mg
  • Fat: 5 g
  • Saturated Fat: 3 g
  • Unsaturated Fat: 2 g
  • Trans Fat: 0 g
  • Carbohydrates: 40 g
  • Fiber: 1 g
  • Protein: 2 g
  • Cholesterol: 20 mg

Keywords: Don't skip the orange zest! It's a game-changer for flavor. Always zest before juicing to make it easier.

Did you make this recipe?

Share a photo and tag us — we can't wait to see what you've made!

Zesty Lemon Poppy Seed Delight

One rainy afternoon, I found myself in my grandmother’s cozy kitchen, the kind that always smelled like warmth and love. She was whipping up her famous Lemon Poppy Seed Loaf, a recipe that had been passed down through generations. As the batter came together, the zesty aroma of fresh lemons filled the air, mingling perfectly with the nutty fragrance of poppy seeds. I can still picture her, apron-clad, as she expertly drizzled a vibrant citrus icing over the loaf, creating a glossy, sun-kissed finish that beckoned us to dive in. It was a moment that sparked my own passion for baking, and this recipe has become a cherished staple in my home ever since.

When you take a bite of this Lemon Poppy Seed Loaf, it’s like a burst of sunshine on your palate. The loaf is beautifully golden, with a tender crumb that melts in your mouth. Each slice is speckled with tiny poppy seeds, adding a delightful crunch that contrasts beautifully with the tangy sweetness of the lemon. And that citrus icing? It’s the finishing touch that elevates this loaf from ordinary to extraordinary, with its bright, zesty flavor dancing on your taste buds.

This recipe stands out because it embraces simplicity while delivering on flavor. I’ve added a hint of vanilla to the batter, enhancing the overall taste and making it even more indulgent. Trust me, once you make this Lemon Poppy Seed Loaf With Citrus Icing, it’ll become a go-to in your baking repertoire.

So, let me show you exactly how to make it!

Zesty Lemon Poppy Seed Delight

Why You’ll Love This Recipe

  • Moist and tender crumb that melts in your mouth, thanks to the perfect balance of butter and buttermilk.
  • Bright, zesty lemon flavor paired with crunchy poppy seeds, creating a delightful texture and taste experience.
  • Easy to whip up in just about an hour, perfect for last-minute gatherings or a cozy afternoon treat.
  • Budget-friendly with everyday ingredients, making it an accessible option for all home bakers.
  • The citrus icing adds a sweet tang that elevates the loaf, turning a simple recipe into a showstopper!

Ingredients

  • 1 ½ cups (190g) all-purpose flour
  • 1 teaspoon baking powder
  • ½ teaspoon baking soda
  • ½ teaspoon salt
  • 3 tablespoons poppy seeds
  • ½ cup (115g) unsalted butter, softened to room temperature
  • 1 cup (200g) granulated sugar
  • 2 large eggs
  • 1 teaspoon vanilla extract
  • 1 teaspoon lemon zest (from about 1 medium lemon)
  • ½ cup (120ml) buttermilk
  • 2 tablespoons fresh lemon juice

For the Citrus Icing:

  • 1 cup (120g) powdered sugar
  • 2 tablespoons fresh lemon juice
  • 1 tablespoon orange juice
  • 1 teaspoon lemon zest (for garnish, optional)

Let’s dive into the key ingredients that make this Lemon Poppy Seed Loaf so special. The all-purpose flour provides the structure and base for the loaf, while the baking powder and baking soda ensure it rises perfectly, giving the loaf a light texture. For a gluten-free variation, you could substitute the flour with a gluten-free all-purpose blend. Poppy seeds not only add a delightful crunch but also contribute to the unique flavor profile that pairs well with the citrus notes.

Unsalted butter is crucial for achieving the buttery richness that makes this loaf so moist. If you’re looking for a dairy-free option, coconut oil or a vegan butter can be used instead. The buttermilk is another essential component, providing acidity that activates the baking soda for a fluffy texture. If you don’t have buttermilk on hand, you can easily make a substitute by mixing ½ cup of milk with 1 tablespoon of vinegar or lemon juice and letting it sit for about 5 minutes.

Step-by-Step Instructions

  1. Preheat your oven to 350°F (175°C). Grease a 9×5-inch loaf pan or line it with parchment paper for easy removal later.
  2. In a medium mixing bowl, whisk together 1 ½ cups of all-purpose flour, 1 teaspoon of baking powder, ½ teaspoon of baking soda, ½ teaspoon of salt, and 3 tablespoons of poppy seeds. This helps to evenly distribute the baking agents and ensures a uniform rise.
  3. In a large mixing bowl, cream together ½ cup of softened unsalted butter and 1 cup of granulated sugar using an electric mixer on medium speed for about 3-4 minutes, until the mixture is light and fluffy. Make sure to scrape down the sides of the bowl occasionally.
  4. Add 2 large eggs, 1 teaspoon of vanilla extract, and 1 teaspoon of lemon zest to the creamed butter and sugar, mixing until fully combined. You want a smooth consistency, so ensure there are no lumps of butter.
  5. In a small bowl, combine ½ cup of buttermilk and 2 tablespoons of fresh lemon juice. Alternately add the dry ingredients and buttermilk mixture to the butter mixture, starting and ending with the dry ingredients. Mix just until combined; do not overmix, as this can lead to a dense loaf.
  6. Pour the batter into the prepared loaf pan. Smooth the top with a spatula, ensuring it’s even. Bake in the preheated oven for 50-60 minutes, or until a toothpick inserted in the center comes out clean. The edges should be lightly golden brown, and the center should feel just set.
  7. Once baked, remove the loaf from the oven and allow it to cool in the pan for about 10 minutes. Then, transfer it to a wire rack to cool completely. Resist the urge to slice too soon, as it will be crumbly if it’s still warm.
  8. While the loaf is cooling, prepare the citrus icing. In a medium bowl, whisk together 1 cup of powdered sugar, 2 tablespoons of fresh lemon juice, and 1 tablespoon of orange juice until smooth. If the icing is too thick, you can add a little more juice to reach your desired consistency.
  9. Once the loaf is completely cool, drizzle the citrus icing over the top. If you like, sprinkle with an additional teaspoon of lemon zest for an extra pop of flavor and color.

Pro Tips for the Best Lemon Poppy Seed Loaf With Citrus Icing

  • Be careful not to overmix your batter; this is a common mistake that can lead to a dense loaf. Mix just until the dry ingredients are incorporated for a light and fluffy texture.
  • Use room temperature ingredients, especially the butter and eggs. This helps to create a smoother batter and ensures even baking. Take your eggs out of the fridge about 30 minutes before you start.
  • For a more pronounced lemon flavor, consider adding a little lemon extract in addition to the zest and juice. Just a half teaspoon can elevate the citrus notes significantly.
  • When measuring your flour, spoon it into the measuring cup and level it off with a knife instead of scooping directly from the bag. This prevents packing and ensures you don’t end up with a dry loaf.
  • Invest in a good quality loaf pan; it makes a difference in heat distribution, which ensures even baking. If your pan is dark-coated, reduce the oven temperature by 25°F to prevent over-browning.

Variations & Serving Ideas

For a delightful twist, consider adding blueberries or raspberries to the batter for a fruity burst of flavor. You can also experiment with different citrus fruits—try lime or grapefruit zest and juice for a refreshing change. For a healthier option, substitute half of the all-purpose flour with whole wheat flour for added fiber without compromising too much on texture.

This Lemon Poppy Seed Loaf pairs beautifully with a light salad, such as a mixed greens salad with a vinaigrette, or a cup of tea for a cozy afternoon treat. It also complements a creamy cheese platter, as the acidity of the loaf balances rich cheeses perfectly. Lastly, a scoop of vanilla ice cream on the side creates a delightful contrast of temperatures and flavors!

Storage, Make-Ahead & Reheating

This Lemon Poppy Seed Loaf can be stored at room temperature for up to 3 days if wrapped tightly in plastic wrap. If you want to keep it longer, it freezes well for up to 3 months. To freeze, wrap the loaf tightly in plastic wrap and then in aluminum foil to prevent freezer burn.

When you’re ready to enjoy it again, simply thaw it in the fridge overnight. Reheat individual slices in the microwave for 15-20 seconds or in a toaster oven until warmed through. Interestingly, many people find that this loaf tastes even better the next day, as the flavors have time to meld!

Frequently Asked Questions

Can I make Lemon Poppy Seed Loaf With Citrus Icing ahead of time?

Yes — in fact, it tastes even better the next day! You can make the loaf a day in advance, allowing the flavors to develop. Just be sure to store it in an airtight container to maintain its moisture.

Can I substitute the poppy seeds?

Absolutely! If you don’t have poppy seeds on hand or prefer an alternative, you can use sesame seeds for a similar crunch or omit them entirely for a smooth loaf.

What can I use instead of buttermilk?

If you don’t have buttermilk, you can easily create a substitute by mixing ½ cup of milk (dairy or plant-based) with 1 tablespoon of vinegar or lemon juice. Let it sit for 5 minutes before using in the recipe.

How can I make this recipe gluten-free?

To make a gluten-free version of this Lemon Poppy Seed Loaf, substitute the all-purpose flour with a gluten-free all-purpose flour blend. Just ensure that the blend contains a binding agent like xanthan gum for the best results.

What is the best way to store leftover loaf?

Leftover Lemon Poppy Seed Loaf should be stored in an airtight container at room temperature for up to 3 days. For longer storage, wrap it tightly and freeze for up to 3 months. Thaw it before serving for the best texture.

Zesty Lemon Poppy Seed Delight

Final Thoughts

The Lemon Poppy Seed Loaf with Citrus Icing is truly a delightful treat that brings a burst of brightness to any occasion. The zesty lemon flavor combined with the subtle crunch of poppy seeds creates a satisfying balance, while the citrus icing adds a touch of sweetness that perfectly complements the loaf’s tanginess.

This is the kind of recipe I come back to again and again, especially when I want to brighten up a gloomy day or celebrate a small victory. The aroma that fills the kitchen as it bakes is absolutely heavenly! I encourage you to give this recipe a try; you might just find it becoming a beloved staple in your home. Don’t forget to share your results or even add your own unique twist—I can’t wait to see what you create!

Print
clock clock iconcutlery cutlery iconflag flag iconfolder folder iconinstagram instagram iconpinterest pinterest iconfacebook facebook iconprint print iconsquares squares iconheart heart iconheart solid heart solid icon

Lemon Poppy Seed Loaf


  • Author: Lily author
  • Total Time: 36 minute
  • Yield: 1 loaf 1x
Pin Recipe
Print Recipe

Description

This Lemon Poppy Seed Loaf is a delightful treat that combines zesty lemon flavor with crunchy poppy seeds. Topped with a citrus icing, it’s perfect for any occasion.


Ingredients

Scale
  • 1 ½ cups (190g) all-purpose flour
  • 1 teaspoon baking powder
  • ½ teaspoon baking soda
  • ½ teaspoon salt
  • 3 tablespoons poppy seeds
  • ½ cup (115g) unsalted butter, softened to room temperature
  • 1 cup (200g) granulated sugar
  • 2 large eggs
  • 1 teaspoon vanilla extract
  • 1 teaspoon lemon zest (from about 1 medium lemon)
  • ½ cup (120ml) buttermilk
  • 2 tablespoons fresh lemon juice
  • 1 cup (120g) powdered sugar
  • 2 tablespoons fresh lemon juice
  • 1 tablespoon orange juice
  • 1 teaspoon lemon zest (for garnish, optional)

Instructions

  1. Preheat your oven to 350°F (175°C). Grease a 9×5-inch loaf pan or line it with parchment paper for easy removal later.
  2. In a medium mixing bowl, whisk together 1 ½ cups of all-purpose flour, 1 teaspoon of baking powder, ½ teaspoon of baking soda, ½ teaspoon of salt, and 3 tablespoons of poppy seeds. This helps to evenly distribute the baking agents and ensures a uniform rise.
  3. In a large mixing bowl, cream together ½ cup of softened unsalted butter and 1 cup of granulated sugar using an electric mixer on medium speed for about 3-4 minutes, until the mixture is light and fluffy. Make sure to scrape down the sides of the bowl occasionally.
  4. Add 2 large eggs, 1 teaspoon of vanilla extract, and 1 teaspoon of lemon zest to the creamed butter and sugar, mixing until fully combined. You want a smooth consistency, so ensure there are no lumps of butter.
  5. In a small bowl, combine ½ cup of buttermilk and 2 tablespoons of fresh lemon juice. Alternately add the dry ingredients and buttermilk mixture to the butter mixture, starting and ending with the dry ingredients. Mix just until combined; do not overmix, as this can lead to a dense loaf.
  6. Pour the batter into the prepared loaf pan. Smooth the top with a spatula, ensuring it’s even. Bake in the preheated oven for 50-60 minutes, or until a toothpick inserted in the center comes out clean. The edges should be lightly golden brown, and the center should feel just set.
  7. Once baked, remove the loaf from the oven and allow it to cool in the pan for about 10 minutes. Then, transfer it to a wire rack to cool completely. Resist the urge to slice too soon, as it will be crumbly if it’s still warm.
  8. While the loaf is cooling, prepare the citrus icing. In a medium bowl, whisk together 1 cup of powdered sugar, 2 tablespoons of fresh lemon juice, and 1 tablespoon of orange juice until smooth. If the icing is too thick, you can add a little more juice to reach your desired consistency.
  9. Once the loaf is completely cool, drizzle the citrus icing over the top. If you like, sprinkle with an additional teaspoon of lemon zest for an extra pop of flavor and color.
  • Prep Time: 15 mins
  • Cook Time: 50-60 mins
  • Category: Dessert
  • Method: Baking
  • Cuisine: American

Nutrition

  • Serving Size: 1 slice
  • Calories: 200
  • Sugar: 15 g
  • Sodium: 150 mg
  • Fat: 8 g
  • Saturated Fat: 5 g
  • Unsaturated Fat: 3 g
  • Trans Fat: 0 g
  • Carbohydrates: 30 g
  • Fiber: 1 g
  • Protein: 3 g
  • Cholesterol: 40 mg

Keywords: Be careful not to overmix your batter; this is a common mistake that can lead to a dense loaf. Use room temperature ingredients for a smoother batter and even baking.

Did you make this recipe?

Share a photo and tag us — we can't wait to see what you've made!

  • Privacy Policy
  • Terms Of Service
  • Contact
  • About
  • GDPR

Copyright © 2025 Homesmad