• Skip to primary navigation
  • Skip to main content
  • Skip to primary sidebar
Homesmad

Homesmad

  • Home
  • Breakfast & Brunch
  • Appetizers & Snacks
  • Dinner
  • Dessert
  • About
  • Privacy Policy
  • Contact
Homesmad
  • Home
  • Breakfast & Brunch
  • Appetizers & Snacks
  • Dinner
  • Dessert
  • About
  • Privacy Policy
  • Contact

Grilled Veggie Mozzarella Sandwiches: Quick & Cheesy Lunch

October 9, 2025 by Lily author

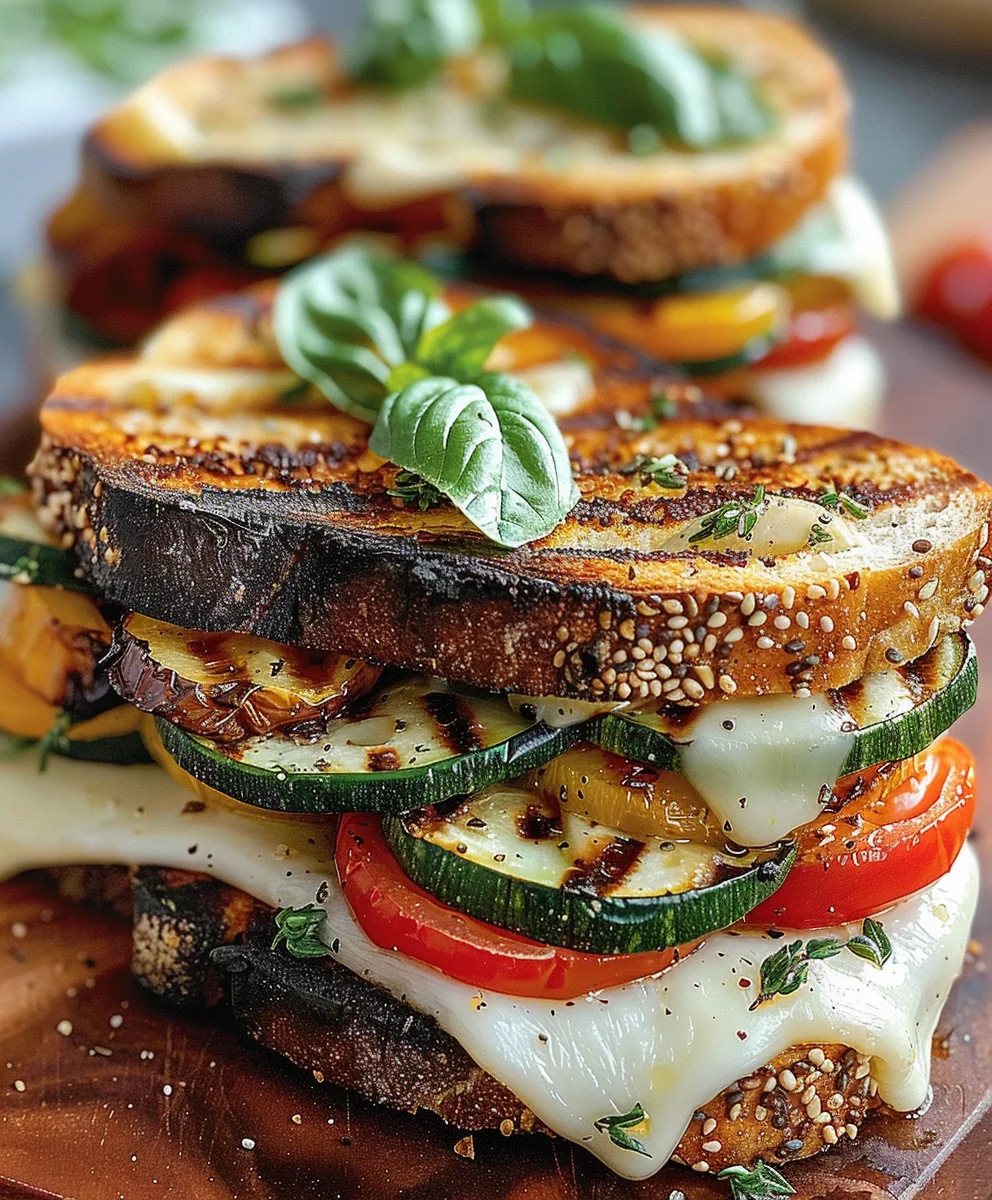
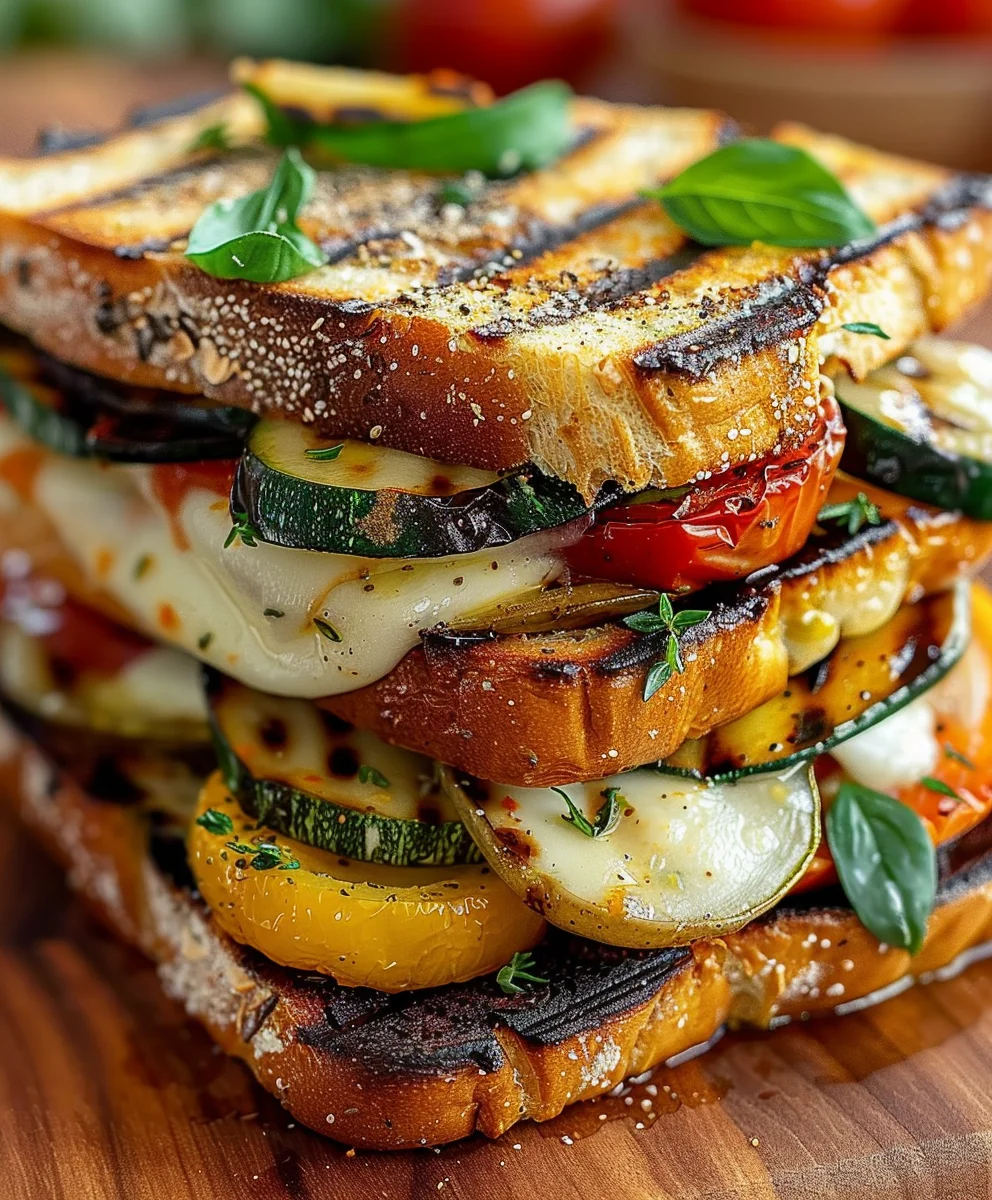
Grilled Veggie Mozzarella Sandwiches are more than just a simple meal; they are a celebration of vibrant flavors and textures, promising a truly satisfying culinary experience with every single bite. Imagine the irresistible aroma of smoky, tender vegetables fresh off the grill, perfectly nestled between slices of golden-brown, toasted bread, and unified by the creamy, molten embrace of fresh mozzarella cheese. This delightful creation takes the humble sandwich to new heights, blending the rustic charm of garden-fresh produce with the comforting richness of authentic Italian cheese.

Why We Adore This Incredible Sandwich

The inherent beauty of this dish lies in its exquisite balance. While the sandwich itself has a rich lineage as a convenient and versatile food, this particular rendition pays homage to simple, quality ingredients, reminiscent of Mediterranean influences where fresh vegetables and cheese are king. People unequivocally love these sandwiches for a multitude of reasons: the incredible interplay of sweet grilled peppers, earthy zucchini, and savory onions, all beautifully complemented by the rich, milky mozzarella that stretches deliciously with each bite. It’s a quick, convenient, and incredibly flavorful option, perfect for a light lunch, a satisfying dinner, or even a sophisticated picnic. Crafting these Grilled Veggie Mozzarella Sandwiches offers both ease and gourmet appeal, proving that a hearty, wholesome, and utterly delicious meal can be prepared with minimal fuss, leaving you thoroughly delighted.

Grilled Veggie Mozzarella Sandwiches: Quick & Cheesy Lunch this RECIPE

Ingredients:

Creating these incredible Grilled Veggie Mozzarella Sandwiches begins with gathering the freshest, most vibrant ingredients. Trust me, the quality of your produce will truly shine through in every bite!

For the Grilled Vegetables:

  • 2 medium zucchini, about 8-9 inches long, washed and ends trimmed
  • 1 medium eggplant, about 7-8 inches long, washed and ends trimmed
  • 1 large red bell pepper, washed and cored
  • 1 large yellow bell pepper, washed and cored
  • 1 large orange bell pepper, washed and cored (for that extra pop of color!)
  • 1 large red onion, peeled and root end trimmed
  • 2 tablespoons extra virgin olive oil, plus more for brushing
  • 1 teaspoon dried Italian seasoning blend
  • ½ teaspoon garlic powder
  • ¼ teaspoon black pepper, freshly ground
  • ½ teaspoon sea salt, or to taste

For the Sandwiches:

  • 1 large loaf of ciabatta bread (or 4 individual ciabatta rolls), about 10-12 inches long, halved horizontally
  • 8 ounces fresh mozzarella cheese, thinly sliced into about 1/4-inch thick rounds
  • 4 tablespoons basil pesto (homemade or good quality store-bought)
  • 2 tablespoons balsamic glaze (optional, but highly recommended for a touch of sweetness and tang)
  • 2 tablespoons unsalted butter, softened, or extra virgin olive oil for brushing the bread

For Optional Seasoning and Garnish:

  • A handful of fresh basil leaves, roughly chopped or left whole for garnish
  • A pinch of red pepper flakes for a little kick (if you like it spicy!)

Preparing Our Delicious Vegetables:

Alright, let’s get started on the foundation of our amazing Grilled Veggie Mozzarella Sandwiches – those perfectly cooked vegetables! This step is all about precise slicing and thoughtful seasoning to ensure maximum flavor and optimal grilling.

  1. First things first, let’s tackle our zucchini and eggplant. With a sharp knife, carefully slice the zucchini lengthwise into planks about ¼ to ⅓ inch thick. Aim for consistency here; uniform slices will cook more evenly on the grill. Repeat this process with the eggplant, slicing it into similar ¼ to ⅓ inch thick rounds or planks, depending on its shape. Lay these slices out on a large baking sheet or a clean, flat surface.
  2. Next up are our vibrant bell peppers. For each pepper, place it cut-side down and press gently to flatten. Then, slice it lengthwise into wide strips, approximately 1-inch wide. You want these strips to be substantial enough to handle the heat of the grill without falling through or becoming too flimsy. Place these alongside your zucchini and eggplant.
  3. Finally, let’s prepare the red onion. Peel the outer skin, then slice the onion into thick rings, about ½ inch thick. Make sure to keep the rings intact as much as possible, as this helps them stay together while grilling. Separate any rings that naturally fall apart, but generally, try to maintain their circular form. Add these to your collection of prepared vegetables.
  4. In a large bowl, drizzle the 2 tablespoons of extra virgin olive oil over all the sliced vegetables. Sprinkle them evenly with the Italian seasoning blend, garlic powder, black pepper, and sea salt. Now, with clean hands (or using tongs), gently toss the vegetables until every single piece is lightly coated with the oil and seasonings. You want each surface to have a kiss of flavor. This even coating is crucial for developing those wonderful charred notes and ensuring the seasonings really permeate the vegetables. Set them aside while you prepare your grill.

Grilling the Veggies to Perfection:

Now comes the fun part – getting those beautiful grill marks and tender, smoky flavor into our vegetables! This phase is key to the overall success of our Grilled Veggie Mozzarella Sandwiches, so pay close attention to heat and timing.

  1. Preheat your grill to medium-high heat. If you’re using a gas grill, this means setting the burners to a medium-high flame. For a charcoal grill, aim for coals that are glowing orange with a light layer of ash, indicating good heat. Ensure your grill grates are clean. Once preheated, lightly brush the grates with a high-smoke-point oil (like canola or grapeseed) or rub them with a folded paper towel dipped in oil using tongs. This will prevent sticking.
  2. Once the grill is hot and ready, carefully place the seasoned vegetable slices onto the hot grates. Start with the eggplant and zucchini, as they might take slightly longer than the peppers and onions. Lay them in a single layer, ensuring not to overcrowd the grill. Overcrowding can lower the grill temperature and steam the vegetables instead of grilling them, preventing those desirable char marks.
  3. Grill the vegetables for about 3-5 minutes per side. You’re looking for beautiful, distinct grill marks to appear, and for the vegetables to soften and become tender, but not mushy. For the bell pepper strips, grill them until they are slightly charred and tender, about 4-6 minutes per side, depending on thickness and desired tenderness. The red onion rings will also take about 3-5 minutes per side, becoming caramelized and slightly translucent.
  4. Keep a close eye on your vegetables as they grill. Grilling times can vary based on your grill’s heat and the thickness of your slices. Use tongs to flip them gently to ensure even cooking and those perfect crosshatch grill marks. You might need to rotate them slightly to achieve this.
  5. As each batch of vegetables finishes grilling, remove them from the grill and transfer them to a clean plate or cutting board. You can layer them loosely, allowing them to cool slightly. We want them warm, not piping hot, when we assemble the sandwiches, so they don’t instantly melt the mozzarella before it’s time. This collection of perfectly grilled vegetables is going to be the heart of our Grilled Veggie Mozzarella Sandwiches.

Assembling Our Grilled Veggie Mozzarella Sandwiches:

With our veggies beautifully grilled, it’s time to bring all the components together to create our magnificent Grilled Veggie Mozzarella Sandwiches. This step is where layers of flavor and texture are carefully constructed.

  1. Take your ciabatta loaf or rolls and carefully slice it horizontally. You want two large, even halves. If you’re using individual rolls, simply slice each one horizontally.
  2. Generously spread the basil pesto on the inside of both the top and bottom halves of the ciabatta bread. The pesto adds a wonderful herby, garlicky, and slightly nutty base flavor that complements the grilled vegetables beautifully. Don’t be shy here; a good layer of pesto truly elevates the sandwich.
  3. Now, if you’re using balsamic glaze, drizzle a light amount over the pesto on both halves of the bread. This optional step adds a lovely sweet and tangy counterpoint that cuts through the richness of the cheese and pesto, enhancing the overall flavor profile of our Grilled Veggie Mozzarella Sandwiches.
  4. Begin layering your grilled vegetables onto the bottom half of the ciabatta. Start with a foundation of the broader pieces, like eggplant and zucchini, then strategically place the bell pepper strips and red onion rings. Make sure to distribute the vegetables evenly across the entire surface so every bite gets a taste of everything. Aim for a generous but manageable stack.
  5. Next, arrange the thin slices of fresh mozzarella cheese over the grilled vegetables. Overlap them slightly to ensure full coverage. The mozzarella is going to be the creamy, melty heart of our sandwich, so make sure there’s enough to go around. We’re building towards that perfect cheese pull!
  6. If you’re using fresh basil leaves, scatter them over the mozzarella now. Their aromatic freshness will be a delightful addition. If you enjoy a bit of heat, sprinkle a pinch of red pepper flakes over the cheese as well.
  7. Carefully place the top half of the ciabatta bread over the layered vegetables and mozzarella, gently pressing down to consolidate the sandwich. If you’re making one large sandwich from a loaf, you’ll have one big, impressive sandwich. If using individual rolls, you’ll now have four perfectly assembled individual sandwiches.

Grilling the Sandwiches for Ultimate Crunch and Melt:

The final stage of preparing our Grilled Veggie Mozzarella Sandwiches is to grill them to golden-brown perfection, ensuring the bread is wonderfully crispy and the mozzarella is gloriously melted and gooey. This is where the magic truly happens!

  1. Preheat your grill pan, a panini press, or your outdoor grill to medium heat. If using a grill pan, place it over a medium flame and allow it to heat up for 3-5 minutes. If using a panini press, preheat it according to the manufacturer’s instructions. For an outdoor grill, ensure the heat is consistent and not too high to prevent burning.
  2. While the grill or press is heating, lightly brush the outer surfaces of your assembled sandwiches with softened butter or extra virgin olive oil. This not only helps them brown beautifully but also adds another layer of rich flavor and helps create a lovely crispy crust on our Grilled Veggie Mozzarella Sandwiches.
  3. Carefully place the buttered sandwiches onto the preheated grill pan, panini press, or outdoor grill. If using a grill pan or outdoor grill, you might need to place a heavy, oven-safe pan or brick wrapped in foil on top of the sandwiches to press them down evenly. This helps to flatten the sandwich slightly, ensuring maximum contact with the heat and a more even melt and toast.
  4. Grill the sandwiches for approximately 4-7 minutes per side on a grill pan or outdoor grill, or until the bread is golden brown and crispy, and the cheese inside is completely melted and bubbling. If using a panini press, grill for about 5-8 minutes, or until the press indicates it’s done, or you observe the bread is beautifully toasted and the cheese has achieved that perfect gooey consistency.
  5. Keep a close watch on the sandwiches as they grill. The goal is a deeply golden, toasted exterior with those appealing grill marks, and an interior where the mozzarella is soft, stretchy, and beautifully melted. You might need to adjust the heat slightly to prevent burning. We want a perfect balance of texture and temperature.

Serving Suggestions and Enjoyment:

Congratulations! You’ve successfully crafted these magnificent Grilled Veggie Mozzarella Sandwiches. Now for the best part – savoring your culinary creation.

  1. Once your sandwiches are perfectly grilled, remove them from the heat and transfer them to a cutting board. It’s often a good idea to let them rest for just 2-3 minutes before slicing. This allows the hot cheese to settle slightly and prevents the fillings from spilling out when you cut into them.
  2. For a large ciabatta loaf sandwich, use a serrated knife to slice it into individual portions, usually 2 to 4 pieces, depending on how generous you want each serving to be. If you made individual rolls, they are ready to serve as is.
  3. Serve your glorious Grilled Veggie Mozzarella Sandwiches immediately while they are warm and the cheese is still wonderfully gooey. These are fantastic on their own, but they also pair beautifully with a simple green salad dressed with a light vinaigrette, or a cup of your favorite tomato soup for a comforting meal. Enjoy every delightful, flavorful bite!

Grilled Veggie Mozzarella Sandwiches: Quick & Cheesy Lunch

Conclusion:

And there you have it! We’ve journeyed through the simple yet profoundly satisfying creation of what I truly believe is a star in the world of quick, delicious meals. This isn’t just another sandwich; it’s an experience. Imagine the crisp, golden-brown exterior giving way to a warm, tender interior where perfectly grilled vegetables meld seamlessly with gloriously melted mozzarella. The flavors are bright, comforting, and utterly irresistible, making this recipe a true game-changer for anyone seeking a vibrant, wholesome, and incredibly tasty option that comes together with remarkable ease. It’s the kind of dish that delights the senses and leaves you feeling completely nourished and content, proving that sometimes, the simplest ingredients can produce the most extraordinary results. I truly believe that once you try these, you’ll understand why I’m so enthusiastic about the sheer joy they bring to the table.

What I adore most about this recipe, beyond its incredible taste, is its inherent adaptability. It’s a fantastic canvas for your culinary imagination, allowing you to tailor it perfectly to your preferences or whatever fresh produce you happen to have on hand. Don’t feel constrained by the specific vegetables I’ve suggested; think of them as a delightful starting point. The beauty of these Grilled Veggie Mozzarella Sandwiches lies in their versatility, inviting you to experiment and make them truly your own. This isn’t just a recipe; it’s an invitation to explore and get creative in your kitchen, ensuring that every time you make it, it feels like a fresh, exciting adventure.

Unleash Your Creativity: Serving Suggestions & Variations

Let’s talk about how you can elevate this already fantastic sandwich even further, or simply adapt it to suit different moods and occasions. Think of these as pathways to even more deliciousness:

  • Bread Choices: While a rustic sourdough or a sturdy artisan bread works beautifully for its crunch and chew, don’t hesitate to branch out. A soft focaccia can offer a delightful textural contrast, absorbing the veggie juices and cheese beautifully. Ciabatta provides a lovely airy crumb and crisp crust, while a whole-grain bread can add a nutty depth and extra fiber. Each bread brings its own unique character to the party!
  • Cheese Swaps: Mozzarella is a classic for its unparalleled melt, but imagine the possibilities with other cheeses! Provolone offers a sharper, more piquant note. Smoked gouda would introduce a fantastic smoky dimension, while a creamy fontina would bring a delicate, nutty flavor. Even a sprinkle of crumbled goat cheese or feta (added after grilling for best texture) could add a tangy kick that beautifully complements the grilled vegetables.
  • Vegetable Expansions: The sky’s the limit here! Consider adding thin slices of grilled eggplant, vibrant bell peppers of different colors, tender asparagus spears, or even some savory mushrooms. A handful of fresh spinach or arugula can be added after grilling for a peppery, fresh bite. Artichoke hearts or sun-dried tomatoes (either dried or packed in oil) would introduce a lovely tangy-sweet element that truly shines. Remember, the key is to ensure your chosen vegetables are cooked until tender-crisp before assembly to avoid a watery sandwich.
  • Flavor Boosters: A thin layer of pesto (basil or sun-dried tomato) on the inside of the bread can add an incredible depth of flavor. A drizzle of balsamic glaze after grilling can introduce a sweet and tangy complexity. A smear of olive tapenade or roasted red pepper spread can also elevate the savory profile. Don’t forget the power of fresh herbs – a few sprigs of fresh basil, oregano, or thyme tucked inside can make all the difference.
  • Perfect Pairings: While these sandwiches are incredibly satisfying on their own, they also play well with others. Serve them alongside a simple green salad with a light vinaigrette for a balanced meal. A bowl of warm tomato soup or a hearty lentil soup makes for an ultimate comfort food duo. For a lighter touch, a fresh fruit salad or a tangy coleslaw can offer a refreshing contrast.
  • Protein Power-Up: If you’re looking to make this a heartier meal, consider adding some pre-cooked grilled chicken slices, strips of halloumi cheese (grilled alongside your veggies!), or even some crumbled firm tofu for a plant-based protein boost.

So, now that you’re armed with all these delicious ideas and a proven recipe, it’s truly your turn! I genuinely encourage you to grab your ingredients, fire up your grill (or panini press, or even a skillet!), and experience the magic of these Grilled Veggie Mozzarella Sandwiches for yourself. There’s something so incredibly satisfying about creating a meal that’s not only healthy and delicious but also brings a touch of culinary joy to your day. Don’t be shy about making substitutions or trying new combinations – that’s where the real fun begins!

Once you’ve savored every last bite, I would absolutely love to hear about your experience. Did you stick to the original recipe, or did you venture into exciting new variations? What were your favorite additions or serving suggestions? Your insights and culinary adventures are so valuable, not just to me, but to our entire community of food lovers. So, please, come back and share your thoughts, your successes, and perhaps even a photo or two if you’re inclined. Let’s inspire each other to keep cooking, keep exploring, and keep enjoying the wonderful world of food, one delicious sandwich at a time!


Grilled Veggie Mozzarella Sandwiches: Quick & Cheesy Lunch

Grilled Veggie Mozzarella Sandwiches: Quick & Cheesy Lunch

These Grilled Veggie Mozzarella Sandwiches are a delightful blend of smoky, tender vegetables, fresh mozzarella, and toasted bread. A quick, satisfying, and flavorful meal, perfect for lunch or dinner, offering a celebration of vibrant flavors and textures.

Prep Time
20 Minutes

Cook Time
30 Minutes

Total Time
50 Minutes

Servings
4 servings

Ingredients

  • 2 medium zucchini
  • 1 medium eggplant
  • 1 large red bell pepper
  • 1 large yellow bell pepper
  • 1 large orange bell pepper
  • 1 large red onion
  • 2 tablespoons extra virgin olive oil
  • 1 teaspoon dried Italian seasoning blend
  • ½ teaspoon garlic powder
  • ¼ teaspoon black pepper
  • ½ teaspoon sea salt
  • 1 large loaf ciabatta bread (or 4 individual ciabatta rolls)
  • 8 ounces fresh mozzarella cheese, thinly sliced
  • 4 tablespoons basil pesto
  • 2 tablespoons balsamic glaze (optional)
  • 2 tablespoons unsalted butter, softened, or extra virgin olive oil
  • Fresh basil leaves (optional garnish)
  • Red pepper flakes (optional garnish)

Instructions

  1. Step 1
    Slice zucchini and eggplant lengthwise into ¼-⅓ inch planks. Slice bell peppers lengthwise into 1-inch strips. Slice red onion into ½-inch thick rings. In a large bowl, toss all sliced vegetables with 2 tbsp olive oil, Italian seasoning, garlic powder, black pepper, and sea salt until evenly coated.
  2. Step 2
    Preheat grill to medium-high heat and lightly oil grates. Grill vegetables (eggplant, zucchini, peppers, onions) for 3-6 minutes per side until tender with distinct char marks. Transfer to a plate.
  3. Step 3
    Slice ciabatta loaf horizontally. Generously spread basil pesto on both inside halves of the bread. Drizzle with balsamic glaze, if using. Layer grilled vegetables evenly on the bottom half of the ciabatta. Arrange thinly sliced fresh mozzarella over the vegetables. Add fresh basil leaves and red pepper flakes, if desired.
  4. Step 4
    Place the top half of the ciabatta over the fillings, gently pressing down. Lightly brush the outer surfaces of the assembled sandwich (or individual rolls) with softened butter or olive oil. Preheat a grill pan, panini press, or outdoor grill to medium heat. Place buttered sandwiches on the preheated surface. Grill for 4-8 minutes (per side on grill pan/outdoor grill, or until panini press indicates done) until bread is golden brown, crispy, and cheese is gloriously melted and gooey. Use a heavy pan or brick to press down if using a grill pan or outdoor grill.
  5. Step 5
    Remove from heat and let rest for 2-3 minutes. Slice a large loaf into 2-4 individual portions. Serve immediately while warm and the cheese is wonderfully gooey. Pairs beautifully with a simple green salad or tomato soup.

Important Information

Nutrition Facts (Per Serving)

It is important to consider this information as approximate and not to use it as definitive health advice.

Allergy Information

Please check ingredients for potential allergens and consult a health professional if in doubt.

« Previous Post
Decadent Pistachio Mousse with Rich Chocolate Ganache
Next Post »
Pumpkin Cheesecake Truffles: Easy No-Bake Dessert Bites

If you enjoyed this…

Creamy Corn Soup: The Ultimate Comfort Food Recipe

Strawberry Balsamic Brie Grilled Cheese: The Ultimate Gourmet Recipe

Delicious Chicken Avocado Melt Sandwich Recipe You’ll Love!

Primary Sidebar

Browse by Diet

BreakfastDinnerLunchDessertAppetizer

Sweet Peach Yogurt Parfait Delight

One of my fondest memories is from a lazy summer afternoon spent at my grandmother’s house. The sun filtered through the kitchen window, casting a warm glow over the table where she would create her culinary magic. It was during one of those blissful moments that I first tasted her Peach Yogurt Parfait with Honey and Granola. The sweet aroma of ripe peaches mingling with creamy yogurt and the crunch of granola was nothing short of heavenly. It felt like summer captured in a bowl, and I still remember the joy of diving in with a spoon, each layer revealing a new burst of flavor.

When I think about that parfait, I can almost hear the gentle hum of the bees outside, reminding me of the floral notes that honey brings to every bite. The vibrant yellows and soft oranges of the peaches contrast beautifully with the creamy white yogurt and the golden crunch of granola. It’s a dish that not only looks delightful but also tastes like a celebration of fresh, wholesome ingredients.

What makes my version of this Peach Yogurt Parfait special is the careful balance of flavors and textures. I use ripe, juicy peaches, drizzled with locally sourced honey, and a homemade granola that’s bursting with nuts and seeds for an extra crunch. It’s a simple dish, but every layer is crafted with love and attention.

Let me show you exactly how to make this delightful parfait, so you can bring a bit of that summer magic into your kitchen!

Sweet Peach Yogurt Parfait Delight

Why You’ll Love This Recipe

  • Delightfully creamy texture from the Greek yogurt, paired with the juicy sweetness of fresh peaches.
  • Ready in under 20 minutes, making it a quick and satisfying breakfast or snack option.
  • Budget-friendly, using common ingredients that you may already have in your pantry.
  • Customizable with your favorite granola and nuts, allowing you to tailor each parfait to your taste.
  • Perfectly balanced flavors with the bright acidity of lemon juice and the sweetness of honey enhancing the peaches.

Ingredients

  • For the Parfait:
  • 2 cups plain Greek yogurt (or vanilla yogurt for a sweeter option)
  • 2 large ripe peaches, diced (about 2 cups)
  • 1 tablespoon fresh lemon juice (to prevent browning of peaches)
  • 2 tablespoons honey (plus more for drizzling)
  • 1 teaspoon vanilla extract (optional for extra flavor)
  • For the Granola:
  • 1 cup granola (store-bought or homemade; see notes for a simple granola recipe)
  • 1/4 cup sliced almonds (optional for added crunch)
  • 1/4 cup shredded coconut (optional for added flavor)

Let’s dive into some key ingredients that make this Peach Yogurt Parfait so delightful! First, the Greek yogurt is not only creamy but also packed with protein, making it a satisfying option for breakfast or a snack. If you’re looking for a sweeter option, you can easily substitute it with vanilla yogurt, though it may alter the overall flavor balance. Next, the ripe peaches are the star of the show; their natural sweetness shines through, so I recommend choosing peaches that yield slightly to pressure, indicating they’re perfectly ripe. If peaches aren’t in season, feel free to use nectarines or even frozen peaches—just thaw them before use. Finally, honey adds a lovely floral sweetness that ties everything together. If you prefer, maple syrup can serve as a delicious substitute.

Step-by-Step Instructions

  1. Start by preparing the peaches. Wash them thoroughly, then slice and dice them into bite-sized pieces. In a medium bowl, toss the diced peaches with 1 tablespoon of fresh lemon juice to prevent browning. Set aside for about 5 minutes while the lemon juice works its magic.
  2. In a separate bowl, combine the Greek yogurt, 2 tablespoons of honey, and 1 teaspoon of vanilla extract if using. Stir the mixture until smooth and thoroughly blended. This should take about a minute. Avoid overmixing to maintain the creaminess of the yogurt.
  3. Now it’s time to layer your parfait. Grab a clear glass or bowl to showcase your beautiful creation. Start with a generous spoonful of the yogurt mixture at the bottom—about 1/4 cup will do. Use a spoon to spread it evenly.
  4. Add a layer of the diced peaches over the yogurt, ensuring they cover the yogurt completely. You might want to use about half of what you have prepared—roughly 1 cup. This layer should be visually appealing, so arrange the peaches neatly.
  5. Sprinkle 1/4 cup of granola over the peaches. This adds a delightful crunch. Make sure to distribute it evenly to ensure every bite has that satisfying texture. Avoid packing it down too tightly, as you want it to maintain its crunch.
  6. Repeat the layers: spoon in another 1/4 cup of yogurt, followed by another cup of peaches, and another sprinkle of granola. You should have at least two layers, but feel free to add more depending on your glass size.
  7. Finish off your parfait with a drizzle of honey on top for added sweetness and a touch of elegance. If you’re using sliced almonds or shredded coconut, sprinkle them on top now. It adds a lovely visual contrast and extra flavor.
  8. Serve immediately or refrigerate for up to 30 minutes before serving to allow the flavors to meld together. However, I recommend enjoying it fresh to maintain the granola’s crunch.

Pro Tips for the Best Peach Yogurt Parfait With Honey And Granola

  • Make sure to choose ripe peaches for the best flavor and texture. A common mistake is using unripe fruit, which can lead to a less enjoyable parfait. Look for peaches that are fragrant and slightly soft to the touch.
  • Use a clear glass to assemble your parfait; this not only makes for a beautiful presentation but also allows you to see the colorful layers, which adds to the enjoyment of eating it.
  • For an even creamier texture, consider whipping the Greek yogurt with a hand mixer for a couple of minutes before layering. This small adjustment makes a huge difference in mouthfeel.
  • Be mindful of the granola-to-yogurt ratio. Too much granola can overwhelm the parfait, while too little can make it feel too creamy. Aim for about 1/4 cup of granola per layer for the perfect balance.
  • If you’re making this for a gathering, consider preparing the yogurt and peaches ahead of time and layering them just before serving. This ensures the granola stays crunchy!

Variations & Serving Ideas

There are so many ways to get creative with your Peach Yogurt Parfait! For a tropical twist, swap out the peaches for mangoes or pineapples and top with coconut flakes. If you prefer a berry flavor, mix in some blueberries or strawberries with the peaches for added color and taste. For a nutty version, incorporate chopped walnuts or pecans instead of almonds.

As for serving ideas, this parfait pairs beautifully with a side of scrambled eggs for a hearty breakfast or fresh fruit salad for a light lunch. You might also enjoy it alongside whole grain toast with almond butter for an energizing snack. The contrast of flavors and textures will elevate your meal experience!

Storage, Make-Ahead & Reheating

The Peach Yogurt Parfait is best enjoyed fresh, but you can prepare some components ahead of time. Store the layered parfait in an airtight container in the refrigerator for up to 24 hours. However, be cautious; the granola may lose its crunch if stored too long. You can freeze the yogurt and peach mixture for up to 2 months; just remember to thaw it in the refrigerator overnight before serving.

If you plan to enjoy this dish the next day, it can taste even better as the flavors meld together. Just remember to add the granola right before serving to keep its delightful crunch!

Frequently Asked Questions

Can I make Peach Yogurt Parfait With Honey And Granola ahead of time?

Yes — in fact, it tastes even better the next day as the flavors meld. However, I recommend waiting to add the granola until just before serving to maintain its crunch.

What can I substitute for Greek yogurt?

If you prefer a lighter option, you can substitute Greek yogurt with regular yogurt or a dairy-free alternative like coconut yogurt. Just remember that this may alter the creaminess and flavor profile slightly.

Can I use frozen peaches for this parfait?

Absolutely! Just make sure to thaw the frozen peaches before using them. They will still add great flavor, though the texture may be slightly softer than fresh peaches.

How do I make the parfait vegan?

To make a vegan version, substitute the Greek yogurt with a plant-based yogurt alternative, and replace honey with maple syrup or agave nectar. This keeps the parfait sweet while adhering to a vegan diet.

What other fruits can I use in this recipe?

You can mix and match fruits based on your preference. Try using strawberries, blueberries, raspberries, or even bananas. Just make sure to adjust the lemon juice as needed to prevent browning.

Sweet Peach Yogurt Parfait Delight

Final Thoughts

The Peach Yogurt Parfait with Honey and Granola is a delightful blend of creamy yogurt, sweet peaches, and crunchy granola that creates a satisfying and nourishing treat. Each layer bursts with flavor, making it a perfect choice for breakfast or a light dessert.

This is the kind of recipe I come back to again and again, especially when I want something refreshing and wholesome to start my day. The harmony of sweet and tart flavors, combined with the delightful crunch, never fails to lift my spirits!

I encourage you to give this parfait a try and indulge in its comforting goodness. Feel free to share your results or even add your own twist—perhaps a sprinkle of cinnamon or a handful of nuts. Enjoy creating your perfect parfait!

Print
clock clock iconcutlery cutlery iconflag flag iconfolder folder iconinstagram instagram iconpinterest pinterest iconfacebook facebook iconprint print iconsquares squares iconheart heart iconheart solid heart solid icon

Peach Yogurt Parfait


  • Author: Lily author
  • Total Time: 15 minutes
  • Yield: 4 servings 1x
Pin Recipe
Print Recipe

Description

This Peach Yogurt Parfait combines creamy Greek yogurt, juicy peaches, and crunchy granola for a delightful treat. It’s a perfect breakfast or snack that captures the essence of summer in every bite.


Ingredients

Scale
  • For the Parfait:
  • 2 cups plain Greek yogurt (or vanilla yogurt for a sweeter option)
  • 2 large ripe peaches, diced (about 2 cups)
  • 1 tablespoon fresh lemon juice (to prevent browning of peaches)
  • 2 tablespoons honey (plus more for drizzling)
  • 1 teaspoon vanilla extract (optional for extra flavor)
  • For the Granola:
  • 1 cup granola (store-bought or homemade; see notes for a simple granola recipe)
  • 1/4 cup sliced almonds (optional for added crunch)
  • 1/4 cup shredded coconut (optional for added flavor)

Instructions

  1. Start by preparing the peaches. Wash them thoroughly, then slice and dice them into bite-sized pieces. In a medium bowl, toss the diced peaches with 1 tablespoon of fresh lemon juice to prevent browning. Set aside for about 5 minutes while the lemon juice works its magic.
  2. In a separate bowl, combine the Greek yogurt, 2 tablespoons of honey, and 1 teaspoon of vanilla extract if using. Stir the mixture until smooth and thoroughly blended. This should take about a minute. Avoid overmixing to maintain the creaminess of the yogurt.
  3. Now it’s time to layer your parfait. Grab a clear glass or bowl to showcase your beautiful creation. Start with a generous spoonful of the yogurt mixture at the bottom—about 1/4 cup will do. Use a spoon to spread it evenly.
  4. Add a layer of the diced peaches over the yogurt, ensuring they cover the yogurt completely. You might want to use about half of what you have prepared—roughly 1 cup. This layer should be visually appealing, so arrange the peaches neatly.
  5. Sprinkle 1/4 cup of granola over the peaches. This adds a delightful crunch. Make sure to distribute it evenly to ensure every bite has that satisfying texture. Avoid packing it down too tightly, as you want it to maintain its crunch.
  6. Repeat the layers: spoon in another 1/4 cup of yogurt, followed by another cup of peaches, and another sprinkle of granola. You should have at least two layers, but feel free to add more depending on your glass size.
  7. Finish off your parfait with a drizzle of honey on top for added sweetness and a touch of elegance. If you’re using sliced almonds or shredded coconut, sprinkle them on top now. It adds a lovely visual contrast and extra flavor.
  8. Serve immediately or refrigerate for up to 30 minutes before serving to allow the flavors to meld together. However, I recommend enjoying it fresh to maintain the granola’s crunch.
  • Prep Time: 15 mins
  • Cook Time: 0 mins
  • Category: Breakfast
  • Method: No-cook
  • Cuisine: American

Nutrition

  • Serving Size: 1 parfait
  • Calories: 250
  • Sugar: 20 g
  • Sodium: 50 mg
  • Fat: 5 g
  • Saturated Fat: 2 g
  • Unsaturated Fat: 3 g
  • Trans Fat: 0 g
  • Carbohydrates: 40 g
  • Fiber: 3 g
  • Protein: 10 g
  • Cholesterol: 10 mg

Keywords: Choose ripe peaches for the best flavor and texture. Use a clear glass for a beautiful presentation. For creaminess, consider whipping the yogurt before layering. Be mindful of the granola-to-yogurt ratio. Prepare yogurt and peaches ahead of time for gatherings, layering just before serving.

Did you make this recipe?

Share a photo and tag us — we can't wait to see what you've made!

Sun-Kissed Frozen Orange Cream Slush

As a child, summer days felt like they lasted forever. I remember the sticky heat wrapping around me as I played outside, my laughter mingling with the sounds of the neighborhood. But nothing could cool me down quite like the moment I’d spot my grandmother, laboring over her blender, whipping up her famous Frozen Orange Creamsicle Slush. That vibrant orange treat, with its frosty texture and sweet citrus aroma, was like a burst of sunshine in a cup. Just one sip, and I could feel the coolness wash over me, sparking pure joy.

This Frozen Orange Creamsicle Slush has a way of making you feel like a kid again. Its creamy, dreamy consistency is a delightful balance of bright orange and soft vanilla, inviting you to dive right in. The refreshing tang of orange dances on your tongue, while the smooth creaminess envelops you in a comforting embrace. It’s a nostalgic treat that’s perfect for hot summer afternoons or anytime you need a little pick-me-up.

What makes my version of this slush stand out is the addition of a hint of vanilla bean, which elevates the flavor and adds an extra layer of richness. Plus, it’s super easy to whip up with just a few simple ingredients that you probably already have on hand! So, if you’re ready to relive those sun-soaked memories, let me show you exactly how to make it.

Sun-Kissed Frozen Orange Cream Slush

Why You’ll Love This Recipe

  • Each slush is a perfect blend of creamy vanilla and zesty orange, creating a nostalgic flavor reminiscent of summer days.
  • This refreshing treat is ready in under 15 minutes, making it an ideal quick dessert for unexpected guests or hot afternoons.
  • With just 8 simple ingredients, it’s budget-friendly, ensuring you don’t have to break the bank to enjoy a delicious slush.
  • The slush has a perfectly smooth texture, thanks to the combination of ice and ice cream, providing a delightful contrast to the bright citrus flavors.
  • It’s highly customizable; you can easily adjust the sweetness and add fresh herbs for a unique twist that suits your taste.

Ingredients

  • 2 cups orange juice (freshly squeezed or store-bought)
  • 1 cup vanilla ice cream
  • 1 cup crushed ice
  • 1/2 cup milk (whole or 2%)
  • 1/4 cup granulated sugar (adjust based on sweetness preference)
  • 1 teaspoon vanilla extract
  • Zest of 1 orange (for added flavor)
  • Fresh orange slices and mint leaves (for garnish)

The star of this Frozen Orange Creamsicle Slush is the orange juice, which provides the vibrant, citrusy base. Freshly squeezed juice will yield the brightest flavor, but store-bought options can be just as convenient. If you’re opting for store-bought, choose 100% pure juice with no added sugars for the best results. Another essential ingredient is the vanilla ice cream; it adds creaminess and sweetness. You can substitute it with dairy-free ice cream if you’re looking for a vegan option. Whole or 2% milk complements the ice cream, creating a smooth blend. If you want a lower-calorie version, almond or oat milk can be good alternatives.

Lastly, the granulated sugar can be adjusted based on your sweetness preference. If you prefer a more natural sweetener, consider using honey or agave syrup. The orange zest enhances the flavor profile, providing an aromatic pop that brings the whole slush together. Don’t skip it! It adds an extra layer of brightness that makes this slush truly special.

Step-by-Step Instructions

  1. Start by preparing your ingredients. Gather 2 cups of orange juice, 1 cup of vanilla ice cream, and 1 cup of crushed ice. Make sure the ice is finely crushed, as larger chunks can make blending difficult.
  2. In a blender, combine the orange juice, vanilla ice cream, crushed ice, and 1/2 cup of milk. Add 1/4 cup of granulated sugar and 1 teaspoon of vanilla extract. If you like a sweeter slush, consider adding a bit more sugar at this stage.
  3. Add the zest of 1 orange to the blender. This step is crucial for enhancing the citrus flavor of your slush. Make sure not to include the bitter white pith—only the flavorful zest.
  4. Blend the mixture on medium-high speed for about 30-45 seconds. Stop once the ingredients are fully combined and the slush has a smooth, even consistency. If you notice large chunks of ice, blend for an additional 10-15 seconds. Avoid over-blending, as this can make the slush too liquidy.
  5. Once blended, taste the slush. If it needs more sweetness, add a little more sugar and blend for a few more seconds. If it’s too thick, you can add a splash of milk to reach your desired consistency.
  6. Pour the slush into glasses. This recipe typically serves 4, but you can easily double it for larger gatherings. Use a spoon to help guide the slush into the glasses if needed.
  7. Garnish each serving with fresh orange slices and mint leaves. The mint not only adds a pop of color but also a refreshing aroma that complements the citrus flavors beautifully.
  8. Serve immediately and enjoy! If you’ve made extra, you can refrigerate it for a short time, but it’s best enjoyed fresh.

Pro Tips for the Best Frozen Orange Creamsicle Slush

  • Don’t skip the orange zest! It’s a game-changer for flavor. Always zest before juicing to make it easier.
  • Use a high-powered blender for the best texture. A standard blender may struggle with ice, leading to uneven consistency. If you have a food processor, that can work too, but ensure the ice is finely crushed.
  • Adjust the ice-to-liquid ratio carefully. If your slush is too thick, it won’t blend well. Start with less ice and add more until you reach your preferred texture.
  • Be cautious with the sugar! Always start with the lower amount, as you can easily add more, but it’s hard to fix an overly sweet slush.
  • For a fun twist, consider adding a splash of coconut milk or a handful of fresh fruit like strawberries or pineapple. This not only enhances the flavor but also adds a beautiful color contrast.

Variations & Serving Ideas

There are countless ways to put a spin on your Frozen Orange Creamsicle Slush. Consider making a tropical version by adding in some pineapple juice or coconut milk for a delightful tropical twist. If you’re feeling adventurous, try incorporating a handful of frozen mango or peach slices for added sweetness. For a lighter version, swap out the vanilla ice cream for Greek yogurt for a creamy yet tangy alternative.

As for serving ideas, this refreshing slush pairs wonderfully with light summer dishes like grilled chicken skewers, fish tacos, or a simple salad topped with citrus vinaigrette. The bright, zesty flavors of the slush complement these dishes perfectly, making them an ideal pairing for a sunny day.

Storage, Make-Ahead & Reheating

This Frozen Orange Creamsicle Slush is best enjoyed fresh, but if you have leftovers, you can store them in an airtight container in the fridge for up to 2 days. Just keep in mind that the slush may lose some of its texture over time as the ice melts. It doesn’t freeze well, as the ice will turn into a solid block. If you must freeze it, blend again after thawing to restore the slushy consistency. This treat is best the day you make it, as the flavors meld together beautifully overnight, enhancing its deliciousness.

Frequently Asked Questions

Can I make Frozen Orange Creamsicle Slush ahead of time?

Yes — in fact, it tastes even better the next day as the flavors meld. However, it’s best to enjoy it fresh, as the texture can change if stored for too long. If you need to prepare it ahead, keep it in the fridge and re-blend before serving.

What kind of orange juice should I use?

For the best flavor, use freshly squeezed orange juice. However, if you’re short on time, opt for 100% pure store-bought juice without added sugars. This will ensure that your slush remains flavorful and refreshing.

Can I substitute the vanilla ice cream?

Absolutely! If you’re looking for a dairy-free option, coconut milk ice cream or a non-dairy vanilla ice cream can work wonderfully. They will still provide the creamy texture and sweetness you desire.

How can I adjust the sweetness of my slush?

You can easily adjust the sweetness by modifying the amount of sugar added. Start with 1/4 cup and taste the mixture before blending. If you prefer it sweeter, add more sugar gradually until it reaches your desired level.

What should I do if my slush is too thick?

If your slush is too thick, simply add a splash of milk or orange juice and blend again. This will help achieve a more drinkable consistency while maintaining the slushy texture. Adjust gradually to reach your preferred thickness.

Sun-Kissed Frozen Orange Cream Slush

Final Thoughts

The Frozen Orange Creamsicle Slush is a delightful blend of refreshing citrus and creamy goodness, making it a perfect treat for warm days or any time you crave a taste of nostalgia. The way the bright orange flavor dances with the creamy texture truly elevates this slush, transforming it into a satisfying escape from the everyday.

This is the kind of recipe I come back to again and again, especially when I’m looking to cool down or impress guests at a summer gathering. It’s simple to make and always brings smiles all around! I encourage you to try this recipe for yourself—don’t hesitate to share your results or even put your own spin on it. Happy slushing!

Print
clock clock iconcutlery cutlery iconflag flag iconfolder folder iconinstagram instagram iconpinterest pinterest iconfacebook facebook iconprint print iconsquares squares iconheart heart iconheart solid heart solid icon

Frozen Orange Creamsicle Slush


  • Author: Lily author
  • Total Time: 15 minutes
  • Yield: 4 servings 1x
Pin Recipe
Print Recipe

Description

This Frozen Orange Creamsicle Slush is a refreshing treat that combines creamy vanilla and zesty orange flavors. Perfect for hot summer days, it brings back nostalgic memories with every sip.


Ingredients

Scale
  • 2 cups orange juice (freshly squeezed or store-bought)
  • 1 cup vanilla ice cream
  • 1 cup crushed ice
  • 1/2 cup milk (whole or 2%)
  • 1/4 cup granulated sugar (adjust based on sweetness preference)
  • 1 teaspoon vanilla extract
  • Zest of 1 orange (for added flavor)
  • Fresh orange slices and mint leaves (for garnish)

Instructions

  1. Start by preparing your ingredients. Gather 2 cups of orange juice, 1 cup of vanilla ice cream, and 1 cup of crushed ice. Make sure the ice is finely crushed, as larger chunks can make blending difficult.
  2. In a blender, combine the orange juice, vanilla ice cream, crushed ice, and 1/2 cup of milk. Add 1/4 cup of granulated sugar and 1 teaspoon of vanilla extract. If you like a sweeter slush, consider adding a bit more sugar at this stage.
  3. Add the zest of 1 orange to the blender. This step is crucial for enhancing the citrus flavor of your slush. Make sure not to include the bitter white pith—only the flavorful zest.
  4. Blend the mixture on medium-high speed for about 30-45 seconds. Stop once the ingredients are fully combined and the slush has a smooth, even consistency. If you notice large chunks of ice, blend for an additional 10-15 seconds. Avoid over-blending, as this can make the slush too liquidy.
  5. Once blended, taste the slush. If it needs more sweetness, add a little more sugar and blend for a few more seconds. If it’s too thick, you can add a splash of milk to reach your desired consistency.
  6. Pour the slush into glasses. This recipe typically serves 4, but you can easily double it for larger gatherings. Use a spoon to help guide the slush into the glasses if needed.
  7. Garnish each serving with fresh orange slices and mint leaves. The mint not only adds a pop of color but also a refreshing aroma that complements the citrus flavors beautifully.
  8. Serve immediately and enjoy! If you’ve made extra, you can refrigerate it for a short time, but it's best enjoyed fresh.
  • Prep Time: 15 min
  • Cook Time: 0 min
  • Category: Dessert
  • Method: Blending
  • Cuisine: American

Nutrition

  • Serving Size: 1 serving
  • Calories: 200
  • Sugar: 30 g
  • Sodium: 50 mg
  • Fat: 5 g
  • Saturated Fat: 3 g
  • Unsaturated Fat: 2 g
  • Trans Fat: 0 g
  • Carbohydrates: 40 g
  • Fiber: 1 g
  • Protein: 2 g
  • Cholesterol: 20 mg

Keywords: Don't skip the orange zest! It's a game-changer for flavor. Always zest before juicing to make it easier.

Did you make this recipe?

Share a photo and tag us — we can't wait to see what you've made!

Zesty Lemon Poppy Seed Delight

One rainy afternoon, I found myself in my grandmother’s cozy kitchen, the kind that always smelled like warmth and love. She was whipping up her famous Lemon Poppy Seed Loaf, a recipe that had been passed down through generations. As the batter came together, the zesty aroma of fresh lemons filled the air, mingling perfectly with the nutty fragrance of poppy seeds. I can still picture her, apron-clad, as she expertly drizzled a vibrant citrus icing over the loaf, creating a glossy, sun-kissed finish that beckoned us to dive in. It was a moment that sparked my own passion for baking, and this recipe has become a cherished staple in my home ever since.

When you take a bite of this Lemon Poppy Seed Loaf, it’s like a burst of sunshine on your palate. The loaf is beautifully golden, with a tender crumb that melts in your mouth. Each slice is speckled with tiny poppy seeds, adding a delightful crunch that contrasts beautifully with the tangy sweetness of the lemon. And that citrus icing? It’s the finishing touch that elevates this loaf from ordinary to extraordinary, with its bright, zesty flavor dancing on your taste buds.

This recipe stands out because it embraces simplicity while delivering on flavor. I’ve added a hint of vanilla to the batter, enhancing the overall taste and making it even more indulgent. Trust me, once you make this Lemon Poppy Seed Loaf With Citrus Icing, it’ll become a go-to in your baking repertoire.

So, let me show you exactly how to make it!

Zesty Lemon Poppy Seed Delight

Why You’ll Love This Recipe

  • Moist and tender crumb that melts in your mouth, thanks to the perfect balance of butter and buttermilk.
  • Bright, zesty lemon flavor paired with crunchy poppy seeds, creating a delightful texture and taste experience.
  • Easy to whip up in just about an hour, perfect for last-minute gatherings or a cozy afternoon treat.
  • Budget-friendly with everyday ingredients, making it an accessible option for all home bakers.
  • The citrus icing adds a sweet tang that elevates the loaf, turning a simple recipe into a showstopper!

Ingredients

  • 1 ½ cups (190g) all-purpose flour
  • 1 teaspoon baking powder
  • ½ teaspoon baking soda
  • ½ teaspoon salt
  • 3 tablespoons poppy seeds
  • ½ cup (115g) unsalted butter, softened to room temperature
  • 1 cup (200g) granulated sugar
  • 2 large eggs
  • 1 teaspoon vanilla extract
  • 1 teaspoon lemon zest (from about 1 medium lemon)
  • ½ cup (120ml) buttermilk
  • 2 tablespoons fresh lemon juice

For the Citrus Icing:

  • 1 cup (120g) powdered sugar
  • 2 tablespoons fresh lemon juice
  • 1 tablespoon orange juice
  • 1 teaspoon lemon zest (for garnish, optional)

Let’s dive into the key ingredients that make this Lemon Poppy Seed Loaf so special. The all-purpose flour provides the structure and base for the loaf, while the baking powder and baking soda ensure it rises perfectly, giving the loaf a light texture. For a gluten-free variation, you could substitute the flour with a gluten-free all-purpose blend. Poppy seeds not only add a delightful crunch but also contribute to the unique flavor profile that pairs well with the citrus notes.

Unsalted butter is crucial for achieving the buttery richness that makes this loaf so moist. If you’re looking for a dairy-free option, coconut oil or a vegan butter can be used instead. The buttermilk is another essential component, providing acidity that activates the baking soda for a fluffy texture. If you don’t have buttermilk on hand, you can easily make a substitute by mixing ½ cup of milk with 1 tablespoon of vinegar or lemon juice and letting it sit for about 5 minutes.

Step-by-Step Instructions

  1. Preheat your oven to 350°F (175°C). Grease a 9×5-inch loaf pan or line it with parchment paper for easy removal later.
  2. In a medium mixing bowl, whisk together 1 ½ cups of all-purpose flour, 1 teaspoon of baking powder, ½ teaspoon of baking soda, ½ teaspoon of salt, and 3 tablespoons of poppy seeds. This helps to evenly distribute the baking agents and ensures a uniform rise.
  3. In a large mixing bowl, cream together ½ cup of softened unsalted butter and 1 cup of granulated sugar using an electric mixer on medium speed for about 3-4 minutes, until the mixture is light and fluffy. Make sure to scrape down the sides of the bowl occasionally.
  4. Add 2 large eggs, 1 teaspoon of vanilla extract, and 1 teaspoon of lemon zest to the creamed butter and sugar, mixing until fully combined. You want a smooth consistency, so ensure there are no lumps of butter.
  5. In a small bowl, combine ½ cup of buttermilk and 2 tablespoons of fresh lemon juice. Alternately add the dry ingredients and buttermilk mixture to the butter mixture, starting and ending with the dry ingredients. Mix just until combined; do not overmix, as this can lead to a dense loaf.
  6. Pour the batter into the prepared loaf pan. Smooth the top with a spatula, ensuring it’s even. Bake in the preheated oven for 50-60 minutes, or until a toothpick inserted in the center comes out clean. The edges should be lightly golden brown, and the center should feel just set.
  7. Once baked, remove the loaf from the oven and allow it to cool in the pan for about 10 minutes. Then, transfer it to a wire rack to cool completely. Resist the urge to slice too soon, as it will be crumbly if it’s still warm.
  8. While the loaf is cooling, prepare the citrus icing. In a medium bowl, whisk together 1 cup of powdered sugar, 2 tablespoons of fresh lemon juice, and 1 tablespoon of orange juice until smooth. If the icing is too thick, you can add a little more juice to reach your desired consistency.
  9. Once the loaf is completely cool, drizzle the citrus icing over the top. If you like, sprinkle with an additional teaspoon of lemon zest for an extra pop of flavor and color.

Pro Tips for the Best Lemon Poppy Seed Loaf With Citrus Icing

  • Be careful not to overmix your batter; this is a common mistake that can lead to a dense loaf. Mix just until the dry ingredients are incorporated for a light and fluffy texture.
  • Use room temperature ingredients, especially the butter and eggs. This helps to create a smoother batter and ensures even baking. Take your eggs out of the fridge about 30 minutes before you start.
  • For a more pronounced lemon flavor, consider adding a little lemon extract in addition to the zest and juice. Just a half teaspoon can elevate the citrus notes significantly.
  • When measuring your flour, spoon it into the measuring cup and level it off with a knife instead of scooping directly from the bag. This prevents packing and ensures you don’t end up with a dry loaf.
  • Invest in a good quality loaf pan; it makes a difference in heat distribution, which ensures even baking. If your pan is dark-coated, reduce the oven temperature by 25°F to prevent over-browning.

Variations & Serving Ideas

For a delightful twist, consider adding blueberries or raspberries to the batter for a fruity burst of flavor. You can also experiment with different citrus fruits—try lime or grapefruit zest and juice for a refreshing change. For a healthier option, substitute half of the all-purpose flour with whole wheat flour for added fiber without compromising too much on texture.

This Lemon Poppy Seed Loaf pairs beautifully with a light salad, such as a mixed greens salad with a vinaigrette, or a cup of tea for a cozy afternoon treat. It also complements a creamy cheese platter, as the acidity of the loaf balances rich cheeses perfectly. Lastly, a scoop of vanilla ice cream on the side creates a delightful contrast of temperatures and flavors!

Storage, Make-Ahead & Reheating

This Lemon Poppy Seed Loaf can be stored at room temperature for up to 3 days if wrapped tightly in plastic wrap. If you want to keep it longer, it freezes well for up to 3 months. To freeze, wrap the loaf tightly in plastic wrap and then in aluminum foil to prevent freezer burn.

When you’re ready to enjoy it again, simply thaw it in the fridge overnight. Reheat individual slices in the microwave for 15-20 seconds or in a toaster oven until warmed through. Interestingly, many people find that this loaf tastes even better the next day, as the flavors have time to meld!

Frequently Asked Questions

Can I make Lemon Poppy Seed Loaf With Citrus Icing ahead of time?

Yes — in fact, it tastes even better the next day! You can make the loaf a day in advance, allowing the flavors to develop. Just be sure to store it in an airtight container to maintain its moisture.

Can I substitute the poppy seeds?

Absolutely! If you don’t have poppy seeds on hand or prefer an alternative, you can use sesame seeds for a similar crunch or omit them entirely for a smooth loaf.

What can I use instead of buttermilk?

If you don’t have buttermilk, you can easily create a substitute by mixing ½ cup of milk (dairy or plant-based) with 1 tablespoon of vinegar or lemon juice. Let it sit for 5 minutes before using in the recipe.

How can I make this recipe gluten-free?

To make a gluten-free version of this Lemon Poppy Seed Loaf, substitute the all-purpose flour with a gluten-free all-purpose flour blend. Just ensure that the blend contains a binding agent like xanthan gum for the best results.

What is the best way to store leftover loaf?

Leftover Lemon Poppy Seed Loaf should be stored in an airtight container at room temperature for up to 3 days. For longer storage, wrap it tightly and freeze for up to 3 months. Thaw it before serving for the best texture.

Zesty Lemon Poppy Seed Delight

Final Thoughts

The Lemon Poppy Seed Loaf with Citrus Icing is truly a delightful treat that brings a burst of brightness to any occasion. The zesty lemon flavor combined with the subtle crunch of poppy seeds creates a satisfying balance, while the citrus icing adds a touch of sweetness that perfectly complements the loaf’s tanginess.

This is the kind of recipe I come back to again and again, especially when I want to brighten up a gloomy day or celebrate a small victory. The aroma that fills the kitchen as it bakes is absolutely heavenly! I encourage you to give this recipe a try; you might just find it becoming a beloved staple in your home. Don’t forget to share your results or even add your own unique twist—I can’t wait to see what you create!

Print
clock clock iconcutlery cutlery iconflag flag iconfolder folder iconinstagram instagram iconpinterest pinterest iconfacebook facebook iconprint print iconsquares squares iconheart heart iconheart solid heart solid icon

Lemon Poppy Seed Loaf


  • Author: Lily author
  • Total Time: 25 minute
  • Yield: 1 loaf 1x
Pin Recipe
Print Recipe

Description

This Lemon Poppy Seed Loaf is a delightful treat that combines zesty lemon flavor with crunchy poppy seeds. Topped with a citrus icing, it’s perfect for any occasion.


Ingredients

Scale
  • 1 ½ cups (190g) all-purpose flour
  • 1 teaspoon baking powder
  • ½ teaspoon baking soda
  • ½ teaspoon salt
  • 3 tablespoons poppy seeds
  • ½ cup (115g) unsalted butter, softened to room temperature
  • 1 cup (200g) granulated sugar
  • 2 large eggs
  • 1 teaspoon vanilla extract
  • 1 teaspoon lemon zest (from about 1 medium lemon)
  • ½ cup (120ml) buttermilk
  • 2 tablespoons fresh lemon juice
  • 1 cup (120g) powdered sugar
  • 2 tablespoons fresh lemon juice
  • 1 tablespoon orange juice
  • 1 teaspoon lemon zest (for garnish, optional)

Instructions

  1. Preheat your oven to 350°F (175°C). Grease a 9×5-inch loaf pan or line it with parchment paper for easy removal later.
  2. In a medium mixing bowl, whisk together 1 ½ cups of all-purpose flour, 1 teaspoon of baking powder, ½ teaspoon of baking soda, ½ teaspoon of salt, and 3 tablespoons of poppy seeds. This helps to evenly distribute the baking agents and ensures a uniform rise.
  3. In a large mixing bowl, cream together ½ cup of softened unsalted butter and 1 cup of granulated sugar using an electric mixer on medium speed for about 3-4 minutes, until the mixture is light and fluffy. Make sure to scrape down the sides of the bowl occasionally.
  4. Add 2 large eggs, 1 teaspoon of vanilla extract, and 1 teaspoon of lemon zest to the creamed butter and sugar, mixing until fully combined. You want a smooth consistency, so ensure there are no lumps of butter.
  5. In a small bowl, combine ½ cup of buttermilk and 2 tablespoons of fresh lemon juice. Alternately add the dry ingredients and buttermilk mixture to the butter mixture, starting and ending with the dry ingredients. Mix just until combined; do not overmix, as this can lead to a dense loaf.
  6. Pour the batter into the prepared loaf pan. Smooth the top with a spatula, ensuring it’s even. Bake in the preheated oven for 50-60 minutes, or until a toothpick inserted in the center comes out clean. The edges should be lightly golden brown, and the center should feel just set.
  7. Once baked, remove the loaf from the oven and allow it to cool in the pan for about 10 minutes. Then, transfer it to a wire rack to cool completely. Resist the urge to slice too soon, as it will be crumbly if it’s still warm.
  8. While the loaf is cooling, prepare the citrus icing. In a medium bowl, whisk together 1 cup of powdered sugar, 2 tablespoons of fresh lemon juice, and 1 tablespoon of orange juice until smooth. If the icing is too thick, you can add a little more juice to reach your desired consistency.
  9. Once the loaf is completely cool, drizzle the citrus icing over the top. If you like, sprinkle with an additional teaspoon of lemon zest for an extra pop of flavor and color.
  • Prep Time: 15 mins
  • Cook Time: 50-60 mins
  • Category: Dessert
  • Method: Baking
  • Cuisine: American

Nutrition

  • Serving Size: 1 slice
  • Calories: 200
  • Sugar: 15 g
  • Sodium: 150 mg
  • Fat: 8 g
  • Saturated Fat: 5 g
  • Unsaturated Fat: 3 g
  • Trans Fat: 0 g
  • Carbohydrates: 30 g
  • Fiber: 1 g
  • Protein: 3 g
  • Cholesterol: 40 mg

Keywords: Be careful not to overmix your batter; this is a common mistake that can lead to a dense loaf. Use room temperature ingredients for a smoother batter and even baking.

Did you make this recipe?

Share a photo and tag us — we can't wait to see what you've made!

  • Privacy Policy
  • Terms Of Service
  • Contact
  • About
  • GDPR

Copyright © 2025 Homesmad