• Skip to primary navigation
  • Skip to main content
  • Skip to primary sidebar
Homesmad

Homesmad

  • Home
  • Breakfast & Brunch
  • Appetizers & Snacks
  • Dinner
  • Dessert
  • About
  • Privacy Policy
  • Contact
Homesmad
  • Home
  • Breakfast & Brunch
  • Appetizers & Snacks
  • Dinner
  • Dessert
  • About
  • Privacy Policy
  • Contact

Beef Bacon Cheeseburger Meatball Recipe: Ultimate Guide!

October 10, 2025 by Lily author

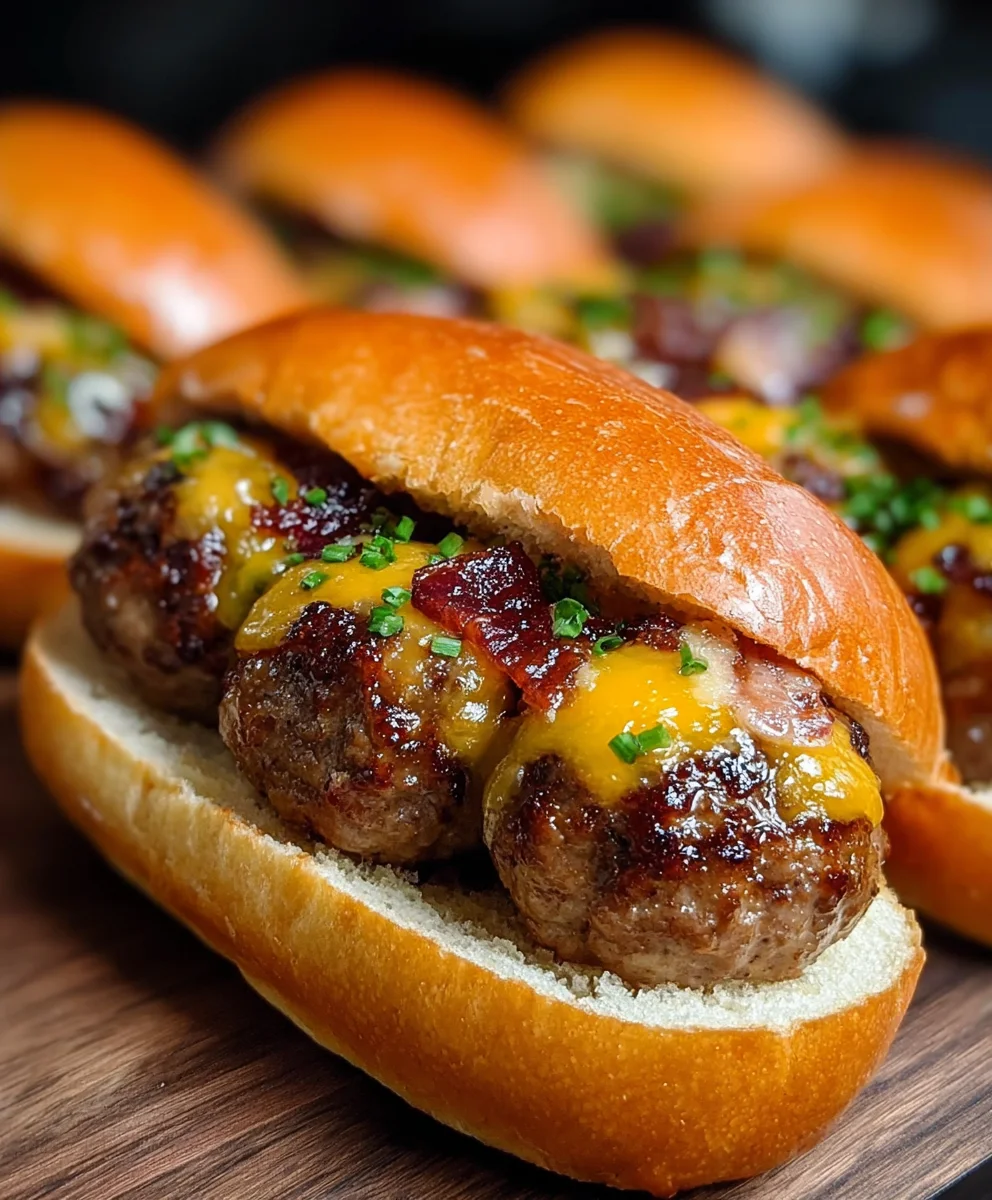
Beef Bacon Cheeseburger Meatball The Ultimate Recipe Guide is finally here, and I couldn’t be more excited to share this culinary masterpiece with you! Imagine all the savory, smoky, and cheesy goodness of your favorite diner classic, perfectly encapsulated into a succulent, bite-sized meatball. This isn’t just another recipe; it’s an experience, a delightful fusion that elevates familiar flavors into something truly extraordinary.

While meatballs boast a rich history spanning countless cultures and the humble cheeseburger reigns supreme as an American icon, this dish cleverly marries these beloved comfort foods, taking them to an innovative new level. It’s a celebration of bold tastes and satisfying textures that promises to be a showstopper at any gathering. People adore this dish for countless reasons: the irresistible combination of juicy beef, crispy bacon bits, and melting cheese in every bite is simply divine. It offers the quintessential cheeseburger experience without the bun, making it versatile for appetizers, main courses, or even a fun, deconstructed meal.

My goal with this Beef Bacon Cheeseburger Meatball The Ultimate Recipe Guide is to provide you with everything you need to create these fantastic morsels with ease. Get ready to impress your family and friends with a dish that is both novel and deeply comforting, proving that some culinary combinations are simply meant to be.

Beef Bacon Cheeseburger Meatball Recipe: Ultimate Guide! this RECIPE

Ingredients:

  • For the Beef Bacon Cheeseburger Meatballs:

    • 2 pounds (approximately 900g) 80/20 ground beef, chilled – I find this fat content offers the perfect balance of flavor and juiciness without being overly greasy.
    • 8 slices thick-cut bacon, rendered crisp and finely crumbled – The backbone of our bacon cheeseburger flavor!
    • 4 ounces (approximately 115g) sharp cheddar cheese, cut into ½-inch cubes – For that delightful cheesy explosion in every bite.
    • ½ cup panko breadcrumbs – My secret for incredibly light and airy meatballs.
    • ¼ cup finely minced yellow onion – Adds a subtle sweetness and aromatic depth.
    • 2 cloves garlic, minced – Essential for that savory kick.
    • 1 large egg, lightly beaten – Our binder, ensuring everything holds together beautifully.
    • 2 tablespoons Worcestershire sauce – A foundational umami booster for any beef dish.
    • 1 tablespoon Dijon mustard – For a touch of tang and classic cheeseburger flavor.
    • 1 teaspoon smoked paprika – Enhances the smoky notes from the bacon.
    • ½ teaspoon onion powder – Reinforces the fresh onion flavor.
    • ½ teaspoon garlic powder – Adds another layer of garlicky goodness.
    • 1 teaspoon kosher salt, or to taste – Always adjust to your preference.
    • ½ teaspoon freshly ground black pepper, or to taste – Freshly ground makes a world of difference.
    • 2 tablespoons olive oil, for searing (if pan-frying) – Or use a little of the rendered bacon fat for extra flavor!
  • For the Tangy Cheeseburger Glaze:

    • ½ cup ketchup – The classic base for any burger sauce.
    • ¼ cup yellow mustard – Adds that quintessential burger zing.
    • 2 tablespoons apple cider vinegar – For a bright, acidic counterpoint.
    • 1 tablespoon brown sugar, packed – Balances the acidity and adds a hint of caramelization.
    • 1 tablespoon pickle relish (sweet or dill, your preference) – I lean towards dill for that savory crunch.
    • ½ teaspoon onion powder – To deepen the savory notes.
    • ½ teaspoon garlic powder – Because more garlic is always better!
    • Pinch of cayenne pepper (optional) – If you like a little subtle heat.
  • For Garnish and Serving Suggestions:

    • Toasted sesame seeds – To mimic a burger bun!
    • Extra crumbled cooked bacon – Because you can never have too much bacon.
    • Finely chopped fresh chives or green onions – For a fresh, herbaceous finish.
    • Mini slider buns or toothpicks, for serving.
    • Additional pickles, sliced for serving.

Preparing the Components for Our Ultimate Beef Bacon Cheeseburger Meatball:

  1. Render the Bacon: My first step for these incredible beef bacon cheeseburger meatballs is always to get that bacon crispy. In a large skillet, cook the thick-cut bacon over medium heat until it’s beautifully crisp. This usually takes about 8-10 minutes, so keep an eye on it. Once done, transfer the cooked bacon to a plate lined with paper towels to drain. Don’t discard that rendered bacon fat! We’ll save a tablespoon or two for extra flavor if we decide to pan-sear our meatballs later, and it’s fantastic for adding a smoky depth to other dishes. Once cool enough to handle, finely crumble the bacon. This crispy bacon is key to the texture and flavor profile of our ultimate cheeseburger meatballs.
  2. Prepare the Cheese and Aromatics: While the bacon cools, turn your attention to the cheddar cheese. Cut the block of sharp cheddar into neat ½-inch cubes. You want these to be substantial enough to create a molten cheese pocket inside each meatball. Next, finely mince the yellow onion and garlic. The goal here is very small pieces so they blend seamlessly into the meatball mixture and don’t create an overwhelming crunch.

Crafting the Beef Bacon Cheeseburger Meatball Mixture:

  1. Combine Dry Ingredients: In a small bowl, I like to whisk together the panko breadcrumbs, smoked paprika, onion powder, garlic powder, kosher salt, and black pepper. This ensures all the seasonings are evenly distributed before they hit the meat, preventing clumps of spice in your final meatball.
  2. Prepare the Wet Binders: In another small bowl, lightly beat the large egg. Then, stir in the Worcestershire sauce and Dijon mustard. This liquid mixture will help bind the meatballs and inject those classic burger flavors throughout.
  3. Mix the Meatball Base: Now for the fun part – combining everything! In a large mixing bowl, gently add the chilled 80/20 ground beef. It’s important that the beef is cold, as it helps prevent overworking the meat, which can lead to tough meatballs. Add the finely minced yellow onion and garlic, the crumbled crisp bacon, and the seasoned breadcrumb mixture. Pour the egg, Worcestershire, and Dijon mixture over everything.
  4. Gentle Mixing is Key: With clean hands, gently mix all the ingredients until they are just combined. The secret here is to mix minimally. Overworking the meat can make the meatballs dense and less tender. You want everything to be evenly distributed, but stop as soon as that happens. Think of it as folding the ingredients together rather than mashing them. This step is crucial for achieving that tender, juicy texture in our beef bacon cheeseburger meatballs.

Stuffing and Shaping Our Cheeseburger Meatballs:

  1. Portion the Meat: Divide the meat mixture into approximately 18-20 equal portions. I find using a 2-tablespoon scoop or just eyeballing it works well for consistent sizing. You want each meatball to be substantial enough to hold a cheese cube but not so large that it becomes unwieldy.
  2. Stuff with Cheese: Take one portion of the meat mixture and flatten it into a disc in the palm of your hand. Place one ½-inch cube of sharp cheddar cheese right in the center of the disc. Carefully bring the edges of the meat up and around the cheese, completely encasing it. Pinch the seams to seal, ensuring no cheese is exposed. This step is what transforms a regular meatball into a glorious beef bacon cheeseburger meatball.
  3. Shape the Meatballs: Once sealed, gently roll the meatball between your palms to form a smooth, uniform sphere. Place the finished meatball on a baking sheet lined with parchment paper. Repeat this process with the remaining meat and cheese cubes. It’s okay if they aren’t perfectly round, but aim for a relatively consistent size for even cooking.
  4. Chill (Optional, but Recommended): If time allows, I highly recommend placing the baking sheet with the formed meatballs into the refrigerator for at least 20-30 minutes. This helps the meatballs firm up, making them less likely to fall apart during cooking and ensuring the cheese stays locked inside. This brief chill also helps prevent over-spreading and keeps their beautiful spherical shape.

Cooking the Beef Bacon Cheeseburger Meatballs to Perfection:

  1. Preheat Oven and Prepare Baking Sheet: If you’re baking (my preferred method for these as it’s less messy and ensures even cooking without constant flipping), preheat your oven to 400°F (200°C). If you haven’t already, line a baking sheet with parchment paper or foil for easy cleanup. You can also place an oven-safe wire rack on the baking sheet for even crispier bottoms, allowing air to circulate.
  2. Bake the Meatballs: Arrange the chilled meatballs on the prepared baking sheet, ensuring they have a little space between them for air circulation. Bake for 18-25 minutes, depending on their size and your oven, or until they are cooked through and beautifully browned on the outside. An instant-read thermometer inserted into the center of a meatball (avoiding the cheese pocket) should register 160°F (71°C). The aroma filling your kitchen at this point is truly spectacular – the essence of a beef bacon cheeseburger come to life!
  3. Alternatively, Pan-Sear and Finish: If you prefer a pan-seared crust, heat 1-2 tablespoons of olive oil (or saved bacon fat!) in a large, oven-safe skillet over medium-high heat. Once hot, carefully add the meatballs, ensuring not to overcrowd the pan. Sear them for 2-3 minutes per side until beautifully browned all over. Then, transfer the skillet to the preheated 400°F (200°C) oven and bake for an additional 10-15 minutes, or until cooked through to 160°F (71°C). This two-step method gives you the best of both worlds: a crispy exterior and a tender, juicy interior.

Crafting the Tangy Cheeseburger Glaze:

  1. Combine Glaze Ingredients: While the meatballs are cooking, let’s whip up our irresistible tangy cheeseburger glaze. In a small saucepan, combine the ketchup, yellow mustard, apple cider vinegar, packed brown sugar, pickle relish, onion powder, garlic powder, and the optional pinch of cayenne pepper.
  2. Simmer the Glaze: Place the saucepan over medium-low heat. Bring the mixture to a gentle simmer, stirring occasionally. Let it simmer for about 5-7 minutes, or until the glaze has slightly thickened to your desired consistency. It should be syrupy enough to coat the back of a spoon. Taste and adjust seasonings if necessary – you might want a bit more vinegar for tang or a touch more brown sugar for sweetness. Remove from heat and set aside. This glaze is the perfect complement to our beef bacon cheeseburger meatballs, adding that authentic burger joint flavor.

Finishing and Serving Our Ultimate Beef Bacon Cheeseburger Meatballs:

  1. Glaze the Meatballs: Once the meatballs are cooked, remove them from the oven. You have a couple of options for glazing:

    • Direct Glaze: You can simply brush the warm glaze over each meatball right out of the oven.
    • Return to Oven (Recommended for Deeper Flavor): For an even more integrated flavor and a slightly caramelized glaze, gently toss the cooked meatballs directly in the saucepan with the warm glaze, ensuring each meatball is evenly coated. Then, you can return them to the oven for another 5 minutes at 350°F (175°C) to allow the glaze to set and become wonderfully sticky.
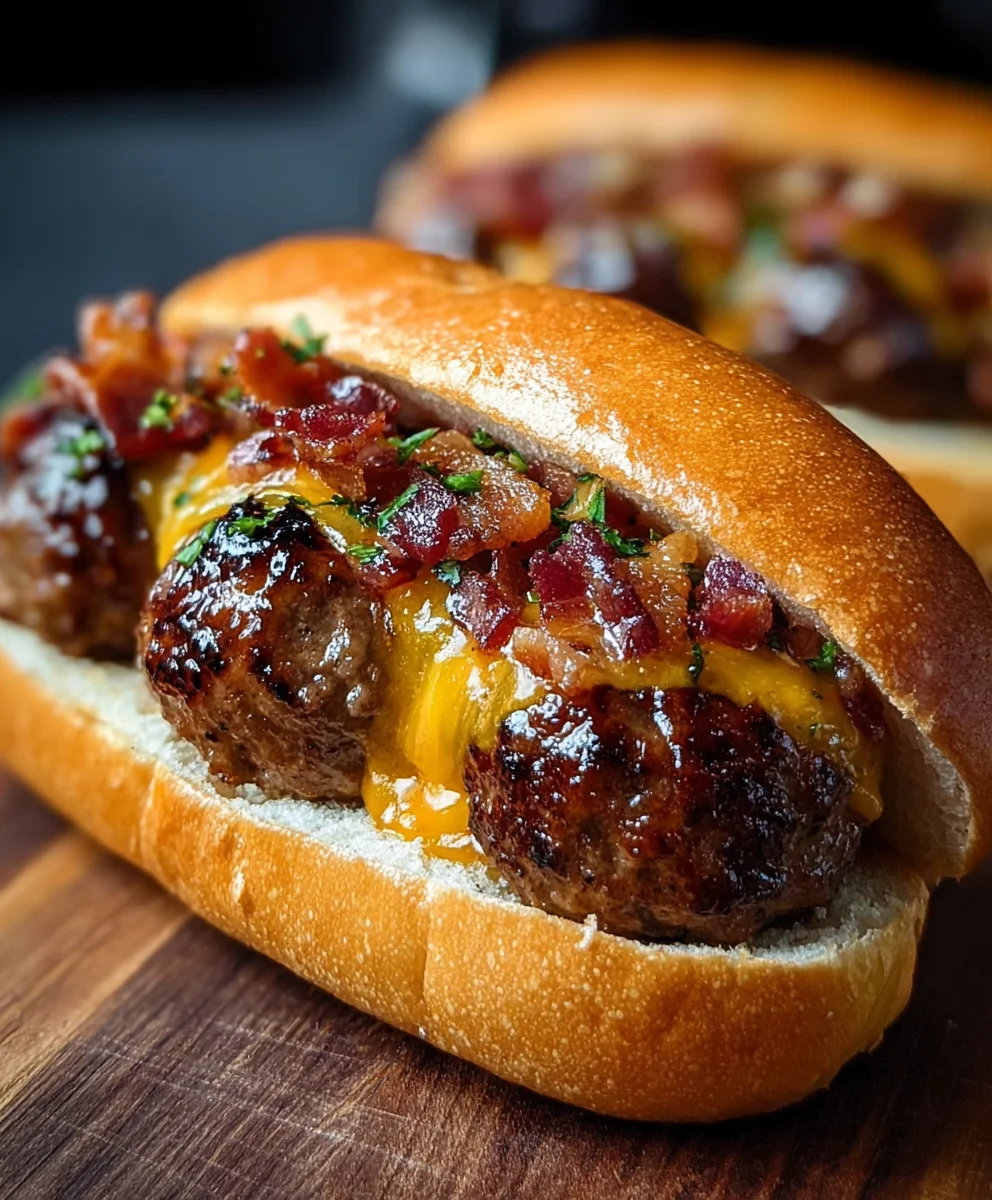
  2. Garnish and Serve: Transfer the glazed beef bacon cheeseburger meatballs to a serving platter. Immediately sprinkle them generously with toasted sesame seeds and additional crumbled cooked bacon. Finish with a scattering of freshly chopped chives or green onions for a pop of color and freshness.
  3. Serving Suggestions: These incredible meatballs are wonderfully versatile.

    • Appetizer Style: Serve them hot with toothpicks for an amazing party snack. They are a guaranteed crowd-pleaser and are always the first to disappear!
    • Mini Sliders: Tuck them into mini slider buns with extra pickles for a delightful take on classic cheeseburger sliders.
    • Main Course: Enjoy them simply with a side of creamy mashed potatoes or a fresh green salad for a hearty and satisfying meal. The rich flavors of the beef, bacon, and cheese, combined with the tangy glaze, make for an unforgettable culinary experience.

    I promise you, these Beef Bacon Cheeseburger Meatballs are an ultimate recipe guide for anyone looking to impress or simply indulge in some truly sensational comfort food. They bring together all the beloved elements of a classic cheeseburger in a fun, bite-sized package.

Beef Bacon Cheeseburger Meatball Recipe: Ultimate Guide!

Conclusion:

Well, my friends, we’ve reached the delicious culmination of our culinary journey! I truly hope you’re as excited as I am about the prospect of whipping up these incredible morsels. This isn’t just another dish; it’s a guaranteed crowd-pleaser, a comfort food hero, and an absolute triumph of flavor. What makes these meatballs an undeniable must-try is the ingenious combination of classic, beloved tastes—the savory richness of beef, the smoky crunch of bacon, and the gooey comfort of melted cheese—all encapsulated in a perfectly bite-sized package. It’s the essence of a gourmet burger, reimagined for every occasion. Every single bite delivers that unmistakable cheeseburger satisfaction, elevated by the textural contrast of crispy bacon and the tender, juicy meatball base. Trust me, your taste buds are in for a serious treat.

I find immense joy in cooking for loved ones, and few recipes spark as much enthusiasm as this one. Whether you’re hosting a lively gathering, looking for an exciting weeknight dinner, or simply craving something truly special, these meatballs rise to the occasion beautifully. They are incredibly versatile, fitting seamlessly into various mealtime scenarios. For a casual appetizer, simply skewer them with toothpicks and serve with your favorite dipping sauces like tangy BBQ, creamy ranch, or even a spicy sriracha mayo for an extra kick. Guests will be marveling at their ingenuity and devouring them before you can say “seconds!”

When it comes to serving these beauties as a main course, the possibilities are just as exciting. Imagine them nestled into soft sub rolls, smothered with extra cheese and a dollop of marinara, creating an epic meatball sub that redefines comfort food. They also pair wonderfully with a simple side of pasta, transforming a humble spaghetti dish into something truly extraordinary. For a lighter touch, serve them alongside a crisp green salad or a bed of fluffy rice to soak up all those incredible juices. And for those cozy nights in, I love them with a side of creamy mashed potatoes, turning a classic meal into a memorable feast. Don’t hesitate to get creative with your plating; a sprinkle of fresh parsley or chives can add a lovely pop of color and freshness.

But the fun doesn’t stop at serving suggestions; this recipe is ripe for creative variations! Feel free to experiment with different types of cheese inside the meatballs—pepper jack for a little zing, smoked gouda for an added layer of complexity, or even a blend of cheddar and Monterey Jack for ultimate meltiness. If you’re feeling adventurous, try swapping out a portion of the ground beef for ground pork or turkey to slightly alter the flavor profile and texture. You could also finely dice some onions or bell peppers and mix them directly into the meat mixture for added flavor and moisture. For an extra smoky depth, consider incorporating a pinch of smoked paprika into your seasoning blend. This really is your canvas to personalize and make it uniquely yours.

I honestly believe that the detailed steps provided in this Beef Bacon Cheeseburger Meatball The Ultimate Recipe Guide will empower you to create a truly spectacular dish that will be talked about long after the plates are cleared. It’s a recipe that marries simplicity with incredible flavor, making it accessible for home cooks of all skill levels. There’s a profound satisfaction that comes from creating something so utterly delicious from scratch, and I’m so eager for you to experience that joy.

So, what are you waiting for? Gather your ingredients, roll up your sleeves, and dive into this delightful cooking adventure. I wholeheartedly encourage you to give this recipe a try. I promise you won’t be disappointed! And once you’ve experienced the magic of these incredible meatballs, please don’t keep it to yourself. I’d absolutely love to hear about your culinary triumphs! Share your thoughts, your photos, and any brilliant variations you came up with. Your experiences inspire me and other fellow food enthusiasts. Let’s celebrate the joy of good food together!


Beef Bacon Cheeseburger Meatball The Ultimate Recipe Guide

Beef Bacon Cheeseburger Meatball The Ultimate Recipe Guide

Experience the ultimate fusion of comfort foods with these Beef Bacon Cheeseburger Meatballs. Juicy beef, crispy beef bacon, and melty cheddar cheese are perfectly encapsulated in a bite-sized meatball, finished with a tangy cheeseburger glaze. Ideal as an appetizer or a unique main course.

Prep Time
15 Minutes

Cook Time
30 Minutes

Total Time
45 Minutes

Servings
20 meatballs

Ingredients

  • 1.5 lbs 80/20 Ground Beef
  • 1/2 lb Beef Bacon, cooked crisp and crumbled
  • 8 oz Sharp Cheddar Cheese, cut into 1/2-inch cubes
  • 1 cup Panko Bread Crumbs
  • 1/2 cup Milk
  • 1 large Egg, lightly beaten
  • 1/4 cup Yellow Onion, finely diced
  • 2 cloves Garlic, minced
  • 2 tablespoons Worcestershire Sauce
  • 1 tablespoon Dijon Mustard
  • 1 teaspoon Smoked Paprika
  • 1/2 teaspoon Garlic Powder
  • 1/4 teaspoon Onion Powder
  • Salt to taste
  • Black Pepper to taste
  • 1/2 cup Mayonnaise
  • 2 tablespoons Olive Oil (for searing, optional)
  • — For the Tangy Cheeseburger Glaze —
  • 1/2 cup Ketchup
  • 1/4 cup Yellow Mustard
  • 2 tablespoons Apple Cider Vinegar
  • 1 tablespoon Brown Sugar, packed
  • 1 tablespoon Pickle Relish
  • 1/2 teaspoon Onion Powder
  • 1/2 teaspoon Garlic Powder
  • Pinch of Cayenne Pepper (optional)
  • — For Garnish and Serving Suggestions —
  • Toasted Sesame Seeds
  • Extra crumbled cooked Beef Bacon
  • Finely chopped fresh Chives or Green Onions
  • Mini slider buns or toothpicks (optional)
  • Additional pickles, sliced (optional)

Instructions

  1. Step 1
    Cook 1/2 lb beef bacon until crisp; crumble finely. Cut 8 oz sharp cheddar into 1/2-inch cubes. Finely mince 1/4 cup yellow onion and 2 cloves garlic.
  2. Step 2
    In a small bowl, whisk 1 large egg, 1/2 cup milk, 2 tbsp Worcestershire sauce, and 1 tbsp Dijon mustard. In another bowl, combine 1 cup panko breadcrumbs, 1 tsp smoked paprika, 1/2 tsp garlic powder, 1/4 tsp onion powder, salt, and pepper.
  3. Step 3
    In a large bowl, gently combine 1.5 lbs ground beef, minced onion, minced garlic, crumbled beef bacon, seasoned breadcrumbs, the wet mixture, and 1/2 cup mayonnaise. Mix minimally to avoid tough meatballs.
  4. Step 4
    Divide meat mixture into 20 equal portions. Flatten each portion, place a cheddar cube in the center, and seal the meat around the cheese. Roll into smooth spheres and place on a parchment-lined baking sheet.
  5. Step 5
    Refrigerate formed meatballs for 20-30 minutes to help them firm up and hold their shape during cooking.
  6. Step 6
    Preheat oven to 400°F (200°C). Arrange chilled meatballs on a prepared baking sheet. Bake for 18-25 minutes, or until browned and an internal temperature of 160°F (71°C) is reached. Alternatively, pan-sear in 1-2 tbsp olive oil until browned, then transfer to the oven for 10-15 minutes until cooked through.
  7. Step 7
    While meatballs cook, combine 1/2 cup ketchup, 1/4 cup yellow mustard, 2 tbsp apple cider vinegar, 1 tbsp brown sugar, 1 tbsp pickle relish, 1/2 tsp onion powder, 1/2 tsp garlic powder, and an optional pinch of cayenne pepper in a small saucepan. Simmer over medium-low heat for 5-7 minutes until slightly thickened.
  8. Step 8
    Toss cooked meatballs in the warm glaze until evenly coated. For a deeper flavor, return them to the oven for 5 minutes at 350°F (175°C). Transfer to a platter, garnish with toasted sesame seeds, extra crumbled beef bacon, and chopped chives/green onions. Serve hot.

Important Information

Nutrition Facts (Per Serving)

It is important to consider this information as approximate and not to use it as definitive health advice.

Allergy Information

Please check ingredients for potential allergens and consult a health professional if in doubt.

« Previous Post
Pumpkin Cheesecake Truffles: Easy No-Bake Dessert Bites
Next Post »
Strawberry Shortcake Fluff Salad: Delicious, Easy Dessert

If you enjoyed this…

Hot Honey Infused Feta Chicken: A Spicy, Savory Delight!

Mediterranean Ground Beef Stir Fry

Mediterranean Ground Beef Stir Fry

Loaded Beef Bacon Cheeseburger Pasta: Easy & Delicious!

Primary Sidebar

Browse by Diet

BreakfastDinnerLunchDessertAppetizer

Sweet Peach Yogurt Parfait Delight

One of my fondest memories is from a lazy summer afternoon spent at my grandmother’s house. The sun filtered through the kitchen window, casting a warm glow over the table where she would create her culinary magic. It was during one of those blissful moments that I first tasted her Peach Yogurt Parfait with Honey and Granola. The sweet aroma of ripe peaches mingling with creamy yogurt and the crunch of granola was nothing short of heavenly. It felt like summer captured in a bowl, and I still remember the joy of diving in with a spoon, each layer revealing a new burst of flavor.

When I think about that parfait, I can almost hear the gentle hum of the bees outside, reminding me of the floral notes that honey brings to every bite. The vibrant yellows and soft oranges of the peaches contrast beautifully with the creamy white yogurt and the golden crunch of granola. It’s a dish that not only looks delightful but also tastes like a celebration of fresh, wholesome ingredients.

What makes my version of this Peach Yogurt Parfait special is the careful balance of flavors and textures. I use ripe, juicy peaches, drizzled with locally sourced honey, and a homemade granola that’s bursting with nuts and seeds for an extra crunch. It’s a simple dish, but every layer is crafted with love and attention.

Let me show you exactly how to make this delightful parfait, so you can bring a bit of that summer magic into your kitchen!

Sweet Peach Yogurt Parfait Delight

Why You’ll Love This Recipe

  • Delightfully creamy texture from the Greek yogurt, paired with the juicy sweetness of fresh peaches.
  • Ready in under 20 minutes, making it a quick and satisfying breakfast or snack option.
  • Budget-friendly, using common ingredients that you may already have in your pantry.
  • Customizable with your favorite granola and nuts, allowing you to tailor each parfait to your taste.
  • Perfectly balanced flavors with the bright acidity of lemon juice and the sweetness of honey enhancing the peaches.

Ingredients

  • For the Parfait:
  • 2 cups plain Greek yogurt (or vanilla yogurt for a sweeter option)
  • 2 large ripe peaches, diced (about 2 cups)
  • 1 tablespoon fresh lemon juice (to prevent browning of peaches)
  • 2 tablespoons honey (plus more for drizzling)
  • 1 teaspoon vanilla extract (optional for extra flavor)
  • For the Granola:
  • 1 cup granola (store-bought or homemade; see notes for a simple granola recipe)
  • 1/4 cup sliced almonds (optional for added crunch)
  • 1/4 cup shredded coconut (optional for added flavor)

Let’s dive into some key ingredients that make this Peach Yogurt Parfait so delightful! First, the Greek yogurt is not only creamy but also packed with protein, making it a satisfying option for breakfast or a snack. If you’re looking for a sweeter option, you can easily substitute it with vanilla yogurt, though it may alter the overall flavor balance. Next, the ripe peaches are the star of the show; their natural sweetness shines through, so I recommend choosing peaches that yield slightly to pressure, indicating they’re perfectly ripe. If peaches aren’t in season, feel free to use nectarines or even frozen peaches—just thaw them before use. Finally, honey adds a lovely floral sweetness that ties everything together. If you prefer, maple syrup can serve as a delicious substitute.

Step-by-Step Instructions

  1. Start by preparing the peaches. Wash them thoroughly, then slice and dice them into bite-sized pieces. In a medium bowl, toss the diced peaches with 1 tablespoon of fresh lemon juice to prevent browning. Set aside for about 5 minutes while the lemon juice works its magic.
  2. In a separate bowl, combine the Greek yogurt, 2 tablespoons of honey, and 1 teaspoon of vanilla extract if using. Stir the mixture until smooth and thoroughly blended. This should take about a minute. Avoid overmixing to maintain the creaminess of the yogurt.
  3. Now it’s time to layer your parfait. Grab a clear glass or bowl to showcase your beautiful creation. Start with a generous spoonful of the yogurt mixture at the bottom—about 1/4 cup will do. Use a spoon to spread it evenly.
  4. Add a layer of the diced peaches over the yogurt, ensuring they cover the yogurt completely. You might want to use about half of what you have prepared—roughly 1 cup. This layer should be visually appealing, so arrange the peaches neatly.
  5. Sprinkle 1/4 cup of granola over the peaches. This adds a delightful crunch. Make sure to distribute it evenly to ensure every bite has that satisfying texture. Avoid packing it down too tightly, as you want it to maintain its crunch.
  6. Repeat the layers: spoon in another 1/4 cup of yogurt, followed by another cup of peaches, and another sprinkle of granola. You should have at least two layers, but feel free to add more depending on your glass size.
  7. Finish off your parfait with a drizzle of honey on top for added sweetness and a touch of elegance. If you’re using sliced almonds or shredded coconut, sprinkle them on top now. It adds a lovely visual contrast and extra flavor.
  8. Serve immediately or refrigerate for up to 30 minutes before serving to allow the flavors to meld together. However, I recommend enjoying it fresh to maintain the granola’s crunch.

Pro Tips for the Best Peach Yogurt Parfait With Honey And Granola

  • Make sure to choose ripe peaches for the best flavor and texture. A common mistake is using unripe fruit, which can lead to a less enjoyable parfait. Look for peaches that are fragrant and slightly soft to the touch.
  • Use a clear glass to assemble your parfait; this not only makes for a beautiful presentation but also allows you to see the colorful layers, which adds to the enjoyment of eating it.
  • For an even creamier texture, consider whipping the Greek yogurt with a hand mixer for a couple of minutes before layering. This small adjustment makes a huge difference in mouthfeel.
  • Be mindful of the granola-to-yogurt ratio. Too much granola can overwhelm the parfait, while too little can make it feel too creamy. Aim for about 1/4 cup of granola per layer for the perfect balance.
  • If you’re making this for a gathering, consider preparing the yogurt and peaches ahead of time and layering them just before serving. This ensures the granola stays crunchy!

Variations & Serving Ideas

There are so many ways to get creative with your Peach Yogurt Parfait! For a tropical twist, swap out the peaches for mangoes or pineapples and top with coconut flakes. If you prefer a berry flavor, mix in some blueberries or strawberries with the peaches for added color and taste. For a nutty version, incorporate chopped walnuts or pecans instead of almonds.

As for serving ideas, this parfait pairs beautifully with a side of scrambled eggs for a hearty breakfast or fresh fruit salad for a light lunch. You might also enjoy it alongside whole grain toast with almond butter for an energizing snack. The contrast of flavors and textures will elevate your meal experience!

Storage, Make-Ahead & Reheating

The Peach Yogurt Parfait is best enjoyed fresh, but you can prepare some components ahead of time. Store the layered parfait in an airtight container in the refrigerator for up to 24 hours. However, be cautious; the granola may lose its crunch if stored too long. You can freeze the yogurt and peach mixture for up to 2 months; just remember to thaw it in the refrigerator overnight before serving.

If you plan to enjoy this dish the next day, it can taste even better as the flavors meld together. Just remember to add the granola right before serving to keep its delightful crunch!

Frequently Asked Questions

Can I make Peach Yogurt Parfait With Honey And Granola ahead of time?

Yes — in fact, it tastes even better the next day as the flavors meld. However, I recommend waiting to add the granola until just before serving to maintain its crunch.

What can I substitute for Greek yogurt?

If you prefer a lighter option, you can substitute Greek yogurt with regular yogurt or a dairy-free alternative like coconut yogurt. Just remember that this may alter the creaminess and flavor profile slightly.

Can I use frozen peaches for this parfait?

Absolutely! Just make sure to thaw the frozen peaches before using them. They will still add great flavor, though the texture may be slightly softer than fresh peaches.

How do I make the parfait vegan?

To make a vegan version, substitute the Greek yogurt with a plant-based yogurt alternative, and replace honey with maple syrup or agave nectar. This keeps the parfait sweet while adhering to a vegan diet.

What other fruits can I use in this recipe?

You can mix and match fruits based on your preference. Try using strawberries, blueberries, raspberries, or even bananas. Just make sure to adjust the lemon juice as needed to prevent browning.

Sweet Peach Yogurt Parfait Delight

Final Thoughts

The Peach Yogurt Parfait with Honey and Granola is a delightful blend of creamy yogurt, sweet peaches, and crunchy granola that creates a satisfying and nourishing treat. Each layer bursts with flavor, making it a perfect choice for breakfast or a light dessert.

This is the kind of recipe I come back to again and again, especially when I want something refreshing and wholesome to start my day. The harmony of sweet and tart flavors, combined with the delightful crunch, never fails to lift my spirits!

I encourage you to give this parfait a try and indulge in its comforting goodness. Feel free to share your results or even add your own twist—perhaps a sprinkle of cinnamon or a handful of nuts. Enjoy creating your perfect parfait!

Print
clock clock iconcutlery cutlery iconflag flag iconfolder folder iconinstagram instagram iconpinterest pinterest iconfacebook facebook iconprint print iconsquares squares iconheart heart iconheart solid heart solid icon

Peach Yogurt Parfait


  • Author: Lily author
  • Total Time: 15 minutes
  • Yield: 4 servings 1x
Pin Recipe
Print Recipe

Description

This Peach Yogurt Parfait combines creamy Greek yogurt, juicy peaches, and crunchy granola for a delightful treat. It’s a perfect breakfast or snack that captures the essence of summer in every bite.


Ingredients

Scale
  • For the Parfait:
  • 2 cups plain Greek yogurt (or vanilla yogurt for a sweeter option)
  • 2 large ripe peaches, diced (about 2 cups)
  • 1 tablespoon fresh lemon juice (to prevent browning of peaches)
  • 2 tablespoons honey (plus more for drizzling)
  • 1 teaspoon vanilla extract (optional for extra flavor)
  • For the Granola:
  • 1 cup granola (store-bought or homemade; see notes for a simple granola recipe)
  • 1/4 cup sliced almonds (optional for added crunch)
  • 1/4 cup shredded coconut (optional for added flavor)

Instructions

  1. Start by preparing the peaches. Wash them thoroughly, then slice and dice them into bite-sized pieces. In a medium bowl, toss the diced peaches with 1 tablespoon of fresh lemon juice to prevent browning. Set aside for about 5 minutes while the lemon juice works its magic.
  2. In a separate bowl, combine the Greek yogurt, 2 tablespoons of honey, and 1 teaspoon of vanilla extract if using. Stir the mixture until smooth and thoroughly blended. This should take about a minute. Avoid overmixing to maintain the creaminess of the yogurt.
  3. Now it’s time to layer your parfait. Grab a clear glass or bowl to showcase your beautiful creation. Start with a generous spoonful of the yogurt mixture at the bottom—about 1/4 cup will do. Use a spoon to spread it evenly.
  4. Add a layer of the diced peaches over the yogurt, ensuring they cover the yogurt completely. You might want to use about half of what you have prepared—roughly 1 cup. This layer should be visually appealing, so arrange the peaches neatly.
  5. Sprinkle 1/4 cup of granola over the peaches. This adds a delightful crunch. Make sure to distribute it evenly to ensure every bite has that satisfying texture. Avoid packing it down too tightly, as you want it to maintain its crunch.
  6. Repeat the layers: spoon in another 1/4 cup of yogurt, followed by another cup of peaches, and another sprinkle of granola. You should have at least two layers, but feel free to add more depending on your glass size.
  7. Finish off your parfait with a drizzle of honey on top for added sweetness and a touch of elegance. If you’re using sliced almonds or shredded coconut, sprinkle them on top now. It adds a lovely visual contrast and extra flavor.
  8. Serve immediately or refrigerate for up to 30 minutes before serving to allow the flavors to meld together. However, I recommend enjoying it fresh to maintain the granola’s crunch.
  • Prep Time: 15 mins
  • Cook Time: 0 mins
  • Category: Breakfast
  • Method: No-cook
  • Cuisine: American

Nutrition

  • Serving Size: 1 parfait
  • Calories: 250
  • Sugar: 20 g
  • Sodium: 50 mg
  • Fat: 5 g
  • Saturated Fat: 2 g
  • Unsaturated Fat: 3 g
  • Trans Fat: 0 g
  • Carbohydrates: 40 g
  • Fiber: 3 g
  • Protein: 10 g
  • Cholesterol: 10 mg

Keywords: Choose ripe peaches for the best flavor and texture. Use a clear glass for a beautiful presentation. For creaminess, consider whipping the yogurt before layering. Be mindful of the granola-to-yogurt ratio. Prepare yogurt and peaches ahead of time for gatherings, layering just before serving.

Did you make this recipe?

Share a photo and tag us — we can't wait to see what you've made!

Sun-Kissed Frozen Orange Cream Slush

As a child, summer days felt like they lasted forever. I remember the sticky heat wrapping around me as I played outside, my laughter mingling with the sounds of the neighborhood. But nothing could cool me down quite like the moment I’d spot my grandmother, laboring over her blender, whipping up her famous Frozen Orange Creamsicle Slush. That vibrant orange treat, with its frosty texture and sweet citrus aroma, was like a burst of sunshine in a cup. Just one sip, and I could feel the coolness wash over me, sparking pure joy.

This Frozen Orange Creamsicle Slush has a way of making you feel like a kid again. Its creamy, dreamy consistency is a delightful balance of bright orange and soft vanilla, inviting you to dive right in. The refreshing tang of orange dances on your tongue, while the smooth creaminess envelops you in a comforting embrace. It’s a nostalgic treat that’s perfect for hot summer afternoons or anytime you need a little pick-me-up.

What makes my version of this slush stand out is the addition of a hint of vanilla bean, which elevates the flavor and adds an extra layer of richness. Plus, it’s super easy to whip up with just a few simple ingredients that you probably already have on hand! So, if you’re ready to relive those sun-soaked memories, let me show you exactly how to make it.

Sun-Kissed Frozen Orange Cream Slush

Why You’ll Love This Recipe

  • Each slush is a perfect blend of creamy vanilla and zesty orange, creating a nostalgic flavor reminiscent of summer days.
  • This refreshing treat is ready in under 15 minutes, making it an ideal quick dessert for unexpected guests or hot afternoons.
  • With just 8 simple ingredients, it’s budget-friendly, ensuring you don’t have to break the bank to enjoy a delicious slush.
  • The slush has a perfectly smooth texture, thanks to the combination of ice and ice cream, providing a delightful contrast to the bright citrus flavors.
  • It’s highly customizable; you can easily adjust the sweetness and add fresh herbs for a unique twist that suits your taste.

Ingredients

  • 2 cups orange juice (freshly squeezed or store-bought)
  • 1 cup vanilla ice cream
  • 1 cup crushed ice
  • 1/2 cup milk (whole or 2%)
  • 1/4 cup granulated sugar (adjust based on sweetness preference)
  • 1 teaspoon vanilla extract
  • Zest of 1 orange (for added flavor)
  • Fresh orange slices and mint leaves (for garnish)

The star of this Frozen Orange Creamsicle Slush is the orange juice, which provides the vibrant, citrusy base. Freshly squeezed juice will yield the brightest flavor, but store-bought options can be just as convenient. If you’re opting for store-bought, choose 100% pure juice with no added sugars for the best results. Another essential ingredient is the vanilla ice cream; it adds creaminess and sweetness. You can substitute it with dairy-free ice cream if you’re looking for a vegan option. Whole or 2% milk complements the ice cream, creating a smooth blend. If you want a lower-calorie version, almond or oat milk can be good alternatives.

Lastly, the granulated sugar can be adjusted based on your sweetness preference. If you prefer a more natural sweetener, consider using honey or agave syrup. The orange zest enhances the flavor profile, providing an aromatic pop that brings the whole slush together. Don’t skip it! It adds an extra layer of brightness that makes this slush truly special.

Step-by-Step Instructions

  1. Start by preparing your ingredients. Gather 2 cups of orange juice, 1 cup of vanilla ice cream, and 1 cup of crushed ice. Make sure the ice is finely crushed, as larger chunks can make blending difficult.
  2. In a blender, combine the orange juice, vanilla ice cream, crushed ice, and 1/2 cup of milk. Add 1/4 cup of granulated sugar and 1 teaspoon of vanilla extract. If you like a sweeter slush, consider adding a bit more sugar at this stage.
  3. Add the zest of 1 orange to the blender. This step is crucial for enhancing the citrus flavor of your slush. Make sure not to include the bitter white pith—only the flavorful zest.
  4. Blend the mixture on medium-high speed for about 30-45 seconds. Stop once the ingredients are fully combined and the slush has a smooth, even consistency. If you notice large chunks of ice, blend for an additional 10-15 seconds. Avoid over-blending, as this can make the slush too liquidy.
  5. Once blended, taste the slush. If it needs more sweetness, add a little more sugar and blend for a few more seconds. If it’s too thick, you can add a splash of milk to reach your desired consistency.
  6. Pour the slush into glasses. This recipe typically serves 4, but you can easily double it for larger gatherings. Use a spoon to help guide the slush into the glasses if needed.
  7. Garnish each serving with fresh orange slices and mint leaves. The mint not only adds a pop of color but also a refreshing aroma that complements the citrus flavors beautifully.
  8. Serve immediately and enjoy! If you’ve made extra, you can refrigerate it for a short time, but it’s best enjoyed fresh.

Pro Tips for the Best Frozen Orange Creamsicle Slush

  • Don’t skip the orange zest! It’s a game-changer for flavor. Always zest before juicing to make it easier.
  • Use a high-powered blender for the best texture. A standard blender may struggle with ice, leading to uneven consistency. If you have a food processor, that can work too, but ensure the ice is finely crushed.
  • Adjust the ice-to-liquid ratio carefully. If your slush is too thick, it won’t blend well. Start with less ice and add more until you reach your preferred texture.
  • Be cautious with the sugar! Always start with the lower amount, as you can easily add more, but it’s hard to fix an overly sweet slush.
  • For a fun twist, consider adding a splash of coconut milk or a handful of fresh fruit like strawberries or pineapple. This not only enhances the flavor but also adds a beautiful color contrast.

Variations & Serving Ideas

There are countless ways to put a spin on your Frozen Orange Creamsicle Slush. Consider making a tropical version by adding in some pineapple juice or coconut milk for a delightful tropical twist. If you’re feeling adventurous, try incorporating a handful of frozen mango or peach slices for added sweetness. For a lighter version, swap out the vanilla ice cream for Greek yogurt for a creamy yet tangy alternative.

As for serving ideas, this refreshing slush pairs wonderfully with light summer dishes like grilled chicken skewers, fish tacos, or a simple salad topped with citrus vinaigrette. The bright, zesty flavors of the slush complement these dishes perfectly, making them an ideal pairing for a sunny day.

Storage, Make-Ahead & Reheating

This Frozen Orange Creamsicle Slush is best enjoyed fresh, but if you have leftovers, you can store them in an airtight container in the fridge for up to 2 days. Just keep in mind that the slush may lose some of its texture over time as the ice melts. It doesn’t freeze well, as the ice will turn into a solid block. If you must freeze it, blend again after thawing to restore the slushy consistency. This treat is best the day you make it, as the flavors meld together beautifully overnight, enhancing its deliciousness.

Frequently Asked Questions

Can I make Frozen Orange Creamsicle Slush ahead of time?

Yes — in fact, it tastes even better the next day as the flavors meld. However, it’s best to enjoy it fresh, as the texture can change if stored for too long. If you need to prepare it ahead, keep it in the fridge and re-blend before serving.

What kind of orange juice should I use?

For the best flavor, use freshly squeezed orange juice. However, if you’re short on time, opt for 100% pure store-bought juice without added sugars. This will ensure that your slush remains flavorful and refreshing.

Can I substitute the vanilla ice cream?

Absolutely! If you’re looking for a dairy-free option, coconut milk ice cream or a non-dairy vanilla ice cream can work wonderfully. They will still provide the creamy texture and sweetness you desire.

How can I adjust the sweetness of my slush?

You can easily adjust the sweetness by modifying the amount of sugar added. Start with 1/4 cup and taste the mixture before blending. If you prefer it sweeter, add more sugar gradually until it reaches your desired level.

What should I do if my slush is too thick?

If your slush is too thick, simply add a splash of milk or orange juice and blend again. This will help achieve a more drinkable consistency while maintaining the slushy texture. Adjust gradually to reach your preferred thickness.

Sun-Kissed Frozen Orange Cream Slush

Final Thoughts

The Frozen Orange Creamsicle Slush is a delightful blend of refreshing citrus and creamy goodness, making it a perfect treat for warm days or any time you crave a taste of nostalgia. The way the bright orange flavor dances with the creamy texture truly elevates this slush, transforming it into a satisfying escape from the everyday.

This is the kind of recipe I come back to again and again, especially when I’m looking to cool down or impress guests at a summer gathering. It’s simple to make and always brings smiles all around! I encourage you to try this recipe for yourself—don’t hesitate to share your results or even put your own spin on it. Happy slushing!

Print
clock clock iconcutlery cutlery iconflag flag iconfolder folder iconinstagram instagram iconpinterest pinterest iconfacebook facebook iconprint print iconsquares squares iconheart heart iconheart solid heart solid icon

Frozen Orange Creamsicle Slush


  • Author: Lily author
  • Total Time: 15 minutes
  • Yield: 4 servings 1x
Pin Recipe
Print Recipe

Description

This Frozen Orange Creamsicle Slush is a refreshing treat that combines creamy vanilla and zesty orange flavors. Perfect for hot summer days, it brings back nostalgic memories with every sip.


Ingredients

Scale
  • 2 cups orange juice (freshly squeezed or store-bought)
  • 1 cup vanilla ice cream
  • 1 cup crushed ice
  • 1/2 cup milk (whole or 2%)
  • 1/4 cup granulated sugar (adjust based on sweetness preference)
  • 1 teaspoon vanilla extract
  • Zest of 1 orange (for added flavor)
  • Fresh orange slices and mint leaves (for garnish)

Instructions

  1. Start by preparing your ingredients. Gather 2 cups of orange juice, 1 cup of vanilla ice cream, and 1 cup of crushed ice. Make sure the ice is finely crushed, as larger chunks can make blending difficult.
  2. In a blender, combine the orange juice, vanilla ice cream, crushed ice, and 1/2 cup of milk. Add 1/4 cup of granulated sugar and 1 teaspoon of vanilla extract. If you like a sweeter slush, consider adding a bit more sugar at this stage.
  3. Add the zest of 1 orange to the blender. This step is crucial for enhancing the citrus flavor of your slush. Make sure not to include the bitter white pith—only the flavorful zest.
  4. Blend the mixture on medium-high speed for about 30-45 seconds. Stop once the ingredients are fully combined and the slush has a smooth, even consistency. If you notice large chunks of ice, blend for an additional 10-15 seconds. Avoid over-blending, as this can make the slush too liquidy.
  5. Once blended, taste the slush. If it needs more sweetness, add a little more sugar and blend for a few more seconds. If it’s too thick, you can add a splash of milk to reach your desired consistency.
  6. Pour the slush into glasses. This recipe typically serves 4, but you can easily double it for larger gatherings. Use a spoon to help guide the slush into the glasses if needed.
  7. Garnish each serving with fresh orange slices and mint leaves. The mint not only adds a pop of color but also a refreshing aroma that complements the citrus flavors beautifully.
  8. Serve immediately and enjoy! If you’ve made extra, you can refrigerate it for a short time, but it's best enjoyed fresh.
  • Prep Time: 15 min
  • Cook Time: 0 min
  • Category: Dessert
  • Method: Blending
  • Cuisine: American

Nutrition

  • Serving Size: 1 serving
  • Calories: 200
  • Sugar: 30 g
  • Sodium: 50 mg
  • Fat: 5 g
  • Saturated Fat: 3 g
  • Unsaturated Fat: 2 g
  • Trans Fat: 0 g
  • Carbohydrates: 40 g
  • Fiber: 1 g
  • Protein: 2 g
  • Cholesterol: 20 mg

Keywords: Don't skip the orange zest! It's a game-changer for flavor. Always zest before juicing to make it easier.

Did you make this recipe?

Share a photo and tag us — we can't wait to see what you've made!

Zesty Lemon Poppy Seed Delight

One rainy afternoon, I found myself in my grandmother’s cozy kitchen, the kind that always smelled like warmth and love. She was whipping up her famous Lemon Poppy Seed Loaf, a recipe that had been passed down through generations. As the batter came together, the zesty aroma of fresh lemons filled the air, mingling perfectly with the nutty fragrance of poppy seeds. I can still picture her, apron-clad, as she expertly drizzled a vibrant citrus icing over the loaf, creating a glossy, sun-kissed finish that beckoned us to dive in. It was a moment that sparked my own passion for baking, and this recipe has become a cherished staple in my home ever since.

When you take a bite of this Lemon Poppy Seed Loaf, it’s like a burst of sunshine on your palate. The loaf is beautifully golden, with a tender crumb that melts in your mouth. Each slice is speckled with tiny poppy seeds, adding a delightful crunch that contrasts beautifully with the tangy sweetness of the lemon. And that citrus icing? It’s the finishing touch that elevates this loaf from ordinary to extraordinary, with its bright, zesty flavor dancing on your taste buds.

This recipe stands out because it embraces simplicity while delivering on flavor. I’ve added a hint of vanilla to the batter, enhancing the overall taste and making it even more indulgent. Trust me, once you make this Lemon Poppy Seed Loaf With Citrus Icing, it’ll become a go-to in your baking repertoire.

So, let me show you exactly how to make it!

Zesty Lemon Poppy Seed Delight

Why You’ll Love This Recipe

  • Moist and tender crumb that melts in your mouth, thanks to the perfect balance of butter and buttermilk.
  • Bright, zesty lemon flavor paired with crunchy poppy seeds, creating a delightful texture and taste experience.
  • Easy to whip up in just about an hour, perfect for last-minute gatherings or a cozy afternoon treat.
  • Budget-friendly with everyday ingredients, making it an accessible option for all home bakers.
  • The citrus icing adds a sweet tang that elevates the loaf, turning a simple recipe into a showstopper!

Ingredients

  • 1 ½ cups (190g) all-purpose flour
  • 1 teaspoon baking powder
  • ½ teaspoon baking soda
  • ½ teaspoon salt
  • 3 tablespoons poppy seeds
  • ½ cup (115g) unsalted butter, softened to room temperature
  • 1 cup (200g) granulated sugar
  • 2 large eggs
  • 1 teaspoon vanilla extract
  • 1 teaspoon lemon zest (from about 1 medium lemon)
  • ½ cup (120ml) buttermilk
  • 2 tablespoons fresh lemon juice

For the Citrus Icing:

  • 1 cup (120g) powdered sugar
  • 2 tablespoons fresh lemon juice
  • 1 tablespoon orange juice
  • 1 teaspoon lemon zest (for garnish, optional)

Let’s dive into the key ingredients that make this Lemon Poppy Seed Loaf so special. The all-purpose flour provides the structure and base for the loaf, while the baking powder and baking soda ensure it rises perfectly, giving the loaf a light texture. For a gluten-free variation, you could substitute the flour with a gluten-free all-purpose blend. Poppy seeds not only add a delightful crunch but also contribute to the unique flavor profile that pairs well with the citrus notes.

Unsalted butter is crucial for achieving the buttery richness that makes this loaf so moist. If you’re looking for a dairy-free option, coconut oil or a vegan butter can be used instead. The buttermilk is another essential component, providing acidity that activates the baking soda for a fluffy texture. If you don’t have buttermilk on hand, you can easily make a substitute by mixing ½ cup of milk with 1 tablespoon of vinegar or lemon juice and letting it sit for about 5 minutes.

Step-by-Step Instructions

  1. Preheat your oven to 350°F (175°C). Grease a 9×5-inch loaf pan or line it with parchment paper for easy removal later.
  2. In a medium mixing bowl, whisk together 1 ½ cups of all-purpose flour, 1 teaspoon of baking powder, ½ teaspoon of baking soda, ½ teaspoon of salt, and 3 tablespoons of poppy seeds. This helps to evenly distribute the baking agents and ensures a uniform rise.
  3. In a large mixing bowl, cream together ½ cup of softened unsalted butter and 1 cup of granulated sugar using an electric mixer on medium speed for about 3-4 minutes, until the mixture is light and fluffy. Make sure to scrape down the sides of the bowl occasionally.
  4. Add 2 large eggs, 1 teaspoon of vanilla extract, and 1 teaspoon of lemon zest to the creamed butter and sugar, mixing until fully combined. You want a smooth consistency, so ensure there are no lumps of butter.
  5. In a small bowl, combine ½ cup of buttermilk and 2 tablespoons of fresh lemon juice. Alternately add the dry ingredients and buttermilk mixture to the butter mixture, starting and ending with the dry ingredients. Mix just until combined; do not overmix, as this can lead to a dense loaf.
  6. Pour the batter into the prepared loaf pan. Smooth the top with a spatula, ensuring it’s even. Bake in the preheated oven for 50-60 minutes, or until a toothpick inserted in the center comes out clean. The edges should be lightly golden brown, and the center should feel just set.
  7. Once baked, remove the loaf from the oven and allow it to cool in the pan for about 10 minutes. Then, transfer it to a wire rack to cool completely. Resist the urge to slice too soon, as it will be crumbly if it’s still warm.
  8. While the loaf is cooling, prepare the citrus icing. In a medium bowl, whisk together 1 cup of powdered sugar, 2 tablespoons of fresh lemon juice, and 1 tablespoon of orange juice until smooth. If the icing is too thick, you can add a little more juice to reach your desired consistency.
  9. Once the loaf is completely cool, drizzle the citrus icing over the top. If you like, sprinkle with an additional teaspoon of lemon zest for an extra pop of flavor and color.

Pro Tips for the Best Lemon Poppy Seed Loaf With Citrus Icing

  • Be careful not to overmix your batter; this is a common mistake that can lead to a dense loaf. Mix just until the dry ingredients are incorporated for a light and fluffy texture.
  • Use room temperature ingredients, especially the butter and eggs. This helps to create a smoother batter and ensures even baking. Take your eggs out of the fridge about 30 minutes before you start.
  • For a more pronounced lemon flavor, consider adding a little lemon extract in addition to the zest and juice. Just a half teaspoon can elevate the citrus notes significantly.
  • When measuring your flour, spoon it into the measuring cup and level it off with a knife instead of scooping directly from the bag. This prevents packing and ensures you don’t end up with a dry loaf.
  • Invest in a good quality loaf pan; it makes a difference in heat distribution, which ensures even baking. If your pan is dark-coated, reduce the oven temperature by 25°F to prevent over-browning.

Variations & Serving Ideas

For a delightful twist, consider adding blueberries or raspberries to the batter for a fruity burst of flavor. You can also experiment with different citrus fruits—try lime or grapefruit zest and juice for a refreshing change. For a healthier option, substitute half of the all-purpose flour with whole wheat flour for added fiber without compromising too much on texture.

This Lemon Poppy Seed Loaf pairs beautifully with a light salad, such as a mixed greens salad with a vinaigrette, or a cup of tea for a cozy afternoon treat. It also complements a creamy cheese platter, as the acidity of the loaf balances rich cheeses perfectly. Lastly, a scoop of vanilla ice cream on the side creates a delightful contrast of temperatures and flavors!

Storage, Make-Ahead & Reheating

This Lemon Poppy Seed Loaf can be stored at room temperature for up to 3 days if wrapped tightly in plastic wrap. If you want to keep it longer, it freezes well for up to 3 months. To freeze, wrap the loaf tightly in plastic wrap and then in aluminum foil to prevent freezer burn.

When you’re ready to enjoy it again, simply thaw it in the fridge overnight. Reheat individual slices in the microwave for 15-20 seconds or in a toaster oven until warmed through. Interestingly, many people find that this loaf tastes even better the next day, as the flavors have time to meld!

Frequently Asked Questions

Can I make Lemon Poppy Seed Loaf With Citrus Icing ahead of time?

Yes — in fact, it tastes even better the next day! You can make the loaf a day in advance, allowing the flavors to develop. Just be sure to store it in an airtight container to maintain its moisture.

Can I substitute the poppy seeds?

Absolutely! If you don’t have poppy seeds on hand or prefer an alternative, you can use sesame seeds for a similar crunch or omit them entirely for a smooth loaf.

What can I use instead of buttermilk?

If you don’t have buttermilk, you can easily create a substitute by mixing ½ cup of milk (dairy or plant-based) with 1 tablespoon of vinegar or lemon juice. Let it sit for 5 minutes before using in the recipe.

How can I make this recipe gluten-free?

To make a gluten-free version of this Lemon Poppy Seed Loaf, substitute the all-purpose flour with a gluten-free all-purpose flour blend. Just ensure that the blend contains a binding agent like xanthan gum for the best results.

What is the best way to store leftover loaf?

Leftover Lemon Poppy Seed Loaf should be stored in an airtight container at room temperature for up to 3 days. For longer storage, wrap it tightly and freeze for up to 3 months. Thaw it before serving for the best texture.

Zesty Lemon Poppy Seed Delight

Final Thoughts

The Lemon Poppy Seed Loaf with Citrus Icing is truly a delightful treat that brings a burst of brightness to any occasion. The zesty lemon flavor combined with the subtle crunch of poppy seeds creates a satisfying balance, while the citrus icing adds a touch of sweetness that perfectly complements the loaf’s tanginess.

This is the kind of recipe I come back to again and again, especially when I want to brighten up a gloomy day or celebrate a small victory. The aroma that fills the kitchen as it bakes is absolutely heavenly! I encourage you to give this recipe a try; you might just find it becoming a beloved staple in your home. Don’t forget to share your results or even add your own unique twist—I can’t wait to see what you create!

Print
clock clock iconcutlery cutlery iconflag flag iconfolder folder iconinstagram instagram iconpinterest pinterest iconfacebook facebook iconprint print iconsquares squares iconheart heart iconheart solid heart solid icon

Lemon Poppy Seed Loaf


  • Author: Lily author
  • Total Time: 35 minute
  • Yield: 1 loaf 1x
Pin Recipe
Print Recipe

Description

This Lemon Poppy Seed Loaf is a delightful treat that combines zesty lemon flavor with crunchy poppy seeds. Topped with a citrus icing, it’s perfect for any occasion.


Ingredients

Scale
  • 1 ½ cups (190g) all-purpose flour
  • 1 teaspoon baking powder
  • ½ teaspoon baking soda
  • ½ teaspoon salt
  • 3 tablespoons poppy seeds
  • ½ cup (115g) unsalted butter, softened to room temperature
  • 1 cup (200g) granulated sugar
  • 2 large eggs
  • 1 teaspoon vanilla extract
  • 1 teaspoon lemon zest (from about 1 medium lemon)
  • ½ cup (120ml) buttermilk
  • 2 tablespoons fresh lemon juice
  • 1 cup (120g) powdered sugar
  • 2 tablespoons fresh lemon juice
  • 1 tablespoon orange juice
  • 1 teaspoon lemon zest (for garnish, optional)

Instructions

  1. Preheat your oven to 350°F (175°C). Grease a 9×5-inch loaf pan or line it with parchment paper for easy removal later.
  2. In a medium mixing bowl, whisk together 1 ½ cups of all-purpose flour, 1 teaspoon of baking powder, ½ teaspoon of baking soda, ½ teaspoon of salt, and 3 tablespoons of poppy seeds. This helps to evenly distribute the baking agents and ensures a uniform rise.
  3. In a large mixing bowl, cream together ½ cup of softened unsalted butter and 1 cup of granulated sugar using an electric mixer on medium speed for about 3-4 minutes, until the mixture is light and fluffy. Make sure to scrape down the sides of the bowl occasionally.
  4. Add 2 large eggs, 1 teaspoon of vanilla extract, and 1 teaspoon of lemon zest to the creamed butter and sugar, mixing until fully combined. You want a smooth consistency, so ensure there are no lumps of butter.
  5. In a small bowl, combine ½ cup of buttermilk and 2 tablespoons of fresh lemon juice. Alternately add the dry ingredients and buttermilk mixture to the butter mixture, starting and ending with the dry ingredients. Mix just until combined; do not overmix, as this can lead to a dense loaf.
  6. Pour the batter into the prepared loaf pan. Smooth the top with a spatula, ensuring it’s even. Bake in the preheated oven for 50-60 minutes, or until a toothpick inserted in the center comes out clean. The edges should be lightly golden brown, and the center should feel just set.
  7. Once baked, remove the loaf from the oven and allow it to cool in the pan for about 10 minutes. Then, transfer it to a wire rack to cool completely. Resist the urge to slice too soon, as it will be crumbly if it’s still warm.
  8. While the loaf is cooling, prepare the citrus icing. In a medium bowl, whisk together 1 cup of powdered sugar, 2 tablespoons of fresh lemon juice, and 1 tablespoon of orange juice until smooth. If the icing is too thick, you can add a little more juice to reach your desired consistency.
  9. Once the loaf is completely cool, drizzle the citrus icing over the top. If you like, sprinkle with an additional teaspoon of lemon zest for an extra pop of flavor and color.
  • Prep Time: 15 mins
  • Cook Time: 50-60 mins
  • Category: Dessert
  • Method: Baking
  • Cuisine: American

Nutrition

  • Serving Size: 1 slice
  • Calories: 200
  • Sugar: 15 g
  • Sodium: 150 mg
  • Fat: 8 g
  • Saturated Fat: 5 g
  • Unsaturated Fat: 3 g
  • Trans Fat: 0 g
  • Carbohydrates: 30 g
  • Fiber: 1 g
  • Protein: 3 g
  • Cholesterol: 40 mg

Keywords: Be careful not to overmix your batter; this is a common mistake that can lead to a dense loaf. Use room temperature ingredients for a smoother batter and even baking.

Did you make this recipe?

Share a photo and tag us — we can't wait to see what you've made!

  • Privacy Policy
  • Terms Of Service
  • Contact
  • About
  • GDPR

Copyright © 2025 Homesmad