• Skip to primary navigation
  • Skip to main content
  • Skip to primary sidebar
Homesmad

Homesmad

  • Home
  • Breakfast & Brunch
  • Appetizers & Snacks
  • Dinner
  • Dessert
  • About
  • Privacy Policy
  • Contact
Homesmad
  • Home
  • Breakfast & Brunch
  • Appetizers & Snacks
  • Dinner
  • Dessert
  • About
  • Privacy Policy
  • Contact

Best Parmesan Crusted Chicken Recipe – Crispy & Flavorful!

October 15, 2025 by Lily author

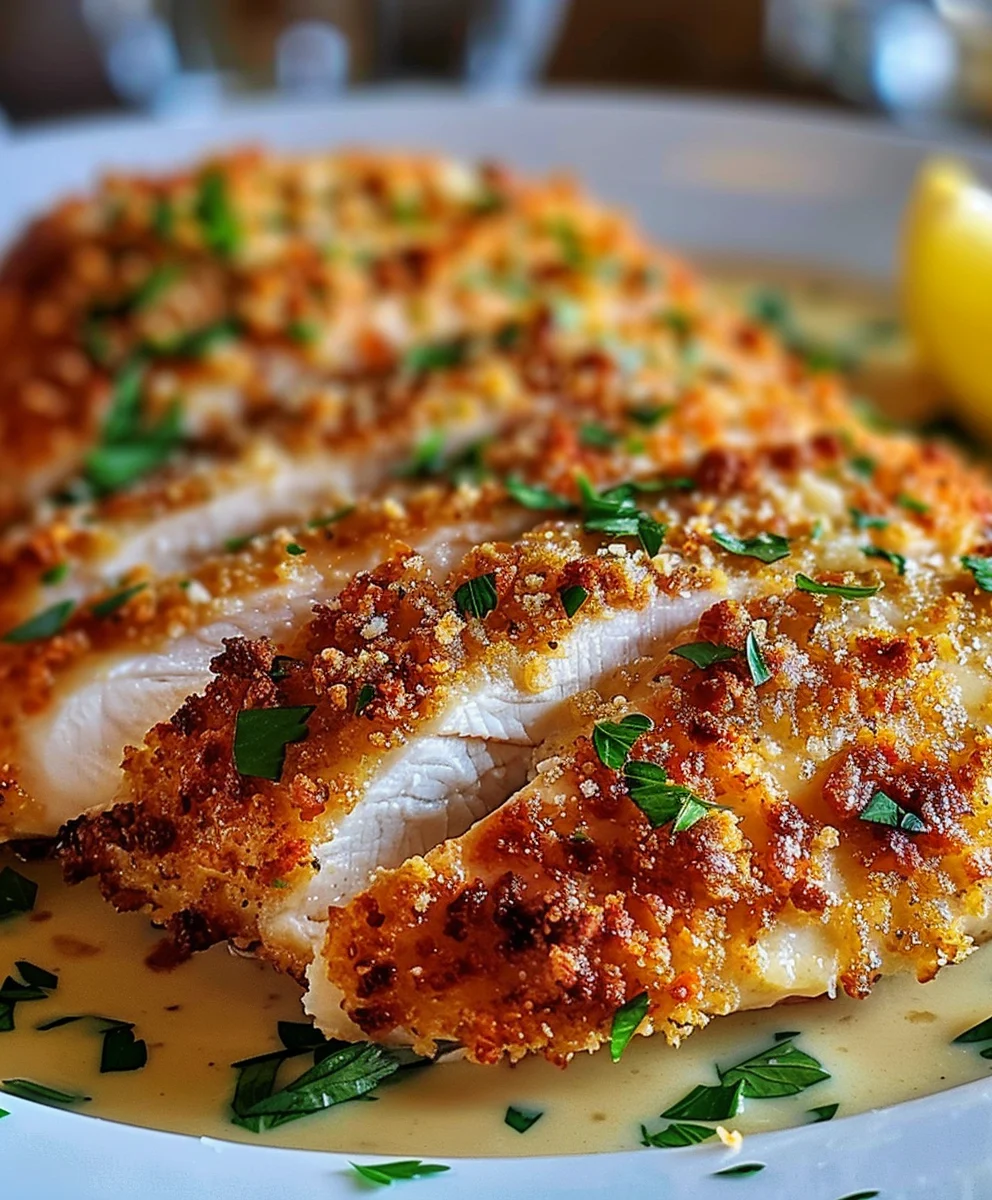
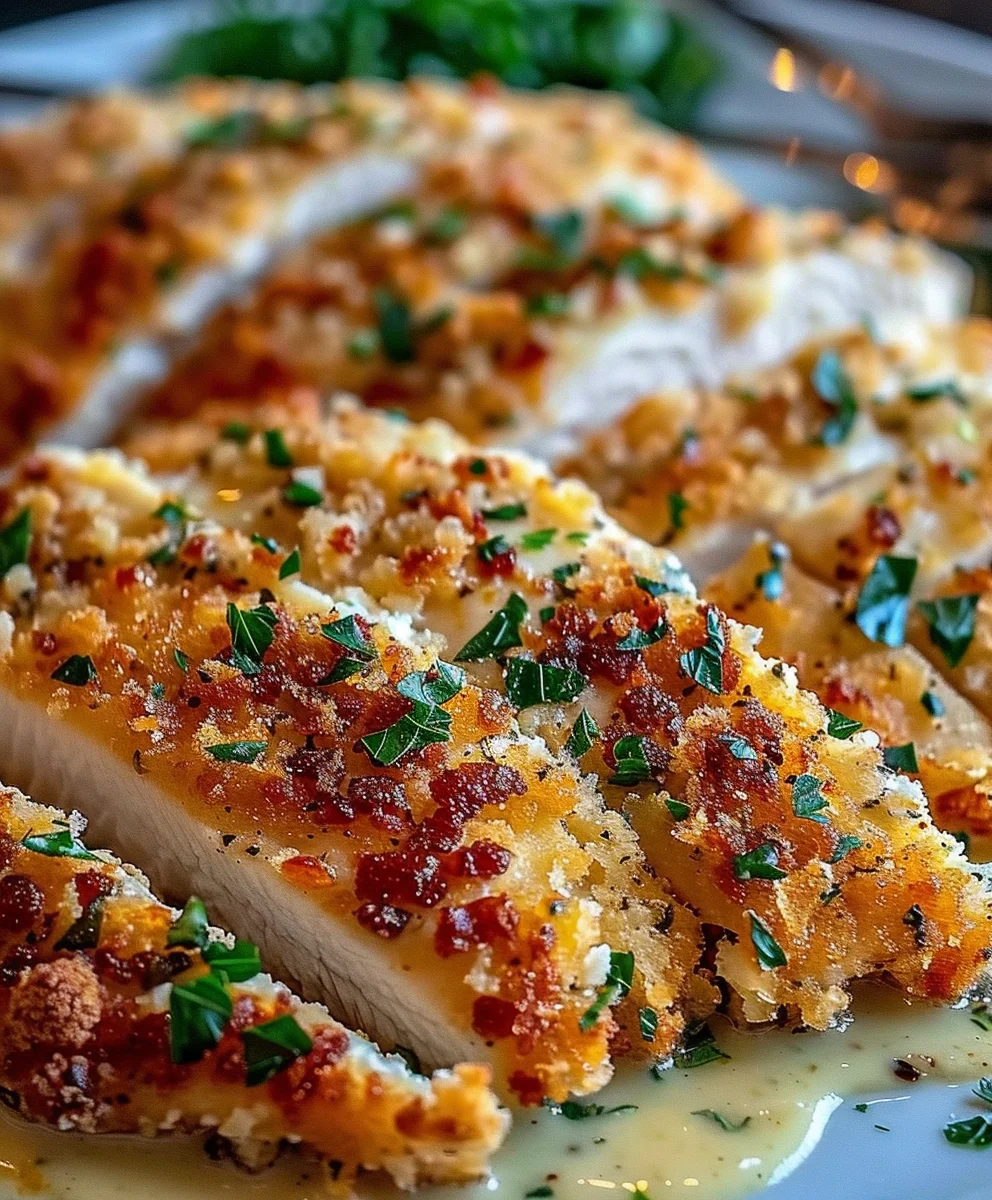
The Best Recipe For Parmesan Crusted Chicken is more than just a meal; it’s an invitation to a culinary experience that consistently impresses and satisfies. Imagine sinking your teeth into a perfectly golden, intensely savory crust, crisp to perfection, yielding to exceptionally tender and juicy chicken beneath. This dish masterfully combines a delightful textural contrast with an explosion of rich, umami flavors from the Parmesan, making it a beloved staple in kitchens worldwide.

Drawing its inspiration from the heart of Italian-American comfort food, where simple ingredients are elevated through clever techniques, Parmesan crusted chicken has carved out a special place on dinner tables. It’s a testament to the enduring appeal of quality ingredients prepared with care. My family and I adore this dish not only for its incredible taste and satisfying crunch but also for its surprising versatility and ease of preparation, transforming an ordinary weeknight into something truly special. If you’ve been searching for a reliable, show-stopping method to achieve poultry perfection, look no further; this truly is the Best Recipe For Parmesan Crusted Chicken you’ll ever make, guaranteeing rave reviews every time.

Best Parmesan Crusted Chicken Recipe – Crispy & Flavorful! this RECIPE

Ingredients:

  • 4 boneless, skinless chicken breasts: About 6-8 ounces each. I always opt for fresh, high-quality chicken for the best flavor and texture. If your breasts are particularly thick, we’ll pound them to an even thickness to ensure they cook through evenly and quickly.
  • 1 cup all-purpose flour: This will be our first dredging station, helping to create a dry surface for the egg wash to adhere to.
  • 2 large eggs: Lightly beaten with a splash of milk or water. These act as the crucial binder, ensuring our delicious crust sticks firmly to the chicken.
  • 2 tablespoons milk (or water): Added to the eggs to thin them slightly, making for a more even coat.
  • 1 cup Panko breadcrumbs: Panko is key here! Its light, airy, and flaky texture delivers an unparalleled crispiness that regular breadcrumbs often can’t match. This is a secret weapon for achieving that perfect crunch.
  • 1 cup freshly grated Parmesan cheese: Please, no pre-shredded stuff! Freshly grated Parmesan melts beautifully and provides a richer, nuttier flavor that truly elevates the crust. It’s one of the stars of our “Best Recipe For Parmesan Crusted Chicken.”
  • 1 teaspoon garlic powder: For that essential aromatic kick.
  • 1 teaspoon onion powder: Complements the garlic beautifully, adding depth.
  • 1/2 teaspoon dried Italian seasoning: A blend of herbs like oregano, basil, thyme, and rosemary, it adds a wonderful aromatic complexity to our crust.
  • 1/2 teaspoon black pepper: Freshly ground is always my preference for maximum flavor.
  • 1 teaspoon salt (or to taste): Divided between seasoning the chicken and the breading mixture. Adjust according to your preference, but don’t skimp entirely, as salt really brings out the flavors.
  • 1/4 cup chopped fresh parsley (for garnish, optional): A vibrant sprinkle of green not only adds freshness but also makes the dish look incredibly inviting.
  • 2 tablespoons olive oil: For an initial pan-sear, adding flavor and helping to achieve that golden-brown crust.
  • 1-2 tablespoons unsalted butter: Added towards the end of pan-frying to enhance browning and infuse a rich, buttery flavor into our glorious crust.
  • Lemon wedges (for serving, optional): A squeeze of fresh lemon juice at the end cuts through the richness and brightens all the flavors. Highly recommended!

Preparation is Key to the Best Parmesan Crusted Chicken

  1. Prepare Your Chicken Breasts: First things first, let’s get our chicken ready. Place each boneless, skinless chicken breast between two sheets of plastic wrap or inside a large freezer bag. Using a meat mallet or the bottom of a heavy skillet, pound the chicken breasts to an even thickness of about 1/2 to 3/4 inch. The goal here isn’t just to flatten them, but to ensure they cook evenly and quickly, preventing some parts from drying out while others are still cooking. This step is crucial for tender, juicy results. Once pounded, remove the plastic, pat the chicken dry thoroughly with paper towels. Don’t skip patting them dry! Excess moisture can prevent your crust from becoming truly crispy. Season both sides of each chicken breast lightly with about 1/2 teaspoon of salt and a good pinch of black pepper. This initial seasoning penetrates the meat, ensuring flavor in every bite.
  2. Set Up Your Dredging Stations: This organized approach is vital for a smooth process and a perfectly coated chicken. You’ll need three shallow dishes or plates with wide rims.

    • In the first dish, place the 1 cup of all-purpose flour. Make sure it’s spread out evenly, creating a consistent base for the next layer.
    • In the second dish, whisk together the 2 large eggs and 2 tablespoons of milk (or water) until well combined and slightly frothy. This is your binding agent! It’s important to whisk thoroughly to ensure an even coating.
    • In the third and largest dish, combine the 1 cup of Panko breadcrumbs, 1 cup of freshly grated Parmesan cheese, 1 teaspoon garlic powder, 1 teaspoon onion powder, 1/2 teaspoon dried Italian seasoning, and the remaining 1/2 teaspoon of black pepper and 1/2 teaspoon of salt. Mix these ingredients thoroughly with a fork until everything is evenly distributed. This mixture is where all that incredible flavor and texture for our “Best Recipe For Parmesan Crusted Chicken” truly comes from, so ensure it’s well-mixed and ready to deliver maximum impact. The Panko provides the crunch, while the Parmesan offers that savory, cheesy depth.

    Before you begin dredging, I always recommend having a clean plate or baking sheet ready next to your dredging station. This is where you’ll place the coated chicken breasts before cooking, helping to keep your kitchen tidy and your workflow efficient, especially when dealing with raw chicken.

  3. Coat the Chicken: Now for the fun part – getting that beautiful crust on! Take one pounded and seasoned chicken breast and dredge it first in the flour, ensuring it’s fully coated on all sides. Gently shake off any excess flour; we want a thin, even layer. Too much flour can lead to a gummy crust. Next, dip the floured chicken into the egg wash, allowing any excess to drip off. This step is crucial for the breadcrumbs to adhere properly. Finally, transfer the chicken to the Panko and Parmesan mixture. Press the mixture firmly onto both sides of the chicken, ensuring it’s completely covered. Don’t be shy; really press it on there to create a thick, flavorful crust that won’t fall off during cooking. Repeat this process for all four chicken breasts, placing each coated piece on your prepared clean plate or baking sheet. If you have time, let the coated chicken rest for about 10-15 minutes. This little rest helps the coating adhere even better, reducing the chance of it falling off during cooking and contributing to an even crisper finish. It’s a small step that makes a big difference to the integrity of your glorious crust.

The Pan-Frying Process for Golden Perfection

  1. Heat the Pan: Place a large, heavy-bottomed skillet (cast iron or stainless steel works wonderfully here for even heat distribution) over medium-high heat. Add 2 tablespoons of olive oil. Allow the oil to heat up until it shimmers slightly and you can see a few wisps of smoke – this indicates it’s hot enough. A crucial tip for achieving a truly crispy crust is ensuring your oil is at the right temperature from the start. If the oil isn’t hot enough, the chicken will absorb too much oil and become greasy instead of crispy. If it’s too hot, the crust will burn before the chicken cooks through, leaving you with an undercooked interior and a charred exterior. Patience is a virtue here, but don’t let it get smoking violently.
  2. Pan-Fry the Chicken: Carefully place two coated chicken breasts into the hot skillet. Make sure not to overcrowd the pan, as this can drastically lower the oil temperature and lead to steaming instead of frying, resulting in a less crispy and potentially soggy crust. Cook for 4-6 minutes per side, or until the crust is a deep golden brown and the internal temperature of the chicken reaches 165°F (74°C). The exact cooking time will depend on the thickness of your chicken and the heat of your stove, so keep a watchful eye on that beautiful crust. When you flip, make sure the first side is truly golden and crisp before turning, as flipping too early can cause the coating to stick to the pan or tear.

    Pro Tip for Juicy Chicken: If your chicken breasts are still a bit thick (perhaps you couldn’t pound them quite thin enough) and you’re worried about them cooking through completely on the stovetop, or if you simply prefer to finish them in the oven for peace of mind, you can transfer them to a baking sheet after achieving a beautiful golden crust on both sides in the skillet. Bake in a preheated oven at 375°F (190°C) for an additional 8-12 minutes, or until the internal temperature reaches 165°F (74°C) as measured with a meat thermometer. This can be a great way to ensure the chicken is cooked perfectly without over-browning or burning the delicate crust.

  3. Add Butter for Enhanced Flavor: About halfway through the cooking of each batch (or just before the final flip), add 1-2 tablespoons of unsalted butter to the skillet. Allow it to melt and foam, then carefully spoon the melted butter over the cooking chicken. This basting technique will infuse even more richness into the Parmesan crust, adding a depth of flavor that is absolutely irresistible and contributes significantly to this being the “Best Recipe For Parmesan Crusted Chicken.” The butter not only adds flavor but also helps with the beautiful browning.
  4. Cook Remaining Chicken: Once the first batch of chicken is done, transfer the cooked chicken to a wire rack set over a baking sheet. This setup helps keep the chicken warm and, crucially, allows any excess oil to drain away, preventing the bottom crust from becoming soggy. Maintaining airflow around the chicken is key for preserving crispiness. Repeat the process with the remaining chicken breasts, adding a little more olive oil to the pan if needed before starting the next batch. You want to ensure there’s enough oil to cover the bottom of the pan for even cooking and optimal browning.

Serving Your Perfectly Crusted Chicken

  1. Rest and Garnish: Once all your Parmesan crusted chicken breasts are beautifully golden and cooked through, let them rest for 5 minutes before serving. Resting allows the juices that have migrated to the center of the meat during cooking to redistribute back throughout the entire breast, ensuring every single bite is incredibly moist, tender, and flavorful. This is a small but mighty step that makes a huge difference in the final quality of your dish – patience truly pays off here.
  2. Final Touches: Transfer the rested chicken to your serving plates. Sprinkle generously with fresh chopped parsley for a burst of vibrant color and herbaceous freshness that cuts through the richness. If you opted for lemon wedges, serve them alongside the chicken, as a squeeze of fresh lemon juice at the table brightens all the savory flavors and adds a delightful, zesty counterpoint that I find absolutely essential.
  3. Enjoy Your Culinary Masterpiece: This Parmesan Crusted Chicken is incredibly versatile and utterly delicious. It’s fantastic served simply with a side of steamed green beans, a fresh garden salad with a light vinaigrette, or, my personal favorite, over a bed of al dente pasta tossed in your favorite marinara sauce. It’s a dish that truly impresses with its crispy exterior, juicy interior, and layers of savory, cheesy flavor. I know you’ll love making and eating this – it truly is the “Best Recipe For Parmesan Crusted Chicken” you’ll find, and I hope it becomes a cherished staple in your kitchen!

Best Parmesan Crusted Chicken Recipe – Crispy & Flavorful!

Conclusion:

I truly hope you’re as excited as I am about this incredible dish! Having walked through the steps, you now possess the knowledge to create something truly spectacular right in your own kitchen. This isn’t just another chicken recipe; it’s a culinary experience waiting to happen, a testament to how simple ingredients can come together to form something truly extraordinary. My aim was to guide you not just through a recipe, but towards a successful and delightful cooking adventure that will impress everyone at your table.

What makes this particular preparation an absolute standout, and dare I say, the Best Recipe For Parmesan Crusted Chicken you’ll ever try, is its remarkable balance of textures and flavors. We’re talking about chicken that’s impossibly tender and juicy on the inside, encased in a golden, gloriously crispy crust bursting with savory Parmesan cheese. It’s not just a meal; it’s a moment. Every single bite delivers that satisfying crunch followed by succulent, perfectly seasoned chicken. It’s the kind of dish that makes weeknights feel special and elevates a simple family dinner into something truly memorable. I’ve personally seen it win over even the pickiest eaters, and it’s become a cornerstone in my own cooking repertoire for its sheer deliciousness and relative ease of execution.

Imagine the irresistible aroma filling your kitchen as it bakes to perfection – that delightful scent of melting cheese, savory herbs, and perfectly cooked chicken. That’s precisely what awaits you. It’s a dish that looks impressive enough for guests but is straightforward enough for a casual Tuesday night meal. The simple magic lies in the way the Parmesan crisps up, forming a protective, flavorful shield that locks in all the moisture, ensuring your chicken is never dry. It’s this attention to detail, this understanding of how flavors and textures harmonise, that truly sets this particular preparation apart from others you might have encountered. Trust me when I say, once you’ve experienced the delightful crunch and the tender interior of this chicken, you’ll understand why it earns such high praise. It’s comfort food perfected, without being overly complicated, making it accessible to cooks of all skill levels.

Elevate Your Plate: Serving Suggestions & Creative Twists

Now that you’ve mastered the core recipe, let’s talk about taking it even further! This Parmesan crusted chicken is incredibly versatile, making it a fantastic centerpiece for a variety of meals. For a truly classic Italian-inspired dinner, I absolutely love serving it alongside a generous portion of al dente spaghetti or linguine tossed in a vibrant homemade marinara sauce. The richness of the chicken pairs beautifully with the tangy sweetness of the tomato. If you’re leaning towards something lighter, a fresh, crisp Caesar salad with homemade croutons or a simple arugula salad dressed with a bright lemon vinaigrette makes for an excellent companion, cutting through the richness perfectly. Roasted asparagus, tender broccoli, or perfectly blanched green beans also make for wonderfully healthy and flavorful sides that complement the chicken without ever overpowering its star quality.

But why stop there? Let’s get wonderfully creative!

Fantastic Sauce Pairings

While delicious on its own, a simple sauce can truly transform this dish and add another layer of sophistication. Try a generous squeeze of fresh lemon juice over the top just before serving for a bright, zesty lift that awakens the palate. A homemade lemon butter sauce, perhaps with a touch of white wine and capers, would add an elegant and savory dimension. For a richer profile, a creamy Alfredo sauce could be drizzled over the chicken, or even served invitingly alongside. A dollop of fresh pesto, whether traditional basil or a sun-dried tomato version, can also introduce a wonderful depth of herbaceous flavor that complements the cheese beautifully.

Exciting Recipe Variations

Don’t be afraid to experiment with the crust itself! While Parmesan is undeniably king here, consider mixing in other hard cheeses like Pecorino Romano for a sharper, saltier kick, or even a touch of finely grated Asiago for a nuanced nutty flavor. For an herbaceous twist, finely chop some fresh parsley, oregano, or thyme and mix it directly into your breadcrumb mixture – the aroma as it bakes is absolutely divine and truly elevates the experience! If you enjoy a bit of heat, a pinch of red pepper flakes in the breading adds a subtle warmth that can be quite addictive and surprising. You could also experiment with the type of breadcrumbs; panko breadcrumbs will give you an even lighter, crispier texture, while homemade breadcrumbs offer a more rustic and hearty feel.

Beyond the crust, consider the presentation and serving style. Slice the cooked chicken and serve it over a bed of creamy polenta for a comforting, hearty meal that feels both rustic and refined. Or, for a quick and satisfying lunch idea, chop it up and add it to a fresh wrap with some crisp greens and a drizzle of ranch or Caesar dressing. It’s also fantastic cold, making delicious and convenient leftovers for salads the next day. You could even adapt this recipe for smaller chicken tenders, making them perfect for a kid-friendly meal or an appetizer platter with various delightful dipping sauces.

Your Culinary Adventure Awaits!

So, now it’s truly your turn! I genuinely encourage you to roll up your sleeves, gather your ingredients, and give this remarkable recipe a try. Don’t be intimidated; the entire process is straightforward, and the rewards are absolutely delicious and well worth the minimal effort. There’s a unique and profound satisfaction that comes from creating something truly wonderful from scratch in your own kitchen, and this Parmesan crusted chicken definitely falls into that gratifying category. It’s a recipe that builds confidence in the kitchen and consistently delivers fantastic, crowd-pleasing results every single time.

Once you’ve experienced the magic of this dish and delighted your taste buds, I would absolutely love to hear about it! Did you try one of the suggested variations? What did you serve it with? Please feel free to share your culinary triumphs, your serving suggestions, or any creative twists you came up with in the comments section below. Your experiences not only inspire me but also genuinely help other home cooks in our vibrant community discover new ideas and approaches. Snap a photo of your masterpiece and share it with us – let’s celebrate delicious food and shared culinary joy together!

Thank you for joining me on this culinary journey. I sincerely hope this recipe becomes a cherished favorite in your household, bringing joy, incredible flavor, and memorable moments to your table for many meals to come. Happy cooking, my friends!


Best Parmesan Crusted Chicken Recipe – Crispy & Flavorful!

Best Parmesan Crusted Chicken Recipe – Crispy & Flavorful!

Imagine sinking your teeth into a perfectly golden, intensely savory crust, crisp to perfection, yielding to exceptionally tender and juicy chicken beneath. This dish masterfully combines a delightful textural contrast with an explosion of rich, umami flavors from the Parmesan, making it a beloved staple in kitchens worldwide. This truly is the Best Recipe For Parmesan Crusted Chicken you’ll ever make, guaranteeing rave reviews every time.

Prep Time
40 Minutes

Cook Time
30 Minutes

Total Time
10 Minutes

Servings
4 servings

Ingredients

  • 4 boneless, skinless chicken breasts (6-8 oz each)
  • 1 cup all-purpose flour
  • 2 large eggs, lightly beaten
  • 2 tablespoons milk (or water)
  • 1 cup Panko breadcrumbs
  • 1 cup freshly grated Parmesan cheese
  • 1 teaspoon garlic powder
  • 1 teaspoon onion powder
  • 1/2 teaspoon dried Italian seasoning
  • 1/2 teaspoon black pepper
  • 1 teaspoon salt
  • 1/4 cup chopped fresh parsley (for garnish, optional)
  • 2 tablespoons olive oil
  • 1-2 tablespoons unsalted butter
  • Lemon wedges (for serving, optional)

Instructions

  1. Step 1
    Pound chicken breasts to 1/2-3/4 inch thickness. Pat dry and season with 1/2 tsp salt and a pinch of pepper.
  2. Step 2
    Set up three dredging stations: 1) 1 cup all-purpose flour, 2) 2 whisked eggs with 2 tbsp milk, 3) 1 cup Panko, 1 cup Parmesan, 1 tsp garlic powder, 1 tsp onion powder, 1/2 tsp Italian seasoning, 1/2 tsp black pepper, and 1/2 tsp salt, thoroughly mixed.
  3. Step 3
    Dredge chicken in flour (shaking off excess), then egg wash (allowing excess to drip), then Panko-Parmesan mixture, pressing firmly to coat completely. Let coated chicken rest for 10-15 minutes.
  4. Step 4
    Heat 2 tablespoons olive oil in a large, heavy-bottomed skillet over medium-high heat until shimmering.
  5. Step 5
    Pan-fry 2 chicken breasts at a time for 4-6 minutes per side until golden brown and internal temperature reaches 165°F (74°C). If needed, finish in a preheated 375°F (190°C) oven for 8-12 minutes.
  6. Step 6
    Halfway through cooking each batch, add 1-2 tablespoons unsalted butter to the skillet and baste chicken with melted butter.
  7. Step 7
    Transfer cooked chicken to a wire rack. Repeat with remaining chicken, adding more olive oil if needed.
  8. Step 8
    Rest chicken for 5 minutes before serving to allow juices to redistribute.
  9. Step 9
    Garnish with fresh chopped parsley and serve with lemon wedges, if desired.
  10. Step 10
    Enjoy your Parmesan Crusted Chicken with your favorite sides like green beans, a garden salad, or pasta with marinara sauce.

Important Information

Nutrition Facts (Per Serving)

It is important to consider this information as approximate and not to use it as definitive health advice.

Allergy Information

Please check ingredients for potential allergens and consult a health professional if in doubt.

« Previous Post
Delicious Quick & Easy Homemade Butter Chicken Recipe
Next Post »
Crispy Smashed Carrots: Your New Favorite Side Dish!

If you enjoyed this…

Chicken Rice Bowl

Chicken Rice Bowl – A Flavorful, Easy, and Satisfying Meal!

Crispy Bang Bang Salmon Bites

Crispy Bang Bang Salmon Bites

Mouthwatering One Pot Lasagna Soup: Dinner’s Never Been Easier!

Primary Sidebar

Browse by Diet

BreakfastDinnerLunchDessertAppetizer

Sweet Peach Yogurt Parfait Delight

One of my fondest memories is from a lazy summer afternoon spent at my grandmother’s house. The sun filtered through the kitchen window, casting a warm glow over the table where she would create her culinary magic. It was during one of those blissful moments that I first tasted her Peach Yogurt Parfait with Honey and Granola. The sweet aroma of ripe peaches mingling with creamy yogurt and the crunch of granola was nothing short of heavenly. It felt like summer captured in a bowl, and I still remember the joy of diving in with a spoon, each layer revealing a new burst of flavor.

When I think about that parfait, I can almost hear the gentle hum of the bees outside, reminding me of the floral notes that honey brings to every bite. The vibrant yellows and soft oranges of the peaches contrast beautifully with the creamy white yogurt and the golden crunch of granola. It’s a dish that not only looks delightful but also tastes like a celebration of fresh, wholesome ingredients.

What makes my version of this Peach Yogurt Parfait special is the careful balance of flavors and textures. I use ripe, juicy peaches, drizzled with locally sourced honey, and a homemade granola that’s bursting with nuts and seeds for an extra crunch. It’s a simple dish, but every layer is crafted with love and attention.

Let me show you exactly how to make this delightful parfait, so you can bring a bit of that summer magic into your kitchen!

Sweet Peach Yogurt Parfait Delight

Why You’ll Love This Recipe

  • Delightfully creamy texture from the Greek yogurt, paired with the juicy sweetness of fresh peaches.
  • Ready in under 20 minutes, making it a quick and satisfying breakfast or snack option.
  • Budget-friendly, using common ingredients that you may already have in your pantry.
  • Customizable with your favorite granola and nuts, allowing you to tailor each parfait to your taste.
  • Perfectly balanced flavors with the bright acidity of lemon juice and the sweetness of honey enhancing the peaches.

Ingredients

  • For the Parfait:
  • 2 cups plain Greek yogurt (or vanilla yogurt for a sweeter option)
  • 2 large ripe peaches, diced (about 2 cups)
  • 1 tablespoon fresh lemon juice (to prevent browning of peaches)
  • 2 tablespoons honey (plus more for drizzling)
  • 1 teaspoon vanilla extract (optional for extra flavor)
  • For the Granola:
  • 1 cup granola (store-bought or homemade; see notes for a simple granola recipe)
  • 1/4 cup sliced almonds (optional for added crunch)
  • 1/4 cup shredded coconut (optional for added flavor)

Let’s dive into some key ingredients that make this Peach Yogurt Parfait so delightful! First, the Greek yogurt is not only creamy but also packed with protein, making it a satisfying option for breakfast or a snack. If you’re looking for a sweeter option, you can easily substitute it with vanilla yogurt, though it may alter the overall flavor balance. Next, the ripe peaches are the star of the show; their natural sweetness shines through, so I recommend choosing peaches that yield slightly to pressure, indicating they’re perfectly ripe. If peaches aren’t in season, feel free to use nectarines or even frozen peaches—just thaw them before use. Finally, honey adds a lovely floral sweetness that ties everything together. If you prefer, maple syrup can serve as a delicious substitute.

Step-by-Step Instructions

  1. Start by preparing the peaches. Wash them thoroughly, then slice and dice them into bite-sized pieces. In a medium bowl, toss the diced peaches with 1 tablespoon of fresh lemon juice to prevent browning. Set aside for about 5 minutes while the lemon juice works its magic.
  2. In a separate bowl, combine the Greek yogurt, 2 tablespoons of honey, and 1 teaspoon of vanilla extract if using. Stir the mixture until smooth and thoroughly blended. This should take about a minute. Avoid overmixing to maintain the creaminess of the yogurt.
  3. Now it’s time to layer your parfait. Grab a clear glass or bowl to showcase your beautiful creation. Start with a generous spoonful of the yogurt mixture at the bottom—about 1/4 cup will do. Use a spoon to spread it evenly.
  4. Add a layer of the diced peaches over the yogurt, ensuring they cover the yogurt completely. You might want to use about half of what you have prepared—roughly 1 cup. This layer should be visually appealing, so arrange the peaches neatly.
  5. Sprinkle 1/4 cup of granola over the peaches. This adds a delightful crunch. Make sure to distribute it evenly to ensure every bite has that satisfying texture. Avoid packing it down too tightly, as you want it to maintain its crunch.
  6. Repeat the layers: spoon in another 1/4 cup of yogurt, followed by another cup of peaches, and another sprinkle of granola. You should have at least two layers, but feel free to add more depending on your glass size.
  7. Finish off your parfait with a drizzle of honey on top for added sweetness and a touch of elegance. If you’re using sliced almonds or shredded coconut, sprinkle them on top now. It adds a lovely visual contrast and extra flavor.
  8. Serve immediately or refrigerate for up to 30 minutes before serving to allow the flavors to meld together. However, I recommend enjoying it fresh to maintain the granola’s crunch.

Pro Tips for the Best Peach Yogurt Parfait With Honey And Granola

  • Make sure to choose ripe peaches for the best flavor and texture. A common mistake is using unripe fruit, which can lead to a less enjoyable parfait. Look for peaches that are fragrant and slightly soft to the touch.
  • Use a clear glass to assemble your parfait; this not only makes for a beautiful presentation but also allows you to see the colorful layers, which adds to the enjoyment of eating it.
  • For an even creamier texture, consider whipping the Greek yogurt with a hand mixer for a couple of minutes before layering. This small adjustment makes a huge difference in mouthfeel.
  • Be mindful of the granola-to-yogurt ratio. Too much granola can overwhelm the parfait, while too little can make it feel too creamy. Aim for about 1/4 cup of granola per layer for the perfect balance.
  • If you’re making this for a gathering, consider preparing the yogurt and peaches ahead of time and layering them just before serving. This ensures the granola stays crunchy!

Variations & Serving Ideas

There are so many ways to get creative with your Peach Yogurt Parfait! For a tropical twist, swap out the peaches for mangoes or pineapples and top with coconut flakes. If you prefer a berry flavor, mix in some blueberries or strawberries with the peaches for added color and taste. For a nutty version, incorporate chopped walnuts or pecans instead of almonds.

As for serving ideas, this parfait pairs beautifully with a side of scrambled eggs for a hearty breakfast or fresh fruit salad for a light lunch. You might also enjoy it alongside whole grain toast with almond butter for an energizing snack. The contrast of flavors and textures will elevate your meal experience!

Storage, Make-Ahead & Reheating

The Peach Yogurt Parfait is best enjoyed fresh, but you can prepare some components ahead of time. Store the layered parfait in an airtight container in the refrigerator for up to 24 hours. However, be cautious; the granola may lose its crunch if stored too long. You can freeze the yogurt and peach mixture for up to 2 months; just remember to thaw it in the refrigerator overnight before serving.

If you plan to enjoy this dish the next day, it can taste even better as the flavors meld together. Just remember to add the granola right before serving to keep its delightful crunch!

Frequently Asked Questions

Can I make Peach Yogurt Parfait With Honey And Granola ahead of time?

Yes — in fact, it tastes even better the next day as the flavors meld. However, I recommend waiting to add the granola until just before serving to maintain its crunch.

What can I substitute for Greek yogurt?

If you prefer a lighter option, you can substitute Greek yogurt with regular yogurt or a dairy-free alternative like coconut yogurt. Just remember that this may alter the creaminess and flavor profile slightly.

Can I use frozen peaches for this parfait?

Absolutely! Just make sure to thaw the frozen peaches before using them. They will still add great flavor, though the texture may be slightly softer than fresh peaches.

How do I make the parfait vegan?

To make a vegan version, substitute the Greek yogurt with a plant-based yogurt alternative, and replace honey with maple syrup or agave nectar. This keeps the parfait sweet while adhering to a vegan diet.

What other fruits can I use in this recipe?

You can mix and match fruits based on your preference. Try using strawberries, blueberries, raspberries, or even bananas. Just make sure to adjust the lemon juice as needed to prevent browning.

Sweet Peach Yogurt Parfait Delight

Final Thoughts

The Peach Yogurt Parfait with Honey and Granola is a delightful blend of creamy yogurt, sweet peaches, and crunchy granola that creates a satisfying and nourishing treat. Each layer bursts with flavor, making it a perfect choice for breakfast or a light dessert.

This is the kind of recipe I come back to again and again, especially when I want something refreshing and wholesome to start my day. The harmony of sweet and tart flavors, combined with the delightful crunch, never fails to lift my spirits!

I encourage you to give this parfait a try and indulge in its comforting goodness. Feel free to share your results or even add your own twist—perhaps a sprinkle of cinnamon or a handful of nuts. Enjoy creating your perfect parfait!

Print
clock clock iconcutlery cutlery iconflag flag iconfolder folder iconinstagram instagram iconpinterest pinterest iconfacebook facebook iconprint print iconsquares squares iconheart heart iconheart solid heart solid icon

Peach Yogurt Parfait


  • Author: Lily author
  • Total Time: 15 minutes
  • Yield: 4 servings 1x
Pin Recipe
Print Recipe

Description

This Peach Yogurt Parfait combines creamy Greek yogurt, juicy peaches, and crunchy granola for a delightful treat. It’s a perfect breakfast or snack that captures the essence of summer in every bite.


Ingredients

Scale
  • For the Parfait:
  • 2 cups plain Greek yogurt (or vanilla yogurt for a sweeter option)
  • 2 large ripe peaches, diced (about 2 cups)
  • 1 tablespoon fresh lemon juice (to prevent browning of peaches)
  • 2 tablespoons honey (plus more for drizzling)
  • 1 teaspoon vanilla extract (optional for extra flavor)
  • For the Granola:
  • 1 cup granola (store-bought or homemade; see notes for a simple granola recipe)
  • 1/4 cup sliced almonds (optional for added crunch)
  • 1/4 cup shredded coconut (optional for added flavor)

Instructions

  1. Start by preparing the peaches. Wash them thoroughly, then slice and dice them into bite-sized pieces. In a medium bowl, toss the diced peaches with 1 tablespoon of fresh lemon juice to prevent browning. Set aside for about 5 minutes while the lemon juice works its magic.
  2. In a separate bowl, combine the Greek yogurt, 2 tablespoons of honey, and 1 teaspoon of vanilla extract if using. Stir the mixture until smooth and thoroughly blended. This should take about a minute. Avoid overmixing to maintain the creaminess of the yogurt.
  3. Now it’s time to layer your parfait. Grab a clear glass or bowl to showcase your beautiful creation. Start with a generous spoonful of the yogurt mixture at the bottom—about 1/4 cup will do. Use a spoon to spread it evenly.
  4. Add a layer of the diced peaches over the yogurt, ensuring they cover the yogurt completely. You might want to use about half of what you have prepared—roughly 1 cup. This layer should be visually appealing, so arrange the peaches neatly.
  5. Sprinkle 1/4 cup of granola over the peaches. This adds a delightful crunch. Make sure to distribute it evenly to ensure every bite has that satisfying texture. Avoid packing it down too tightly, as you want it to maintain its crunch.
  6. Repeat the layers: spoon in another 1/4 cup of yogurt, followed by another cup of peaches, and another sprinkle of granola. You should have at least two layers, but feel free to add more depending on your glass size.
  7. Finish off your parfait with a drizzle of honey on top for added sweetness and a touch of elegance. If you’re using sliced almonds or shredded coconut, sprinkle them on top now. It adds a lovely visual contrast and extra flavor.
  8. Serve immediately or refrigerate for up to 30 minutes before serving to allow the flavors to meld together. However, I recommend enjoying it fresh to maintain the granola’s crunch.
  • Prep Time: 15 mins
  • Cook Time: 0 mins
  • Category: Breakfast
  • Method: No-cook
  • Cuisine: American

Nutrition

  • Serving Size: 1 parfait
  • Calories: 250
  • Sugar: 20 g
  • Sodium: 50 mg
  • Fat: 5 g
  • Saturated Fat: 2 g
  • Unsaturated Fat: 3 g
  • Trans Fat: 0 g
  • Carbohydrates: 40 g
  • Fiber: 3 g
  • Protein: 10 g
  • Cholesterol: 10 mg

Keywords: Choose ripe peaches for the best flavor and texture. Use a clear glass for a beautiful presentation. For creaminess, consider whipping the yogurt before layering. Be mindful of the granola-to-yogurt ratio. Prepare yogurt and peaches ahead of time for gatherings, layering just before serving.

Did you make this recipe?

Share a photo and tag us — we can't wait to see what you've made!

Sun-Kissed Frozen Orange Cream Slush

As a child, summer days felt like they lasted forever. I remember the sticky heat wrapping around me as I played outside, my laughter mingling with the sounds of the neighborhood. But nothing could cool me down quite like the moment I’d spot my grandmother, laboring over her blender, whipping up her famous Frozen Orange Creamsicle Slush. That vibrant orange treat, with its frosty texture and sweet citrus aroma, was like a burst of sunshine in a cup. Just one sip, and I could feel the coolness wash over me, sparking pure joy.

This Frozen Orange Creamsicle Slush has a way of making you feel like a kid again. Its creamy, dreamy consistency is a delightful balance of bright orange and soft vanilla, inviting you to dive right in. The refreshing tang of orange dances on your tongue, while the smooth creaminess envelops you in a comforting embrace. It’s a nostalgic treat that’s perfect for hot summer afternoons or anytime you need a little pick-me-up.

What makes my version of this slush stand out is the addition of a hint of vanilla bean, which elevates the flavor and adds an extra layer of richness. Plus, it’s super easy to whip up with just a few simple ingredients that you probably already have on hand! So, if you’re ready to relive those sun-soaked memories, let me show you exactly how to make it.

Sun-Kissed Frozen Orange Cream Slush

Why You’ll Love This Recipe

  • Each slush is a perfect blend of creamy vanilla and zesty orange, creating a nostalgic flavor reminiscent of summer days.
  • This refreshing treat is ready in under 15 minutes, making it an ideal quick dessert for unexpected guests or hot afternoons.
  • With just 8 simple ingredients, it’s budget-friendly, ensuring you don’t have to break the bank to enjoy a delicious slush.
  • The slush has a perfectly smooth texture, thanks to the combination of ice and ice cream, providing a delightful contrast to the bright citrus flavors.
  • It’s highly customizable; you can easily adjust the sweetness and add fresh herbs for a unique twist that suits your taste.

Ingredients

  • 2 cups orange juice (freshly squeezed or store-bought)
  • 1 cup vanilla ice cream
  • 1 cup crushed ice
  • 1/2 cup milk (whole or 2%)
  • 1/4 cup granulated sugar (adjust based on sweetness preference)
  • 1 teaspoon vanilla extract
  • Zest of 1 orange (for added flavor)
  • Fresh orange slices and mint leaves (for garnish)

The star of this Frozen Orange Creamsicle Slush is the orange juice, which provides the vibrant, citrusy base. Freshly squeezed juice will yield the brightest flavor, but store-bought options can be just as convenient. If you’re opting for store-bought, choose 100% pure juice with no added sugars for the best results. Another essential ingredient is the vanilla ice cream; it adds creaminess and sweetness. You can substitute it with dairy-free ice cream if you’re looking for a vegan option. Whole or 2% milk complements the ice cream, creating a smooth blend. If you want a lower-calorie version, almond or oat milk can be good alternatives.

Lastly, the granulated sugar can be adjusted based on your sweetness preference. If you prefer a more natural sweetener, consider using honey or agave syrup. The orange zest enhances the flavor profile, providing an aromatic pop that brings the whole slush together. Don’t skip it! It adds an extra layer of brightness that makes this slush truly special.

Step-by-Step Instructions

  1. Start by preparing your ingredients. Gather 2 cups of orange juice, 1 cup of vanilla ice cream, and 1 cup of crushed ice. Make sure the ice is finely crushed, as larger chunks can make blending difficult.
  2. In a blender, combine the orange juice, vanilla ice cream, crushed ice, and 1/2 cup of milk. Add 1/4 cup of granulated sugar and 1 teaspoon of vanilla extract. If you like a sweeter slush, consider adding a bit more sugar at this stage.
  3. Add the zest of 1 orange to the blender. This step is crucial for enhancing the citrus flavor of your slush. Make sure not to include the bitter white pith—only the flavorful zest.
  4. Blend the mixture on medium-high speed for about 30-45 seconds. Stop once the ingredients are fully combined and the slush has a smooth, even consistency. If you notice large chunks of ice, blend for an additional 10-15 seconds. Avoid over-blending, as this can make the slush too liquidy.
  5. Once blended, taste the slush. If it needs more sweetness, add a little more sugar and blend for a few more seconds. If it’s too thick, you can add a splash of milk to reach your desired consistency.
  6. Pour the slush into glasses. This recipe typically serves 4, but you can easily double it for larger gatherings. Use a spoon to help guide the slush into the glasses if needed.
  7. Garnish each serving with fresh orange slices and mint leaves. The mint not only adds a pop of color but also a refreshing aroma that complements the citrus flavors beautifully.
  8. Serve immediately and enjoy! If you’ve made extra, you can refrigerate it for a short time, but it’s best enjoyed fresh.

Pro Tips for the Best Frozen Orange Creamsicle Slush

  • Don’t skip the orange zest! It’s a game-changer for flavor. Always zest before juicing to make it easier.
  • Use a high-powered blender for the best texture. A standard blender may struggle with ice, leading to uneven consistency. If you have a food processor, that can work too, but ensure the ice is finely crushed.
  • Adjust the ice-to-liquid ratio carefully. If your slush is too thick, it won’t blend well. Start with less ice and add more until you reach your preferred texture.
  • Be cautious with the sugar! Always start with the lower amount, as you can easily add more, but it’s hard to fix an overly sweet slush.
  • For a fun twist, consider adding a splash of coconut milk or a handful of fresh fruit like strawberries or pineapple. This not only enhances the flavor but also adds a beautiful color contrast.

Variations & Serving Ideas

There are countless ways to put a spin on your Frozen Orange Creamsicle Slush. Consider making a tropical version by adding in some pineapple juice or coconut milk for a delightful tropical twist. If you’re feeling adventurous, try incorporating a handful of frozen mango or peach slices for added sweetness. For a lighter version, swap out the vanilla ice cream for Greek yogurt for a creamy yet tangy alternative.

As for serving ideas, this refreshing slush pairs wonderfully with light summer dishes like grilled chicken skewers, fish tacos, or a simple salad topped with citrus vinaigrette. The bright, zesty flavors of the slush complement these dishes perfectly, making them an ideal pairing for a sunny day.

Storage, Make-Ahead & Reheating

This Frozen Orange Creamsicle Slush is best enjoyed fresh, but if you have leftovers, you can store them in an airtight container in the fridge for up to 2 days. Just keep in mind that the slush may lose some of its texture over time as the ice melts. It doesn’t freeze well, as the ice will turn into a solid block. If you must freeze it, blend again after thawing to restore the slushy consistency. This treat is best the day you make it, as the flavors meld together beautifully overnight, enhancing its deliciousness.

Frequently Asked Questions

Can I make Frozen Orange Creamsicle Slush ahead of time?

Yes — in fact, it tastes even better the next day as the flavors meld. However, it’s best to enjoy it fresh, as the texture can change if stored for too long. If you need to prepare it ahead, keep it in the fridge and re-blend before serving.

What kind of orange juice should I use?

For the best flavor, use freshly squeezed orange juice. However, if you’re short on time, opt for 100% pure store-bought juice without added sugars. This will ensure that your slush remains flavorful and refreshing.

Can I substitute the vanilla ice cream?

Absolutely! If you’re looking for a dairy-free option, coconut milk ice cream or a non-dairy vanilla ice cream can work wonderfully. They will still provide the creamy texture and sweetness you desire.

How can I adjust the sweetness of my slush?

You can easily adjust the sweetness by modifying the amount of sugar added. Start with 1/4 cup and taste the mixture before blending. If you prefer it sweeter, add more sugar gradually until it reaches your desired level.

What should I do if my slush is too thick?

If your slush is too thick, simply add a splash of milk or orange juice and blend again. This will help achieve a more drinkable consistency while maintaining the slushy texture. Adjust gradually to reach your preferred thickness.

Sun-Kissed Frozen Orange Cream Slush

Final Thoughts

The Frozen Orange Creamsicle Slush is a delightful blend of refreshing citrus and creamy goodness, making it a perfect treat for warm days or any time you crave a taste of nostalgia. The way the bright orange flavor dances with the creamy texture truly elevates this slush, transforming it into a satisfying escape from the everyday.

This is the kind of recipe I come back to again and again, especially when I’m looking to cool down or impress guests at a summer gathering. It’s simple to make and always brings smiles all around! I encourage you to try this recipe for yourself—don’t hesitate to share your results or even put your own spin on it. Happy slushing!

Print
clock clock iconcutlery cutlery iconflag flag iconfolder folder iconinstagram instagram iconpinterest pinterest iconfacebook facebook iconprint print iconsquares squares iconheart heart iconheart solid heart solid icon

Frozen Orange Creamsicle Slush


  • Author: Lily author
  • Total Time: 15 minutes
  • Yield: 4 servings 1x
Pin Recipe
Print Recipe

Description

This Frozen Orange Creamsicle Slush is a refreshing treat that combines creamy vanilla and zesty orange flavors. Perfect for hot summer days, it brings back nostalgic memories with every sip.


Ingredients

Scale
  • 2 cups orange juice (freshly squeezed or store-bought)
  • 1 cup vanilla ice cream
  • 1 cup crushed ice
  • 1/2 cup milk (whole or 2%)
  • 1/4 cup granulated sugar (adjust based on sweetness preference)
  • 1 teaspoon vanilla extract
  • Zest of 1 orange (for added flavor)
  • Fresh orange slices and mint leaves (for garnish)

Instructions

  1. Start by preparing your ingredients. Gather 2 cups of orange juice, 1 cup of vanilla ice cream, and 1 cup of crushed ice. Make sure the ice is finely crushed, as larger chunks can make blending difficult.
  2. In a blender, combine the orange juice, vanilla ice cream, crushed ice, and 1/2 cup of milk. Add 1/4 cup of granulated sugar and 1 teaspoon of vanilla extract. If you like a sweeter slush, consider adding a bit more sugar at this stage.
  3. Add the zest of 1 orange to the blender. This step is crucial for enhancing the citrus flavor of your slush. Make sure not to include the bitter white pith—only the flavorful zest.
  4. Blend the mixture on medium-high speed for about 30-45 seconds. Stop once the ingredients are fully combined and the slush has a smooth, even consistency. If you notice large chunks of ice, blend for an additional 10-15 seconds. Avoid over-blending, as this can make the slush too liquidy.
  5. Once blended, taste the slush. If it needs more sweetness, add a little more sugar and blend for a few more seconds. If it’s too thick, you can add a splash of milk to reach your desired consistency.
  6. Pour the slush into glasses. This recipe typically serves 4, but you can easily double it for larger gatherings. Use a spoon to help guide the slush into the glasses if needed.
  7. Garnish each serving with fresh orange slices and mint leaves. The mint not only adds a pop of color but also a refreshing aroma that complements the citrus flavors beautifully.
  8. Serve immediately and enjoy! If you’ve made extra, you can refrigerate it for a short time, but it's best enjoyed fresh.
  • Prep Time: 15 min
  • Cook Time: 0 min
  • Category: Dessert
  • Method: Blending
  • Cuisine: American

Nutrition

  • Serving Size: 1 serving
  • Calories: 200
  • Sugar: 30 g
  • Sodium: 50 mg
  • Fat: 5 g
  • Saturated Fat: 3 g
  • Unsaturated Fat: 2 g
  • Trans Fat: 0 g
  • Carbohydrates: 40 g
  • Fiber: 1 g
  • Protein: 2 g
  • Cholesterol: 20 mg

Keywords: Don't skip the orange zest! It's a game-changer for flavor. Always zest before juicing to make it easier.

Did you make this recipe?

Share a photo and tag us — we can't wait to see what you've made!

Zesty Lemon Poppy Seed Delight

One rainy afternoon, I found myself in my grandmother’s cozy kitchen, the kind that always smelled like warmth and love. She was whipping up her famous Lemon Poppy Seed Loaf, a recipe that had been passed down through generations. As the batter came together, the zesty aroma of fresh lemons filled the air, mingling perfectly with the nutty fragrance of poppy seeds. I can still picture her, apron-clad, as she expertly drizzled a vibrant citrus icing over the loaf, creating a glossy, sun-kissed finish that beckoned us to dive in. It was a moment that sparked my own passion for baking, and this recipe has become a cherished staple in my home ever since.

When you take a bite of this Lemon Poppy Seed Loaf, it’s like a burst of sunshine on your palate. The loaf is beautifully golden, with a tender crumb that melts in your mouth. Each slice is speckled with tiny poppy seeds, adding a delightful crunch that contrasts beautifully with the tangy sweetness of the lemon. And that citrus icing? It’s the finishing touch that elevates this loaf from ordinary to extraordinary, with its bright, zesty flavor dancing on your taste buds.

This recipe stands out because it embraces simplicity while delivering on flavor. I’ve added a hint of vanilla to the batter, enhancing the overall taste and making it even more indulgent. Trust me, once you make this Lemon Poppy Seed Loaf With Citrus Icing, it’ll become a go-to in your baking repertoire.

So, let me show you exactly how to make it!

Zesty Lemon Poppy Seed Delight

Why You’ll Love This Recipe

  • Moist and tender crumb that melts in your mouth, thanks to the perfect balance of butter and buttermilk.
  • Bright, zesty lemon flavor paired with crunchy poppy seeds, creating a delightful texture and taste experience.
  • Easy to whip up in just about an hour, perfect for last-minute gatherings or a cozy afternoon treat.
  • Budget-friendly with everyday ingredients, making it an accessible option for all home bakers.
  • The citrus icing adds a sweet tang that elevates the loaf, turning a simple recipe into a showstopper!

Ingredients

  • 1 ½ cups (190g) all-purpose flour
  • 1 teaspoon baking powder
  • ½ teaspoon baking soda
  • ½ teaspoon salt
  • 3 tablespoons poppy seeds
  • ½ cup (115g) unsalted butter, softened to room temperature
  • 1 cup (200g) granulated sugar
  • 2 large eggs
  • 1 teaspoon vanilla extract
  • 1 teaspoon lemon zest (from about 1 medium lemon)
  • ½ cup (120ml) buttermilk
  • 2 tablespoons fresh lemon juice

For the Citrus Icing:

  • 1 cup (120g) powdered sugar
  • 2 tablespoons fresh lemon juice
  • 1 tablespoon orange juice
  • 1 teaspoon lemon zest (for garnish, optional)

Let’s dive into the key ingredients that make this Lemon Poppy Seed Loaf so special. The all-purpose flour provides the structure and base for the loaf, while the baking powder and baking soda ensure it rises perfectly, giving the loaf a light texture. For a gluten-free variation, you could substitute the flour with a gluten-free all-purpose blend. Poppy seeds not only add a delightful crunch but also contribute to the unique flavor profile that pairs well with the citrus notes.

Unsalted butter is crucial for achieving the buttery richness that makes this loaf so moist. If you’re looking for a dairy-free option, coconut oil or a vegan butter can be used instead. The buttermilk is another essential component, providing acidity that activates the baking soda for a fluffy texture. If you don’t have buttermilk on hand, you can easily make a substitute by mixing ½ cup of milk with 1 tablespoon of vinegar or lemon juice and letting it sit for about 5 minutes.

Step-by-Step Instructions

  1. Preheat your oven to 350°F (175°C). Grease a 9×5-inch loaf pan or line it with parchment paper for easy removal later.
  2. In a medium mixing bowl, whisk together 1 ½ cups of all-purpose flour, 1 teaspoon of baking powder, ½ teaspoon of baking soda, ½ teaspoon of salt, and 3 tablespoons of poppy seeds. This helps to evenly distribute the baking agents and ensures a uniform rise.
  3. In a large mixing bowl, cream together ½ cup of softened unsalted butter and 1 cup of granulated sugar using an electric mixer on medium speed for about 3-4 minutes, until the mixture is light and fluffy. Make sure to scrape down the sides of the bowl occasionally.
  4. Add 2 large eggs, 1 teaspoon of vanilla extract, and 1 teaspoon of lemon zest to the creamed butter and sugar, mixing until fully combined. You want a smooth consistency, so ensure there are no lumps of butter.
  5. In a small bowl, combine ½ cup of buttermilk and 2 tablespoons of fresh lemon juice. Alternately add the dry ingredients and buttermilk mixture to the butter mixture, starting and ending with the dry ingredients. Mix just until combined; do not overmix, as this can lead to a dense loaf.
  6. Pour the batter into the prepared loaf pan. Smooth the top with a spatula, ensuring it’s even. Bake in the preheated oven for 50-60 minutes, or until a toothpick inserted in the center comes out clean. The edges should be lightly golden brown, and the center should feel just set.
  7. Once baked, remove the loaf from the oven and allow it to cool in the pan for about 10 minutes. Then, transfer it to a wire rack to cool completely. Resist the urge to slice too soon, as it will be crumbly if it’s still warm.
  8. While the loaf is cooling, prepare the citrus icing. In a medium bowl, whisk together 1 cup of powdered sugar, 2 tablespoons of fresh lemon juice, and 1 tablespoon of orange juice until smooth. If the icing is too thick, you can add a little more juice to reach your desired consistency.
  9. Once the loaf is completely cool, drizzle the citrus icing over the top. If you like, sprinkle with an additional teaspoon of lemon zest for an extra pop of flavor and color.

Pro Tips for the Best Lemon Poppy Seed Loaf With Citrus Icing

  • Be careful not to overmix your batter; this is a common mistake that can lead to a dense loaf. Mix just until the dry ingredients are incorporated for a light and fluffy texture.
  • Use room temperature ingredients, especially the butter and eggs. This helps to create a smoother batter and ensures even baking. Take your eggs out of the fridge about 30 minutes before you start.
  • For a more pronounced lemon flavor, consider adding a little lemon extract in addition to the zest and juice. Just a half teaspoon can elevate the citrus notes significantly.
  • When measuring your flour, spoon it into the measuring cup and level it off with a knife instead of scooping directly from the bag. This prevents packing and ensures you don’t end up with a dry loaf.
  • Invest in a good quality loaf pan; it makes a difference in heat distribution, which ensures even baking. If your pan is dark-coated, reduce the oven temperature by 25°F to prevent over-browning.

Variations & Serving Ideas

For a delightful twist, consider adding blueberries or raspberries to the batter for a fruity burst of flavor. You can also experiment with different citrus fruits—try lime or grapefruit zest and juice for a refreshing change. For a healthier option, substitute half of the all-purpose flour with whole wheat flour for added fiber without compromising too much on texture.

This Lemon Poppy Seed Loaf pairs beautifully with a light salad, such as a mixed greens salad with a vinaigrette, or a cup of tea for a cozy afternoon treat. It also complements a creamy cheese platter, as the acidity of the loaf balances rich cheeses perfectly. Lastly, a scoop of vanilla ice cream on the side creates a delightful contrast of temperatures and flavors!

Storage, Make-Ahead & Reheating

This Lemon Poppy Seed Loaf can be stored at room temperature for up to 3 days if wrapped tightly in plastic wrap. If you want to keep it longer, it freezes well for up to 3 months. To freeze, wrap the loaf tightly in plastic wrap and then in aluminum foil to prevent freezer burn.

When you’re ready to enjoy it again, simply thaw it in the fridge overnight. Reheat individual slices in the microwave for 15-20 seconds or in a toaster oven until warmed through. Interestingly, many people find that this loaf tastes even better the next day, as the flavors have time to meld!

Frequently Asked Questions

Can I make Lemon Poppy Seed Loaf With Citrus Icing ahead of time?

Yes — in fact, it tastes even better the next day! You can make the loaf a day in advance, allowing the flavors to develop. Just be sure to store it in an airtight container to maintain its moisture.

Can I substitute the poppy seeds?

Absolutely! If you don’t have poppy seeds on hand or prefer an alternative, you can use sesame seeds for a similar crunch or omit them entirely for a smooth loaf.

What can I use instead of buttermilk?

If you don’t have buttermilk, you can easily create a substitute by mixing ½ cup of milk (dairy or plant-based) with 1 tablespoon of vinegar or lemon juice. Let it sit for 5 minutes before using in the recipe.

How can I make this recipe gluten-free?

To make a gluten-free version of this Lemon Poppy Seed Loaf, substitute the all-purpose flour with a gluten-free all-purpose flour blend. Just ensure that the blend contains a binding agent like xanthan gum for the best results.

What is the best way to store leftover loaf?

Leftover Lemon Poppy Seed Loaf should be stored in an airtight container at room temperature for up to 3 days. For longer storage, wrap it tightly and freeze for up to 3 months. Thaw it before serving for the best texture.

Zesty Lemon Poppy Seed Delight

Final Thoughts

The Lemon Poppy Seed Loaf with Citrus Icing is truly a delightful treat that brings a burst of brightness to any occasion. The zesty lemon flavor combined with the subtle crunch of poppy seeds creates a satisfying balance, while the citrus icing adds a touch of sweetness that perfectly complements the loaf’s tanginess.

This is the kind of recipe I come back to again and again, especially when I want to brighten up a gloomy day or celebrate a small victory. The aroma that fills the kitchen as it bakes is absolutely heavenly! I encourage you to give this recipe a try; you might just find it becoming a beloved staple in your home. Don’t forget to share your results or even add your own unique twist—I can’t wait to see what you create!

Print
clock clock iconcutlery cutlery iconflag flag iconfolder folder iconinstagram instagram iconpinterest pinterest iconfacebook facebook iconprint print iconsquares squares iconheart heart iconheart solid heart solid icon

Lemon Poppy Seed Loaf


  • Author: Lily author
  • Total Time: 16 minute
  • Yield: 1 loaf 1x
Pin Recipe
Print Recipe

Description

This Lemon Poppy Seed Loaf is a delightful treat that combines zesty lemon flavor with crunchy poppy seeds. Topped with a citrus icing, it’s perfect for any occasion.


Ingredients

Scale
  • 1 ½ cups (190g) all-purpose flour
  • 1 teaspoon baking powder
  • ½ teaspoon baking soda
  • ½ teaspoon salt
  • 3 tablespoons poppy seeds
  • ½ cup (115g) unsalted butter, softened to room temperature
  • 1 cup (200g) granulated sugar
  • 2 large eggs
  • 1 teaspoon vanilla extract
  • 1 teaspoon lemon zest (from about 1 medium lemon)
  • ½ cup (120ml) buttermilk
  • 2 tablespoons fresh lemon juice
  • 1 cup (120g) powdered sugar
  • 2 tablespoons fresh lemon juice
  • 1 tablespoon orange juice
  • 1 teaspoon lemon zest (for garnish, optional)

Instructions

  1. Preheat your oven to 350°F (175°C). Grease a 9×5-inch loaf pan or line it with parchment paper for easy removal later.
  2. In a medium mixing bowl, whisk together 1 ½ cups of all-purpose flour, 1 teaspoon of baking powder, ½ teaspoon of baking soda, ½ teaspoon of salt, and 3 tablespoons of poppy seeds. This helps to evenly distribute the baking agents and ensures a uniform rise.
  3. In a large mixing bowl, cream together ½ cup of softened unsalted butter and 1 cup of granulated sugar using an electric mixer on medium speed for about 3-4 minutes, until the mixture is light and fluffy. Make sure to scrape down the sides of the bowl occasionally.
  4. Add 2 large eggs, 1 teaspoon of vanilla extract, and 1 teaspoon of lemon zest to the creamed butter and sugar, mixing until fully combined. You want a smooth consistency, so ensure there are no lumps of butter.
  5. In a small bowl, combine ½ cup of buttermilk and 2 tablespoons of fresh lemon juice. Alternately add the dry ingredients and buttermilk mixture to the butter mixture, starting and ending with the dry ingredients. Mix just until combined; do not overmix, as this can lead to a dense loaf.
  6. Pour the batter into the prepared loaf pan. Smooth the top with a spatula, ensuring it’s even. Bake in the preheated oven for 50-60 minutes, or until a toothpick inserted in the center comes out clean. The edges should be lightly golden brown, and the center should feel just set.
  7. Once baked, remove the loaf from the oven and allow it to cool in the pan for about 10 minutes. Then, transfer it to a wire rack to cool completely. Resist the urge to slice too soon, as it will be crumbly if it’s still warm.
  8. While the loaf is cooling, prepare the citrus icing. In a medium bowl, whisk together 1 cup of powdered sugar, 2 tablespoons of fresh lemon juice, and 1 tablespoon of orange juice until smooth. If the icing is too thick, you can add a little more juice to reach your desired consistency.
  9. Once the loaf is completely cool, drizzle the citrus icing over the top. If you like, sprinkle with an additional teaspoon of lemon zest for an extra pop of flavor and color.
  • Prep Time: 15 mins
  • Cook Time: 50-60 mins
  • Category: Dessert
  • Method: Baking
  • Cuisine: American

Nutrition

  • Serving Size: 1 slice
  • Calories: 200
  • Sugar: 15 g
  • Sodium: 150 mg
  • Fat: 8 g
  • Saturated Fat: 5 g
  • Unsaturated Fat: 3 g
  • Trans Fat: 0 g
  • Carbohydrates: 30 g
  • Fiber: 1 g
  • Protein: 3 g
  • Cholesterol: 40 mg

Keywords: Be careful not to overmix your batter; this is a common mistake that can lead to a dense loaf. Use room temperature ingredients for a smoother batter and even baking.

Did you make this recipe?

Share a photo and tag us — we can't wait to see what you've made!

  • Privacy Policy
  • Terms Of Service
  • Contact
  • About
  • GDPR

Copyright © 2025 Homesmad