• Skip to primary navigation
  • Skip to main content
  • Skip to primary sidebar
Homesmad

Homesmad

  • Home
  • Breakfast & Brunch
  • Appetizers & Snacks
  • Dinner
  • Dessert
  • About
  • Privacy Policy
  • Contact
Homesmad
  • Home
  • Breakfast & Brunch
  • Appetizers & Snacks
  • Dinner
  • Dessert
  • About
  • Privacy Policy
  • Contact

Best Chicken Avocado Melt Sandwich Recipe – Quick Lunch!

October 17, 2025 by Lily author

Chicken Avocado Melt Sandwich Recipe – the very sound of it promises a symphony of textures and flavors, and I am absolutely thrilled to share a dish that has quickly become a beloved staple in my kitchen. Imagine biting into perfectly toasted bread, yielding to a warm, savory filling where tender, seasoned chicken mingles with creamy, ripe avocado, all bound together by irresistibly melted cheese. It’s a culinary experience that truly elevates the humble sandwich to an art form. While the concept of a melt is timeless, this specific combination of fresh ingredients offers a modern twist, reflecting a contemporary appreciation for balanced, delicious meals.

This isn’t just any sandwich; it’s a quick-to-prepare, incredibly satisfying meal perfect for a bustling weekday lunch or a cozy weekend dinner. Its harmonious blend of protein, healthy fats, and comfort-food warmth makes it an instant hit with everyone. I’ve refined this particular Chicken Avocado Melt Sandwich Recipe to ensure maximum flavor and ease of preparation, guaranteeing a consistently delicious outcome every time you make it. Get ready to discover your new favorite go-to meal that perfectly combines convenience with gourmet taste!

Best Chicken Avocado Melt Sandwich Recipe - Quick Lunch! this RECIPE

Ingredients:

  • For the Chicken:
    • 2 boneless, skinless chicken breasts (about 6-8 oz each)
    • 1 tablespoon olive oil or avocado oil
    • 1 teaspoon smoked paprika
    • ½ teaspoon garlic powder
    • ½ teaspoon onion powder
    • ¼ teaspoon cayenne pepper (optional, for a hint of heat)
    • ½ teaspoon salt, or to taste
    • ¼ teaspoon black pepper, freshly ground, or to taste
  • For the Creamy Avocado Spread:
    • 1 large ripe avocado, or 2 small ones (Hass variety works wonderfully)
    • 1 tablespoon fresh lime juice or lemon juice
    • 2 tablespoons finely chopped fresh cilantro (optional, but highly recommended)
    • ¼ teaspoon salt, or to taste
    • ⅛ teaspoon black pepper, or to taste
    • Pinch of red pepper flakes (optional, for a little kick)
  • For Assembling the Sandwich:
    • 8 slices of your favorite bread (sourdough, challah, whole wheat, or a hearty white bread work exceptionally well)
    • 4 slices of Monterey Jack cheese, pepper jack cheese, or provolone cheese (or a mix!)
    • 4 slices of cheddar cheese (sharp or mild, depending on your preference)
    • 2-4 tablespoons unsalted butter, softened, or mayonnaise for spreading on the outside of the bread

Preparing the Chicken:

This is where the magic begins for our “Chicken Avocado Melt Sandwich Recipe”! A well-seasoned and perfectly cooked chicken breast is the foundation of flavor.

  1. Prepare the Chicken Breasts: First, take your two boneless, skinless chicken breasts and pat them thoroughly dry with paper towels. This crucial step helps ensure a beautiful sear and prevents steaming. If your chicken breasts are very thick, you might want to slice them horizontally in half to create four thinner cutlets, or gently pound them to an even ¾-inch thickness. This ensures even cooking and a more tender result in your sandwich.
  2. Season the Chicken: In a small bowl, combine your smoked paprika, garlic powder, onion powder, cayenne pepper (if using), ½ teaspoon salt, and ¼ teaspoon black pepper. Sprinkle this seasoning blend generously and evenly over both sides of each chicken breast. Gently press the seasoning into the chicken with your fingertips to make sure it adheres well.
  3. Heat the Skillet: Place a large, heavy-bottomed skillet (cast iron or stainless steel works best for achieving a great crust) over medium-high heat. Add 1 tablespoon of olive oil or avocado oil and let it heat until shimmering and almost smoking. You want a good hot pan to get that delicious golden-brown crust.
  4. Cook the Chicken: Carefully place the seasoned chicken breasts into the hot skillet. Do not overcrowd the pan; cook them in batches if necessary. Allow the chicken to sear undisturbed for about 5-7 minutes per side, or until a beautiful golden-brown crust forms and the internal temperature reaches 165°F (74°C) when measured with a meat thermometer at the thickest part. Resist the urge to move the chicken too early – that initial sear is key to flavor and texture.
  5. Rest and Shred: Once cooked, transfer the chicken breasts to a cutting board and let them rest for at least 5-10 minutes. This resting period is vital, as it allows the juices to redistribute throughout the meat, ensuring a tender and moist chicken for your “Chicken Avocado Melt Sandwich Recipe.” After resting, you can either dice the chicken into small, bite-sized pieces or shred it using two forks. I personally love the texture of shredded chicken in a melt, but diced works perfectly too! Set aside.

Crafting the Creamy Avocado Spread:

The avocado spread is the heart of the “Chicken Avocado Melt Sandwich Recipe,” bringing creaminess, freshness, and a delightful contrast to the savory chicken and melted cheese.

  1. Choose Your Avocado: Select a ripe avocado. A ripe avocado will yield slightly to gentle pressure when squeezed, but won’t feel mushy. Its skin will also often be a darker green or nearly black.
  2. Prepare the Avocado: Carefully slice the avocado in half lengthwise around the pit. Twist the halves to separate them. Remove the pit (a sharp tap with a knife and a twist works well, but be cautious!), then scoop the creamy flesh into a medium-sized bowl using a spoon.
  3. Mash the Avocado: Using a fork, thoroughly mash the avocado until it reaches your desired consistency. Some people prefer it completely smooth, while others enjoy a few small chunks for added texture. Personally, I like a slightly chunky texture in my spread.
  4. Season and Flavor: Add the fresh lime juice (this is critical not only for flavor but also to prevent the avocado from browning too quickly), finely chopped fresh cilantro (if using), ¼ teaspoon salt, ⅛ teaspoon black pepper, and a pinch of red pepper flakes (if you enjoy a little heat). Mix everything together well, ensuring all the seasonings are evenly distributed throughout the creamy avocado. Taste and adjust the seasoning as needed – you might find it needs a little more salt or a brighter zing from additional lime juice. This spread should be vibrant and well-balanced.
  5. Set Aside: Cover the bowl with plastic wrap, pressing it directly onto the surface of the avocado spread to minimize air exposure, which helps maintain its vibrant green color. Set aside until you’re ready to assemble your “Chicken Avocado Melt Sandwich Recipe.”

Assembling the Ultimate Chicken Avocado Melt Sandwich:

Now for the exciting part – bringing all these delicious components together to create your perfect “Chicken Avocado Melt Sandwich Recipe”!

  1. Prepare Your Bread: Lay out your 8 slices of bread on a clean work surface. Decide which side will be the “outside” of your sandwich – this is the side you’ll butter or spread with mayonnaise for grilling. Generously spread a thin, even layer of softened unsalted butter or mayonnaise on one side of each bread slice. This creates a beautiful golden crust and prevents the bread from drying out during grilling.
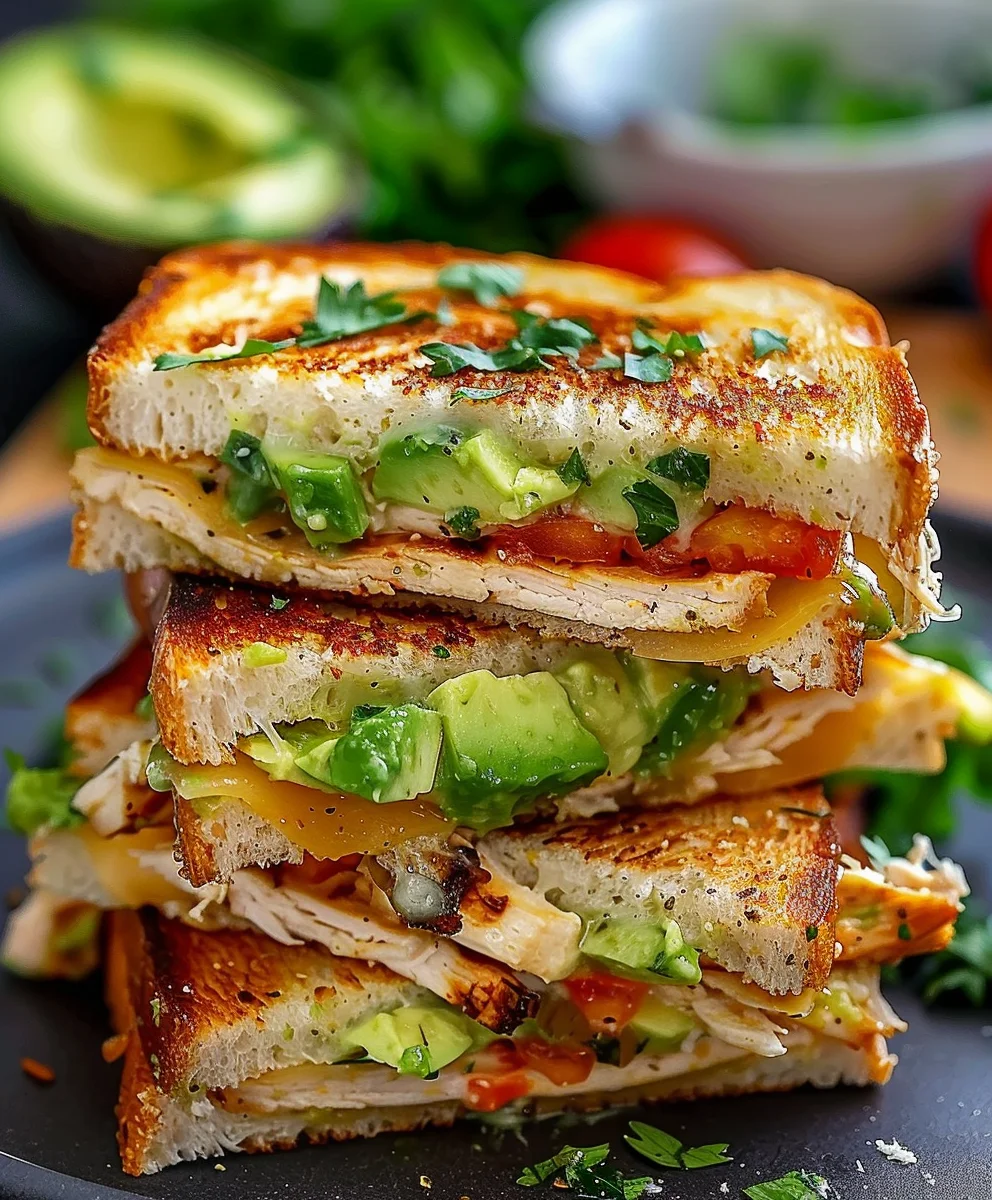
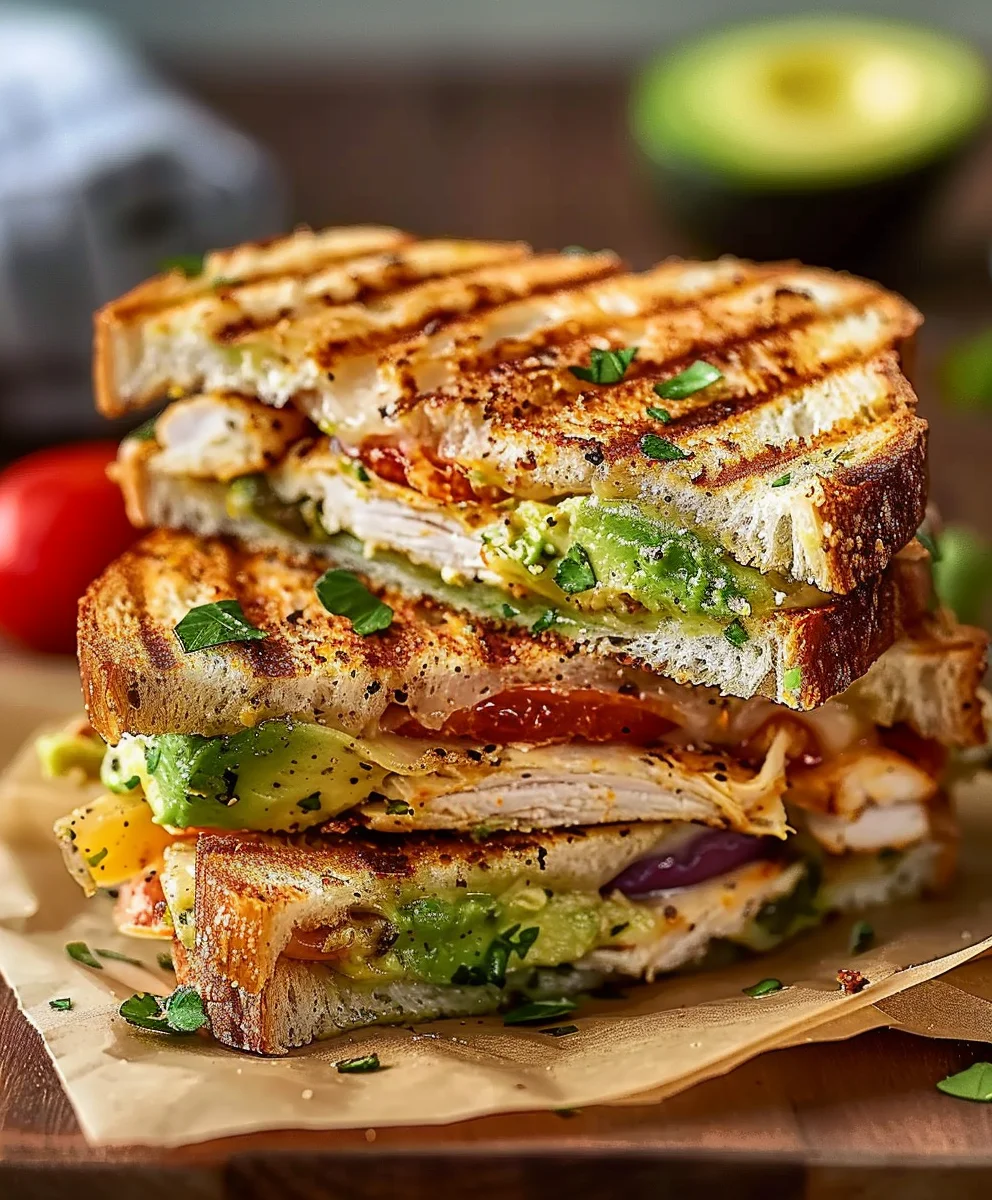
  2. Layer the Cheese (Bottom Slice): On four of the bread slices (the ones that will form the bottom of your sandwiches, buttered-side down), place one slice of Monterey Jack or provolone cheese. This acts as a delicious barrier and helps the sandwich hold together as it melts.
  3. Add the Chicken: Evenly distribute the shredded or diced cooked chicken over the cheese layers on these four slices of bread. Don’t be shy, but also don’t overstuff it to the point where it won’t close!
  4. Generously Apply Avocado Spread: Spoon a generous amount of your creamy avocado spread over the chicken on each sandwich. Use the back of the spoon to gently spread it out, covering the chicken evenly. This layer is crucial for moisture and flavor, so make sure each bite gets a good helping.
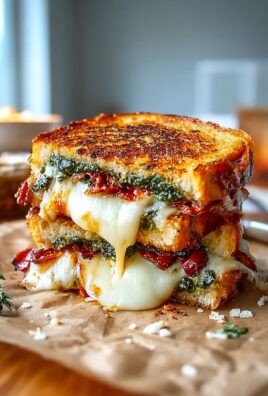
  5. Layer More Cheese (Top Slice): On top of the avocado spread, place one slice of cheddar cheese on each sandwich. This second layer of cheese ensures maximum meltiness and deliciousness, binding the avocado and chicken perfectly.
  6. Close the Sandwich: Take the remaining four slices of bread (buttered-side up) and place them on top of the cheese layers, buttered-side facing outwards. Gently press down on each sandwich to make sure all the layers are snugly fit together. You now have four beautifully assembled, un-grilled “Chicken Avocado Melt Sandwich Recipe” masterpieces, ready for the heat!

Grilling Your Chicken Avocado Melt to Perfection:

This phase is all about achieving that irresistible golden-brown crust and perfectly melted cheese, the hallmarks of a truly great “Chicken Avocado Melt Sandwich Recipe.”

  1. Preheat Your Griddle or Skillet: Place a large skillet, griddle, or even a panini press over medium heat. If using a skillet or griddle, ensure it’s large enough to comfortably fit two sandwiches at a time without overcrowding. Allow it to preheat for about 3-5 minutes. You’re looking for a medium heat; too high and the bread will burn before the cheese melts, too low and it will get soggy.
  2. Grill the First Side: Carefully place two of your assembled sandwiches onto the preheated skillet, buttered-side down. Cook for approximately 4-6 minutes, or until the bottom slice of bread is beautifully golden brown and crispy. Lift a corner gently with a spatula to check on the color – you’re aiming for that perfect toasted look.
  3. Flip and Melt: Once the first side is golden, carefully flip the sandwiches over. Now, here’s a trick for an extra gooey melt: as soon as you flip, you can gently press down on the sandwiches with a spatula or even use a weighted press (like another heavy skillet or a brick wrapped in foil) to ensure even contact with the hot pan. This helps the cheese melt faster and creates a wonderfully compact sandwich.
  4. Cook the Second Side: Continue to cook for another 4-6 minutes on the second side, or until it’s also golden brown and, most importantly, the cheese inside is completely melted and gooey. You should see the cheese just beginning to ooze out the sides, indicating ultimate deliciousness. The internal heat will also warm the chicken and avocado, bringing all the flavors together beautifully.
  5. Repeat if Necessary: If you have more sandwiches to grill, remove the first batch from the pan and repeat the process with the remaining two sandwiches, adjusting the heat slightly if the pan gets too hot.

Serving Your Delicious Chicken Avocado Melt:

The final steps to enjoying your incredible “Chicken Avocado Melt Sandwich Recipe” creation!

  1. Rest Briefly: Once grilled to perfection, transfer your golden, cheesy “Chicken Avocado Melt Sandwich Recipe” to a cutting board. Let them rest for just 1-2 minutes. This brief rest helps the sandwich settle and prevents all the delicious filling from immediately escaping when you cut into it.
  2. Slice and Serve: For the best eating experience, slice each sandwich diagonally in half. This classic presentation makes them easier to handle and showcases the beautiful layers of chicken, avocado, and melted cheese inside.
  3. Garnish (Optional): For an extra touch of freshness and visual appeal, you can sprinkle a few more chopped fresh cilantro leaves over the cut sandwiches just before serving. A small wedge of lime on the side is also a nice addition, allowing for an extra squeeze of citrus if desired.
  4. Enjoy Immediately: These sandwiches are best enjoyed warm, straight from the pan, while the cheese is still wonderfully gooey and the bread is crisp.
  5. Pairing Suggestions: The “Chicken Avocado Melt Sandwich Recipe” is hearty enough to be a meal on its own, but it also pairs wonderfully with a simple side salad, a bowl of tomato soup, or even a handful of crispy potato chips for that classic diner feel.

Storage Tips:

While this “Chicken Avocado Melt Sandwich Recipe” is absolutely best served fresh, if you have any leftovers, wrap them tightly in foil and store them in the refrigerator for up to 1 day. Reheat gently in a dry skillet over medium-low heat or in a toaster oven until warmed through and re-crisped. Be aware that the avocado may brown slightly, but the flavor will still be delightful.

Variations to Explore:

Feel free to experiment with this “Chicken Avocado Melt Sandwich Recipe” to make it your own! You could add a slice of crispy bacon for a smoky crunch, a thin slice of tomato for added juiciness, or even a spread of pesto or chipotle mayo for an extra flavor boost. Different cheeses like Swiss or Gruyere could also be fantastic. The possibilities are endless when you have such a versatile and delicious base!

Best Chicken Avocado Melt Sandwich Recipe - Quick Lunch!

Conclusion:

Well, my friends, we’ve reached the delicious end of our culinary journey, and I genuinely hope you’re as excited as I am about what we’ve just explored. This isn’t just another sandwich; it’s an experience, a symphony of textures and flavors that truly elevates the humble grilled sandwich to something spectacular. From the moment you take that first bite, you’ll understand exactly why I’m so passionate about this particular creation. The creamy, rich avocado, perfectly ripened and mashed, provides a smooth counterpoint to the tender, savory shredded chicken. Then, the melted cheese, gooey and golden, stretches invitingly, binding all the elements together with its comforting warmth. And let’s not forget the bread – toasted to a golden perfection, offering that satisfying crunch before yielding to the soft, flavorful interior. It’s a complete sensory delight, a perfect balance of savory, creamy, and crunchy in every single mouthful. It’s a recipe that promises not just a meal, but a moment of pure, unadulterated comfort and joy. This isn’t just a quick fix; it’s a testament to how simple ingredients, when combined thoughtfully, can create something truly extraordinary. I’ve made this for countless friends and family gatherings, and without fail, it receives rave reviews every single time. It’s truly a dish that brings smiles to faces and warmth to hearts, making it an indispensable part of my personal recipe collection.

One of the many things I adore about the Chicken Avocado Melt Sandwich Recipe is its incredible versatility. While the core ingredients are fantastic on their own, there are so many ways to customize it to your personal preferences or what you have on hand. For a quick and easy weeknight dinner, I love serving it alongside a simple crisp green salad with a light vinaigrette – the freshness of the salad cuts through the richness of the sandwich beautifully, creating a well-rounded meal. If you’re looking for something a bit heartier, a bowl of warm tomato soup for dipping is an absolute classic pairing that never disappoints; the combination of a grilled cheese-style sandwich and creamy soup is just iconic. For those who enjoy a bit of crunch, a handful of your favorite potato chips on the side adds another layer of texture. Don’t be afraid to experiment with your cheese choice either! While cheddar is a fantastic classic, Swiss, Monterey Jack, or even a spicy pepper jack can add a wonderful new dimension of flavor. You could also try different types of bread – a hearty sourdough or a multi-grain loaf would work wonders, offering unique flavors and textures. Want to sneak in some extra veggies? A thin slice of tomato or a few spinach leaves tucked inside can add freshness and nutrients without overpowering the main flavors. For a little kick, a dash of hot sauce or a sprinkle of red pepper flakes mixed into the avocado mash would be absolutely divine. Or, if you’re feeling adventurous, a dollop of chipotle mayo or a smear of pesto could transform the flavor profile entirely. The possibilities are truly endless, making this recipe a fantastic canvas for your culinary creativity.

So, now that you have all the insider tips and tricks, what are you waiting for? I wholeheartedly encourage you to roll up your sleeves, head to your kitchen, and give this incredible recipe a try. You deserve to experience the sheer delight of a perfectly crafted, warm, and comforting sandwich that satisfies every craving. Trust me, once you taste it, you’ll wonder how you ever lived without it. And when you do make it, I would absolutely love to hear about your experience! Did you stick to the classic? Did you venture out and try some of the variations? What were your favorite additions or substitutions? Please, share your culinary adventures with me! You can leave a comment below, or even better, snap a photo of your magnificent creation and share it on your favorite social media platform. Don’t forget to tag me or use a specific hashtag (if I had one, I’d suggest #MyChickenAvocadoMelt) so I can see your masterpieces! Your feedback and shared experiences truly fuel my passion for creating and sharing delicious recipes like this. Let’s build a community of enthusiastic home cooks who aren’t afraid to indulge in simple, yet profound, gastronomic pleasures. Your kitchen is about to become the happiest place in your home, all thanks to this delightful sandwich. I can’t wait to see what delicious magic you whip up. Happy cooking, everyone!


Chicken Avocado Melt Sandwich Recipe

Chicken Avocado Melt Sandwich Recipe

Imagine biting into perfectly toasted bread, yielding to a warm, savory filling where tender, seasoned chicken mingles with creamy, ripe avocado, all bound together by irresistibly melted cheese. It’s a quick-to-prepare, incredibly satisfying meal perfect for a bustling weekday lunch or a cozy weekend dinner.

Prep Time
15 Minutes

Cook Time
25 Minutes

Total Time
40 Minutes

Servings
2 servings

Ingredients

  • 2 boneless, skinless chicken breasts
  • Salt and pepper
  • 1 tbsp olive oil
  • 1 avocado, sliced
  • 4 slices cheese (Swiss, cheddar, or provolone)
  • 4 slices bread
  • 2 tbsp mayonnaise
  • 1 tbsp Dijon mustard
  • 1 small red onion, thinly sliced
  • 1 tomato, sliced
  • Butter or olive oil

Instructions

  1. Step 1
    Pat chicken breasts dry, season with salt and pepper. Heat 1 tbsp olive oil in a skillet over medium-high heat. Cook chicken 5-7 minutes per side until 165°F. Rest 5-10 minutes, then shred or slice.
  2. Step 2
    Slice avocado, red onion, and tomato. Combine mayonnaise and Dijon mustard.
  3. Step 3
    Butter one side of each bread slice for grilling. On the other side, spread the mayonnaise-Dijon mixture. On two bread slices, layer cheese, cooked chicken, sliced avocado, red onion, and tomato. Top with remaining cheese and the other two bread slices, buttered side out.
  4. Step 4
    Heat a skillet over medium heat. Grill sandwiches, buttered-side down, 4-6 minutes per side until golden and cheese is melted.
  5. Step 5
    Rest briefly, then slice diagonally and serve warm.

Important Information

Nutrition Facts (Per Serving)

It is important to consider this information as approximate and not to use it as definitive health advice.

Allergy Information

Please check ingredients for potential allergens and consult a health professional if in doubt.

« Previous Post
Air Fryer Calzones: Crispy, Cheesy & Ready in Under Mins
Next Post »
Delightful Pumpkin Fluff: Easy, Creamy, No-Bake Treat!

If you enjoyed this…

Bacon Pesto Grilled Cheese: The Ultimate Recipe

Peach Watermelon Salad: The Ultimate Summer Recipe

Delicious Chicken Club Pasta Salad – Easy Recipe to Try!

Primary Sidebar

Browse by Diet

BreakfastDinnerLunchDessertAppetizer

Sweet Peach Yogurt Parfait Delight

One of my fondest memories is from a lazy summer afternoon spent at my grandmother’s house. The sun filtered through the kitchen window, casting a warm glow over the table where she would create her culinary magic. It was during one of those blissful moments that I first tasted her Peach Yogurt Parfait with Honey and Granola. The sweet aroma of ripe peaches mingling with creamy yogurt and the crunch of granola was nothing short of heavenly. It felt like summer captured in a bowl, and I still remember the joy of diving in with a spoon, each layer revealing a new burst of flavor.

When I think about that parfait, I can almost hear the gentle hum of the bees outside, reminding me of the floral notes that honey brings to every bite. The vibrant yellows and soft oranges of the peaches contrast beautifully with the creamy white yogurt and the golden crunch of granola. It’s a dish that not only looks delightful but also tastes like a celebration of fresh, wholesome ingredients.

What makes my version of this Peach Yogurt Parfait special is the careful balance of flavors and textures. I use ripe, juicy peaches, drizzled with locally sourced honey, and a homemade granola that’s bursting with nuts and seeds for an extra crunch. It’s a simple dish, but every layer is crafted with love and attention.

Let me show you exactly how to make this delightful parfait, so you can bring a bit of that summer magic into your kitchen!

Sweet Peach Yogurt Parfait Delight

Why You’ll Love This Recipe

  • Delightfully creamy texture from the Greek yogurt, paired with the juicy sweetness of fresh peaches.
  • Ready in under 20 minutes, making it a quick and satisfying breakfast or snack option.
  • Budget-friendly, using common ingredients that you may already have in your pantry.
  • Customizable with your favorite granola and nuts, allowing you to tailor each parfait to your taste.
  • Perfectly balanced flavors with the bright acidity of lemon juice and the sweetness of honey enhancing the peaches.

Ingredients

  • For the Parfait:
  • 2 cups plain Greek yogurt (or vanilla yogurt for a sweeter option)
  • 2 large ripe peaches, diced (about 2 cups)
  • 1 tablespoon fresh lemon juice (to prevent browning of peaches)
  • 2 tablespoons honey (plus more for drizzling)
  • 1 teaspoon vanilla extract (optional for extra flavor)
  • For the Granola:
  • 1 cup granola (store-bought or homemade; see notes for a simple granola recipe)
  • 1/4 cup sliced almonds (optional for added crunch)
  • 1/4 cup shredded coconut (optional for added flavor)

Let’s dive into some key ingredients that make this Peach Yogurt Parfait so delightful! First, the Greek yogurt is not only creamy but also packed with protein, making it a satisfying option for breakfast or a snack. If you’re looking for a sweeter option, you can easily substitute it with vanilla yogurt, though it may alter the overall flavor balance. Next, the ripe peaches are the star of the show; their natural sweetness shines through, so I recommend choosing peaches that yield slightly to pressure, indicating they’re perfectly ripe. If peaches aren’t in season, feel free to use nectarines or even frozen peaches—just thaw them before use. Finally, honey adds a lovely floral sweetness that ties everything together. If you prefer, maple syrup can serve as a delicious substitute.

Step-by-Step Instructions

  1. Start by preparing the peaches. Wash them thoroughly, then slice and dice them into bite-sized pieces. In a medium bowl, toss the diced peaches with 1 tablespoon of fresh lemon juice to prevent browning. Set aside for about 5 minutes while the lemon juice works its magic.
  2. In a separate bowl, combine the Greek yogurt, 2 tablespoons of honey, and 1 teaspoon of vanilla extract if using. Stir the mixture until smooth and thoroughly blended. This should take about a minute. Avoid overmixing to maintain the creaminess of the yogurt.
  3. Now it’s time to layer your parfait. Grab a clear glass or bowl to showcase your beautiful creation. Start with a generous spoonful of the yogurt mixture at the bottom—about 1/4 cup will do. Use a spoon to spread it evenly.
  4. Add a layer of the diced peaches over the yogurt, ensuring they cover the yogurt completely. You might want to use about half of what you have prepared—roughly 1 cup. This layer should be visually appealing, so arrange the peaches neatly.
  5. Sprinkle 1/4 cup of granola over the peaches. This adds a delightful crunch. Make sure to distribute it evenly to ensure every bite has that satisfying texture. Avoid packing it down too tightly, as you want it to maintain its crunch.
  6. Repeat the layers: spoon in another 1/4 cup of yogurt, followed by another cup of peaches, and another sprinkle of granola. You should have at least two layers, but feel free to add more depending on your glass size.
  7. Finish off your parfait with a drizzle of honey on top for added sweetness and a touch of elegance. If you’re using sliced almonds or shredded coconut, sprinkle them on top now. It adds a lovely visual contrast and extra flavor.
  8. Serve immediately or refrigerate for up to 30 minutes before serving to allow the flavors to meld together. However, I recommend enjoying it fresh to maintain the granola’s crunch.

Pro Tips for the Best Peach Yogurt Parfait With Honey And Granola

  • Make sure to choose ripe peaches for the best flavor and texture. A common mistake is using unripe fruit, which can lead to a less enjoyable parfait. Look for peaches that are fragrant and slightly soft to the touch.
  • Use a clear glass to assemble your parfait; this not only makes for a beautiful presentation but also allows you to see the colorful layers, which adds to the enjoyment of eating it.
  • For an even creamier texture, consider whipping the Greek yogurt with a hand mixer for a couple of minutes before layering. This small adjustment makes a huge difference in mouthfeel.
  • Be mindful of the granola-to-yogurt ratio. Too much granola can overwhelm the parfait, while too little can make it feel too creamy. Aim for about 1/4 cup of granola per layer for the perfect balance.
  • If you’re making this for a gathering, consider preparing the yogurt and peaches ahead of time and layering them just before serving. This ensures the granola stays crunchy!

Variations & Serving Ideas

There are so many ways to get creative with your Peach Yogurt Parfait! For a tropical twist, swap out the peaches for mangoes or pineapples and top with coconut flakes. If you prefer a berry flavor, mix in some blueberries or strawberries with the peaches for added color and taste. For a nutty version, incorporate chopped walnuts or pecans instead of almonds.

As for serving ideas, this parfait pairs beautifully with a side of scrambled eggs for a hearty breakfast or fresh fruit salad for a light lunch. You might also enjoy it alongside whole grain toast with almond butter for an energizing snack. The contrast of flavors and textures will elevate your meal experience!

Storage, Make-Ahead & Reheating

The Peach Yogurt Parfait is best enjoyed fresh, but you can prepare some components ahead of time. Store the layered parfait in an airtight container in the refrigerator for up to 24 hours. However, be cautious; the granola may lose its crunch if stored too long. You can freeze the yogurt and peach mixture for up to 2 months; just remember to thaw it in the refrigerator overnight before serving.

If you plan to enjoy this dish the next day, it can taste even better as the flavors meld together. Just remember to add the granola right before serving to keep its delightful crunch!

Frequently Asked Questions

Can I make Peach Yogurt Parfait With Honey And Granola ahead of time?

Yes — in fact, it tastes even better the next day as the flavors meld. However, I recommend waiting to add the granola until just before serving to maintain its crunch.

What can I substitute for Greek yogurt?

If you prefer a lighter option, you can substitute Greek yogurt with regular yogurt or a dairy-free alternative like coconut yogurt. Just remember that this may alter the creaminess and flavor profile slightly.

Can I use frozen peaches for this parfait?

Absolutely! Just make sure to thaw the frozen peaches before using them. They will still add great flavor, though the texture may be slightly softer than fresh peaches.

How do I make the parfait vegan?

To make a vegan version, substitute the Greek yogurt with a plant-based yogurt alternative, and replace honey with maple syrup or agave nectar. This keeps the parfait sweet while adhering to a vegan diet.

What other fruits can I use in this recipe?

You can mix and match fruits based on your preference. Try using strawberries, blueberries, raspberries, or even bananas. Just make sure to adjust the lemon juice as needed to prevent browning.

Sweet Peach Yogurt Parfait Delight

Final Thoughts

The Peach Yogurt Parfait with Honey and Granola is a delightful blend of creamy yogurt, sweet peaches, and crunchy granola that creates a satisfying and nourishing treat. Each layer bursts with flavor, making it a perfect choice for breakfast or a light dessert.

This is the kind of recipe I come back to again and again, especially when I want something refreshing and wholesome to start my day. The harmony of sweet and tart flavors, combined with the delightful crunch, never fails to lift my spirits!

I encourage you to give this parfait a try and indulge in its comforting goodness. Feel free to share your results or even add your own twist—perhaps a sprinkle of cinnamon or a handful of nuts. Enjoy creating your perfect parfait!

Print
clock clock iconcutlery cutlery iconflag flag iconfolder folder iconinstagram instagram iconpinterest pinterest iconfacebook facebook iconprint print iconsquares squares iconheart heart iconheart solid heart solid icon

Peach Yogurt Parfait


  • Author: Lily author
  • Total Time: 15 minutes
  • Yield: 4 servings 1x
Pin Recipe
Print Recipe

Description

This Peach Yogurt Parfait combines creamy Greek yogurt, juicy peaches, and crunchy granola for a delightful treat. It’s a perfect breakfast or snack that captures the essence of summer in every bite.


Ingredients

Scale
  • For the Parfait:
  • 2 cups plain Greek yogurt (or vanilla yogurt for a sweeter option)
  • 2 large ripe peaches, diced (about 2 cups)
  • 1 tablespoon fresh lemon juice (to prevent browning of peaches)
  • 2 tablespoons honey (plus more for drizzling)
  • 1 teaspoon vanilla extract (optional for extra flavor)
  • For the Granola:
  • 1 cup granola (store-bought or homemade; see notes for a simple granola recipe)
  • 1/4 cup sliced almonds (optional for added crunch)
  • 1/4 cup shredded coconut (optional for added flavor)

Instructions

  1. Start by preparing the peaches. Wash them thoroughly, then slice and dice them into bite-sized pieces. In a medium bowl, toss the diced peaches with 1 tablespoon of fresh lemon juice to prevent browning. Set aside for about 5 minutes while the lemon juice works its magic.
  2. In a separate bowl, combine the Greek yogurt, 2 tablespoons of honey, and 1 teaspoon of vanilla extract if using. Stir the mixture until smooth and thoroughly blended. This should take about a minute. Avoid overmixing to maintain the creaminess of the yogurt.
  3. Now it’s time to layer your parfait. Grab a clear glass or bowl to showcase your beautiful creation. Start with a generous spoonful of the yogurt mixture at the bottom—about 1/4 cup will do. Use a spoon to spread it evenly.
  4. Add a layer of the diced peaches over the yogurt, ensuring they cover the yogurt completely. You might want to use about half of what you have prepared—roughly 1 cup. This layer should be visually appealing, so arrange the peaches neatly.
  5. Sprinkle 1/4 cup of granola over the peaches. This adds a delightful crunch. Make sure to distribute it evenly to ensure every bite has that satisfying texture. Avoid packing it down too tightly, as you want it to maintain its crunch.
  6. Repeat the layers: spoon in another 1/4 cup of yogurt, followed by another cup of peaches, and another sprinkle of granola. You should have at least two layers, but feel free to add more depending on your glass size.
  7. Finish off your parfait with a drizzle of honey on top for added sweetness and a touch of elegance. If you’re using sliced almonds or shredded coconut, sprinkle them on top now. It adds a lovely visual contrast and extra flavor.
  8. Serve immediately or refrigerate for up to 30 minutes before serving to allow the flavors to meld together. However, I recommend enjoying it fresh to maintain the granola’s crunch.
  • Prep Time: 15 mins
  • Cook Time: 0 mins
  • Category: Breakfast
  • Method: No-cook
  • Cuisine: American

Nutrition

  • Serving Size: 1 parfait
  • Calories: 250
  • Sugar: 20 g
  • Sodium: 50 mg
  • Fat: 5 g
  • Saturated Fat: 2 g
  • Unsaturated Fat: 3 g
  • Trans Fat: 0 g
  • Carbohydrates: 40 g
  • Fiber: 3 g
  • Protein: 10 g
  • Cholesterol: 10 mg

Keywords: Choose ripe peaches for the best flavor and texture. Use a clear glass for a beautiful presentation. For creaminess, consider whipping the yogurt before layering. Be mindful of the granola-to-yogurt ratio. Prepare yogurt and peaches ahead of time for gatherings, layering just before serving.

Did you make this recipe?

Share a photo and tag us — we can't wait to see what you've made!

Sun-Kissed Frozen Orange Cream Slush

As a child, summer days felt like they lasted forever. I remember the sticky heat wrapping around me as I played outside, my laughter mingling with the sounds of the neighborhood. But nothing could cool me down quite like the moment I’d spot my grandmother, laboring over her blender, whipping up her famous Frozen Orange Creamsicle Slush. That vibrant orange treat, with its frosty texture and sweet citrus aroma, was like a burst of sunshine in a cup. Just one sip, and I could feel the coolness wash over me, sparking pure joy.

This Frozen Orange Creamsicle Slush has a way of making you feel like a kid again. Its creamy, dreamy consistency is a delightful balance of bright orange and soft vanilla, inviting you to dive right in. The refreshing tang of orange dances on your tongue, while the smooth creaminess envelops you in a comforting embrace. It’s a nostalgic treat that’s perfect for hot summer afternoons or anytime you need a little pick-me-up.

What makes my version of this slush stand out is the addition of a hint of vanilla bean, which elevates the flavor and adds an extra layer of richness. Plus, it’s super easy to whip up with just a few simple ingredients that you probably already have on hand! So, if you’re ready to relive those sun-soaked memories, let me show you exactly how to make it.

Sun-Kissed Frozen Orange Cream Slush

Why You’ll Love This Recipe

  • Each slush is a perfect blend of creamy vanilla and zesty orange, creating a nostalgic flavor reminiscent of summer days.
  • This refreshing treat is ready in under 15 minutes, making it an ideal quick dessert for unexpected guests or hot afternoons.
  • With just 8 simple ingredients, it’s budget-friendly, ensuring you don’t have to break the bank to enjoy a delicious slush.
  • The slush has a perfectly smooth texture, thanks to the combination of ice and ice cream, providing a delightful contrast to the bright citrus flavors.
  • It’s highly customizable; you can easily adjust the sweetness and add fresh herbs for a unique twist that suits your taste.

Ingredients

  • 2 cups orange juice (freshly squeezed or store-bought)
  • 1 cup vanilla ice cream
  • 1 cup crushed ice
  • 1/2 cup milk (whole or 2%)
  • 1/4 cup granulated sugar (adjust based on sweetness preference)
  • 1 teaspoon vanilla extract
  • Zest of 1 orange (for added flavor)
  • Fresh orange slices and mint leaves (for garnish)

The star of this Frozen Orange Creamsicle Slush is the orange juice, which provides the vibrant, citrusy base. Freshly squeezed juice will yield the brightest flavor, but store-bought options can be just as convenient. If you’re opting for store-bought, choose 100% pure juice with no added sugars for the best results. Another essential ingredient is the vanilla ice cream; it adds creaminess and sweetness. You can substitute it with dairy-free ice cream if you’re looking for a vegan option. Whole or 2% milk complements the ice cream, creating a smooth blend. If you want a lower-calorie version, almond or oat milk can be good alternatives.

Lastly, the granulated sugar can be adjusted based on your sweetness preference. If you prefer a more natural sweetener, consider using honey or agave syrup. The orange zest enhances the flavor profile, providing an aromatic pop that brings the whole slush together. Don’t skip it! It adds an extra layer of brightness that makes this slush truly special.

Step-by-Step Instructions

  1. Start by preparing your ingredients. Gather 2 cups of orange juice, 1 cup of vanilla ice cream, and 1 cup of crushed ice. Make sure the ice is finely crushed, as larger chunks can make blending difficult.
  2. In a blender, combine the orange juice, vanilla ice cream, crushed ice, and 1/2 cup of milk. Add 1/4 cup of granulated sugar and 1 teaspoon of vanilla extract. If you like a sweeter slush, consider adding a bit more sugar at this stage.
  3. Add the zest of 1 orange to the blender. This step is crucial for enhancing the citrus flavor of your slush. Make sure not to include the bitter white pith—only the flavorful zest.
  4. Blend the mixture on medium-high speed for about 30-45 seconds. Stop once the ingredients are fully combined and the slush has a smooth, even consistency. If you notice large chunks of ice, blend for an additional 10-15 seconds. Avoid over-blending, as this can make the slush too liquidy.
  5. Once blended, taste the slush. If it needs more sweetness, add a little more sugar and blend for a few more seconds. If it’s too thick, you can add a splash of milk to reach your desired consistency.
  6. Pour the slush into glasses. This recipe typically serves 4, but you can easily double it for larger gatherings. Use a spoon to help guide the slush into the glasses if needed.
  7. Garnish each serving with fresh orange slices and mint leaves. The mint not only adds a pop of color but also a refreshing aroma that complements the citrus flavors beautifully.
  8. Serve immediately and enjoy! If you’ve made extra, you can refrigerate it for a short time, but it’s best enjoyed fresh.

Pro Tips for the Best Frozen Orange Creamsicle Slush

  • Don’t skip the orange zest! It’s a game-changer for flavor. Always zest before juicing to make it easier.
  • Use a high-powered blender for the best texture. A standard blender may struggle with ice, leading to uneven consistency. If you have a food processor, that can work too, but ensure the ice is finely crushed.
  • Adjust the ice-to-liquid ratio carefully. If your slush is too thick, it won’t blend well. Start with less ice and add more until you reach your preferred texture.
  • Be cautious with the sugar! Always start with the lower amount, as you can easily add more, but it’s hard to fix an overly sweet slush.
  • For a fun twist, consider adding a splash of coconut milk or a handful of fresh fruit like strawberries or pineapple. This not only enhances the flavor but also adds a beautiful color contrast.

Variations & Serving Ideas

There are countless ways to put a spin on your Frozen Orange Creamsicle Slush. Consider making a tropical version by adding in some pineapple juice or coconut milk for a delightful tropical twist. If you’re feeling adventurous, try incorporating a handful of frozen mango or peach slices for added sweetness. For a lighter version, swap out the vanilla ice cream for Greek yogurt for a creamy yet tangy alternative.

As for serving ideas, this refreshing slush pairs wonderfully with light summer dishes like grilled chicken skewers, fish tacos, or a simple salad topped with citrus vinaigrette. The bright, zesty flavors of the slush complement these dishes perfectly, making them an ideal pairing for a sunny day.

Storage, Make-Ahead & Reheating

This Frozen Orange Creamsicle Slush is best enjoyed fresh, but if you have leftovers, you can store them in an airtight container in the fridge for up to 2 days. Just keep in mind that the slush may lose some of its texture over time as the ice melts. It doesn’t freeze well, as the ice will turn into a solid block. If you must freeze it, blend again after thawing to restore the slushy consistency. This treat is best the day you make it, as the flavors meld together beautifully overnight, enhancing its deliciousness.

Frequently Asked Questions

Can I make Frozen Orange Creamsicle Slush ahead of time?

Yes — in fact, it tastes even better the next day as the flavors meld. However, it’s best to enjoy it fresh, as the texture can change if stored for too long. If you need to prepare it ahead, keep it in the fridge and re-blend before serving.

What kind of orange juice should I use?

For the best flavor, use freshly squeezed orange juice. However, if you’re short on time, opt for 100% pure store-bought juice without added sugars. This will ensure that your slush remains flavorful and refreshing.

Can I substitute the vanilla ice cream?

Absolutely! If you’re looking for a dairy-free option, coconut milk ice cream or a non-dairy vanilla ice cream can work wonderfully. They will still provide the creamy texture and sweetness you desire.

How can I adjust the sweetness of my slush?

You can easily adjust the sweetness by modifying the amount of sugar added. Start with 1/4 cup and taste the mixture before blending. If you prefer it sweeter, add more sugar gradually until it reaches your desired level.

What should I do if my slush is too thick?

If your slush is too thick, simply add a splash of milk or orange juice and blend again. This will help achieve a more drinkable consistency while maintaining the slushy texture. Adjust gradually to reach your preferred thickness.

Sun-Kissed Frozen Orange Cream Slush

Final Thoughts

The Frozen Orange Creamsicle Slush is a delightful blend of refreshing citrus and creamy goodness, making it a perfect treat for warm days or any time you crave a taste of nostalgia. The way the bright orange flavor dances with the creamy texture truly elevates this slush, transforming it into a satisfying escape from the everyday.

This is the kind of recipe I come back to again and again, especially when I’m looking to cool down or impress guests at a summer gathering. It’s simple to make and always brings smiles all around! I encourage you to try this recipe for yourself—don’t hesitate to share your results or even put your own spin on it. Happy slushing!

Print
clock clock iconcutlery cutlery iconflag flag iconfolder folder iconinstagram instagram iconpinterest pinterest iconfacebook facebook iconprint print iconsquares squares iconheart heart iconheart solid heart solid icon

Frozen Orange Creamsicle Slush


  • Author: Lily author
  • Total Time: 15 minutes
  • Yield: 4 servings 1x
Pin Recipe
Print Recipe

Description

This Frozen Orange Creamsicle Slush is a refreshing treat that combines creamy vanilla and zesty orange flavors. Perfect for hot summer days, it brings back nostalgic memories with every sip.


Ingredients

Scale
  • 2 cups orange juice (freshly squeezed or store-bought)
  • 1 cup vanilla ice cream
  • 1 cup crushed ice
  • 1/2 cup milk (whole or 2%)
  • 1/4 cup granulated sugar (adjust based on sweetness preference)
  • 1 teaspoon vanilla extract
  • Zest of 1 orange (for added flavor)
  • Fresh orange slices and mint leaves (for garnish)

Instructions

  1. Start by preparing your ingredients. Gather 2 cups of orange juice, 1 cup of vanilla ice cream, and 1 cup of crushed ice. Make sure the ice is finely crushed, as larger chunks can make blending difficult.
  2. In a blender, combine the orange juice, vanilla ice cream, crushed ice, and 1/2 cup of milk. Add 1/4 cup of granulated sugar and 1 teaspoon of vanilla extract. If you like a sweeter slush, consider adding a bit more sugar at this stage.
  3. Add the zest of 1 orange to the blender. This step is crucial for enhancing the citrus flavor of your slush. Make sure not to include the bitter white pith—only the flavorful zest.
  4. Blend the mixture on medium-high speed for about 30-45 seconds. Stop once the ingredients are fully combined and the slush has a smooth, even consistency. If you notice large chunks of ice, blend for an additional 10-15 seconds. Avoid over-blending, as this can make the slush too liquidy.
  5. Once blended, taste the slush. If it needs more sweetness, add a little more sugar and blend for a few more seconds. If it’s too thick, you can add a splash of milk to reach your desired consistency.
  6. Pour the slush into glasses. This recipe typically serves 4, but you can easily double it for larger gatherings. Use a spoon to help guide the slush into the glasses if needed.
  7. Garnish each serving with fresh orange slices and mint leaves. The mint not only adds a pop of color but also a refreshing aroma that complements the citrus flavors beautifully.
  8. Serve immediately and enjoy! If you’ve made extra, you can refrigerate it for a short time, but it's best enjoyed fresh.
  • Prep Time: 15 min
  • Cook Time: 0 min
  • Category: Dessert
  • Method: Blending
  • Cuisine: American

Nutrition

  • Serving Size: 1 serving
  • Calories: 200
  • Sugar: 30 g
  • Sodium: 50 mg
  • Fat: 5 g
  • Saturated Fat: 3 g
  • Unsaturated Fat: 2 g
  • Trans Fat: 0 g
  • Carbohydrates: 40 g
  • Fiber: 1 g
  • Protein: 2 g
  • Cholesterol: 20 mg

Keywords: Don't skip the orange zest! It's a game-changer for flavor. Always zest before juicing to make it easier.

Did you make this recipe?

Share a photo and tag us — we can't wait to see what you've made!

Zesty Lemon Poppy Seed Delight

One rainy afternoon, I found myself in my grandmother’s cozy kitchen, the kind that always smelled like warmth and love. She was whipping up her famous Lemon Poppy Seed Loaf, a recipe that had been passed down through generations. As the batter came together, the zesty aroma of fresh lemons filled the air, mingling perfectly with the nutty fragrance of poppy seeds. I can still picture her, apron-clad, as she expertly drizzled a vibrant citrus icing over the loaf, creating a glossy, sun-kissed finish that beckoned us to dive in. It was a moment that sparked my own passion for baking, and this recipe has become a cherished staple in my home ever since.

When you take a bite of this Lemon Poppy Seed Loaf, it’s like a burst of sunshine on your palate. The loaf is beautifully golden, with a tender crumb that melts in your mouth. Each slice is speckled with tiny poppy seeds, adding a delightful crunch that contrasts beautifully with the tangy sweetness of the lemon. And that citrus icing? It’s the finishing touch that elevates this loaf from ordinary to extraordinary, with its bright, zesty flavor dancing on your taste buds.

This recipe stands out because it embraces simplicity while delivering on flavor. I’ve added a hint of vanilla to the batter, enhancing the overall taste and making it even more indulgent. Trust me, once you make this Lemon Poppy Seed Loaf With Citrus Icing, it’ll become a go-to in your baking repertoire.

So, let me show you exactly how to make it!

Zesty Lemon Poppy Seed Delight

Why You’ll Love This Recipe

  • Moist and tender crumb that melts in your mouth, thanks to the perfect balance of butter and buttermilk.
  • Bright, zesty lemon flavor paired with crunchy poppy seeds, creating a delightful texture and taste experience.
  • Easy to whip up in just about an hour, perfect for last-minute gatherings or a cozy afternoon treat.
  • Budget-friendly with everyday ingredients, making it an accessible option for all home bakers.
  • The citrus icing adds a sweet tang that elevates the loaf, turning a simple recipe into a showstopper!

Ingredients

  • 1 ½ cups (190g) all-purpose flour
  • 1 teaspoon baking powder
  • ½ teaspoon baking soda
  • ½ teaspoon salt
  • 3 tablespoons poppy seeds
  • ½ cup (115g) unsalted butter, softened to room temperature
  • 1 cup (200g) granulated sugar
  • 2 large eggs
  • 1 teaspoon vanilla extract
  • 1 teaspoon lemon zest (from about 1 medium lemon)
  • ½ cup (120ml) buttermilk
  • 2 tablespoons fresh lemon juice

For the Citrus Icing:

  • 1 cup (120g) powdered sugar
  • 2 tablespoons fresh lemon juice
  • 1 tablespoon orange juice
  • 1 teaspoon lemon zest (for garnish, optional)

Let’s dive into the key ingredients that make this Lemon Poppy Seed Loaf so special. The all-purpose flour provides the structure and base for the loaf, while the baking powder and baking soda ensure it rises perfectly, giving the loaf a light texture. For a gluten-free variation, you could substitute the flour with a gluten-free all-purpose blend. Poppy seeds not only add a delightful crunch but also contribute to the unique flavor profile that pairs well with the citrus notes.

Unsalted butter is crucial for achieving the buttery richness that makes this loaf so moist. If you’re looking for a dairy-free option, coconut oil or a vegan butter can be used instead. The buttermilk is another essential component, providing acidity that activates the baking soda for a fluffy texture. If you don’t have buttermilk on hand, you can easily make a substitute by mixing ½ cup of milk with 1 tablespoon of vinegar or lemon juice and letting it sit for about 5 minutes.

Step-by-Step Instructions

  1. Preheat your oven to 350°F (175°C). Grease a 9×5-inch loaf pan or line it with parchment paper for easy removal later.
  2. In a medium mixing bowl, whisk together 1 ½ cups of all-purpose flour, 1 teaspoon of baking powder, ½ teaspoon of baking soda, ½ teaspoon of salt, and 3 tablespoons of poppy seeds. This helps to evenly distribute the baking agents and ensures a uniform rise.
  3. In a large mixing bowl, cream together ½ cup of softened unsalted butter and 1 cup of granulated sugar using an electric mixer on medium speed for about 3-4 minutes, until the mixture is light and fluffy. Make sure to scrape down the sides of the bowl occasionally.
  4. Add 2 large eggs, 1 teaspoon of vanilla extract, and 1 teaspoon of lemon zest to the creamed butter and sugar, mixing until fully combined. You want a smooth consistency, so ensure there are no lumps of butter.
  5. In a small bowl, combine ½ cup of buttermilk and 2 tablespoons of fresh lemon juice. Alternately add the dry ingredients and buttermilk mixture to the butter mixture, starting and ending with the dry ingredients. Mix just until combined; do not overmix, as this can lead to a dense loaf.
  6. Pour the batter into the prepared loaf pan. Smooth the top with a spatula, ensuring it’s even. Bake in the preheated oven for 50-60 minutes, or until a toothpick inserted in the center comes out clean. The edges should be lightly golden brown, and the center should feel just set.
  7. Once baked, remove the loaf from the oven and allow it to cool in the pan for about 10 minutes. Then, transfer it to a wire rack to cool completely. Resist the urge to slice too soon, as it will be crumbly if it’s still warm.
  8. While the loaf is cooling, prepare the citrus icing. In a medium bowl, whisk together 1 cup of powdered sugar, 2 tablespoons of fresh lemon juice, and 1 tablespoon of orange juice until smooth. If the icing is too thick, you can add a little more juice to reach your desired consistency.
  9. Once the loaf is completely cool, drizzle the citrus icing over the top. If you like, sprinkle with an additional teaspoon of lemon zest for an extra pop of flavor and color.

Pro Tips for the Best Lemon Poppy Seed Loaf With Citrus Icing

  • Be careful not to overmix your batter; this is a common mistake that can lead to a dense loaf. Mix just until the dry ingredients are incorporated for a light and fluffy texture.
  • Use room temperature ingredients, especially the butter and eggs. This helps to create a smoother batter and ensures even baking. Take your eggs out of the fridge about 30 minutes before you start.
  • For a more pronounced lemon flavor, consider adding a little lemon extract in addition to the zest and juice. Just a half teaspoon can elevate the citrus notes significantly.
  • When measuring your flour, spoon it into the measuring cup and level it off with a knife instead of scooping directly from the bag. This prevents packing and ensures you don’t end up with a dry loaf.
  • Invest in a good quality loaf pan; it makes a difference in heat distribution, which ensures even baking. If your pan is dark-coated, reduce the oven temperature by 25°F to prevent over-browning.

Variations & Serving Ideas

For a delightful twist, consider adding blueberries or raspberries to the batter for a fruity burst of flavor. You can also experiment with different citrus fruits—try lime or grapefruit zest and juice for a refreshing change. For a healthier option, substitute half of the all-purpose flour with whole wheat flour for added fiber without compromising too much on texture.

This Lemon Poppy Seed Loaf pairs beautifully with a light salad, such as a mixed greens salad with a vinaigrette, or a cup of tea for a cozy afternoon treat. It also complements a creamy cheese platter, as the acidity of the loaf balances rich cheeses perfectly. Lastly, a scoop of vanilla ice cream on the side creates a delightful contrast of temperatures and flavors!

Storage, Make-Ahead & Reheating

This Lemon Poppy Seed Loaf can be stored at room temperature for up to 3 days if wrapped tightly in plastic wrap. If you want to keep it longer, it freezes well for up to 3 months. To freeze, wrap the loaf tightly in plastic wrap and then in aluminum foil to prevent freezer burn.

When you’re ready to enjoy it again, simply thaw it in the fridge overnight. Reheat individual slices in the microwave for 15-20 seconds or in a toaster oven until warmed through. Interestingly, many people find that this loaf tastes even better the next day, as the flavors have time to meld!

Frequently Asked Questions

Can I make Lemon Poppy Seed Loaf With Citrus Icing ahead of time?

Yes — in fact, it tastes even better the next day! You can make the loaf a day in advance, allowing the flavors to develop. Just be sure to store it in an airtight container to maintain its moisture.

Can I substitute the poppy seeds?

Absolutely! If you don’t have poppy seeds on hand or prefer an alternative, you can use sesame seeds for a similar crunch or omit them entirely for a smooth loaf.

What can I use instead of buttermilk?

If you don’t have buttermilk, you can easily create a substitute by mixing ½ cup of milk (dairy or plant-based) with 1 tablespoon of vinegar or lemon juice. Let it sit for 5 minutes before using in the recipe.

How can I make this recipe gluten-free?

To make a gluten-free version of this Lemon Poppy Seed Loaf, substitute the all-purpose flour with a gluten-free all-purpose flour blend. Just ensure that the blend contains a binding agent like xanthan gum for the best results.

What is the best way to store leftover loaf?

Leftover Lemon Poppy Seed Loaf should be stored in an airtight container at room temperature for up to 3 days. For longer storage, wrap it tightly and freeze for up to 3 months. Thaw it before serving for the best texture.

Zesty Lemon Poppy Seed Delight

Final Thoughts

The Lemon Poppy Seed Loaf with Citrus Icing is truly a delightful treat that brings a burst of brightness to any occasion. The zesty lemon flavor combined with the subtle crunch of poppy seeds creates a satisfying balance, while the citrus icing adds a touch of sweetness that perfectly complements the loaf’s tanginess.

This is the kind of recipe I come back to again and again, especially when I want to brighten up a gloomy day or celebrate a small victory. The aroma that fills the kitchen as it bakes is absolutely heavenly! I encourage you to give this recipe a try; you might just find it becoming a beloved staple in your home. Don’t forget to share your results or even add your own unique twist—I can’t wait to see what you create!

Print
clock clock iconcutlery cutlery iconflag flag iconfolder folder iconinstagram instagram iconpinterest pinterest iconfacebook facebook iconprint print iconsquares squares iconheart heart iconheart solid heart solid icon

Lemon Poppy Seed Loaf


  • Author: Lily author
  • Total Time: 23 minute
  • Yield: 1 loaf 1x
Pin Recipe
Print Recipe

Description

This Lemon Poppy Seed Loaf is a delightful treat that combines zesty lemon flavor with crunchy poppy seeds. Topped with a citrus icing, it’s perfect for any occasion.


Ingredients

Scale
  • 1 ½ cups (190g) all-purpose flour
  • 1 teaspoon baking powder
  • ½ teaspoon baking soda
  • ½ teaspoon salt
  • 3 tablespoons poppy seeds
  • ½ cup (115g) unsalted butter, softened to room temperature
  • 1 cup (200g) granulated sugar
  • 2 large eggs
  • 1 teaspoon vanilla extract
  • 1 teaspoon lemon zest (from about 1 medium lemon)
  • ½ cup (120ml) buttermilk
  • 2 tablespoons fresh lemon juice
  • 1 cup (120g) powdered sugar
  • 2 tablespoons fresh lemon juice
  • 1 tablespoon orange juice
  • 1 teaspoon lemon zest (for garnish, optional)

Instructions

  1. Preheat your oven to 350°F (175°C). Grease a 9×5-inch loaf pan or line it with parchment paper for easy removal later.
  2. In a medium mixing bowl, whisk together 1 ½ cups of all-purpose flour, 1 teaspoon of baking powder, ½ teaspoon of baking soda, ½ teaspoon of salt, and 3 tablespoons of poppy seeds. This helps to evenly distribute the baking agents and ensures a uniform rise.
  3. In a large mixing bowl, cream together ½ cup of softened unsalted butter and 1 cup of granulated sugar using an electric mixer on medium speed for about 3-4 minutes, until the mixture is light and fluffy. Make sure to scrape down the sides of the bowl occasionally.
  4. Add 2 large eggs, 1 teaspoon of vanilla extract, and 1 teaspoon of lemon zest to the creamed butter and sugar, mixing until fully combined. You want a smooth consistency, so ensure there are no lumps of butter.
  5. In a small bowl, combine ½ cup of buttermilk and 2 tablespoons of fresh lemon juice. Alternately add the dry ingredients and buttermilk mixture to the butter mixture, starting and ending with the dry ingredients. Mix just until combined; do not overmix, as this can lead to a dense loaf.
  6. Pour the batter into the prepared loaf pan. Smooth the top with a spatula, ensuring it’s even. Bake in the preheated oven for 50-60 minutes, or until a toothpick inserted in the center comes out clean. The edges should be lightly golden brown, and the center should feel just set.
  7. Once baked, remove the loaf from the oven and allow it to cool in the pan for about 10 minutes. Then, transfer it to a wire rack to cool completely. Resist the urge to slice too soon, as it will be crumbly if it’s still warm.
  8. While the loaf is cooling, prepare the citrus icing. In a medium bowl, whisk together 1 cup of powdered sugar, 2 tablespoons of fresh lemon juice, and 1 tablespoon of orange juice until smooth. If the icing is too thick, you can add a little more juice to reach your desired consistency.
  9. Once the loaf is completely cool, drizzle the citrus icing over the top. If you like, sprinkle with an additional teaspoon of lemon zest for an extra pop of flavor and color.
  • Prep Time: 15 mins
  • Cook Time: 50-60 mins
  • Category: Dessert
  • Method: Baking
  • Cuisine: American

Nutrition

  • Serving Size: 1 slice
  • Calories: 200
  • Sugar: 15 g
  • Sodium: 150 mg
  • Fat: 8 g
  • Saturated Fat: 5 g
  • Unsaturated Fat: 3 g
  • Trans Fat: 0 g
  • Carbohydrates: 30 g
  • Fiber: 1 g
  • Protein: 3 g
  • Cholesterol: 40 mg

Keywords: Be careful not to overmix your batter; this is a common mistake that can lead to a dense loaf. Use room temperature ingredients for a smoother batter and even baking.

Did you make this recipe?

Share a photo and tag us — we can't wait to see what you've made!

  • Privacy Policy
  • Terms Of Service
  • Contact
  • About
  • GDPR

Copyright © 2025 Homesmad