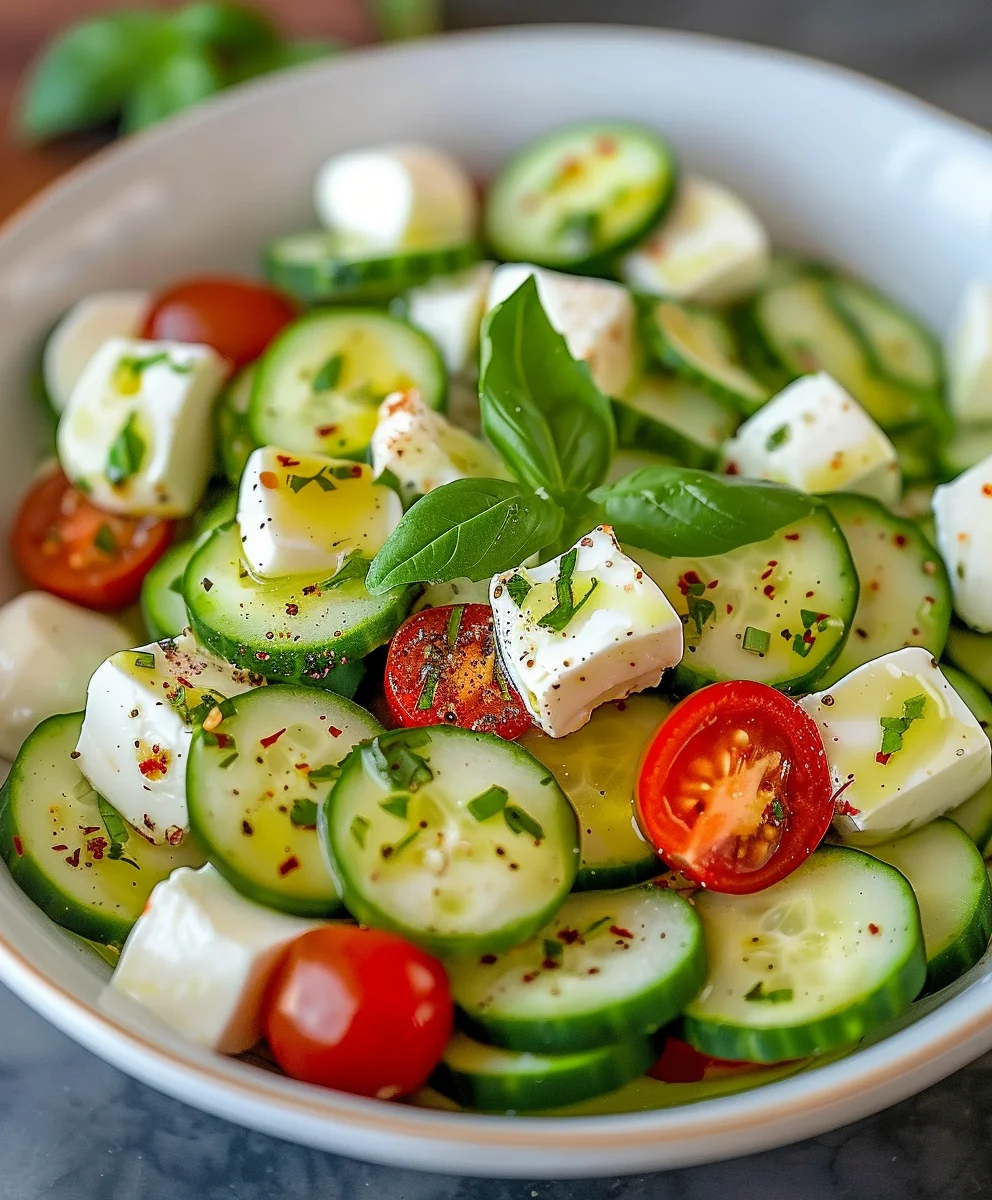
Easy Cucumber Mozzarella Salad – there are few dishes that capture the essence of effortless elegance and refreshing flavor quite like this one. Imagine a vibrant medley of crisp, cool cucumber and tender, milky mozzarella, all coming together in a symphony of textures and tastes that truly brightens any palate. I am incredibly excited to share with you a recipe that celebrates the beauty of simplicity and the sheer joy of fresh ingredients.
This delightful salad, while not steeped in centuries of ancient history, draws its profound inspiration from the revered Mediterranean tradition of showcasing fresh, high-quality produce. It’s a wonderful, lighter twist on the classic Italian Caprese, thoughtfully replacing the traditional tomato with the wonderfully refreshing crunch of cucumber. People adore this dish for countless reasons: its unparalleled freshness, the satisfying contrast between the crisp cucumber and the creamy, soft mozzarella, and its incredible versatility. It’s wonderfully quick to prepare, requires absolutely no cooking, and serves as the perfect light lunch, a vibrant side dish, or an impressive appetizer for any gathering. When you’re seeking a wholesome, delicious, and incredibly straightforward option that bursts with clean flavors, this Easy Cucumber Mozzarella Salad is truly a culinary gem that promises to delight.

Ingredients:
- Cucumbers: 3 large English cucumbers, or about 6-8 small Persian cucumbers. I find these varieties have fewer seeds and thinner skins, making them perfect for our fresh salad.
- Fresh Mozzarella: 16 oz (approximately 450g) of fresh mozzarella. You can opt for mini mozzarella balls (ciliegine or bocconcini) for convenience, or a large fresh mozzarella ball that you can cube yourself.
- Cherry or Grape Tomatoes: 1 pint (about 2 cups) of vibrant cherry or grape tomatoes. Halving them releases their juicy sweetness into the salad.
- Red Onion: 1/2 small red onion, very thinly sliced. If you find red onion too strong, a quick soak in ice water for 10 minutes can mellow its flavor.
- Fresh Dill: 1/4 cup of fresh dill, finely chopped. This herb adds an irreplaceable bright, slightly anisy note to our Easy Cucumber Mozzarella Salad.
- Fresh Mint: 2 tablespoons of fresh mint, finely chopped. A touch of mint elevates the freshness to another level.
- Extra Virgin Olive Oil: 1/4 cup of high-quality extra virgin olive oil. The foundation of any good vinaigrette!
- White Wine Vinegar: 2 tablespoons of white wine vinegar. This provides a crisp tang. You could also use apple cider vinegar for a slightly fruitier note.
- Dijon Mustard: 1 teaspoon of Dijon mustard. This acts as an emulsifier, helping our dressing come together smoothly and adding a subtle depth of flavor.
- Garlic: 1 small clove of garlic, minced very finely. Alternatively, 1/2 teaspoon of garlic powder can be used if fresh isn’t available.
- Sea Salt: 1/2 teaspoon of fine sea salt, or to taste.
- Freshly Ground Black Pepper: 1/4 teaspoon, or to taste.
- Optional Kick: 1/4 teaspoon of red pepper flakes, if you enjoy a little warmth in your salad.
Equipment You’ll Need:
- Large mixing bowl
- Small bowl for dressing
- Whisk or fork
- Sharp knife
- Cutting board
- Measuring cups and spoons
- Salad servers
Preparing for Your Easy Cucumber Mozzarella Salad:
This is where we set the stage for our incredibly refreshing and flavorful Easy Cucumber Mozzarella Salad. Taking your time with the prep work ensures every bite is perfect.
- Wash and Prepare Cucumbers: First, I always give my cucumbers a thorough wash under cold running water. For English cucumbers, I usually don’t peel them because their skin is quite thin and tender, and it adds a lovely bit of color and nutrients. If you’re using Persian cucumbers, definitely leave the skins on! For either type, trim off the ends. Then, slice them into bite-sized pieces. I prefer a half-moon shape for English cucumbers – slice them in half lengthwise, then cut into approximately 1/4 to 1/2-inch thick pieces. For Persian cucumbers, I often just slice them into rounds of a similar thickness. The goal is a uniform size so they mix well with the other ingredients. Place the sliced cucumbers into your large mixing bowl.
- Drain and Prepare Mozzarella: If you’re using mini mozzarella balls (ciliegine or bocconcini), simply drain them very well. I like to pat them dry gently with a paper towel to remove any excess moisture, which can dilute our dressing. If you’re using a large ball of fresh mozzarella, drain it, pat it dry, and then carefully cut it into bite-sized cubes, roughly 1/2-inch square. Again, uniformity is key for an aesthetically pleasing and easy-to-eat salad. Add the prepared mozzarella to the bowl with the cucumbers.
- Wash and Halve Tomatoes: Rinse your cherry or grape tomatoes under cold water. Pat them dry. Then, with a sharp knife, carefully halve each tomato. This not only makes them easier to eat but also allows their delicious juices to mingle with our dressing, adding another layer of flavor to the Easy Cucumber Mozzarella Salad. Add the halved tomatoes to the large mixing bowl.
- Slice Red Onion: This step is crucial for balancing the flavors. Peel your red onion and then slice it as thinly as you possibly can. I often use a mandoline for this if I have one handy, but a very sharp knife and a steady hand work perfectly. The thinner the slices, the less overpowering the onion will be. If you find red onion too pungent, as I sometimes do, you can place the thin slices in a small bowl of ice water for about 10 minutes. This really helps to mellow their intensity. After soaking, make sure to drain them very well and pat them dry before adding them to your main mixing bowl.
- Chop Fresh Herbs: Wash your fresh dill and mint. Gently pat them dry with a paper towel. On your cutting board, finely chop the dill. Do the same for the mint. The aroma alone is enough to get me excited for this Easy Cucumber Mozzarella Salad! Set these aside; we’ll add them a little later to preserve their freshness.
Crafting the Dressing:
The dressing is the heart of our Easy Cucumber Mozzarella Salad, bringing all the fresh ingredients together with a harmonious blend of tangy, savory, and herbaceous notes. It’s simple, but quality ingredients make all the difference.
- Combine Wet Ingredients: In a small bowl, pour in your 1/4 cup of high-quality extra virgin olive oil. I always say, use an olive oil you genuinely enjoy the taste of, as it truly shines through in a fresh salad like this. Add the 2 tablespoons of white wine vinegar next. The acidity from the vinegar is essential for brightening up the creamy mozzarella and fresh vegetables.
- Add Flavor Enhancers: Now, add the 1 teaspoon of Dijon mustard. Don’t skip this! Dijon doesn’t just add a subtle zing; it’s also a fantastic emulsifier, meaning it helps the oil and vinegar stay together rather than separating. Next, mince your garlic clove very, very finely, or use 1/2 teaspoon of garlic powder if that’s what you have. I prefer fresh garlic for its vibrant punch.
- Season the Dressing: Sprinkle in the 1/2 teaspoon of fine sea salt and the 1/4 teaspoon of freshly ground black pepper. Remember, you can always adjust these to your personal preference later, but this is a good starting point. If you like a little heat, this is the moment to add your 1/4 teaspoon of red pepper flakes. It provides a lovely, subtle warmth that complements the cool cucumber beautifully.
- Whisk Until Emulsified: With a whisk or a fork, vigorously whisk all the dressing ingredients together until they are well combined and slightly emulsified. You’ll notice the mixture becoming a bit thicker and more opaque, indicating that the oil and vinegar have come together beautifully. This creates a creamy texture that coats every piece of our Easy Cucumber Mozzarella Salad perfectly.
- Taste and Adjust: Before pouring it over our beautiful vegetables and cheese, give the dressing a quick taste. Does it need a little more salt? A bit more pepper? Perhaps a touch more vinegar for extra tang? This is your chance to customize it to your exact liking.
Assembling Your Easy Cucumber Mozzarella Salad:
Now for the satisfying part – bringing all those wonderfully prepared ingredients together to create your spectacular Easy Cucumber Mozzarella Salad!
- Combine Main Ingredients: In your large mixing bowl, where you’ve already placed your prepared cucumbers, mozzarella, tomatoes, and red onion, ensure everything is loosely mixed. We want to ensure the dressing has an easy path to coat all surfaces.
- Add Fresh Herbs: Gently sprinkle the finely chopped fresh dill and mint over the vegetables and cheese. These delicate herbs are best added now, just before the dressing, to ensure their vibrant flavor and color are retained. Their aromatic contribution is what truly makes this an Easy Cucumber Mozzarella Salad, distinguishing it from simpler preparations.
- Pour the Dressing: Slowly pour your freshly whisked dressing evenly over all the ingredients in the large bowl. Make sure to get every last drop – that dressing is liquid gold for this salad!
- Toss Gently but Thoroughly: Using two salad servers or large spoons, gently but thoroughly toss the salad. You want to ensure every single piece of cucumber, mozzarella, tomato, and onion is lightly coated with that incredible dressing. Be careful not to mash the ingredients; we want to keep those beautiful mozzarella balls and cucumber slices intact. Continue tossing until everything looks glistening and well-integrated.
- Allow Flavors to Mingle (Chill Time): While you could technically serve this Easy Cucumber Mozzarella Salad immediately, I find it truly shines after about 15-30 minutes in the refrigerator. This brief chilling period allows all the flavors to marry and deepen, making the salad even more delicious. The cucumbers absorb some of the dressing, and the mozzarella takes on hints of the herbs and garlic. If you have more time, an hour is even better, but don’t let it sit too long, as the cucumbers can release a lot of water.
- Final Taste Test Before Serving: Just before you’re ready to serve, give the salad one final gentle toss and a quick taste. Sometimes, after chilling, flavors can mellow slightly, and you might want to add a tiny pinch more salt or a grind of black pepper. This ensures your Easy Cucumber Mozzarella Salad is at its absolute peak of flavor.
Serving Suggestions and Variations:
This Easy Cucumber Mozzarella Salad is incredibly versatile and makes a fantastic addition to almost any meal. Here are a few ideas to get your creative juices flowing:
- As a Light Side Dish: Serve it alongside grilled chicken, fish, or steak for a refreshing and healthy accompaniment. The coolness of the cucumber and the creaminess of the mozzarella perfectly complement warm proteins. It’s also excellent with sandwiches or wraps.
- Part of a Mezze Platter: Incorporate it into a Mediterranean-inspired spread with hummus, pita bread, olives, and other fresh vegetables. Its bright flavors fit right in!
- Add Protein: To turn this into a heartier meal, consider adding cooked and cooled chickpeas, grilled shrimp, or shredded rotisserie chicken. This transforms our Easy Cucumber Mozzarella Salad into a complete lunch or light dinner.
- Pasta Salad Base: For a delightful twist, add some cooked and cooled small pasta shapes like orzo, ditalini, or small shells to the salad. It makes for an incredibly satisfying pasta salad.
- Garnish for Extra Flair: Before serving, a sprinkle of fresh croutons for crunch, a few toasted pine nuts, or a very light drizzle of a balsamic glaze (not too much, you don’t want to overpower the fresh flavors!) can elevate the presentation and taste.
- Herb Variations: While dill and mint are my go-to for this Easy Cucumber Mozzarella Salad, feel free to experiment with other fresh herbs. Fresh parsley or a touch of oregano could offer a different, but equally delicious, flavor profile.
Storage Tips for Your Fresh Salad:
While this Easy Cucumber Mozzarella Salad is best enjoyed fresh, you might find yourself with leftovers, or you might want to prepare it slightly in advance. Here’s how to keep it tasting great:
- Refrigeration: Store any leftover Easy Cucumber Mozzarella Salad in an airtight container in the refrigerator. This helps to maintain its freshness and prevent it from absorbing other odors from your fridge.
- Best Consumed Quickly: I recommend enjoying this salad within 1-2 days. Cucumbers have a high water content, and over time, they will release more liquid, which can make the salad a bit watery and less crisp. The mozzarella also tastes best when it’s still fresh and tender.
- Consider Dressing Separately (If Making Ahead): If you are preparing a large batch and know you won’t eat it all at once, you might consider storing the dressing separately from the main ingredients. Combine them just before serving each portion. This will ensure the cucumbers remain as crisp as possible for longer.
Why You’ll Love This Easy Cucumber Mozzarella Salad:
- Incredibly Refreshing: The crisp cucumbers, juicy tomatoes, and fresh herbs create a wonderfully light and invigorating experience, perfect for warm weather or as a palate cleanser.
- Simple Yet Elegant: Despite its straightforward preparation, this salad looks absolutely beautiful on any table, making it ideal for casual weeknight dinners and special gatherings alike. It’s truly an Easy Cucumber Mozzarella Salad that impresses with minimal effort.
- Bursting with Flavor: Each bite offers a delightful combination of creamy mozzarella, tangy dressing, and the bright, earthy notes of fresh vegetables and herbs.
- Healthy and Nutritious: Packed with fresh produce and healthy fats from the olive oil, it’s a guilt-free dish that supports a balanced lifestyle.
- Quick to Prepare: From start to finish, you can have this amazing Easy Cucumber Mozzarella Salad on the table in under 30 minutes, making it a perfect last-minute addition to any meal.
- Customizable: Easily adapt it to your taste preferences by adjusting the herbs, adding other vegetables, or incorporating proteins. It’s a truly versatile recipe!
Conclusion:
And there you have it, my friends! We’ve reached the end of our culinary journey for today, but I truly believe we’ve just opened the door to a world of fresh, vibrant flavors that you’re going to absolutely adore. When I set out to create this recipe, my goal was always to deliver something that wasn’t just delicious, but also incredibly simple to prepare, making it a perfect fit for anyone, regardless of their kitchen prowess or time constraints. This isn’t just another side dish; it’s a celebration of uncomplicated ingredients coming together in perfect harmony. It embodies everything I love about summer eating, even if you’re making it in the dead of winter and longing for sunshine.
Why This Recipe Is an Absolute Must-Try
Let me tell you why I am so passionately convinced that this recipe will become a new staple in your home. First and foremost, its refreshing quality is unparalleled. The crisp, cool cucumbers, combined with the creamy, delicate mozzarella, create a textural dance that is utterly satisfying. Then, there’s the vibrant dressing – that perfect balance of tang and subtle sweetness that brightens every single bite. It’s light, it’s healthy, and it leaves you feeling energized, not weighed down. It’s the kind of dish that makes you feel good from the inside out. In a world where we often seek complex flavors, there’s a profound beauty in the simplicity and purity of ingredients allowed to shine through. My Easy Cucumber Mozzarella Salad isn’t just a recipe; it’s a testament to how simple components, thoughtfully combined, can create something truly spectacular that will impress everyone who tries it. I promise you, once you taste that first forkful, you’ll understand exactly what I mean.
Elevate Your Meals: Serving Suggestions & Creative Variations
One of the many things I adore about this salad is its incredible versatility. It truly shines as a standalone light lunch, especially on those hot days when you crave something cool and invigorating. Picture yourself enjoying a generous bowl of this by the pool, or taking it with you for a picnic in the park. It’s also an exceptional companion to almost any main course. Think about serving it alongside grilled chicken, flaky baked salmon, or a perfectly seared steak – the freshness cuts beautifully through richer flavors, cleansing the palate and adding a lovely textural contrast. It’s also an absolute superstar at potlucks, barbecues, and family gatherings; trust me, it’s always one of the first dishes to disappear!
But don’t stop there! This recipe is a fantastic canvas for your own culinary creativity. Feel free to explore some delightful variations. For an added burst of color and sweetness, try tossing in some halved cherry tomatoes or finely diced red bell peppers. A sprinkle of fresh herbs like dill, mint, or basil can introduce another layer of aromatic complexity that is simply divine. If you’re a fan of a little more zing, a touch of finely minced red onion or some Kalamata olives could be wonderful additions. For those who enjoy different cheeses, consider swapping the fresh mozzarella for crumbled feta, which adds a salty, tangy kick, or even some small, marinated mozzarella pearls for an extra burst of flavor. You could also experiment with the dressing – a balsamic glaze drizzled over the top, or a lemon-herb vinaigrette with a hint of Dijon mustard, could transform the profile beautifully. For a heartier meal, why not add some chickpeas or cannellini beans for extra protein and fiber? The possibilities are truly endless, and I encourage you to make this salad uniquely your own.
Your Turn! Share Your Delicious Creations!
Now, it’s your moment to shine in the kitchen! I genuinely hope you’re feeling inspired and excited to try this delightful Easy Cucumber Mozzarella Salad. It’s a recipe that promises minimal effort for maximum flavor, a true win-win in my book. Gather your ingredients, take a few minutes, and prepare to be amazed by how such simple components can yield such a profound and satisfying taste. Once you’ve made it and experienced its refreshing deliciousness, I would absolutely love to hear about your experience. Did you make any fun variations? What did you serve it with? Please don’t hesitate to share your thoughts, your tips, and especially your beautiful photos! Nothing makes me happier than seeing your culinary triumphs. So go on, give this recipe a try, and let’s celebrate the joy of fresh, easy, and incredibly tasty food together. Happy cooking!
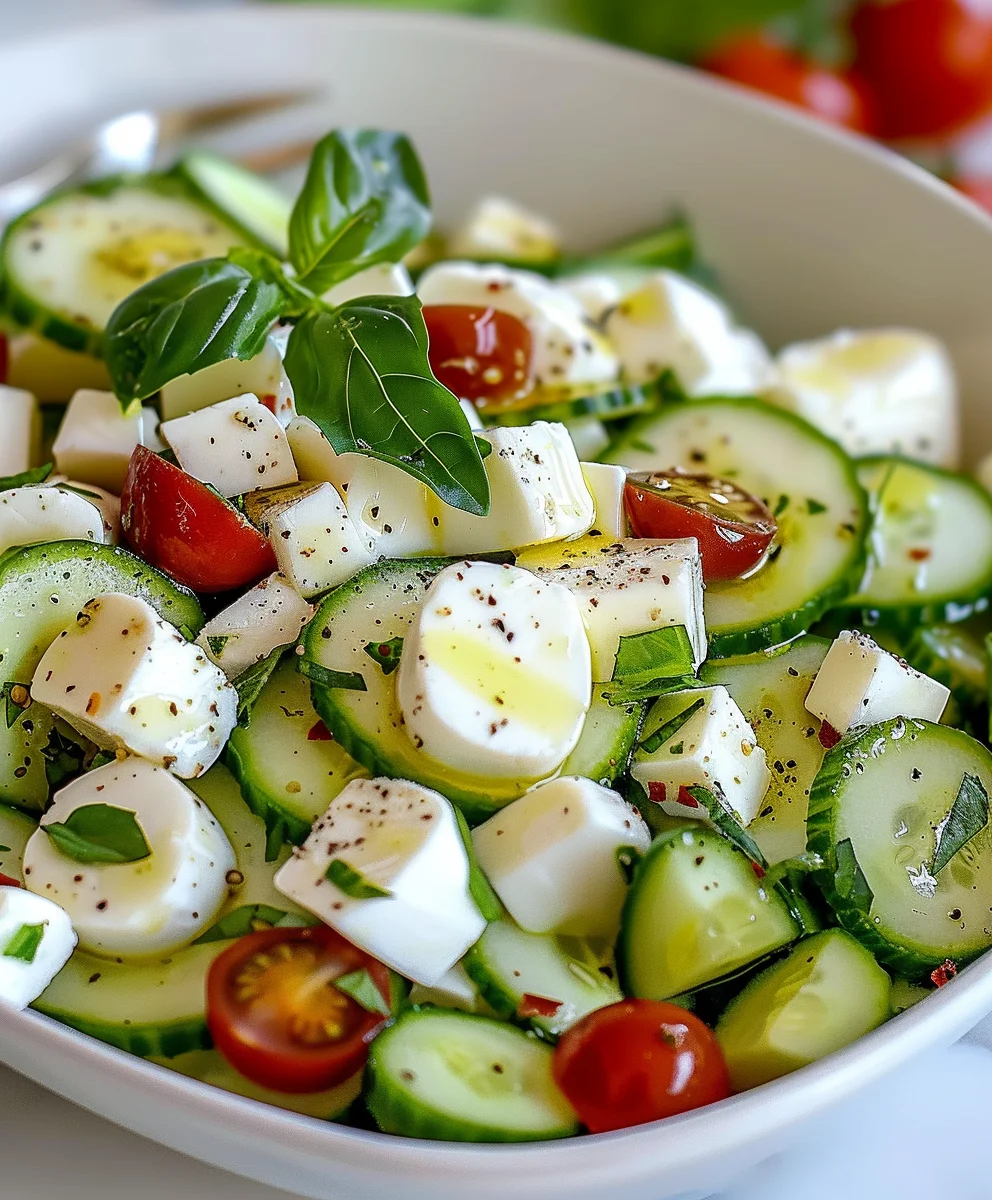
Easy Cucumber Mozzarella Salad
Easy Cucumber Mozzarella Salad – there are few dishes that capture the essence of effortless elegance and refreshing flavor quite like this one. Imagine a vibrant medley of crisp, cool cucumber and tender, milky mozzarella, all coming together in a symphony of textures and tastes that truly brightens any palate.
Ingredients
-
3 large English cucumbers (or 6-8 small Persian cucumbers)
-
8 oz fresh mozzarella balls (halved or 1 cup diced fresh mozzarella)
-
3 cups cherry tomatoes, halved
-
1/2 small red onion, thinly sliced
-
1/3 cup fresh basil leaves, chopped
-
1/4 cup extra virgin olive oil
-
2 tablespoons white grape vinegar
-
1 teaspoon Dijon mustard
-
1 small garlic clove, minced (or 1/2 tsp garlic powder)
-
1/2 teaspoon sea salt
-
1/4 teaspoon black pepper
-
1/4 teaspoon red pepper flakes (optional)
Instructions
-
Step 1
Wash, trim, and slice cucumbers into bite-sized pieces. Place in a large mixing bowl. -
Step 2
Drain and gently pat dry the fresh mozzarella. Halve mini balls or dice a large ball into bite-sized cubes. Add to the bowl with cucumbers. -
Step 3
Wash and halve cherry tomatoes. Peel and thinly slice the red onion (optional: soak in ice water for 10 minutes, then drain and pat dry to mellow flavor). Add both to the large mixing bowl. -
Step 4
In a small bowl, whisk together the extra virgin olive oil, white grape vinegar, Dijon mustard, minced garlic, sea salt, black pepper, and optional red pepper flakes until well emulsified. Taste and adjust seasoning as desired. -
Step 5
Add the chopped fresh basil to the large bowl. Pour the prepared dressing evenly over all ingredients. Gently toss with salad servers until everything is well coated. Refrigerate for 15-30 minutes to allow flavors to mingle and deepen. -
Step 6
Give the salad a final gentle toss and taste before serving. Adjust salt or pepper if needed. Serve chilled as a light lunch, side dish, or appetizer.
Important Information
Nutrition Facts (Per Serving)
It is important to consider this information as approximate and not to use it as definitive health advice.
Allergy Information
Please check ingredients for potential allergens and consult a health professional if in doubt.