• Skip to primary navigation
  • Skip to main content
  • Skip to primary sidebar
Homesmad

Homesmad

  • Home
  • Breakfast & Brunch
  • Appetizers & Snacks
  • Dinner
  • Dessert
  • About
  • Privacy Policy
  • Contact
Homesmad
  • Home
  • Breakfast & Brunch
  • Appetizers & Snacks
  • Dinner
  • Dessert
  • About
  • Privacy Policy
  • Contact

Salted Caramel Pretzel Bark: Sweet & Salty Perfection!

October 30, 2025 by Lily author

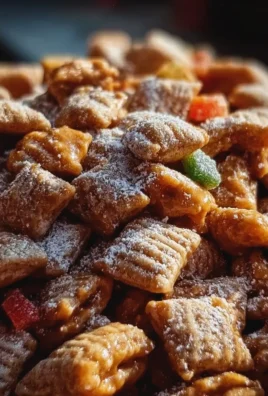
Salted Caramel Pretzel Bark is not just a dessert; it’s an experience – a symphony of textures and flavors that will captivate your palate from the very first bite. Imagine the perfect harmony of rich, decadent chocolate, chewy, golden caramel, and crisp, salty pretzels, all unified by that irresistible hint of sea salt. I am absolutely thrilled to share this incredible recipe with you, promising a delightful treat that is surprisingly simple to create, yet delivers on sophisticated taste that everyone will adore.

While this particular confection might not trace its roots back centuries, its appeal is undeniably classic, marrying beloved elements into a modern masterpiece. The genius of this modern treat lies in its clever combination: the timeless allure of chocolate bark gets an exciting upgrade with the addition of buttery, sweet caramel and the satisfying crunch of pretzels. This dish perfectly embodies why we adore comfort food with a gourmet twist, making it an instant favorite in many homes.

Why Everyone Loves Salted Caramel Pretzel Bark

People consistently rave about its addictive balance of sweet and salty, the satisfying contrast between the smooth chocolate and the crunchy pretzels, and how incredibly easy it is to prepare for any occasion, from a casual family gathering to an elegant holiday party. It’s a go-to for gifting, a guaranteed crowd-pleaser, and a truly effortless way to create something spectacular without needing to turn on your oven.

Get ready to impress your friends and family with a creation that looks as fantastic as it tastes, requiring minimal effort but yielding maximum delight. You’ll be amazed at how quickly this becomes a staple in your recipe repertoire!

Salted Caramel Pretzel Bark: Sweet & Salty Perfection! this RECIPE

Ingredients:

  • For the Dark Chocolate Base:
    • 16 ounces (about 2 ½ cups) high-quality dark chocolate chips or finely chopped dark chocolate bars (aim for 60-70% cocoa content for a rich, intense flavor that beautifully balances the sweetness of the caramel). I personally love using Ghirardelli or Guittard baking bars for their smooth melt and superior taste.
    • 1 teaspoon neutral oil (like coconut oil, vegetable oil, or a flavorless shortening like Crisco). This is optional, but it helps the chocolate melt more smoothly and creates a glossy, less brittle finish for our Salted Caramel Pretzel Bark.
  • For the Pretzel Layer:
    • 6-8 ounces (approximately 4-5 cups) mini pretzel twists or pretzel sticks. I find that a mix of shapes adds wonderful visual appeal and textural variety. Ensure they are fresh and crisp; stale pretzels will detract from the overall experience of your Salted Caramel Pretzel Bark.
  • For the Luscious Caramel Layer:
    • 14 ounces (about 40-50 individual pieces) soft, chewy caramels, unwrapped. Werther’s Chewy Caramels or Kraft Caramels work exceptionally well for this. Make sure they are the soft, meltable kind, not hard candies.
    • 3 tablespoons heavy cream. This helps achieve that perfect pourable, yet still thick and rich, caramel consistency.
    • 2 tablespoons unsalted butter, cut into small pieces. Butter adds a beautiful richness and helps prevent the caramel from seizing.
    • ½ teaspoon pure vanilla extract. A touch of vanilla enhances the caramel’s depth of flavor.
    • ¼ teaspoon fine sea salt (optional, as we’ll use flaky salt later, but a tiny bit here can deepen the caramel’s flavor).
  • For the Milk Chocolate Drizzle/Top Layer:
    • 8 ounces (about 1 ½ cups) good quality milk chocolate chips or finely chopped milk chocolate bars. This layer adds a comforting sweetness that perfectly complements the dark chocolate and salty pretzels, truly defining our Salted Caramel Pretzel Bark masterpiece.
  • For the White Chocolate Swirl (Optional, but highly recommended for visual appeal and an extra layer of flavor):
    • 4 ounces (about ¾ cup) white chocolate chips or finely chopped white chocolate bar. Ensure it’s true white chocolate made with cocoa butter, not confectionery coating, for the best taste and melting properties.
  • The Essential Finishing Touch:
    • 1-2 teaspoons flaky sea salt (such as Maldon or Fleur de Sel). This is absolutely critical for the “Salted” aspect of our Salted Caramel Pretzel Bark and provides a delightful textural crunch and burst of salinity that makes all the flavors sing.

Gathering Your Tools and Prepping the Workspace

  1. Before we even think about melting chocolate or stirring caramel, let’s get our kitchen ready! You’ll need a large baking sheet, roughly 10×15 inches or 12×17 inches. The exact size isn’t crucial, but a larger one will yield a thinner bark, while a smaller one will give you a thicker, chewier result. I usually opt for a standard half-sheet pan.
  2. Line your chosen baking sheet completely with parchment paper. This is non-negotiable for easy removal and cleanup. Trust me, trying to pry hardened chocolate bark from an unlined pan is a task you don’t want to undertake! Ensure the parchment paper hangs over the edges a bit, creating “handles” that will be super helpful later when lifting the Salted Caramel Pretzel Bark out of the pan.
  3. Prepare your melting stations. For the chocolates, you can use a double boiler setup (a heatproof bowl set over a saucepan of simmering water) or microwave-safe bowls. For the caramel, a medium saucepan will be ideal. Also, have a few rubber spatulas, a whisk, and possibly a small offset spatula or butter knife handy for spreading.

Preparing the Pretzel Foundation for Your Salted Caramel Pretzel Bark

  1. Now, let’s get those pretzels ready. While some recipes call for crushing them, I prefer to keep most of them whole for that satisfying crunch and visual appeal. However, if you have any larger pretzel pieces or just want a more uniform layer, you can gently crush about a quarter of your pretzels. You can do this by placing them in a Ziploc bag and gently tapping with a rolling pin or the bottom of a heavy pan, or simply breaking them by hand. Be careful not to turn them into dust; we want chunky pieces, not crumbs.
  2. Once you’ve decided on your pretzel strategy, set them aside for just a moment. They’ll be ready to jump into action after our first chocolate layer is spread.

Melting the Chocolate Layers: A Symphony of Sweetness

Melting the Dark Chocolate Base

  1. In a heatproof bowl, combine your dark chocolate chips or chopped dark chocolate. If using the optional neutral oil, add it in now. You have two excellent methods for melting:
    • Double Boiler Method (My preferred method for control): Place the bowl over a saucepan containing about an inch or two of simmering water, ensuring the bottom of the bowl does not touch the water. Stir gently and continuously with a rubber spatula until the chocolate is smooth and completely melted. This method provides gentle, even heat, reducing the risk of scorching. Tip: Make sure no steam or water gets into the chocolate, as even a tiny drop can cause it to seize and become grainy.
    • Microwave Method (Quicker, but requires vigilance): Microwave the chocolate in 30-second intervals, stirring thoroughly after each interval. Chocolate retains its shape even when melted, so it’s crucial to stir to assess its consistency. Continue until it’s smooth and glossy. Be very careful not to overheat it, as dark chocolate can easily burn in the microwave, leading to a bitter taste and crumbly texture. Less is more here; if it looks almost melted, stir vigorously, and the residual heat will often do the rest.
  2. Once your dark chocolate is perfectly smooth and velvety, immediately pour it onto your parchment-lined baking sheet. Using an offset spatula or the back of a spoon, gently spread the chocolate evenly across the entire surface. Aim for a relatively thin, consistent layer. This will form the sturdy and delicious foundation of your Salted Caramel Pretzel Bark. Work quickly but carefully, as the chocolate will start to set.

Preparing the Milk and White Chocolate for Drizzling

  1. While the dark chocolate is still wet (this is important for the pretzels to adhere!), let’s prepare our other chocolates. In separate microwave-safe bowls, melt the milk chocolate and the white chocolate following the microwave method described above (30-second intervals, stirring well). White chocolate is particularly prone to seizing, so melt it even more carefully, using shorter intervals and less power if your microwave allows. For an extra smooth finish, you can add a tiny bit (¼ teaspoon) of neutral oil to each of these as well. Once melted, set them aside, stirring occasionally to keep them fluid.

Crafting the Luxurious Caramel Layer

  1. Now for the star of the show, the caramel! In a medium-sized, heavy-bottomed saucepan, combine the unwrapped soft caramels, heavy cream, and butter pieces. Place the saucepan over low to medium-low heat. The key here is patience and gentle heat.
  2. Stir continuously with a heatproof spatula or wooden spoon. The caramels will slowly start to soften and melt, combining with the cream and butter. It might look a little lumpy at first, but keep stirring. The goal is a smooth, luscious, pourable caramel sauce. This process can take anywhere from 8 to 15 minutes, depending on your stove and the size of your caramels. Don’t rush it by cranking up the heat, as this can scorch the caramel or cause it to become overly stiff.
  3. Once the mixture is completely smooth with no lumps, remove the saucepan from the heat. Stir in the vanilla extract and the optional fine sea salt. Give it a good stir to ensure everything is well incorporated. The aroma alone will tell you this is going to be amazing for our Salted Caramel Pretzel Bark!

Assembling Your Spectacular Salted Caramel Pretzel Bark

The Pretzel Power Layer

  1. Remember that freshly spread dark chocolate? While it’s still tacky and hasn’t fully set, evenly scatter your pretzels over the entire surface. I like to gently press them down a little bit, just enough to ensure they adhere well to the chocolate. Make sure you get good coverage; we want a fantastic pretzel-to-chocolate ratio in every bite of Salted Caramel Pretzel Bark.

The Golden Caramel Cascade

  1. Now, for the glorious caramel! While it’s still warm and pourable (if it’s cooled too much and become too thick, you can gently warm it again over low heat or in the microwave for a few seconds), drizzle it generously over the layer of pretzels. You can use a spoon to dollop it around, then gently spread it with an offset spatula or the back of a spoon to create a relatively even layer. It doesn’t have to be perfect, as the pretzels will create some natural bumps and crevices, which just add character to our Salted Caramel Pretzel Bark. Just ensure most of the pretzels are coated.

The Milk Chocolate Embrace

  1. Once the caramel is spread, immediately pour your melted milk chocolate over the caramel layer. Again, use your offset spatula to gently spread it, coaxing it to cover the caramel and pretzels as much as possible. It’s okay if some of the caramel or pretzels peek through; that’s part of the rustic charm of homemade bark. This layer adds another dimension of chocolatey goodness and helps to encapsulate all those wonderful textures and flavors.

The Artistic White Chocolate Swirl

  1. This step is where your inner artist can shine! Take your melted white chocolate. You can either drizzle it directly from the bowl using a spoon, creating thin lines back and forth across the milk chocolate layer, or for more precision, transfer it to a small piping bag (or a Ziploc bag with a tiny corner snipped off).
  2. Once you have your white chocolate lines, immediately grab a clean skewer, toothpick, or the tip of a butter knife. Drag it through the white chocolate lines in alternating directions (up, then down) to create a beautiful swirled pattern. This not only looks stunning but also adds a subtle, creamy sweetness that contrasts beautifully with the richer dark and milk chocolates in our Salted Caramel Pretzel Bark. Work quickly before the chocolate starts to set!

The Grand Finale: Flaky Sea Salt

  1. This is the moment we’ve been waiting for! While all the chocolate layers are still wet and soft, generously sprinkle the flaky sea salt all over the entire surface of your bark. Don’t be shy here; the salt is absolutely essential to the “Salted” in Salted Caramel Pretzel Bark. The large, irregular crystals of flaky sea salt provide bursts of salinity and a delightful textural contrast that truly elevates this treat from simply good to absolutely unforgettable. I love how it glitters on top, too!

Chilling and Setting the Salted Caramel Pretzel Bark

  1. Now that your masterpiece is assembled, it’s time for the crucial chilling phase. Carefully transfer the baking sheet to your refrigerator. You’ll want to chill it for at least 2 to 4 hours, or until the chocolate is completely firm and hard to the touch. The longer it chills, the easier it will be to break and the cleaner your pieces will be.
  2. Alternatively, if you’re in a hurry (and who isn’t when delicious Salted Caramel Pretzel Bark is waiting?), you can place it in the freezer for about 45 minutes to an hour. Just be mindful not to leave it in there too long, as extreme cold can sometimes affect the chocolate’s texture slightly upon thawing, though for bark, it’s generally fine. The goal is simply to get all those layers perfectly solid and integrated.

Breaking and Serving Your Homemade Treat

  1. Once your Salted Caramel Pretzel Bark is completely firm, remove the baking sheet from the refrigerator or freezer. Using those parchment paper “handles” you wisely created earlier, carefully lift the entire sheet of bark out of the pan and transfer it to a clean cutting board or a sturdy counter surface.
  2. Now for the satisfying part: breaking it! You can do this in a couple of ways. For truly rustic, irregular pieces (my personal favorite for bark), simply use your hands to break it into shards of various sizes. The caramel and chocolate will snap beautifully, revealing all those wonderful layers. If you prefer more uniform pieces, you can use a large, sharp knife to gently score and then break or even cut the bark. Just be prepared for a little bit of a crumbly mess, especially with the pretzels.
  3. Serving and Storage: Arrange your gorgeous Salted Caramel Pretzel Bark pieces on a platter for immediate enjoyment. This bark makes a fantastic homemade gift, a delightful party favor, or simply a well-deserved treat for yourself! Store any leftover bark in an airtight container at room temperature for up to 1 week, or in the refrigerator for up to 2 weeks, especially in warmer climates. If storing in the fridge, let it sit at room temperature for 10-15 minutes before serving for the best texture and flavor. The combination of salty pretzels, gooey caramel, and three types of chocolate with that perfect pop of flaky sea salt is simply irresistible. Enjoy every single bite of your incredible homemade Salted Caramel Pretzel Bark!

Salted Caramel Pretzel Bark: Sweet & Salty Perfection!

Conclusion:

And there you have it, my friends! We’ve reached the sweet, salty, and utterly satisfying end of our culinary journey together. I genuinely hope you’ve enjoyed discovering the magic behind this incredibly simple yet profoundly delicious treat. This isn’t just another recipe; it’s an invitation to experience pure joy in every single bite. If you’ve been on the fence about trying a new dessert, allow me to push you gently (or perhaps enthusiastically!) right into the realm of this exceptional Salted Caramel Pretzel Bark.

Why This Recipe Is an Absolute Must-Try:

First and foremost, it’s an undeniable symphony of textures and flavors. Imagine that initial crunch from the crisp pretzels, followed by the smooth, luxurious melt of rich chocolate, all perfectly balanced by the sweet, chewy embrace of homemade or store-bought caramel, and finally, that delightful pop of sea salt that cuts through the sweetness, leaving your palate refreshed and craving just one more piece. It’s a masterful blend of sweet and salty, a combination that has captivated taste buds for generations, elevated to new heights with the added crunch of pretzels. It’s incredibly easy to make, requiring minimal fuss and effort, yet it delivers a show-stopping result that will impress anyone lucky enough to try it. Seriously, the effort-to-wow-factor ratio here is off the charts! It’s the kind of treat that looks sophisticated and complex but comes together in a flash, making it ideal for busy weekdays or impromptu gatherings.

Serving Suggestions & Creative Variations to Explore:

Once your beautiful bark has set and is ready to be devoured, the possibilities are truly endless. Naturally, it’s a phenomenal stand-alone snack, perfect for an after-dinner indulgence with a cup of coffee or tea. But don’t stop there! Crumble a few pieces over a scoop of vanilla bean ice cream for an instant upgrade to a simple dessert, adding layers of crunch, chew, and that irresistible sweet-salty dynamic. It makes an incredible addition to any party platter or dessert table, guaranteed to be one of the first treats to disappear. Furthermore, neatly packaged pieces make for thoughtful, homemade gifts during the holidays or for a hostess. Who wouldn’t love a baggie of this exquisite bark?

And if you’re feeling adventurous, this recipe is a fantastic canvas for your creativity! While I adore the classic version we’ve explored, consider these delightful variations: Try swapping out the milk chocolate for a richer dark chocolate for a more intense flavor profile, or use white chocolate for a creamier, sweeter experience, perhaps with a sprinkle of crushed peppermint for a festive twist. You could also experiment with different toppings – a handful of chopped roasted pecans or almonds would add another layer of nutty texture, or maybe some mini chocolate chips for extra chocolatey goodness. For a fun, colorful flair, a scattering of sprinkles before the chocolate sets would make it perfect for a birthday celebration. You could even drizzle a contrasting chocolate (like white chocolate over dark) for a visually stunning finish. Don’t be afraid to make it your own; that’s part of the joy of baking!

Your Turn to Shine!

Now, it’s your moment to shine in the kitchen! I’ve shared all my tips and tricks, and I truly believe this recipe for Salted Caramel Pretzel Bark will become a cherished staple in your home. It’s more than just a sweet treat; it’s a moment of delightful indulgence, a small act of self-care, or a wonderful way to show someone you care. Don’t hesitate any longer. Gather your ingredients, clear some space on your counter, and get ready to create something truly magical. I can practically taste the anticipation!

Once you’ve whipped up your own batch, I would absolutely love to hear about your experience. Did you stick to the original recipe, or did you venture into some exciting variations? What was your favorite part of making it, and, more importantly, what did your taste testers think? Please share your stories, your triumphs, and even your questions in the comments below. Nothing makes me happier than seeing you all create and enjoy these recipes in your own kitchens. Happy baking, and happy indulging!


Salted Caramel Pretzel Bark

Salted Caramel Pretzel Bark

A symphony of textures and flavors, this Salted Caramel Pretzel Bark combines rich, decadent chocolate, chewy caramel, and crisp, salty pretzels, all unified by an irresistible hint of sea salt. A surprisingly simple yet sophisticated no-bake treat.

Prep Time
45 Minutes
Cook Time
25 Minutes
Total Time
45 Minutes
Servings
24 servings

Ingredients

  • 16 ounces dark chocolate chips (or chopped dark chocolate)
  • 1 teaspoon neutral oil (optional)
  • 8 ounces mini pretzels (twists or sticks)
  • 11 ounces soft, chewy caramels, unwrapped
  • 2 tablespoons heavy cream
  • 2 tablespoons unsalted butter
  • ½ teaspoon pure vanilla extract
  • ¼ teaspoon fine sea salt (optional)
  • 12 ounces milk chocolate chips (or chopped milk chocolate)
  • 4 ounces white chocolate chips (or chopped white chocolate) (optional)
  • 1-2 teaspoons flaky sea salt

Instructions

  1. Step 1
    Line a large baking sheet (approx. 10×15 to 12×17 inches) with parchment paper, ensuring it hangs over the edges for handles. If desired, gently crush a quarter of the pretzels and set aside.
  2. Step 2
    Melt 16 ounces dark chocolate (with optional 1 tsp neutral oil) using a double boiler or microwave until smooth. Pour onto the prepared baking sheet and spread evenly into a thin layer.
  3. Step 3
    While the dark chocolate is still wet, evenly scatter 8 ounces of pretzels over the entire surface, pressing gently to ensure they adhere.
  4. Step 4
    In a medium saucepan, combine 11 ounces unwrapped soft caramels, 2 tablespoons heavy cream, and 2 tablespoons unsalted butter. Melt over low to medium-low heat, stirring continuously until completely smooth. Remove from heat, then stir in ½ teaspoon vanilla extract and optional ¼ teaspoon fine sea salt.
  5. Step 5
    While the caramel is still warm and pourable, drizzle it generously over the pretzel layer, then gently spread to cover most of the pretzels.
  6. Step 6
    Melt 12 ounces milk chocolate. Pour it over the caramel layer and gently spread to cover, encapsulating the pretzels and caramel.
  7. Step 7
    Melt 4 ounces white chocolate. Drizzle lines of white chocolate over the wet milk chocolate. Immediately drag a clean skewer or toothpick through the lines in alternating directions to create a swirled pattern.
  8. Step 8
    While all chocolate layers are still wet, generously sprinkle 1-2 teaspoons of flaky sea salt over the entire surface of the bark.
  9. Step 9
    Carefully transfer the baking sheet to the refrigerator and chill for at least 2 to 4 hours, or until all chocolate layers are completely firm. Alternatively, freeze for 45 minutes to 1 hour.
  10. Step 10
    Once firm, lift the bark from the pan using the parchment paper handles. Transfer to a cutting board and break into rustic, irregular pieces by hand, or use a sharp knife for more uniform pieces. Store in an airtight container at room temperature for up to 1 week, or in the refrigerator for up to 2 weeks.

Important Information

Nutrition Facts (Per Serving)

It is important to consider this information as approximate and not to use it as definitive health advice.

Allergy Information

Please check ingredients for potential allergens and consult a health professional if in doubt.

« Previous Post
Best Louisiana Remoulade Sauce Recipe - Easy & Zesty
Next Post »
Maple Donut Bars: Soft, Chewy, & Irresistibly Delicious!

If you enjoyed this…

Crave-Worthy Caramel Apple Puppy Chow – Ultimate Snack

Raspberry Swirl Shortbread Cookies: A Delightful Treat for Any Occasion

Lemon Blueberry Sheet Cake: Easy Recipe & Baking Tips

Primary Sidebar

Browse by Diet

BreakfastDinnerLunchDessertAppetizer

Sweet Peach Yogurt Parfait Delight

One of my fondest memories is from a lazy summer afternoon spent at my grandmother’s house. The sun filtered through the kitchen window, casting a warm glow over the table where she would create her culinary magic. It was during one of those blissful moments that I first tasted her Peach Yogurt Parfait with Honey and Granola. The sweet aroma of ripe peaches mingling with creamy yogurt and the crunch of granola was nothing short of heavenly. It felt like summer captured in a bowl, and I still remember the joy of diving in with a spoon, each layer revealing a new burst of flavor.

When I think about that parfait, I can almost hear the gentle hum of the bees outside, reminding me of the floral notes that honey brings to every bite. The vibrant yellows and soft oranges of the peaches contrast beautifully with the creamy white yogurt and the golden crunch of granola. It’s a dish that not only looks delightful but also tastes like a celebration of fresh, wholesome ingredients.

What makes my version of this Peach Yogurt Parfait special is the careful balance of flavors and textures. I use ripe, juicy peaches, drizzled with locally sourced honey, and a homemade granola that’s bursting with nuts and seeds for an extra crunch. It’s a simple dish, but every layer is crafted with love and attention.

Let me show you exactly how to make this delightful parfait, so you can bring a bit of that summer magic into your kitchen!

Sweet Peach Yogurt Parfait Delight

Why You’ll Love This Recipe

  • Delightfully creamy texture from the Greek yogurt, paired with the juicy sweetness of fresh peaches.
  • Ready in under 20 minutes, making it a quick and satisfying breakfast or snack option.
  • Budget-friendly, using common ingredients that you may already have in your pantry.
  • Customizable with your favorite granola and nuts, allowing you to tailor each parfait to your taste.
  • Perfectly balanced flavors with the bright acidity of lemon juice and the sweetness of honey enhancing the peaches.

Ingredients

  • For the Parfait:
  • 2 cups plain Greek yogurt (or vanilla yogurt for a sweeter option)
  • 2 large ripe peaches, diced (about 2 cups)
  • 1 tablespoon fresh lemon juice (to prevent browning of peaches)
  • 2 tablespoons honey (plus more for drizzling)
  • 1 teaspoon vanilla extract (optional for extra flavor)
  • For the Granola:
  • 1 cup granola (store-bought or homemade; see notes for a simple granola recipe)
  • 1/4 cup sliced almonds (optional for added crunch)
  • 1/4 cup shredded coconut (optional for added flavor)

Let’s dive into some key ingredients that make this Peach Yogurt Parfait so delightful! First, the Greek yogurt is not only creamy but also packed with protein, making it a satisfying option for breakfast or a snack. If you’re looking for a sweeter option, you can easily substitute it with vanilla yogurt, though it may alter the overall flavor balance. Next, the ripe peaches are the star of the show; their natural sweetness shines through, so I recommend choosing peaches that yield slightly to pressure, indicating they’re perfectly ripe. If peaches aren’t in season, feel free to use nectarines or even frozen peaches—just thaw them before use. Finally, honey adds a lovely floral sweetness that ties everything together. If you prefer, maple syrup can serve as a delicious substitute.

Step-by-Step Instructions

  1. Start by preparing the peaches. Wash them thoroughly, then slice and dice them into bite-sized pieces. In a medium bowl, toss the diced peaches with 1 tablespoon of fresh lemon juice to prevent browning. Set aside for about 5 minutes while the lemon juice works its magic.
  2. In a separate bowl, combine the Greek yogurt, 2 tablespoons of honey, and 1 teaspoon of vanilla extract if using. Stir the mixture until smooth and thoroughly blended. This should take about a minute. Avoid overmixing to maintain the creaminess of the yogurt.
  3. Now it’s time to layer your parfait. Grab a clear glass or bowl to showcase your beautiful creation. Start with a generous spoonful of the yogurt mixture at the bottom—about 1/4 cup will do. Use a spoon to spread it evenly.
  4. Add a layer of the diced peaches over the yogurt, ensuring they cover the yogurt completely. You might want to use about half of what you have prepared—roughly 1 cup. This layer should be visually appealing, so arrange the peaches neatly.
  5. Sprinkle 1/4 cup of granola over the peaches. This adds a delightful crunch. Make sure to distribute it evenly to ensure every bite has that satisfying texture. Avoid packing it down too tightly, as you want it to maintain its crunch.
  6. Repeat the layers: spoon in another 1/4 cup of yogurt, followed by another cup of peaches, and another sprinkle of granola. You should have at least two layers, but feel free to add more depending on your glass size.
  7. Finish off your parfait with a drizzle of honey on top for added sweetness and a touch of elegance. If you’re using sliced almonds or shredded coconut, sprinkle them on top now. It adds a lovely visual contrast and extra flavor.
  8. Serve immediately or refrigerate for up to 30 minutes before serving to allow the flavors to meld together. However, I recommend enjoying it fresh to maintain the granola’s crunch.

Pro Tips for the Best Peach Yogurt Parfait With Honey And Granola

  • Make sure to choose ripe peaches for the best flavor and texture. A common mistake is using unripe fruit, which can lead to a less enjoyable parfait. Look for peaches that are fragrant and slightly soft to the touch.
  • Use a clear glass to assemble your parfait; this not only makes for a beautiful presentation but also allows you to see the colorful layers, which adds to the enjoyment of eating it.
  • For an even creamier texture, consider whipping the Greek yogurt with a hand mixer for a couple of minutes before layering. This small adjustment makes a huge difference in mouthfeel.
  • Be mindful of the granola-to-yogurt ratio. Too much granola can overwhelm the parfait, while too little can make it feel too creamy. Aim for about 1/4 cup of granola per layer for the perfect balance.
  • If you’re making this for a gathering, consider preparing the yogurt and peaches ahead of time and layering them just before serving. This ensures the granola stays crunchy!

Variations & Serving Ideas

There are so many ways to get creative with your Peach Yogurt Parfait! For a tropical twist, swap out the peaches for mangoes or pineapples and top with coconut flakes. If you prefer a berry flavor, mix in some blueberries or strawberries with the peaches for added color and taste. For a nutty version, incorporate chopped walnuts or pecans instead of almonds.

As for serving ideas, this parfait pairs beautifully with a side of scrambled eggs for a hearty breakfast or fresh fruit salad for a light lunch. You might also enjoy it alongside whole grain toast with almond butter for an energizing snack. The contrast of flavors and textures will elevate your meal experience!

Storage, Make-Ahead & Reheating

The Peach Yogurt Parfait is best enjoyed fresh, but you can prepare some components ahead of time. Store the layered parfait in an airtight container in the refrigerator for up to 24 hours. However, be cautious; the granola may lose its crunch if stored too long. You can freeze the yogurt and peach mixture for up to 2 months; just remember to thaw it in the refrigerator overnight before serving.

If you plan to enjoy this dish the next day, it can taste even better as the flavors meld together. Just remember to add the granola right before serving to keep its delightful crunch!

Frequently Asked Questions

Can I make Peach Yogurt Parfait With Honey And Granola ahead of time?

Yes — in fact, it tastes even better the next day as the flavors meld. However, I recommend waiting to add the granola until just before serving to maintain its crunch.

What can I substitute for Greek yogurt?

If you prefer a lighter option, you can substitute Greek yogurt with regular yogurt or a dairy-free alternative like coconut yogurt. Just remember that this may alter the creaminess and flavor profile slightly.

Can I use frozen peaches for this parfait?

Absolutely! Just make sure to thaw the frozen peaches before using them. They will still add great flavor, though the texture may be slightly softer than fresh peaches.

How do I make the parfait vegan?

To make a vegan version, substitute the Greek yogurt with a plant-based yogurt alternative, and replace honey with maple syrup or agave nectar. This keeps the parfait sweet while adhering to a vegan diet.

What other fruits can I use in this recipe?

You can mix and match fruits based on your preference. Try using strawberries, blueberries, raspberries, or even bananas. Just make sure to adjust the lemon juice as needed to prevent browning.

Sweet Peach Yogurt Parfait Delight

Final Thoughts

The Peach Yogurt Parfait with Honey and Granola is a delightful blend of creamy yogurt, sweet peaches, and crunchy granola that creates a satisfying and nourishing treat. Each layer bursts with flavor, making it a perfect choice for breakfast or a light dessert.

This is the kind of recipe I come back to again and again, especially when I want something refreshing and wholesome to start my day. The harmony of sweet and tart flavors, combined with the delightful crunch, never fails to lift my spirits!

I encourage you to give this parfait a try and indulge in its comforting goodness. Feel free to share your results or even add your own twist—perhaps a sprinkle of cinnamon or a handful of nuts. Enjoy creating your perfect parfait!

Print
clock clock iconcutlery cutlery iconflag flag iconfolder folder iconinstagram instagram iconpinterest pinterest iconfacebook facebook iconprint print iconsquares squares iconheart heart iconheart solid heart solid icon

Peach Yogurt Parfait


  • Author: Lily author
  • Total Time: 15 minutes
  • Yield: 4 servings 1x
Pin Recipe
Print Recipe

Description

This Peach Yogurt Parfait combines creamy Greek yogurt, juicy peaches, and crunchy granola for a delightful treat. It’s a perfect breakfast or snack that captures the essence of summer in every bite.


Ingredients

Scale
  • For the Parfait:
  • 2 cups plain Greek yogurt (or vanilla yogurt for a sweeter option)
  • 2 large ripe peaches, diced (about 2 cups)
  • 1 tablespoon fresh lemon juice (to prevent browning of peaches)
  • 2 tablespoons honey (plus more for drizzling)
  • 1 teaspoon vanilla extract (optional for extra flavor)
  • For the Granola:
  • 1 cup granola (store-bought or homemade; see notes for a simple granola recipe)
  • 1/4 cup sliced almonds (optional for added crunch)
  • 1/4 cup shredded coconut (optional for added flavor)

Instructions

  1. Start by preparing the peaches. Wash them thoroughly, then slice and dice them into bite-sized pieces. In a medium bowl, toss the diced peaches with 1 tablespoon of fresh lemon juice to prevent browning. Set aside for about 5 minutes while the lemon juice works its magic.
  2. In a separate bowl, combine the Greek yogurt, 2 tablespoons of honey, and 1 teaspoon of vanilla extract if using. Stir the mixture until smooth and thoroughly blended. This should take about a minute. Avoid overmixing to maintain the creaminess of the yogurt.
  3. Now it’s time to layer your parfait. Grab a clear glass or bowl to showcase your beautiful creation. Start with a generous spoonful of the yogurt mixture at the bottom—about 1/4 cup will do. Use a spoon to spread it evenly.
  4. Add a layer of the diced peaches over the yogurt, ensuring they cover the yogurt completely. You might want to use about half of what you have prepared—roughly 1 cup. This layer should be visually appealing, so arrange the peaches neatly.
  5. Sprinkle 1/4 cup of granola over the peaches. This adds a delightful crunch. Make sure to distribute it evenly to ensure every bite has that satisfying texture. Avoid packing it down too tightly, as you want it to maintain its crunch.
  6. Repeat the layers: spoon in another 1/4 cup of yogurt, followed by another cup of peaches, and another sprinkle of granola. You should have at least two layers, but feel free to add more depending on your glass size.
  7. Finish off your parfait with a drizzle of honey on top for added sweetness and a touch of elegance. If you’re using sliced almonds or shredded coconut, sprinkle them on top now. It adds a lovely visual contrast and extra flavor.
  8. Serve immediately or refrigerate for up to 30 minutes before serving to allow the flavors to meld together. However, I recommend enjoying it fresh to maintain the granola’s crunch.
  • Prep Time: 15 mins
  • Cook Time: 0 mins
  • Category: Breakfast
  • Method: No-cook
  • Cuisine: American

Nutrition

  • Serving Size: 1 parfait
  • Calories: 250
  • Sugar: 20 g
  • Sodium: 50 mg
  • Fat: 5 g
  • Saturated Fat: 2 g
  • Unsaturated Fat: 3 g
  • Trans Fat: 0 g
  • Carbohydrates: 40 g
  • Fiber: 3 g
  • Protein: 10 g
  • Cholesterol: 10 mg

Keywords: Choose ripe peaches for the best flavor and texture. Use a clear glass for a beautiful presentation. For creaminess, consider whipping the yogurt before layering. Be mindful of the granola-to-yogurt ratio. Prepare yogurt and peaches ahead of time for gatherings, layering just before serving.

Did you make this recipe?

Share a photo and tag us — we can't wait to see what you've made!

Sun-Kissed Frozen Orange Cream Slush

As a child, summer days felt like they lasted forever. I remember the sticky heat wrapping around me as I played outside, my laughter mingling with the sounds of the neighborhood. But nothing could cool me down quite like the moment I’d spot my grandmother, laboring over her blender, whipping up her famous Frozen Orange Creamsicle Slush. That vibrant orange treat, with its frosty texture and sweet citrus aroma, was like a burst of sunshine in a cup. Just one sip, and I could feel the coolness wash over me, sparking pure joy.

This Frozen Orange Creamsicle Slush has a way of making you feel like a kid again. Its creamy, dreamy consistency is a delightful balance of bright orange and soft vanilla, inviting you to dive right in. The refreshing tang of orange dances on your tongue, while the smooth creaminess envelops you in a comforting embrace. It’s a nostalgic treat that’s perfect for hot summer afternoons or anytime you need a little pick-me-up.

What makes my version of this slush stand out is the addition of a hint of vanilla bean, which elevates the flavor and adds an extra layer of richness. Plus, it’s super easy to whip up with just a few simple ingredients that you probably already have on hand! So, if you’re ready to relive those sun-soaked memories, let me show you exactly how to make it.

Sun-Kissed Frozen Orange Cream Slush

Why You’ll Love This Recipe

  • Each slush is a perfect blend of creamy vanilla and zesty orange, creating a nostalgic flavor reminiscent of summer days.
  • This refreshing treat is ready in under 15 minutes, making it an ideal quick dessert for unexpected guests or hot afternoons.
  • With just 8 simple ingredients, it’s budget-friendly, ensuring you don’t have to break the bank to enjoy a delicious slush.
  • The slush has a perfectly smooth texture, thanks to the combination of ice and ice cream, providing a delightful contrast to the bright citrus flavors.
  • It’s highly customizable; you can easily adjust the sweetness and add fresh herbs for a unique twist that suits your taste.

Ingredients

  • 2 cups orange juice (freshly squeezed or store-bought)
  • 1 cup vanilla ice cream
  • 1 cup crushed ice
  • 1/2 cup milk (whole or 2%)
  • 1/4 cup granulated sugar (adjust based on sweetness preference)
  • 1 teaspoon vanilla extract
  • Zest of 1 orange (for added flavor)
  • Fresh orange slices and mint leaves (for garnish)

The star of this Frozen Orange Creamsicle Slush is the orange juice, which provides the vibrant, citrusy base. Freshly squeezed juice will yield the brightest flavor, but store-bought options can be just as convenient. If you’re opting for store-bought, choose 100% pure juice with no added sugars for the best results. Another essential ingredient is the vanilla ice cream; it adds creaminess and sweetness. You can substitute it with dairy-free ice cream if you’re looking for a vegan option. Whole or 2% milk complements the ice cream, creating a smooth blend. If you want a lower-calorie version, almond or oat milk can be good alternatives.

Lastly, the granulated sugar can be adjusted based on your sweetness preference. If you prefer a more natural sweetener, consider using honey or agave syrup. The orange zest enhances the flavor profile, providing an aromatic pop that brings the whole slush together. Don’t skip it! It adds an extra layer of brightness that makes this slush truly special.

Step-by-Step Instructions

  1. Start by preparing your ingredients. Gather 2 cups of orange juice, 1 cup of vanilla ice cream, and 1 cup of crushed ice. Make sure the ice is finely crushed, as larger chunks can make blending difficult.
  2. In a blender, combine the orange juice, vanilla ice cream, crushed ice, and 1/2 cup of milk. Add 1/4 cup of granulated sugar and 1 teaspoon of vanilla extract. If you like a sweeter slush, consider adding a bit more sugar at this stage.
  3. Add the zest of 1 orange to the blender. This step is crucial for enhancing the citrus flavor of your slush. Make sure not to include the bitter white pith—only the flavorful zest.
  4. Blend the mixture on medium-high speed for about 30-45 seconds. Stop once the ingredients are fully combined and the slush has a smooth, even consistency. If you notice large chunks of ice, blend for an additional 10-15 seconds. Avoid over-blending, as this can make the slush too liquidy.
  5. Once blended, taste the slush. If it needs more sweetness, add a little more sugar and blend for a few more seconds. If it’s too thick, you can add a splash of milk to reach your desired consistency.
  6. Pour the slush into glasses. This recipe typically serves 4, but you can easily double it for larger gatherings. Use a spoon to help guide the slush into the glasses if needed.
  7. Garnish each serving with fresh orange slices and mint leaves. The mint not only adds a pop of color but also a refreshing aroma that complements the citrus flavors beautifully.
  8. Serve immediately and enjoy! If you’ve made extra, you can refrigerate it for a short time, but it’s best enjoyed fresh.

Pro Tips for the Best Frozen Orange Creamsicle Slush

  • Don’t skip the orange zest! It’s a game-changer for flavor. Always zest before juicing to make it easier.
  • Use a high-powered blender for the best texture. A standard blender may struggle with ice, leading to uneven consistency. If you have a food processor, that can work too, but ensure the ice is finely crushed.
  • Adjust the ice-to-liquid ratio carefully. If your slush is too thick, it won’t blend well. Start with less ice and add more until you reach your preferred texture.
  • Be cautious with the sugar! Always start with the lower amount, as you can easily add more, but it’s hard to fix an overly sweet slush.
  • For a fun twist, consider adding a splash of coconut milk or a handful of fresh fruit like strawberries or pineapple. This not only enhances the flavor but also adds a beautiful color contrast.

Variations & Serving Ideas

There are countless ways to put a spin on your Frozen Orange Creamsicle Slush. Consider making a tropical version by adding in some pineapple juice or coconut milk for a delightful tropical twist. If you’re feeling adventurous, try incorporating a handful of frozen mango or peach slices for added sweetness. For a lighter version, swap out the vanilla ice cream for Greek yogurt for a creamy yet tangy alternative.

As for serving ideas, this refreshing slush pairs wonderfully with light summer dishes like grilled chicken skewers, fish tacos, or a simple salad topped with citrus vinaigrette. The bright, zesty flavors of the slush complement these dishes perfectly, making them an ideal pairing for a sunny day.

Storage, Make-Ahead & Reheating

This Frozen Orange Creamsicle Slush is best enjoyed fresh, but if you have leftovers, you can store them in an airtight container in the fridge for up to 2 days. Just keep in mind that the slush may lose some of its texture over time as the ice melts. It doesn’t freeze well, as the ice will turn into a solid block. If you must freeze it, blend again after thawing to restore the slushy consistency. This treat is best the day you make it, as the flavors meld together beautifully overnight, enhancing its deliciousness.

Frequently Asked Questions

Can I make Frozen Orange Creamsicle Slush ahead of time?

Yes — in fact, it tastes even better the next day as the flavors meld. However, it’s best to enjoy it fresh, as the texture can change if stored for too long. If you need to prepare it ahead, keep it in the fridge and re-blend before serving.

What kind of orange juice should I use?

For the best flavor, use freshly squeezed orange juice. However, if you’re short on time, opt for 100% pure store-bought juice without added sugars. This will ensure that your slush remains flavorful and refreshing.

Can I substitute the vanilla ice cream?

Absolutely! If you’re looking for a dairy-free option, coconut milk ice cream or a non-dairy vanilla ice cream can work wonderfully. They will still provide the creamy texture and sweetness you desire.

How can I adjust the sweetness of my slush?

You can easily adjust the sweetness by modifying the amount of sugar added. Start with 1/4 cup and taste the mixture before blending. If you prefer it sweeter, add more sugar gradually until it reaches your desired level.

What should I do if my slush is too thick?

If your slush is too thick, simply add a splash of milk or orange juice and blend again. This will help achieve a more drinkable consistency while maintaining the slushy texture. Adjust gradually to reach your preferred thickness.

Sun-Kissed Frozen Orange Cream Slush

Final Thoughts

The Frozen Orange Creamsicle Slush is a delightful blend of refreshing citrus and creamy goodness, making it a perfect treat for warm days or any time you crave a taste of nostalgia. The way the bright orange flavor dances with the creamy texture truly elevates this slush, transforming it into a satisfying escape from the everyday.

This is the kind of recipe I come back to again and again, especially when I’m looking to cool down or impress guests at a summer gathering. It’s simple to make and always brings smiles all around! I encourage you to try this recipe for yourself—don’t hesitate to share your results or even put your own spin on it. Happy slushing!

Print
clock clock iconcutlery cutlery iconflag flag iconfolder folder iconinstagram instagram iconpinterest pinterest iconfacebook facebook iconprint print iconsquares squares iconheart heart iconheart solid heart solid icon

Frozen Orange Creamsicle Slush


  • Author: Lily author
  • Total Time: 15 minutes
  • Yield: 4 servings 1x
Pin Recipe
Print Recipe

Description

This Frozen Orange Creamsicle Slush is a refreshing treat that combines creamy vanilla and zesty orange flavors. Perfect for hot summer days, it brings back nostalgic memories with every sip.


Ingredients

Scale
  • 2 cups orange juice (freshly squeezed or store-bought)
  • 1 cup vanilla ice cream
  • 1 cup crushed ice
  • 1/2 cup milk (whole or 2%)
  • 1/4 cup granulated sugar (adjust based on sweetness preference)
  • 1 teaspoon vanilla extract
  • Zest of 1 orange (for added flavor)
  • Fresh orange slices and mint leaves (for garnish)

Instructions

  1. Start by preparing your ingredients. Gather 2 cups of orange juice, 1 cup of vanilla ice cream, and 1 cup of crushed ice. Make sure the ice is finely crushed, as larger chunks can make blending difficult.
  2. In a blender, combine the orange juice, vanilla ice cream, crushed ice, and 1/2 cup of milk. Add 1/4 cup of granulated sugar and 1 teaspoon of vanilla extract. If you like a sweeter slush, consider adding a bit more sugar at this stage.
  3. Add the zest of 1 orange to the blender. This step is crucial for enhancing the citrus flavor of your slush. Make sure not to include the bitter white pith—only the flavorful zest.
  4. Blend the mixture on medium-high speed for about 30-45 seconds. Stop once the ingredients are fully combined and the slush has a smooth, even consistency. If you notice large chunks of ice, blend for an additional 10-15 seconds. Avoid over-blending, as this can make the slush too liquidy.
  5. Once blended, taste the slush. If it needs more sweetness, add a little more sugar and blend for a few more seconds. If it’s too thick, you can add a splash of milk to reach your desired consistency.
  6. Pour the slush into glasses. This recipe typically serves 4, but you can easily double it for larger gatherings. Use a spoon to help guide the slush into the glasses if needed.
  7. Garnish each serving with fresh orange slices and mint leaves. The mint not only adds a pop of color but also a refreshing aroma that complements the citrus flavors beautifully.
  8. Serve immediately and enjoy! If you’ve made extra, you can refrigerate it for a short time, but it's best enjoyed fresh.
  • Prep Time: 15 min
  • Cook Time: 0 min
  • Category: Dessert
  • Method: Blending
  • Cuisine: American

Nutrition

  • Serving Size: 1 serving
  • Calories: 200
  • Sugar: 30 g
  • Sodium: 50 mg
  • Fat: 5 g
  • Saturated Fat: 3 g
  • Unsaturated Fat: 2 g
  • Trans Fat: 0 g
  • Carbohydrates: 40 g
  • Fiber: 1 g
  • Protein: 2 g
  • Cholesterol: 20 mg

Keywords: Don't skip the orange zest! It's a game-changer for flavor. Always zest before juicing to make it easier.

Did you make this recipe?

Share a photo and tag us — we can't wait to see what you've made!

Zesty Lemon Poppy Seed Delight

One rainy afternoon, I found myself in my grandmother’s cozy kitchen, the kind that always smelled like warmth and love. She was whipping up her famous Lemon Poppy Seed Loaf, a recipe that had been passed down through generations. As the batter came together, the zesty aroma of fresh lemons filled the air, mingling perfectly with the nutty fragrance of poppy seeds. I can still picture her, apron-clad, as she expertly drizzled a vibrant citrus icing over the loaf, creating a glossy, sun-kissed finish that beckoned us to dive in. It was a moment that sparked my own passion for baking, and this recipe has become a cherished staple in my home ever since.

When you take a bite of this Lemon Poppy Seed Loaf, it’s like a burst of sunshine on your palate. The loaf is beautifully golden, with a tender crumb that melts in your mouth. Each slice is speckled with tiny poppy seeds, adding a delightful crunch that contrasts beautifully with the tangy sweetness of the lemon. And that citrus icing? It’s the finishing touch that elevates this loaf from ordinary to extraordinary, with its bright, zesty flavor dancing on your taste buds.

This recipe stands out because it embraces simplicity while delivering on flavor. I’ve added a hint of vanilla to the batter, enhancing the overall taste and making it even more indulgent. Trust me, once you make this Lemon Poppy Seed Loaf With Citrus Icing, it’ll become a go-to in your baking repertoire.

So, let me show you exactly how to make it!

Zesty Lemon Poppy Seed Delight

Why You’ll Love This Recipe

  • Moist and tender crumb that melts in your mouth, thanks to the perfect balance of butter and buttermilk.
  • Bright, zesty lemon flavor paired with crunchy poppy seeds, creating a delightful texture and taste experience.
  • Easy to whip up in just about an hour, perfect for last-minute gatherings or a cozy afternoon treat.
  • Budget-friendly with everyday ingredients, making it an accessible option for all home bakers.
  • The citrus icing adds a sweet tang that elevates the loaf, turning a simple recipe into a showstopper!

Ingredients

  • 1 ½ cups (190g) all-purpose flour
  • 1 teaspoon baking powder
  • ½ teaspoon baking soda
  • ½ teaspoon salt
  • 3 tablespoons poppy seeds
  • ½ cup (115g) unsalted butter, softened to room temperature
  • 1 cup (200g) granulated sugar
  • 2 large eggs
  • 1 teaspoon vanilla extract
  • 1 teaspoon lemon zest (from about 1 medium lemon)
  • ½ cup (120ml) buttermilk
  • 2 tablespoons fresh lemon juice

For the Citrus Icing:

  • 1 cup (120g) powdered sugar
  • 2 tablespoons fresh lemon juice
  • 1 tablespoon orange juice
  • 1 teaspoon lemon zest (for garnish, optional)

Let’s dive into the key ingredients that make this Lemon Poppy Seed Loaf so special. The all-purpose flour provides the structure and base for the loaf, while the baking powder and baking soda ensure it rises perfectly, giving the loaf a light texture. For a gluten-free variation, you could substitute the flour with a gluten-free all-purpose blend. Poppy seeds not only add a delightful crunch but also contribute to the unique flavor profile that pairs well with the citrus notes.

Unsalted butter is crucial for achieving the buttery richness that makes this loaf so moist. If you’re looking for a dairy-free option, coconut oil or a vegan butter can be used instead. The buttermilk is another essential component, providing acidity that activates the baking soda for a fluffy texture. If you don’t have buttermilk on hand, you can easily make a substitute by mixing ½ cup of milk with 1 tablespoon of vinegar or lemon juice and letting it sit for about 5 minutes.

Step-by-Step Instructions

  1. Preheat your oven to 350°F (175°C). Grease a 9×5-inch loaf pan or line it with parchment paper for easy removal later.
  2. In a medium mixing bowl, whisk together 1 ½ cups of all-purpose flour, 1 teaspoon of baking powder, ½ teaspoon of baking soda, ½ teaspoon of salt, and 3 tablespoons of poppy seeds. This helps to evenly distribute the baking agents and ensures a uniform rise.
  3. In a large mixing bowl, cream together ½ cup of softened unsalted butter and 1 cup of granulated sugar using an electric mixer on medium speed for about 3-4 minutes, until the mixture is light and fluffy. Make sure to scrape down the sides of the bowl occasionally.
  4. Add 2 large eggs, 1 teaspoon of vanilla extract, and 1 teaspoon of lemon zest to the creamed butter and sugar, mixing until fully combined. You want a smooth consistency, so ensure there are no lumps of butter.
  5. In a small bowl, combine ½ cup of buttermilk and 2 tablespoons of fresh lemon juice. Alternately add the dry ingredients and buttermilk mixture to the butter mixture, starting and ending with the dry ingredients. Mix just until combined; do not overmix, as this can lead to a dense loaf.
  6. Pour the batter into the prepared loaf pan. Smooth the top with a spatula, ensuring it’s even. Bake in the preheated oven for 50-60 minutes, or until a toothpick inserted in the center comes out clean. The edges should be lightly golden brown, and the center should feel just set.
  7. Once baked, remove the loaf from the oven and allow it to cool in the pan for about 10 minutes. Then, transfer it to a wire rack to cool completely. Resist the urge to slice too soon, as it will be crumbly if it’s still warm.
  8. While the loaf is cooling, prepare the citrus icing. In a medium bowl, whisk together 1 cup of powdered sugar, 2 tablespoons of fresh lemon juice, and 1 tablespoon of orange juice until smooth. If the icing is too thick, you can add a little more juice to reach your desired consistency.
  9. Once the loaf is completely cool, drizzle the citrus icing over the top. If you like, sprinkle with an additional teaspoon of lemon zest for an extra pop of flavor and color.

Pro Tips for the Best Lemon Poppy Seed Loaf With Citrus Icing

  • Be careful not to overmix your batter; this is a common mistake that can lead to a dense loaf. Mix just until the dry ingredients are incorporated for a light and fluffy texture.
  • Use room temperature ingredients, especially the butter and eggs. This helps to create a smoother batter and ensures even baking. Take your eggs out of the fridge about 30 minutes before you start.
  • For a more pronounced lemon flavor, consider adding a little lemon extract in addition to the zest and juice. Just a half teaspoon can elevate the citrus notes significantly.
  • When measuring your flour, spoon it into the measuring cup and level it off with a knife instead of scooping directly from the bag. This prevents packing and ensures you don’t end up with a dry loaf.
  • Invest in a good quality loaf pan; it makes a difference in heat distribution, which ensures even baking. If your pan is dark-coated, reduce the oven temperature by 25°F to prevent over-browning.

Variations & Serving Ideas

For a delightful twist, consider adding blueberries or raspberries to the batter for a fruity burst of flavor. You can also experiment with different citrus fruits—try lime or grapefruit zest and juice for a refreshing change. For a healthier option, substitute half of the all-purpose flour with whole wheat flour for added fiber without compromising too much on texture.

This Lemon Poppy Seed Loaf pairs beautifully with a light salad, such as a mixed greens salad with a vinaigrette, or a cup of tea for a cozy afternoon treat. It also complements a creamy cheese platter, as the acidity of the loaf balances rich cheeses perfectly. Lastly, a scoop of vanilla ice cream on the side creates a delightful contrast of temperatures and flavors!

Storage, Make-Ahead & Reheating

This Lemon Poppy Seed Loaf can be stored at room temperature for up to 3 days if wrapped tightly in plastic wrap. If you want to keep it longer, it freezes well for up to 3 months. To freeze, wrap the loaf tightly in plastic wrap and then in aluminum foil to prevent freezer burn.

When you’re ready to enjoy it again, simply thaw it in the fridge overnight. Reheat individual slices in the microwave for 15-20 seconds or in a toaster oven until warmed through. Interestingly, many people find that this loaf tastes even better the next day, as the flavors have time to meld!

Frequently Asked Questions

Can I make Lemon Poppy Seed Loaf With Citrus Icing ahead of time?

Yes — in fact, it tastes even better the next day! You can make the loaf a day in advance, allowing the flavors to develop. Just be sure to store it in an airtight container to maintain its moisture.

Can I substitute the poppy seeds?

Absolutely! If you don’t have poppy seeds on hand or prefer an alternative, you can use sesame seeds for a similar crunch or omit them entirely for a smooth loaf.

What can I use instead of buttermilk?

If you don’t have buttermilk, you can easily create a substitute by mixing ½ cup of milk (dairy or plant-based) with 1 tablespoon of vinegar or lemon juice. Let it sit for 5 minutes before using in the recipe.

How can I make this recipe gluten-free?

To make a gluten-free version of this Lemon Poppy Seed Loaf, substitute the all-purpose flour with a gluten-free all-purpose flour blend. Just ensure that the blend contains a binding agent like xanthan gum for the best results.

What is the best way to store leftover loaf?

Leftover Lemon Poppy Seed Loaf should be stored in an airtight container at room temperature for up to 3 days. For longer storage, wrap it tightly and freeze for up to 3 months. Thaw it before serving for the best texture.

Zesty Lemon Poppy Seed Delight

Final Thoughts

The Lemon Poppy Seed Loaf with Citrus Icing is truly a delightful treat that brings a burst of brightness to any occasion. The zesty lemon flavor combined with the subtle crunch of poppy seeds creates a satisfying balance, while the citrus icing adds a touch of sweetness that perfectly complements the loaf’s tanginess.

This is the kind of recipe I come back to again and again, especially when I want to brighten up a gloomy day or celebrate a small victory. The aroma that fills the kitchen as it bakes is absolutely heavenly! I encourage you to give this recipe a try; you might just find it becoming a beloved staple in your home. Don’t forget to share your results or even add your own unique twist—I can’t wait to see what you create!

Print
clock clock iconcutlery cutlery iconflag flag iconfolder folder iconinstagram instagram iconpinterest pinterest iconfacebook facebook iconprint print iconsquares squares iconheart heart iconheart solid heart solid icon

Lemon Poppy Seed Loaf


  • Author: Lily author
  • Total Time: 38 minute
  • Yield: 1 loaf 1x
Pin Recipe
Print Recipe

Description

This Lemon Poppy Seed Loaf is a delightful treat that combines zesty lemon flavor with crunchy poppy seeds. Topped with a citrus icing, it’s perfect for any occasion.


Ingredients

Scale
  • 1 ½ cups (190g) all-purpose flour
  • 1 teaspoon baking powder
  • ½ teaspoon baking soda
  • ½ teaspoon salt
  • 3 tablespoons poppy seeds
  • ½ cup (115g) unsalted butter, softened to room temperature
  • 1 cup (200g) granulated sugar
  • 2 large eggs
  • 1 teaspoon vanilla extract
  • 1 teaspoon lemon zest (from about 1 medium lemon)
  • ½ cup (120ml) buttermilk
  • 2 tablespoons fresh lemon juice
  • 1 cup (120g) powdered sugar
  • 2 tablespoons fresh lemon juice
  • 1 tablespoon orange juice
  • 1 teaspoon lemon zest (for garnish, optional)

Instructions

  1. Preheat your oven to 350°F (175°C). Grease a 9×5-inch loaf pan or line it with parchment paper for easy removal later.
  2. In a medium mixing bowl, whisk together 1 ½ cups of all-purpose flour, 1 teaspoon of baking powder, ½ teaspoon of baking soda, ½ teaspoon of salt, and 3 tablespoons of poppy seeds. This helps to evenly distribute the baking agents and ensures a uniform rise.
  3. In a large mixing bowl, cream together ½ cup of softened unsalted butter and 1 cup of granulated sugar using an electric mixer on medium speed for about 3-4 minutes, until the mixture is light and fluffy. Make sure to scrape down the sides of the bowl occasionally.
  4. Add 2 large eggs, 1 teaspoon of vanilla extract, and 1 teaspoon of lemon zest to the creamed butter and sugar, mixing until fully combined. You want a smooth consistency, so ensure there are no lumps of butter.
  5. In a small bowl, combine ½ cup of buttermilk and 2 tablespoons of fresh lemon juice. Alternately add the dry ingredients and buttermilk mixture to the butter mixture, starting and ending with the dry ingredients. Mix just until combined; do not overmix, as this can lead to a dense loaf.
  6. Pour the batter into the prepared loaf pan. Smooth the top with a spatula, ensuring it’s even. Bake in the preheated oven for 50-60 minutes, or until a toothpick inserted in the center comes out clean. The edges should be lightly golden brown, and the center should feel just set.
  7. Once baked, remove the loaf from the oven and allow it to cool in the pan for about 10 minutes. Then, transfer it to a wire rack to cool completely. Resist the urge to slice too soon, as it will be crumbly if it’s still warm.
  8. While the loaf is cooling, prepare the citrus icing. In a medium bowl, whisk together 1 cup of powdered sugar, 2 tablespoons of fresh lemon juice, and 1 tablespoon of orange juice until smooth. If the icing is too thick, you can add a little more juice to reach your desired consistency.
  9. Once the loaf is completely cool, drizzle the citrus icing over the top. If you like, sprinkle with an additional teaspoon of lemon zest for an extra pop of flavor and color.
  • Prep Time: 15 mins
  • Cook Time: 50-60 mins
  • Category: Dessert
  • Method: Baking
  • Cuisine: American

Nutrition

  • Serving Size: 1 slice
  • Calories: 200
  • Sugar: 15 g
  • Sodium: 150 mg
  • Fat: 8 g
  • Saturated Fat: 5 g
  • Unsaturated Fat: 3 g
  • Trans Fat: 0 g
  • Carbohydrates: 30 g
  • Fiber: 1 g
  • Protein: 3 g
  • Cholesterol: 40 mg

Keywords: Be careful not to overmix your batter; this is a common mistake that can lead to a dense loaf. Use room temperature ingredients for a smoother batter and even baking.

Did you make this recipe?

Share a photo and tag us — we can't wait to see what you've made!

  • Privacy Policy
  • Terms Of Service
  • Contact
  • About
  • GDPR

Copyright © 2025 Homesmad