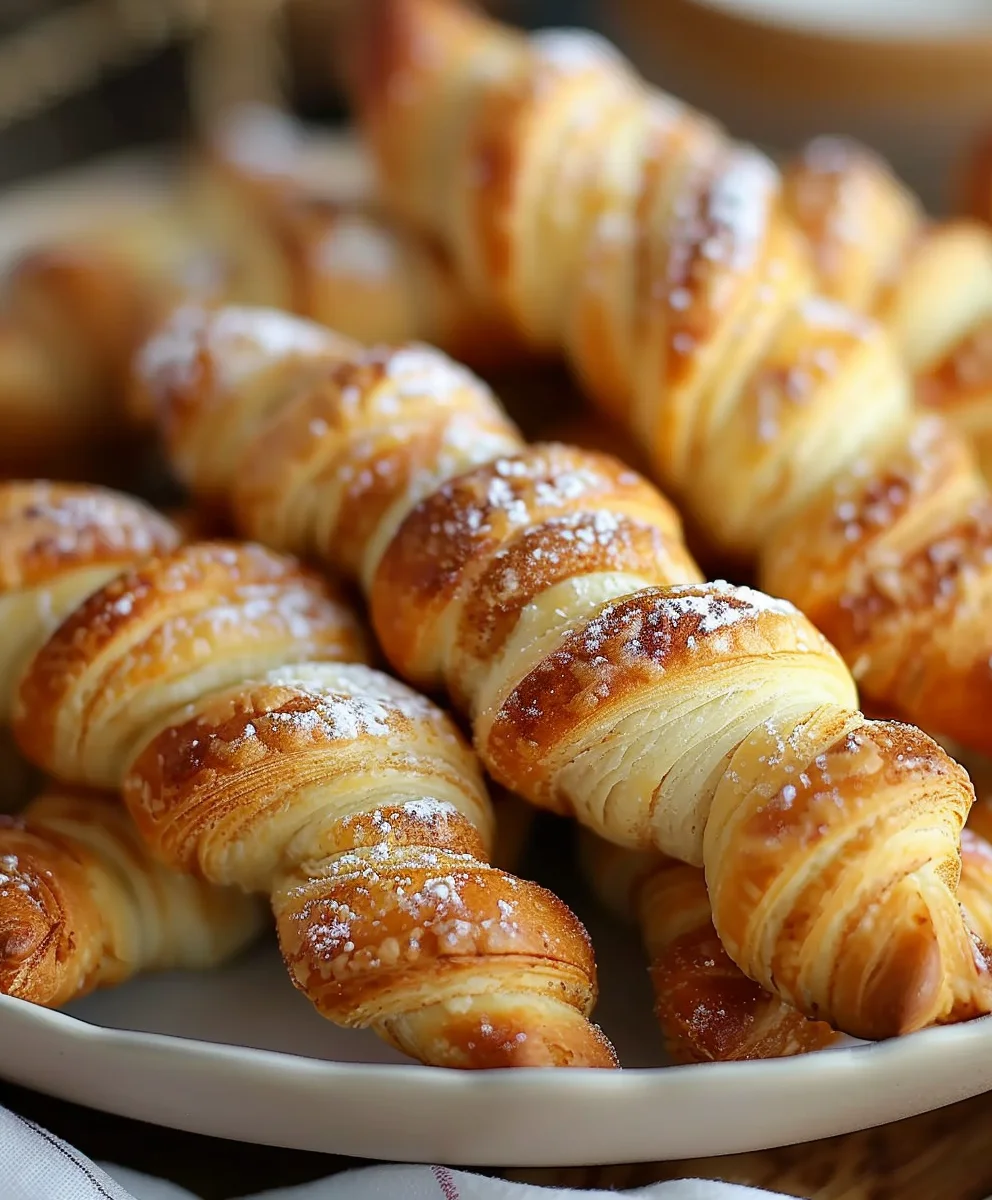
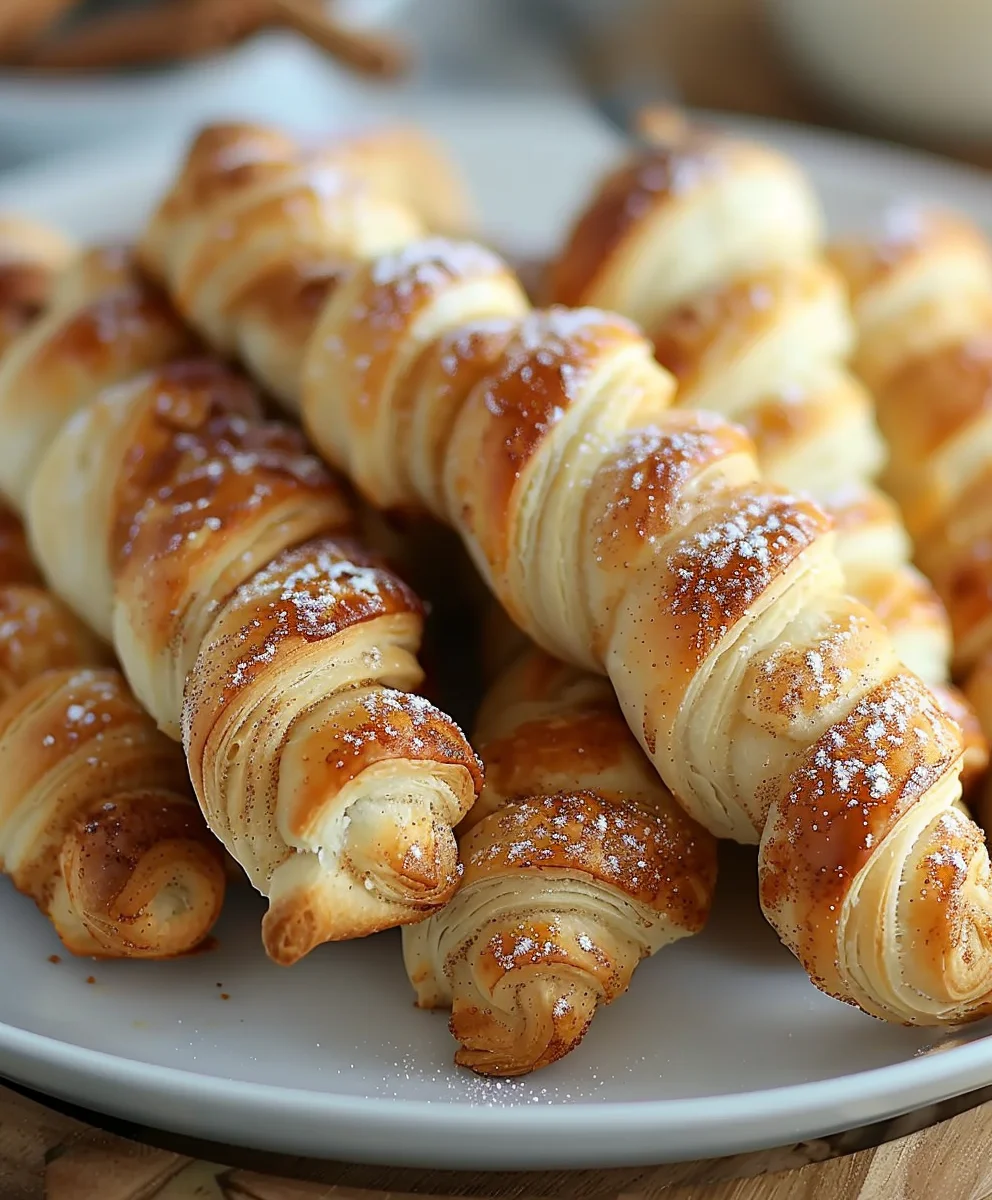
Crescent Roll Cinnamon Twists are about to become your new favorite simple indulgence, transforming ordinary mornings or dessert cravings into something truly special. I’ve always been captivated by recipes that deliver incredible flavor with minimal fuss, and this one certainly tops the list. Imagine the irresistible aroma of warm cinnamon filling your kitchen, promising a treat that’s both comforting and utterly delightful. That’s exactly what these twists offer, making gourmet-level pastries accessible to everyone, right in your own home.
A Sweet Heritage, Simplified
While the traditional cinnamon roll boasts a rich and storied history as a beloved breakfast staple across many cultures, our simplified version, the Crescent Roll Cinnamon Twists, brings that same comforting warmth and sweet spice to your table with unparalleled ease. There’s just something magical about the flaky, buttery layers of crescent dough, twisted with a generous swirl of cinnamon sugar, emerging golden brown and fragrant from the oven. It’s a testament to how simple ingredients can create something truly extraordinary, harkening back to a time when homemade treats were a cornerstone of family life.
People adore this dish not only for its irresistible taste—a perfect balance of sweet, spicy, and buttery notes that dance on your palate—but also for its incredibly tender, flaky texture and the sheer convenience it offers. Whether you’re whipping up a quick breakfast for the family, preparing an impressive brunch item, or simply craving a delightful afternoon treat, these Crescent Roll Cinnamon Twists are an absolute game-changer. They embody everything we love about homemade pastries, without the long proofing times, offering a quick path to pure deliciousness. I’m so excited for you to experience the joy of these effortless, yet utterly decadent, treats!

Ingredients:
- Two (2) cans (8 ounces each) of refrigerated crescent roll dough. I always opt for the seamless dough if available, as it makes the initial preparation a little smoother, but the classic perforated kind works beautifully too! Just be ready to pinch those seams together.
- One-quarter (1/4) cup of unsalted butter, softened to room temperature. It’s really important that your butter is soft, almost spreadable, but not melted. This helps it spread evenly without tearing the delicate dough. If you only have salted butter, you can use it, but I’d recommend slightly reducing any added salt in the glaze, if you were planning to add some.
- Half (1/2) cup of granulated sugar. This is the sweet base for our cinnamon coating.
- Two (2) teaspoons of ground cinnamon. For the best flavor, make sure your cinnamon is fresh! Older spices can lose their potency, and we want that beautiful, warm spice to shine through.
- One and a half (1 1/2) cups of powdered sugar (also known as confectioners’ sugar), for our delightful drizzle. Sifting it can prevent lumps in your glaze, which is a little trick I often employ.
- Two (2) tablespoons of milk. Any milk will do here – whole, 2%, or even a dairy-free alternative like almond milk. This is the liquid component that will bring our glaze together.
- Half (1/2) teaspoon of pure vanilla extract. Always choose pure vanilla extract over imitation if you can; it makes a remarkable difference in flavor! This adds a lovely depth and warmth to the sweet glaze.
- A pinch of salt (optional, for the glaze). I sometimes add a tiny pinch to my glaze to balance the sweetness and really make the flavors pop, but it’s entirely up to your preference.
Preparing Your Workspace and Ingredients
- Before we dive into the fun part, let’s get our kitchen ready! First, I always preheat my oven to 375°F (190°C). Preheating is crucial for consistent baking results, ensuring your twists start baking immediately at the correct temperature, leading to that perfect golden-brown exterior and tender interior. While the oven warms up, line a large baking sheet with parchment paper. This simple step is a game-changer! It prevents sticking, makes cleanup incredibly easy, and helps the twists brown evenly on the bottom. If you don’t have parchment paper, a silicone baking mat works wonderfully too. If neither are available, you can lightly grease your baking sheet, but parchment is truly my preferred method here.
- Next, I’ll unroll one of the cans of crescent roll dough onto the prepared baking sheet. If you’re using the classic perforated dough, carefully unroll it and lay it flat. You’ll notice the pre-cut triangles. Gently pinch together the seams where the triangles meet to form one large rectangle. It doesn’t have to be absolutely perfect, but try to make it as seamless as possible to create a sturdy base for our twists. This step is important because it prevents the twists from separating prematurely during baking, ensuring they hold their shape beautifully. If your dough tears slightly during this process, don’t worry! Just gently press the edges back together. The beauty of crescent dough is its forgiving nature.
Crafting the Cinnamon Sugar Mixture
- Now, let’s get that irresistible cinnamon sugar ready! In a small bowl, I combine the granulated sugar and ground cinnamon. Take your time to whisk these two ingredients together thoroughly. I like to use a small whisk or even a fork to ensure that the cinnamon is evenly distributed throughout the sugar, with no clumps of cinnamon powder. This uniform mixture is key to getting that wonderful cinnamon flavor in every single bite of your twist. The aroma alone as you mix it will start to get your taste buds tingling, I promise!
- Once your cinnamon sugar is perfectly mixed, we’ll gently spread our softened butter over the surface of the crescent dough. I find that using a small offset spatula or the back of a spoon works best for this. The goal here is an even, thin layer of butter across the entire rectangle of dough. Be gentle as you spread, as the dough is quite delicate. The butter not only adds a rich flavor and helps with browning, but it also acts as the “glue” for our cinnamon sugar mixture, ensuring it adheres beautifully to the dough. If your butter isn’t quite soft enough, it can tear the dough, so make sure it’s truly at room temperature.
Assembling the Twists: The Heart of the Recipe
- With the butter spread, it’s time for the cinnamon sugar! Evenly sprinkle the entire cinnamon sugar mixture over the buttered dough. I like to use my fingers to ensure a really good, consistent coverage. Don’t be shy here; we want that full cinnamon punch! Gently pat it down with your hand or the back of a spoon to help it stick to the butter. This extra pat can make a difference in keeping the mixture in place as you move to the next steps.
- Next, carefully unroll the second can of crescent dough directly on top of the cinnamon-sugar-coated first layer. Just like before, if you’re using the perforated dough, lay it flat and gently pinch together all the seams to create another seamless rectangle. This second layer seals in all that delicious cinnamon sugar goodness and creates the foundation for our twists. Take your time to align the edges as best you can with the bottom layer.
- Once both layers are stacked, use a rolling pin to very gently roll over the top. This step is important for two reasons: it helps to press the two dough layers together, ensuring they bond properly, and it slightly flattens the dough, making it easier to cut and twist. Be gentle, though, as we don’t want to make the dough too thin. Just a few light passes with the rolling pin will do the trick. You should notice the two layers becoming one cohesive sheet.
- Now for the cutting! Using a sharp knife or a pizza cutter (which I find works exceptionally well here), cut the large rectangle of dough lengthwise into about 12-14 strips, each roughly 3/4 to 1 inch wide. The key is to try and make them as uniform as possible so they bake evenly. Don’t worry if they’re not perfectly straight; homemade charm is part of the appeal!
- Here’s where the “twist” comes in! Pick up each strip of dough carefully. Hold one end in place and gently twist the strip several times, from one end to the other. Aim for about 3-4 twists per strip. This twisting motion creates those beautiful, spiraled layers that define our crescent roll cinnamon twists. As you twist, the cinnamon sugar will peek out, promising a delightful texture and flavor. Place each twisted strip back onto your parchment-lined baking sheet, leaving a little space between each one to allow for expansion during baking.
- As I place them on the baking sheet, I sometimes gently stretch them out a little as I twist, aiming for a length that fits comfortably on the sheet without overcrowding. Crowding the baking sheet can lead to uneven baking, as the steam won’t be able to escape properly, and the twists won’t get that lovely golden-brown finish. If you have a smaller baking sheet or just a lot of twists, it’s always better to bake them in two batches. Trust me, it’s worth the extra few minutes for a perfectly baked batch.
- Repeat this twisting and placing process for all the strips until your baking sheet is full. If you’re anything like me, you’ll find this part quite therapeutic! It’s also a great step if you have little helpers in the kitchen; kids often love twisting the dough. Just remind them to be gentle.
Baking Your Golden Twists
- Once all your twists are beautifully assembled on the baking sheet, it’s time for them to meet the heat! Carefully transfer the baking sheet to your preheated oven. I usually place them on the middle rack for optimal air circulation and even baking.
- Bake the crescent roll cinnamon twists for about 10-14 minutes. But here’s a crucial tip: baking times can vary significantly between ovens! So, rather than sticking strictly to the clock, I encourage you to keep a close eye on your twists. You’re looking for a beautiful golden-brown color. The edges should be nicely crisped, and the centers should be puffed and cooked through.
- Around the 8-minute mark, I like to peek in. If one side of the pan seems to be browning faster than the other, I’ll often rotate the baking sheet 180 degrees. This simple action helps ensure all your twists achieve that perfect, uniform golden hue. Don’t underestimate the power of a quick pan rotation!
- When they emerge from the oven, your kitchen will be filled with the most incredible aroma of warm cinnamon and sweet dough – it’s truly intoxicating! The twists will be puffy and slightly soft when they first come out. Let them cool on the baking sheet for about 5 minutes. This brief cooling period allows them to set up slightly, making them easier to transfer without breaking, and also helps them achieve a delightful chewiness.
- After 5 minutes, carefully transfer the warm twists to a wire cooling rack. Allow them to cool completely before glazing, or at least until they are just warm to the touch. If you try to glaze them while they’re too hot, the glaze will simply melt and run off, which we definitely don’t want! We’re aiming for that lovely opaque drizzle that sets nicely.
Whipping Up the Sweet Glaze
- While your beautiful twists are cooling, let’s make the quick and easy glaze that will take them to the next level. In a medium bowl, combine the powdered sugar, milk, vanilla extract, and that optional pinch of salt if you’re using it. I always recommend sifting the powdered sugar first if you want an extra smooth, lump-free glaze. It’s a small step that makes a big difference in the final texture.
- Whisk all the glaze ingredients together until you achieve a smooth, pourable consistency. You’re aiming for a glaze that’s thick enough to cling to the twists but thin enough to drizzle. If your glaze seems too thick, add a tiny splash more milk, about half a teaspoon at a time, until you reach your desired consistency. If it’s too thin, you can add a tablespoon or two more powdered sugar to thicken it up. Adjusting the consistency is entirely about personal preference here!
- I like to ensure there are no visible lumps of powdered sugar. A well-whisked glaze provides a wonderfully uniform coating and ensures a pleasant texture with every bite. The vanilla extract really rounds out the sweetness, giving the glaze a classic, comforting flavor profile that pairs perfectly with the cinnamon.
Finishing Touches and Serving Suggestions
- Now for the grand finale! Once your crescent roll cinnamon twists have cooled sufficiently (they can still be slightly warm, but not hot!), it’s time to glaze them. You have a few options here. My preferred method is to either use a spoon to generously drizzle the glaze over each twist, allowing it to cascade down the sides, or to transfer the glaze to a small piping bag (or even a Ziploc bag with a corner snipped off) for more controlled lines. For a truly decadent experience, you can even dip one side of each twist directly into the bowl of glaze!
- As you drizzle, feel free to be creative with your patterns! Sometimes I do neat zigzags, other times I go for a more rustic, free-form look. The key is to get a good coating that provides that extra layer of sweetness and a lovely visual appeal. The white glaze against the golden-brown twists is just stunning.
- Once glazed, let the twists sit for a few minutes to allow the glaze to set slightly. This usually takes about 5-10 minutes, depending on the thickness of your glaze and the humidity in your kitchen. If you’re impatient (like I often am!), you can enjoy them immediately, even if the glaze is still a bit soft.
- These Crescent Roll Cinnamon Twists are truly best enjoyed fresh, ideally within a few hours of baking. The dough is at its softest and most tender, and the cinnamon sugar is wonderfully fragrant. They make an incredible breakfast treat with your morning coffee, a delightful addition to a brunch spread, or a perfect afternoon snack.
- If you happen to have any leftovers (which is rare in my house!), you can store them in an airtight container at room temperature for up to 2-3 days. To refresh them and bring back some of that freshly baked warmth, you can pop them in a microwave for 10-15 seconds or in a preheated oven (around 300°F/150°C) for a few minutes until warmed through. Just be mindful not to overheat, as the glaze can melt.
- These twists are incredibly versatile too! Feel free to experiment. You could add a tiny pinch of nutmeg or cardamom to your cinnamon sugar mixture for an extra layer of spice. Sometimes, I even sprinkle a few chopped pecans or walnuts over the buttered dough before adding the top layer for a delightful nutty crunch. No matter how you serve them, I hope you enjoy making and eating these easy, delicious Crescent Roll Cinnamon Twists as much as I do! They truly are a crowd-pleaser and a wonderful way to bring a little bit of bakery magic into your home.
Conclusion:
There’s simply no denying the magical allure of freshly baked goods, and I truly believe this recipe for Crescent Roll Cinnamon Twists stands out as a shimmering beacon of deliciousness. From the moment you pull these golden, spiraled delights from the oven, filling your home with an intoxicating aroma of warm cinnamon and sweet butter, you’ll understand exactly why I’m so passionate about them. It’s more than just a recipe; it’s an experience, a simple pleasure that delivers immense satisfaction with minimal effort. I’ve found that the sheer ease with which you can transform a humble can of crescent roll dough into something so utterly captivating is nothing short of brilliant, making it an absolute must-try for bakers of all skill levels, from complete novices to seasoned pros seeking a quick, impressive treat.
What makes these twists so incredibly special, you ask? It’s the perfect harmony of textures and flavors. You get that signature flaky, tender, buttery dough of the crescent roll, beautifully intertwined with a rich, aromatic cinnamon-sugar filling that caramelizes just slightly at the edges. Then, there’s the delightful optional glaze, adding a glistening finish and another layer of irresistible sweetness that makes each bite an absolute dream. These aren’t just for breakfast either; I’ve served them as a delightful dessert, a cozy afternoon snack with coffee, or even as a comforting treat during a chilly evening. Their versatility is truly one of their strongest suits, ensuring they fit seamlessly into any part of your day where a little sweetness is desired.
Serving Suggestions for Maximum Enjoyment
While these cinnamon twists are undeniably perfect straight out of the oven, warm and fragrant, there are so many wonderful ways to elevate your serving experience. I often find myself enjoying them with a strong cup of coffee or a tall glass of milk, letting the contrasting flavors dance on my palate. For a truly decadent experience, imagine serving a warm Crescent Roll Cinnamon Twist alongside a scoop of vanilla bean ice cream, allowing the cold creaminess to meld with the warm, spiced pastry. Or, for a simpler yet equally delightful twist, a dollop of freshly whipped cream can add an ethereal lightness. Don’t shy away from dipping them either! A small bowl of warm caramel sauce or even a dark chocolate ganache can transform them into an even more indulgent dessert. The possibilities are truly endless, catering to whatever sweet craving you might have at the moment.
Endless Variations to Spark Your Creativity
Part of the joy of baking, for me, is experimenting, and this recipe offers a fantastic canvas for your creative urges. Want to switch up the spice profile? A pinch of nutmeg or cardamom alongside the cinnamon can introduce a whole new layer of warmth and complexity. For those who love a bit of tang, a thin layer of cream cheese mixed with a little sugar and vanilla can be spread onto the dough before sprinkling the cinnamon sugar, creating a delightful cream cheese swirl. You could even fold in some mini chocolate chips or finely chopped nuts into the cinnamon sugar mixture for added texture and flavor. Feeling fruity? A thin layer of apricot or raspberry jam spread on the dough before rolling could lead to a truly unique and delicious fruit-filled twist. Remember, this recipe is a foundation, a starting point for your culinary adventures. Don’t be afraid to make it your own, to adapt it to your taste, or to incorporate ingredients you already love. That’s where the real magic happens in the kitchen!
So, I implore you, don’t just read about these delectable treats; roll up your sleeves and give them a try! I promise you won’t regret it. The process is incredibly rewarding, and the end result is a truly spectacular, crowd-pleasing pastry that you’ll want to make again and again. These Crescent Roll Cinnamon Twists are designed to bring joy, warmth, and a touch of homemade goodness to any occasion. Once you’ve baked your own batch, I would absolutely love to hear about your experience! Share your photos, your favorite serving suggestions, or any creative variations you came up with in the comments. Your insights and adventures inspire me, and I can’t wait to see what wonderful creations you’ll bring to life. Happy baking!
Quick Crescent Roll Cinnamon Twists
An easy recipe for flaky cinnamon twists, made by layering crescent dough with a sweet cinnamon-sugar filling and finishing with a simple glaze. Perfect for a quick breakfast or dessert.
Ingredients
-
1 can refrigerated crescent roll dough
-
1/4 cup unsalted butter, melted
-
1/2 cup granulated sugar
-
2 tablespoons ground cinnamon
-
1/2 cup powdered sugar (optional, for glaze)
-
2 tablespoons milk (optional, for glaze)
Instructions
-
Step 1
Preheat your oven to 375°F (190°C) and line a baking sheet with parchment paper. -
Step 2
Unroll the can of crescent dough onto the prepared baking sheet. If it’s perforated, gently pinch the seams together to form one large rectangle. -
Step 3
In a small bowl, combine the 1/2 cup granulated sugar and 2 tablespoons ground cinnamon, whisking thoroughly. -
Step 4
Evenly spread the 1/4 cup melted unsalted butter over one half of the crescent dough rectangle. -
Step 5
Generously sprinkle the cinnamon sugar mixture over the buttered half of the dough. Gently pat it down. -
Step 6
Fold the unbuttered half of the dough over the cinnamon-sugar coated half, creating a smaller rectangle. Gently press down or roll lightly with a rolling pin to seal the layers. -
Step 7
Using a sharp knife or pizza cutter, cut the layered dough lengthwise into 6-7 strips, each about 1 inch wide. -
Step 8
Carefully pick up each strip, hold one end, and gently twist it 3-4 times. Place the twisted strips onto the baking sheet, leaving space between them. -
Step 9
Bake for 10-14 minutes, or until the twists are beautifully golden brown. If necessary, rotate the baking sheet halfway through baking for even browning. -
Step 10
Remove from the oven and let cool on the baking sheet for 5 minutes, then transfer to a wire rack to cool slightly before glazing. -
Step 11
For the optional glaze: In a small bowl, whisk together 1/2 cup powdered sugar and 2 tablespoons milk until smooth and pourable. Adjust consistency with more milk or powdered sugar if needed. -
Step 12
Drizzle the glaze generously over the warm (but not hot) twists. Allow the glaze to set for a few minutes before serving. Best enjoyed fresh.
Important Information
Nutrition Facts (Per Serving)
It is important to consider this information as approximate and not to use it as definitive health advice.
Allergy Information
Please check ingredients for potential allergens and consult a health professional if in doubt.