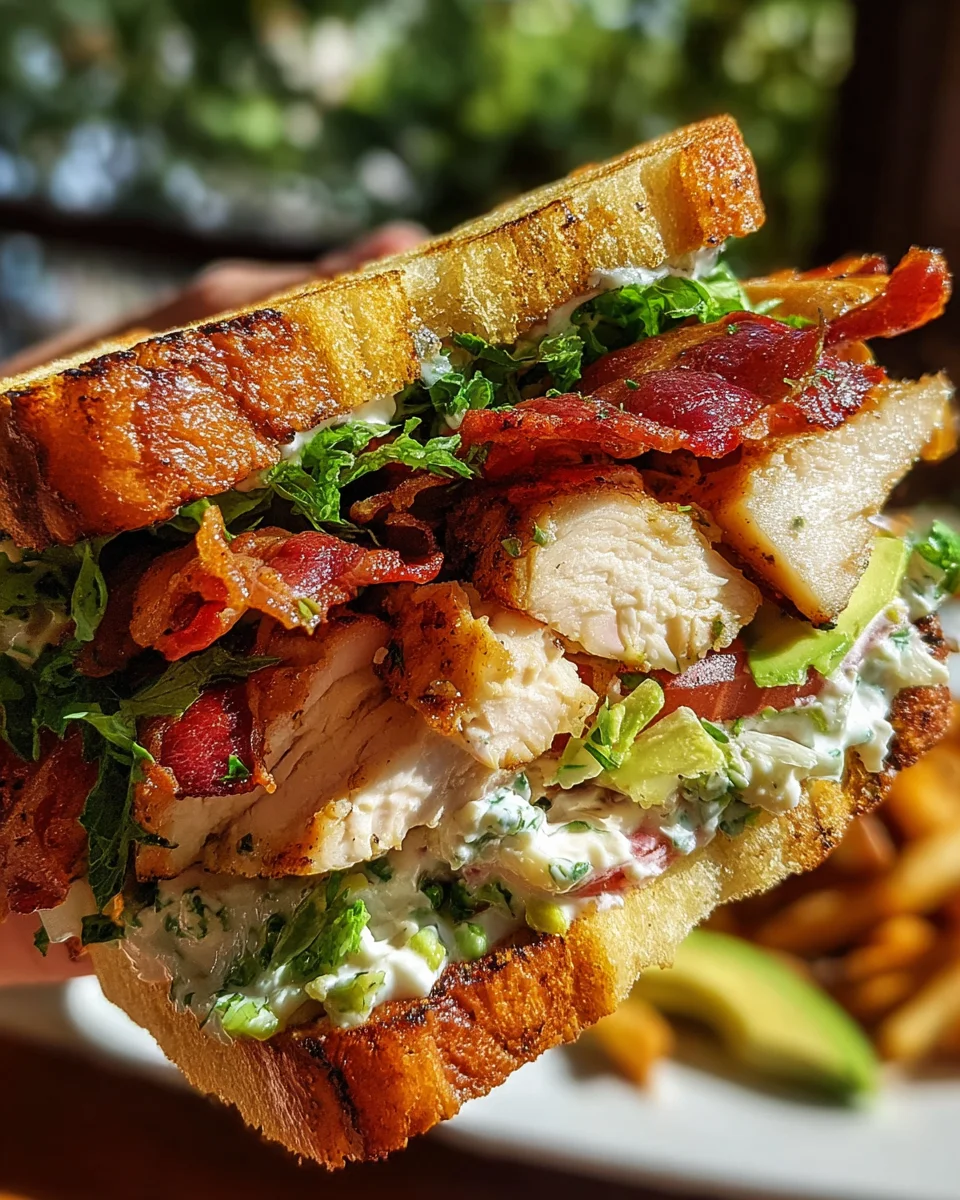
Ultimate Loaded Chicken Club Sandwich With Crispy Beef Bacon And Avocado Ranch Spread – what if I told you that your idea of the perfect sandwich is about to be completely redefined? Forget everything you thought you knew about the humble club; we’re taking it to an entirely new level of culinary delight that promises to tantalize your taste buds and satisfy your deepest cravings.
A Legacy of Layers, Reimagined for Modern Palates
The classic club sandwich has a rich and fascinating history, dating back to late 19th-century American clubhouses, where it was originally envisioned as a sophisticated, multi-layered treat for discerning diners. Over the decades, this iconic dish has gracefully evolved, adapting to new tastes and regional ingredients, but always retaining its essence as a hearty, satisfying meal that truly stands the test of time. Our rendition pays homage to this timeless favorite by elevating it with a modern twist, introducing an incredible symphony of textures and flavors that will surprise and delight you.
Why You’ll Crave This Masterpiece of Flavor
Imagine succulent, perfectly cooked chicken, generously layered with irresistibly crispy beef bacon, fresh, crisp lettuce, juicy heirloom tomatoes, and then crowned with our vibrant, creamy avocado ranch spread. It’s the harmonious blend of savory, fresh, and zesty notes that makes this dish truly unforgettable. People adore this sandwich not just for its incredible, balanced taste, but for the satisfying crunch from the bacon and lettuce, the tender chicken, and the luxurious, velvety spread that expertly ties every single component together. Each bite delivers a burst of layered flavor, making it the perfect choice for a sophisticated lunch, a gourmet picnic, or a hearty dinner. This is truly the Ultimate Loaded Chicken Club Sandwich With Crispy Beef Bacon And Avocado Ranch Spread you’ve been dreaming of, offering a premium, gourmet experience right in your own kitchen.

Ingredients:
- For the Ultimate Loaded Chicken Club Sandwich:
- 12 slices of your favorite sandwich bread (I love a good hearty sourdough or a classic white Pullman loaf for this, something sturdy enough to hold all the goodness)
- 8 slices (about 8-10 ounces) premium quality beef bacon
- 2 boneless, skinless chicken breasts (about 6-8 ounces each, butterflied or pounded to an even ¾-inch thickness for quick, even cooking)
- 4 large lettuce leaves (crisp varieties like Romaine or iceberg work best to add that satisfying crunch)
- 2 ripe medium tomatoes, thinly sliced
- ½ medium red onion, thinly sliced into rings (optional, but highly recommended for a punch of flavor)
- 4 slices cheddar or provolone cheese (optional, but adds to the “loaded” aspect and creamy texture)
- Butter, for toasting the bread (about 2 tablespoons, softened)
- Salt and freshly ground black pepper, to taste
- For the Grilled Chicken Marinade:
- 2 tablespoons olive oil
- 1 tablespoon fresh lemon juice
- 1 clove garlic, minced very finely
- ½ teaspoon dried oregano
- ¼ teaspoon smoked paprika
- Pinch of red pepper flakes (optional, for a subtle kick)
- Salt and freshly ground black pepper, to taste
- For the Avocado Ranch Spread:
- 1 ripe large avocado (choose one that yields slightly to gentle pressure)
- ½ cup good quality mayonnaise
- ¼ cup sour cream or plain Greek yogurt (for tang and creaminess)
- 2 tablespoons fresh chives, finely chopped
- 1 tablespoon fresh parsley, finely chopped
- 1 tablespoon fresh dill, finely chopped
- 1 clove garlic, minced very finely or grated
- 1 tablespoon fresh lemon juice (essential for brightness and to prevent avocado browning)
- ½ teaspoon onion powder
- ¼ teaspoon black pepper
- ¼ teaspoon salt (or to taste)
- A splash of milk or water, if needed, to reach desired consistency
Crafting Your Silky Avocado Ranch Spread:
- Prepare Your Herbs and Garlic: First things first, let’s get that amazing avocado ranch spread ready. Finely chop your fresh chives, parsley, and dill. Mince that garlic clove until it’s super fine. Fresh herbs are truly the secret to a vibrant ranch, so don’t skimp here!
- Scoop the Avocado: Carefully slice your ripe avocado in half, remove the pit, and scoop the creamy green flesh into a medium-sized mixing bowl. You want a beautifully ripe avocado, as this will ensure a smooth, luxurious spread. If it’s too firm, it won’t blend as well, and if it’s overripe, it might have brown spots.
- Combine Wet Ingredients: Add the mayonnaise, sour cream (or Greek yogurt), and fresh lemon juice to the bowl with the avocado. The lemon juice is not just for flavor; it’s also a hero in preventing your beautiful avocado from browning too quickly.
- Add Dry Spices and Herbs: Now, incorporate your minced garlic, chopped chives, parsley, dill, onion powder, black pepper, and salt.
- Blend Until Smooth: Using a fork, potato masher, or an immersion blender (my preferred method for ultimate creaminess), mash and blend all the ingredients together until the spread is wonderfully smooth and uniform. You want it to be spreadable, without any large lumps of avocado. If it seems a little too thick, add a tiny splash of milk or water, just a tablespoon at a time, until you reach your desired consistency. It should be thick enough to stay on the bread but smooth enough to spread easily.
- Taste and Adjust: This is a crucial step! Taste your avocado ranch spread. Does it need a little more salt? A pinch more pepper? Maybe another squeeze of lemon for brightness? Adjust to your liking. Remember, this spread is going to be a star player in our sandwich, so make sure it sings! Once perfect, cover the bowl and pop it into the refrigerator while you prepare the other components. Chilling it allows the flavors to meld beautifully.
Preparing and Grilling Your Juicy Chicken Breast:
- Butterfly or Pound the Chicken: Take your boneless, skinless chicken breasts. If they are very thick (over 1 inch), I highly recommend butterflying them open like a book, or placing them between two sheets of plastic wrap and gently pounding them to an even ¾-inch thickness. This ensures they cook quickly and evenly, preventing dry spots. Aim for consistency across both breasts.
- Whisk the Marinade: In a shallow dish or a resealable plastic bag, whisk together all the ingredients for the chicken marinade: olive oil, fresh lemon juice, minced garlic, dried oregano, smoked paprika, and a pinch of red pepper flakes if you’re using them. Season generously with salt and freshly ground black pepper.
- Marinate the Chicken: Add the prepared chicken breasts to the marinade, ensuring they are thoroughly coated. Massage the marinade into the chicken for a minute or two. Cover the dish or seal the bag and refrigerate for at least 30 minutes, or up to 2 hours. Don’t marinate for too long with lemon juice, as it can start to “cook” the chicken and alter its texture. This short marinade is perfect for adding incredible flavor and tenderness.
- Preheat Your Grill: Preheat your grill (or a grill pan on the stovetop) to medium-high heat. Allow it to get nice and hot before placing the chicken on it. A hot grill creates those beautiful sear marks and locks in the juices.
- Grill the Chicken: Remove the chicken from the marinade, letting any excess drip off. Place the chicken breasts on the hot grill. Cook for about 4-6 minutes per side, depending on thickness, until they are golden brown, beautifully charred, and cooked through. The internal temperature should reach 165°F (74°C). Avoid overcooking, as we want that chicken to be tender and juicy, not dry.
- Rest the Chicken: Once cooked, transfer the chicken breasts to a cutting board. It’s absolutely essential to let them rest for at least 5-10 minutes. This allows the juices to redistribute throughout the meat, resulting in a much juicier chicken. Tent them loosely with foil to keep them warm.
- Slice the Chicken: After resting, slice the chicken breasts against the grain into thin, even strips. This makes them easier to eat in the sandwich and ensures a tender bite.
Achieving Perfectly Crispy Beef Bacon:
- Choose Your Method: You have a couple of great options for cooking beef bacon: stovetop or oven. For a larger batch and consistently flat, crispy results, the oven is fantastic. For a smaller batch and quicker cooking, the stovetop works well.
- Oven Method (Recommended for “Ultimate” crispiness):
- Preheat your oven to 400°F (200°C).
- Line a large baking sheet with foil for easy cleanup. Place a wire rack on top of the foil-lined baking sheet.
- Arrange the beef bacon slices in a single layer on the wire rack, making sure they don’t overlap.
- Bake for 15-20 minutes, or until the bacon is beautifully crisp and golden brown to your liking. Keep a close eye on it, as cooking times can vary.
- Once crispy, carefully transfer the bacon to a plate lined with paper towels to drain any excess fat. This step is crucial for achieving that delightful crunch.
- Stovetop Method:
- Place the beef bacon slices in a single layer in a large, cold skillet (cast iron or heavy-bottomed pan works best).
- Turn the heat to medium-low. Cooking bacon slowly allows the fat to render gradually, leading to crispier results.
- Cook for 8-12 minutes, turning occasionally with tongs, until the bacon reaches your desired level of crispiness.
- Remove the crispy bacon and place it on a plate lined with paper towels to drain the excess fat.
- Keep Warm: Once drained, you can keep the crispy beef bacon warm by covering it loosely with foil while you prepare the other components.
Preparing the Remaining Components:
- Slice Vegetables: Thinly slice your ripe tomatoes and red onion. Wash and thoroughly dry your lettuce leaves. Having everything ready to go makes assembly a breeze. The crispiness of the lettuce and the freshness of the tomatoes are key to balancing the richness of the sandwich.
- Toast the Bread: This is where the magic of a club sandwich truly begins. Melt about ½ tablespoon of butter in a large skillet over medium heat, or use a toaster. You’ll be toasting 12 slices of bread.
- Skillet Method: If using a skillet, place 2-3 slices of bread in the melted butter and toast until golden brown and crisp on both sides. Repeat with the remaining bread, adding more butter as needed. The skillet method provides an extra layer of richness and a beautiful, even toast.
- Toaster Method: If using a toaster, toast your bread to a medium-dark golden brown. You want a good crunch, but not burnt.
Once toasted, set the bread aside. You’ll have three slices per sandwich.
Assembling Your Ultimate Loaded Chicken Club Sandwich:
- Gather Your Components: Now for the grand finale! Make sure all your components are ready and within reach: toasted bread, sliced grilled chicken, crispy beef bacon, avocado ranch spread, lettuce, tomato, red onion, and cheese slices if using. You’ll be making three layers for each sandwich.
- First Layer of Bread: Take one slice of toasted bread. Spread a generous amount of your luscious avocado ranch spread on one side. Don’t be shy! This is our foundational flavor layer.
- Add Lettuce and Tomato: Place a crisp lettuce leaf or two on top of the spread. Arrange a couple of slices of fresh tomato over the lettuce.
- Chicken and Onion: Now, pile on a generous portion of your sliced grilled chicken. Evenly distribute about half of your sliced red onion (if using) over the chicken. If you’re using cheese, this is where you’d add one slice on top of the chicken and onion.
- Second Layer of Bread and Bacon: Take a second slice of toasted bread. Spread avocado ranch spread on both sides of this middle slice. Place it directly on top of your chicken and veggie layer. Now, arrange 4 slices of your perfectly crispy beef bacon on this middle slice. The double-sided spread ensures every bite is flavorful and helps the bacon adhere.
- More Lettuce and Tomato: Add another layer of crisp lettuce and tomato slices on top of the bacon.
- Final Layer of Chicken and Cheese (Optional): Place the remaining sliced grilled chicken on top of the lettuce and tomato. If using, add another slice of cheese. This adds to the “loaded” aspect and gives a lovely melty texture if the sandwich is served immediately and the chicken is still warm.
- Top with Final Bread Slice: Take your third and final slice of toasted bread. Spread avocado ranch spread on one side of this slice and place it spread-side down on top of your sandwich.
- Secure and Cut: For an authentic club sandwich experience, you’ll want to secure it. Insert two long toothpicks or wooden skewers through the sandwich, usually diagonally, to hold all the layers together. Carefully slice the sandwich into halves or quarters, typically triangles, using a sharp serrated knife. Cutting a club sandwich cleanly requires a sharp knife and a firm hand.
- Serve Immediately: Serve your Ultimate Loaded Chicken Club Sandwich With Crispy Beef Bacon And Avocado Ranch Spread immediately, perhaps with a side of chips or a simple salad. Enjoy the incredible layers of flavor and texture you’ve created! Each bite is a symphony of creamy avocado ranch, savory chicken, salty crispy bacon, and fresh veggies, all held together by perfectly toasted bread.
Conclusion:
Well, my friends, we’ve reached the delicious finale of our culinary journey, and I genuinely hope you’re as excited as I am about what we’ve created today. This isn’t just another recipe; it’s an invitation to experience sandwich perfection. From the moment you take that first glorious bite, you’ll understand why this particular combination of flavors and textures is truly something special. We’ve taken the classic club sandwich concept and elevated it to an art form, ensuring every element plays a crucial role in delivering an unforgettable experience.
What makes this sandwich a non-negotiable addition to your recipe repertoire? It’s the symphony of flavors and textures that dances across your palate. Imagine sinking your teeth through perfectly toasted bread, followed by the juicy tenderness of seasoned chicken breast. Then comes the irresistible crunch and savory depth of crispy beef bacon – a revelation for anyone who loves that smoky, salty goodness. But the magic doesn’t stop there. The fresh, crisp lettuce and ripe, vibrant tomatoes add a vital counterpoint, providing freshness and a delightful snap. And binding it all together, the star of the show: our homemade avocado ranch spread. Its creamy, tangy, herby richness is nothing short of sublime, adding a luxurious mouthfeel and a burst of vibrant flavor that ties every single ingredient into a harmonious whole.
This isn’t just a lunch item; it’s a meal that exudes comfort, sophistication, and pure culinary joy. It’s perfect for a weekend brunch with friends, a satisfying weeknight dinner when you want something special but easy, or even the star of your next picnic basket. The Ultimate Loaded Chicken Club Sandwich With Crispy Beef Bacon And Avocado Ranch Spread isn’t merely a name; it’s a promise of what awaits you when you decide to whip this up in your own kitchen. It satisfies every craving, leaving you feeling utterly content and wonderfully indulged.
Elevate Your Meal: Serving Suggestions
Now that you’ve mastered the art of creating this masterpiece, let’s talk about how to serve it for maximum enjoyment. While this sandwich is undeniably a complete meal in itself, pairing it with a few thoughtful sides can turn it into an even grander occasion. For a classic diner feel, a generous handful of crispy, golden potato chips or a side of homemade sweet potato fries would be absolutely perfect. The salty crunch perfectly complements the rich flavors of the sandwich. If you’re leaning towards something a bit lighter, a refreshing side salad with a simple vinaigrette, or a creamy coleslaw, would provide a lovely contrast and add another layer of freshness to your plate. And of course, no club sandwich experience is truly complete without a dill pickle spear or two to cut through the richness.
As for beverages, an ice-cold glass of freshly brewed iced tea or a zesty lemonade makes for a delightful and refreshing companion. For those who enjoy a more adult pairing, a light, crisp lager or a pale ale would beautifully complement the savory notes of the chicken and beef bacon without overpowering the delicate avocado ranch. Even a sparkling water with a hint of lemon or lime could be a fantastic, simple choice.
Make It Your Own: Creative Variations
One of the things I love most about cooking is the freedom to personalize and adapt recipes to suit individual tastes and what you have on hand. While I truly believe the original recipe for this incredible sandwich is flawless, don’t hesitate to get creative!
- Bread Choices: Experiment with different breads! While white or whole wheat toast is classic, consider using a sturdy sourdough for an added tang, a soft brioche for a touch of sweetness, or even a toasted ciabatta roll for a more rustic feel.
- Chicken Options: If you’re short on time, leftover rotisserie chicken can be a fantastic shortcut, shredded and mixed with a touch of seasoning. You could also grill your chicken for a smoky char, or even bread and lightly fry it for an extra crispy layer.
- Bacon Alternatives: If beef bacon isn’t your preference or readily available, good quality turkey bacon can be a suitable substitute, or even regular pork bacon if that’s what you prefer. For a vegetarian twist (though this recipe heavily features meat), you could try crispy halloumi or marinated portobello slices.
- Cheese Please: Feel free to add a slice of your favorite cheese! Provolone, sharp cheddar, or a creamy Monterey Jack would melt beautifully between the warm layers.
- Veggies Galore: Expand your vegetable horizons! Thinly sliced red onion for a zesty bite, crisp cucumber rounds for extra crunch, or even a few tender sprouts can add another dimension of flavor and texture.
- Ranch Remix: Spice up your avocado ranch by adding a pinch of cayenne pepper or a dash of hot sauce. For an herbaceous boost, fresh cilantro or dill can be wonderful additions. For a lighter version, swap half the mayonnaise for Greek yogurt.
My ultimate encouragement to you is this: Don’t let this recipe be just another bookmark in your browser. Roll up your sleeves, gather your ingredients, and commit to creating this culinary masterpiece in your own kitchen. I promise you, the effort is minimal compared to the incredibly rewarding explosion of flavors you’re about to experience. There’s a profound satisfaction in crafting something so utterly delicious from scratch, something that will undoubtedly impress anyone you share it with – or simply bring immense joy to yourself!
Once you’ve embarked on this delicious adventure and tasted the magic of this Ultimate Loaded Chicken Club Sandwich, I would absolutely love to hear from you! Share your experiences, your photos, your clever variations, and your triumphs. Your feedback inspires me and helps others discover the joy of cooking. Happy cooking, and even happier eating!
Ultimate Loaded Chicken Club Sandwich with Crispy Beef Bacon
Ultimate Loaded Chicken Club Sandwich With Crispy Beef Bacon And Avocado Ranch Spread – what if I told you that your idea of the perfect sandwich is about to be completely redefined? Forget everything you thought you knew about the humble club; we’re taking it to an entirely new level of culinary delight that promises to tantalize your taste buds and satisfy your deepest cravings.
Ingredients
Instructions
Important Information
Nutrition Facts (Per Serving)
It is important to consider this information as approximate and not to use it as definitive health advice.
Allergy Information
Please check ingredients for potential allergens and consult a health professional if in doubt.