• Skip to primary navigation
  • Skip to main content
  • Skip to primary sidebar
Homesmad

Homesmad

  • Home
  • Breakfast & Brunch
  • Appetizers & Snacks
  • Dinner
  • Dessert
  • About
  • Privacy Policy
  • Contact
Homesmad
  • Home
  • Breakfast & Brunch
  • Appetizers & Snacks
  • Dinner
  • Dessert
  • About
  • Privacy Policy
  • Contact

Soft Baked Maple Donut Bars: Easy & Delicious Treat!

November 8, 2025 by Lily author

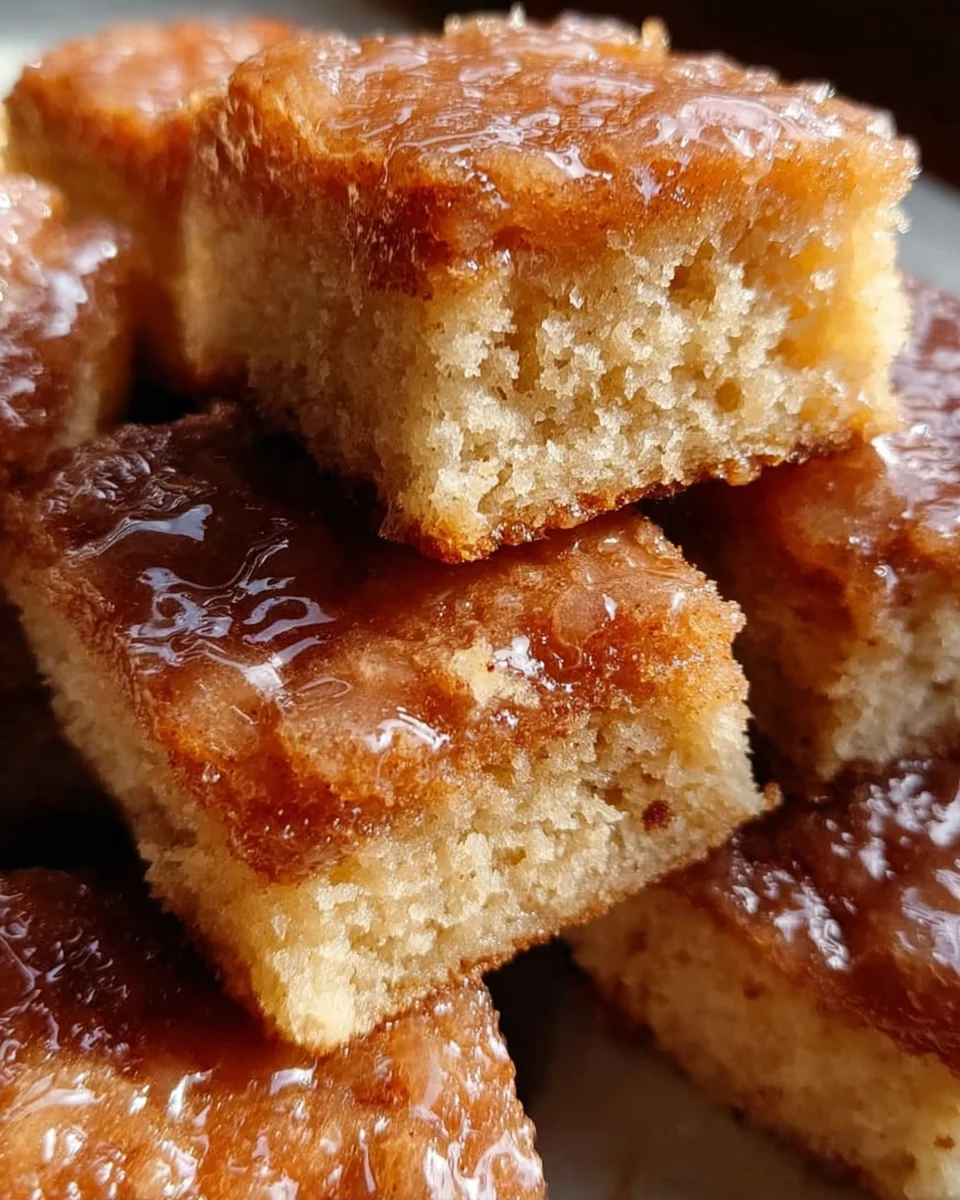
Soft Baked Maple Donut Bars offer an irresistible twist on a beloved classic, delivering all the comforting flavors and tender texture of your favorite maple-glazed donut without the deep-frying fuss. Imagine sinking your teeth into a perfectly soft, cake-like square, generously infused with the golden warmth of real maple syrup and finished with a delicate, sweet glaze. This simple yet utterly decadent recipe promises to become a new favorite in your baking repertoire, perfect for breakfast, brunch, or an afternoon treat that gathers everyone around the table.

The journey of the humble donut is a fascinating one, with roots tracing back to Dutch “olykoeks” or “oily cakes” in the 19th century, eventually evolving into the ring-shaped delights we cherish today. Combining this cherished pastry concept with the rich, autumnal notes of maple syrup elevates it to a whole new level of cozy indulgence. Maple itself carries a deep cultural significance, particularly in North America, symbolizing harvest, tradition, and the sweet embrace of nature’s bounty, making these bars more than just a treat—they’re a taste of comfort.

What makes these particular bars so universally adored? It’s the delightful marriage of convenience and sheer deliciousness. You get that signature tender, airy crumb and the rich, complex sweetness of maple, all in a convenient bar format that’s incredibly easy to make and even easier to share. No more wrestling with hot oil or painstakingly shaping individual donuts – just pour, bake, glaze, and enjoy! These incredible Soft Baked Maple Donut Bars are a testament to how simple baking can yield truly spectacular results, bringing a smile to everyone’s face with their irresistible taste and wonderfully soft texture.

Soft Baked Maple Donut Bars: Easy & Delicious Treat! this RECIPE

Ingredients:

  • For the Soft Baked Maple Donut Bars:

    • 2 cups (240g) all-purpose flour, spooned and leveled – This ensures a light, fluffy texture for our donut bars.
    • 1 tablespoon baking powder – The leavening agent that gives our bars their beautiful rise.
    • 1/2 teaspoon baking soda – Works with the buttermilk to create a tender crumb.
    • 1/2 teaspoon salt – Enhances all the flavors, balancing the sweetness perfectly.
    • 1/2 teaspoon ground cinnamon – Adds that classic donut warmth and spice.
    • 1/4 teaspoon ground nutmeg – A must-have for that authentic donut aroma and taste.
    • 1/2 cup (113g) unsalted butter, softened to room temperature – Crucial for a rich, moist crumb.
    • 3/4 cup (150g) granulated sugar – Sweetens our bars beautifully without overpowering the maple.
    • 1 large egg, at room temperature – Binds everything together and adds richness.
    • 1 teaspoon vanilla extract – A fundamental flavor enhancer in almost any baked good.
    • 1 cup (240ml) buttermilk, at room temperature – Reacts with baking soda for tenderness and a subtle tang. If you don’t have buttermilk, you can make your own by adding 1 tablespoon of white vinegar or lemon juice to a measuring cup and filling the rest with regular milk. Let it sit for 5 minutes before using.
  • For the Maple Glaze:

    • 2 cups (240g) powdered sugar (confectioners’ sugar), sifted – Ensures a smooth, lump-free glaze. Sifting is key here!
    • 1/4 cup (60ml) pure maple syrup – The star of our glaze, providing that unmistakable maple flavor. Use real maple syrup for the best results, not pancake syrup.
    • 3-4 tablespoons milk (or heavy cream), at room temperature – Adjust the consistency of your glaze to perfection. Start with 3 and add more as needed.
    • 1/2 teaspoon vanilla extract – Complements the maple and adds depth.
    • Pinch of salt – Just a tiny bit to cut through the sweetness and brighten the flavors.
  • Optional Garnish:

    • Chopped toasted pecans or walnuts – Adds a lovely crunch and nutty flavor.
    • A light dusting of powdered sugar – For an extra touch of elegance.

Equipment You’ll Need:

  • 9×13 inch baking pan – The perfect size for our Soft Baked Maple Donut Bars, allowing them to bake evenly.
  • Parchment paper – Essential for easy removal and cleanup. Don’t skip this!
  • Large mixing bowls (at least two) – One for dry ingredients, one for wet.
  • Whisk – For combining ingredients thoroughly.
  • Electric mixer (stand or hand-held) – Makes creaming butter and sugar a breeze.
  • Rubber spatula – For scraping down bowls and folding batter.
  • Measuring cups and spoons – Accuracy is important in baking.
  • Wire cooling rack – Allows air circulation for even cooling, preventing soggy bottoms.
  • Small saucepan (for glaze, if warming) or medium bowl – For whisking together the glaze ingredients.

Preparing Your Soft Baked Maple Donut Bars

Get ready to create some truly delightful Soft Baked Maple Donut Bars! This recipe is designed to be straightforward, yielding a batch of tender, cake-like donut bars infused with warm spices and topped with a luscious maple glaze. We’re going to break it down into manageable phases, ensuring success for every baker.

Phase 1: Preparing the Donut Bar Batter

Step 1: Prepping Your Oven and Pan
  1. First things first, let’s get our oven ready. Preheat your oven to 350°F (175°C). This ensures a consistent temperature from the moment your batter goes in, which is crucial for even baking and a beautiful rise for our Soft Baked Maple Donut Bars.
  2. Next, prepare your 9×13 inch baking pan. Line the bottom and sides with parchment paper, leaving an overhang on the longer sides. This overhang will act as handles, making it incredibly easy to lift the entire baked slab of donut bars out of the pan once it’s cooled. A little spray of non-stick cooking spray beneath the parchment helps it stick to the pan, preventing it from sliding around as you spread the batter. This simple step makes a world of difference when it comes to serving!
Step 2: Combining Dry Ingredients
  1. In a large mixing bowl, whisk together your all-purpose flour, baking powder, baking soda, salt, ground cinnamon, and ground nutmeg. It’s really important to whisk these dry ingredients thoroughly for about 30 seconds to a minute. This ensures that the leavening agents and spices are evenly distributed throughout the flour. If they aren’t, you might end up with pockets of flavor or uneven rising in your Soft Baked Maple Donut Bars. Set this bowl aside for now.
Step 3: Whisking Wet Ingredients
  1. In another large mixing bowl, using an electric mixer (either a stand mixer with the paddle attachment or a hand-held mixer), cream together the softened unsalted butter and granulated sugar. Beat them on medium-high speed for about 2-3 minutes, or until the mixture becomes light, fluffy, and pale in color. This process incorporates air into the butter and sugar, which contributes significantly to the light and tender texture of our donut bars. Scrape down the sides of the bowl with a rubber spatula halfway through to ensure everything is well combined.
  2. Once the butter and sugar are perfectly creamed, add the large egg and vanilla extract. Beat again on medium speed for another minute, until the egg is fully incorporated and the mixture is smooth and glossy. You want to make sure there are no visible streaks of egg yolk. This mixture forms the rich foundation of our Soft Baked Maple Donut Bars.
Step 4: Merging Wet and Dry
  1. Now it’s time to bring everything together. With the mixer on low speed, begin adding the dry ingredient mixture to the wet ingredient mixture in three alternating additions with the buttermilk. Start by adding about one-third of the dry ingredients, mixing just until almost combined.
  2. Then, pour in half of the buttermilk, mixing until just barely incorporated.
  3. Repeat this process: add another third of the dry ingredients, mix, then the remaining buttermilk, mix, and finally the last third of the dry ingredients. Mix on low speed only until the ingredients are just combined. It’s absolutely crucial here not to overmix the batter. Overmixing develops the gluten in the flour too much, which can lead to tough, dense donut bars rather than the soft, tender texture we’re aiming for. A few small lumps in the batter are perfectly fine; they will disappear during baking. Use a rubber spatula to give the batter one final gentle fold, ensuring no pockets of flour remain at the bottom of the bowl.
Step 5: Pouring and Spreading the Batter
  1. Carefully pour the finished batter into your prepared 9×13 inch baking pan. Use your rubber spatula to gently spread the batter evenly across the bottom of the pan. Try to make the top as smooth and level as possible. This ensures that your Soft Baked Maple Donut Bars will bake uniformly and have a beautiful, flat surface for glazing later.

Phase 2: Baking the Soft Baked Maple Donut Bars

Step 6: The Bake Cycle
  1. Place the baking pan in your preheated 350°F (175°C) oven. Bake for approximately 25-30 minutes. The exact baking time can vary slightly depending on your oven, so it’s always good to keep an eye on them.
  2. You’ll know your Soft Baked Maple Donut Bars are perfectly baked when the edges are lightly golden brown, and a wooden skewer or toothpick inserted into the center comes out clean or with just a few moist crumbs attached. If it comes out with wet batter, continue baking for a few more minutes and test again. Avoid opening the oven door too frequently during the first 20 minutes to prevent the bars from sinking.
Step 7: Cooling Down
  1. Once baked, remove the pan from the oven and place it on a wire cooling rack. Allow the donut bars to cool in the pan for about 15-20 minutes. This initial cooling period allows the bars to set up properly and makes them less fragile.
  2. After this initial cooling, use the parchment paper overhangs to carefully lift the entire slab of donut bars out of the pan and transfer it directly onto the wire cooling rack. Allow them to cool completely to room temperature before applying the glaze. This step is non-negotiable! If you try to glaze warm Soft Baked Maple Donut Bars, the glaze will melt and run right off, resulting in a sticky mess instead of a beautiful, set topping. Patience is a virtue here!

Phase 3: Crafting the Irresistible Maple Glaze

Step 8: Gathering Glaze Ingredients
  1. While your donut bars are cooling, it’s the perfect time to prepare the star of the show: our delicious maple glaze. Gather all your glaze ingredients: the sifted powdered sugar, pure maple syrup, milk (or heavy cream), vanilla extract, and a tiny pinch of salt. Make sure your powdered sugar is truly sifted; this prevents lumps and guarantees a silky-smooth glaze.
Step 9: Whisking the Glaze
  1. In a medium-sized bowl, combine the sifted powdered sugar, pure maple syrup, vanilla extract, and pinch of salt.
  2. Begin by adding 3 tablespoons of milk (or heavy cream). Whisk everything together thoroughly using a fork or a small whisk. Start slowly to avoid a cloud of powdered sugar! Continue whisking until the mixture is completely smooth and free of any lumps.
Step 10: Adjusting Glaze Consistency
  1. Now, this is where you customize your glaze. The consistency is key for a beautiful topping for our Soft Baked Maple Donut Bars. You want a glaze that is thick enough to coat the back of a spoon and pour slowly, but not so thick that it’s clumpy and hard to spread. If your glaze seems too thick, add the remaining tablespoon of milk, a tiny bit at a time (half a teaspoon at a time), whisking well after each addition, until you reach your desired consistency.
  2. Conversely, if your glaze somehow ends up too thin, you can add a little more sifted powdered sugar (a tablespoon at a time) to thicken it. The ideal consistency will allow it to spread easily over the bars and set beautifully without being too runny. I often find it’s just right when it drizzles off the whisk in a thick ribbon that holds its shape briefly before melting back into the bowl.

Phase 4: Glazing and Finishing Your Soft Baked Maple Donut Bars

Step 11: The Glazing Moment
  1. Once your Soft Baked Maple Donut Bars are completely cool – and I mean completely cool to the touch – it’s time to glaze them. Ensure they are on the wire cooling rack, ideally with a sheet of parchment paper or aluminum foil underneath to catch any drips, making cleanup much easier.
  2. Carefully pour the prepared maple glaze over the cooled donut bars. You can either pour it all at once in the center and spread it gently with an offset spatula or the back of a spoon, or you can drizzle it evenly over the entire surface. Work relatively quickly but smoothly, as the glaze will start to set. Try to cover the entire top surface for a consistent, beautiful finish. The rich maple aroma at this stage is absolutely heavenly!
Step 12: Optional Garnishes and Setting
  1. If you’re using optional garnishes like chopped toasted pecans or walnuts, sprinkle them over the wet glaze immediately after spreading it. This ensures they stick nicely as the glaze sets. You could also do a light dusting of extra powdered sugar for an elegant look, though I usually save that for serving if the glaze isn’t quite enough for some.
  2. Allow the glaze to set completely. This usually takes about 30-60 minutes at room temperature, or you can speed it up by placing the bars in the refrigerator for about 15-20 minutes. You want the glaze to be firm to the touch so it doesn’t smudge when you slice into your delightful Soft Baked Maple Donut Bars.
Step 13: Slicing and Serving
  1. Once the glaze is fully set, it’s time for the best part: slicing and serving! Using a sharp knife, carefully cut the large slab of Soft Baked Maple Donut Bars into individual bar-sized pieces. I usually aim for 12-16 bars, depending on how large I want each serving to be. Wiping your knife clean between cuts can help ensure neat, clean edges, especially with a sticky glaze.
  2. Serve your freshly baked, glazed Soft Baked Maple Donut Bars immediately and enjoy the tender, cake-like texture and incredible maple flavor. They are perfect for breakfast, a sweet snack, or even dessert!

Soft Baked Maple Donut Bars: Easy & Delicious Treat!

Conclusion:

Well, my friends, we’ve reached the sweet end of our journey through this delightful recipe, and I truly hope you’re feeling as excited as I am about what awaits you in your kitchen. If there’s one recipe I urge you to prioritize, it’s this one. Why? Because these aren’t just any ordinary baked goods; they are a revelation, a perfect symphony of textures and flavors that will undoubtedly become a treasured staple in your baking repertoire. Imagine sinking your teeth into something so incredibly tender, so pillowy soft, with that unmistakable, comforting hug of maple permeating every single bite. That, my dear bakers, is the magic encapsulated within each piece of the fabulous Soft Baked Maple Donut Bars. They offer all the beloved essence of a classic maple donut but in an unbelievably convenient, shareable bar form, making them perfect for any occasion without the fuss and mess of deep-frying.

What truly elevates these bars to a must-try status is their unparalleled moistness and the harmonious balance of sweetness. They strike that perfect note where they are indulgent without being cloying, allowing the rich, earthy warmth of maple to truly shine. There’s a beautiful simplicity to their elegance; they look impressive with their glossy glaze, yet they are surprisingly straightforward to prepare, making them an ideal project for bakers of all skill levels. From the moment the aroma of baking maple fills your home, you’ll know you’ve stumbled upon something truly special. They evoke a sense of nostalgia, bringing back memories of cozy mornings and sweet treats, but with a fresh, modern twist that makes them feel brand new.

Now, for those exciting moments of enjoyment! While these bars are absolutely divine on their own, perhaps with a steaming mug of coffee or a tall glass of cold milk, I have a few serving suggestions that I think you’ll love. Imagine them warmed ever so slightly, creating an even more irresistible gooey texture, then perhaps served alongside a scoop of vanilla bean ice cream for an ultimate dessert experience. The contrast of the warm, soft bar with the cold, creamy ice cream is simply heavenly. They also make an incredible addition to any brunch spread, beautifully complementing a fruit platter or a savory quiche. For a delightful afternoon treat, consider a dollop of fresh whipped cream and a sprinkle of toasted pecans on top – pure bliss!

But don’t stop there! These versatile bars also open up a world of delightful variations for the adventurous baker. While the classic maple glaze is undeniably perfect, you could experiment with a different topping. How about a delicate dusting of powdered sugar for a simpler look, or a spiced chai glaze for an extra layer of warmth? For those who love a bit of crunch, consider folding in some finely chopped walnuts or pecans into the batter itself, or sprinkling them over the wet glaze for added texture. You could even incorporate a touch of cinnamon or nutmeg into the dry ingredients to further enhance that cozy, autumnal vibe, making them even more reminiscent of your favorite fall treats. Think about a drizzle of dark chocolate over the maple glaze for a sophisticated touch, or a sprinkle of flaky sea salt to really make the maple flavor pop and create a delightful sweet-and-salty combination. The possibilities are truly endless, allowing you to tailor this fantastic recipe to your unique preferences and impress anyone lucky enough to get a taste.

So, please, don’t just take my word for it. I genuinely encourage you to roll up your sleeves, preheat your oven, and embark on this wonderful baking adventure. Trust me when I say that the effort, which is minimal, will be rewarded tenfold with every tender, flavorful bite. There’s a profound satisfaction that comes from creating something so delicious from scratch, and these bars deliver that in spades. They are more than just a recipe; they’re an experience, a little piece of comfort you can share with loved ones or savor all by yourself.

Once you’ve had the joy of baking and tasting these magnificent bars, I would absolutely love to hear from you. What did you think? Did you try any of the serving suggestions or come up with a creative variation of your own? Please share your experiences, your photos, and your triumphs! Your feedback and ideas truly inspire me, and I can’t wait to see the incredible creations that emerge from your kitchens. Happy baking, everyone, and get ready to fall in love with these delightful maple treats!


Soft Baked Maple Donut Bars: Easy & Delicious Treat!

Indulge in Soft Baked Maple Donut Bars, a delightful treat offering all the comforting flavors and tender texture of maple-glazed donuts without the deep-frying. These easy-to-make cake-like squares are infused with real maple syrup and finished with a delicate, sweet glaze, perfect for any occasion.

Prep Time
20 Minutes
Cook Time
30 Minutes
Total Time
35 Minutes
Servings
16 bars

Ingredients


Instructions


Important Information

Nutrition Facts (Per Serving)

It is important to consider this information as approximate and not to use it as definitive health advice.

Allergy Information

Please check ingredients for potential allergens and consult a health professional if in doubt.

« Previous Post
Festive Christmas Chai Latte – Your Perfect Holiday Sip!
Next Post »
Baked Pumpkin Fritter Bites: Easy & Delicious Fall Treat!

If you enjoyed this…

Soft Baked Maple Donut Bars – Easy & Delicious Homemade Treat!

Strawberry Cheesecake Cinnabon Rolls

Strawberry Cheesecake Cinnabon Rolls

Greek Yogurt Jello Fluff: A Delicious & Healthy Dessert Recipe

Primary Sidebar

Browse by Diet

BreakfastDinnerLunchDessertAppetizer

Sweet Peach Yogurt Parfait Delight

One of my fondest memories is from a lazy summer afternoon spent at my grandmother’s house. The sun filtered through the kitchen window, casting a warm glow over the table where she would create her culinary magic. It was during one of those blissful moments that I first tasted her Peach Yogurt Parfait with Honey and Granola. The sweet aroma of ripe peaches mingling with creamy yogurt and the crunch of granola was nothing short of heavenly. It felt like summer captured in a bowl, and I still remember the joy of diving in with a spoon, each layer revealing a new burst of flavor.

When I think about that parfait, I can almost hear the gentle hum of the bees outside, reminding me of the floral notes that honey brings to every bite. The vibrant yellows and soft oranges of the peaches contrast beautifully with the creamy white yogurt and the golden crunch of granola. It’s a dish that not only looks delightful but also tastes like a celebration of fresh, wholesome ingredients.

What makes my version of this Peach Yogurt Parfait special is the careful balance of flavors and textures. I use ripe, juicy peaches, drizzled with locally sourced honey, and a homemade granola that’s bursting with nuts and seeds for an extra crunch. It’s a simple dish, but every layer is crafted with love and attention.

Let me show you exactly how to make this delightful parfait, so you can bring a bit of that summer magic into your kitchen!

Sweet Peach Yogurt Parfait Delight

Why You’ll Love This Recipe

  • Delightfully creamy texture from the Greek yogurt, paired with the juicy sweetness of fresh peaches.
  • Ready in under 20 minutes, making it a quick and satisfying breakfast or snack option.
  • Budget-friendly, using common ingredients that you may already have in your pantry.
  • Customizable with your favorite granola and nuts, allowing you to tailor each parfait to your taste.
  • Perfectly balanced flavors with the bright acidity of lemon juice and the sweetness of honey enhancing the peaches.

Ingredients

  • For the Parfait:
  • 2 cups plain Greek yogurt (or vanilla yogurt for a sweeter option)
  • 2 large ripe peaches, diced (about 2 cups)
  • 1 tablespoon fresh lemon juice (to prevent browning of peaches)
  • 2 tablespoons honey (plus more for drizzling)
  • 1 teaspoon vanilla extract (optional for extra flavor)
  • For the Granola:
  • 1 cup granola (store-bought or homemade; see notes for a simple granola recipe)
  • 1/4 cup sliced almonds (optional for added crunch)
  • 1/4 cup shredded coconut (optional for added flavor)

Let’s dive into some key ingredients that make this Peach Yogurt Parfait so delightful! First, the Greek yogurt is not only creamy but also packed with protein, making it a satisfying option for breakfast or a snack. If you’re looking for a sweeter option, you can easily substitute it with vanilla yogurt, though it may alter the overall flavor balance. Next, the ripe peaches are the star of the show; their natural sweetness shines through, so I recommend choosing peaches that yield slightly to pressure, indicating they’re perfectly ripe. If peaches aren’t in season, feel free to use nectarines or even frozen peaches—just thaw them before use. Finally, honey adds a lovely floral sweetness that ties everything together. If you prefer, maple syrup can serve as a delicious substitute.

Step-by-Step Instructions

  1. Start by preparing the peaches. Wash them thoroughly, then slice and dice them into bite-sized pieces. In a medium bowl, toss the diced peaches with 1 tablespoon of fresh lemon juice to prevent browning. Set aside for about 5 minutes while the lemon juice works its magic.
  2. In a separate bowl, combine the Greek yogurt, 2 tablespoons of honey, and 1 teaspoon of vanilla extract if using. Stir the mixture until smooth and thoroughly blended. This should take about a minute. Avoid overmixing to maintain the creaminess of the yogurt.
  3. Now it’s time to layer your parfait. Grab a clear glass or bowl to showcase your beautiful creation. Start with a generous spoonful of the yogurt mixture at the bottom—about 1/4 cup will do. Use a spoon to spread it evenly.
  4. Add a layer of the diced peaches over the yogurt, ensuring they cover the yogurt completely. You might want to use about half of what you have prepared—roughly 1 cup. This layer should be visually appealing, so arrange the peaches neatly.
  5. Sprinkle 1/4 cup of granola over the peaches. This adds a delightful crunch. Make sure to distribute it evenly to ensure every bite has that satisfying texture. Avoid packing it down too tightly, as you want it to maintain its crunch.
  6. Repeat the layers: spoon in another 1/4 cup of yogurt, followed by another cup of peaches, and another sprinkle of granola. You should have at least two layers, but feel free to add more depending on your glass size.
  7. Finish off your parfait with a drizzle of honey on top for added sweetness and a touch of elegance. If you’re using sliced almonds or shredded coconut, sprinkle them on top now. It adds a lovely visual contrast and extra flavor.
  8. Serve immediately or refrigerate for up to 30 minutes before serving to allow the flavors to meld together. However, I recommend enjoying it fresh to maintain the granola’s crunch.

Pro Tips for the Best Peach Yogurt Parfait With Honey And Granola

  • Make sure to choose ripe peaches for the best flavor and texture. A common mistake is using unripe fruit, which can lead to a less enjoyable parfait. Look for peaches that are fragrant and slightly soft to the touch.
  • Use a clear glass to assemble your parfait; this not only makes for a beautiful presentation but also allows you to see the colorful layers, which adds to the enjoyment of eating it.
  • For an even creamier texture, consider whipping the Greek yogurt with a hand mixer for a couple of minutes before layering. This small adjustment makes a huge difference in mouthfeel.
  • Be mindful of the granola-to-yogurt ratio. Too much granola can overwhelm the parfait, while too little can make it feel too creamy. Aim for about 1/4 cup of granola per layer for the perfect balance.
  • If you’re making this for a gathering, consider preparing the yogurt and peaches ahead of time and layering them just before serving. This ensures the granola stays crunchy!

Variations & Serving Ideas

There are so many ways to get creative with your Peach Yogurt Parfait! For a tropical twist, swap out the peaches for mangoes or pineapples and top with coconut flakes. If you prefer a berry flavor, mix in some blueberries or strawberries with the peaches for added color and taste. For a nutty version, incorporate chopped walnuts or pecans instead of almonds.

As for serving ideas, this parfait pairs beautifully with a side of scrambled eggs for a hearty breakfast or fresh fruit salad for a light lunch. You might also enjoy it alongside whole grain toast with almond butter for an energizing snack. The contrast of flavors and textures will elevate your meal experience!

Storage, Make-Ahead & Reheating

The Peach Yogurt Parfait is best enjoyed fresh, but you can prepare some components ahead of time. Store the layered parfait in an airtight container in the refrigerator for up to 24 hours. However, be cautious; the granola may lose its crunch if stored too long. You can freeze the yogurt and peach mixture for up to 2 months; just remember to thaw it in the refrigerator overnight before serving.

If you plan to enjoy this dish the next day, it can taste even better as the flavors meld together. Just remember to add the granola right before serving to keep its delightful crunch!

Frequently Asked Questions

Can I make Peach Yogurt Parfait With Honey And Granola ahead of time?

Yes — in fact, it tastes even better the next day as the flavors meld. However, I recommend waiting to add the granola until just before serving to maintain its crunch.

What can I substitute for Greek yogurt?

If you prefer a lighter option, you can substitute Greek yogurt with regular yogurt or a dairy-free alternative like coconut yogurt. Just remember that this may alter the creaminess and flavor profile slightly.

Can I use frozen peaches for this parfait?

Absolutely! Just make sure to thaw the frozen peaches before using them. They will still add great flavor, though the texture may be slightly softer than fresh peaches.

How do I make the parfait vegan?

To make a vegan version, substitute the Greek yogurt with a plant-based yogurt alternative, and replace honey with maple syrup or agave nectar. This keeps the parfait sweet while adhering to a vegan diet.

What other fruits can I use in this recipe?

You can mix and match fruits based on your preference. Try using strawberries, blueberries, raspberries, or even bananas. Just make sure to adjust the lemon juice as needed to prevent browning.

Sweet Peach Yogurt Parfait Delight

Final Thoughts

The Peach Yogurt Parfait with Honey and Granola is a delightful blend of creamy yogurt, sweet peaches, and crunchy granola that creates a satisfying and nourishing treat. Each layer bursts with flavor, making it a perfect choice for breakfast or a light dessert.

This is the kind of recipe I come back to again and again, especially when I want something refreshing and wholesome to start my day. The harmony of sweet and tart flavors, combined with the delightful crunch, never fails to lift my spirits!

I encourage you to give this parfait a try and indulge in its comforting goodness. Feel free to share your results or even add your own twist—perhaps a sprinkle of cinnamon or a handful of nuts. Enjoy creating your perfect parfait!

Print
clock clock iconcutlery cutlery iconflag flag iconfolder folder iconinstagram instagram iconpinterest pinterest iconfacebook facebook iconprint print iconsquares squares iconheart heart iconheart solid heart solid icon

Peach Yogurt Parfait


  • Author: Lily author
  • Total Time: 15 minutes
  • Yield: 4 servings 1x
Pin Recipe
Print Recipe

Description

This Peach Yogurt Parfait combines creamy Greek yogurt, juicy peaches, and crunchy granola for a delightful treat. It’s a perfect breakfast or snack that captures the essence of summer in every bite.


Ingredients

Scale
  • For the Parfait:
  • 2 cups plain Greek yogurt (or vanilla yogurt for a sweeter option)
  • 2 large ripe peaches, diced (about 2 cups)
  • 1 tablespoon fresh lemon juice (to prevent browning of peaches)
  • 2 tablespoons honey (plus more for drizzling)
  • 1 teaspoon vanilla extract (optional for extra flavor)
  • For the Granola:
  • 1 cup granola (store-bought or homemade; see notes for a simple granola recipe)
  • 1/4 cup sliced almonds (optional for added crunch)
  • 1/4 cup shredded coconut (optional for added flavor)

Instructions

  1. Start by preparing the peaches. Wash them thoroughly, then slice and dice them into bite-sized pieces. In a medium bowl, toss the diced peaches with 1 tablespoon of fresh lemon juice to prevent browning. Set aside for about 5 minutes while the lemon juice works its magic.
  2. In a separate bowl, combine the Greek yogurt, 2 tablespoons of honey, and 1 teaspoon of vanilla extract if using. Stir the mixture until smooth and thoroughly blended. This should take about a minute. Avoid overmixing to maintain the creaminess of the yogurt.
  3. Now it’s time to layer your parfait. Grab a clear glass or bowl to showcase your beautiful creation. Start with a generous spoonful of the yogurt mixture at the bottom—about 1/4 cup will do. Use a spoon to spread it evenly.
  4. Add a layer of the diced peaches over the yogurt, ensuring they cover the yogurt completely. You might want to use about half of what you have prepared—roughly 1 cup. This layer should be visually appealing, so arrange the peaches neatly.
  5. Sprinkle 1/4 cup of granola over the peaches. This adds a delightful crunch. Make sure to distribute it evenly to ensure every bite has that satisfying texture. Avoid packing it down too tightly, as you want it to maintain its crunch.
  6. Repeat the layers: spoon in another 1/4 cup of yogurt, followed by another cup of peaches, and another sprinkle of granola. You should have at least two layers, but feel free to add more depending on your glass size.
  7. Finish off your parfait with a drizzle of honey on top for added sweetness and a touch of elegance. If you’re using sliced almonds or shredded coconut, sprinkle them on top now. It adds a lovely visual contrast and extra flavor.
  8. Serve immediately or refrigerate for up to 30 minutes before serving to allow the flavors to meld together. However, I recommend enjoying it fresh to maintain the granola’s crunch.
  • Prep Time: 15 mins
  • Cook Time: 0 mins
  • Category: Breakfast
  • Method: No-cook
  • Cuisine: American

Nutrition

  • Serving Size: 1 parfait
  • Calories: 250
  • Sugar: 20 g
  • Sodium: 50 mg
  • Fat: 5 g
  • Saturated Fat: 2 g
  • Unsaturated Fat: 3 g
  • Trans Fat: 0 g
  • Carbohydrates: 40 g
  • Fiber: 3 g
  • Protein: 10 g
  • Cholesterol: 10 mg

Keywords: Choose ripe peaches for the best flavor and texture. Use a clear glass for a beautiful presentation. For creaminess, consider whipping the yogurt before layering. Be mindful of the granola-to-yogurt ratio. Prepare yogurt and peaches ahead of time for gatherings, layering just before serving.

Did you make this recipe?

Share a photo and tag us — we can't wait to see what you've made!

Sun-Kissed Frozen Orange Cream Slush

As a child, summer days felt like they lasted forever. I remember the sticky heat wrapping around me as I played outside, my laughter mingling with the sounds of the neighborhood. But nothing could cool me down quite like the moment I’d spot my grandmother, laboring over her blender, whipping up her famous Frozen Orange Creamsicle Slush. That vibrant orange treat, with its frosty texture and sweet citrus aroma, was like a burst of sunshine in a cup. Just one sip, and I could feel the coolness wash over me, sparking pure joy.

This Frozen Orange Creamsicle Slush has a way of making you feel like a kid again. Its creamy, dreamy consistency is a delightful balance of bright orange and soft vanilla, inviting you to dive right in. The refreshing tang of orange dances on your tongue, while the smooth creaminess envelops you in a comforting embrace. It’s a nostalgic treat that’s perfect for hot summer afternoons or anytime you need a little pick-me-up.

What makes my version of this slush stand out is the addition of a hint of vanilla bean, which elevates the flavor and adds an extra layer of richness. Plus, it’s super easy to whip up with just a few simple ingredients that you probably already have on hand! So, if you’re ready to relive those sun-soaked memories, let me show you exactly how to make it.

Sun-Kissed Frozen Orange Cream Slush

Why You’ll Love This Recipe

  • Each slush is a perfect blend of creamy vanilla and zesty orange, creating a nostalgic flavor reminiscent of summer days.
  • This refreshing treat is ready in under 15 minutes, making it an ideal quick dessert for unexpected guests or hot afternoons.
  • With just 8 simple ingredients, it’s budget-friendly, ensuring you don’t have to break the bank to enjoy a delicious slush.
  • The slush has a perfectly smooth texture, thanks to the combination of ice and ice cream, providing a delightful contrast to the bright citrus flavors.
  • It’s highly customizable; you can easily adjust the sweetness and add fresh herbs for a unique twist that suits your taste.

Ingredients

  • 2 cups orange juice (freshly squeezed or store-bought)
  • 1 cup vanilla ice cream
  • 1 cup crushed ice
  • 1/2 cup milk (whole or 2%)
  • 1/4 cup granulated sugar (adjust based on sweetness preference)
  • 1 teaspoon vanilla extract
  • Zest of 1 orange (for added flavor)
  • Fresh orange slices and mint leaves (for garnish)

The star of this Frozen Orange Creamsicle Slush is the orange juice, which provides the vibrant, citrusy base. Freshly squeezed juice will yield the brightest flavor, but store-bought options can be just as convenient. If you’re opting for store-bought, choose 100% pure juice with no added sugars for the best results. Another essential ingredient is the vanilla ice cream; it adds creaminess and sweetness. You can substitute it with dairy-free ice cream if you’re looking for a vegan option. Whole or 2% milk complements the ice cream, creating a smooth blend. If you want a lower-calorie version, almond or oat milk can be good alternatives.

Lastly, the granulated sugar can be adjusted based on your sweetness preference. If you prefer a more natural sweetener, consider using honey or agave syrup. The orange zest enhances the flavor profile, providing an aromatic pop that brings the whole slush together. Don’t skip it! It adds an extra layer of brightness that makes this slush truly special.

Step-by-Step Instructions

  1. Start by preparing your ingredients. Gather 2 cups of orange juice, 1 cup of vanilla ice cream, and 1 cup of crushed ice. Make sure the ice is finely crushed, as larger chunks can make blending difficult.
  2. In a blender, combine the orange juice, vanilla ice cream, crushed ice, and 1/2 cup of milk. Add 1/4 cup of granulated sugar and 1 teaspoon of vanilla extract. If you like a sweeter slush, consider adding a bit more sugar at this stage.
  3. Add the zest of 1 orange to the blender. This step is crucial for enhancing the citrus flavor of your slush. Make sure not to include the bitter white pith—only the flavorful zest.
  4. Blend the mixture on medium-high speed for about 30-45 seconds. Stop once the ingredients are fully combined and the slush has a smooth, even consistency. If you notice large chunks of ice, blend for an additional 10-15 seconds. Avoid over-blending, as this can make the slush too liquidy.
  5. Once blended, taste the slush. If it needs more sweetness, add a little more sugar and blend for a few more seconds. If it’s too thick, you can add a splash of milk to reach your desired consistency.
  6. Pour the slush into glasses. This recipe typically serves 4, but you can easily double it for larger gatherings. Use a spoon to help guide the slush into the glasses if needed.
  7. Garnish each serving with fresh orange slices and mint leaves. The mint not only adds a pop of color but also a refreshing aroma that complements the citrus flavors beautifully.
  8. Serve immediately and enjoy! If you’ve made extra, you can refrigerate it for a short time, but it’s best enjoyed fresh.

Pro Tips for the Best Frozen Orange Creamsicle Slush

  • Don’t skip the orange zest! It’s a game-changer for flavor. Always zest before juicing to make it easier.
  • Use a high-powered blender for the best texture. A standard blender may struggle with ice, leading to uneven consistency. If you have a food processor, that can work too, but ensure the ice is finely crushed.
  • Adjust the ice-to-liquid ratio carefully. If your slush is too thick, it won’t blend well. Start with less ice and add more until you reach your preferred texture.
  • Be cautious with the sugar! Always start with the lower amount, as you can easily add more, but it’s hard to fix an overly sweet slush.
  • For a fun twist, consider adding a splash of coconut milk or a handful of fresh fruit like strawberries or pineapple. This not only enhances the flavor but also adds a beautiful color contrast.

Variations & Serving Ideas

There are countless ways to put a spin on your Frozen Orange Creamsicle Slush. Consider making a tropical version by adding in some pineapple juice or coconut milk for a delightful tropical twist. If you’re feeling adventurous, try incorporating a handful of frozen mango or peach slices for added sweetness. For a lighter version, swap out the vanilla ice cream for Greek yogurt for a creamy yet tangy alternative.

As for serving ideas, this refreshing slush pairs wonderfully with light summer dishes like grilled chicken skewers, fish tacos, or a simple salad topped with citrus vinaigrette. The bright, zesty flavors of the slush complement these dishes perfectly, making them an ideal pairing for a sunny day.

Storage, Make-Ahead & Reheating

This Frozen Orange Creamsicle Slush is best enjoyed fresh, but if you have leftovers, you can store them in an airtight container in the fridge for up to 2 days. Just keep in mind that the slush may lose some of its texture over time as the ice melts. It doesn’t freeze well, as the ice will turn into a solid block. If you must freeze it, blend again after thawing to restore the slushy consistency. This treat is best the day you make it, as the flavors meld together beautifully overnight, enhancing its deliciousness.

Frequently Asked Questions

Can I make Frozen Orange Creamsicle Slush ahead of time?

Yes — in fact, it tastes even better the next day as the flavors meld. However, it’s best to enjoy it fresh, as the texture can change if stored for too long. If you need to prepare it ahead, keep it in the fridge and re-blend before serving.

What kind of orange juice should I use?

For the best flavor, use freshly squeezed orange juice. However, if you’re short on time, opt for 100% pure store-bought juice without added sugars. This will ensure that your slush remains flavorful and refreshing.

Can I substitute the vanilla ice cream?

Absolutely! If you’re looking for a dairy-free option, coconut milk ice cream or a non-dairy vanilla ice cream can work wonderfully. They will still provide the creamy texture and sweetness you desire.

How can I adjust the sweetness of my slush?

You can easily adjust the sweetness by modifying the amount of sugar added. Start with 1/4 cup and taste the mixture before blending. If you prefer it sweeter, add more sugar gradually until it reaches your desired level.

What should I do if my slush is too thick?

If your slush is too thick, simply add a splash of milk or orange juice and blend again. This will help achieve a more drinkable consistency while maintaining the slushy texture. Adjust gradually to reach your preferred thickness.

Sun-Kissed Frozen Orange Cream Slush

Final Thoughts

The Frozen Orange Creamsicle Slush is a delightful blend of refreshing citrus and creamy goodness, making it a perfect treat for warm days or any time you crave a taste of nostalgia. The way the bright orange flavor dances with the creamy texture truly elevates this slush, transforming it into a satisfying escape from the everyday.

This is the kind of recipe I come back to again and again, especially when I’m looking to cool down or impress guests at a summer gathering. It’s simple to make and always brings smiles all around! I encourage you to try this recipe for yourself—don’t hesitate to share your results or even put your own spin on it. Happy slushing!

Print
clock clock iconcutlery cutlery iconflag flag iconfolder folder iconinstagram instagram iconpinterest pinterest iconfacebook facebook iconprint print iconsquares squares iconheart heart iconheart solid heart solid icon

Frozen Orange Creamsicle Slush


  • Author: Lily author
  • Total Time: 15 minutes
  • Yield: 4 servings 1x
Pin Recipe
Print Recipe

Description

This Frozen Orange Creamsicle Slush is a refreshing treat that combines creamy vanilla and zesty orange flavors. Perfect for hot summer days, it brings back nostalgic memories with every sip.


Ingredients

Scale
  • 2 cups orange juice (freshly squeezed or store-bought)
  • 1 cup vanilla ice cream
  • 1 cup crushed ice
  • 1/2 cup milk (whole or 2%)
  • 1/4 cup granulated sugar (adjust based on sweetness preference)
  • 1 teaspoon vanilla extract
  • Zest of 1 orange (for added flavor)
  • Fresh orange slices and mint leaves (for garnish)

Instructions

  1. Start by preparing your ingredients. Gather 2 cups of orange juice, 1 cup of vanilla ice cream, and 1 cup of crushed ice. Make sure the ice is finely crushed, as larger chunks can make blending difficult.
  2. In a blender, combine the orange juice, vanilla ice cream, crushed ice, and 1/2 cup of milk. Add 1/4 cup of granulated sugar and 1 teaspoon of vanilla extract. If you like a sweeter slush, consider adding a bit more sugar at this stage.
  3. Add the zest of 1 orange to the blender. This step is crucial for enhancing the citrus flavor of your slush. Make sure not to include the bitter white pith—only the flavorful zest.
  4. Blend the mixture on medium-high speed for about 30-45 seconds. Stop once the ingredients are fully combined and the slush has a smooth, even consistency. If you notice large chunks of ice, blend for an additional 10-15 seconds. Avoid over-blending, as this can make the slush too liquidy.
  5. Once blended, taste the slush. If it needs more sweetness, add a little more sugar and blend for a few more seconds. If it’s too thick, you can add a splash of milk to reach your desired consistency.
  6. Pour the slush into glasses. This recipe typically serves 4, but you can easily double it for larger gatherings. Use a spoon to help guide the slush into the glasses if needed.
  7. Garnish each serving with fresh orange slices and mint leaves. The mint not only adds a pop of color but also a refreshing aroma that complements the citrus flavors beautifully.
  8. Serve immediately and enjoy! If you’ve made extra, you can refrigerate it for a short time, but it's best enjoyed fresh.
  • Prep Time: 15 min
  • Cook Time: 0 min
  • Category: Dessert
  • Method: Blending
  • Cuisine: American

Nutrition

  • Serving Size: 1 serving
  • Calories: 200
  • Sugar: 30 g
  • Sodium: 50 mg
  • Fat: 5 g
  • Saturated Fat: 3 g
  • Unsaturated Fat: 2 g
  • Trans Fat: 0 g
  • Carbohydrates: 40 g
  • Fiber: 1 g
  • Protein: 2 g
  • Cholesterol: 20 mg

Keywords: Don't skip the orange zest! It's a game-changer for flavor. Always zest before juicing to make it easier.

Did you make this recipe?

Share a photo and tag us — we can't wait to see what you've made!

Zesty Lemon Poppy Seed Delight

One rainy afternoon, I found myself in my grandmother’s cozy kitchen, the kind that always smelled like warmth and love. She was whipping up her famous Lemon Poppy Seed Loaf, a recipe that had been passed down through generations. As the batter came together, the zesty aroma of fresh lemons filled the air, mingling perfectly with the nutty fragrance of poppy seeds. I can still picture her, apron-clad, as she expertly drizzled a vibrant citrus icing over the loaf, creating a glossy, sun-kissed finish that beckoned us to dive in. It was a moment that sparked my own passion for baking, and this recipe has become a cherished staple in my home ever since.

When you take a bite of this Lemon Poppy Seed Loaf, it’s like a burst of sunshine on your palate. The loaf is beautifully golden, with a tender crumb that melts in your mouth. Each slice is speckled with tiny poppy seeds, adding a delightful crunch that contrasts beautifully with the tangy sweetness of the lemon. And that citrus icing? It’s the finishing touch that elevates this loaf from ordinary to extraordinary, with its bright, zesty flavor dancing on your taste buds.

This recipe stands out because it embraces simplicity while delivering on flavor. I’ve added a hint of vanilla to the batter, enhancing the overall taste and making it even more indulgent. Trust me, once you make this Lemon Poppy Seed Loaf With Citrus Icing, it’ll become a go-to in your baking repertoire.

So, let me show you exactly how to make it!

Zesty Lemon Poppy Seed Delight

Why You’ll Love This Recipe

  • Moist and tender crumb that melts in your mouth, thanks to the perfect balance of butter and buttermilk.
  • Bright, zesty lemon flavor paired with crunchy poppy seeds, creating a delightful texture and taste experience.
  • Easy to whip up in just about an hour, perfect for last-minute gatherings or a cozy afternoon treat.
  • Budget-friendly with everyday ingredients, making it an accessible option for all home bakers.
  • The citrus icing adds a sweet tang that elevates the loaf, turning a simple recipe into a showstopper!

Ingredients

  • 1 ½ cups (190g) all-purpose flour
  • 1 teaspoon baking powder
  • ½ teaspoon baking soda
  • ½ teaspoon salt
  • 3 tablespoons poppy seeds
  • ½ cup (115g) unsalted butter, softened to room temperature
  • 1 cup (200g) granulated sugar
  • 2 large eggs
  • 1 teaspoon vanilla extract
  • 1 teaspoon lemon zest (from about 1 medium lemon)
  • ½ cup (120ml) buttermilk
  • 2 tablespoons fresh lemon juice

For the Citrus Icing:

  • 1 cup (120g) powdered sugar
  • 2 tablespoons fresh lemon juice
  • 1 tablespoon orange juice
  • 1 teaspoon lemon zest (for garnish, optional)

Let’s dive into the key ingredients that make this Lemon Poppy Seed Loaf so special. The all-purpose flour provides the structure and base for the loaf, while the baking powder and baking soda ensure it rises perfectly, giving the loaf a light texture. For a gluten-free variation, you could substitute the flour with a gluten-free all-purpose blend. Poppy seeds not only add a delightful crunch but also contribute to the unique flavor profile that pairs well with the citrus notes.

Unsalted butter is crucial for achieving the buttery richness that makes this loaf so moist. If you’re looking for a dairy-free option, coconut oil or a vegan butter can be used instead. The buttermilk is another essential component, providing acidity that activates the baking soda for a fluffy texture. If you don’t have buttermilk on hand, you can easily make a substitute by mixing ½ cup of milk with 1 tablespoon of vinegar or lemon juice and letting it sit for about 5 minutes.

Step-by-Step Instructions

  1. Preheat your oven to 350°F (175°C). Grease a 9×5-inch loaf pan or line it with parchment paper for easy removal later.
  2. In a medium mixing bowl, whisk together 1 ½ cups of all-purpose flour, 1 teaspoon of baking powder, ½ teaspoon of baking soda, ½ teaspoon of salt, and 3 tablespoons of poppy seeds. This helps to evenly distribute the baking agents and ensures a uniform rise.
  3. In a large mixing bowl, cream together ½ cup of softened unsalted butter and 1 cup of granulated sugar using an electric mixer on medium speed for about 3-4 minutes, until the mixture is light and fluffy. Make sure to scrape down the sides of the bowl occasionally.
  4. Add 2 large eggs, 1 teaspoon of vanilla extract, and 1 teaspoon of lemon zest to the creamed butter and sugar, mixing until fully combined. You want a smooth consistency, so ensure there are no lumps of butter.
  5. In a small bowl, combine ½ cup of buttermilk and 2 tablespoons of fresh lemon juice. Alternately add the dry ingredients and buttermilk mixture to the butter mixture, starting and ending with the dry ingredients. Mix just until combined; do not overmix, as this can lead to a dense loaf.
  6. Pour the batter into the prepared loaf pan. Smooth the top with a spatula, ensuring it’s even. Bake in the preheated oven for 50-60 minutes, or until a toothpick inserted in the center comes out clean. The edges should be lightly golden brown, and the center should feel just set.
  7. Once baked, remove the loaf from the oven and allow it to cool in the pan for about 10 minutes. Then, transfer it to a wire rack to cool completely. Resist the urge to slice too soon, as it will be crumbly if it’s still warm.
  8. While the loaf is cooling, prepare the citrus icing. In a medium bowl, whisk together 1 cup of powdered sugar, 2 tablespoons of fresh lemon juice, and 1 tablespoon of orange juice until smooth. If the icing is too thick, you can add a little more juice to reach your desired consistency.
  9. Once the loaf is completely cool, drizzle the citrus icing over the top. If you like, sprinkle with an additional teaspoon of lemon zest for an extra pop of flavor and color.

Pro Tips for the Best Lemon Poppy Seed Loaf With Citrus Icing

  • Be careful not to overmix your batter; this is a common mistake that can lead to a dense loaf. Mix just until the dry ingredients are incorporated for a light and fluffy texture.
  • Use room temperature ingredients, especially the butter and eggs. This helps to create a smoother batter and ensures even baking. Take your eggs out of the fridge about 30 minutes before you start.
  • For a more pronounced lemon flavor, consider adding a little lemon extract in addition to the zest and juice. Just a half teaspoon can elevate the citrus notes significantly.
  • When measuring your flour, spoon it into the measuring cup and level it off with a knife instead of scooping directly from the bag. This prevents packing and ensures you don’t end up with a dry loaf.
  • Invest in a good quality loaf pan; it makes a difference in heat distribution, which ensures even baking. If your pan is dark-coated, reduce the oven temperature by 25°F to prevent over-browning.

Variations & Serving Ideas

For a delightful twist, consider adding blueberries or raspberries to the batter for a fruity burst of flavor. You can also experiment with different citrus fruits—try lime or grapefruit zest and juice for a refreshing change. For a healthier option, substitute half of the all-purpose flour with whole wheat flour for added fiber without compromising too much on texture.

This Lemon Poppy Seed Loaf pairs beautifully with a light salad, such as a mixed greens salad with a vinaigrette, or a cup of tea for a cozy afternoon treat. It also complements a creamy cheese platter, as the acidity of the loaf balances rich cheeses perfectly. Lastly, a scoop of vanilla ice cream on the side creates a delightful contrast of temperatures and flavors!

Storage, Make-Ahead & Reheating

This Lemon Poppy Seed Loaf can be stored at room temperature for up to 3 days if wrapped tightly in plastic wrap. If you want to keep it longer, it freezes well for up to 3 months. To freeze, wrap the loaf tightly in plastic wrap and then in aluminum foil to prevent freezer burn.

When you’re ready to enjoy it again, simply thaw it in the fridge overnight. Reheat individual slices in the microwave for 15-20 seconds or in a toaster oven until warmed through. Interestingly, many people find that this loaf tastes even better the next day, as the flavors have time to meld!

Frequently Asked Questions

Can I make Lemon Poppy Seed Loaf With Citrus Icing ahead of time?

Yes — in fact, it tastes even better the next day! You can make the loaf a day in advance, allowing the flavors to develop. Just be sure to store it in an airtight container to maintain its moisture.

Can I substitute the poppy seeds?

Absolutely! If you don’t have poppy seeds on hand or prefer an alternative, you can use sesame seeds for a similar crunch or omit them entirely for a smooth loaf.

What can I use instead of buttermilk?

If you don’t have buttermilk, you can easily create a substitute by mixing ½ cup of milk (dairy or plant-based) with 1 tablespoon of vinegar or lemon juice. Let it sit for 5 minutes before using in the recipe.

How can I make this recipe gluten-free?

To make a gluten-free version of this Lemon Poppy Seed Loaf, substitute the all-purpose flour with a gluten-free all-purpose flour blend. Just ensure that the blend contains a binding agent like xanthan gum for the best results.

What is the best way to store leftover loaf?

Leftover Lemon Poppy Seed Loaf should be stored in an airtight container at room temperature for up to 3 days. For longer storage, wrap it tightly and freeze for up to 3 months. Thaw it before serving for the best texture.

Zesty Lemon Poppy Seed Delight

Final Thoughts

The Lemon Poppy Seed Loaf with Citrus Icing is truly a delightful treat that brings a burst of brightness to any occasion. The zesty lemon flavor combined with the subtle crunch of poppy seeds creates a satisfying balance, while the citrus icing adds a touch of sweetness that perfectly complements the loaf’s tanginess.

This is the kind of recipe I come back to again and again, especially when I want to brighten up a gloomy day or celebrate a small victory. The aroma that fills the kitchen as it bakes is absolutely heavenly! I encourage you to give this recipe a try; you might just find it becoming a beloved staple in your home. Don’t forget to share your results or even add your own unique twist—I can’t wait to see what you create!

Print
clock clock iconcutlery cutlery iconflag flag iconfolder folder iconinstagram instagram iconpinterest pinterest iconfacebook facebook iconprint print iconsquares squares iconheart heart iconheart solid heart solid icon

Lemon Poppy Seed Loaf


  • Author: Lily author
  • Total Time: 41 minute
  • Yield: 1 loaf 1x
Pin Recipe
Print Recipe

Description

This Lemon Poppy Seed Loaf is a delightful treat that combines zesty lemon flavor with crunchy poppy seeds. Topped with a citrus icing, it’s perfect for any occasion.


Ingredients

Scale
  • 1 ½ cups (190g) all-purpose flour
  • 1 teaspoon baking powder
  • ½ teaspoon baking soda
  • ½ teaspoon salt
  • 3 tablespoons poppy seeds
  • ½ cup (115g) unsalted butter, softened to room temperature
  • 1 cup (200g) granulated sugar
  • 2 large eggs
  • 1 teaspoon vanilla extract
  • 1 teaspoon lemon zest (from about 1 medium lemon)
  • ½ cup (120ml) buttermilk
  • 2 tablespoons fresh lemon juice
  • 1 cup (120g) powdered sugar
  • 2 tablespoons fresh lemon juice
  • 1 tablespoon orange juice
  • 1 teaspoon lemon zest (for garnish, optional)

Instructions

  1. Preheat your oven to 350°F (175°C). Grease a 9×5-inch loaf pan or line it with parchment paper for easy removal later.
  2. In a medium mixing bowl, whisk together 1 ½ cups of all-purpose flour, 1 teaspoon of baking powder, ½ teaspoon of baking soda, ½ teaspoon of salt, and 3 tablespoons of poppy seeds. This helps to evenly distribute the baking agents and ensures a uniform rise.
  3. In a large mixing bowl, cream together ½ cup of softened unsalted butter and 1 cup of granulated sugar using an electric mixer on medium speed for about 3-4 minutes, until the mixture is light and fluffy. Make sure to scrape down the sides of the bowl occasionally.
  4. Add 2 large eggs, 1 teaspoon of vanilla extract, and 1 teaspoon of lemon zest to the creamed butter and sugar, mixing until fully combined. You want a smooth consistency, so ensure there are no lumps of butter.
  5. In a small bowl, combine ½ cup of buttermilk and 2 tablespoons of fresh lemon juice. Alternately add the dry ingredients and buttermilk mixture to the butter mixture, starting and ending with the dry ingredients. Mix just until combined; do not overmix, as this can lead to a dense loaf.
  6. Pour the batter into the prepared loaf pan. Smooth the top with a spatula, ensuring it’s even. Bake in the preheated oven for 50-60 minutes, or until a toothpick inserted in the center comes out clean. The edges should be lightly golden brown, and the center should feel just set.
  7. Once baked, remove the loaf from the oven and allow it to cool in the pan for about 10 minutes. Then, transfer it to a wire rack to cool completely. Resist the urge to slice too soon, as it will be crumbly if it’s still warm.
  8. While the loaf is cooling, prepare the citrus icing. In a medium bowl, whisk together 1 cup of powdered sugar, 2 tablespoons of fresh lemon juice, and 1 tablespoon of orange juice until smooth. If the icing is too thick, you can add a little more juice to reach your desired consistency.
  9. Once the loaf is completely cool, drizzle the citrus icing over the top. If you like, sprinkle with an additional teaspoon of lemon zest for an extra pop of flavor and color.
  • Prep Time: 15 mins
  • Cook Time: 50-60 mins
  • Category: Dessert
  • Method: Baking
  • Cuisine: American

Nutrition

  • Serving Size: 1 slice
  • Calories: 200
  • Sugar: 15 g
  • Sodium: 150 mg
  • Fat: 8 g
  • Saturated Fat: 5 g
  • Unsaturated Fat: 3 g
  • Trans Fat: 0 g
  • Carbohydrates: 30 g
  • Fiber: 1 g
  • Protein: 3 g
  • Cholesterol: 40 mg

Keywords: Be careful not to overmix your batter; this is a common mistake that can lead to a dense loaf. Use room temperature ingredients for a smoother batter and even baking.

Did you make this recipe?

Share a photo and tag us — we can't wait to see what you've made!

  • Privacy Policy
  • Terms Of Service
  • Contact
  • About
  • GDPR

Copyright © 2025 Homesmad