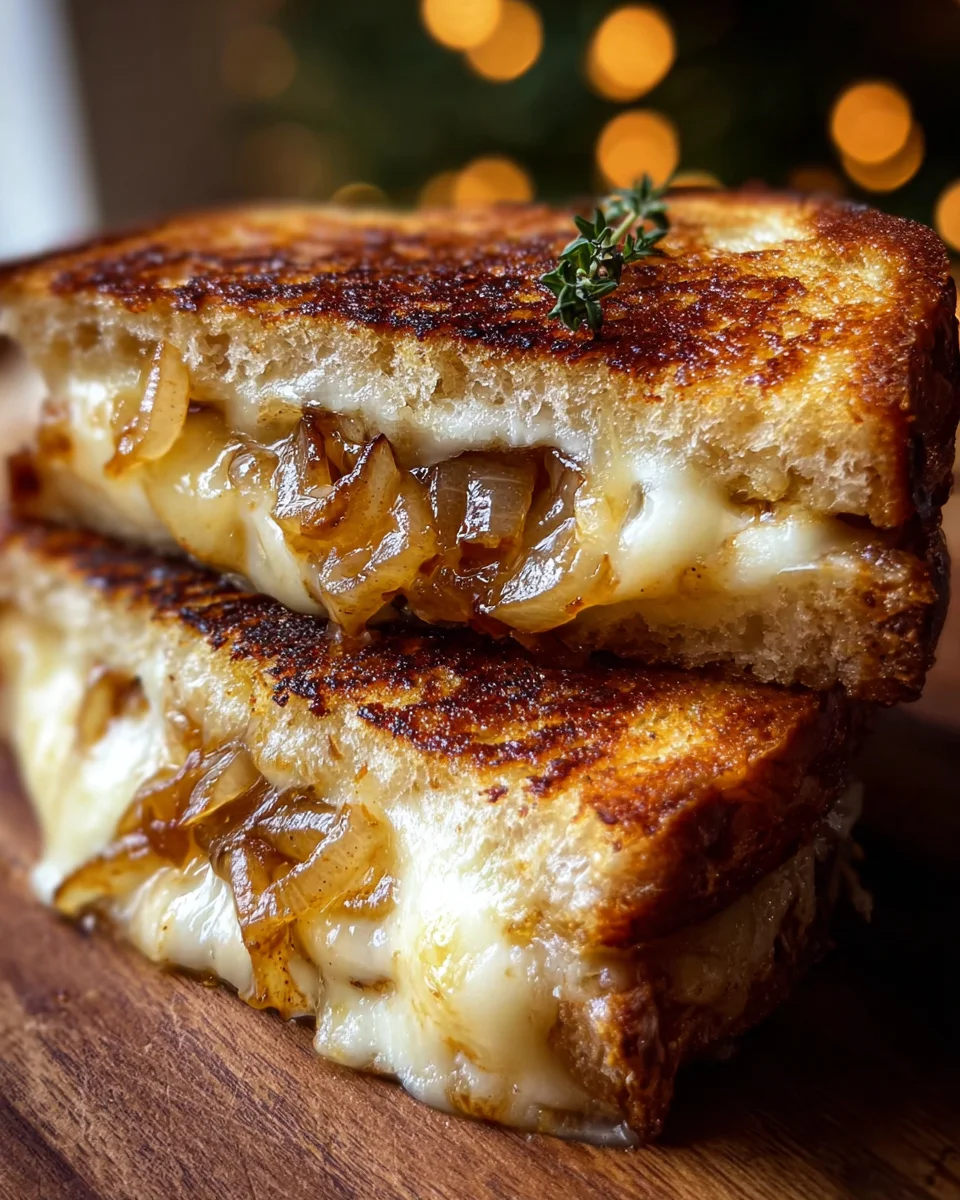
Pear Apple Grilled Cheese With Caramelized Onions isn’t just a sandwich; it’s a revelation, an elevated take on a beloved classic that promises to tantalize your taste buds in the most extraordinary way. Forget everything you thought you knew about grilled cheese, because this recipe transforms simple ingredients into a gourmet experience that is both comforting and sophisticated. I believe few dishes manage to strike such a perfect balance between sweet, savory, and tangy, all enveloped in perfectly golden, crispy bread and gooey, melted cheese.
The grilled cheese sandwich, a true staple of American comfort food, boasts a rich history dating back to the early 20th century, evolving from humble cheese-on-toast to the iconic diner classic we cherish today. However, this particular rendition steps boldly into modern culinary artistry, inviting the crisp sweetness of pears, the tart brightness of apples, and the deep, savory notes of caramelized onions to the party. People adore this dish not only for its incredible taste — the fruit beautifully cuts through the richness of the cheese, while the caramelized onions add an irresistible umami depth — but also for its delightful texture contrast and surprising simplicity. Preparing this Pear Apple Grilled Cheese With Caramelized Onions is more than cooking; it’s crafting a moment of pure culinary bliss that will undoubtedly become a new favorite in your repertoire.
Ingredients:
-
For the Caramelized Onions:
- 2 large or 3 medium yellow onions, thinly sliced (about 1/8-inch thick)
- 2 tablespoons unsalted butter
- 1 tablespoon olive oil
- 1/2 teaspoon salt, plus more to taste
- 1/4 teaspoon black pepper, plus more to taste
- 1 teaspoon granulated sugar (optional, for deeper caramelization)
- 1-2 tablespoons water or vegetable broth (for deglazing, if needed)
-
For the Pear Apple Grilled Cheese:
- 8 slices sturdy bread (such as sourdough, challah, or brioche – I love sourdough for its tang!)
- 4 tablespoons unsalted butter, softened (for spreading on bread)
- 6-8 ounces sharp cheddar cheese, shredded or thinly sliced (about 1.5 to 2 ounces per sandwich)
- 4 ounces Gruyère cheese, shredded or thinly sliced (about 1 ounce per sandwich – for that nutty depth!)
- 1 medium firm pear (e.g., Bosc or Anjou), cored and thinly sliced (about 1/8-inch thick)
- 1 medium crisp apple (e.g., Honeycrisp, Fuji, or Granny Smith), cored and thinly sliced (about 1/8-inch thick)
Caramelizing the Onions: The Foundation of Flavor
Alright, let’s kick things off with arguably the most crucial component of our Pear Apple Grilled Cheese With Caramelized Onions: those glorious, sweet, deeply flavorful caramelized onions. This step truly takes time and patience, but I promise you, every minute invested will pay off tenfold in the final sandwich. Don’t rush this part; it’s where the magic happens!
- First things first, grab a large, heavy-bottomed pan or Dutch oven. I find that a wider pan works best because it allows more surface area for the onions to make contact with the heat, promoting even cooking and browning. Place it over medium-low heat.
- Add the 2 tablespoons of unsalted butter and 1 tablespoon of olive oil to the pan. The olive oil helps prevent the butter from burning at the beginning, giving us a nice fat base. Allow the butter to melt completely, swirling it around to coat the bottom of the pan.
- Once the butter is melted and slightly shimmering, add your thinly sliced yellow onions. Pile them high! It might seem like an enormous amount, but trust me, they will cook down dramatically. Add the 1/2 teaspoon of salt and 1/4 teaspoon of black pepper now. The salt will help draw out moisture from the onions, which is essential for their breakdown and subsequent caramelization.
- Stir the onions well to coat them thoroughly with the butter and oil. Now, here’s the golden rule for caramelizing onions: low and slow. Reduce the heat to low, or just slightly below medium-low, depending on your stovetop’s temperament. We’re not trying to brown them quickly; we’re coaxing out their natural sugars.
- Let the onions cook, stirring every 5-7 minutes initially. For the first 15-20 minutes, you’ll mostly see them soften and release a lot of liquid. They’ll become translucent and their volume will decrease significantly.
- After about 20-30 minutes, they’ll start to turn a pale golden color. This is when you can add the optional 1 teaspoon of granulated sugar. While onions naturally contain sugar, adding a little extra can enhance the browning and deepen the caramelization process, resulting in an even richer flavor. Stir it in thoroughly.
- Continue cooking, stirring more frequently now – every 3-5 minutes – to ensure even browning and prevent scorching. You’ll notice the color gradually deepening from golden to amber, and then to a rich, deep brown. Scrape the bottom of the pan as you stir to incorporate any browned bits (fond) back into the onions; this is pure flavor!
- If you notice any bits sticking too stubbornly to the bottom of the pan, or if they seem to be browning too quickly, add a tablespoon or two of water or vegetable broth. This will help deglaze the pan, lifting all those delicious browned bits and preventing them from burning. It also adds a tiny bit of moisture to keep the onions cooking gently.
- The entire caramelization process can take anywhere from 45 minutes to 1 hour and 15 minutes, sometimes even longer, depending on the quantity of onions and your heat management. You’re looking for a rich, even, deep brown color and a wonderfully sweet, savory, and slightly tangy aroma. The onions should be meltingly tender, almost jam-like in consistency.
- Once they’ve reached this beautiful state, taste and adjust seasoning if needed. You might want a tiny pinch more salt or pepper. Remove them from the pan and set them aside. Oh, the aroma in your kitchen right now must be incredible!
Preparing the Fruit: Sweet & Tangy Slices
While your onions are doing their slow, delicious dance, you can get ahead with preparing your fruit. The combination of pear and apple in this Pear Apple Grilled Cheese With Caramelized Onions is what makes it truly special – you get the sweetness and slight give of the pear, contrasted with the crisp, tart bite of the apple.
- Grab your chosen pear (I love Bosc or Anjou for their firm texture and subtle sweetness that holds up well to heat) and apple (Honeycrisp or Fuji for sweetness, Granny Smith for a lovely tart counterpoint).
- Wash both fruits thoroughly under cold running water.
- Using a sharp knife or a mandoline (be careful!), core the pear and apple. You can leave the skin on for extra fiber, nutrition, and a bit of color, or peel them if you prefer. I usually leave the skin on; it adds rustic charm and texture.
- Slice both the pear and apple very thinly, aiming for about 1/8-inch thickness. This is important because thin slices will soften nicely within the sandwich without making it too bulky or watery. Thicker slices might remain too crunchy, which isn’t ideal for a grilled cheese.
- Once sliced, keep them separate or mix them gently in a small bowl. Set these aside, ready for assembly.
Assembling the Sandwiches: The Layering Game
With our onions caramelized to perfection and our fruit beautifully sliced, it’s time to bring all the elements together for our ultimate Pear Apple Grilled Cheese With Caramelized Onions. This is where we construct our flavor bombs!
- Lay out your 8 slices of sturdy bread on a clean work surface. My go-to is sourdough because its slight tang beautifully cuts through the richness of the cheese and the sweetness of the fruit and onions. Challah or brioche would offer a richer, sweeter crust, which is also fantastic.
- Generously butter one side of each bread slice with your softened unsalted butter. Make sure you go right to the edges; this buttered side will be making contact with the hot pan, giving us that glorious golden, crispy crust we all crave in a grilled cheese.
- Now, flip four of the bread slices so the unbuttered side is facing up. These will be the bottom halves of your sandwiches.
- On each of these four unbuttered sides, start building your sandwich. I like to start with a layer of cheese, as it acts like a delicious glue to hold everything in place. Evenly distribute about half of your shredded sharp cheddar and Gruyère across these four slices. Don’t be shy with the cheese; it’s a grilled cheese, after all!
- Next, gently arrange a layer of your thinly sliced pear and apple on top of the cheese. Try to cover as much surface area as possible without piling it too high. About 3-4 slices of each fruit per sandwich usually works well, ensuring you get that delightful fruitiness in every bite.
- Now for the star flavor bomb: spoon a generous helping of those rich, sweet caramelized onions over the fruit. I usually aim for about 2-3 tablespoons per sandwich. Spread them out evenly. The sweetness and umami of these onions will elevate the entire sandwich.
- Top the onions with the remaining shredded sharp cheddar and Gruyère. This second layer of cheese will melt down and meet the bottom layer, encapsulating the fruit and onions in a gooey embrace.
- Finally, take the remaining four buttered bread slices and place them butter-side up on top of your fillings, completing your sandwiches. Gently press down on each sandwich to compact it slightly. You now have four glorious, ready-to-grill sandwiches!
Grilling the Sandwiches: Golden Perfection
We’re on the home stretch! Grilling is where our Pear Apple Grilled Cheese With Caramelized Onions transforms from a stack of ingredients into a warm, gooey, crispy masterpiece. Proper heat management is key here to achieve that perfect golden-brown crust and fully melted interior.
- Heat a large non-stick skillet or a cast-iron pan over medium-low heat. Again, much like with the onions, we’re aiming for a gentle heat. If the heat is too high, the bread will brown too quickly, and the cheese won’t have enough time to melt properly, leaving you with a burnt exterior and cold, hard cheese inside – a grilled cheese tragedy!
- Once the pan is warm (you should feel gentle heat if you hold your hand an inch above it), carefully place 2 of your assembled sandwiches into the pan. Don’t overcrowd the pan; you want to ensure even cooking. If your pan is large enough for all four, fantastic, but often two at a time works best.
- Let the sandwiches cook undisturbed for about 4-6 minutes. During this time, the buttered bread will begin to brown, and the heat will start to penetrate the layers, softening the fruit and melting the cheese.
- Periodically, you can gently lift a corner of the sandwich with a spatula to peek at the underside. You’re looking for a beautiful, even, golden-brown color. Once achieved, use your spatula to carefully flip the sandwiches over.
- Now, here’s a little trick for extra melty goodness and a perfectly compressed sandwich: gently press down on the sandwiches with your spatula. You can also place a slightly smaller pan or a weighted object on top of the sandwiches to apply even pressure. This helps to flatten them slightly, ensuring all the fillings are snug and the cheese melts into every nook and cranny.
- Continue cooking on the second side for another 4-6 minutes, or until that side is also beautifully golden brown and the cheese inside is completely melted and gooey. You should see a little bit of cheese oozing out, which is always a good sign! The fruit should be tender, and the caramelized onions warm and fragrant.
- If you find the bread browning too quickly, simply lower the heat a bit. If it’s taking too long to brown, you can slightly increase it, but always err on the side of caution with grilled cheese. Patience is a virtue here.
- Once both sides are golden and the cheese is gloriously molten, carefully remove the grilled cheese sandwiches from the pan.
- If you’re cooking in batches, repeat the process with the remaining sandwiches. You might need to wipe out the pan with a paper towel between batches if any butter or cheese has burned.
Serving Your Masterpiece:
Place the hot, crispy Pear Apple Grilled Cheese With Caramelized Onions on a cutting board. I highly recommend letting them rest for just a minute or two before slicing. This allows the molten cheese to set ever so slightly, preventing it from all oozing out when you cut into it. Slice each sandwich diagonally (the classic grilled cheese cut!) and serve immediately. The aroma of sweet caramelized onions, juicy fruit, and savory melted cheese is simply irresistible. This is more than just a sandwich; it’s a gourmet experience in every bite. Enjoy!

Conclusion:
And there you have it, my friends! We’ve reached the delicious culmination of our culinary journey, and I genuinely hope you’re feeling inspired to dive headfirst into creating this absolute gem of a dish. I truly believe that the Pear Apple Grilled Cheese With Caramelized Onions isn’t just another sandwich; it’s an experience, a symphony of flavors that will dance on your palate and leave you wondering why you haven’t been making grilled cheese like this your whole life. The perfect balance of the sweet, tender caramelized onions, the subtle tartness of the crisp apple slices, the juicy succulence of the pear, and the ultimate gooey embrace of melted cheese, all cradled between perfectly toasted bread – it’s a revelation. This recipe takes a beloved comfort food and elevates it to gourmet status with minimal effort, proving that sometimes, the most extraordinary meals come from the simplest, yet most thoughtfully combined, ingredients. It’s comforting, sophisticated, and undeniably satisfying, making it a must-try for anyone looking to add a touch of magic to their mealtime repertoire.
Elevate Your Meal: Serving Suggestions and Variations
Now that you’re armed with the knowledge to create this masterpiece, let’s talk about how to make it even more special, or how to adapt it to your unique tastes. While the Pear Apple Grilled Cheese With Caramelized Onions is perfectly capable of shining as a standalone star, I often find myself enjoying it alongside a warm bowl of creamy tomato soup – the classic pairing truly never disappoints. The tangy brightness of the soup cuts beautifully through the richness of the sandwich, creating a harmonious and utterly comforting meal. Another fantastic option is a crisp, peppery arugula salad, perhaps dressed simply with a balsamic vinaigrette; the peppery greens and acidic dressing provide a wonderful contrast. For those who enjoy a little extra kick, a drizzle of hot honey over the finished sandwich can introduce a delightful sweet and spicy note that’s surprisingly addictive.
Feeling adventurous with your cheeses? While a good sharp cheddar or a creamy Fontina works wonders, don’t hesitate to experiment! A rich, buttery brie could add an even more luxurious texture, or a slightly nutty Gruyère would complement the fruit beautifully. For an extra layer of savory depth, I’ve sometimes added a thin slice or two of prosciutto or crispy bacon before grilling – just be mindful not to overpower the delicate fruit flavors. If you’re looking to switch up the bread, a hearty sourdough offers a fantastic tang, while a sweeter brioche or challah would lean into the dessert-like qualities of the fruit and caramel. And for my plant-based friends, fear not! With a good quality vegan cheese substitute and a plant-based butter for grilling, this recipe can easily be adapted to be entirely dairy-free without sacrificing much of its glorious gooey charm. Consider adding a pinch of cinnamon or a tiny grating of fresh nutmeg to the caramelized onions for an extra layer of autumnal warmth – it’s subtle but incredibly impactful.
Your Culinary Journey Awaits!
So, what are you waiting for? This isn’t just a recipe; it’s an invitation to explore new flavors, to elevate your everyday, and to create something truly memorable in your own kitchen. I truly encourage you to give this Pear Apple Grilled Cheese With Caramelized Onions a try sooner rather than later. Trust me, your taste buds will thank you! There’s an immense joy in creating something delicious from scratch, and even more so when that creation manages to surprise and delight everyone who tastes it. Once you’ve whipped up your own perfect grilled cheese masterpiece, I would absolutely love to hear about your experience! Please, don’t keep your culinary triumphs to yourself. Share your photos, tell me about any variations you tried, or simply let me know what you thought of this unique flavor combination in the comments below. Your feedback and creativity inspire me and our wonderful community of home cooks every single day. Happy cooking, and may your sandwiches always be perfectly golden and gloriously gooey!
Pear Apple Grilled Cheese With Caramelized Onions
This Pear Apple Grilled Cheese with Caramelized Onions is an elevated take on a beloved classic. It perfectly balances sweet, savory, and tangy flavors, enveloped in golden, crispy bread and gooey, melted cheese for a gourmet comfort food experience.
Ingredients
Instructions
Important Information
Nutrition Facts (Per Serving)
It is important to consider this information as approximate and not to use it as definitive health advice.
Allergy Information
Please check ingredients for potential allergens and consult a health professional if in doubt.