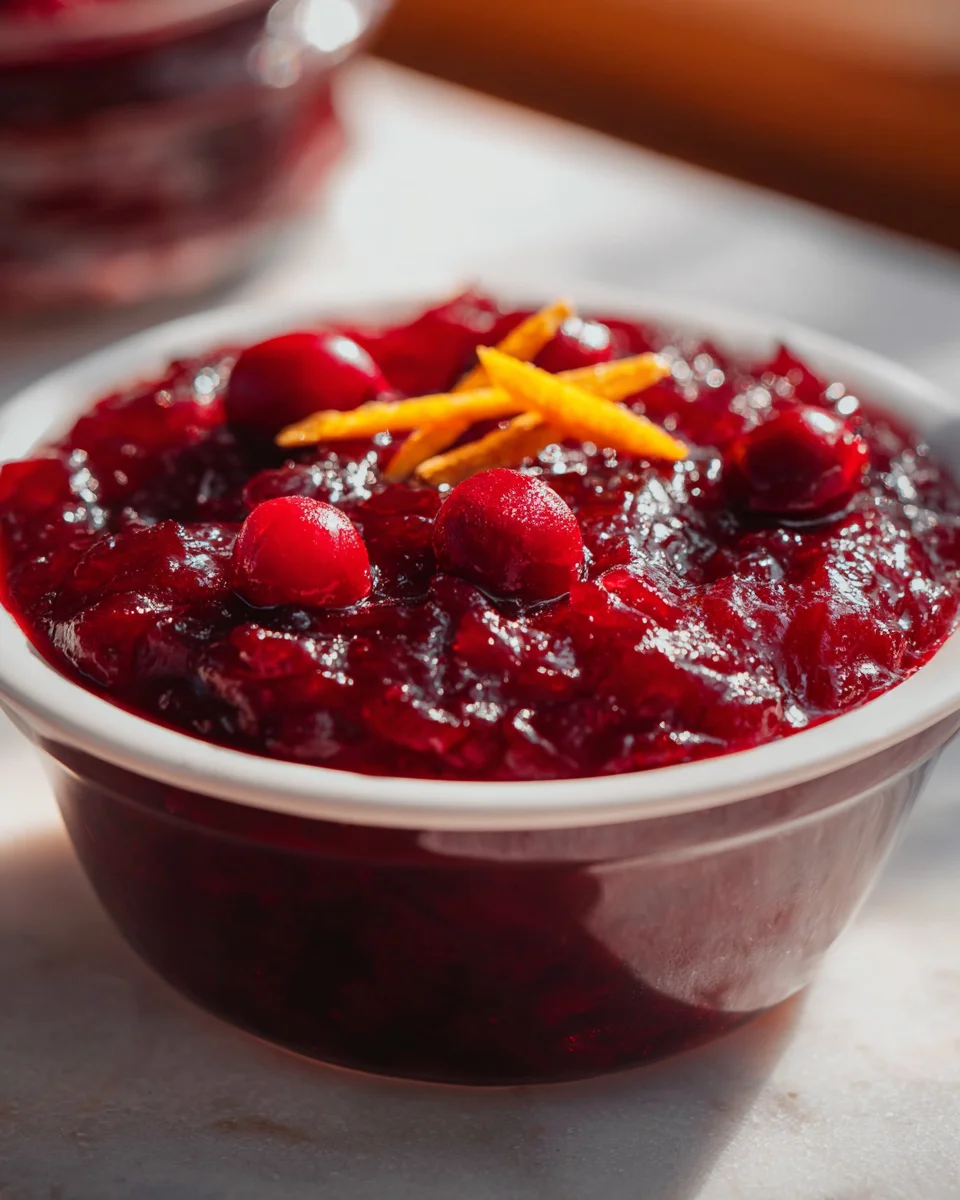
Classic Christmas Cranberry Sauce is more than just a condiment; it’s a vibrant, ruby-red beacon of holiday cheer on any festive table. Have you ever considered the humble cranberry’s journey from a native North American berry to an indispensable part of our most cherished holiday feasts? For me, the rich history and cultural significance of this beloved side dish are almost as appealing as its mouth-watering taste.
Native Americans were the first to appreciate the cranberry, using it for food, medicine, and dye. Later, the Pilgrims adopted it, and it quickly became a staple for autumn and winter celebrations, particularly Thanksgiving and Christmas. What makes this dish so universally adored? It’s the delightful contrast of flavors – the bright, tart burst of cranberries perfectly balanced with a touch of sweetness, creating a symphony for your taste buds. Its beautiful jewel-toned appearance instantly elevates any plate, offering a fresh, zesty counterpoint to rich roasted meats and savory stuffings.
Making your own Classic Christmas Cranberry Sauce from scratch is incredibly rewarding, transforming a simple fruit into a truly spectacular accompaniment that far surpasses anything from a can. I promise, the ease of preparation combined with the incredible flavor and texture will make you wonder why you ever bought it pre-made. Get ready to add a burst of homemade love to your holiday spread!

Ingredients:
- 12 ounces (about 3 cups) fresh or frozen cranberries: When I’m making my Classic Christmas Cranberry Sauce, I always reach for plump, vibrant cranberries. Fresh cranberries are wonderful for their bright, tart flavor and beautiful color, but I often use frozen ones too, especially outside of peak season, as they work just as beautifully without any need for thawing. Just make sure they’re whole and not shriveled.
- 1 cup granulated sugar: This is the essential sweetener that balances the cranberries’ natural tartness. Depending on your personal preference for sweetness, you might adjust this slightly. I find 1 cup to be the perfect sweet spot for a classic sauce that isn’t overly sugary.
- 1 cup water (or orange juice for an extra citrusy kick): Water is the base liquid that helps the cranberries break down and release their pectin, forming that lovely sauce consistency. If you’re feeling adventurous and want to deepen the citrus notes, substituting orange juice for water is a fantastic variation I often recommend for an even brighter, more festive flavor profile in your Classic Christmas Cranberry Sauce.
- 1 orange, zested (optional, but highly recommended for aroma and flavor): Ah, the secret weapon! A little bit of fresh orange zest adds an incredible aromatic depth and brightens the overall flavor of your cranberry sauce. I use a microplane to get just the orange part, avoiding the bitter white pith. This simple addition elevates the Classic Christmas Cranberry Sauce from good to extraordinary.
- Pinch of salt: Just a tiny pinch, believe it or not, makes a huge difference! It doesn’t make the sauce salty, but rather enhances all the other flavors, making the cranberries taste even more vibrant and the sugar more balanced. It’s a culinary trick I apply to almost all my sweet dishes, and it works wonders for this Classic Christmas Cranberry Sauce.
Preparing Your Ingredients for the Perfect Classic Christmas Cranberry Sauce
-
Rinse and Sort Cranberries: My first step, and a crucial one, is to prepare the cranberries. Whether you’re using fresh or frozen, I always recommend giving them a good rinse under cold running water. Spread them out on a clean kitchen towel or paper towels and pick through them carefully. What am I looking for? Any shriveled berries, tiny stems, or leaves that might have snuck into the bag. Discard anything that doesn’t look perfect. This ensures every bite of your Classic Christmas Cranberry Sauce is delightful and free from unexpected textures. If you’re using frozen cranberries, there’s no need to thaw them beforehand; they can go straight into the pot, which is a fantastic time-saver, especially during the busy holiday season.
Why Proper Cranberry Selection Matters:
Selecting good quality cranberries is the foundation of a truly outstanding Classic Christmas Cranberry Sauce. Fresh cranberries should be firm, plump, and a vibrant deep red color. They should bounce if you drop them gently! These characteristics indicate freshness and optimal flavor. Shriveled or soft cranberries might signify older fruit, which could lead to a less vibrant sauce. Taking a moment for this initial preparation truly sets the stage for success.
-
Zest the Orange (if using): If you’ve decided to incorporate that lovely orange zest (and I genuinely hope you do!), now is the time to prepare it. Using a microplane or a fine grater, carefully remove the bright orange outer layer of the orange peel. Be very mindful to avoid the white pith underneath, as this part can be quite bitter and would detract from the fresh, bright flavor we’re aiming for in our Classic Christmas Cranberry Sauce. I usually zest directly over my saucepan so any aromatic oils that spray out go straight into the pot, adding another layer of fragrance. This simple step infuses the sauce with a beautiful citrus aroma that perfectly complements the tart cranberries, making it truly special.
The Magic of Orange Zest in Cranberry Sauce:
Orange zest isn’t just for flavor; it’s also about aroma. The oils in the zest are volatile and release a wonderful fragrance as the sauce cooks. This creates a more complex and inviting sensory experience, which is particularly wonderful for a holiday staple like Classic Christmas Cranberry Sauce. It bridges the gap between the tartness of the cranberries and the sweetness of the sugar, creating a harmonious balance that is incredibly appealing.
-
Measure Remaining Ingredients: Have your granulated sugar, water (or orange juice), and pinch of salt measured out and ready to go. Mis-measuring can significantly impact the final texture and sweetness of your Classic Christmas Cranberry Sauce, so I always take a moment to ensure my measurements are precise. This ‘mise en place’ approach, where all ingredients are prepped before cooking, makes the actual cooking process incredibly smooth and enjoyable. It minimizes stress and allows you to focus purely on the transformation happening in your pot.
Accuracy is Key for Consistency:
Especially with a recipe that relies on the interaction of sugar, liquid, and fruit pectin, accurate measurements are paramount. Too much liquid and your sauce might be too thin; too little, and it could seize up. The precise amount of sugar ensures the tartness is just right. Trust me, paying attention to these details will result in a consistently delicious Classic Christmas Cranberry Sauce every time.
The Cooking Process: Simmering Perfection for Your Classic Christmas Cranberry Sauce
-
Combine Ingredients in a Saucepan: Now for the exciting part! In a medium-sized saucepan (I like one with a heavy bottom for even heat distribution), combine your prepared cranberries, granulated sugar, water (or orange juice), orange zest (if using), and that tiny pinch of salt. Give everything a good stir with a wooden spoon or spatula to ensure the sugar is evenly distributed and the cranberries are coated. This initial mixing helps the sugar begin to dissolve as the pan heats up, preventing it from sticking to the bottom. I usually use a non-reactive saucepan, like stainless steel, to prevent any metallic flavors from leaching into the sauce, which is important for the bright, clean taste of a Classic Christmas Cranberry Sauce.
Choosing the Right Saucepan:
A heavy-bottomed saucepan is ideal for making cranberry sauce. It distributes heat more evenly, which helps prevent scorching the sugar or cranberries at the bottom of the pan. This is especially important as the mixture thickens and becomes more prone to sticking. A pan with a capacity of at least 2-3 quarts is usually sufficient for this recipe, allowing enough room for the cranberries to bubble and burst without overflowing.
-
Bring to a Boil: Place your saucepan over medium-high heat. I constantly stir the mixture gently as it warms up to help dissolve the sugar and prevent any sticking. You’ll notice the sugar beginning to melt into the liquid, and the mixture will start to gently simmer. Keep an eye on it, and as soon as it comes to a rolling boil – where bubbles are breaking rapidly on the surface – it’s time for the next step. This initial boil is crucial for kicking off the cooking process and ensuring the cranberries start to break down effectively, setting the stage for that perfect Classic Christmas Cranberry Sauce texture.
The Importance of the Initial Boil:
Bringing the mixture to a full boil quickly helps to dissolve the sugar completely and ensures the cranberries are exposed to enough heat to begin breaking down their cell walls. This breakdown is key to releasing their natural pectin, which is the substance responsible for thickening the sauce. Without a good initial boil, your Classic Christmas Cranberry Sauce might not achieve its desired consistency.
-
Reduce Heat and Simmer: Once it’s boiling, immediately reduce the heat to medium-low. This is where the magic truly happens. You want the sauce to maintain a gentle, consistent simmer, not a vigorous boil. Let it simmer uncovered for about 10 to 15 minutes, or until the cranberries have burst open and the sauce has thickened to your desired consistency. I like to stir occasionally during this phase, not just to prevent sticking, but also to help encourage all the cranberries to burst evenly. You’ll hear little popping sounds as the cranberries burst, which is a satisfying indicator of progress!
Understanding the Bursting Cranberries:
As the cranberries heat up, the water inside them expands, causing their skins to rupture. This releases their vibrant red juices and, crucially, their natural pectin. Pectin is a gelling agent found in many fruits, and it’s what gives cranberry sauce its characteristic jelly-like texture. The more cranberries that burst, the thicker your Classic Christmas Cranberry Sauce will become. I often gently press some of the remaining whole berries against the side of the pot with my spoon to encourage them to pop if they seem a bit stubborn.
-
Check for Desired Consistency: The sauce will continue to thicken significantly as it cools, so don’t expect it to be super thick straight off the stove. What I look for is a sauce where most of the cranberries have burst, and the liquid has visibly reduced and coats the back of a spoon. If you prefer a chunkier sauce, you might stop cooking a minute or two earlier, leaving a few more whole berries. For a smoother sauce, you can continue simmering a bit longer, perhaps gently mashing any remaining whole berries with your spoon against the side of the pot. Remember, the goal is a beautiful, glossy Classic Christmas Cranberry Sauce that will be perfect for your holiday table.
Achieving Your Preferred Texture:
This step is all about personal preference. Some people adore a very chunky sauce, while others prefer a smooth, almost jam-like consistency. If you want it very smooth, you could even briefly use an immersion blender or pass the sauce through a food mill, but for a truly “Classic Christmas Cranberry Sauce,” I find leaving some texture from the burst berries is absolutely perfect. It provides a delightful contrast to the smooth, rich flavors of a holiday meal. Overcooking can make it too stiff, while undercooking can leave it too runny, so pay close attention during this phase.
Cooling and Setting Your Classic Christmas Cranberry Sauce
-
Remove from Heat and Cool: Once your Classic Christmas Cranberry Sauce has reached your desired consistency, take the saucepan off the heat immediately. I like to give it one final stir. Now comes the hard part: patience! Pour the hot sauce into a heatproof bowl or container. It will look quite liquidy at this stage, and that’s perfectly normal. Don’t worry, the magic of pectin is still working, and it will thicken beautifully as it cools. Allow it to cool down to room temperature on your counter first. This initial cooling helps it set more gradually and evenly. You’ll notice it start to firm up even during this stage, transforming from a bubbling liquid into that recognizable sauce texture.
Understanding Pectin’s Role in Setting:
The pectin released from the cranberries during cooking forms a gel network as the sauce cools. This is a natural process that gives jams and jellies their structure. If your sauce seems too thin when hot, resist the urge to keep cooking it endlessly. Pectin needs time and a reduction in temperature to fully activate its gelling properties. Trust the process; your Classic Christmas Cranberry Sauce will firm up as it cools, achieving that delightful wobbly consistency.
-
Chill Thoroughly: After it has cooled to room temperature, cover the bowl or container tightly with a lid or plastic wrap. Transfer it to the refrigerator. For the best results and a perfectly set Classic Christmas Cranberry Sauce, I recommend chilling it for at least 4 hours, or preferably overnight. Chilling not only sets the sauce to its ideal consistency but also allows the flavors to meld and deepen. The tartness mellows slightly, and the orange zest (if used) really shines through, creating a wonderfully balanced and aromatic sauce that is truly ready for its holiday debut. Serving it cold is also traditional and provides a refreshing contrast to warm, savory dishes.
Why Chilling is Essential:
Chilling is not just about making the sauce cold; it’s a critical part of the setting process. The cold temperature helps solidify the pectin gel, giving the cranberry sauce its characteristic spoonable, yet firm, texture. Rushing this step might result in a sauce that is too runny. Additionally, the flavors of the cranberries, sugar, and any aromatics like orange zest need time to fully integrate and develop complexity. A well-chilled Classic Christmas Cranberry Sauce always tastes better and has a superior texture.
Serving Suggestions and Storage for Your Classic Christmas Cranberry Sauce
-
Serving Your Delicious Classic Christmas Cranberry Sauce: Once thoroughly chilled, your homemade Classic Christmas Cranberry Sauce is ready to be the star of your holiday table! I love serving it in a beautiful glass bowl, showcasing its vibrant ruby-red color. It’s an indispensable accompaniment to roasted turkey, ham, or chicken, offering a bright, tart counterpoint to rich meats. But don’t limit its use to just the main meal! I often find myself enjoying leftover cranberry sauce in so many creative ways. It’s fantastic stirred into Greek yogurt for breakfast, dolloped onto pancakes or waffles, spread on a turkey sandwich, or even warmed slightly and drizzled over vanilla ice cream for a surprisingly delightful dessert. The versatility of a well-made Classic Christmas Cranberry Sauce truly extends beyond the holiday feast, making it a valuable addition to your culinary repertoire.
Beyond the Turkey: Creative Uses for Cranberry Sauce:
Think outside the holiday box! Cranberry sauce can be blended into smoothies for a tart kick, swirled into muffin batter, used as a glaze for pork tenderloin, or even incorporated into a festive vinaigrette. I’ve even used it as a base for a sweet and savory appetizer, spread on crackers with a bit of brie. Its bright acidity cuts through richness and adds a welcome burst of flavor to many dishes. Having a batch of homemade Classic Christmas Cranberry Sauce on hand means you always have a secret weapon for elevating everyday meals.
-
Storing Your Classic Christmas Cranberry Sauce: Proper storage ensures your hard work lasts, allowing you to enjoy this delightful condiment for days or even weeks. Transfer any leftover Classic Christmas Cranberry Sauce into an airtight container. When stored in the refrigerator, it will keep beautifully for up to 10-14 days. This makes it an ideal make-ahead component for your holiday meal prep, reducing stress on the big day. For longer storage, I often freeze portions of my cranberry sauce. Simply spoon it into freezer-safe containers or heavy-duty freezer bags, leaving a little headspace for expansion. It will maintain its quality in the freezer for up to 2-3 months. To enjoy frozen cranberry sauce, simply thaw it overnight in the refrigerator. A quick stir might be needed before serving, and it will be as delicious as the day you made it. This preservation method means you can enjoy the taste of a Classic Christmas Cranberry Sauce well beyond the holiday season, bringing a touch of festive flavor to any meal.
Tips for Optimal Storage and Freezing:
When freezing, I sometimes portion the sauce into smaller containers. This way, I can thaw just the amount I need without having to defrost the entire batch. Labeling your containers with the date is also a good habit to ensure you’re consuming it within its optimal freshness window. While the sauce might appear a little softer after thawing, a good stir will usually bring it back to its original consistency. The robust flavors of the cranberries and the sugar act as natural preservatives, making Classic Christmas Cranberry Sauce an excellent candidate for both refrigeration and freezing.
Tips for the Perfect Classic Christmas Cranberry Sauce & Exciting Variations
Making a truly exceptional Classic Christmas Cranberry Sauce is an art form that offers plenty of room for personal touches. Here are some of my favorite tips and variations that I’ve discovered over the years, ensuring your sauce is always a showstopper and perfectly tailored to your taste:
-
Adjusting Sweetness: While 1 cup of sugar is my go-to for a beautifully balanced Classic Christmas Cranberry Sauce, taste is incredibly subjective, especially when it comes to sweetness. If you find cranberries exceptionally tart or prefer a sweeter sauce, you can add an additional 1/4 to 1/2 cup of sugar during the cooking process. The best time to adjust is towards the end of the simmering, after the cranberries have burst. Give it a taste, and if you desire more sweetness, stir in a little more sugar until it dissolves. Conversely, if you enjoy a very tart sauce, you could slightly reduce the sugar by 1/4 cup. Just be mindful that sugar also contributes to the sauce’s body and helps with the gelling process, so don’t reduce it too drastically if you want a firm set. This customization is key to making your Classic Christmas Cranberry Sauce truly yours.
The Balance of Sweet and Tart:
The beauty of Classic Christmas Cranberry Sauce lies in its bright acidity, which is crucial for cutting through the richness of holiday meats. Don’t be afraid of the tartness; it’s what makes the sauce so refreshing and addictive. The sugar is there to temper, not eliminate, that characteristic cranberry tang. Experimenting with sweetness levels is a wonderful way to personalize this holiday staple.
-
Spice It Up: For an even more festive and aromatic Classic Christmas Cranberry Sauce, consider adding whole spices to the saucepan along with the cranberries. My favorites include a cinnamon stick, a few whole cloves, or a couple of star anise pods. These spices infuse the sauce with warm, inviting notes that perfectly complement the cranberries. Remember to remove the whole spices before serving for the best texture. You could also stir in a pinch of ground ginger or a tiny dash of nutmeg at the very end of the cooking process for a subtle, spicy kick. These additions truly elevate the complexity of your Classic Christmas Cranberry Sauce, making each spoonful an aromatic delight.
Infusion Techniques for Spices:
Using whole spices is often preferred over ground spices for sauces like this because they infuse flavor without making the sauce gritty or changing its color significantly. The longer the spices simmer, the more pronounced their flavor will be. If you’re unsure, start with a small amount and taste. You can always add more during the next batch, creating your signature Classic Christmas Cranberry Sauce spice blend.
-
Add a Splash of Liqueur: For an adult-friendly and sophisticated twist, I sometimes stir in a tablespoon or two of a complementary liqueur after removing the sauce from the heat, but before cooling. Grand Marnier or Cointreau (orange liqueurs) are fantastic choices, as they enhance the citrus notes. A splash of port wine or even a good quality bourbon can also add incredible depth and warmth, making your Classic Christmas Cranberry Sauce truly memorable. The alcohol will cook off, leaving behind only its nuanced flavor, adding an extra layer of complexity that holiday guests will adore. This is a simple yet impactful way to transform a classic into something truly gourmet.
The Art of Alcohol in Cooking:
Adding alcohol at the end of the cooking process preserves its nuanced flavor profile. If added earlier, the alcohol might fully evaporate, taking some of its delicate notes with it. Liqueurs, especially those with citrus or berry undertones, naturally pair well with cranberries, creating a Classic Christmas Cranberry Sauce that feels even more luxurious and special.
-
Citrus Alternatives: While orange zest is my top recommendation for the ultimate Classic Christmas Cranberry Sauce, don’t hesitate to experiment with other citrus fruits. Lemon zest can provide an even brighter, tangier note, while lime zest offers a unique, slightly more exotic aromatic quality. You could also use a combination of citrus zests for a multi-layered flavor profile. Similarly, replacing water with freshly squeezed lemon or lime juice instead of orange juice can drastically change the flavor profile, offering a different but equally delicious experience. These small tweaks allow you to tailor your Classic Christmas Cranberry Sauce to perfectly match your holiday menu or personal preferences.
Exploring Citrus Harmony:
Each citrus fruit brings its own unique set of aromatic compounds and acidity. Lemon offers a sharp, clean brightness, while lime introduces a more floral, sometimes slightly bitter edge. Understanding these subtle differences can help you craft a Classic Christmas Cranberry Sauce that harmonizes perfectly with the other dishes on your holiday table. Don’t be afraid to mix and match!
-
Making Ahead: One of the absolute best things about Classic Christmas Cranberry Sauce is how well it holds up when made in advance. As I mentioned in the storage section, you can prepare this sauce up to two weeks ahead of your holiday gathering and keep it stored in an airtight container in the refrigerator. In fact, many people (myself included!) find that the flavors actually deepen and meld beautifully after a day or two in the fridge. This makes it an absolute lifesaver for holiday meal planning, allowing you to tick one major item off your to-do list well before the big day, freeing up valuable time and kitchen space for other dishes. So, don’t hesitate to get a head start on your Classic Christmas Cranberry Sauce; it will only get better with time!
The Advantage of Prep-Ahead Dishes:
Holiday cooking can be hectic, and anything that can be prepared in advance is a huge win. Cranberry sauce is perfect for this, as its texture and flavor are improved by resting. This allows you to focus on more time-sensitive items like roasting the turkey or preparing fresh side dishes closer to serving time. A Classic Christmas Cranberry Sauce that’s been given time to mature in the fridge will always taste more integrated and delightful.
There you have it – my complete guide to making a truly spectacular Classic Christmas Cranberry Sauce. I hope you enjoy making and sharing this vibrant, flavorful, and indispensable holiday favorite!
Conclusion:
So there you have it, my friends! We’ve journeyed together through the simple steps to create a truly unforgettable side dish. If you’ve ever settled for the canned, wobbly version of cranberry sauce, prepare to have your world (and your taste buds) utterly transformed. This recipe isn’t just about cooking; it’s about crafting an experience, a vibrant burst of flavor that brightens any plate it graces. I genuinely believe that mastering this dish is a small culinary victory, offering an immense payoff for very little effort. It’s fresh, it’s zesty, and it hits all the right notes between sweet and tart, ensuring it complements rather than overwhelms your main courses. You’ll find yourself wondering why you ever bothered with anything else, and I promise, your guests will be asking for the recipe. This isn’t merely a condiment; it’s a statement of homemade excellence, a testament to the fact that the best things in life, and on your dinner table, are often the ones made with a little love and care from scratch. This Classic Christmas Cranberry Sauce truly is a game-changer for your holiday spread and beyond. Its glistening ruby hue and intoxicating aroma are just the beginning; the taste is what will truly capture your heart and palate. It’s the kind of staple that makes every bite feel a little more special, a little more festive, proving that a little effort can yield extraordinary results.
Beyond the Holiday Table: Creative Serving Suggestions
But wait, the magic doesn’t stop at the holiday dinner table! While this incredible sauce is an absolute non-negotiable alongside your roasted turkey, glazed ham, or even a succulent roast chicken, its versatility extends far beyond traditional holiday fare. Imagine stirring a spoonful or two into your morning oatmeal or creamy yogurt for a delightful, tangy twist to breakfast that wakes up your senses. Or perhaps spread it generously onto a warm scone, a buttery croissant, or a piece of toasted brioche – it’s a revelation, trust me, turning a simple pastry into something gourmet. It makes an incredible, vibrant filling for thumbprint cookies or a beautiful swirl in a cheesecake batter, adding a striking pop of color and a tart counterpoint to rich desserts. Don’t shy away from incorporating it into savory applications outside of the main course either. A generous dollop on top of baked brie with a sprinkle of toasted walnuts or pecans makes for an elegant appetizer that will disappear in minutes at your next gathering. It also pairs wonderfully with strong, aged cheeses on a charcuterie board, cutting through the richness beautifully. I’ve even been known to use it as a delightful glaze for pork tenderloin or a vibrant accompaniment to pan-seared duck breast. The possibilities are genuinely endless, limited only by your imagination, and I encourage you to experiment boldly with its bright, fresh flavors. This sauce isn’t just for Christmas; it’s a year-round flavor enhancer ready to elevate any meal.
Make It Your Own: Exciting Variations
Feeling adventurous? While the classic recipe stands perfectly on its own, delivering pure, unadulterated cranberry goodness, don’t hesitate to play around with variations to suit your personal taste or the mood of the occasion. A pinch of ground ginger, a touch of cardamom, or a stick of cinnamon added to the pot can infuse a beautiful warmth and complexity, especially appealing during the colder months. For a more sophisticated edge, consider adding a splash of orange liqueur (like Cointreau or Grand Marnier) or even a good quality port wine during the last few minutes of simmering; the alcohol will cook off, leaving behind a wonderfully nuanced flavor. A few thin strips of fresh orange zest cooked with the cranberries, then removed before serving, will infuse an incredible citrus aroma and bright flavor. You could also experiment with adding a few dried apricots, chopped figs, or pitted dates along with the cranberries for an extra layer of sweetness and texture. Some folks even like to add a tiny amount of heat with a thin slice of jalapeño (removed before serving, of course!) for a subtle kick that surprisingly complements the tartness of the cranberries. Make it your own, make it unique, and most importantly, make it delicious – the beauty of homemade is the freedom to customize!
So now it’s your turn! I truly hope you’re inspired to roll up your sleeves and give this fantastic recipe a try. You’ll be amazed at how simple it is to achieve such a spectacular, flavorful result that far surpasses anything you can buy ready-made. Trust me, once you taste the difference that homemade makes, you’ll never go back to the canned stuff. Please, when you do whip up a batch, I’d absolutely love to hear about your experience. Did you stick to the classic? Did you venture into one of the variations I suggested, or perhaps invent one of your own? Share your thoughts, your photos, and your culinary triumphs! Your feedback and kitchen adventures are always a delight to hear about, and I cherish seeing how you make these recipes your own. Happy cooking, and may your meals be filled with flavor, joy, and the deliciousness of homemade goodness!
Easy Classic Christmas Cranberry Sauce for Your Holiday Meal
Classic Christmas Cranberry Sauce is more than just a condiment; it’s a vibrant, ruby-red beacon of holiday cheer on any festive table. This easy homemade recipe creates a delightful contrast of bright, tart cranberries perfectly balanced with a touch of sweetness.
Ingredients
Instructions
Important Information
Nutrition Facts (Per Serving)
It is important to consider this information as approximate and not to use it as definitive health advice.
Allergy Information
Please check ingredients for potential allergens and consult a health professional if in doubt.