Grinch Oreo Truffles are more than just a delightful holiday treat; they are a vibrant, whimsical embodiment of festive cheer that brings a mischievous grin to everyone’s face! As the holiday season approaches, I find immense joy in crafting desserts that not only taste incredible but also tell a story, and what better tale to tell than one inspired by our favorite green, heart-growing character?
The Grinch, with his journey from a Christmas curmudgeon to a beloved symbol of true holiday spirit, holds a special place in many hearts. These adorable truffles capture that essence perfectly with their signature vibrant green hue and irresistible flavor. They offer a fantastic no-bake solution for busy hosts and a charming activity for families looking to create some edible magic together. You’ll discover that Grinch Oreo Truffles are incredibly simple to make, requiring just a few ingredients, yet they deliver a rich, creamy, and undeniably delicious experience that appeals to all ages. Their popularity stems from this perfect blend of convenience, festive appearance, and that irresistible chocolate-and-cream cheese combination. I am so excited for you to try making these and share the joy!

Ingredients:
- 36 Regular Oreo Cookies: I always opt for the classic ones; they provide the perfect base and flavor for our truffles. You can also use Golden Oreos if you prefer a lighter base before coloring, but the classic dark chocolate offers a lovely contrast.
- 8 ounces Cream Cheese: Make sure it’s full-fat and softened to room temperature. This is crucial for achieving that smooth, pliable texture we’re looking for. A block of cream cheese works best, not the whipped variety from a tub.
- 1-2 teaspoons Green Gel Food Coloring: Gel food coloring is absolutely essential here. It gives us a vibrant, consistent Grinch green without adding too much liquid, which can change the texture of our truffle mixture. Liquid food coloring can make the mixture too wet and harder to work with.
- 1 pound White Chocolate Melting Wafers or High-Quality White Chocolate Chips: Using melting wafers or a good quality white chocolate specifically designed for melting will give you the smoothest, most professional-looking coating. Cheaper chocolate chips can sometimes be difficult to melt smoothly and can seize up.
- 1-2 teaspoons Vegetable Shortening or Coconut Oil (Optional, but Recommended): This is my secret weapon for creating a silky-smooth chocolate coating that’s easy to dip and sets beautifully. It helps thin the chocolate slightly without compromising its ability to set.
- Red Heart Sprinkles or Small Red Candy Hearts: These are absolutely non-negotiable for capturing the iconic Grinch look. You need that little red heart to truly bring our Grinch Oreo Truffles to life!
- Various Red and Green Sprinkles (Optional): For an extra festive touch, feel free to use some red and green nonpareils or jimmie sprinkles to add more holiday cheer to your truffles.
Preparing the Grinch Oreo Base:
This first stage is where the magic truly begins, transforming simple Oreos and cream cheese into a delicious, festive canvas for our Grinch-themed treats. Pay close attention to texture and color here; they are key to success!
-
Crushing the Oreos:
First things first, let’s get those Oreos ready. Grab all 36 of your regular Oreo cookies. You have a couple of options for crushing them, and I’ll walk you through my preferred methods.
- Food Processor Method (My Go-To): If you have a food processor, this is by far the easiest and most efficient way to achieve the perfect consistency. Place all the Oreo cookies, cream filling and all, into the bowl of your food processor. Pulse them on high speed until they are finely crushed into crumbs. You’re looking for a texture that resembles fine sand or very fine dirt, with no large chunks remaining. It’s important not to over-process to the point where they turn into a paste; we want distinct crumbs, just very tiny ones. This usually takes about 30-60 seconds of pulsing, stopping to scrape down the sides if necessary. The cream filling will incorporate beautifully into the crumbs, adding to the richness.
- Ziploc Bag & Rolling Pin Method: If you don’t have a food processor, no worries at all! You can still get perfectly crushed Oreos. Place the cookies into a large, sturdy Ziploc bag. Make sure to seal it tightly, pressing out as much air as possible to prevent it from bursting. Lay the bag flat on a sturdy surface and use a rolling pin or even the bottom of a heavy skillet to crush the cookies. Start gently and then apply more pressure, rolling over the cookies repeatedly until they are uniformly crushed into fine crumbs. This method takes a bit more elbow grease, but it’s incredibly satisfying and works just as well. Just be sure to check for any larger pieces and continue crushing until everything is fine.
Once your Oreos are perfectly crushed, transfer them into a large mixing bowl. This bowl will be the home for our truffle base.
-
Mixing with Cream Cheese:
Now, it’s time to introduce the cream cheese. Remember, it needs to be softened to room temperature. This is really important because cold cream cheese will be difficult to mix evenly and can leave you with lumps, which we absolutely want to avoid for a smooth truffle. If your cream cheese isn’t soft enough, you can microwave it in 10-second intervals, checking and stirring, until it’s just soft, but not melted or hot.
Add the entire 8 ounces of softened cream cheese to the bowl with your crushed Oreo crumbs. Using a sturdy spatula, a large spoon, or even your clean hands (which I find works best for this part!), begin to mix the ingredients together. At first, it might seem like there isn’t enough cream cheese to bind all those crumbs, but be patient and keep mixing. The warmth from your hands can also help everything come together more smoothly.
You’re aiming for a consistency that resembles a very thick dough or a firm play-dough. It should be uniform in texture, moist enough to hold its shape when pressed together, but not sticky or greasy. There should be no visible streaks of cream cheese, and all the Oreo crumbs should be thoroughly incorporated. This thorough mixing ensures each truffle will have a consistent, delightful texture.
-
Adding the Grinch Green Color:
Here’s where our Grinch Oreo Truffles truly get their iconic look! Grab your green gel food coloring. I strongly recommend gel over liquid because it’s much more concentrated, meaning you’ll use less to achieve a vibrant color, which won’t alter the truffle mixture’s consistency.
Start by adding about 1 teaspoon of the green gel food coloring to your Oreo and cream cheese mixture. Now, mix it thoroughly. Again, a sturdy spatula, spoon, or your hands will work well. Continue to mix until the color is completely uniform throughout the entire batch of truffle dough. It’s essential to be patient and keep mixing until there are no white or uncolored streaks remaining.
After mixing, assess the color. Are you happy with your Grinch green? If you want a more intense, vibrant green, add another small amount of gel food coloring, maybe a quarter or half teaspoon at a time, and mix again until fully incorporated. Remember, you can always add more, but you can’t take it away! My goal is usually a bold, cheerful green that immediately makes you think of the Grinch.
The final mixture should be a beautiful, uniform green dough, ready for shaping.
Forming and Chilling the Truffles:
This stage is all about shaping our green dough into perfect little truffle spheres and then making sure they are firm enough for their chocolate bath.
-
Shaping the Truffles:
Now that our Grinch-green truffle mixture is perfectly colored and mixed, it’s time to shape them. For consistency in size, which looks much more appealing and ensures even cooking/chilling, I highly recommend using a small cookie scoop or a melon baller. A 1-tablespoon size scoop is usually ideal for truffles.
Scoop out portions of the mixture, and then, using your hands, gently roll each portion into a smooth, compact ball. Aim for uniformity in size and shape. If your hands start to get sticky, you can lightly dust them with a tiny bit of powdered sugar, or even better, rinse them under cold water and dry them completely – cold hands help prevent sticking.
As you roll them, place the finished truffle balls onto a baking sheet lined with parchment paper or a silicone baking mat. The parchment paper is crucial here as it will prevent the truffles from sticking to the tray during chilling and make them easy to lift off later. Continue this process until all of your truffle mixture has been rolled into neat little balls. You should end up with approximately 40-48 truffles, depending on their size.
-
Chilling for Firmness:
This step is absolutely critical and cannot be skipped or rushed! Once all your truffles are rolled and placed on the parchment-lined baking sheet, it’s time to chill them. Transfer the baking sheet to your refrigerator. You need to chill these truffles for at least 30 minutes, but 1-2 hours is even better, and overnight chilling is fantastic if you have the time.
Why is chilling so important? It allows the cream cheese and Oreo mixture to firm up significantly. When the truffles are firm and cold, they will be much easier to handle when dipping them in chocolate. They won’t fall apart or get mushy in the warm chocolate, and the cold surface will also help the chocolate coating set more quickly and evenly. A well-chilled truffle is the secret to a beautifully coated truffle. Don’t underestimate the power of a good chill!
Melting the White Chocolate Coating:
The coating is what gives our Grinch Oreo Truffles their smooth, festive exterior. Melting chocolate can be a bit tricky, but with the right technique, you’ll achieve a perfect, glossy finish.
-
Preparing the Chocolate:
While your truffles are chilling, you can prepare the white chocolate coating. Unwrap your pound of white chocolate melting wafers or high-quality white chocolate chips. If using a block of white chocolate, chop it into small, uniform pieces. Smaller pieces melt more evenly and reduce the risk of scorching.
Place the chocolate into a microwave-safe bowl. If you’re planning on using a double boiler, place it into the top bowl of your double boiler setup.
-
Melting the Chocolate:
There are two excellent methods for melting chocolate, and I’ll detail both so you can choose what works best for you:
- Microwave Method (My Preferred for Speed): This is the quickest way, but it requires careful attention to prevent burning or seizing. Place the bowl of chocolate in the microwave and heat it in short bursts, usually 30 seconds at a time. After each 30-second interval, remove the bowl and stir the chocolate vigorously with a rubber spatula. Even if the chocolate doesn’t look fully melted, stirring helps distribute the heat and melts residual pieces. Continue heating and stirring in 15-20 second intervals (reducing the time as the chocolate gets warmer) until the chocolate is smooth and completely melted, with no lumps. It is absolutely crucial not to overheat the chocolate, as white chocolate is particularly prone to seizing or scorching, which makes it unusable. Always err on the side of caution with shorter heating times.
- Double Boiler Method (Gentle and Controlled): This method is fantastic for a gentler, more controlled melt. Set up a double boiler by placing a heatproof bowl (make sure it’s larger than the saucepan’s opening) over a saucepan containing about an inch or two of simmering water. Ensure the bottom of the bowl does not touch the water. The steam from the simmering water will gently heat the bowl and melt the chocolate. Add your chocolate to the top bowl and stir continuously with a rubber spatula until the chocolate is completely smooth and melted. This method takes a bit longer, but it’s much harder to burn the chocolate. Make sure no water or steam gets into the chocolate, as even a tiny drop can cause it to seize.
Once your chocolate is beautifully melted and smooth, remove it from the heat source.
-
Adding Shortening/Coconut Oil (Optional, but Highly Recommended):
This is where we take our chocolate coating from good to absolutely fantastic. Add 1-2 teaspoons of vegetable shortening or coconut oil to your melted white chocolate. Start with 1 teaspoon, stir it in completely, and then add more if needed. The goal here is to achieve a slightly thinner, more fluid consistency. This makes dipping the truffles much easier, allows for a thinner, more elegant coating, and helps the chocolate set with a lovely, glossy finish.
Stir until the shortening or coconut oil is fully incorporated and the chocolate is silky smooth. If the chocolate starts to cool down and thicken during the dipping process, you can gently reheat it using short bursts in the microwave (5-10 seconds) or by placing it back over the double boiler for a moment, stirring constantly.
Coating and Decorating the Truffles:
This is the fun part where our Grinch Oreo Truffles get their final, festive flourish!
-
Dipping the Truffles:
Retrieve your thoroughly chilled truffle balls from the refrigerator. Set up your dipping station: have your melted white chocolate ready, a fork or a specialized dipping tool, your red heart sprinkles, and another parchment-lined baking sheet nearby for the finished truffles.
Working with one truffle at a time, gently drop a truffle ball into the melted white chocolate. Use your fork or dipping tool to submerge the truffle completely. Lift the truffle out of the chocolate, allowing any excess chocolate to drip back into the bowl. You can gently tap the fork against the edge of the bowl to help remove excess coating. We want a nice, even, relatively thin coat of chocolate, not a thick, gloppy one.
Carefully transfer the coated truffle back to the clean parchment-lined baking sheet.
-
Decorating with Grinch Hearts:
This step needs to be done immediately after dipping each truffle, while the chocolate is still wet! As soon as you place a freshly dipped truffle onto the parchment paper, pick up one of your red heart sprinkles or small red candy hearts. Carefully place it onto the still-wet white chocolate coating, positioning it slightly off-center to mimic the Grinch’s heart. Gently press it down a little to ensure it adheres well to the chocolate.
If you’re also using other red and green sprinkles, now is the time to add those too, sprinkling them over the wet chocolate around the heart for an extra festive touch. Don’t wait too long, as white chocolate sets relatively quickly, especially on a cold truffle!
Continue this dipping and decorating process with all the remaining truffle balls, ensuring each one gets its signature Grinch heart.
Final Chilling and Storage:
Almost there! These final steps ensure your Grinch Oreo Truffles are perfectly set and ready to be enjoyed or gifted.
-
Setting the Coating:
Once all your truffles are dipped and decorated, transfer the baking sheet back to the refrigerator. Allow them to chill for another 15-30 minutes, or until the white chocolate coating is completely set and firm to the touch. This chilling time ensures the chocolate hardens beautifully, giving your truffles a satisfying snap when you bite into them and preventing them from getting messy at room temperature.
-
Storage and Enjoyment:
Once fully set, your Grinch Oreo Truffles are ready to be devoured! For optimal freshness and to maintain their firm texture, store these delightful treats in an airtight container in the refrigerator. They will stay fresh and delicious for up to 1-2 weeks. You can also layer them in the container with parchment paper between layers to prevent them from sticking together. If you’re preparing these ahead for a holiday party, they hold up wonderfully.
They are best served chilled, straight from the fridge. The contrast between the cold, firm truffle and the rich, sweet coating is simply irresistible. Prepare yourself for compliments; these Grinch Oreo Truffles are always a showstopper! They’re not just a dessert; they’re a tiny, festive piece of holiday joy.
Conclusion:
Well, my friends, we’ve come to the delicious end of our journey with these truly magical treats. If you’ve been searching for that quintessential holiday dessert that effortlessly combines festive cheer with irresistible flavor, then I can confidently say you’ve found your new go-to. These aren’t just any ordinary confections; they are a vibrant explosion of joy, an edible embodiment of holiday spirit that brings smiles to every face. I genuinely believe that once you whip up your first batch, you’ll understand why I’m so enthusiastic about them. The simple fact that you don’t even need to turn on your oven is a huge win, making them accessible to even the most novice bakers. Yet, despite their simplicity, the end result is something so elegant and charming, it looks like it came straight from a professional bakery display.
What truly sets these delightful bites apart is the perfect harmony of textures and tastes. Imagine the rich, deep chocolatey crunch of the crumbled Oreo cookies, beautifully softened and bound together by a creamy, luscious filling, all enrobed in a smooth, vibrant candy shell. It’s a symphony for your taste buds, a little bite of heaven that satisfies any sweet craving. They strike that perfect balance of being decadently rich without being overly heavy, leaving you wanting just one more. And let’s not forget their incredible visual appeal! The festive green, accented by that iconic red heart, makes them an instant showstopper on any holiday platter. Seriously, the moment these
Grinch Oreo Truffles
make an appearance, they become the undisputed stars of the dessert table, sparking conversations and spreading cheer.
Now, let’s talk about making these treats shine even brighter. When it comes to serving, these truffles are incredibly versatile. They are absolutely ideal for your annual holiday party or potluck, standing out amongst the usual array of cookies and pies. Arrange them artfully on a chilled platter with a few sprigs of fresh mint or a dusting of confectioners’ sugar for an extra touch of elegance. They make fantastic edible gifts, too! Package them in small, clear boxes tied with a festive ribbon, and you’ve got a homemade present that’s far more thoughtful and delicious than anything you could buy. Imagine bringing these to a cookie exchange – you’ll be the talk of the event! For a cozy night in, enjoy them with a steaming mug of hot cocoa topped with whipped cream, or alongside a glass of cold milk. They’re also perfect as a delightful finish to a holiday meal, a small but impactful sweet treat that leaves everyone feeling content.
But why stop there? The beauty of a simple recipe like this lies in its endless possibilities for personalization. While the classic Grinch theme is undeniably charming, feel free to unleash your inner pastry artist! You could experiment with different Oreo flavors – perhaps Golden Oreos for a vanilla base, or even Mint Oreos for an extra cool kick. Swap out the green candy melts for dark chocolate for a more sophisticated look, or use white candy melts and dye them various colors for a rainbow effect. Don’t be afraid to play with your toppings either! Instead of the red heart, you could use festive sprinkles, edible glitter, or even a drizzle of contrasting chocolate. A tiny sprinkle of flaky sea salt on top of some darker chocolate variations can truly elevate the flavor profile, creating a wonderful sweet and savory contrast. Or, for a hint of warmth, try adding a tiny dash of peppermint extract or a touch of almond extract to the cream cheese mixture before rolling. Make them reflect your own unique style and taste!
So, what are you waiting for? This holiday season, I truly hope you’ll give these incredible truffles a try. There’s a special kind of joy that comes from creating something so delightful with your own hands, and even more joy in sharing that creation with loved ones. It’s a simple recipe, but the memories it helps create are priceless. So go ahead, gather your ingredients, put on some festive music, and let your kitchen fill with the spirit of the season. And when you do, please don’t keep it to yourself! I would absolutely love to hear about your experience. Did you stick to the classic design, or did you put your own spin on them? What did your friends and family think? Share your photos, your triumphs, and any clever variations you come up with in the comments below. Let’s build a little community around these wonderful treats. Happy baking, and may your holidays be filled with delicious moments!
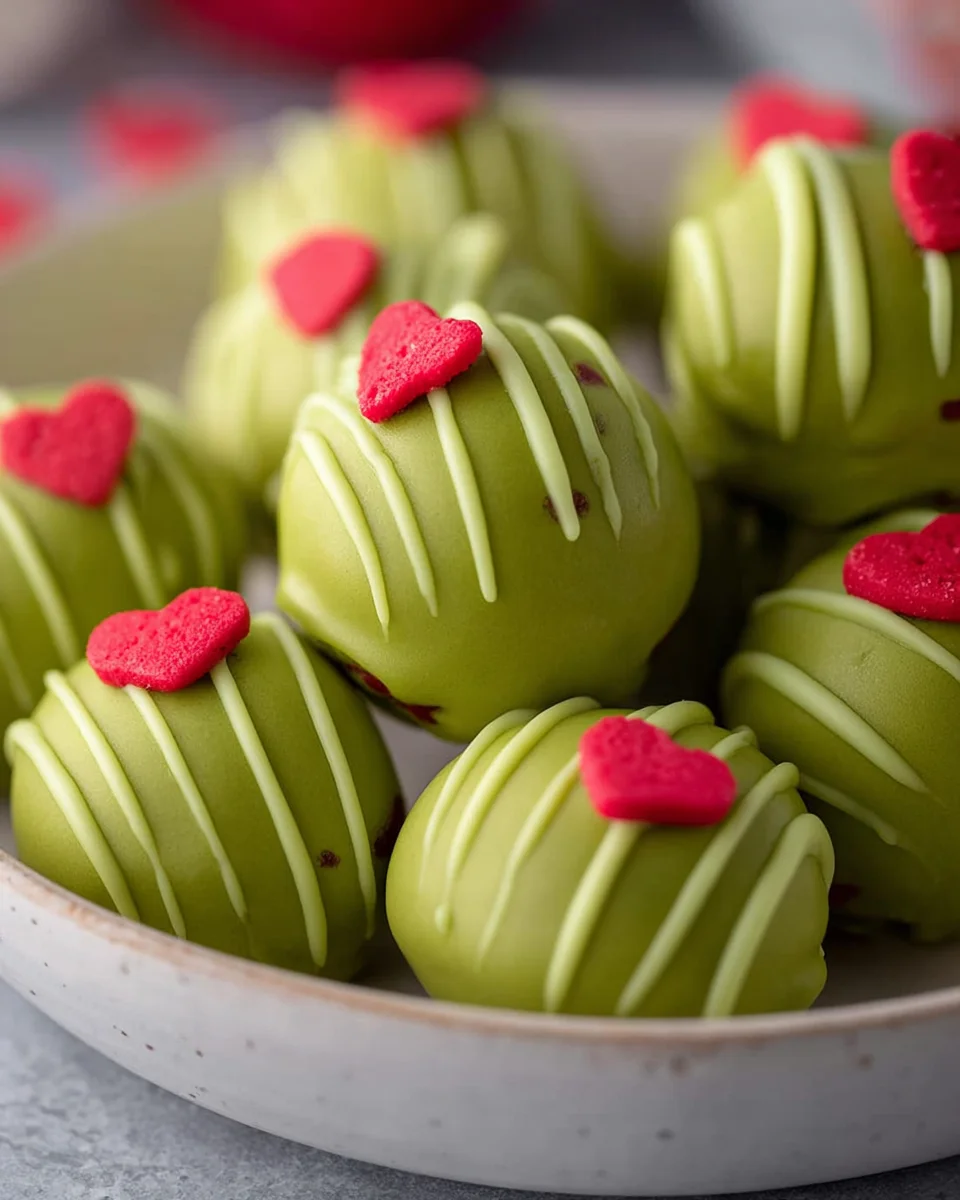
Grinch Oreo Truffles
Grinch Oreo Truffles are a vibrant, whimsical no-bake holiday treat, perfect for capturing the spirit of the Grinch! These truffles are incredibly simple to make, requiring just a few ingredients, yet deliver a rich, creamy, and delicious experience appealing to all ages.
Ingredients
Instructions
Important Information
Nutrition Facts (Per Serving)
It is important to consider this information as approximate and not to use it as definitive health advice.
Allergy Information
Please check ingredients for potential allergens and consult a health professional if in doubt.