• Skip to primary navigation
  • Skip to main content
  • Skip to primary sidebar
Homesmad

Homesmad

  • Home
  • Breakfast & Brunch
  • Appetizers & Snacks
  • Dinner
  • Dessert
  • About
  • Privacy Policy
  • Contact
Homesmad
  • Home
  • Breakfast & Brunch
  • Appetizers & Snacks
  • Dinner
  • Dessert
  • About
  • Privacy Policy
  • Contact

Honey Lime Chicken Rice Bowls: Your New Favorite Dinner!

November 19, 2025 by Lily author

Honey Lime Chicken Rice Bowls An Incredible Ultimate Recipe – get ready to transform your dinner routine with a dish that promises a burst of vibrant flavor and ultimate satisfaction!

I’ve always been fascinated by how a simple concept like a “bowl” can become a canvas for such incredible culinary creativity. This modern take on the global phenomenon of one-bowl meals draws inspiration from diverse culinary traditions, where wholesome ingredients are brought together to create a harmonious and fulfilling experience, echoing the comfort and balance found in bento boxes, bibimbap, or even Hawaiian poke. It’s a testament to the universal appeal of a well-composed, individual meal that caters to both health and convenience.

Why Everyone Loves These Incredible Bowls

What makes people absolutely adore this dish? It’s the perfect marriage of tender, juicy chicken marinated in a sticky-sweet honey-lime glaze, served over fluffy rice, and crowned with your favorite fresh, crisp vegetables. Every bite offers that delightful balance of sweet, tangy, and savory, with textures that keep you coming back for more. It’s not just delicious; it’s also incredibly convenient, making it a fantastic option for busy weeknights, healthy meal prep, or simply when you crave something truly special without the fuss. I promise you, this truly is the Honey Lime Chicken Rice Bowls An Incredible Ultimate Recipe you’ve been searching for, designed to bring joy and incredible taste to your table.

Honey Lime Chicken Rice Bowls: Your New Favorite Dinner! this RECIPE

Ingredients:

For the Honey Lime Chicken:

  • 1.5 lbs Boneless, Skinless Chicken Thighs or Breasts: I personally love using chicken thighs for their juicy tenderness and richer flavor, but breasts work beautifully if you prefer a leaner option. Make sure to trim any excess fat.
  • 3 tablespoons Honey: Liquid gold! This provides the beautiful sweetness and helps create that irresistible caramelization.
  • 2 tablespoons Fresh Lime Juice: Freshly squeezed is non-negotiable here. It brings a bright, zesty tang that cuts through the sweetness and enlivens the chicken.
  • 1 tablespoon Soy Sauce: I use a low-sodium variety, but regular is fine. It adds a crucial umami depth and savory balance to our marinade.
  • 1 tablespoon Olive Oil: For the marinade, it helps emulsify the ingredients and tenderize the chicken.
  • 2 cloves Garlic: Minced finely. Garlic is a must for almost any savory dish, and it adds a wonderful aromatic foundation to our chicken.
  • 1 teaspoon Grated Fresh Ginger: If you can get fresh ginger, absolutely use it! It imparts a warming, subtly spicy aroma that pairs incredibly well with lime and honey.
  • 1/2 teaspoon Red Pepper Flakes (optional): For a subtle kick that awakens the palate. Adjust to your spice preference, or omit entirely.
  • Salt and Freshly Ground Black Pepper: To taste, essential for seasoning.

For the Fluffy Basmati Rice:

  • 1.5 cups Basmati Rice: Its long grains and delicate aroma are perfect for absorbing the flavors of our bowl. Other long-grain white rices can also be used.
  • 2.5 cups Water or Chicken Broth: Using broth instead of water can add another layer of flavor to your rice.
  • 1/2 teaspoon Salt: For seasoning the rice.
  • 1 tablespoon Olive Oil or Butter (optional): A little fat can help prevent sticking and add richness.

For the Zesty Lime Dressing:

  • 1/4 cup Fresh Lime Juice: Again, freshly squeezed is key for the best flavor!
  • 3 tablespoons Olive Oil: A good quality extra virgin olive oil works wonderfully here, providing a smooth base for the dressing.
  • 1 tablespoon Honey: To balance the tartness of the lime and add a touch of sweetness.
  • 1 clove Garlic: Minced very finely, or grated, for a subtle garlic aroma without being overpowering.
  • 1 tablespoon Chopped Fresh Cilantro: This herb is a star in this dressing, adding an incredible freshness and vibrant color.
  • Salt and Freshly Ground Black Pepper: To taste, to ensure the dressing is perfectly seasoned.

For the Fresh Bowl Toppings:

  • 1 large Avocado: Diced or sliced. Creamy avocado adds a fantastic texture and healthy fats to the bowl.
  • 1 cup Cherry Tomatoes: Halved. Their burst of juiciness and slight acidity is a wonderful contrast.
  • 1/2 English Cucumber: Diced. For a refreshing crunch.
  • 1/4 cup Red Onion: Thinly sliced or finely diced. If you find raw red onion too strong, you can soak it in ice water for 10-15 minutes to mellow its flavor.
  • Fresh Cilantro: A handful, chopped, for garnish and an extra burst of freshness.
  • Lime Wedges: For serving, allowing everyone to add an extra squeeze of brightness to their bowl.
  • Sesame Seeds (optional): For a little extra crunch and visual appeal.

Preparation: Crafting Your Honey Lime Chicken Rice Bowls An Incredible Ultimate Recipe

  1. Prepare the Chicken for Marination: First things first, let’s get our chicken ready to soak up all those amazing flavors. If you’re using chicken thighs, lay them on a cutting board and trim away any excessive fat or gristle. For chicken breasts, you might want to slice them horizontally to create thinner cutlets or cut them into 1-inch pieces to ensure even cooking and easier eating in a bowl. Pat the chicken thoroughly dry with paper towels; this is a crucial step that helps the marinade adhere better and allows for a more beautiful sear later on. Place the prepared chicken into a medium-sized bowl or a resealable plastic bag.
  2. Whisk Up the Honey Lime Marinade: In a separate small bowl, combine the honey, fresh lime juice, soy sauce, olive oil, minced garlic, grated fresh ginger, and red pepper flakes (if using). Whisk everything together really well until the honey is fully dissolved and the marinade is homogenous. You want all those vibrant flavors to be evenly distributed. Season the marinade with a generous pinch of salt and a few grinds of black pepper, tasting it to ensure it’s just right. Remember, this marinade will flavor your chicken, so make sure it’s delicious on its own!
  3. Marinate the Chicken: Pour the prepared honey lime marinade over the chicken, ensuring every piece is thoroughly coated. If using a bowl, you can use tongs to toss the chicken around. If using a bag, simply seal it and massage the marinade into the chicken. For optimal flavor penetration and tenderness, refrigerate the chicken for at least 30 minutes. However, if you have the time, I highly recommend letting it marinate for 2 to 4 hours. For an even deeper flavor experience, you can even marinate it overnight, though I wouldn’t go beyond 12-18 hours as the lime juice can start to “cook” the chicken.
  4. Rinse and Prepare the Basmati Rice: While the chicken is marinating, let’s get started on our fluffy rice. Place the basmati rice in a fine-mesh sieve and rinse it under cold running water. You’ll want to rinse it thoroughly until the water runs clear. This step is super important as it removes excess starch, which is the secret to achieving perfectly separate, fluffy grains rather than a sticky, clumpy mess. Once rinsed, transfer the rice to a medium saucepan. Add the water (or chicken broth) and the 1/2 teaspoon of salt. If using, add 1 tablespoon of olive oil or butter to the pot. Stir once to combine.
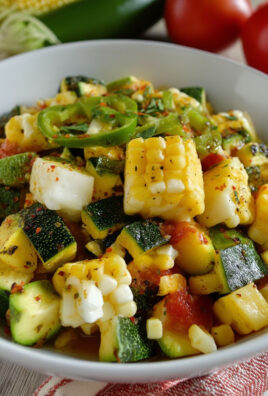
  5. Chop and Prepare Your Toppings: This is where we bring in all the fresh, vibrant elements for our bowls. Dice the avocado, halve the cherry tomatoes, dice the English cucumber, and thinly slice or finely dice the red onion. If you’re sensitive to the strong flavor of raw red onion, place the sliced red onion in a small bowl and cover it with ice water; let it sit for about 10-15 minutes, then drain thoroughly before using. Chop a generous handful of fresh cilantro for both the dressing and as a garnish. Arrange all your prepared toppings in separate small bowls or on a platter; this makes assembling your ultimate bowls a breeze later on.

Cooking Phase: Bringing the Flavors to Life

  1. Cook the Basmati Rice: Place the saucepan with the rice mixture over medium-high heat. Bring the water to a rolling boil. As soon as it boils, give it one final gentle stir, then immediately reduce the heat to the lowest setting, cover the pot tightly with a lid, and let it simmer undisturbed for 15 minutes. It’s crucial not to lift the lid during this time, as you’ll lose valuable steam needed for cooking the rice. After 15 minutes, remove the pot from the heat but keep the lid on. Let it rest for another 10 minutes. This resting period allows the steam to redistribute and finish cooking the rice, resulting in perfectly tender, fluffy grains. Finally, remove the lid and fluff the rice gently with a fork. Set aside, keeping it warm if possible.
  2. Cook the Honey Lime Chicken: While the rice is resting, it’s time to cook our marinated chicken. Remove the chicken from the refrigerator about 15-20 minutes before cooking to bring it closer to room temperature for more even cooking. Heat 1 tablespoon of olive oil in a large skillet or cast-iron pan over medium-high heat. Once the oil is shimmering and hot (you should see a slight ripple), carefully add the chicken in a single layer, ensuring not to overcrowd the pan. You might need to cook the chicken in batches to achieve a good sear. Reserve any leftover marinade – we’ll use it to create a delicious glaze!
  3. Sear and Glaze the Chicken: Allow the chicken to sear undisturbed for 3-5 minutes per side, depending on the thickness of your chicken pieces, until it develops a beautiful golden-brown crust. For chicken thighs, this might take a bit longer. Once both sides are seared, reduce the heat to medium-low. Pour the reserved marinade into the pan with the chicken. Let it simmer, stirring occasionally, until the marinade reduces and thickens into a glossy, sticky sauce that coats the chicken beautifully. This usually takes another 3-5 minutes. The internal temperature of the chicken should reach 165°F (74°C) at its thickest part. If using chicken breasts, be careful not to overcook them, as they can dry out quickly. Remove the chicken from the pan and let it rest on a cutting board for 5 minutes before slicing or dicing. Resting allows the juices to redistribute, ensuring tender and juicy chicken.
  4. Prepare the Zesty Lime Dressing: While the chicken is resting, let’s whip up our vibrant dressing. In a small bowl, combine the fresh lime juice, olive oil, honey, finely minced garlic, and chopped fresh cilantro. Whisk vigorously until the dressing is emulsified and well combined. Taste the dressing and season it generously with salt and freshly ground black pepper. Adjust the seasoning as needed; you might want a little more honey if you prefer it sweeter, or more lime for extra tang. This dressing is truly the bright, fresh crown jewel of our “Honey Lime Chicken Rice Bowls An Incredible Ultimate Recipe.”

Assembly: Building Your Ultimate Honey Lime Chicken Rice Bowls

  1. Slice or Dice the Cooked Chicken: Once the chicken has rested, slice it into thin strips or dice it into bite-sized pieces. You’ll notice how incredibly juicy it is, thanks to the resting period. You can even drizzle any remaining glaze from the pan over the sliced chicken for an extra burst of flavor.
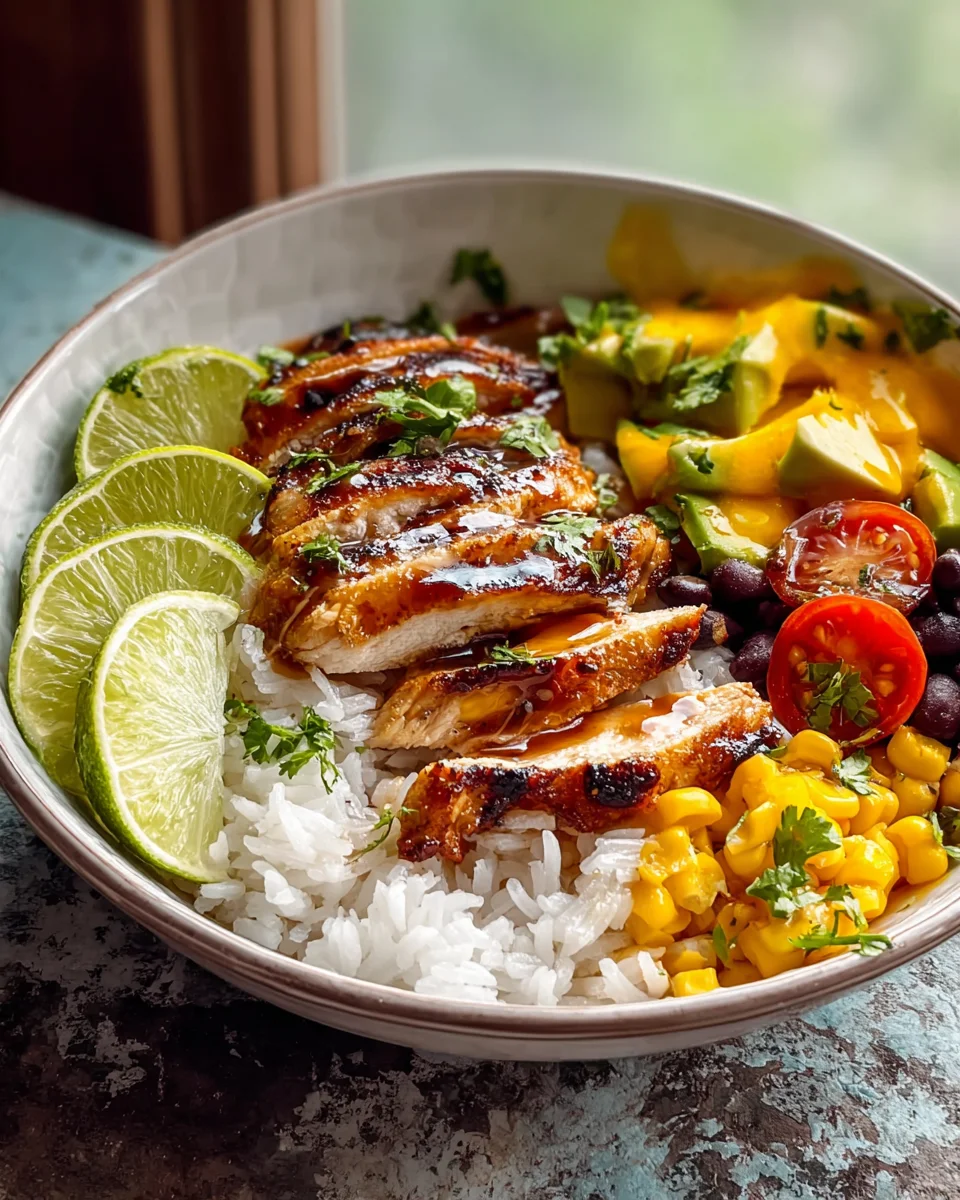
  2. Build Your Incredible Bowls: Now for the fun part – assembling your beautiful bowls! Grab your serving bowls. Start with a generous base of the fluffy basmati rice in the bottom of each bowl. This warm, aromatic rice will be the perfect canvas for our flavorful components.
  3. Layer on the Goodness: Arrange the sliced or diced honey lime chicken artfully over the rice. Next, start adding your fresh toppings. Create little sections or scatter them creatively: a spoonful of diced avocado, a handful of halved cherry tomatoes, some refreshing diced cucumber, and a sprinkle of the thinly sliced red onion. The contrast of colors and textures is what makes these bowls so appealing.
  4. Drizzle and Garnish: Drizzle a generous amount of the zesty lime dressing over the entire bowl. Don’t be shy; this dressing ties all the flavors together beautifully. Finish each bowl with a final sprinkle of fresh chopped cilantro and, if you like, a pinch of sesame seeds for an added layer of texture and visual appeal. Place a lime wedge on the side of each bowl, so guests can add an extra squeeze of fresh lime juice to their liking, brightening up all the flavors even further.
  5. Serve Immediately: Serve your magnificent Honey Lime Chicken Rice Bowls An Incredible Ultimate Recipe immediately and enjoy the incredible symphony of sweet, tangy, savory, and fresh flavors! These bowls are not only incredibly satisfying but also bursting with vibrant ingredients that make for a truly wholesome and delicious meal. I promise, once you try this recipe, it’ll become a regular in your rotation!

Honey Lime Chicken Rice Bowls: Your New Favorite Dinner!

Conclusion:

Well, my friends, we’ve reached the end of our culinary journey for today, but truly, the adventure has just begun for your taste buds! If you’ve been following along, you’ll know that this isn’t just another dinner recipe; it’s a vibrant symphony of flavors, a truly satisfying experience that manages to be both incredibly comforting and wonderfully fresh all at once. I can honestly say, with absolute conviction, that you simply must try this dish. It stands out because it takes simple, wholesome ingredients and elevates them into something extraordinary without demanding hours of your precious time. The combination of succulent chicken, infused with that irresistible sweet and tangy honey-lime glaze, served over fluffy rice, creates a harmony that is profoundly addictive.

What I adore most about this recipe is its undeniable ability to transform an ordinary weeknight meal into something special. It’s the kind of dish that brings smiles around the table, a testament to the fact that delicious, wholesome food doesn’t have to be complicated. The aroma alone as it cooks is enough to get your stomach rumbling, promising a feast that delivers on every front – from its enticing scent to its vibrant presentation and, most importantly, its absolutely unforgettable taste. It’s light enough not to feel heavy, yet hearty enough to leave you feeling completely content. This balance is key, making it perfect for any season, any occasion, and a truly stellar addition to your regular meal rotation. You’ll quickly find yourself craving it again and again, which is always a sign of a truly remarkable recipe.

Elevate Your Bowl: Serving Suggestions & Brilliant Variations

While the core recipe is fantastic on its own, part of the joy of cooking is making it your own! I love to think of these rice bowls as a canvas for creativity, allowing you to personalize them based on your pantry, preferences, or simply what you’re in the mood for. For an extra pop of freshness and texture, always finish your bowl with a generous sprinkle of freshly chopped cilantro and a handful of toasted sesame seeds – they add a lovely nutty crunch and an appealing visual touch. A few slices of creamy avocado can introduce a wonderful textural contrast and richness, lending a luxurious feel to each bite. A squeeze of fresh lime juice right before serving will brighten all the flavors even further, waking up your palate. For those who enjoy a little heat, a drizzle of sriracha or a pinch of red pepper flakes offers a fantastic kick that complements the sweet and tangy notes beautifully without overpowering them. Don’t forget a side of quick-pickled red onions; their sharp, tangy bite cuts through the richness and adds another layer of complexity that is simply divine and absolutely worth the extra few minutes of preparation.

But why stop there? The beauty of this bowl concept is its incredible versatility, encouraging you to experiment and make it uniquely yours. Don’t have chicken? No problem! This honey-lime marinade works wonders with shrimp, firm tofu (pressed and pan-fried for best results), or even thinly sliced pork tenderloin. If you’re looking to boost your veggie intake, feel free to toss in some colorful bell peppers, crisp snap peas, shredded carrots, or steamed broccoli florets during the last few minutes of cooking, or serve them fresh and crunchy on the side. Edamame also makes a wonderful addition for extra protein and texture. For a low-carb alternative, swap out the white rice for cauliflower rice, quinoa, farro, or even a blend of leafy greens at the base of your bowl. You can also play with the sauce itself – a touch more honey for a sweeter profile, an extra splash of lime for more zest, or even a hint of grated fresh ginger for an aromatic twist. Each variation offers a new adventure, ensuring this recipe never gets boring and always fits your dietary needs or whatever ingredients you have readily available.

Your Culinary Journey Starts Now!

So, what are you waiting for? I wholeheartedly encourage you to roll up your sleeves and give this recipe a whirl. It’s designed to be approachable for home cooks of all skill levels, promising a dish that looks and tastes far more complicated than it actually is. Imagine the satisfaction of presenting such a vibrant, flavor-packed meal to your family or friends, knowing you created something truly special with your own hands. I truly believe that once you experience the delightful balance of sweet, tangy, and savory in every mouthful, you’ll understand why I’m so passionate about it and why it has earned a permanent spot in my kitchen repertoire. It’s a testament to simple ingredients yielding spectacular results.

Once you’ve made it, don’t keep the magic to yourself! I absolutely love seeing your creations and hearing about your cooking adventures. Please share your experiences, your own unique twists, and any brilliant serving suggestions you come up with. Tag us, tell us, let the culinary conversation continue! Your feedback and ideas are what make this community so vibrant and inspiring, and who knows, your clever adaptation might inspire countless others. From my kitchen to yours, I wish you incredible success and immense enjoyment with what I confidently present as the one and only Honey Lime Chicken Rice Bowls An Incredible Ultimate Recipe. Get cooking, enjoy every bite, and spread the deliciousness!


Honey Lime Chicken Rice Bowls: Your New Favorite Dinner!

Transform your dinner routine with these Honey Lime Chicken Rice Bowls! Featuring tender chicken in a sticky-sweet honey-lime glaze, served over fluffy rice, and topped with fresh, crisp vegetables. It’s a delightful balance of sweet, tangy, and savory flavors, perfect for a satisfying weeknight meal or healthy meal prep.

Prep Time
15 Minutes
Cook Time
30 Minutes
Total Time
45 Minutes
Servings
4-6 servings

Ingredients


Instructions


Important Information

Nutrition Facts (Per Serving)

It is important to consider this information as approximate and not to use it as definitive health advice.

Allergy Information

Please check ingredients for potential allergens and consult a health professional if in doubt.

« Previous Post
Japanese Cucumber Salad (Sunomono) - Quick & Refreshing
Next Post »
Hot Cocoa Cookies with Fluffy Marshmallow Buttercream

If you enjoyed this…

Calabacitas con elote: A Delicious and Easy Recipe

Sizzling Grilled Steak Fajita Platter – Perfect for Dinner!

General Tso Chicken: The Ultimate Guide to Making It at Home

Primary Sidebar

Browse by Diet

BreakfastDinnerLunchDessertAppetizer

Sweet Peach Yogurt Parfait Delight

One of my fondest memories is from a lazy summer afternoon spent at my grandmother’s house. The sun filtered through the kitchen window, casting a warm glow over the table where she would create her culinary magic. It was during one of those blissful moments that I first tasted her Peach Yogurt Parfait with Honey and Granola. The sweet aroma of ripe peaches mingling with creamy yogurt and the crunch of granola was nothing short of heavenly. It felt like summer captured in a bowl, and I still remember the joy of diving in with a spoon, each layer revealing a new burst of flavor.

When I think about that parfait, I can almost hear the gentle hum of the bees outside, reminding me of the floral notes that honey brings to every bite. The vibrant yellows and soft oranges of the peaches contrast beautifully with the creamy white yogurt and the golden crunch of granola. It’s a dish that not only looks delightful but also tastes like a celebration of fresh, wholesome ingredients.

What makes my version of this Peach Yogurt Parfait special is the careful balance of flavors and textures. I use ripe, juicy peaches, drizzled with locally sourced honey, and a homemade granola that’s bursting with nuts and seeds for an extra crunch. It’s a simple dish, but every layer is crafted with love and attention.

Let me show you exactly how to make this delightful parfait, so you can bring a bit of that summer magic into your kitchen!

Sweet Peach Yogurt Parfait Delight

Why You’ll Love This Recipe

  • Delightfully creamy texture from the Greek yogurt, paired with the juicy sweetness of fresh peaches.
  • Ready in under 20 minutes, making it a quick and satisfying breakfast or snack option.
  • Budget-friendly, using common ingredients that you may already have in your pantry.
  • Customizable with your favorite granola and nuts, allowing you to tailor each parfait to your taste.
  • Perfectly balanced flavors with the bright acidity of lemon juice and the sweetness of honey enhancing the peaches.

Ingredients

  • For the Parfait:
  • 2 cups plain Greek yogurt (or vanilla yogurt for a sweeter option)
  • 2 large ripe peaches, diced (about 2 cups)
  • 1 tablespoon fresh lemon juice (to prevent browning of peaches)
  • 2 tablespoons honey (plus more for drizzling)
  • 1 teaspoon vanilla extract (optional for extra flavor)
  • For the Granola:
  • 1 cup granola (store-bought or homemade; see notes for a simple granola recipe)
  • 1/4 cup sliced almonds (optional for added crunch)
  • 1/4 cup shredded coconut (optional for added flavor)

Let’s dive into some key ingredients that make this Peach Yogurt Parfait so delightful! First, the Greek yogurt is not only creamy but also packed with protein, making it a satisfying option for breakfast or a snack. If you’re looking for a sweeter option, you can easily substitute it with vanilla yogurt, though it may alter the overall flavor balance. Next, the ripe peaches are the star of the show; their natural sweetness shines through, so I recommend choosing peaches that yield slightly to pressure, indicating they’re perfectly ripe. If peaches aren’t in season, feel free to use nectarines or even frozen peaches—just thaw them before use. Finally, honey adds a lovely floral sweetness that ties everything together. If you prefer, maple syrup can serve as a delicious substitute.

Step-by-Step Instructions

  1. Start by preparing the peaches. Wash them thoroughly, then slice and dice them into bite-sized pieces. In a medium bowl, toss the diced peaches with 1 tablespoon of fresh lemon juice to prevent browning. Set aside for about 5 minutes while the lemon juice works its magic.
  2. In a separate bowl, combine the Greek yogurt, 2 tablespoons of honey, and 1 teaspoon of vanilla extract if using. Stir the mixture until smooth and thoroughly blended. This should take about a minute. Avoid overmixing to maintain the creaminess of the yogurt.
  3. Now it’s time to layer your parfait. Grab a clear glass or bowl to showcase your beautiful creation. Start with a generous spoonful of the yogurt mixture at the bottom—about 1/4 cup will do. Use a spoon to spread it evenly.
  4. Add a layer of the diced peaches over the yogurt, ensuring they cover the yogurt completely. You might want to use about half of what you have prepared—roughly 1 cup. This layer should be visually appealing, so arrange the peaches neatly.
  5. Sprinkle 1/4 cup of granola over the peaches. This adds a delightful crunch. Make sure to distribute it evenly to ensure every bite has that satisfying texture. Avoid packing it down too tightly, as you want it to maintain its crunch.
  6. Repeat the layers: spoon in another 1/4 cup of yogurt, followed by another cup of peaches, and another sprinkle of granola. You should have at least two layers, but feel free to add more depending on your glass size.
  7. Finish off your parfait with a drizzle of honey on top for added sweetness and a touch of elegance. If you’re using sliced almonds or shredded coconut, sprinkle them on top now. It adds a lovely visual contrast and extra flavor.
  8. Serve immediately or refrigerate for up to 30 minutes before serving to allow the flavors to meld together. However, I recommend enjoying it fresh to maintain the granola’s crunch.

Pro Tips for the Best Peach Yogurt Parfait With Honey And Granola

  • Make sure to choose ripe peaches for the best flavor and texture. A common mistake is using unripe fruit, which can lead to a less enjoyable parfait. Look for peaches that are fragrant and slightly soft to the touch.
  • Use a clear glass to assemble your parfait; this not only makes for a beautiful presentation but also allows you to see the colorful layers, which adds to the enjoyment of eating it.
  • For an even creamier texture, consider whipping the Greek yogurt with a hand mixer for a couple of minutes before layering. This small adjustment makes a huge difference in mouthfeel.
  • Be mindful of the granola-to-yogurt ratio. Too much granola can overwhelm the parfait, while too little can make it feel too creamy. Aim for about 1/4 cup of granola per layer for the perfect balance.
  • If you’re making this for a gathering, consider preparing the yogurt and peaches ahead of time and layering them just before serving. This ensures the granola stays crunchy!

Variations & Serving Ideas

There are so many ways to get creative with your Peach Yogurt Parfait! For a tropical twist, swap out the peaches for mangoes or pineapples and top with coconut flakes. If you prefer a berry flavor, mix in some blueberries or strawberries with the peaches for added color and taste. For a nutty version, incorporate chopped walnuts or pecans instead of almonds.

As for serving ideas, this parfait pairs beautifully with a side of scrambled eggs for a hearty breakfast or fresh fruit salad for a light lunch. You might also enjoy it alongside whole grain toast with almond butter for an energizing snack. The contrast of flavors and textures will elevate your meal experience!

Storage, Make-Ahead & Reheating

The Peach Yogurt Parfait is best enjoyed fresh, but you can prepare some components ahead of time. Store the layered parfait in an airtight container in the refrigerator for up to 24 hours. However, be cautious; the granola may lose its crunch if stored too long. You can freeze the yogurt and peach mixture for up to 2 months; just remember to thaw it in the refrigerator overnight before serving.

If you plan to enjoy this dish the next day, it can taste even better as the flavors meld together. Just remember to add the granola right before serving to keep its delightful crunch!

Frequently Asked Questions

Can I make Peach Yogurt Parfait With Honey And Granola ahead of time?

Yes — in fact, it tastes even better the next day as the flavors meld. However, I recommend waiting to add the granola until just before serving to maintain its crunch.

What can I substitute for Greek yogurt?

If you prefer a lighter option, you can substitute Greek yogurt with regular yogurt or a dairy-free alternative like coconut yogurt. Just remember that this may alter the creaminess and flavor profile slightly.

Can I use frozen peaches for this parfait?

Absolutely! Just make sure to thaw the frozen peaches before using them. They will still add great flavor, though the texture may be slightly softer than fresh peaches.

How do I make the parfait vegan?

To make a vegan version, substitute the Greek yogurt with a plant-based yogurt alternative, and replace honey with maple syrup or agave nectar. This keeps the parfait sweet while adhering to a vegan diet.

What other fruits can I use in this recipe?

You can mix and match fruits based on your preference. Try using strawberries, blueberries, raspberries, or even bananas. Just make sure to adjust the lemon juice as needed to prevent browning.

Sweet Peach Yogurt Parfait Delight

Final Thoughts

The Peach Yogurt Parfait with Honey and Granola is a delightful blend of creamy yogurt, sweet peaches, and crunchy granola that creates a satisfying and nourishing treat. Each layer bursts with flavor, making it a perfect choice for breakfast or a light dessert.

This is the kind of recipe I come back to again and again, especially when I want something refreshing and wholesome to start my day. The harmony of sweet and tart flavors, combined with the delightful crunch, never fails to lift my spirits!

I encourage you to give this parfait a try and indulge in its comforting goodness. Feel free to share your results or even add your own twist—perhaps a sprinkle of cinnamon or a handful of nuts. Enjoy creating your perfect parfait!

Print
clock clock iconcutlery cutlery iconflag flag iconfolder folder iconinstagram instagram iconpinterest pinterest iconfacebook facebook iconprint print iconsquares squares iconheart heart iconheart solid heart solid icon

Peach Yogurt Parfait


  • Author: Lily author
  • Total Time: 15 minutes
  • Yield: 4 servings 1x
Pin Recipe
Print Recipe

Description

This Peach Yogurt Parfait combines creamy Greek yogurt, juicy peaches, and crunchy granola for a delightful treat. It’s a perfect breakfast or snack that captures the essence of summer in every bite.


Ingredients

Scale
  • For the Parfait:
  • 2 cups plain Greek yogurt (or vanilla yogurt for a sweeter option)
  • 2 large ripe peaches, diced (about 2 cups)
  • 1 tablespoon fresh lemon juice (to prevent browning of peaches)
  • 2 tablespoons honey (plus more for drizzling)
  • 1 teaspoon vanilla extract (optional for extra flavor)
  • For the Granola:
  • 1 cup granola (store-bought or homemade; see notes for a simple granola recipe)
  • 1/4 cup sliced almonds (optional for added crunch)
  • 1/4 cup shredded coconut (optional for added flavor)

Instructions

  1. Start by preparing the peaches. Wash them thoroughly, then slice and dice them into bite-sized pieces. In a medium bowl, toss the diced peaches with 1 tablespoon of fresh lemon juice to prevent browning. Set aside for about 5 minutes while the lemon juice works its magic.
  2. In a separate bowl, combine the Greek yogurt, 2 tablespoons of honey, and 1 teaspoon of vanilla extract if using. Stir the mixture until smooth and thoroughly blended. This should take about a minute. Avoid overmixing to maintain the creaminess of the yogurt.
  3. Now it’s time to layer your parfait. Grab a clear glass or bowl to showcase your beautiful creation. Start with a generous spoonful of the yogurt mixture at the bottom—about 1/4 cup will do. Use a spoon to spread it evenly.
  4. Add a layer of the diced peaches over the yogurt, ensuring they cover the yogurt completely. You might want to use about half of what you have prepared—roughly 1 cup. This layer should be visually appealing, so arrange the peaches neatly.
  5. Sprinkle 1/4 cup of granola over the peaches. This adds a delightful crunch. Make sure to distribute it evenly to ensure every bite has that satisfying texture. Avoid packing it down too tightly, as you want it to maintain its crunch.
  6. Repeat the layers: spoon in another 1/4 cup of yogurt, followed by another cup of peaches, and another sprinkle of granola. You should have at least two layers, but feel free to add more depending on your glass size.
  7. Finish off your parfait with a drizzle of honey on top for added sweetness and a touch of elegance. If you’re using sliced almonds or shredded coconut, sprinkle them on top now. It adds a lovely visual contrast and extra flavor.
  8. Serve immediately or refrigerate for up to 30 minutes before serving to allow the flavors to meld together. However, I recommend enjoying it fresh to maintain the granola’s crunch.
  • Prep Time: 15 mins
  • Cook Time: 0 mins
  • Category: Breakfast
  • Method: No-cook
  • Cuisine: American

Nutrition

  • Serving Size: 1 parfait
  • Calories: 250
  • Sugar: 20 g
  • Sodium: 50 mg
  • Fat: 5 g
  • Saturated Fat: 2 g
  • Unsaturated Fat: 3 g
  • Trans Fat: 0 g
  • Carbohydrates: 40 g
  • Fiber: 3 g
  • Protein: 10 g
  • Cholesterol: 10 mg

Keywords: Choose ripe peaches for the best flavor and texture. Use a clear glass for a beautiful presentation. For creaminess, consider whipping the yogurt before layering. Be mindful of the granola-to-yogurt ratio. Prepare yogurt and peaches ahead of time for gatherings, layering just before serving.

Did you make this recipe?

Share a photo and tag us — we can't wait to see what you've made!

Sun-Kissed Frozen Orange Cream Slush

As a child, summer days felt like they lasted forever. I remember the sticky heat wrapping around me as I played outside, my laughter mingling with the sounds of the neighborhood. But nothing could cool me down quite like the moment I’d spot my grandmother, laboring over her blender, whipping up her famous Frozen Orange Creamsicle Slush. That vibrant orange treat, with its frosty texture and sweet citrus aroma, was like a burst of sunshine in a cup. Just one sip, and I could feel the coolness wash over me, sparking pure joy.

This Frozen Orange Creamsicle Slush has a way of making you feel like a kid again. Its creamy, dreamy consistency is a delightful balance of bright orange and soft vanilla, inviting you to dive right in. The refreshing tang of orange dances on your tongue, while the smooth creaminess envelops you in a comforting embrace. It’s a nostalgic treat that’s perfect for hot summer afternoons or anytime you need a little pick-me-up.

What makes my version of this slush stand out is the addition of a hint of vanilla bean, which elevates the flavor and adds an extra layer of richness. Plus, it’s super easy to whip up with just a few simple ingredients that you probably already have on hand! So, if you’re ready to relive those sun-soaked memories, let me show you exactly how to make it.

Sun-Kissed Frozen Orange Cream Slush

Why You’ll Love This Recipe

  • Each slush is a perfect blend of creamy vanilla and zesty orange, creating a nostalgic flavor reminiscent of summer days.
  • This refreshing treat is ready in under 15 minutes, making it an ideal quick dessert for unexpected guests or hot afternoons.
  • With just 8 simple ingredients, it’s budget-friendly, ensuring you don’t have to break the bank to enjoy a delicious slush.
  • The slush has a perfectly smooth texture, thanks to the combination of ice and ice cream, providing a delightful contrast to the bright citrus flavors.
  • It’s highly customizable; you can easily adjust the sweetness and add fresh herbs for a unique twist that suits your taste.

Ingredients

  • 2 cups orange juice (freshly squeezed or store-bought)
  • 1 cup vanilla ice cream
  • 1 cup crushed ice
  • 1/2 cup milk (whole or 2%)
  • 1/4 cup granulated sugar (adjust based on sweetness preference)
  • 1 teaspoon vanilla extract
  • Zest of 1 orange (for added flavor)
  • Fresh orange slices and mint leaves (for garnish)

The star of this Frozen Orange Creamsicle Slush is the orange juice, which provides the vibrant, citrusy base. Freshly squeezed juice will yield the brightest flavor, but store-bought options can be just as convenient. If you’re opting for store-bought, choose 100% pure juice with no added sugars for the best results. Another essential ingredient is the vanilla ice cream; it adds creaminess and sweetness. You can substitute it with dairy-free ice cream if you’re looking for a vegan option. Whole or 2% milk complements the ice cream, creating a smooth blend. If you want a lower-calorie version, almond or oat milk can be good alternatives.

Lastly, the granulated sugar can be adjusted based on your sweetness preference. If you prefer a more natural sweetener, consider using honey or agave syrup. The orange zest enhances the flavor profile, providing an aromatic pop that brings the whole slush together. Don’t skip it! It adds an extra layer of brightness that makes this slush truly special.

Step-by-Step Instructions

  1. Start by preparing your ingredients. Gather 2 cups of orange juice, 1 cup of vanilla ice cream, and 1 cup of crushed ice. Make sure the ice is finely crushed, as larger chunks can make blending difficult.
  2. In a blender, combine the orange juice, vanilla ice cream, crushed ice, and 1/2 cup of milk. Add 1/4 cup of granulated sugar and 1 teaspoon of vanilla extract. If you like a sweeter slush, consider adding a bit more sugar at this stage.
  3. Add the zest of 1 orange to the blender. This step is crucial for enhancing the citrus flavor of your slush. Make sure not to include the bitter white pith—only the flavorful zest.
  4. Blend the mixture on medium-high speed for about 30-45 seconds. Stop once the ingredients are fully combined and the slush has a smooth, even consistency. If you notice large chunks of ice, blend for an additional 10-15 seconds. Avoid over-blending, as this can make the slush too liquidy.
  5. Once blended, taste the slush. If it needs more sweetness, add a little more sugar and blend for a few more seconds. If it’s too thick, you can add a splash of milk to reach your desired consistency.
  6. Pour the slush into glasses. This recipe typically serves 4, but you can easily double it for larger gatherings. Use a spoon to help guide the slush into the glasses if needed.
  7. Garnish each serving with fresh orange slices and mint leaves. The mint not only adds a pop of color but also a refreshing aroma that complements the citrus flavors beautifully.
  8. Serve immediately and enjoy! If you’ve made extra, you can refrigerate it for a short time, but it’s best enjoyed fresh.

Pro Tips for the Best Frozen Orange Creamsicle Slush

  • Don’t skip the orange zest! It’s a game-changer for flavor. Always zest before juicing to make it easier.
  • Use a high-powered blender for the best texture. A standard blender may struggle with ice, leading to uneven consistency. If you have a food processor, that can work too, but ensure the ice is finely crushed.
  • Adjust the ice-to-liquid ratio carefully. If your slush is too thick, it won’t blend well. Start with less ice and add more until you reach your preferred texture.
  • Be cautious with the sugar! Always start with the lower amount, as you can easily add more, but it’s hard to fix an overly sweet slush.
  • For a fun twist, consider adding a splash of coconut milk or a handful of fresh fruit like strawberries or pineapple. This not only enhances the flavor but also adds a beautiful color contrast.

Variations & Serving Ideas

There are countless ways to put a spin on your Frozen Orange Creamsicle Slush. Consider making a tropical version by adding in some pineapple juice or coconut milk for a delightful tropical twist. If you’re feeling adventurous, try incorporating a handful of frozen mango or peach slices for added sweetness. For a lighter version, swap out the vanilla ice cream for Greek yogurt for a creamy yet tangy alternative.

As for serving ideas, this refreshing slush pairs wonderfully with light summer dishes like grilled chicken skewers, fish tacos, or a simple salad topped with citrus vinaigrette. The bright, zesty flavors of the slush complement these dishes perfectly, making them an ideal pairing for a sunny day.

Storage, Make-Ahead & Reheating

This Frozen Orange Creamsicle Slush is best enjoyed fresh, but if you have leftovers, you can store them in an airtight container in the fridge for up to 2 days. Just keep in mind that the slush may lose some of its texture over time as the ice melts. It doesn’t freeze well, as the ice will turn into a solid block. If you must freeze it, blend again after thawing to restore the slushy consistency. This treat is best the day you make it, as the flavors meld together beautifully overnight, enhancing its deliciousness.

Frequently Asked Questions

Can I make Frozen Orange Creamsicle Slush ahead of time?

Yes — in fact, it tastes even better the next day as the flavors meld. However, it’s best to enjoy it fresh, as the texture can change if stored for too long. If you need to prepare it ahead, keep it in the fridge and re-blend before serving.

What kind of orange juice should I use?

For the best flavor, use freshly squeezed orange juice. However, if you’re short on time, opt for 100% pure store-bought juice without added sugars. This will ensure that your slush remains flavorful and refreshing.

Can I substitute the vanilla ice cream?

Absolutely! If you’re looking for a dairy-free option, coconut milk ice cream or a non-dairy vanilla ice cream can work wonderfully. They will still provide the creamy texture and sweetness you desire.

How can I adjust the sweetness of my slush?

You can easily adjust the sweetness by modifying the amount of sugar added. Start with 1/4 cup and taste the mixture before blending. If you prefer it sweeter, add more sugar gradually until it reaches your desired level.

What should I do if my slush is too thick?

If your slush is too thick, simply add a splash of milk or orange juice and blend again. This will help achieve a more drinkable consistency while maintaining the slushy texture. Adjust gradually to reach your preferred thickness.

Sun-Kissed Frozen Orange Cream Slush

Final Thoughts

The Frozen Orange Creamsicle Slush is a delightful blend of refreshing citrus and creamy goodness, making it a perfect treat for warm days or any time you crave a taste of nostalgia. The way the bright orange flavor dances with the creamy texture truly elevates this slush, transforming it into a satisfying escape from the everyday.

This is the kind of recipe I come back to again and again, especially when I’m looking to cool down or impress guests at a summer gathering. It’s simple to make and always brings smiles all around! I encourage you to try this recipe for yourself—don’t hesitate to share your results or even put your own spin on it. Happy slushing!

Print
clock clock iconcutlery cutlery iconflag flag iconfolder folder iconinstagram instagram iconpinterest pinterest iconfacebook facebook iconprint print iconsquares squares iconheart heart iconheart solid heart solid icon

Frozen Orange Creamsicle Slush


  • Author: Lily author
  • Total Time: 15 minutes
  • Yield: 4 servings 1x
Pin Recipe
Print Recipe

Description

This Frozen Orange Creamsicle Slush is a refreshing treat that combines creamy vanilla and zesty orange flavors. Perfect for hot summer days, it brings back nostalgic memories with every sip.


Ingredients

Scale
  • 2 cups orange juice (freshly squeezed or store-bought)
  • 1 cup vanilla ice cream
  • 1 cup crushed ice
  • 1/2 cup milk (whole or 2%)
  • 1/4 cup granulated sugar (adjust based on sweetness preference)
  • 1 teaspoon vanilla extract
  • Zest of 1 orange (for added flavor)
  • Fresh orange slices and mint leaves (for garnish)

Instructions

  1. Start by preparing your ingredients. Gather 2 cups of orange juice, 1 cup of vanilla ice cream, and 1 cup of crushed ice. Make sure the ice is finely crushed, as larger chunks can make blending difficult.
  2. In a blender, combine the orange juice, vanilla ice cream, crushed ice, and 1/2 cup of milk. Add 1/4 cup of granulated sugar and 1 teaspoon of vanilla extract. If you like a sweeter slush, consider adding a bit more sugar at this stage.
  3. Add the zest of 1 orange to the blender. This step is crucial for enhancing the citrus flavor of your slush. Make sure not to include the bitter white pith—only the flavorful zest.
  4. Blend the mixture on medium-high speed for about 30-45 seconds. Stop once the ingredients are fully combined and the slush has a smooth, even consistency. If you notice large chunks of ice, blend for an additional 10-15 seconds. Avoid over-blending, as this can make the slush too liquidy.
  5. Once blended, taste the slush. If it needs more sweetness, add a little more sugar and blend for a few more seconds. If it’s too thick, you can add a splash of milk to reach your desired consistency.
  6. Pour the slush into glasses. This recipe typically serves 4, but you can easily double it for larger gatherings. Use a spoon to help guide the slush into the glasses if needed.
  7. Garnish each serving with fresh orange slices and mint leaves. The mint not only adds a pop of color but also a refreshing aroma that complements the citrus flavors beautifully.
  8. Serve immediately and enjoy! If you’ve made extra, you can refrigerate it for a short time, but it's best enjoyed fresh.
  • Prep Time: 15 min
  • Cook Time: 0 min
  • Category: Dessert
  • Method: Blending
  • Cuisine: American

Nutrition

  • Serving Size: 1 serving
  • Calories: 200
  • Sugar: 30 g
  • Sodium: 50 mg
  • Fat: 5 g
  • Saturated Fat: 3 g
  • Unsaturated Fat: 2 g
  • Trans Fat: 0 g
  • Carbohydrates: 40 g
  • Fiber: 1 g
  • Protein: 2 g
  • Cholesterol: 20 mg

Keywords: Don't skip the orange zest! It's a game-changer for flavor. Always zest before juicing to make it easier.

Did you make this recipe?

Share a photo and tag us — we can't wait to see what you've made!

Zesty Lemon Poppy Seed Delight

One rainy afternoon, I found myself in my grandmother’s cozy kitchen, the kind that always smelled like warmth and love. She was whipping up her famous Lemon Poppy Seed Loaf, a recipe that had been passed down through generations. As the batter came together, the zesty aroma of fresh lemons filled the air, mingling perfectly with the nutty fragrance of poppy seeds. I can still picture her, apron-clad, as she expertly drizzled a vibrant citrus icing over the loaf, creating a glossy, sun-kissed finish that beckoned us to dive in. It was a moment that sparked my own passion for baking, and this recipe has become a cherished staple in my home ever since.

When you take a bite of this Lemon Poppy Seed Loaf, it’s like a burst of sunshine on your palate. The loaf is beautifully golden, with a tender crumb that melts in your mouth. Each slice is speckled with tiny poppy seeds, adding a delightful crunch that contrasts beautifully with the tangy sweetness of the lemon. And that citrus icing? It’s the finishing touch that elevates this loaf from ordinary to extraordinary, with its bright, zesty flavor dancing on your taste buds.

This recipe stands out because it embraces simplicity while delivering on flavor. I’ve added a hint of vanilla to the batter, enhancing the overall taste and making it even more indulgent. Trust me, once you make this Lemon Poppy Seed Loaf With Citrus Icing, it’ll become a go-to in your baking repertoire.

So, let me show you exactly how to make it!

Zesty Lemon Poppy Seed Delight

Why You’ll Love This Recipe

  • Moist and tender crumb that melts in your mouth, thanks to the perfect balance of butter and buttermilk.
  • Bright, zesty lemon flavor paired with crunchy poppy seeds, creating a delightful texture and taste experience.
  • Easy to whip up in just about an hour, perfect for last-minute gatherings or a cozy afternoon treat.
  • Budget-friendly with everyday ingredients, making it an accessible option for all home bakers.
  • The citrus icing adds a sweet tang that elevates the loaf, turning a simple recipe into a showstopper!

Ingredients

  • 1 ½ cups (190g) all-purpose flour
  • 1 teaspoon baking powder
  • ½ teaspoon baking soda
  • ½ teaspoon salt
  • 3 tablespoons poppy seeds
  • ½ cup (115g) unsalted butter, softened to room temperature
  • 1 cup (200g) granulated sugar
  • 2 large eggs
  • 1 teaspoon vanilla extract
  • 1 teaspoon lemon zest (from about 1 medium lemon)
  • ½ cup (120ml) buttermilk
  • 2 tablespoons fresh lemon juice

For the Citrus Icing:

  • 1 cup (120g) powdered sugar
  • 2 tablespoons fresh lemon juice
  • 1 tablespoon orange juice
  • 1 teaspoon lemon zest (for garnish, optional)

Let’s dive into the key ingredients that make this Lemon Poppy Seed Loaf so special. The all-purpose flour provides the structure and base for the loaf, while the baking powder and baking soda ensure it rises perfectly, giving the loaf a light texture. For a gluten-free variation, you could substitute the flour with a gluten-free all-purpose blend. Poppy seeds not only add a delightful crunch but also contribute to the unique flavor profile that pairs well with the citrus notes.

Unsalted butter is crucial for achieving the buttery richness that makes this loaf so moist. If you’re looking for a dairy-free option, coconut oil or a vegan butter can be used instead. The buttermilk is another essential component, providing acidity that activates the baking soda for a fluffy texture. If you don’t have buttermilk on hand, you can easily make a substitute by mixing ½ cup of milk with 1 tablespoon of vinegar or lemon juice and letting it sit for about 5 minutes.

Step-by-Step Instructions

  1. Preheat your oven to 350°F (175°C). Grease a 9×5-inch loaf pan or line it with parchment paper for easy removal later.
  2. In a medium mixing bowl, whisk together 1 ½ cups of all-purpose flour, 1 teaspoon of baking powder, ½ teaspoon of baking soda, ½ teaspoon of salt, and 3 tablespoons of poppy seeds. This helps to evenly distribute the baking agents and ensures a uniform rise.
  3. In a large mixing bowl, cream together ½ cup of softened unsalted butter and 1 cup of granulated sugar using an electric mixer on medium speed for about 3-4 minutes, until the mixture is light and fluffy. Make sure to scrape down the sides of the bowl occasionally.
  4. Add 2 large eggs, 1 teaspoon of vanilla extract, and 1 teaspoon of lemon zest to the creamed butter and sugar, mixing until fully combined. You want a smooth consistency, so ensure there are no lumps of butter.
  5. In a small bowl, combine ½ cup of buttermilk and 2 tablespoons of fresh lemon juice. Alternately add the dry ingredients and buttermilk mixture to the butter mixture, starting and ending with the dry ingredients. Mix just until combined; do not overmix, as this can lead to a dense loaf.
  6. Pour the batter into the prepared loaf pan. Smooth the top with a spatula, ensuring it’s even. Bake in the preheated oven for 50-60 minutes, or until a toothpick inserted in the center comes out clean. The edges should be lightly golden brown, and the center should feel just set.
  7. Once baked, remove the loaf from the oven and allow it to cool in the pan for about 10 minutes. Then, transfer it to a wire rack to cool completely. Resist the urge to slice too soon, as it will be crumbly if it’s still warm.
  8. While the loaf is cooling, prepare the citrus icing. In a medium bowl, whisk together 1 cup of powdered sugar, 2 tablespoons of fresh lemon juice, and 1 tablespoon of orange juice until smooth. If the icing is too thick, you can add a little more juice to reach your desired consistency.
  9. Once the loaf is completely cool, drizzle the citrus icing over the top. If you like, sprinkle with an additional teaspoon of lemon zest for an extra pop of flavor and color.

Pro Tips for the Best Lemon Poppy Seed Loaf With Citrus Icing

  • Be careful not to overmix your batter; this is a common mistake that can lead to a dense loaf. Mix just until the dry ingredients are incorporated for a light and fluffy texture.
  • Use room temperature ingredients, especially the butter and eggs. This helps to create a smoother batter and ensures even baking. Take your eggs out of the fridge about 30 minutes before you start.
  • For a more pronounced lemon flavor, consider adding a little lemon extract in addition to the zest and juice. Just a half teaspoon can elevate the citrus notes significantly.
  • When measuring your flour, spoon it into the measuring cup and level it off with a knife instead of scooping directly from the bag. This prevents packing and ensures you don’t end up with a dry loaf.
  • Invest in a good quality loaf pan; it makes a difference in heat distribution, which ensures even baking. If your pan is dark-coated, reduce the oven temperature by 25°F to prevent over-browning.

Variations & Serving Ideas

For a delightful twist, consider adding blueberries or raspberries to the batter for a fruity burst of flavor. You can also experiment with different citrus fruits—try lime or grapefruit zest and juice for a refreshing change. For a healthier option, substitute half of the all-purpose flour with whole wheat flour for added fiber without compromising too much on texture.

This Lemon Poppy Seed Loaf pairs beautifully with a light salad, such as a mixed greens salad with a vinaigrette, or a cup of tea for a cozy afternoon treat. It also complements a creamy cheese platter, as the acidity of the loaf balances rich cheeses perfectly. Lastly, a scoop of vanilla ice cream on the side creates a delightful contrast of temperatures and flavors!

Storage, Make-Ahead & Reheating

This Lemon Poppy Seed Loaf can be stored at room temperature for up to 3 days if wrapped tightly in plastic wrap. If you want to keep it longer, it freezes well for up to 3 months. To freeze, wrap the loaf tightly in plastic wrap and then in aluminum foil to prevent freezer burn.

When you’re ready to enjoy it again, simply thaw it in the fridge overnight. Reheat individual slices in the microwave for 15-20 seconds or in a toaster oven until warmed through. Interestingly, many people find that this loaf tastes even better the next day, as the flavors have time to meld!

Frequently Asked Questions

Can I make Lemon Poppy Seed Loaf With Citrus Icing ahead of time?

Yes — in fact, it tastes even better the next day! You can make the loaf a day in advance, allowing the flavors to develop. Just be sure to store it in an airtight container to maintain its moisture.

Can I substitute the poppy seeds?

Absolutely! If you don’t have poppy seeds on hand or prefer an alternative, you can use sesame seeds for a similar crunch or omit them entirely for a smooth loaf.

What can I use instead of buttermilk?

If you don’t have buttermilk, you can easily create a substitute by mixing ½ cup of milk (dairy or plant-based) with 1 tablespoon of vinegar or lemon juice. Let it sit for 5 minutes before using in the recipe.

How can I make this recipe gluten-free?

To make a gluten-free version of this Lemon Poppy Seed Loaf, substitute the all-purpose flour with a gluten-free all-purpose flour blend. Just ensure that the blend contains a binding agent like xanthan gum for the best results.

What is the best way to store leftover loaf?

Leftover Lemon Poppy Seed Loaf should be stored in an airtight container at room temperature for up to 3 days. For longer storage, wrap it tightly and freeze for up to 3 months. Thaw it before serving for the best texture.

Zesty Lemon Poppy Seed Delight

Final Thoughts

The Lemon Poppy Seed Loaf with Citrus Icing is truly a delightful treat that brings a burst of brightness to any occasion. The zesty lemon flavor combined with the subtle crunch of poppy seeds creates a satisfying balance, while the citrus icing adds a touch of sweetness that perfectly complements the loaf’s tanginess.

This is the kind of recipe I come back to again and again, especially when I want to brighten up a gloomy day or celebrate a small victory. The aroma that fills the kitchen as it bakes is absolutely heavenly! I encourage you to give this recipe a try; you might just find it becoming a beloved staple in your home. Don’t forget to share your results or even add your own unique twist—I can’t wait to see what you create!

Print
clock clock iconcutlery cutlery iconflag flag iconfolder folder iconinstagram instagram iconpinterest pinterest iconfacebook facebook iconprint print iconsquares squares iconheart heart iconheart solid heart solid icon

Lemon Poppy Seed Loaf


  • Author: Lily author
  • Total Time: 48 minute
  • Yield: 1 loaf 1x
Pin Recipe
Print Recipe

Description

This Lemon Poppy Seed Loaf is a delightful treat that combines zesty lemon flavor with crunchy poppy seeds. Topped with a citrus icing, it’s perfect for any occasion.


Ingredients

Scale
  • 1 ½ cups (190g) all-purpose flour
  • 1 teaspoon baking powder
  • ½ teaspoon baking soda
  • ½ teaspoon salt
  • 3 tablespoons poppy seeds
  • ½ cup (115g) unsalted butter, softened to room temperature
  • 1 cup (200g) granulated sugar
  • 2 large eggs
  • 1 teaspoon vanilla extract
  • 1 teaspoon lemon zest (from about 1 medium lemon)
  • ½ cup (120ml) buttermilk
  • 2 tablespoons fresh lemon juice
  • 1 cup (120g) powdered sugar
  • 2 tablespoons fresh lemon juice
  • 1 tablespoon orange juice
  • 1 teaspoon lemon zest (for garnish, optional)

Instructions

  1. Preheat your oven to 350°F (175°C). Grease a 9×5-inch loaf pan or line it with parchment paper for easy removal later.
  2. In a medium mixing bowl, whisk together 1 ½ cups of all-purpose flour, 1 teaspoon of baking powder, ½ teaspoon of baking soda, ½ teaspoon of salt, and 3 tablespoons of poppy seeds. This helps to evenly distribute the baking agents and ensures a uniform rise.
  3. In a large mixing bowl, cream together ½ cup of softened unsalted butter and 1 cup of granulated sugar using an electric mixer on medium speed for about 3-4 minutes, until the mixture is light and fluffy. Make sure to scrape down the sides of the bowl occasionally.
  4. Add 2 large eggs, 1 teaspoon of vanilla extract, and 1 teaspoon of lemon zest to the creamed butter and sugar, mixing until fully combined. You want a smooth consistency, so ensure there are no lumps of butter.
  5. In a small bowl, combine ½ cup of buttermilk and 2 tablespoons of fresh lemon juice. Alternately add the dry ingredients and buttermilk mixture to the butter mixture, starting and ending with the dry ingredients. Mix just until combined; do not overmix, as this can lead to a dense loaf.
  6. Pour the batter into the prepared loaf pan. Smooth the top with a spatula, ensuring it’s even. Bake in the preheated oven for 50-60 minutes, or until a toothpick inserted in the center comes out clean. The edges should be lightly golden brown, and the center should feel just set.
  7. Once baked, remove the loaf from the oven and allow it to cool in the pan for about 10 minutes. Then, transfer it to a wire rack to cool completely. Resist the urge to slice too soon, as it will be crumbly if it’s still warm.
  8. While the loaf is cooling, prepare the citrus icing. In a medium bowl, whisk together 1 cup of powdered sugar, 2 tablespoons of fresh lemon juice, and 1 tablespoon of orange juice until smooth. If the icing is too thick, you can add a little more juice to reach your desired consistency.
  9. Once the loaf is completely cool, drizzle the citrus icing over the top. If you like, sprinkle with an additional teaspoon of lemon zest for an extra pop of flavor and color.
  • Prep Time: 15 mins
  • Cook Time: 50-60 mins
  • Category: Dessert
  • Method: Baking
  • Cuisine: American

Nutrition

  • Serving Size: 1 slice
  • Calories: 200
  • Sugar: 15 g
  • Sodium: 150 mg
  • Fat: 8 g
  • Saturated Fat: 5 g
  • Unsaturated Fat: 3 g
  • Trans Fat: 0 g
  • Carbohydrates: 30 g
  • Fiber: 1 g
  • Protein: 3 g
  • Cholesterol: 40 mg

Keywords: Be careful not to overmix your batter; this is a common mistake that can lead to a dense loaf. Use room temperature ingredients for a smoother batter and even baking.

Did you make this recipe?

Share a photo and tag us — we can't wait to see what you've made!

  • Privacy Policy
  • Terms Of Service
  • Contact
  • About
  • GDPR

Copyright © 2025 Homesmad