• Skip to primary navigation
  • Skip to main content
  • Skip to primary sidebar
Homesmad

Homesmad

  • Home
  • Breakfast & Brunch
  • Appetizers & Snacks
  • Dinner
  • Dessert
  • About
  • Privacy Policy
  • Contact
Homesmad
  • Home
  • Breakfast & Brunch
  • Appetizers & Snacks
  • Dinner
  • Dessert
  • About
  • Privacy Policy
  • Contact

Delicious No-Bake White Chocolate Rice Krispie Balls

November 24, 2025 by Lily author

White Chocolate Rice Krispie Balls are more than just a simple treat; they are a delightful journey back to childhood, a testament to the magic of simple ingredients combined with a touch of ingenuity. I’m absolutely thrilled to share this elevated take on a timeless classic with you today. From their humble beginnings as a Kellogg’s creation in the late 1930s, designed by Mildred Day for a Camp Fire Girls bake sale, Rice Krispie Treats quickly became a beloved staple in kitchens across America. They represent the ultimate no-bake convenience, cherished by generations for their irresistible crunch and sweet, gooey goodness.

Why Everyone Loves This Elevated Classic

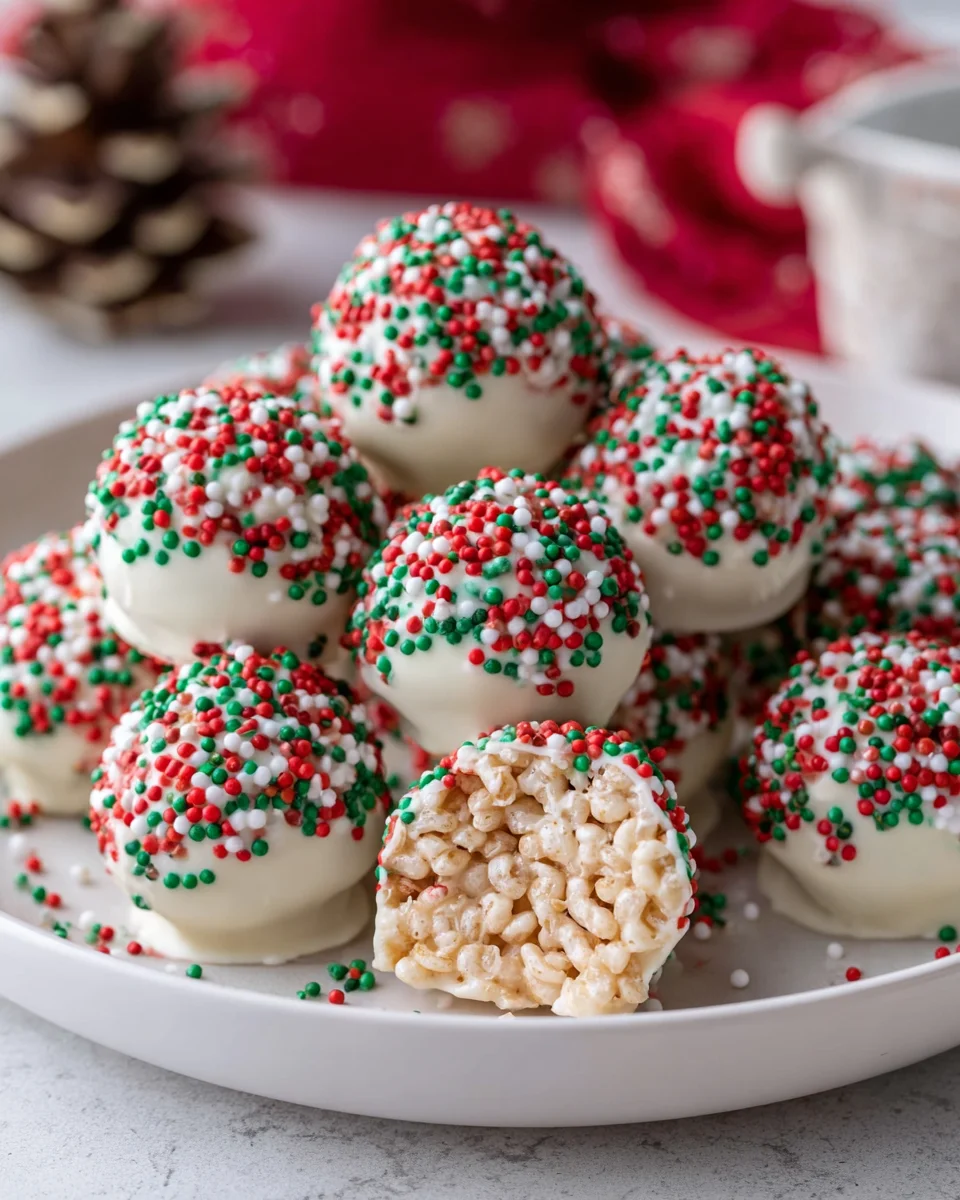
What truly makes our White Chocolate Rice Krispie Balls stand out is the exquisite addition of smooth, velvety white chocolate. This enhancement transforms the familiar crispy texture into an even more decadent experience, marrying the satisfying snap of rice cereal with a creamy, melt-in-your-mouth finish that simply has everyone coming back for more. Whether you’re preparing for a holiday gathering, a school event, or simply craving an effortless yet elegant dessert, these balls are perfect. They are incredibly easy to make, require minimal ingredients, and always deliver maximum smiles.

Delicious No-Bake White Chocolate Rice Krispie Balls this RECIPE

Ingredients:

Creating these delightful White Chocolate Rice Krispie Balls is truly a joy, and it all starts with gathering the right ingredients. Quality makes a difference here, especially with the white chocolate, so try to pick brands you trust for great flavor!

  • Unsalted Butter (3 tablespoons): This is our foundational fat, providing a rich base and ensuring our marshmallows melt smoothly without sticking to the pot. Using unsalted butter gives us precise control over the overall sweetness and saltiness of our White Chocolate Rice Krispie Balls.
  • Miniature Marshmallows (10 ounces, about 6 cups lightly packed): The star binder of any Rice Krispie treat! Miniature marshmallows melt more quickly and evenly than larger ones, making the process much smoother. They provide that classic chewy texture and sweet stickiness we all adore in our White Chocolate Rice Krispie Balls.
  • High-Quality White Chocolate Chips or Chopped White Chocolate Bar (12 ounces): This is where the magic truly happens for our White Chocolate Rice Krispie Balls. Opt for a good quality white chocolate that lists cocoa butter as a primary ingredient, not just sugar and palm oil. This will ensure a smoother melt, a richer flavor, and a better set. You can use chips or finely chopped bars.
  • Crispy Rice Cereal (6 cups): The namesake ingredient! Often known by its brand name, Rice Krispies, this cereal provides the iconic light, airy, and crispy texture. Fresh cereal is key here; stale cereal can lead to a less satisfying crunch in your White Chocolate Rice Krispie Balls.
  • Vanilla Extract (1 teaspoon): A touch of pure vanilla extract elevates the flavor profile, adding warmth and depth that beautifully complements the sweetness of the white chocolate and marshmallows. It’s a subtle but essential addition.
  • Pinch of Salt (optional, but highly recommended): Just a tiny pinch of fine sea salt can miraculously balance out the sweetness, making the white chocolate flavor shine even brighter. It’s a trick many professional bakers use!

Optional Toppings and Embellishments:

While delicious on their own, our White Chocolate Rice Krispie Balls can be made even more special with a few extra touches!

  • Additional White Chocolate (4 ounces): For drizzling or dipping. If you want to add an extra layer of white chocolate decadence, have some extra on hand.
  • Colorful Sprinkles: Perfect for celebrations, adding a festive look and a fun texture.
  • Chopped Nuts (e.g., pistachios, pecans): For a contrasting crunch and nutty flavor.
  • Toasted Coconut Flakes: A tropical twist that pairs wonderfully with white chocolate.
  • Freeze-Dried Raspberries or Strawberries (crushed): For a burst of tartness and beautiful color.

Preparing Your Workspace and Ingredients

Before we even think about turning on the stove, a little prep work goes a long way in making the creation of your White Chocolate Rice Krispie Balls a smooth, enjoyable, and successful process. Trust me, once that marshmallow mixture starts melting, things move quickly, and you’ll want everything ready to go!

  1. Gather Your Tools: You’ll need a very large mixing bowl (the biggest you have!), a large saucepan (preferably non-stick or heavy-bottomed to prevent scorching), a rubber spatula or wooden spoon, a measuring cup for liquids, measuring spoons, and a couple of baking sheets lined with parchment paper or silicone baking mats. Having a small bowl of water nearby for wetting your hands during shaping is also a great idea.
  2. Measure Everything Out: This is crucial. Measure your crispy rice cereal into your very large mixing bowl. Measure your marshmallows and have them ready. Measure your white chocolate chips or chop your white chocolate bar into small, uniform pieces. Even measure your vanilla extract and have that pinch of salt ready. When the time comes to combine everything, you won’t want to be fumbling with measurements.
  3. Prepare Your Baking Sheets: Line two large baking sheets with parchment paper or silicone mats. This is where your finished White Chocolate Rice Krispie Balls will cool and set. The non-stick surface is important to prevent them from sticking. If you only have one baking sheet, plan to work in batches or clear some counter space to set them directly on parchment.
  4. Grease Your Spatula (Optional, but Recommended): Lightly grease your rubber spatula or wooden spoon with a tiny bit of butter or a neutral cooking spray. This will help immensely when stirring the sticky marshmallow mixture and when mixing it into the cereal.

Melting the Sweet Foundation

This phase is all about creating that luscious, gooey base for our White Chocolate Rice Krispie Balls. We need to melt the butter, marshmallows, and white chocolate into a smooth, cohesive mixture. Patience and low heat are your best friends here to avoid scorching the ingredients, especially the white chocolate.

  1. Melt the Butter: Place your large saucepan over medium-low heat. Add the 3 tablespoons of unsalted butter. Allow the butter to melt completely, swirling the pan gently to ensure it coats the bottom. We’re not looking to brown the butter here, just melt it until it’s liquid and shimmering.
    Why low heat?

    Using low heat is absolutely critical. High heat can burn the butter, toast the marshmallows too quickly, and most importantly, cause the white chocolate to seize or burn, resulting in a gritty texture and an unpleasant taste. We want a slow, gentle melt.

  2. Add the Marshmallows: Once the butter is fully melted, add all 10 ounces (about 6 cups) of miniature marshmallows to the saucepan. Stir them gently with your greased spatula or wooden spoon to coat them in the melted butter. Continue to stir continuously, or at least very frequently, as they begin to soften. They will start to clump together, then slowly deflate and melt into a thick, sticky liquid.

    Tip: If you find the marshmallows are sticking excessively, momentarily lift the pan off the heat while stirring, then return it. This helps distribute the heat more evenly.

  3. Incorporate the White Chocolate: Once the marshmallows are about three-quarters melted – meaning there are still a few small lumps but the majority is liquid – add your 12 ounces of white chocolate chips or chopped white chocolate bar to the pan. Continue stirring gently and consistently. The residual heat from the melted marshmallows and the pan will help melt the white chocolate.
    Patience with white chocolate:

    White chocolate can be a bit finicky. It contains cocoa butter, which is sensitive to high heat. Melting it slowly with the marshmallows helps prevent it from seizing (turning into a grainy, stiff paste). Keep the heat on low and stir until the mixture is completely smooth and no lumps of marshmallow or white chocolate remain. This might take a few minutes, but it’s worth the wait for a perfectly smooth base for your White Chocolate Rice Krispie Balls.

  4. Remove from Heat and Finish: As soon as the mixture is completely smooth, glossy, and fully combined, immediately remove the saucepan from the heat. Stir in the 1 teaspoon of vanilla extract and the optional pinch of salt. Mix well until everything is evenly distributed. The vanilla adds a beautiful aromatic quality, and the salt truly balances the sweetness, enhancing the overall flavor of your future White Chocolate Rice Krispie Balls. Don’t underestimate that pinch of salt!

Combining and Shaping the White Chocolate Rice Krispie Balls

Now that we have our wonderfully gooey, sweet white chocolate and marshmallow base, it’s time to bring in the crispy cereal and transform it into our delightful White Chocolate Rice Krispie Balls!

  1. Combine with Crispy Rice Cereal: Immediately pour the warm, melted white chocolate and marshmallow mixture into your very large mixing bowl containing the 6 cups of crispy rice cereal. Work quickly but gently. Using your greased rubber spatula or spoon, fold the mixture over the cereal, ensuring every single piece of cereal gets thoroughly coated. Continue mixing until the cereal is evenly distributed throughout the gooey white chocolate marshmallow base.
    Why a large bowl?

    A large bowl is essential here to give you enough room to mix without spilling. If your bowl is too small, you’ll find it difficult to properly coat all the cereal, leading to some dry spots. Ensure the cereal is fully incorporated; no dry pockets should remain!

    Important: Don’t press down too hard or crush the cereal during mixing. We want to preserve that light, airy crispness that makes these treats so enjoyable.

  2. Cool Slightly Before Shaping: Allow the mixture to cool in the bowl for about 5-10 minutes. It will still be warm, but it needs to be cool enough to handle comfortably without burning your hands. If it’s too hot, the balls will be difficult to form and might lose their shape as they cool. If it cools too much, it will become too stiff to work with.

    The perfect temperature: You’re looking for a temperature where you can comfortably touch the mixture for a few seconds. It will still be warm and pliable.

  3. Prepare for Shaping: Lightly grease your hands with a tiny bit of butter, cooking spray, or dampen them with water. This will prevent the incredibly sticky mixture from adhering to your palms. Re-grease or re-wet your hands as needed throughout the shaping process.
  4. Form the Balls: Take approximately 2 tablespoons of the mixture (or use a 2-tablespoon cookie scoop for consistency) and gently roll it between your greased palms to form a compact, uniform ball, roughly 1.5 to 2 inches in diameter. Place each formed White Chocolate Rice Krispie Ball onto your prepared baking sheets.
    Consistency is key:

    Try to make your balls roughly the same size so they cool and set evenly, and look appealing when served. Don’t press the mixture too tightly, as this can make the balls overly dense and compromise the desired crisp texture. A gentle, firm roll is all you need.

    Troubleshooting: If the mixture becomes too sticky on your hands, re-grease them. If the mixture in the bowl starts to become too stiff to work with, you can pop it back into the microwave for 10-15 seconds on low power to soften it slightly, then continue shaping.

Optional Decoration and Chilling

Once your beautiful White Chocolate Rice Krispie Balls are formed, you have the option to add some extra flair or simply move straight to the chilling stage to set them perfectly.

  1. Optional Decoration (if desired):
    • White Chocolate Drizzle: If you’re adding an extra white chocolate drizzle, melt the additional 4 ounces of white chocolate in a microwave-safe bowl in 20-second intervals, stirring after each, until smooth. Alternatively, use a double boiler for a gentler melt. Once melted, either use a spoon to drizzle artistic patterns over the balls or transfer the melted chocolate to a small piping bag (or a zip-top bag with a tiny corner snipped off) for more controlled lines.
    • Sprinkles or Toppings: Immediately after drizzling with white chocolate (while it’s still wet) or simply after forming the balls, gently press sprinkles, crushed nuts, or other desired toppings onto the surface of the White Chocolate Rice Krispie Balls. The warmth of the mixture or the wet chocolate drizzle will help them adhere.
  2. Chill to Set: Once all your White Chocolate Rice Krispie Balls are formed and decorated (if applicable), place the baking sheets into the refrigerator. Allow them to chill for at least 30 minutes, or until they are firm to the touch and fully set. This chilling time is important for the white chocolate and marshmallow mixture to firm up, making the balls hold their shape perfectly and giving them that satisfying chew.

Serving and Storage

Your incredibly delicious White Chocolate Rice Krispie Balls are now ready to be enjoyed! Here are some final tips on serving and keeping them fresh.

  1. Serve and Enjoy: Once chilled and firm, arrange your White Chocolate Rice Krispie Balls on a platter and serve! They make a fantastic dessert, a delightful snack, or a wonderful addition to any party spread. The combination of sweet white chocolate and the crispy texture is truly irresistible.
  2. Storage: Store any leftover White Chocolate Rice Krispie Balls in an airtight container at room temperature for up to 3-4 days. While they are safe to store in the refrigerator, sometimes the cold can make them a bit too firm. If you do refrigerate them, allow them to come to room temperature for about 10-15 minutes before serving for the best texture. Always ensure the container is airtight to prevent them from drying out and losing their delightful crispness.

Delicious No-Bake White Chocolate Rice Krispie Balls

Conclusion:

So, there you have it! This recipe isn’t just another sweet treat; it’s truly a game-changer when you’re craving something delightful, effortless, and utterly satisfying. I promise you, these delightful bites are poised to become a new staple in your baking repertoire, whether you’re a seasoned chef or just starting out in the kitchen. What I adore most about these is their incredible simplicity coupled with an irresistible charm. They deliver that perfect balance of crispy texture from the puffed rice cereal and the smooth, sweet creaminess of melted white chocolate, a combination that truly sings on the palate. Every single bite offers a comforting crunch followed by a decadent melt-in-your-mouth sensation that is simply unmatched. They’re fantastic for satisfying those spontaneous sweet cravings, yet elegant enough to grace any dessert table. From bustling birthday parties to quiet afternoon tea sessions, these treats fit seamlessly into any occasion, bringing a smile to everyone who tries them. I’ve found them to be an absolute lifesaver for last-minute gatherings, as they come together in a flash without needing any oven time, which is a huge bonus in my book! They’re also wonderfully portable, making them perfect for lunchboxes, picnics, or sharing with friends and colleagues. The joy they bring is truly infectious, and the compliments you’ll receive are almost guaranteed. Seriously, prepare for the “oohs” and “aahs” when you serve these up!

Elevate Your Treat: Serving Suggestions and Creative Variations

Now, how best to enjoy these little spheres of joy? While they are undeniably perfect just as they are, straight from the fridge, I love to get creative with serving suggestions and variations to truly make them my own. For a simple yet elegant presentation, arrange your finished goodies on a beautiful platter alongside fresh berries or a drizzle of raspberry coulis – the tartness provides a wonderful counterpoint to the sweet chocolate. They are also absolutely divine with a cup of freshly brewed coffee or a soothing herbal tea, making for a truly indulgent afternoon pick-me-up. If you’re looking to elevate them even further, consider a sprinkle of flaky sea salt right after they set for that sophisticated sweet-and-salty kick, or perhaps a dusting of cocoa powder for a touch of bitter contrast. For those who love a bit of sparkle, edible glitter or colorful sprinkles can transform them into festive delights, perfect for holiday celebrations or children’s parties.

Thinking about variations? Oh, the possibilities are endless! You could experiment by swapping out the white chocolate for milk chocolate, dark chocolate, or even a mix of all three for a multi-chocolate marvel. A swirl of caramel or peanut butter through the melted chocolate mixture would add another layer of richness and flavor. Imagine adding a few drops of peppermint extract to the melted chocolate for a festive twist during the winter months, or a hint of almond extract for a delicate, nutty undertone. You could also fold in other fun mix-ins like mini marshmallows for extra chewiness, chopped dried cranberries for a tart surprise, or even finely crushed pretzels for an interesting salty crunch. The beauty of these White Chocolate Rice Krispie Balls is their incredible adaptability; they’re a blank canvas for your culinary imagination! Don’t be afraid to experiment with your favorite flavors and textures; that’s where the real fun begins.

I genuinely can’t wait for you to experience the magic of this recipe for yourself. It’s simple, it’s fun, and the results are incredibly rewarding. So, go ahead, gather your ingredients, and whip up a batch (or two!). I am confident that these delicious treats will quickly become a cherished favorite in your home. Once you’ve made them, I’d absolutely love to hear about your experience! Did you stick to the classic recipe, or did you try out one of my suggested variations? Perhaps you even came up with your own unique twist? Please, don’t hesitate to share your thoughts, tips, and especially your photos with me. Your culinary adventures inspire me, and I always enjoy seeing your creative interpretations. Happy snacking, my friends!


White Chocolate Rice Krispie Balls

A delightful, no-bake treat, these White Chocolate Rice Krispie Balls combine crispy rice cereal with a smooth, velvety white chocolate and marshmallow base, offering a decadent twist on a classic childhood favorite.

Prep Time
20 Minutes
Cook Time
10 Minutes
Total Time
10 Minutes
Servings
24 balls

Ingredients


Instructions


Important Information

Nutrition Facts (Per Serving)

It is important to consider this information as approximate and not to use it as definitive health advice.

Allergy Information

Please check ingredients for potential allergens and consult a health professional if in doubt.

« Previous Post
Crispy, Cheesy Garlic Parmesan Focaccia Bread You'll Love
Next Post »
Fall Spiced Apple Cinnamon Snickerdoodle Cookies Recipe

If you enjoyed this…

Rice Krispie Chocolate Chip Cookies

Rice Krispie Chocolate Chip Cookies – Crispy, Chewy & Loaded with Chocolate!

Baked Pumpkin Fritter Bites: Easy & Delicious Fall Treat!

Pumpkin Cheesecake Truffles: Easy No-Bake Dessert Bites

Primary Sidebar

Browse by Diet

BreakfastDinnerLunchDessertAppetizer

Sweet Peach Yogurt Parfait Delight

One of my fondest memories is from a lazy summer afternoon spent at my grandmother’s house. The sun filtered through the kitchen window, casting a warm glow over the table where she would create her culinary magic. It was during one of those blissful moments that I first tasted her Peach Yogurt Parfait with Honey and Granola. The sweet aroma of ripe peaches mingling with creamy yogurt and the crunch of granola was nothing short of heavenly. It felt like summer captured in a bowl, and I still remember the joy of diving in with a spoon, each layer revealing a new burst of flavor.

When I think about that parfait, I can almost hear the gentle hum of the bees outside, reminding me of the floral notes that honey brings to every bite. The vibrant yellows and soft oranges of the peaches contrast beautifully with the creamy white yogurt and the golden crunch of granola. It’s a dish that not only looks delightful but also tastes like a celebration of fresh, wholesome ingredients.

What makes my version of this Peach Yogurt Parfait special is the careful balance of flavors and textures. I use ripe, juicy peaches, drizzled with locally sourced honey, and a homemade granola that’s bursting with nuts and seeds for an extra crunch. It’s a simple dish, but every layer is crafted with love and attention.

Let me show you exactly how to make this delightful parfait, so you can bring a bit of that summer magic into your kitchen!

Sweet Peach Yogurt Parfait Delight

Why You’ll Love This Recipe

  • Delightfully creamy texture from the Greek yogurt, paired with the juicy sweetness of fresh peaches.
  • Ready in under 20 minutes, making it a quick and satisfying breakfast or snack option.
  • Budget-friendly, using common ingredients that you may already have in your pantry.
  • Customizable with your favorite granola and nuts, allowing you to tailor each parfait to your taste.
  • Perfectly balanced flavors with the bright acidity of lemon juice and the sweetness of honey enhancing the peaches.

Ingredients

  • For the Parfait:
  • 2 cups plain Greek yogurt (or vanilla yogurt for a sweeter option)
  • 2 large ripe peaches, diced (about 2 cups)
  • 1 tablespoon fresh lemon juice (to prevent browning of peaches)
  • 2 tablespoons honey (plus more for drizzling)
  • 1 teaspoon vanilla extract (optional for extra flavor)
  • For the Granola:
  • 1 cup granola (store-bought or homemade; see notes for a simple granola recipe)
  • 1/4 cup sliced almonds (optional for added crunch)
  • 1/4 cup shredded coconut (optional for added flavor)

Let’s dive into some key ingredients that make this Peach Yogurt Parfait so delightful! First, the Greek yogurt is not only creamy but also packed with protein, making it a satisfying option for breakfast or a snack. If you’re looking for a sweeter option, you can easily substitute it with vanilla yogurt, though it may alter the overall flavor balance. Next, the ripe peaches are the star of the show; their natural sweetness shines through, so I recommend choosing peaches that yield slightly to pressure, indicating they’re perfectly ripe. If peaches aren’t in season, feel free to use nectarines or even frozen peaches—just thaw them before use. Finally, honey adds a lovely floral sweetness that ties everything together. If you prefer, maple syrup can serve as a delicious substitute.

Step-by-Step Instructions

  1. Start by preparing the peaches. Wash them thoroughly, then slice and dice them into bite-sized pieces. In a medium bowl, toss the diced peaches with 1 tablespoon of fresh lemon juice to prevent browning. Set aside for about 5 minutes while the lemon juice works its magic.
  2. In a separate bowl, combine the Greek yogurt, 2 tablespoons of honey, and 1 teaspoon of vanilla extract if using. Stir the mixture until smooth and thoroughly blended. This should take about a minute. Avoid overmixing to maintain the creaminess of the yogurt.
  3. Now it’s time to layer your parfait. Grab a clear glass or bowl to showcase your beautiful creation. Start with a generous spoonful of the yogurt mixture at the bottom—about 1/4 cup will do. Use a spoon to spread it evenly.
  4. Add a layer of the diced peaches over the yogurt, ensuring they cover the yogurt completely. You might want to use about half of what you have prepared—roughly 1 cup. This layer should be visually appealing, so arrange the peaches neatly.
  5. Sprinkle 1/4 cup of granola over the peaches. This adds a delightful crunch. Make sure to distribute it evenly to ensure every bite has that satisfying texture. Avoid packing it down too tightly, as you want it to maintain its crunch.
  6. Repeat the layers: spoon in another 1/4 cup of yogurt, followed by another cup of peaches, and another sprinkle of granola. You should have at least two layers, but feel free to add more depending on your glass size.
  7. Finish off your parfait with a drizzle of honey on top for added sweetness and a touch of elegance. If you’re using sliced almonds or shredded coconut, sprinkle them on top now. It adds a lovely visual contrast and extra flavor.
  8. Serve immediately or refrigerate for up to 30 minutes before serving to allow the flavors to meld together. However, I recommend enjoying it fresh to maintain the granola’s crunch.

Pro Tips for the Best Peach Yogurt Parfait With Honey And Granola

  • Make sure to choose ripe peaches for the best flavor and texture. A common mistake is using unripe fruit, which can lead to a less enjoyable parfait. Look for peaches that are fragrant and slightly soft to the touch.
  • Use a clear glass to assemble your parfait; this not only makes for a beautiful presentation but also allows you to see the colorful layers, which adds to the enjoyment of eating it.
  • For an even creamier texture, consider whipping the Greek yogurt with a hand mixer for a couple of minutes before layering. This small adjustment makes a huge difference in mouthfeel.
  • Be mindful of the granola-to-yogurt ratio. Too much granola can overwhelm the parfait, while too little can make it feel too creamy. Aim for about 1/4 cup of granola per layer for the perfect balance.
  • If you’re making this for a gathering, consider preparing the yogurt and peaches ahead of time and layering them just before serving. This ensures the granola stays crunchy!

Variations & Serving Ideas

There are so many ways to get creative with your Peach Yogurt Parfait! For a tropical twist, swap out the peaches for mangoes or pineapples and top with coconut flakes. If you prefer a berry flavor, mix in some blueberries or strawberries with the peaches for added color and taste. For a nutty version, incorporate chopped walnuts or pecans instead of almonds.

As for serving ideas, this parfait pairs beautifully with a side of scrambled eggs for a hearty breakfast or fresh fruit salad for a light lunch. You might also enjoy it alongside whole grain toast with almond butter for an energizing snack. The contrast of flavors and textures will elevate your meal experience!

Storage, Make-Ahead & Reheating

The Peach Yogurt Parfait is best enjoyed fresh, but you can prepare some components ahead of time. Store the layered parfait in an airtight container in the refrigerator for up to 24 hours. However, be cautious; the granola may lose its crunch if stored too long. You can freeze the yogurt and peach mixture for up to 2 months; just remember to thaw it in the refrigerator overnight before serving.

If you plan to enjoy this dish the next day, it can taste even better as the flavors meld together. Just remember to add the granola right before serving to keep its delightful crunch!

Frequently Asked Questions

Can I make Peach Yogurt Parfait With Honey And Granola ahead of time?

Yes — in fact, it tastes even better the next day as the flavors meld. However, I recommend waiting to add the granola until just before serving to maintain its crunch.

What can I substitute for Greek yogurt?

If you prefer a lighter option, you can substitute Greek yogurt with regular yogurt or a dairy-free alternative like coconut yogurt. Just remember that this may alter the creaminess and flavor profile slightly.

Can I use frozen peaches for this parfait?

Absolutely! Just make sure to thaw the frozen peaches before using them. They will still add great flavor, though the texture may be slightly softer than fresh peaches.

How do I make the parfait vegan?

To make a vegan version, substitute the Greek yogurt with a plant-based yogurt alternative, and replace honey with maple syrup or agave nectar. This keeps the parfait sweet while adhering to a vegan diet.

What other fruits can I use in this recipe?

You can mix and match fruits based on your preference. Try using strawberries, blueberries, raspberries, or even bananas. Just make sure to adjust the lemon juice as needed to prevent browning.

Sweet Peach Yogurt Parfait Delight

Final Thoughts

The Peach Yogurt Parfait with Honey and Granola is a delightful blend of creamy yogurt, sweet peaches, and crunchy granola that creates a satisfying and nourishing treat. Each layer bursts with flavor, making it a perfect choice for breakfast or a light dessert.

This is the kind of recipe I come back to again and again, especially when I want something refreshing and wholesome to start my day. The harmony of sweet and tart flavors, combined with the delightful crunch, never fails to lift my spirits!

I encourage you to give this parfait a try and indulge in its comforting goodness. Feel free to share your results or even add your own twist—perhaps a sprinkle of cinnamon or a handful of nuts. Enjoy creating your perfect parfait!

Print
clock clock iconcutlery cutlery iconflag flag iconfolder folder iconinstagram instagram iconpinterest pinterest iconfacebook facebook iconprint print iconsquares squares iconheart heart iconheart solid heart solid icon

Peach Yogurt Parfait


  • Author: Lily author
  • Total Time: 15 minutes
  • Yield: 4 servings 1x
Pin Recipe
Print Recipe

Description

This Peach Yogurt Parfait combines creamy Greek yogurt, juicy peaches, and crunchy granola for a delightful treat. It’s a perfect breakfast or snack that captures the essence of summer in every bite.


Ingredients

Scale
  • For the Parfait:
  • 2 cups plain Greek yogurt (or vanilla yogurt for a sweeter option)
  • 2 large ripe peaches, diced (about 2 cups)
  • 1 tablespoon fresh lemon juice (to prevent browning of peaches)
  • 2 tablespoons honey (plus more for drizzling)
  • 1 teaspoon vanilla extract (optional for extra flavor)
  • For the Granola:
  • 1 cup granola (store-bought or homemade; see notes for a simple granola recipe)
  • 1/4 cup sliced almonds (optional for added crunch)
  • 1/4 cup shredded coconut (optional for added flavor)

Instructions

  1. Start by preparing the peaches. Wash them thoroughly, then slice and dice them into bite-sized pieces. In a medium bowl, toss the diced peaches with 1 tablespoon of fresh lemon juice to prevent browning. Set aside for about 5 minutes while the lemon juice works its magic.
  2. In a separate bowl, combine the Greek yogurt, 2 tablespoons of honey, and 1 teaspoon of vanilla extract if using. Stir the mixture until smooth and thoroughly blended. This should take about a minute. Avoid overmixing to maintain the creaminess of the yogurt.
  3. Now it’s time to layer your parfait. Grab a clear glass or bowl to showcase your beautiful creation. Start with a generous spoonful of the yogurt mixture at the bottom—about 1/4 cup will do. Use a spoon to spread it evenly.
  4. Add a layer of the diced peaches over the yogurt, ensuring they cover the yogurt completely. You might want to use about half of what you have prepared—roughly 1 cup. This layer should be visually appealing, so arrange the peaches neatly.
  5. Sprinkle 1/4 cup of granola over the peaches. This adds a delightful crunch. Make sure to distribute it evenly to ensure every bite has that satisfying texture. Avoid packing it down too tightly, as you want it to maintain its crunch.
  6. Repeat the layers: spoon in another 1/4 cup of yogurt, followed by another cup of peaches, and another sprinkle of granola. You should have at least two layers, but feel free to add more depending on your glass size.
  7. Finish off your parfait with a drizzle of honey on top for added sweetness and a touch of elegance. If you’re using sliced almonds or shredded coconut, sprinkle them on top now. It adds a lovely visual contrast and extra flavor.
  8. Serve immediately or refrigerate for up to 30 minutes before serving to allow the flavors to meld together. However, I recommend enjoying it fresh to maintain the granola’s crunch.
  • Prep Time: 15 mins
  • Cook Time: 0 mins
  • Category: Breakfast
  • Method: No-cook
  • Cuisine: American

Nutrition

  • Serving Size: 1 parfait
  • Calories: 250
  • Sugar: 20 g
  • Sodium: 50 mg
  • Fat: 5 g
  • Saturated Fat: 2 g
  • Unsaturated Fat: 3 g
  • Trans Fat: 0 g
  • Carbohydrates: 40 g
  • Fiber: 3 g
  • Protein: 10 g
  • Cholesterol: 10 mg

Keywords: Choose ripe peaches for the best flavor and texture. Use a clear glass for a beautiful presentation. For creaminess, consider whipping the yogurt before layering. Be mindful of the granola-to-yogurt ratio. Prepare yogurt and peaches ahead of time for gatherings, layering just before serving.

Did you make this recipe?

Share a photo and tag us — we can't wait to see what you've made!

Sun-Kissed Frozen Orange Cream Slush

As a child, summer days felt like they lasted forever. I remember the sticky heat wrapping around me as I played outside, my laughter mingling with the sounds of the neighborhood. But nothing could cool me down quite like the moment I’d spot my grandmother, laboring over her blender, whipping up her famous Frozen Orange Creamsicle Slush. That vibrant orange treat, with its frosty texture and sweet citrus aroma, was like a burst of sunshine in a cup. Just one sip, and I could feel the coolness wash over me, sparking pure joy.

This Frozen Orange Creamsicle Slush has a way of making you feel like a kid again. Its creamy, dreamy consistency is a delightful balance of bright orange and soft vanilla, inviting you to dive right in. The refreshing tang of orange dances on your tongue, while the smooth creaminess envelops you in a comforting embrace. It’s a nostalgic treat that’s perfect for hot summer afternoons or anytime you need a little pick-me-up.

What makes my version of this slush stand out is the addition of a hint of vanilla bean, which elevates the flavor and adds an extra layer of richness. Plus, it’s super easy to whip up with just a few simple ingredients that you probably already have on hand! So, if you’re ready to relive those sun-soaked memories, let me show you exactly how to make it.

Sun-Kissed Frozen Orange Cream Slush

Why You’ll Love This Recipe

  • Each slush is a perfect blend of creamy vanilla and zesty orange, creating a nostalgic flavor reminiscent of summer days.
  • This refreshing treat is ready in under 15 minutes, making it an ideal quick dessert for unexpected guests or hot afternoons.
  • With just 8 simple ingredients, it’s budget-friendly, ensuring you don’t have to break the bank to enjoy a delicious slush.
  • The slush has a perfectly smooth texture, thanks to the combination of ice and ice cream, providing a delightful contrast to the bright citrus flavors.
  • It’s highly customizable; you can easily adjust the sweetness and add fresh herbs for a unique twist that suits your taste.

Ingredients

  • 2 cups orange juice (freshly squeezed or store-bought)
  • 1 cup vanilla ice cream
  • 1 cup crushed ice
  • 1/2 cup milk (whole or 2%)
  • 1/4 cup granulated sugar (adjust based on sweetness preference)
  • 1 teaspoon vanilla extract
  • Zest of 1 orange (for added flavor)
  • Fresh orange slices and mint leaves (for garnish)

The star of this Frozen Orange Creamsicle Slush is the orange juice, which provides the vibrant, citrusy base. Freshly squeezed juice will yield the brightest flavor, but store-bought options can be just as convenient. If you’re opting for store-bought, choose 100% pure juice with no added sugars for the best results. Another essential ingredient is the vanilla ice cream; it adds creaminess and sweetness. You can substitute it with dairy-free ice cream if you’re looking for a vegan option. Whole or 2% milk complements the ice cream, creating a smooth blend. If you want a lower-calorie version, almond or oat milk can be good alternatives.

Lastly, the granulated sugar can be adjusted based on your sweetness preference. If you prefer a more natural sweetener, consider using honey or agave syrup. The orange zest enhances the flavor profile, providing an aromatic pop that brings the whole slush together. Don’t skip it! It adds an extra layer of brightness that makes this slush truly special.

Step-by-Step Instructions

  1. Start by preparing your ingredients. Gather 2 cups of orange juice, 1 cup of vanilla ice cream, and 1 cup of crushed ice. Make sure the ice is finely crushed, as larger chunks can make blending difficult.
  2. In a blender, combine the orange juice, vanilla ice cream, crushed ice, and 1/2 cup of milk. Add 1/4 cup of granulated sugar and 1 teaspoon of vanilla extract. If you like a sweeter slush, consider adding a bit more sugar at this stage.
  3. Add the zest of 1 orange to the blender. This step is crucial for enhancing the citrus flavor of your slush. Make sure not to include the bitter white pith—only the flavorful zest.
  4. Blend the mixture on medium-high speed for about 30-45 seconds. Stop once the ingredients are fully combined and the slush has a smooth, even consistency. If you notice large chunks of ice, blend for an additional 10-15 seconds. Avoid over-blending, as this can make the slush too liquidy.
  5. Once blended, taste the slush. If it needs more sweetness, add a little more sugar and blend for a few more seconds. If it’s too thick, you can add a splash of milk to reach your desired consistency.
  6. Pour the slush into glasses. This recipe typically serves 4, but you can easily double it for larger gatherings. Use a spoon to help guide the slush into the glasses if needed.
  7. Garnish each serving with fresh orange slices and mint leaves. The mint not only adds a pop of color but also a refreshing aroma that complements the citrus flavors beautifully.
  8. Serve immediately and enjoy! If you’ve made extra, you can refrigerate it for a short time, but it’s best enjoyed fresh.

Pro Tips for the Best Frozen Orange Creamsicle Slush

  • Don’t skip the orange zest! It’s a game-changer for flavor. Always zest before juicing to make it easier.
  • Use a high-powered blender for the best texture. A standard blender may struggle with ice, leading to uneven consistency. If you have a food processor, that can work too, but ensure the ice is finely crushed.
  • Adjust the ice-to-liquid ratio carefully. If your slush is too thick, it won’t blend well. Start with less ice and add more until you reach your preferred texture.
  • Be cautious with the sugar! Always start with the lower amount, as you can easily add more, but it’s hard to fix an overly sweet slush.
  • For a fun twist, consider adding a splash of coconut milk or a handful of fresh fruit like strawberries or pineapple. This not only enhances the flavor but also adds a beautiful color contrast.

Variations & Serving Ideas

There are countless ways to put a spin on your Frozen Orange Creamsicle Slush. Consider making a tropical version by adding in some pineapple juice or coconut milk for a delightful tropical twist. If you’re feeling adventurous, try incorporating a handful of frozen mango or peach slices for added sweetness. For a lighter version, swap out the vanilla ice cream for Greek yogurt for a creamy yet tangy alternative.

As for serving ideas, this refreshing slush pairs wonderfully with light summer dishes like grilled chicken skewers, fish tacos, or a simple salad topped with citrus vinaigrette. The bright, zesty flavors of the slush complement these dishes perfectly, making them an ideal pairing for a sunny day.

Storage, Make-Ahead & Reheating

This Frozen Orange Creamsicle Slush is best enjoyed fresh, but if you have leftovers, you can store them in an airtight container in the fridge for up to 2 days. Just keep in mind that the slush may lose some of its texture over time as the ice melts. It doesn’t freeze well, as the ice will turn into a solid block. If you must freeze it, blend again after thawing to restore the slushy consistency. This treat is best the day you make it, as the flavors meld together beautifully overnight, enhancing its deliciousness.

Frequently Asked Questions

Can I make Frozen Orange Creamsicle Slush ahead of time?

Yes — in fact, it tastes even better the next day as the flavors meld. However, it’s best to enjoy it fresh, as the texture can change if stored for too long. If you need to prepare it ahead, keep it in the fridge and re-blend before serving.

What kind of orange juice should I use?

For the best flavor, use freshly squeezed orange juice. However, if you’re short on time, opt for 100% pure store-bought juice without added sugars. This will ensure that your slush remains flavorful and refreshing.

Can I substitute the vanilla ice cream?

Absolutely! If you’re looking for a dairy-free option, coconut milk ice cream or a non-dairy vanilla ice cream can work wonderfully. They will still provide the creamy texture and sweetness you desire.

How can I adjust the sweetness of my slush?

You can easily adjust the sweetness by modifying the amount of sugar added. Start with 1/4 cup and taste the mixture before blending. If you prefer it sweeter, add more sugar gradually until it reaches your desired level.

What should I do if my slush is too thick?

If your slush is too thick, simply add a splash of milk or orange juice and blend again. This will help achieve a more drinkable consistency while maintaining the slushy texture. Adjust gradually to reach your preferred thickness.

Sun-Kissed Frozen Orange Cream Slush

Final Thoughts

The Frozen Orange Creamsicle Slush is a delightful blend of refreshing citrus and creamy goodness, making it a perfect treat for warm days or any time you crave a taste of nostalgia. The way the bright orange flavor dances with the creamy texture truly elevates this slush, transforming it into a satisfying escape from the everyday.

This is the kind of recipe I come back to again and again, especially when I’m looking to cool down or impress guests at a summer gathering. It’s simple to make and always brings smiles all around! I encourage you to try this recipe for yourself—don’t hesitate to share your results or even put your own spin on it. Happy slushing!

Print
clock clock iconcutlery cutlery iconflag flag iconfolder folder iconinstagram instagram iconpinterest pinterest iconfacebook facebook iconprint print iconsquares squares iconheart heart iconheart solid heart solid icon

Frozen Orange Creamsicle Slush


  • Author: Lily author
  • Total Time: 15 minutes
  • Yield: 4 servings 1x
Pin Recipe
Print Recipe

Description

This Frozen Orange Creamsicle Slush is a refreshing treat that combines creamy vanilla and zesty orange flavors. Perfect for hot summer days, it brings back nostalgic memories with every sip.


Ingredients

Scale
  • 2 cups orange juice (freshly squeezed or store-bought)
  • 1 cup vanilla ice cream
  • 1 cup crushed ice
  • 1/2 cup milk (whole or 2%)
  • 1/4 cup granulated sugar (adjust based on sweetness preference)
  • 1 teaspoon vanilla extract
  • Zest of 1 orange (for added flavor)
  • Fresh orange slices and mint leaves (for garnish)

Instructions

  1. Start by preparing your ingredients. Gather 2 cups of orange juice, 1 cup of vanilla ice cream, and 1 cup of crushed ice. Make sure the ice is finely crushed, as larger chunks can make blending difficult.
  2. In a blender, combine the orange juice, vanilla ice cream, crushed ice, and 1/2 cup of milk. Add 1/4 cup of granulated sugar and 1 teaspoon of vanilla extract. If you like a sweeter slush, consider adding a bit more sugar at this stage.
  3. Add the zest of 1 orange to the blender. This step is crucial for enhancing the citrus flavor of your slush. Make sure not to include the bitter white pith—only the flavorful zest.
  4. Blend the mixture on medium-high speed for about 30-45 seconds. Stop once the ingredients are fully combined and the slush has a smooth, even consistency. If you notice large chunks of ice, blend for an additional 10-15 seconds. Avoid over-blending, as this can make the slush too liquidy.
  5. Once blended, taste the slush. If it needs more sweetness, add a little more sugar and blend for a few more seconds. If it’s too thick, you can add a splash of milk to reach your desired consistency.
  6. Pour the slush into glasses. This recipe typically serves 4, but you can easily double it for larger gatherings. Use a spoon to help guide the slush into the glasses if needed.
  7. Garnish each serving with fresh orange slices and mint leaves. The mint not only adds a pop of color but also a refreshing aroma that complements the citrus flavors beautifully.
  8. Serve immediately and enjoy! If you’ve made extra, you can refrigerate it for a short time, but it's best enjoyed fresh.
  • Prep Time: 15 min
  • Cook Time: 0 min
  • Category: Dessert
  • Method: Blending
  • Cuisine: American

Nutrition

  • Serving Size: 1 serving
  • Calories: 200
  • Sugar: 30 g
  • Sodium: 50 mg
  • Fat: 5 g
  • Saturated Fat: 3 g
  • Unsaturated Fat: 2 g
  • Trans Fat: 0 g
  • Carbohydrates: 40 g
  • Fiber: 1 g
  • Protein: 2 g
  • Cholesterol: 20 mg

Keywords: Don't skip the orange zest! It's a game-changer for flavor. Always zest before juicing to make it easier.

Did you make this recipe?

Share a photo and tag us — we can't wait to see what you've made!

Zesty Lemon Poppy Seed Delight

One rainy afternoon, I found myself in my grandmother’s cozy kitchen, the kind that always smelled like warmth and love. She was whipping up her famous Lemon Poppy Seed Loaf, a recipe that had been passed down through generations. As the batter came together, the zesty aroma of fresh lemons filled the air, mingling perfectly with the nutty fragrance of poppy seeds. I can still picture her, apron-clad, as she expertly drizzled a vibrant citrus icing over the loaf, creating a glossy, sun-kissed finish that beckoned us to dive in. It was a moment that sparked my own passion for baking, and this recipe has become a cherished staple in my home ever since.

When you take a bite of this Lemon Poppy Seed Loaf, it’s like a burst of sunshine on your palate. The loaf is beautifully golden, with a tender crumb that melts in your mouth. Each slice is speckled with tiny poppy seeds, adding a delightful crunch that contrasts beautifully with the tangy sweetness of the lemon. And that citrus icing? It’s the finishing touch that elevates this loaf from ordinary to extraordinary, with its bright, zesty flavor dancing on your taste buds.

This recipe stands out because it embraces simplicity while delivering on flavor. I’ve added a hint of vanilla to the batter, enhancing the overall taste and making it even more indulgent. Trust me, once you make this Lemon Poppy Seed Loaf With Citrus Icing, it’ll become a go-to in your baking repertoire.

So, let me show you exactly how to make it!

Zesty Lemon Poppy Seed Delight

Why You’ll Love This Recipe

  • Moist and tender crumb that melts in your mouth, thanks to the perfect balance of butter and buttermilk.
  • Bright, zesty lemon flavor paired with crunchy poppy seeds, creating a delightful texture and taste experience.
  • Easy to whip up in just about an hour, perfect for last-minute gatherings or a cozy afternoon treat.
  • Budget-friendly with everyday ingredients, making it an accessible option for all home bakers.
  • The citrus icing adds a sweet tang that elevates the loaf, turning a simple recipe into a showstopper!

Ingredients

  • 1 ½ cups (190g) all-purpose flour
  • 1 teaspoon baking powder
  • ½ teaspoon baking soda
  • ½ teaspoon salt
  • 3 tablespoons poppy seeds
  • ½ cup (115g) unsalted butter, softened to room temperature
  • 1 cup (200g) granulated sugar
  • 2 large eggs
  • 1 teaspoon vanilla extract
  • 1 teaspoon lemon zest (from about 1 medium lemon)
  • ½ cup (120ml) buttermilk
  • 2 tablespoons fresh lemon juice

For the Citrus Icing:

  • 1 cup (120g) powdered sugar
  • 2 tablespoons fresh lemon juice
  • 1 tablespoon orange juice
  • 1 teaspoon lemon zest (for garnish, optional)

Let’s dive into the key ingredients that make this Lemon Poppy Seed Loaf so special. The all-purpose flour provides the structure and base for the loaf, while the baking powder and baking soda ensure it rises perfectly, giving the loaf a light texture. For a gluten-free variation, you could substitute the flour with a gluten-free all-purpose blend. Poppy seeds not only add a delightful crunch but also contribute to the unique flavor profile that pairs well with the citrus notes.

Unsalted butter is crucial for achieving the buttery richness that makes this loaf so moist. If you’re looking for a dairy-free option, coconut oil or a vegan butter can be used instead. The buttermilk is another essential component, providing acidity that activates the baking soda for a fluffy texture. If you don’t have buttermilk on hand, you can easily make a substitute by mixing ½ cup of milk with 1 tablespoon of vinegar or lemon juice and letting it sit for about 5 minutes.

Step-by-Step Instructions

  1. Preheat your oven to 350°F (175°C). Grease a 9×5-inch loaf pan or line it with parchment paper for easy removal later.
  2. In a medium mixing bowl, whisk together 1 ½ cups of all-purpose flour, 1 teaspoon of baking powder, ½ teaspoon of baking soda, ½ teaspoon of salt, and 3 tablespoons of poppy seeds. This helps to evenly distribute the baking agents and ensures a uniform rise.
  3. In a large mixing bowl, cream together ½ cup of softened unsalted butter and 1 cup of granulated sugar using an electric mixer on medium speed for about 3-4 minutes, until the mixture is light and fluffy. Make sure to scrape down the sides of the bowl occasionally.
  4. Add 2 large eggs, 1 teaspoon of vanilla extract, and 1 teaspoon of lemon zest to the creamed butter and sugar, mixing until fully combined. You want a smooth consistency, so ensure there are no lumps of butter.
  5. In a small bowl, combine ½ cup of buttermilk and 2 tablespoons of fresh lemon juice. Alternately add the dry ingredients and buttermilk mixture to the butter mixture, starting and ending with the dry ingredients. Mix just until combined; do not overmix, as this can lead to a dense loaf.
  6. Pour the batter into the prepared loaf pan. Smooth the top with a spatula, ensuring it’s even. Bake in the preheated oven for 50-60 minutes, or until a toothpick inserted in the center comes out clean. The edges should be lightly golden brown, and the center should feel just set.
  7. Once baked, remove the loaf from the oven and allow it to cool in the pan for about 10 minutes. Then, transfer it to a wire rack to cool completely. Resist the urge to slice too soon, as it will be crumbly if it’s still warm.
  8. While the loaf is cooling, prepare the citrus icing. In a medium bowl, whisk together 1 cup of powdered sugar, 2 tablespoons of fresh lemon juice, and 1 tablespoon of orange juice until smooth. If the icing is too thick, you can add a little more juice to reach your desired consistency.
  9. Once the loaf is completely cool, drizzle the citrus icing over the top. If you like, sprinkle with an additional teaspoon of lemon zest for an extra pop of flavor and color.

Pro Tips for the Best Lemon Poppy Seed Loaf With Citrus Icing

  • Be careful not to overmix your batter; this is a common mistake that can lead to a dense loaf. Mix just until the dry ingredients are incorporated for a light and fluffy texture.
  • Use room temperature ingredients, especially the butter and eggs. This helps to create a smoother batter and ensures even baking. Take your eggs out of the fridge about 30 minutes before you start.
  • For a more pronounced lemon flavor, consider adding a little lemon extract in addition to the zest and juice. Just a half teaspoon can elevate the citrus notes significantly.
  • When measuring your flour, spoon it into the measuring cup and level it off with a knife instead of scooping directly from the bag. This prevents packing and ensures you don’t end up with a dry loaf.
  • Invest in a good quality loaf pan; it makes a difference in heat distribution, which ensures even baking. If your pan is dark-coated, reduce the oven temperature by 25°F to prevent over-browning.

Variations & Serving Ideas

For a delightful twist, consider adding blueberries or raspberries to the batter for a fruity burst of flavor. You can also experiment with different citrus fruits—try lime or grapefruit zest and juice for a refreshing change. For a healthier option, substitute half of the all-purpose flour with whole wheat flour for added fiber without compromising too much on texture.

This Lemon Poppy Seed Loaf pairs beautifully with a light salad, such as a mixed greens salad with a vinaigrette, or a cup of tea for a cozy afternoon treat. It also complements a creamy cheese platter, as the acidity of the loaf balances rich cheeses perfectly. Lastly, a scoop of vanilla ice cream on the side creates a delightful contrast of temperatures and flavors!

Storage, Make-Ahead & Reheating

This Lemon Poppy Seed Loaf can be stored at room temperature for up to 3 days if wrapped tightly in plastic wrap. If you want to keep it longer, it freezes well for up to 3 months. To freeze, wrap the loaf tightly in plastic wrap and then in aluminum foil to prevent freezer burn.

When you’re ready to enjoy it again, simply thaw it in the fridge overnight. Reheat individual slices in the microwave for 15-20 seconds or in a toaster oven until warmed through. Interestingly, many people find that this loaf tastes even better the next day, as the flavors have time to meld!

Frequently Asked Questions

Can I make Lemon Poppy Seed Loaf With Citrus Icing ahead of time?

Yes — in fact, it tastes even better the next day! You can make the loaf a day in advance, allowing the flavors to develop. Just be sure to store it in an airtight container to maintain its moisture.

Can I substitute the poppy seeds?

Absolutely! If you don’t have poppy seeds on hand or prefer an alternative, you can use sesame seeds for a similar crunch or omit them entirely for a smooth loaf.

What can I use instead of buttermilk?

If you don’t have buttermilk, you can easily create a substitute by mixing ½ cup of milk (dairy or plant-based) with 1 tablespoon of vinegar or lemon juice. Let it sit for 5 minutes before using in the recipe.

How can I make this recipe gluten-free?

To make a gluten-free version of this Lemon Poppy Seed Loaf, substitute the all-purpose flour with a gluten-free all-purpose flour blend. Just ensure that the blend contains a binding agent like xanthan gum for the best results.

What is the best way to store leftover loaf?

Leftover Lemon Poppy Seed Loaf should be stored in an airtight container at room temperature for up to 3 days. For longer storage, wrap it tightly and freeze for up to 3 months. Thaw it before serving for the best texture.

Zesty Lemon Poppy Seed Delight

Final Thoughts

The Lemon Poppy Seed Loaf with Citrus Icing is truly a delightful treat that brings a burst of brightness to any occasion. The zesty lemon flavor combined with the subtle crunch of poppy seeds creates a satisfying balance, while the citrus icing adds a touch of sweetness that perfectly complements the loaf’s tanginess.

This is the kind of recipe I come back to again and again, especially when I want to brighten up a gloomy day or celebrate a small victory. The aroma that fills the kitchen as it bakes is absolutely heavenly! I encourage you to give this recipe a try; you might just find it becoming a beloved staple in your home. Don’t forget to share your results or even add your own unique twist—I can’t wait to see what you create!

Print
clock clock iconcutlery cutlery iconflag flag iconfolder folder iconinstagram instagram iconpinterest pinterest iconfacebook facebook iconprint print iconsquares squares iconheart heart iconheart solid heart solid icon

Lemon Poppy Seed Loaf


  • Author: Lily author
  • Total Time: 32 minute
  • Yield: 1 loaf 1x
Pin Recipe
Print Recipe

Description

This Lemon Poppy Seed Loaf is a delightful treat that combines zesty lemon flavor with crunchy poppy seeds. Topped with a citrus icing, it’s perfect for any occasion.


Ingredients

Scale
  • 1 ½ cups (190g) all-purpose flour
  • 1 teaspoon baking powder
  • ½ teaspoon baking soda
  • ½ teaspoon salt
  • 3 tablespoons poppy seeds
  • ½ cup (115g) unsalted butter, softened to room temperature
  • 1 cup (200g) granulated sugar
  • 2 large eggs
  • 1 teaspoon vanilla extract
  • 1 teaspoon lemon zest (from about 1 medium lemon)
  • ½ cup (120ml) buttermilk
  • 2 tablespoons fresh lemon juice
  • 1 cup (120g) powdered sugar
  • 2 tablespoons fresh lemon juice
  • 1 tablespoon orange juice
  • 1 teaspoon lemon zest (for garnish, optional)

Instructions

  1. Preheat your oven to 350°F (175°C). Grease a 9×5-inch loaf pan or line it with parchment paper for easy removal later.
  2. In a medium mixing bowl, whisk together 1 ½ cups of all-purpose flour, 1 teaspoon of baking powder, ½ teaspoon of baking soda, ½ teaspoon of salt, and 3 tablespoons of poppy seeds. This helps to evenly distribute the baking agents and ensures a uniform rise.
  3. In a large mixing bowl, cream together ½ cup of softened unsalted butter and 1 cup of granulated sugar using an electric mixer on medium speed for about 3-4 minutes, until the mixture is light and fluffy. Make sure to scrape down the sides of the bowl occasionally.
  4. Add 2 large eggs, 1 teaspoon of vanilla extract, and 1 teaspoon of lemon zest to the creamed butter and sugar, mixing until fully combined. You want a smooth consistency, so ensure there are no lumps of butter.
  5. In a small bowl, combine ½ cup of buttermilk and 2 tablespoons of fresh lemon juice. Alternately add the dry ingredients and buttermilk mixture to the butter mixture, starting and ending with the dry ingredients. Mix just until combined; do not overmix, as this can lead to a dense loaf.
  6. Pour the batter into the prepared loaf pan. Smooth the top with a spatula, ensuring it’s even. Bake in the preheated oven for 50-60 minutes, or until a toothpick inserted in the center comes out clean. The edges should be lightly golden brown, and the center should feel just set.
  7. Once baked, remove the loaf from the oven and allow it to cool in the pan for about 10 minutes. Then, transfer it to a wire rack to cool completely. Resist the urge to slice too soon, as it will be crumbly if it’s still warm.
  8. While the loaf is cooling, prepare the citrus icing. In a medium bowl, whisk together 1 cup of powdered sugar, 2 tablespoons of fresh lemon juice, and 1 tablespoon of orange juice until smooth. If the icing is too thick, you can add a little more juice to reach your desired consistency.
  9. Once the loaf is completely cool, drizzle the citrus icing over the top. If you like, sprinkle with an additional teaspoon of lemon zest for an extra pop of flavor and color.
  • Prep Time: 15 mins
  • Cook Time: 50-60 mins
  • Category: Dessert
  • Method: Baking
  • Cuisine: American

Nutrition

  • Serving Size: 1 slice
  • Calories: 200
  • Sugar: 15 g
  • Sodium: 150 mg
  • Fat: 8 g
  • Saturated Fat: 5 g
  • Unsaturated Fat: 3 g
  • Trans Fat: 0 g
  • Carbohydrates: 30 g
  • Fiber: 1 g
  • Protein: 3 g
  • Cholesterol: 40 mg

Keywords: Be careful not to overmix your batter; this is a common mistake that can lead to a dense loaf. Use room temperature ingredients for a smoother batter and even baking.

Did you make this recipe?

Share a photo and tag us — we can't wait to see what you've made!

  • Privacy Policy
  • Terms Of Service
  • Contact
  • About
  • GDPR

Copyright © 2025 Homesmad