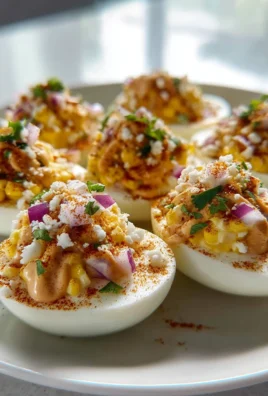
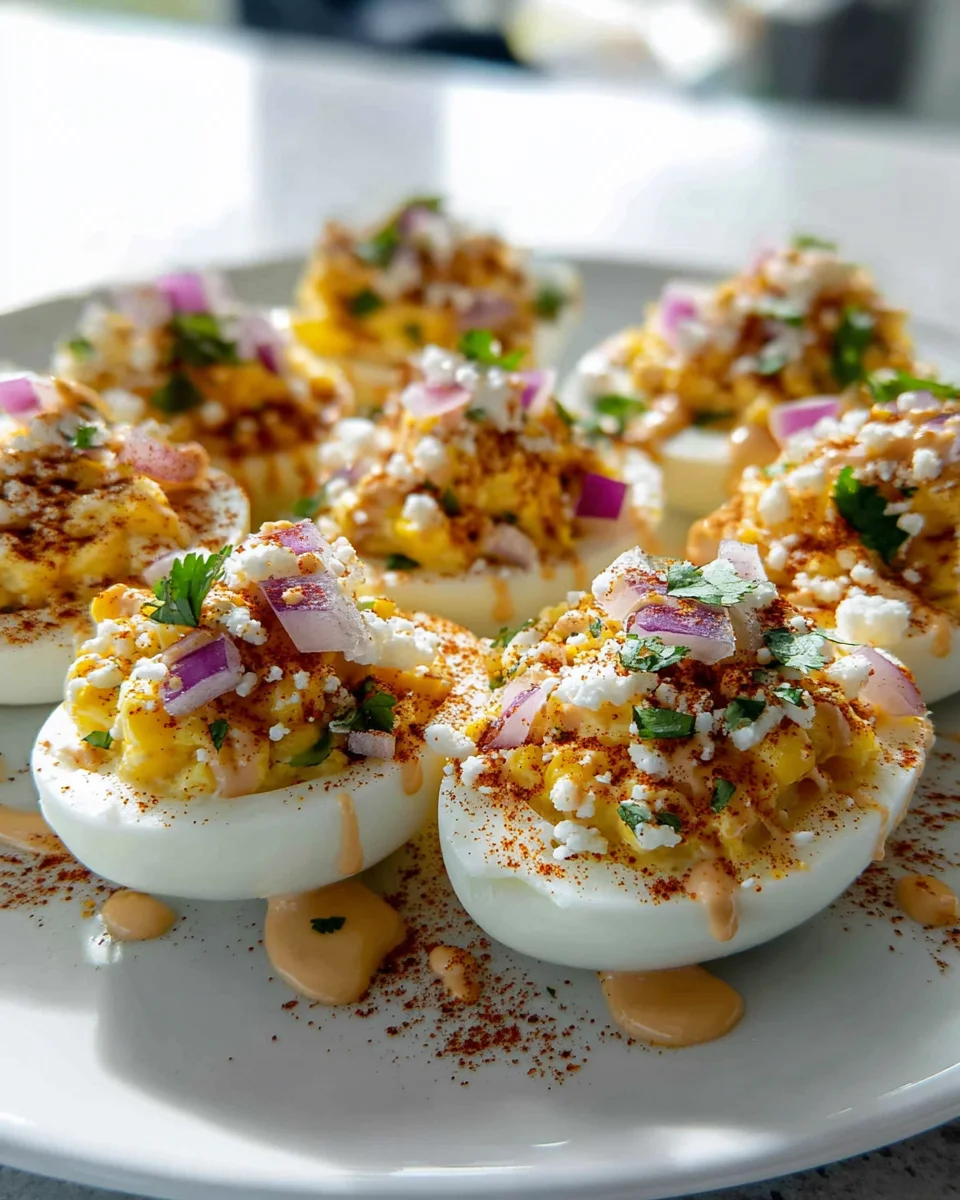
Elote Deviled Eggs Chipotle Mayo
– just hearing those words might make your taste buds tingle with anticipation! Imagine the classic, beloved deviled egg, but elevated to an entirely new dimension of flavor and excitement. This innovative twist takes a familiar party staple and infuses it with the vibrant, smoky, and zesty spirit of Mexican street food, creating an appetizer that is truly unforgettable.
Deviled eggs have been a cherished fixture at gatherings for generations, a simple yet profoundly satisfying bite. Meanwhile, Elote, or Mexican street corn, stands as a culinary marvel in its own right, celebrated for its irresistible combination of smoky grilled corn, tangy lime, creamy mayonnaise, crumbly cheese, and a delightful kick of chili. Bringing these two distinct culinary worlds together isn’t just fusion; it’s a revelation. It’s about taking something comforting and making it extraordinary, appealing to both nostalgic palates and adventurous foodies alike.
People absolutely adore this dish because it offers more than just a snack; it’s a gourmet experience in miniature. You get the comforting, creamy texture of the traditional deviled egg yolk, but then it’s harmoniously complemented by the sweet pop of corn kernels, the smoky depth of chipotle, and the bright, fresh zest of lime. The contrast of textures—from the velvety yolk to the tender corn—and the explosion of flavors—savory, sweet, smoky, tangy, and a touch spicy—makes these Elote Deviled Eggs Chipotle Mayo an irresistible showstopper. They’re incredibly convenient for any gathering, easy to prepare ahead, and I guarantee they will be the first appetizer to disappear from your spread!

Ingredients:
- 12 large eggs: The foundation of our incredible “Elote Deviled Eggs Chipotle Mayo.” I always recommend large eggs for a generous filling.
- 2 cups fresh or frozen corn kernels: If using fresh, aim for about 2-3 ears of corn. Frozen corn is perfectly fine and often more convenient; just make sure to thaw it completely.
- 1/2 cup mayonnaise, plus 1/4 cup for chipotle mayo base: I prefer a good quality, full-fat mayonnaise for maximum creaminess and flavor. This will be divided for the yolk filling and the separate chipotle mayo component.
- 1-2 tablespoons adobo sauce from a can of chipotle peppers: This is where that signature smoky heat comes from. You can also finely mince half a chipotle pepper from the can and add it for more heat and texture, adjusting to your preference.
- 1 tablespoon fresh lime juice: Essential for brightening up both the elote mix and the chipotle mayo, cutting through the richness.
- 1/4 cup crumbled Cotija cheese: This salty, crumbly Mexican cheese is non-negotiable for authentic elote flavor. If you can’t find Cotija, a good quality crumbled feta cheese can be a decent substitute, though it will have a slightly different texture and saltiness.
- 1/4 cup finely chopped fresh cilantro: Adds a burst of freshness and color. Always use fresh cilantro for the best results.
- 2 tablespoons finely minced red onion: Provides a subtle bite and sweetness that complements the other flavors beautifully.
- 1 small jalapeño, finely minced (optional, deseeded for less heat): If you love a little extra kick, this is a fantastic addition. Be sure to remove the seeds and white membrane for a milder heat, or leave some in if you dare!
- 1/2 teaspoon chili powder: A classic elote seasoning, adding warmth and depth.
- 1/4 teaspoon ground cumin: Enhances the savory notes of the corn and spices.
- Pinch of cayenne pepper (optional): For an extra layer of heat if the chipotle isn’t enough for you.
- Salt and freshly ground black pepper to taste: Crucial for balancing all the flavors. I always season throughout the process.
- For Garnish:
- Extra crumbled Cotija cheese: A sprinkle on top for presentation and flavor.
- Finely chopped fresh cilantro: For a pop of green.
- Pinch of Tajín Clásico seasoning: This tangy, salty, chili-lime seasoning is a game-changer for finishing elote-inspired dishes.
- Smoked paprika (optional): A light dusting adds color and another layer of smoky flavor.
Preparing the Eggs:
The first step to making perfect “Elote Deviled Eggs Chipotle Mayo” is, of course, getting those eggs just right. I’ve tried countless methods for boiling eggs, and I’m going to share my absolute favorite way to ensure easy peeling and perfectly cooked yolks every single time.
- The Gentle Boil: Carefully place your 12 large eggs into a large saucepan or pot in a single layer. Make sure they are not overcrowded, as this can lead to uneven cooking or cracking. Fill the pot with cold water, ensuring the water covers the eggs by at least an inch. Add a generous pinch of salt to the water; while some say it helps prevent cracking, I find it mainly helps with the potential for easier peeling if a crack does occur.
- Bring to a Rolling Boil: Place the pot over high heat and bring the water to a rapid, rolling boil. As soon as the water reaches this point, immediately turn off the heat. Do NOT let the eggs continue to boil vigorously.
- The Covered Steep: Cover the pot with a tight-fitting lid and let the eggs sit in the hot water for exactly 10-12 minutes. For a slightly softer, creamier yolk that’s still set, I aim for 10 minutes. If you prefer a firmer, fully cooked yolk, go for 12 minutes. Consistency is key here for the best “Elote Deviled Eggs Chipotle Mayo.”
- The Ice Bath Shock: While the eggs are steeping, prepare a large bowl filled with ice water. Once the timer is up, use a slotted spoon to carefully transfer the eggs from the hot water directly into the ice bath. This sudden temperature change is crucial for two reasons: it stops the cooking process immediately, preventing that unsightly green ring around the yolk, and it helps the egg white contract, making the eggs much easier to peel. Let them cool in the ice bath for at least 10-15 minutes, or until they are completely cold to the touch.
- Gentle Peeling: Once thoroughly chilled, gently crack each egg all over by tapping it lightly on a hard surface. Roll the egg between your palms to further loosen the shell. Begin peeling under cool running water; the water helps to slip the shell away from the egg white, preventing tearing. Take your time to ensure a smooth, clean surface for your deviled eggs. Nobody wants ragged egg whites for this beautiful dish!
- Halve and Scoop: Using a sharp, non-serrated knife, carefully slice each peeled egg in half lengthwise. Wipe your knife between cuts for the cleanest lines. Gently scoop out the bright yellow yolks into a medium-sized mixing bowl. Place the perfectly hollowed egg white halves on a serving platter or a clean baking sheet lined with parchment paper, ready for their delicious filling.
Making the Chipotle Mayo and Elote Mix:
This is where the magic truly happens, creating the signature flavors that elevate these from ordinary deviled eggs to extraordinary “Elote Deviled Eggs Chipotle Mayo.” We’re building layers of smoky, tangy, and savory goodness.
- Char the Corn: If using fresh corn, remove the husks and silks. You can either grill the corn on the cob until slightly charred in spots or cut the kernels off and sauté them in a dry, hot skillet (cast iron works wonderfully) over medium-high heat until they develop some beautiful browning and a slight char. This charring process is vital for that authentic street corn flavor. If using frozen corn, thaw it completely, pat it dry, and then sauté it in a hot skillet until lightly browned and caramelized. This takes about 5-7 minutes. Once charred, set the corn aside to cool slightly.
- Prepare the Elote Components: While the corn cools, take this opportunity to prepare the other fresh components. Finely chop your fresh cilantro, ensuring no large stems remain. Mince the red onion as finely as possible; a tiny dice is what you’re aiming for here, so it integrates smoothly into the filling without being overpowering. If you’re including jalapeño, mince it very finely as well, remembering to remove seeds and membranes for less heat. Crumble the Cotija cheese into small, uniform pieces. Set all these vibrant ingredients aside.
- Whip Up the Chipotle Mayo: In a small bowl, combine the 1/4 cup of mayonnaise, 1-2 tablespoons of adobo sauce (and minced chipotle if using), and 1 tablespoon of fresh lime juice. Stir well until completely smooth and creamy. Taste and adjust the amount of adobo sauce to your desired level of smoky heat. I tend to start with one tablespoon and add more if I’m feeling extra bold. This homemade chipotle mayo is the heart of our “Elote Deviled Eggs Chipotle Mayo.”
Creating the Irresistible Filling:
Now it’s time to bring all those fantastic flavors together into a harmonious, creamy filling that will make these “Elote Deviled Eggs Chipotle Mayo” truly unforgettable.
- Mash the Yolks: In the medium bowl containing your reserved egg yolks, use a fork or a potato masher to thoroughly mash them until they are completely smooth and free of any lumps. I like to get them as fine as possible; this creates the silkiest texture for the filling.
- Combine with Creaminess: To the mashed yolks, add the remaining 1/2 cup of mayonnaise. Now, here’s the fun part: gently fold in the charred corn kernels, the crumbled Cotija cheese, the finely chopped cilantro, the minced red onion, and the minced jalapeño (if using). This is where you really start to see the vibrant colors and textures come to life.
- Introduce the Chipotle Mayo: Pour the freshly made chipotle mayo directly into the yolk mixture. This is the flavor bomb that ties everything together.
- Season to Perfection: Sprinkle in the 1/2 teaspoon of chili powder, 1/4 teaspoon of ground cumin, and a pinch of cayenne pepper if you’re using it. Season generously with salt and freshly ground black pepper. Now, stir everything together thoroughly until all ingredients are well combined and the mixture is uniformly creamy and colorful.
- Taste and Adjust: This is arguably the most important step! Take a small spoonful of the filling and taste it. Does it need more salt? More lime juice for brightness? A little more adobo for heat? Perhaps another pinch of chili powder? Adjust seasonings as needed until the flavor profile is exactly what you’re looking for. The balance of creamy, smoky, tangy, and savory with a hint of spice is what makes these “Elote Deviled Eggs Chipotle Mayo” so exceptional. The filling should be robust and flavorful.
Assembling and Garnishing Your Elote Deviled Eggs Chipotle Mayo:
We’re in the home stretch! The presentation of your “Elote Deviled Eggs Chipotle Mayo” is almost as important as the taste. A beautifully piped and garnished egg is a feast for the eyes as well as the palate.
- Fill the Whites: You have a couple of options for filling the egg whites:
- The Piping Bag Method (Recommended for Best Presentation): For a professional and elegant look, scoop the entire filling mixture into a piping bag fitted with a star tip (my personal favorite is an open star tip, like an Ateco 826 or Wilton 1M, for a beautiful swirl). Carefully pipe a generous amount of filling into each hollowed egg white, creating a lovely swirl or mound. This method truly elevates the visual appeal of your “Elote Deviled Eggs Chipotle Mayo.”
- The Spoon Method: If you don’t have a piping bag, no worries! A small spoon works perfectly well. Simply spoon a good dollop of the filling into each egg white half, mounding it nicely. You can use the back of the spoon to create a little swirl if you like.
- Garnish with Flair: Once all the egg whites are filled, it’s time to add the finishing touches that make these “Elote Deviled Eggs Chipotle Mayo” truly shine.
- Cotija & Cilantro: Sprinkle a little extra crumbled Cotija cheese over each filled egg for a textural contrast and an extra salty kick. Follow with a light dusting of finely chopped fresh cilantro.
- Tajín Power: For that signature elote tang, lightly dust each deviled egg with a pinch of Tajín Clásico seasoning. Be careful not to overdo it, as a little goes a long way.
- Smoked Paprika (Optional): If you want to add another layer of visual appeal and a subtle smoky aroma, lightly dust some smoked paprika over a few of the eggs. This looks beautiful next to the green cilantro and white Cotija.
Tips for Success and Variations:
To ensure your “Elote Deviled Eggs Chipotle Mayo” are always a hit and to give you a few ideas for making them your own, here are some helpful pointers:
Make-Ahead Magic:
Deviled eggs are fantastic for parties and can often be prepared in advance. You can boil and peel the eggs up to 2 days ahead of time, storing the egg whites and yolks separately in airtight containers in the refrigerator. The corn can be charred and cooled, and the chipotle mayo can be made a day in advance as well. Keep all components separate until just before serving. This prevents the filling from drying out and the egg whites from getting soggy. Assemble your “Elote Deviled Eggs Chipotle Mayo” no more than a few hours before serving for the freshest taste and best texture.
Storage Suggestions:
Once assembled, store any leftover “Elote Deviled Eggs Chipotle Mayo” in an airtight container in the refrigerator for up to 2-3 days. While they are best enjoyed fresh, they still make for a delightful snack the next day. I like to place them on a platter with a damp paper towel lightly placed over them before covering to help maintain moisture.
Adjusting the Heat:
The beauty of this “Elote Deviled Eggs Chipotle Mayo” recipe is its adaptability. If you prefer a milder flavor, start with just one tablespoon of adobo sauce and omit the minced jalapeño and cayenne pepper. If you’re a true heat seeker, feel free to add more adobo, include a whole minced chipotle pepper (or even two!), and don’t shy away from that cayenne. You can also drizzle a little extra hot sauce on top of individual eggs if guests have varying spice preferences.
Enhancing the Elote Experience:
For an even more intense elote flavor, consider adding a tiny splash of the brine from pickled jalapeños into your filling. It adds another layer of tang and a subtle heat that complements the existing flavors beautifully. You could also experiment with a very finely minced green onion along with the red onion for a slightly different aromatic profile. Sometimes, I like to toast a pinch of cumin seeds and grind them fresh for an even more vibrant spice note.
Why These Are a Must-Try:
These “Elote Deviled Eggs Chipotle Mayo” aren’t just another appetizer; they’re a flavor experience. The creamy, rich egg yolk filling is perfectly balanced by the smoky char of the corn, the salty tang of Cotija cheese, the fresh brightness of lime and cilantro, and that unforgettable kick from the chipotle mayo. Each bite is an explosion of textures and tastes, making them an instant crowd-pleaser and a standout dish at any gathering. Trust me, once you make these, your guests will be asking for the recipe, and they’ll quickly become a cherished favorite in your culinary repertoire.
Conclusion:
And there you have it, friends! We’ve journeyed through the simple steps to create a truly unforgettable appetizer that I promise will become a staple in your culinary repertoire. If you’ve been searching for a dish that effortlessly marries comfort food familiarity with an exciting, gourmet twist, then look no further. This isn’t just another deviled egg recipe; it’s an experience. I’ve found that guests are always intrigued, often guessing at the secret behind the incredible flavor, and consistently asking for the recipe. It’s the kind of dish that sparks conversation and leaves a lasting impression, proving that sometimes, the most innovative flavors come from combining beloved classics in unexpected ways. The creamy texture, the burst of sweet corn, the smoky heat, and the tangy bite of lime all come together in a symphony that truly elevates the humble deviled egg to star status. It’s surprisingly easy to assemble, yet the sophisticated flavor profile suggests hours of intricate work. Trust me when I say, once you taste the vibrant combination, you’ll understand why this recipe is an absolute game-changer for any gathering, big or small.
What really sets this particular recipe apart and makes it so utterly irresistible is the brilliant fusion of street food flair with a picnic classic. The moment you take a bite of the Elote Deviled Eggs Chipotle Mayo, you’ll be transported. It’s an explosion of creamy, smoky, sweet, and tangy flavors that dances on your palate, offering a depth and complexity far beyond what you’d expect from a deviled egg. We’re talking about the smoky warmth of chipotle, perfectly complementing the sweet char of elote corn, all enveloped in that velvety egg yolk filling. It’s a masterful balance of textures and tastes – from the slight chewiness of the corn kernels to the silken smoothness of the filling and the firm bite of the egg white. This isn’t just an appetizer; it’s a statement. It declares that you’re not afraid to venture beyond the ordinary and that you appreciate bold, well-rounded flavors that truly make an impact.
Elevate Your Serving Experience: Tips and Creative Twists
Now that you’re armed with the knowledge to create this masterpiece, let’s talk about how to make it shine even brighter or adapt it to your preferences. These deviled eggs are, of course, a phenomenal standalone appetizer for any party, potluck, or backyard BBQ. But don’t limit yourself! They also make an incredible accompaniment to a summer spread featuring grilled chicken or fish, adding a burst of flavor that cuts through richer main courses. For presentation, consider garnishing with a sprinkle of fresh cilantro, a pinch of smoked paprika for extra color and aroma, or even a tiny drizzle of a spicy crema for an added layer of indulgence. Want to switch things up? If you prefer less heat, you can reduce the amount of chipotle in the mayo or swap it for a touch of smoked paprika and a hint of cayenne. For a vegetarian twist, consider adding finely minced bell peppers or a touch of roasted red pepper to the filling. If you’re feeling adventurous, a crumble of cotija cheese on top just before serving will further lean into that authentic elote vibe, adding a salty, tangy counterpoint that is simply divine. Remember, the kitchen is your playground, and this recipe provides a fantastic canvas for your creativity!
So, I implore you, don’t just read about this culinary marvel; experience it for yourself! Gather your ingredients, follow these straightforward steps, and prepare to impress your taste buds and everyone lucky enough to share them with you. I am absolutely confident that these unique and utterly delicious deviled eggs will earn you rave reviews and requests for an encore. Once you’ve whipped up a batch, I’d absolutely love to hear about your experience! Did you stick to the recipe, or did you put your own spin on it? What was the general consensus among your friends and family? Share your photos, your stories, and your feedback in the comments below. Your journey into creating truly extraordinary appetizers begins now. Get cooking, enjoy every bite, and spread the joy of these incredible Elote Deviled Eggs. Happy cooking, everyone!
Smoky Elote Deviled Eggs: Chipotle Mayo Fiesta Bites
Elevate classic deviled eggs to a new dimension of flavor with this vibrant Elote-inspired twist. A creamy, spicy yolk filling, complemented by tangy lime, crumbled Cotija cheese, and a delightful chipotle kick, creates an unforgettable appetizer. Perfect for any gathering, these are an instant crowd-pleaser.
Ingredients
Instructions
Important Information
Nutrition Facts (Per Serving)
It is important to consider this information as approximate and not to use it as definitive health advice.
Allergy Information
Please check ingredients for potential allergens and consult a health professional if in doubt.