Easy Peanut Butter Pie Recipe: Imagine a dessert so utterly irresistible, so perfectly balanced between sweet and salty, creamy and crunchy, that it instantly becomes a beloved classic in your home. That’s precisely the magic we’re delving into today. I’m absolutely delighted to share with you a treat that promises pure indulgence with minimal effort.
This delightful confection isn’t just a dessert; it’s a true staple of American comfort food, having graced countless family gatherings and potlucks for generations. Its charm lies not only in its nostalgic appeal but also in its incredible taste – that luscious, velvety peanut butter filling paired with a crisp crust creates an unparalleled textural and flavor experience. People adore it for its rich, satisfying taste and the sheer convenience of whipping up something so spectacular without even turning on the oven, making it a perfect choice for any occasion.
So, if you’re ready to impress your family and friends with a dessert that’s both deeply satisfying and incredibly simple to prepare, then you’ve come to the right place. Get ready to fall in love with my ultimate Easy Peanut Butter Pie Recipe, a dessert that truly delivers on both flavor and ease.
Ingredients:
-
For the Graham Cracker Crust:
- 1 ½ cups (about 180g) Graham Cracker Crumbs: You can buy these pre-crushed or crush your own graham crackers. I find that about 12-15 full sheets of graham crackers will yield enough crumbs.
- ¼ cup (50g) Granulated Sugar: Just a touch of sweetness to complement the crackers and bind the crust.
- ½ cup (113g) Unsalted Butter: Melted. This is the crucial binder for our sturdy, buttery crust. I always opt for unsalted so I can control the salt level myself.
- ¼ teaspoon Salt: A pinch of salt helps to balance the sweetness and enhances the overall flavor of the crust.
-
For the Creamy Peanut Butter Filling:
- 8 ounces (226g) Cream Cheese: Softened to room temperature. This is essential for a smooth, lump-free filling. Make sure it’s full-fat for the best texture and richness.
- 1 cup (240g) Smooth Peanut Butter: I recommend using a conventional, processed peanut butter (like Jif or Skippy) for this recipe. Natural peanut butter tends to separate and can make the filling less stable and creamy. Smooth is key here for that silky texture!
- 1 cup (120g) Powdered Sugar (Confectioners’ Sugar): Sifted. Sifting prevents lumps and ensures a super smooth filling.
- 1 teaspoon Vanilla Extract: Pure vanilla extract adds warmth and depth to the peanut butter flavor. Don’t skip it!
- 1 ½ cups (360ml) Heavy Cream: Cold. This will be whipped into beautiful, stiff peaks to lighten the filling and give it an airy, melt-in-your-mouth texture.
- ½ cup (120g) Granulated Sugar: For sweetening the whipped cream.
-
For the Topping (Optional but Highly Recommended!):
- 1 cup (240ml) Heavy Cream: Cold. For making a fresh whipped cream topping.
- 2 tablespoons (25g) Powdered Sugar: For sweetening the topping.
- ½ teaspoon Vanilla Extract: For flavor in the topping.
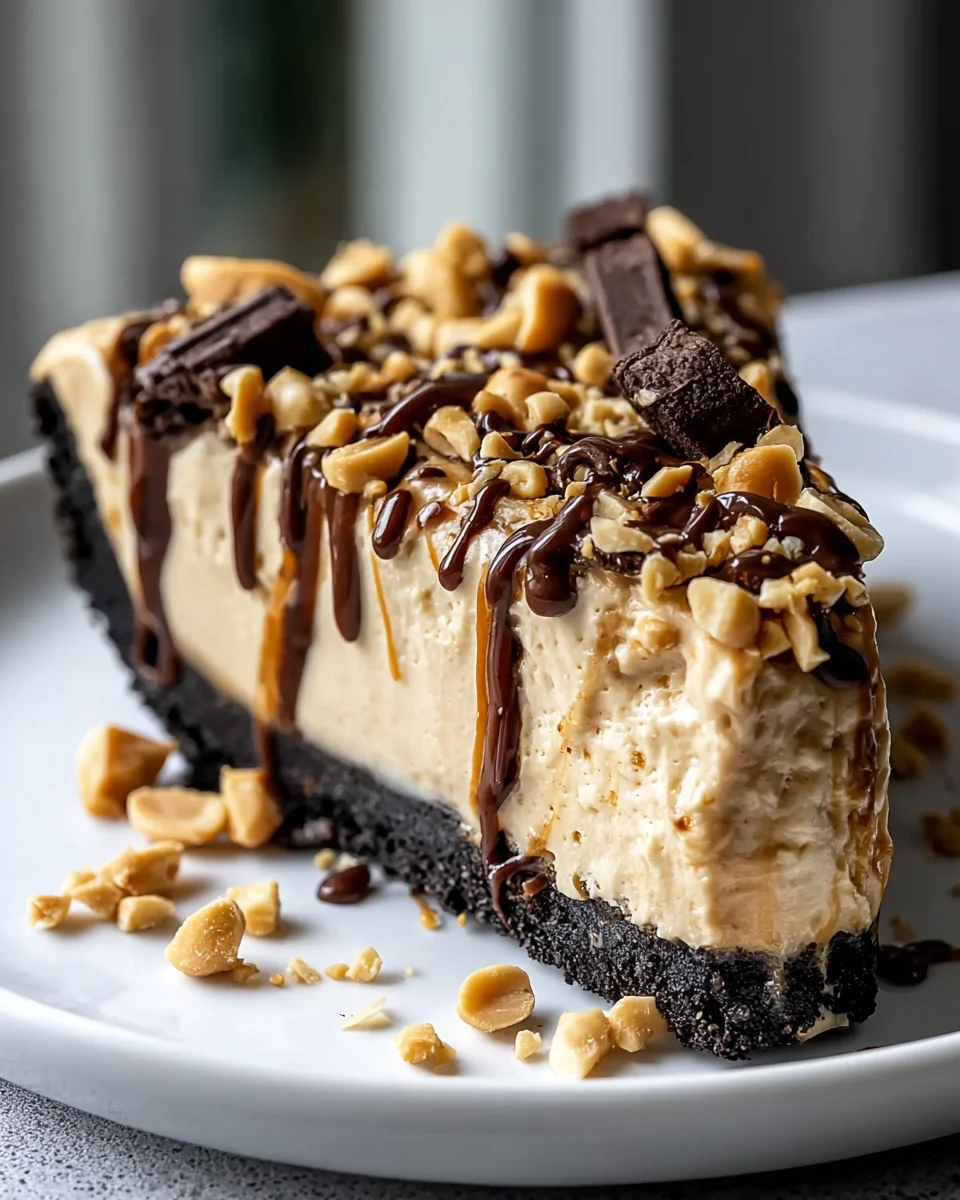
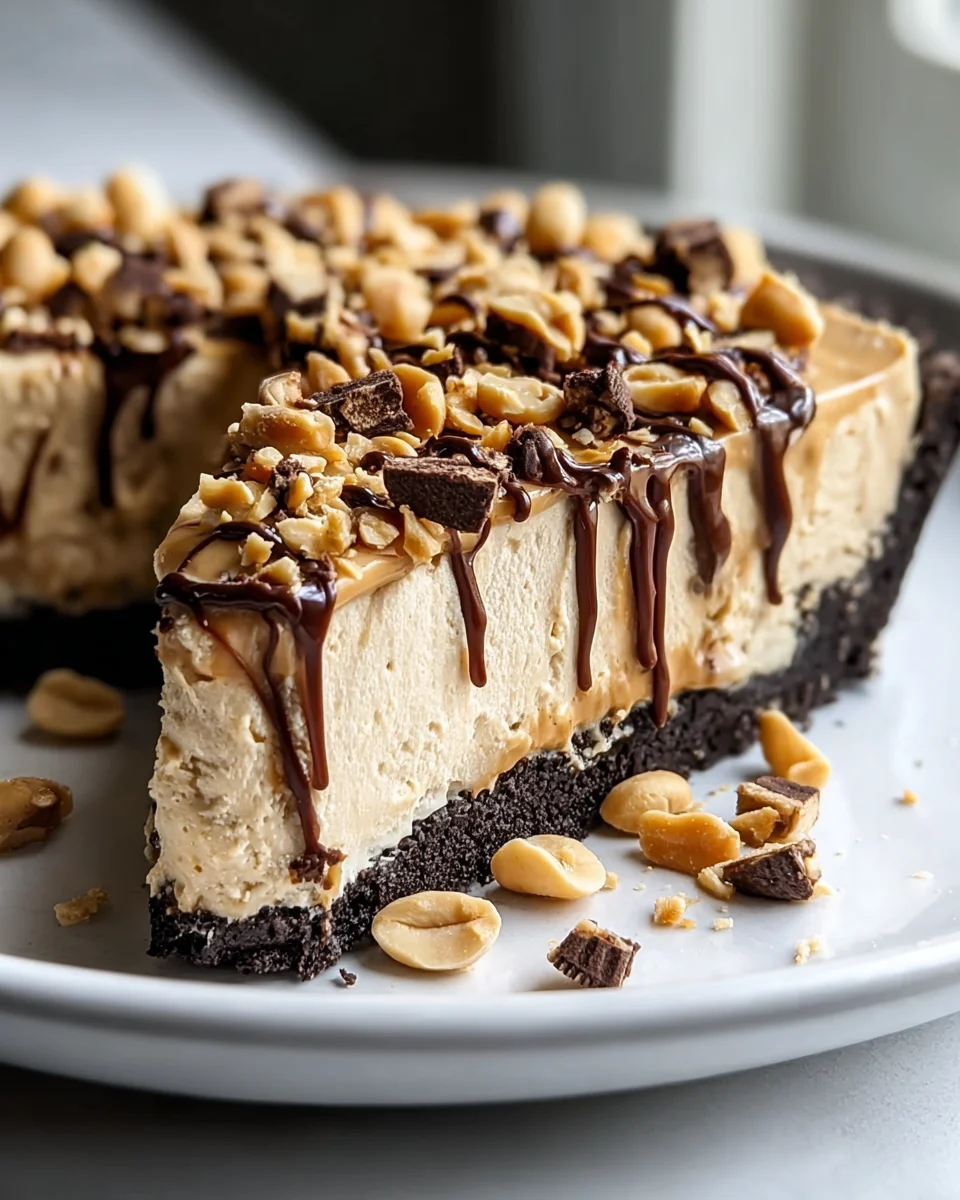
- Chocolate Shavings or Mini Peanut Butter Cups: For garnish. A little extra visual appeal and a burst of complementary flavor never hurt anyone! I love using a vegetable peeler on a chocolate bar for quick, easy shavings.
Equipment You’ll Need:
To embark on this delightful journey of creating the perfect Easy Peanut Butter Pie, you’ll want to gather a few essential tools. Having everything ready before you start will make the process much smoother and more enjoyable. You’ll need a 9-inch pie plate (a standard glass or ceramic one works perfectly), a large mixing bowl (or two, if you want to be extra organized!), an electric mixer (either a stand mixer with a paddle attachment or a hand mixer will be your best friend here for achieving that supremely fluffy filling), a rubber spatula for scraping down the sides of the bowl and folding ingredients, and a whisk for the whipped cream. A small saucepan for melting butter and measuring cups and spoons are also indispensable.
Let’s Make This Easy Peanut Butter Pie Recipe!
Get ready to create a dessert that will have everyone asking for a second slice! This Easy Peanut Butter Pie Recipe is surprisingly simple but incredibly impressive. Follow these detailed steps, and you’ll be enjoying a slice of heaven in no time.
Phase 1: Preparing the Crust
A good pie starts with a great crust, and for our Easy Peanut Butter Pie Recipe, we’re going with a classic, buttery graham cracker crust. It’s simple, no-bake, and provides the perfect crunchy counterpoint to our creamy filling.
- Prepare Your Pie Plate: First things first, grab your 9-inch pie plate. You don’t need to grease it, as the butter in the crust will prevent sticking. Just have it ready on your countertop.
- Melt the Butter: In a small, microwave-safe bowl or a small saucepan over low heat, melt the ½ cup of unsalted butter. Once completely melted, set it aside to cool slightly while you prepare the crumbs. You don’t want to pour scorching hot butter directly onto your crumbs; warm is good, hot is not.
- Combine Dry Ingredients: In a medium-sized mixing bowl, combine the 1 ½ cups of graham cracker crumbs, ¼ cup of granulated sugar, and ¼ teaspoon of salt. Use a spoon or a whisk to mix these dry ingredients thoroughly. You want to make sure the sugar and salt are evenly distributed throughout the crumbs. This ensures every bite of the crust has that perfect balance of sweet and salty.
- Add Melted Butter: Pour the slightly cooled melted butter over the graham cracker mixture. Now, with a fork or your clean fingertips, mix everything together until the crumbs are evenly moistened and resemble wet sand. It’s crucial that all the crumbs are coated in butter; this is what holds the crust together. If you squeeze a handful, it should hold its shape. If it crumbles, you might need a tiny bit more melted butter, but this recipe is usually spot on.
- Press into the Pie Plate: Transfer the moistened graham cracker crumbs into your prepared 9-inch pie plate. Using the bottom of a flat-bottomed measuring cup or your knuckles, firmly press the crumbs evenly over the bottom and up the sides of the pie plate. It’s important to press quite firmly to ensure the crust holds together when sliced. Pay extra attention to the edges and corners to prevent crumbling. A well-pressed crust is a happy crust!
- Chill the Crust: Once pressed, place the pie plate with the crust into the refrigerator. Let it chill for at least 30 minutes. This chilling time is vital as it allows the butter to solidify, setting the crust and making it firm and less prone to crumbling when you add the filling and eventually slice your pie. While the crust is chilling, you can move on to preparing the glorious peanut butter filling.
Phase 2: Crafting the Creamy Peanut Butter Filling
This is where the magic truly happens for our Easy Peanut Butter Pie Recipe! The filling is the star – light, airy, rich, and bursting with peanut butter flavor. Pay close attention to the details here for a truly show-stopping texture.
- Whip the Cream Cheese: In a large mixing bowl (or the bowl of your stand mixer), place the 8 ounces of softened cream cheese. Using an electric mixer on medium speed, beat the cream cheese for 1-2 minutes until it is completely smooth and creamy, with no lumps whatsoever. This initial step is critical for a silky filling. Make sure your cream cheese is truly at room temperature; cold cream cheese will result in lumps.
- Add Peanut Butter and Powdered Sugar: To the smooth cream cheese, add the 1 cup of smooth peanut butter and the 1 cup of sifted powdered sugar. Continue beating on medium speed, scraping down the sides of the bowl frequently with a rubber spatula, until the mixture is fully combined, light, and fluffy. This should take another 2-3 minutes. The mixture will be quite thick at this stage. Ensure there are no streaks of unmixed ingredients.
- Incorporate Vanilla: Add the 1 teaspoon of vanilla extract to the peanut butter mixture and beat for another 30 seconds until fully incorporated. The vanilla brightens the peanut butter flavor beautifully.
- Prepare the Sweetened Whipped Cream: In a separate, clean, and very cold large mixing bowl (I like to chill my bowl and whisk attachment in the freezer for 10-15 minutes beforehand), pour the 1 ½ cups of very cold heavy cream and ½ cup of granulated sugar. Using your electric mixer, start on low speed to prevent splattering, then gradually increase to high speed. Whip the cream until it forms stiff peaks. What does “stiff peaks” mean? When you lift the beaters, the whipped cream should stand straight up without flopping over. Be careful not to over-whip, or you’ll end up with butter! This process usually takes 3-5 minutes, depending on your mixer.
- Fold the Whipped Cream into the Peanut Butter Mixture: This is a delicate step. Take about one-third of your freshly whipped cream and gently fold it into the peanut butter mixture using your rubber spatula. Don’t overmix; just combine it enough to lighten the peanut butter base. This step helps to temper the thicker mixture and makes it easier to incorporate the rest of the whipped cream without deflating it.
- Continue Folding: Add the remaining whipped cream to the bowl. Gently fold it in using a “cut and fold” motion. Cut down the middle with your spatula, sweep to the bottom, and then fold it over. Rotate the bowl as you go. The goal is to incorporate the whipped cream without losing all that lovely air you just whipped into it. You want a light, airy, and uniform consistency. Stop folding as soon as it’s just combined. Overmixing here will result in a denser, less ethereal filling. This delicate folding technique is key for the fluffy texture of your Easy Peanut Butter Pie!
Phase 3: Assembling and Chilling Your Peanut Butter Pie
With our crust chilled and our filling perfectly prepared, it’s time to bring it all together and let the refrigerator work its magic. This phase is quick and easy, but crucial for setting your delightful Easy Peanut Butter Pie.
- Fill the Crust: Retrieve your chilled graham cracker crust from the refrigerator. Carefully spoon the creamy peanut butter filling into the crust.
- Smooth the Top: Using your rubber spatula or the back of a spoon, gently spread the filling evenly across the crust, smoothing the top into an appealing dome or flat surface, whichever you prefer. Take your time to ensure it looks beautiful.
- Chill the Pie: This is a non-negotiable step! Cover the pie loosely with plastic wrap (try to avoid letting the plastic touch the filling directly to prevent sticking) and place it back into the refrigerator. It needs to chill for a minimum of 4 hours, but ideally overnight. The longer it chills, the firmer and more stable your Easy Peanut Butter Pie will be, making for perfect slices. This chilling time allows the flavors to meld and the filling to set completely, ensuring it holds its shape beautifully when cut. Resist the urge to cut into it early!
Phase 4: The Finishing Touches – Topping Your Easy Peanut Butter Pie
Once your Easy Peanut Butter Pie has sufficiently chilled and set, it’s time for the grand finale – the topping! A luscious layer of homemade whipped cream and a sprinkle of chocolate or mini peanut butter cups takes this dessert from delicious to absolutely irresistible.
- Prepare the Topping Whipped Cream (Optional, but highly recommended!): Just before serving, prepare your fresh whipped cream. In another clean, very cold mixing bowl (again, chilling the bowl and beaters helps tremendously), combine the 1 cup of cold heavy cream, 2 tablespoons of powdered sugar, and ½ teaspoon of vanilla extract.
- Whip to Stiff Peaks: Using your electric mixer, start on low speed and gradually increase to high speed. Whip until stiff peaks form. As with the filling, watch carefully to avoid over-whipping. You want it light and fluffy, not clumpy.
- Top Your Pie: Gently spoon or pipe the freshly whipped cream over the chilled pie. You can spread it evenly with a spatula for a rustic look, or use a piping bag with a star tip for a more elegant presentation. This topping adds a wonderful lightness and another layer of creamy texture to the Easy Peanut Butter Pie.
- Garnish: For an extra special touch, sprinkle some chocolate shavings, mini chocolate chips, or even mini peanut butter cups over the whipped cream. A light dusting of cocoa powder or a drizzle of chocolate syrup would also be fantastic. This not only adds visual appeal but also enhances the flavor profile, marrying chocolate and peanut butter in perfect harmony.
- Serve Immediately: Slice your beautiful Easy Peanut Butter Pie with a sharp knife (running the knife under hot water between slices helps for cleaner cuts) and serve immediately. Enjoy the fruits of your labor!
Tips for the Perfect Easy Peanut Butter Pie:
- Room Temperature Cream Cheese is Non-Negotiable: I cannot stress this enough! If your cream cheese isn’t soft and at true room temperature, you’ll end up with lumps in your filling, no matter how much you beat it. Plan ahead and take it out of the fridge at least an hour or two before you start.
- Cold Heavy Cream for Whipping: Conversely, your heavy cream needs to be as cold as possible. I often pop my mixing bowl and whisk attachment into the freezer for 10-15 minutes before whipping the cream. Colder cream whips up faster and creates a more stable, voluminous whipped cream.
- Sift Your Powdered Sugar: Powdered sugar has a tendency to clump. Sifting it before adding to the cream cheese mixture ensures a perfectly smooth, lump-free filling, which is essential for that luxurious mouthfeel we’re aiming for in this Easy Peanut Butter Pie.
- Don’t Overmix the Whipped Cream: When folding the whipped cream into the peanut butter mixture, be gentle and stop as soon as it’s just combined. Overmixing will deflate the whipped cream, resulting in a dense, heavy filling instead of the light, airy texture we want for this Easy Peanut Butter Pie Recipe.
- Chill, Chill, Chill: The chilling time is crucial for the pie to set properly. A minimum of 4 hours is good, but overnight is truly best. This allows all the ingredients to firm up and the flavors to meld beautifully, ensuring clean slices and a delightful texture. Patience is a virtue when making this Easy Peanut Butter Pie.
- Use Conventional Peanut Butter: For the best results and a stable filling, stick to conventional, processed peanut butter like Jif or Skippy. Natural peanut butters tend to separate and can make the filling oily or less stable.
- Clean Slices: For perfectly clean slices, dip your knife in hot water and wipe it clean between each cut. This helps to prevent the filling from sticking to the knife and dragging crumbs from the crust.
- Taste as You Go (Carefully!): While baking requires precision, for no-bake fillings like this one, it’s okay to taste a tiny bit before you’ve added the whipped cream to ensure the sweetness and peanut butter flavor are to your liking. Adjust powdered sugar slightly if desired.
Variations to Customize Your Easy Peanut Butter Pie Recipe:
While the classic Easy Peanut Butter Pie is fantastic on its own, here are some ideas to add your own personal touch and make it even more special:
- Chocolate Swirl: Before chilling, gently drizzle warm melted chocolate (milk, dark, or white) over the top of the filling and use a skewer or toothpick to create beautiful swirls. The contrast of the dark chocolate against the light peanut butter is visually stunning and incredibly delicious, making for an even more decadent Easy Peanut Butter Pie.
- Oreo Crust: Swap out the graham cracker crumbs for crushed Oreo cookies (cream filling included!). Use the same proportions of crumbs and melted butter. This creates a rich, dark chocolate base that pairs exquisitely with the peanut butter filling, elevating your Easy Peanut Butter Pie to a new level of indulgence.
- Salted Caramel Drizzle: After adding the whipped cream topping, generously drizzle homemade or store-bought salted caramel sauce over the pie. The salty-sweet caramel enhances the peanut butter and adds another layer of complexity to this Easy Peanut Butter Pie.
- Peanut Butter Cup Extravaganza: Chop up extra peanut butter cups (mini or regular size) and fold some directly into the peanut butter filling before spreading it into the crust. You can also use them generously for garnish on top. This is for the ultimate peanut butter cup enthusiast!
- Pretzel Crust: For a truly unique sweet and salty experience, try a pretzel crust! Crush pretzels finely and use them in place of graham crackers, reducing the added salt in the crust recipe since pretzels are already salty. This provides an amazing crunch and savory note to your Easy Peanut Butter Pie.
- Add Espresso Powder: For a subtle sophisticated twist, add ½ to 1 teaspoon of instant espresso powder (dissolved in a tiny bit of hot water) to the peanut butter filling. It won’t make the pie taste like coffee, but it will deepen and enhance the chocolate and peanut butter flavors beautifully.
Storage Instructions:
- Refrigeration: Leftover slices of your Easy Peanut Butter Pie, or the whole pie if you haven’t served it all, should be stored in an airtight container or covered tightly with plastic wrap in the refrigerator.
- Shelf Life: When stored properly, this Easy Peanut Butter Pie will remain fresh and delicious for 3-4 days in the refrigerator. The texture is best within the first two days.
- Freezing: Yes, you can freeze this pie! For longer storage, you can freeze the entire pie (without the whipped cream topping) for up to 1 month. Wrap it tightly in plastic wrap, then a layer of aluminum foil. To serve, thaw it overnight in the refrigerator, then add fresh whipped cream and garnish before serving. Individual slices can also be frozen in airtight containers.
Conclusion:
Well, friends, we’ve journeyed through the steps of creating what I genuinely believe will become a staple in your dessert repertoire. This isn’t just any dessert; it’s a celebration of simplicity meeting spectacular flavor. If you’ve been searching for that perfect sweet treat that requires minimal effort but delivers maximum impact, then look no further. This recipe truly stands out because it combines the universally beloved flavors of creamy peanut butter and sweet goodness into a dessert that’s utterly irresistible, without ever needing to turn on your oven. It’s the kind of pie that sparks joy from the first bite, a delightful dance of salty and sweet that captivates your taste buds and leaves you craving just one more slice.
I can personally attest to the fact that this pie has saved me on countless occasions, whether I needed a last-minute contribution to a potluck, a delightful ending to a casual dinner party, or simply a comforting treat for a cozy evening at home. Its no-bake nature makes it an absolute dream for busy schedules, allowing you to whip up something truly impressive without the stress. The smooth, velvety texture of the filling, nestled within a crisp, buttery crust, is a testament to how incredible simple ingredients can be when brought together in harmony. It’s truly a testament to the power of uncomplicated deliciousness! Trust me, once you make this, you’ll understand why I’m so enthusiastic about it.
Now, while this pie is absolutely phenomenal on its own, part of the fun of baking (or in this case, no-baking!) is getting creative! I always encourage a little experimentation to truly make a recipe your own. For a classic presentation, a dollop of freshly whipped cream and a sprinkle of chocolate shavings or chopped roasted peanuts are always a winning combination. But let’s talk variations! If you’re a chocolate lover, try drizzling melted dark chocolate over each slice, or even swirling a thin layer of melted chocolate into the filling before chilling for a peanut butter cup effect. A caramel drizzle can add another layer of rich sweetness, perfectly complementing the nutty notes. For the crust, while a classic graham cracker crust is divine, consider a crushed Oreo or Nutter Butter cookie crust for an extra layer of flavor and texture – a pretzel crust could even offer an intriguing salty counterpoint! You could also transform this into individual mini pies using ramekins or muffin tins, perfect for portion control or a charming presentation at a gathering. Don’t be afraid to put your unique spin on this dessert.
Imagine serving a slice alongside a scoop of vanilla bean ice cream, perhaps with a sprinkle of sea salt to enhance all those incredible flavors. Or, for a truly decadent experience, a thin layer of sliced bananas could be added to the bottom of the crust before adding the filling. The possibilities are truly endless, limited only by your imagination! The beauty of this dessert is its flexibility and ability to adapt to different tastes and preferences. It’s also a fantastic recipe to get the kids involved with; they’ll love helping to crush cookies for the crust or decorate the top with sprinkles and chocolate chips.
So, my dear friends, I implore you: don’t just read about this incredible dessert. Go forth and create! Gather your simple ingredients, dedicate a little time to chilling, and prepare to be amazed. This Easy Peanut Butter Pie Recipe is more than just a recipe; it’s an invitation to experience pure, unadulterated dessert bliss without the usual fuss. Once you’ve tried it, and I’m confident you will, I would absolutely love to hear about your experience! Did you stick to the classic version, or did you unleash your inner culinary artist with some fantastic variations? Share your photos, your triumphs, and your delightful twists in the comments below or on your favorite social media platforms. Let’s spread the joy of this unbelievably easy and utterly delicious pie far and wide! Happy no-baking!
Easy Peanut Butter Pie Recipe
Imagine a dessert so utterly irresistible, perfectly balanced between sweet and salty, creamy and crunchy, that it instantly becomes a beloved classic. This delightful no-bake confection is a true staple of American comfort food, promising pure indulgence with minimal effort.
Ingredients
Instructions
Important Information
Nutrition Facts (Per Serving)
It is important to consider this information as approximate and not to use it as definitive health advice.
Allergy Information
Please check ingredients for potential allergens and consult a health professional if in doubt.