Chocolate Peppermint Blossoms
Hello, fellow dessert lovers! I’m absolutely thrilled to share with you one of my all-time favorite festive treats: Chocolate Peppermint Blossoms. You might be familiar with the classic peanut butter blossom, but trust me, this chocolatey, minty twist takes that beloved concept to a whole new level of holiday magic.
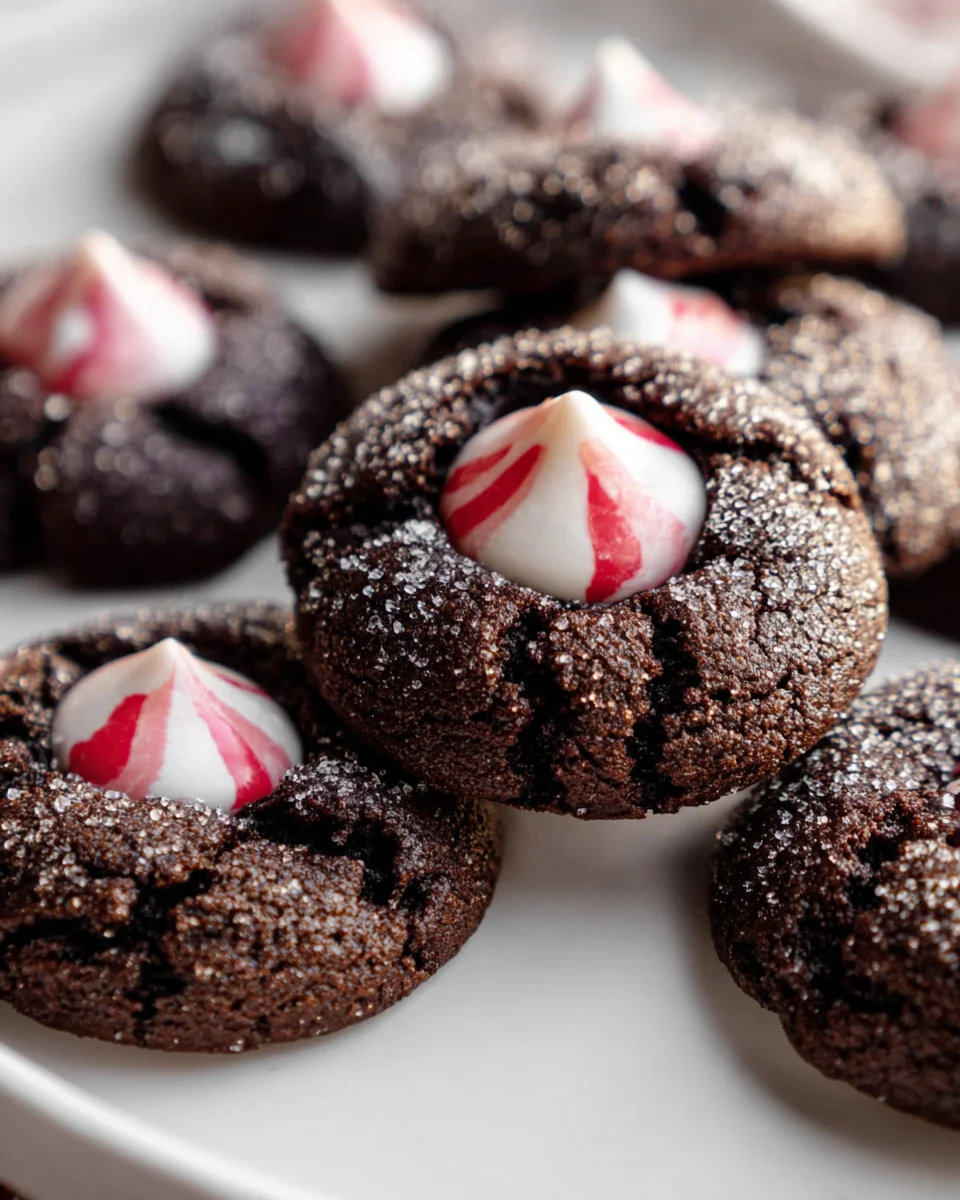
What makes these Chocolate Peppermint Blossoms so incredibly special? It’s that perfect dance between rich, decadent chocolate and the cool, invigorating zing of peppermint. These aren’t just any cookies; they’re little bites of holiday cheer! I promise, you’re going to fall head over heels for the way the fudgy, soft chocolate cookie base, slightly crisp from a roll in sugar, perfectly cradles that iconic, melty peppermint chocolate kiss in the center.
Why will you adore making and eating these? Well, besides being ridiculously delicious, they’re simply gorgeous on any holiday platter, making them ideal for cookie exchanges, gifting, or just indulging yourself by the fireplace. They’re a guaranteed crowd-pleaser that brings a festive spirit to every single bite. Get ready for a symphony of chocolate and mint that’s sure to become a new tradition in your kitchen!
Ingredient Notes
Crafting the perfect Chocolate Peppermint Blossoms is all about the harmony of classic chocolate cookie goodness with that irresistible cool peppermint kick. When I set out to make these festive treats, I focus on a few key ingredients that truly make them shine. Here’s what you’ll need and some thoughts on substitutions:
- All-Purpose Flour: This is the backbone of our cookies, providing structure. I always recommend measuring your flour by weight (around 120 grams per cup) for the most consistent results, but if you’re using cups, spoon and level it to avoid a dense cookie.
- Unsweetened Cocoa Powder: For these blossoms, I love using a good quality unsweetened cocoa powder. You have a choice here: natural or Dutch-processed. Natural cocoa powder (like Hershey’s regular cocoa) offers a rich, slightly fruity chocolate flavor and reacts with baking soda to help the cookies rise. Dutch-processed cocoa powder (like Hershey’s Special Dark) is treated to be less acidic, giving a darker color and a smoother, milder chocolate taste. Either works beautifully, but Dutch-processed will give you a darker, more dramatic looking cookie, which I adore for a peppermint blossom!
- Baking Soda: Our leavening agent! This helps the cookies spread and become tender. Make sure yours isn’t expired for the best lift.
- Salt: A pinch of salt is crucial. It balances the sweetness and enhances all the other flavors, especially the chocolate. Don’t skip it!
- Unsalted Butter: Softened to room temperature, unsalted butter is key for that rich, tender crumb. Room temperature butter creams beautifully with sugar, incorporating air for a light texture. If you only have salted butter, reduce the added salt in the recipe by about ¼ teaspoon. For a dairy-free alternative, a good quality plant-based butter substitute can work, though the texture might vary slightly.
- Granulated Sugar & Light Brown Sugar: Combining these two sugars gives us the best of both worlds. Granulated sugar contributes to crisp edges and chewiness, while brown sugar adds moisture, depth of flavor, and a lovely softness. You could use all granulated sugar in a pinch, but you’d lose some of that delightful chew.
- Large Eggs: Eggs bind everything together and add richness. Make sure they’re at room temperature too; they emulsify better with the butter and sugar, leading to a smoother dough.
- Peppermint Extract: This is where the magic happens! I use pure peppermint extract for that refreshing, cool blast. Be careful not to overdo it, as it can be quite potent. Start with the recommended amount and add a tiny bit more if you prefer a stronger mint flavor. There really isn’t a direct substitution for peppermint extract in terms of flavor intensity and purity.
- Vanilla Extract: While peppermint is the star, a touch of vanilla extract rounds out the flavor profile beautifully, adding warmth and complexity to the chocolate.
- Hershey’s Kisses (Peppermint or Milk Chocolate): The signature “blossom” on top! I love using the Peppermint Bark Kisses when they’re available during the holidays for an extra peppermint punch. Otherwise, regular milk chocolate Kisses are perfect and create that iconic look. If you can’t find Kisses, any small, unwrapped chocolate candy or even a small square of good quality chocolate would work.
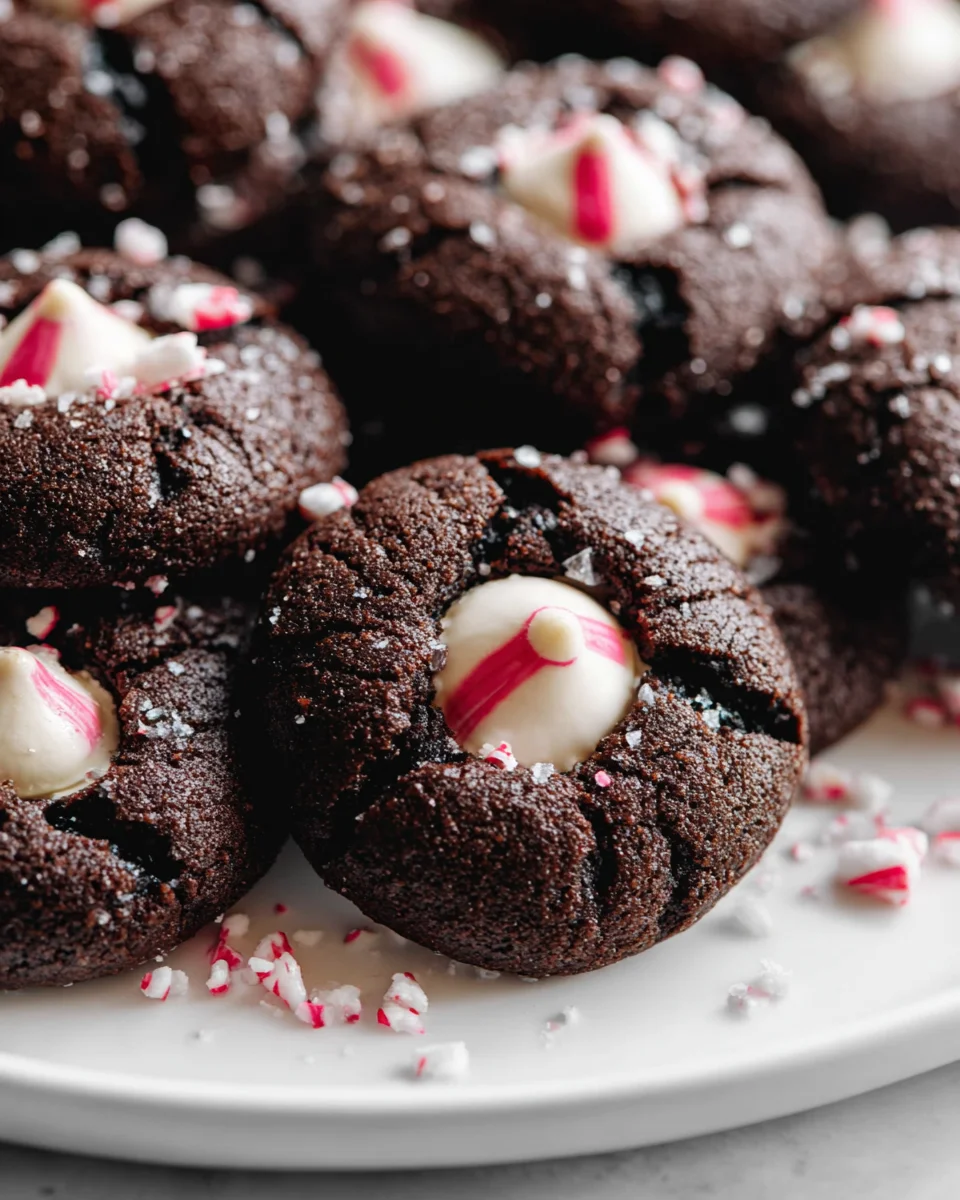
- Crushed Peppermint Candies/Candy Canes (Optional for rolling): While you’ll roll the dough in granulated sugar, a sprinkle of crushed candy canes on top of the melted Kisses after baking, or even rolling the dough balls in crushed candy canes along with the sugar, adds an extra festive touch and texture. I adore the crunch and visual appeal!
Step-by-Step Instructions
Let’s get baking! These Chocolate Peppermint Blossoms are not only delicious but also incredibly fun to make. Follow these steps for perfect, festive cookies every time:
- Prepare for Baking: First things first, preheat your oven to 350°F (175°C). Line several baking sheets with parchment paper or silicone baking mats. This ensures your cookies won’t stick and makes for easy cleanup. If you plan to use crushed peppermint candies, now is a good time to crush them. Place about 1/2 cup of candy canes or peppermint candies in a sturdy zip-top bag and smash them with a rolling pin until you have a mix of fine crumbs and small pieces. Set aside.
- Whisk Dry Ingredients: In a medium bowl, whisk together your all-purpose flour, unsweetened cocoa powder, baking soda, and salt. Make sure these are well combined. Whisking helps to aerate the flour and evenly distribute the leavening agents, which is essential for uniform cookies.
- Cream Wet Ingredients: In a large bowl, using an electric mixer (stand mixer with paddle attachment or a hand mixer), cream together the softened unsalted butter, granulated sugar, and light brown sugar on medium speed until the mixture is light and fluffy. This usually takes about 2-3 minutes. Scrape down the sides of the bowl as needed to ensure everything is incorporated.
- Add Eggs and Extracts: Beat in the large eggs, one at a time, mixing well after each addition until fully incorporated. Then, add the peppermint extract and vanilla extract. Mix until just combined. The mixture might look a little curdled at first, but don’t worry, it will come together as you add the dry ingredients.
- Combine Dry and Wet: Gradually add the dry ingredient mixture to the wet ingredients, mixing on low speed until just combined. Be careful not to overmix! Overmixing can develop the gluten in the flour, leading to tougher cookies. Stop mixing as soon as you no longer see streaks of dry flour.
- Roll the Dough Balls: Place your extra granulated sugar (for rolling) in a small, shallow bowl. If you’re using crushed peppermint candies to roll the dough, place those in another shallow bowl. Using a 1.5-tablespoon cookie scoop or by hand, roll the dough into uniform balls. This helps them bake evenly. First, roll each dough ball in the granulated sugar to coat it, then, if desired, roll it in the crushed peppermint candies for an extra festive touch. Place the sugar-coated (and optionally peppermint-coated) dough balls about 2 inches apart on your prepared baking sheets.
- Bake to Perfection: Bake the Chocolate Peppermint Blossoms in your preheated oven for 8-10 minutes. The edges should be set, but the centers will still look soft and slightly puffy. Remember, they will continue to set as they cool. Do not overbake, or your cookies will lose their delightful chewiness.
- Add the Kisses: As soon as you remove the baking sheets from the oven, immediately press one Hershey’s Kiss (peppermint or milk chocolate) into the center of each warm cookie. The residual heat from the cookie will slightly melt the chocolate, allowing it to adhere perfectly and create that iconic “blossom” look. If you desire, you can sprinkle a few extra crushed candy canes over the slightly melted chocolate of the Kisses for extra sparkle and crunch.
- Cool and Enjoy: Let the cookies cool on the baking sheets for about 5 minutes to allow them to firm up slightly. Then, carefully transfer them to a wire rack to cool completely. This helps prevent the bottoms from getting soggy and ensures the Kisses fully set. Once cooled, they’re ready to be devoured!
Tips & Suggestions
Making these Chocolate Peppermint Blossoms is a joy, and with a few insider tips, you can elevate your baking experience and ensure truly spectacular results:
- Don’t Overmix the Dough: This is a golden rule for many cookie recipes, and it’s especially true for these blossoms. Overmixing develops the gluten in the flour, which can lead to tough, dry cookies. Mix until just combined, stopping as soon as no dry streaks of flour remain. A light touch here makes all the difference for a tender crumb.
- Room Temperature Ingredients are Key: For the butter and eggs, ensure they are at true room temperature. This allows them to cream together beautifully, creating a smooth emulsion that incorporates air, leading to a lighter, more evenly textured cookie. If your butter is too cold, it won’t cream properly; if too warm, it can make the dough greasy.
- Measure Flour Correctly: For the most consistent results, I highly recommend measuring your flour by weight using a kitchen scale (1 cup of all-purpose flour is approximately 120-125 grams). If you don’t have a scale, use the spoon-and-level method: gently spoon flour into your measuring cup until it overflows, then level it off with the back of a knife. Never scoop directly from the bag, as this compacts the flour and you’ll end up with too much.
- Peppermint Extract Potency: Peppermint extract can be quite strong! Start with the amount suggested in the recipe, and if you desire a more intense mint flavor, add a tiny bit more (like 1/8 teaspoon at a time) until it’s just right for your preference. It’s easier to add more than to take away!
- Crushing Candy Canes: If you’re using candy canes for rolling or sprinkling, place them in a sturdy freezer bag and use a rolling pin or even a heavy-bottomed pan to crush them. You want a mix of fine crumbs and small, sparkly pieces for the best texture and visual appeal. Avoid making them too powdery.
- Uniform Cookie Size: Using a cookie scoop (a 1.5-tablespoon scoop is perfect for these) is an easy way to ensure all your cookies are the same size. This promotes even baking, so all your blossoms will be perfectly done at the same time.
- Don’t Overbake: These cookies are meant to be soft and chewy. They might look slightly underbaked when you pull them from the oven, with edges just set and centers still a bit soft. This is exactly what you want! They will continue to set as they cool on the baking sheet. Overbaking will result in dry, crumbly cookies.
- Hershey’s Kiss Placement: Be swift! Press the Kisses into the warm cookies immediately after they come out of the oven. The residual heat is crucial for them to melt slightly and adhere properly. If you wait too long, the cookies will cool and the Kisses won’t stick as well. Don’t worry if the chocolate cracks a little; it adds to their charm.
- Flavor Variations: Feel free to experiment with different types of Hershey’s Kisses! While peppermint Kisses are great, classic milk chocolate or even dark chocolate Kisses would be lovely. You could also stir in a handful of white chocolate chips into the dough for an extra creamy twist.
Storage
Once you’ve gone to the delightful effort of baking these Chocolate Peppermint Blossoms, you’ll want to make sure they stay fresh and delicious for as long as possible. Here’s my advice on how to store them, whether for a few days or longer:
- At Room Temperature (Short-Term):
Once your Chocolate Peppermint Blossoms have completely cooled to room temperature (this is important to prevent condensation), transfer them to an airtight container. I usually layer them with parchment paper in between if I have more than one layer, just to prevent any sticking, especially with the slightly melted Kisses. Stored this way, they will stay wonderfully soft and fresh for 3 to 5 days. Keeping them in an airtight container helps maintain their moisture and protects them from drying out.
- Freezing Baked Cookies (Longer-Term):
If you’re planning ahead or have made a large batch, these cookies freeze beautifully! To freeze baked Chocolate Peppermint Blossoms, first ensure they are completely cool. Then, arrange them in a single layer on a baking sheet and pop them into the freezer for about 1-2 hours, or until they are solid. This “flash freezing” step prevents them from sticking together. Once solid, transfer the frozen cookies to a freezer-safe airtight container or a heavy-duty freezer bag. You can stack them carefully, again, with a piece of parchment paper between layers if desired. They will maintain their quality for up to 3 months. When you’re ready to enjoy them, simply take out the desired number of cookies and let them thaw at room temperature for an hour or so. They taste just as good as freshly baked!
- Freezing Unbaked Cookie Dough (Ultimate Convenience):
For ultimate convenience, you can also freeze the unbaked cookie dough. After you’ve rolled the dough into balls (and coated them in sugar and/or crushed peppermint, if desired), arrange them in a single layer on a baking sheet lined with parchment paper. Flash freeze them until solid (about 2 hours). Once firm, transfer the frozen dough balls to a freezer-safe airtight container or bag. They can be stored for up to 3 months. When you’re ready to bake, you can bake them directly from frozen – just add 1-2 minutes to the baking time. Place the frozen dough balls on a prepared baking sheet, bake, and then press the Hershey’s Kisses into the warm cookies as usual. This is a fantastic way to have fresh, warm Chocolate Peppermint Blossoms whenever the craving strikes!
Final Thoughts
And there you have it! My hope is that these Chocolate Peppermint Blossoms bring as much joy to your kitchen and your taste buds as they do to mine. There’s something truly magical about the rich, dark chocolate meeting the cool, invigorating burst of peppermint, all wrapped up in a tender, chewy cookie. It’s a combination that just screams comfort and festivity! These aren’t just any cookies; they’re a delightful experience, a perfect balance of flavors and textures that will leave everyone reaching for more. Whether you’re baking for a special occasion, a cozy night in, or just because, I promise you, these Chocolate Peppermint Blossoms are an absolute must-try. Get ready to fall in love with their irresistible charm!
Easy Chocolate Peppermint Blossoms: Holiday Cookie Recipe
- Total Time: 25 minutes
- Yield: 24 cookies 1x
Description
These Chocolate Peppermint Blossoms are a delightful twist on a classic favorite, combining rich chocolate with refreshing peppermint. Perfect for holiday gatherings, they are sure to bring festive cheer to your dessert table!
Ingredients
- 2 cups All-Purpose Flour
- 3/4 cup Unsweetened Cocoa Powder
- 1 teaspoon Baking Soda
- 1/2 teaspoon Salt
- 1 cup Unsalted Butter, softened to room temperature
- 1/2 cup Granulated Sugar
- 1/2 cup Light Brown Sugar
- 2 Large Eggs, at room temperature
- 1 teaspoon Peppermint Extract
- 1 teaspoon Vanilla Extract
- Hershey's Kisses (Peppermint or Milk Chocolate)
- Crushed Peppermint Candies/Candy Canes (Optional for rolling)
Instructions
- Preheat your oven to 350°F (175°C). Line several baking sheets with parchment paper or silicone baking mats.
- In a medium bowl, whisk together the all-purpose flour, unsweetened cocoa powder, baking soda, and salt until well combined.
- In a large bowl, cream together the softened unsalted butter, granulated sugar, and light brown sugar on medium speed until light and fluffy, about 2-3 minutes.
- Beat in the large eggs, one at a time, mixing well after each addition. Then, add the peppermint extract and vanilla extract and mix until just combined.
- Gradually add the dry ingredient mixture to the wet ingredients, mixing on low speed until just combined.
- Roll the dough into uniform balls, then roll each ball in granulated sugar to coat it. Optionally, roll in crushed peppermint candies.
- Place the sugar-coated dough balls about 2 inches apart on the prepared baking sheets.
- Bake the cookies for 8-10 minutes, until the edges are set and the centers look soft.
- Immediately press one Hershey's Kiss into the center of each warm cookie.
- Let the cookies cool on the baking sheets for about 5 minutes before transferring them to a wire rack to cool completely.
- Prep Time: 15 mins
- Cook Time: 10 mins
- Category: Dessert
- Method: Baking
- Cuisine: American
Nutrition
- Serving Size: 1 cookie
- Calories: 120
- Sugar: 10 g
- Sodium: 50 mg
- Fat: 6 g
- Saturated Fat: 4 g
- Unsaturated Fat: 2 g
- Trans Fat: 0 g
- Carbohydrates: 15 g
- Fiber: 1 g
- Protein: 2 g
- Cholesterol: 20 mg
Keywords: Ensure all ingredients are at room temperature for the best results. Be careful not to overmix the dough, and remember that the cookies will continue to set as they cool.