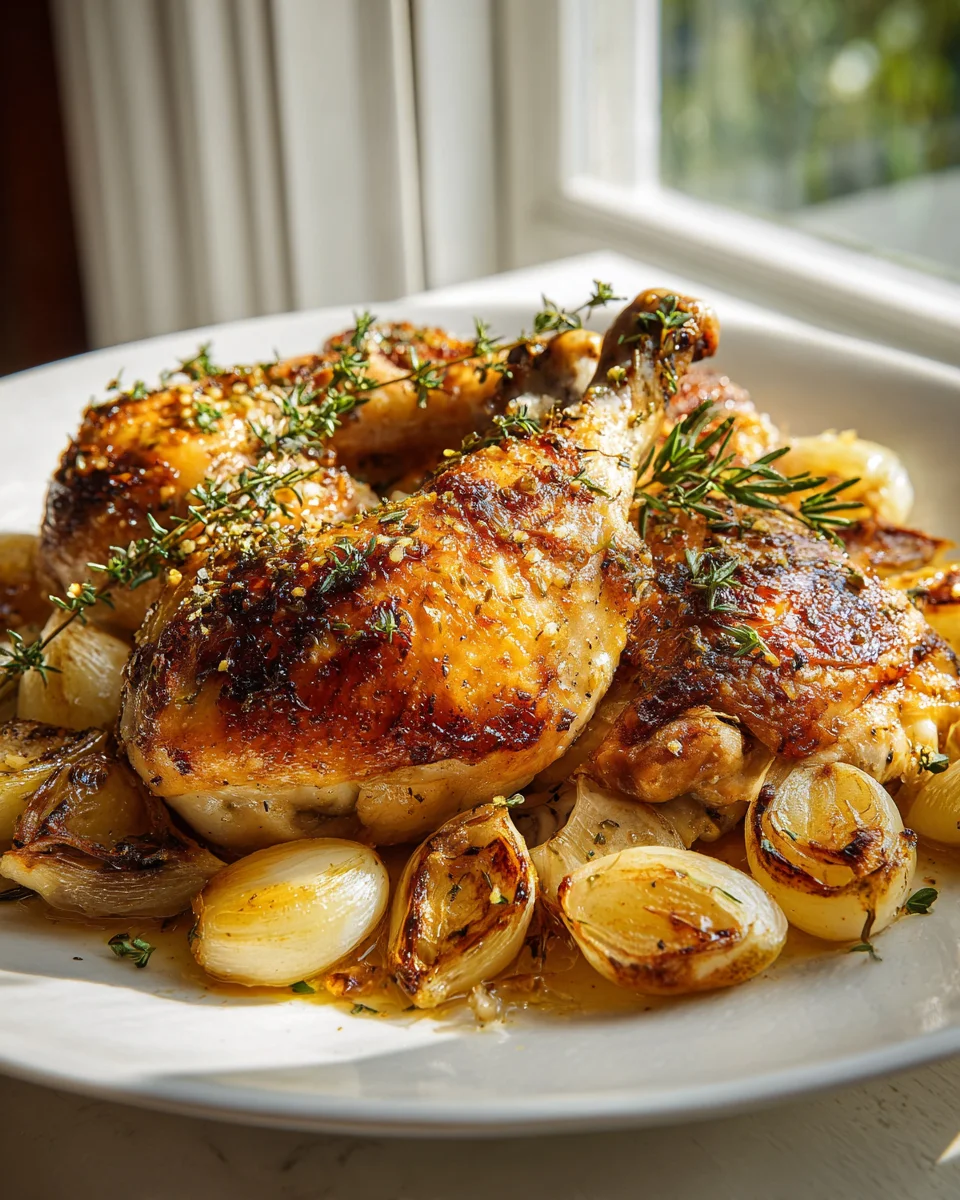
Roasted French Garlic Chicken
Oh, my friends, if you’re looking for a dish that effortlessly brings the elegance and incredible flavors of a French bistro right into your kitchen, you’re in the right place! I absolutely adore this Roasted French Garlic Chicken recipe because it’s a masterclass in how simple, high-quality ingredients can create something truly spectacular. We’re talking about chicken so tender it practically falls off the bone, with a gorgeous, crispy skin, all perfumed with an intoxicating blend of aromatic garlic and classic French herbs like thyme and rosemary.
You’ll love how incredibly easy it is to prepare, making it perfect for a comforting weeknight meal, yet it’s undeniably impressive enough to serve when you have company. Imagine your kitchen filling with the most heavenly aroma as this beautiful bird roasts to golden perfection! This isn’t just any roasted chicken; it’s a dish where every bite promises a burst of savory, garlicky goodness. It’s truly a celebration of simple, rustic flavors, brought to life through the magic of roasting. Get ready to fall in love with your new favorite way to enjoy chicken!

Ingredient Notes
Ah, the star of our show, the Roasted French Garlic Chicken! This isn’t just any roasted chicken; it’s infused with the robust, sweet, and aromatic essence of garlic, a true hallmark of French country cooking. Getting the right ingredients is key to achieving that irresistible flavor and tender, juicy result.
Chicken
- What I use: I always opt for a whole chicken, ideally around 4-5 pounds. This size is perfect for roasting and usually yields enough for a family meal with some delicious leftovers. Look for a good quality, preferably free-range or organic chicken, as the flavor truly shines through.
- Why it works: A whole chicken allows for even cooking, and the bones contribute immense flavor to the pan drippings, which are absolutely divine over the vegetables or as a base for a quick sauce.
- Substitutions: If you’re short on time or prefer specific cuts, bone-in, skin-on chicken pieces like thighs or drumsticks work wonderfully. Just be sure to adjust your cooking time – they’ll roast much faster! The essence of the garlic will still permeate beautifully.
Garlic, glorious Garlic!
- What I use: This is where the “French Garlic” truly comes in! I don’t shy away from garlic; I use a generous amount. Think 2-3 whole heads of garlic. Yes, whole heads! I separate most cloves, leaving the paper on for some, and peeling others. You can even keep a head or two intact, sliced horizontally, to tuck into the cavity.
- Why it works: Roasting transforms raw garlic’s pungent bite into a sweet, mellow, almost creamy delicacy. It becomes spreadable, like butter, and infuses the entire dish with an incredible aroma.
- Substitutions: While fresh garlic is non-negotiable for this recipe, you could experiment with elephant garlic for a milder flavor, or even a mix of regular and smoked garlic for added depth. Just make sure it’s fresh!
Fresh Herbs
- What I use: Classic French herbs are my go-to. A generous bundle of fresh rosemary and thyme sprigs, along with a couple of bay leaves.
- Why it works: These herbs complement the garlic and chicken perfectly, adding an earthy, aromatic layer that’s essential to the French country profile.
- Substitutions: If fresh herbs aren’t available, you can use dried, but reduce the quantity significantly (about 1/3 of the fresh amount) as dried herbs are more potent. Herbes de Provence is also a fantastic substitute that captures the regional flavor beautifully.
Lemon
- What I use: One organic lemon, halved.
- Why it works: Tucking lemon halves into the chicken’s cavity and squeezing some juice over the top before roasting adds a bright, acidic counterpoint that cuts through the richness of the chicken and garlic. It also helps tenderize the meat.
- Substitutions: Orange halves can be a lovely, slightly sweeter alternative if you’re looking for a different citrus note.
Olive Oil
- What I use: A good quality extra virgin olive oil.
- Why it works: It’s essential for a crispy skin, for tossing the vegetables, and for carrying the flavors of the herbs and garlic.
- Substitutions: Avocado oil or grapeseed oil can also be used if you prefer a more neutral flavor or have dietary restrictions.
Vegetables (Optional, but highly recommended)
- What I use: Small, waxy potatoes (like Yukon Gold or red potatoes), carrots, and shallots or small onions.
- Why it works: Roasting these vegetables alongside the chicken allows them to soak up all the flavorful pan drippings, making them incredibly tender and delicious. They become a meal in themselves!
- Substitutions: Feel free to use other root vegetables like parsnips, sweet potatoes, or even fennel for a subtle anise flavor.
Non-Alcoholic Liquid
- What I use: About 1/2 cup of robust chicken or vegetable broth.
- Why it works: Adding a bit of liquid to the bottom of the pan keeps things moist, helps create a flavorful pan sauce, and prevents anything from sticking or burning.
- Substitutions: A non-alcoholic white wine alternative could also be used to deglaze the pan and add complexity.
Salt and Pepper
- What I use: Coarse kosher salt and freshly ground black pepper.
- Why it works: Proper seasoning is foundational. Don’t be shy with the salt, especially for a whole chicken; it penetrates the meat and enhances all the other flavors.
- Substitutions: Sea salt flakes can be used for a slightly different texture and flavor, but stick with fresh pepper for the best aroma.
Step-by-Step Instructions
Let’s get this gorgeous Roasted French Garlic Chicken into the oven! Follow these steps, and you’ll be rewarded with a meal that smells as incredible as it tastes.
- Preheat and Prep: First things first, preheat your oven to 425°F (220°C). While it’s heating, grab your whole chicken and pat it very dry with paper towels – this is crucial for crispy skin! Remove any giblets from the cavity.
- Garlic & Herb Butter/Oil: In a small bowl, combine 1/4 cup of softened unsalted butter (or olive oil for a dairy-free option) with 3-4 cloves of minced fresh garlic, 1 tablespoon of chopped fresh rosemary, 1 tablespoon of chopped fresh thyme, 1 teaspoon of kosher salt, and 1/2 teaspoon of freshly ground black pepper. Mix everything until well combined.
- Season the Chicken: Gently separate the skin from the breast meat with your fingers, being careful not to tear it. Take about half of your garlic & herb butter/oil mixture and spread it directly onto the breast meat under the skin. Then, rub the remaining mixture all over the outside of the chicken, including the legs and wings. Don’t forget to season the cavity lightly with salt and pepper too.
- Stuff the Cavity: Take your two lemon halves and the remaining whole garlic heads (or separate cloves, some peeled, some unpeeled) and stuff them into the chicken’s cavity along with a few sprigs of fresh rosemary and thyme. This infuses incredible flavor from the inside out.
- Prep the Vegetables: If you’re using vegetables, chop your potatoes, carrots, and shallots (or onions) into roughly 1-inch pieces. Toss them in a large roasting pan with a drizzle of olive oil, 5-6 unpeeled garlic cloves (these become incredibly sweet and soft!), a few sprigs of fresh rosemary and thyme, a good pinch of salt, and pepper. Arrange them in a single layer.
- Position the Chicken: Place the seasoned chicken directly on top of the bed of vegetables in the roasting pan. If you’re not using vegetables, simply place the chicken on a roasting rack set inside a large roasting pan. Pour the 1/2 cup of chicken or vegetable broth into the bottom of the pan, around the chicken (or below the rack).
- Initial Roast (High Heat): Transfer the roasting pan to your preheated oven. Roast for 20-25 minutes at 425°F (220°C). This high heat blast helps to brown the skin beautifully and render some of the fat.
- Lower Heat Roast: After 20-25 minutes, reduce the oven temperature to 375°F (190°C) without opening the oven door. Continue roasting for another 60-90 minutes, or until the internal temperature of the thickest part of the thigh (without touching the bone) reaches 165°F (74°C) on an instant-read thermometer.
- Basting (Optional but Recommended): Every 30 minutes or so during the lower heat roast, you can baste the chicken with the pan juices. This helps keep the skin from drying out too much and adds another layer of flavor.
- Rest the Chicken: Once the chicken is cooked through, carefully remove the roasting pan from the oven. Tent the chicken loosely with aluminum foil and let it rest for at least 15-20 minutes before carving. This resting period is critical; it allows the juices to redistribute throughout the meat, resulting in a much more tender and flavorful chicken.
- Serve: Carve the chicken and serve it with the roasted garlic (which you can squeeze out of its skin like butter!), the delicious roasted vegetables, and a spoonful of the flavorful pan juices. Enjoy your magnificent Roasted French Garlic Chicken!
Tips & Suggestions
Making a truly exceptional Roasted French Garlic Chicken involves a few simple tricks and considerations. Here are my favorite tips to elevate your dish and ensure a perfect outcome every time:
- Embrace the Garlic: Seriously, don’t skimp on the garlic! The recipe calls for multiple heads, and for good reason. Roasting transforms it from pungent to sweet and caramelized. I love to tuck unpeeled cloves into the pan with the vegetables, and whole heads, cut in half horizontally, into the cavity. Once roasted, these become incredibly soft and spreadable, perfect for smearing on a crusty baguette or mashing into potatoes.
- The Crispy Skin Secret: A golden, crispy skin is a hallmark of a great roast chicken. My top tips for achieving this are:
- Pat it DRY: Before applying any rub, pat the chicken absolutely dry with paper towels. Moisture is the enemy of crispiness.
- High Heat Start: Beginning with a high oven temperature (like 425°F/220°C) helps to quickly brown the skin and render fat.
- Avoid Crowding: If you’re roasting vegetables, make sure they’re in a single layer and not piled high, as this can create steam and prevent crisping.
- Don’t Overcook, DO Rest: The biggest culprits for dry chicken are overcooking and not letting it rest.
- Use a Thermometer: An instant-read thermometer is your best friend. Target 165°F (74°C) in the thickest part of the thigh.
- Resting is CRITICAL: Resting the chicken for 15-20 minutes allows the muscle fibers to relax and reabsorb the juices, ensuring a tender, moist result. Resist the urge to carve immediately!
- Make a Pan Sauce: Those pan drippings are liquid gold! After removing the chicken and vegetables, you can make a quick, flavorful sauce. Simply place the roasting pan over a stovetop burner on medium heat (if it’s stovetop-safe, otherwise transfer drippings to a saucepan). Deglaze the pan with a splash of chicken broth, scraping up all those delicious brown bits. Let it simmer and reduce for a few minutes until slightly thickened. You can stir in a tiny knob of butter or a teaspoon of cornstarch slurry (cornstarch mixed with a little cold water) for a richer consistency.
- Serving Suggestions:
- Crusty Bread: A fresh baguette is perfect for soaking up the pan juices and for spreading the roasted garlic.
- Simple Green Salad: A light, vinaigrette-dressed green salad offers a fresh counterpoint to the rich chicken.
- Mashed Potatoes: If you’re not roasting potatoes, creamy mashed potatoes are an excellent choice to serve alongside, especially with that roasted garlic mashed in.
- Add More Depth: For an even richer flavor profile, consider adding a tablespoon of whole-grain mustard to your garlic and herb rub for an extra tangy kick. You could also include a few sprigs of fresh marjoram or a pinch of dried savory along with the rosemary and thyme.
Storage
Proper storage of your Roasted French Garlic Chicken ensures that you can enjoy the delicious flavors for days to come, or even save some for a quick meal later.
- Cooling: As soon as the chicken and vegetables have cooled down sufficiently (within 2 hours of cooking), carve any remaining chicken off the bone. This helps it cool faster and prevents bacterial growth.
- Refrigeration: Store leftover carved chicken and roasted vegetables in separate airtight containers in the refrigerator. They will stay fresh for 3-4 days.
- Freezing: For longer storage, you can freeze cooked chicken meat (without the bones or skin, as these don’t freeze as well) in a freezer-safe bag or airtight container. It will keep well for up to 3 months. Roasted vegetables can also be frozen, though their texture might become slightly softer upon thawing.
- Reheating:
- Oven: For best results and to help retain some crispiness in the skin (if reheating skin-on pieces), reheat chicken and vegetables in an oven preheated to 350°F (175°C) until warmed through, about 15-20 minutes. Cover loosely with foil to prevent drying out.
- Microwave: For quick reheating, the microwave works well, but be mindful that the skin might not be as crispy. Heat in short bursts, stirring vegetables and turning chicken pieces, until warmed through.
- Leftover Ideas: Don’t let any of that delicious chicken go to waste! Shred leftover chicken for sandwiches, add it to a hearty chicken salad, stir it into a warm chicken and vegetable soup, or even make chicken tacos or quesadillas. The roasted garlic can be mashed and added to dressings or spread on toast.
Final Thoughts
And there you have it! I truly hope you’re feeling inspired to bring the magic of this Roasted French Garlic Chicken into your own kitchen. I believe this isn’t just any roasted chicken; it’s a harmonious blend of simple ingredients transforming into something truly spectacular.
The way the garlic, herbs, and the roasting process work together creates an aroma that will fill your home with warmth, promising a meal that is both comforting and elegantly impressive. You’ll find the skin beautifully golden and crisp, giving way to unbelievably tender and juicy chicken, infused with that irresistible French garlic flavor.
Whether you’re looking for a delightful weeknight dinner or aiming to impress guests with minimal fuss, this Roasted French Garlic Chicken is a definite must-try. I promise, it’s a recipe you’ll want to revisit again and again, delivering on flavor, aroma, and pure culinary satisfaction. Enjoy every single bite!

Juicy Roasted French Garlic Chicken: A Family Favorite
- Total Time: 1 hour 45 minutes
- Yield: 4 servings 1x
Description
This Roasted French Garlic Chicken recipe brings the elegance and incredible flavors of a French bistro right into your kitchen. Enjoy tender chicken with a crispy skin, infused with aromatic garlic and classic French herbs.
Ingredients
- 1 whole chicken (4–5 pounds)
- 2–3 whole heads of garlic
- A generous bundle of fresh rosemary sprigs
- A generous bundle of fresh thyme sprigs
- 2 bay leaves
- 1 organic lemon, halved
- Good quality extra virgin olive oil
- Small, waxy potatoes (like Yukon Gold or red potatoes)
- Carrots
- Shallots or small onions
- 1/2 cup of robust chicken or vegetable broth
- Coarse kosher salt
- Freshly ground black pepper
- 1/4 cup of softened unsalted butter (or olive oil for a dairy-free option)
- 3–4 cloves of minced fresh garlic
- 1 tablespoon of chopped fresh rosemary
- 1 tablespoon of chopped fresh thyme
- 1 teaspoon of kosher salt
- 1/2 teaspoon of freshly ground black pepper
- 5–6 unpeeled garlic cloves (optional for roasting with vegetables)
Instructions
- Preheat your oven to 425°F (220°C). Pat the whole chicken very dry with paper towels and remove any giblets from the cavity.
- In a small bowl, combine 1/4 cup of softened unsalted butter (or olive oil) with 3-4 cloves of minced fresh garlic, 1 tablespoon of chopped fresh rosemary, 1 tablespoon of chopped fresh thyme, 1 teaspoon of kosher salt, and 1/2 teaspoon of freshly ground black pepper. Mix until well combined.
- Gently separate the skin from the breast meat and spread half of the garlic & herb butter/oil mixture under the skin. Rub the remaining mixture all over the outside of the chicken and season the cavity lightly with salt and pepper.
- Stuff the cavity with the lemon halves, remaining whole garlic heads, and a few sprigs of fresh rosemary and thyme.
- Chop the potatoes, carrots, and shallots (or onions) into roughly 1-inch pieces. Toss them in a large roasting pan with a drizzle of olive oil, 5-6 unpeeled garlic cloves, fresh rosemary and thyme, salt, and pepper. Arrange in a single layer.
- Place the seasoned chicken on top of the vegetables in the roasting pan. Pour 1/2 cup of chicken or vegetable broth into the bottom of the pan.
- Transfer the roasting pan to the oven and roast for 20-25 minutes at 425°F (220°C).
- After 20-25 minutes, reduce the oven temperature to 375°F (190°C) and continue roasting for another 60-90 minutes, or until the internal temperature of the thickest part of the thigh reaches 165°F (74°C).
- Baste the chicken with the pan juices every 30 minutes during the lower heat roast.
- Once cooked, remove the roasting pan from the oven, tent the chicken loosely with aluminum foil, and let it rest for at least 15-20 minutes before carving.
- Carve the chicken and serve it with the roasted garlic, vegetables, and pan juices.
- Prep Time: 15 mins
- Cook Time: 90 mins
- Category: Dinner
- Method: Roasting
- Cuisine: French
Nutrition
- Serving Size: 1 piece of chicken with vegetables
- Calories: 550
- Sugar: 2 g
- Sodium: 800 mg
- Fat: 30 g
- Saturated Fat: 8 g
- Unsaturated Fat: 20 g
- Trans Fat: 0 g
- Carbohydrates: 25 g
- Fiber: 4 g
- Protein: 45 g
- Cholesterol: 130 mg
Keywords: Don't skimp on the garlic! Pat the chicken dry for crispy skin and use a thermometer to ensure it reaches 165°F (74°C). Resting the chicken is crucial for juicy meat.