Italian Sushi
Have you ever found yourself craving something truly unique, a dish that playfully bridges the gap between familiar comfort and exciting innovation? Well, get ready, because I am absolutely thrilled to introduce you to Italian Sushi! This isn’t your nonna’s classic pasta, nor is it a traditional Japanese maki roll. What makes this recipe so incredibly special is its brilliant, unexpected fusion: we’re taking the beloved, robust flavors of Italy – think rich cured beef, creamy cheeses, vibrant roasted vegetables, and a touch of aromatic basil – and reimagining them entirely in the elegant, bite-sized presentation of sushi. It’s an imaginative marriage that creates something utterly delicious and undeniably fun to make and eat.
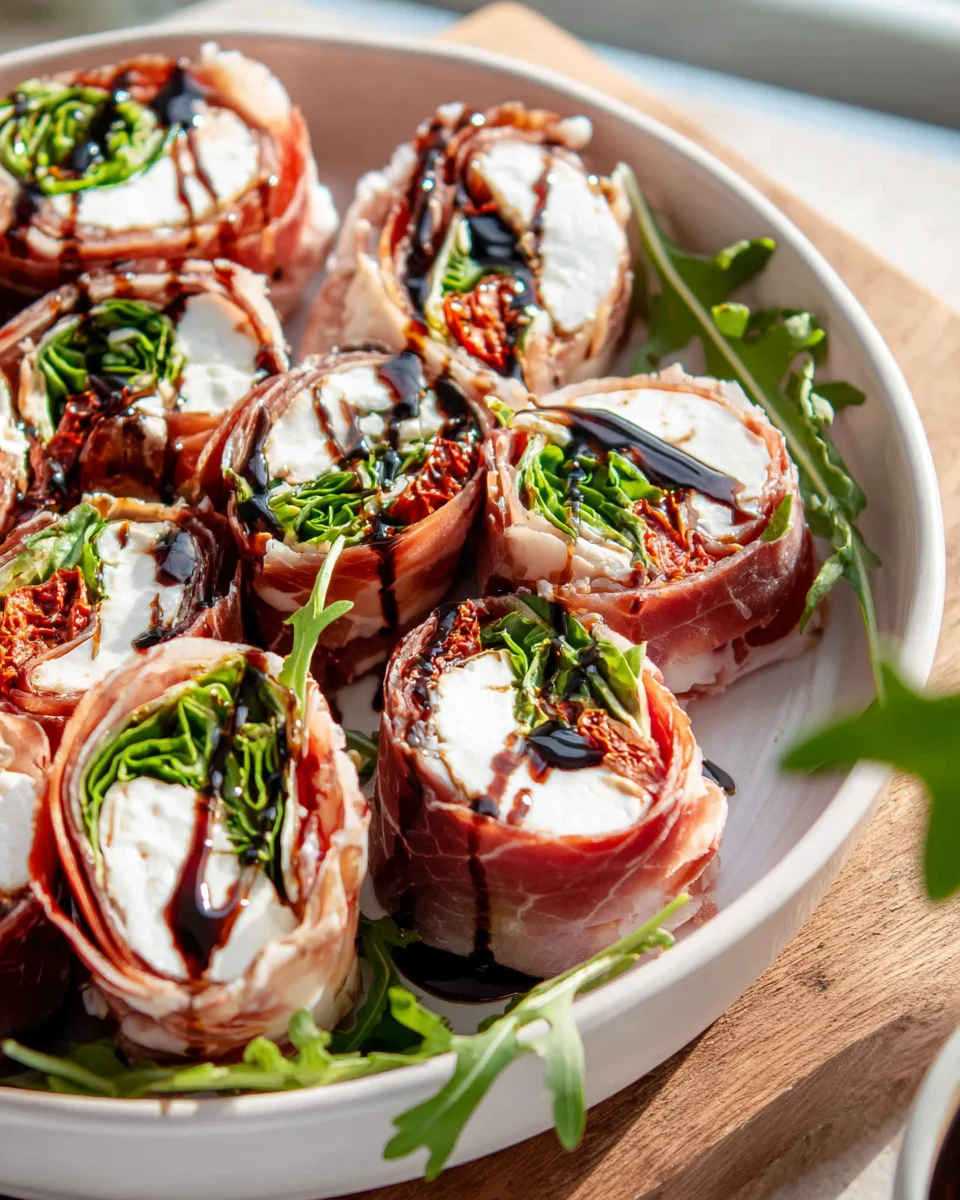
You are going to love Italian Sushi because it’s a fantastic way to surprise your taste buds, impress your friends at your next gathering, or simply enjoy a playful, gourmet twist on two of the world’s most cherished cuisines. Forget seaweed and raw fish; prepare for incredibly flavorful rolls crafted from delicate savory wrappers like grilled zucchini or thin crepes, generously filled with creamy risottos, tender cured beef, sun-dried tomatoes, and parmesan. It’s an edible adventure that promises delight in every single, perfect bite!

Ciao, fellow food adventurers! If you’re anything like me, you love a delicious culinary twist, and that’s exactly what my Italian Sushi recipe brings to the table. Forget everything you know about traditional sushi rice and seaweed; we’re taking the concept of bite-sized, rolled delights and infusing it with the vibrant, sun-drenched flavors of Italy. Think fresh mozzarella, aromatic basil, savory sun-dried tomatoes, and rich bresaola, all artfully rolled and sliced. It’s a fantastic appetizer for parties, a sophisticated light lunch, or just a fun way to enjoy classic Italian ingredients in a new, exciting format. Let’s dive in!
Ingredient Notes
Crafting “Italian Sushi” is all about selecting fresh, high-quality Italian-inspired ingredients and reimagining their presentation. Here’s a breakdown of what you’ll need and some clever substitutions to keep things delicious and inclusive.
- The “Rice” Equivalent (The Base): This is the foundation of our Italian rolls.
- Thinly Sliced Focaccia or Ciabatta: My absolute favorite for an authentic Italian bread base. Look for a dense focaccia, remove the crusts, and slice it as thinly as possible (around 1/8 to 1/4 inch thick). You can gently flatten it slightly with a rolling pin if it’s too airy. This bread offers a wonderful chew and porous texture that absorbs flavors beautifully.
- Substitution/Alternative: Grilled Vegetable Slices: For a lighter, gluten-free, or carb-conscious option, thinly sliced and grilled zucchini or eggplant are fantastic. After grilling, pat them dry to remove excess moisture. They offer a lovely earthy flavor and flexibility for rolling.
- Alternative: Thin Savory Polenta Sheets: If you’re feeling ambitious, you can make a firm polenta, spread it thin, chill it, and then slice it. This provides a unique, creamy texture.
- The “Nori” Equivalent (The Wrapper): This holds all our beautiful fillings together.
- Thinly Sliced Beef Bresaola or Roast Beef: Instead of traditional cured ham, we’re using beef! Bresaola, an air-dried, salted beef, is perfect for its paper-thin slices and rich, savory flavor. If bresaola is hard to find, very thinly sliced, high-quality rare roast beef makes an excellent alternative. Lay these slices slightly overlapping to create a continuous sheet.
- Alternative: Large Fresh Basil Leaves: For a vibrant, aromatic, and vegetarian option, create an overlapping “sheet” with large, fresh basil leaves. This imparts an incredible fragrance to every bite.
- Alternative: Thin Provolone or Mozzarella Slices: For a cheese-lover’s dream, you can carefully lay out thin slices of provolone or fresh mozzarella to form your wrapper.
- The Spreads (Flavor Adhesives): These add moisture and bind flavors.
- Basil Pesto: Classic, bright, and utterly delicious. Choose a good quality store-bought one or make your own.
- Sun-Dried Tomato Pesto or Tapenade: Offers a deeper, more robust flavor.
- Whipped Ricotta with Herbs: Light, creamy, and can be customized with fresh chives, parsley, or a pinch of garlic powder.
- The Fillings (The Stars of the Show): This is where you can get creative with your favorite Italian ingredients.
- Fresh Mozzarella: Sliced thinly or shredded. Bocconcini (small mozzarella balls), sliced in half, also work well.
- Sun-Dried Tomatoes: Oil-packed and well-drained, thinly sliced. Their concentrated flavor is key.
- Roasted Red Peppers: Jarred or homemade, patted dry and sliced into thin strips.
- Fresh Arugula or Baby Spinach: Adds a peppery or mild green bite.
- Marinated Artichoke Hearts: Drained and finely chopped or thinly sliced.
- Olives: Pitted Kalamata or green olives, finely chopped, add a briny kick.
- Balsamic Glaze: A drizzle of this sweet-tart reduction is divine. Ensure it’s a non-alcoholic version if you’re avoiding alcohol.
- Garnish: A little extra virgin olive oil, a sprinkle of flaky sea salt, or a few fresh basil leaves.
Step-by-Step Instructions
Here’s how we’ll bring our Italian Sushi to life. Precision and a gentle hand are your best friends here!
- Prepare Your Base (“Rice”):
- If using focaccia or ciabatta: Using a very sharp serrated knife, carefully slice your bread into uniform pieces, about 1/8 to 1/4 inch thick. Trim off any hard crusts. If the bread seems a bit thick or uneven, gently flatten each slice with a rolling pin until it’s pliable and about 1/8 inch thick.
- If using grilled vegetables: Ensure your zucchini or eggplant slices are thin and uniformly grilled. Pat them thoroughly dry with paper towels to remove any excess moisture, which can make your rolls soggy.
- Set Up Your Rolling Station:
- Lay out a large piece of plastic wrap (about 18-20 inches long) directly on your clean work surface or a bamboo sushi mat. The plastic wrap is crucial for helping you roll tightly and neatly.
- Build the “Nori” Layer:
- On top of the plastic wrap, arrange your chosen wrapper ingredient (beef bresaola, roast beef, or large basil leaves). Lay the slices slightly overlapping to form a continuous, rectangular sheet, roughly 8-10 inches wide and 6-8 inches deep. This will be the outermost layer of your roll.
- Add the “Rice” Layer:
- Carefully place your prepared focaccia/ciabatta slices or grilled vegetable strips on top of the wrapper layer. Arrange them edge-to-edge to form another continuous sheet. Leave about an inch of the wrapper exposed on the side furthest from you; this will help seal the roll.
- Apply the Spread:
- Evenly spread a thin layer of your chosen pesto, tapenade, or whipped ricotta over the focaccia/vegetable layer. Don’t overdo it, as too much spread can make the roll slippery.
- Arrange the Fillings:
- Now for the fun part! Artfully arrange your chosen fillings (thinly sliced mozzarella, sun-dried tomatoes, roasted red pepper strips, arugula, etc.) in a line across the center of the focaccia/vegetable layer. Be mindful not to overfill, as this will make rolling difficult. Keep the ingredients relatively close to the edge nearest you, leaving space at the far end for rolling.
- Time to Roll!
- Gently lift the edge of the plastic wrap (or sushi mat) closest to you, bringing it over the fillings. Begin to roll tightly and evenly. As you roll, use the plastic wrap to guide and compress the ingredients, ensuring a firm, compact roll. Continue rolling away from you until you reach the far end of the wrapper.
- Once rolled, twist the ends of the plastic wrap like a candy wrapper to seal the roll tightly and help it set into a perfect cylindrical shape.
- Chill to Set:
- Place the tightly wrapped roll in the refrigerator for at least 30-60 minutes. This chilling time is crucial; it allows the flavors to meld, and the roll to firm up, making it much easier to slice cleanly.
- Slice and Serve:
- When ready to serve, unwrap the roll. Using a very sharp knife (slightly moistened with water for cleaner cuts), slice the roll into 1-inch thick “sushi” pieces.
- Arrange them artfully on a serving platter. Drizzle with a little extra virgin olive oil and a non-alcoholic balsamic glaze, and garnish with fresh basil leaves or a sprinkle of flaky sea salt. Serve immediately.
Tips & Suggestions
To ensure your Italian Sushi is a masterpiece every time, here are a few insider tips and suggestions:
- Don’t Be Afraid of Plastic Wrap: It’s your best friend for achieving a tight, uniform roll. Think of it as your rolling mat and a way to compress everything securely.
- Chill Factor is Key: Seriously, don’t skip the chilling step. A well-chilled roll slices beautifully, preventing squishing and making for picture-perfect pieces. If you’re short on time, even 15-20 minutes in the freezer can help firm it up quickly.
- Sharp Knife, Clean Cuts: Use your sharpest knife, and wipe it clean (or moisten it) between each cut. This prevents sticking and ensures each piece is perfectly formed.
- Balance Flavors and Textures: When choosing your fillings, think about how they will complement each other. A mix of creamy (mozzarella), salty (bresaola, sun-dried tomatoes), fresh (basil, arugula), and slightly tangy (roasted peppers) creates the most delightful experience.
- Don’t Overfill: This is a common mistake. A slightly thinner roll is much easier to manage and results in more elegant slices than an overstuffed, unruly one.
- Get Creative with Combinations:
- “Caprese Roll”: Basil leaf wrapper, focaccia, pesto, mozzarella, and sun-dried tomatoes.
- “Mediterranean Twist”: Grilled zucchini base, olive tapenade, roasted red peppers, crumbled feta (if you like a little tang), and spinach.
- “Hearty Beef Roll”: Bresaola wrapper, ciabatta, whipped ricotta, sliced roast beef, and arugula.
- Serving Suggestions: These are fantastic as an appetizer for a dinner party, a sophisticated finger food for a buffet, or a light and flavorful lunch. They pair wonderfully with a light salad or a simple bowl of minestrone. You can also serve them with a side of good quality extra virgin olive oil for dipping.
- Make Ahead Components: While the final assembly and slicing are best done closer to serving, you can prepare many components in advance. Grill vegetables, make your pesto, or slice your bread a day ahead. Store them separately in airtight containers.
Storage
Because Italian Sushi is made with fresh ingredients, it’s generally best enjoyed on the day it’s made for optimal flavor and texture. However, if you have leftovers or need to prepare them slightly in advance, here’s how to handle storage:
- Refrigeration: Store any leftover Italian Sushi rolls in an airtight container in the refrigerator. This will help prevent the bread from drying out and keep the fresh ingredients at their best.
- Duration: It will stay fresh in the refrigerator for up to 1-2 days. Beyond that, the bread can become a bit stale, and the fresh vegetables might lose their crispness or release too much moisture.
- Best Served Fresh: I highly recommend assembling and slicing your Italian Sushi no more than a few hours before serving. The flavors are most vibrant, and the textures are at their prime when fresh. If making for a party, you can assemble the rolls, chill them, and then slice them just before your guests arrive.
- Avoid Freezing: I do not recommend freezing Italian Sushi. The fresh mozzarella, bread, and vegetables will not hold up well to freezing and thawing, resulting in a mushy texture and diminished flavor.
- Preventing Soggy Rolls: If you’re storing for a few hours, placing a paper towel at the bottom of the airtight container can help absorb any excess moisture from the vegetables or cheese, keeping the rolls firmer.
Final Thoughts
I know what you might be thinking: ‘Italian Sushi’? It sounds like something pulled from a dream, or perhaps a delightful culinary experiment gone wonderfully right. And let me tell you, that’s exactly what this ‘Italian Sushi’ is – a surprising, sensational success! I poured my heart into crafting this dish, blending the comforting, bold flavors of Italy with the elegant, fun form of sushi, and the result is truly something special.
This isn’t just a novelty; it’s a genuine taste adventure. Imagine the rich, savory notes of perfectly seasoned beef, nestled alongside fresh herbs and vibrant vegetables, all rolled with a delightful touch of ingenuity. And for those who appreciate all the flavor without the fuss, the clever integration of non-alcohol alternatives ensures that every single bite of this ‘Italian Sushi’ is bursting with sophisticated taste, making it a perfect crowd-pleaser for everyone at your table. It’s an innovative dish that manages to be both familiar and wonderfully unexpected, showcasing how incredible things happen when you dare to mix traditions.
So, if you’re looking to ignite your taste buds and impress your friends and family with something truly unique, then this ‘Italian Sushi’ is an absolute must-try. I promise you, stepping out of your culinary comfort zone has never been so deliciously rewarding. Give it a go – you won’t regret experiencing the magic of this truly original fusion!

Italian Sushi: The Ultimate Fusion Dish You Must Try Now!
- Total Time: 30 minutes
- Yield: 4 servings
Description
Italian Sushi is a delightful fusion of robust Italian flavors and the elegant presentation of sushi, offering a unique culinary experience. This imaginative dish combines creamy cheeses, cured meats, and vibrant vegetables in a fun, bite-sized format.
Ingredients
- Thinly Sliced Focaccia or Ciabatta
- Grilled Vegetable Slices (Zucchini or Eggplant)
- Thinly Sliced Beef Bresaola or Roast Beef
- Large Fresh Basil Leaves
- Thin Provolone or Mozzarella Slices
- Basil Pesto
- Sun-Dried Tomato Pesto or Tapenade
- Whipped Ricotta with Herbs
- Fresh Mozzarella
- Sun-Dried Tomatoes
- Roasted Red Peppers
- Fresh Arugula or Baby Spinach
- Marinated Artichoke Hearts
- Olives (Pitted Kalamata or Green)
- Balsamic Glaze
- Extra Virgin Olive Oil
- Flaky Sea Salt
- Fresh Basil Leaves
Instructions
- Prepare Your Base ('Rice'): If using focaccia or ciabatta, slice the bread into uniform pieces, about 1/8 to 1/4 inch thick. Trim off any hard crusts and flatten if necessary. If using grilled vegetables, ensure they are thin and pat them dry.
- Set Up Your Rolling Station: Lay out a large piece of plastic wrap on your clean work surface or a bamboo sushi mat.
- Build the 'Nori' Layer: Arrange your chosen wrapper ingredient on top of the plastic wrap, laying the slices slightly overlapping to form a continuous sheet.
- Add the 'Rice' Layer: Place your prepared focaccia/ciabatta slices or grilled vegetable strips on top of the wrapper layer, leaving about an inch of the wrapper exposed on the side furthest from you.
- Apply the Spread: Spread a thin layer of your chosen pesto, tapenade, or whipped ricotta over the focaccia/vegetable layer.
- Arrange the Fillings: Artfully arrange your chosen fillings in a line across the center of the focaccia/vegetable layer, leaving space at the far end for rolling.
- Time to Roll: Gently lift the edge of the plastic wrap closest to you and roll tightly and evenly, using the plastic wrap to guide and compress the ingredients.
- Chill to Set: Place the tightly wrapped roll in the refrigerator for at least 30-60 minutes.
- Slice and Serve: Unwrap the roll and slice it into 1-inch thick pieces using a sharp knife. Arrange on a serving platter and drizzle with olive oil and balsamic glaze, garnishing with fresh basil leaves or flaky sea salt.
- Prep Time: 30 mins
- Cook Time: 0 mins
- Category: Appetizer
- Method: No cooking required
- Cuisine: Italian
Nutrition
- Serving Size: 1 roll
- Calories: 250
- Sugar: 2 g
- Sodium: 400 mg
- Fat: 12 g
- Saturated Fat: 5 g
- Unsaturated Fat: 6 g
- Trans Fat: 0 g
- Carbohydrates: 30 g
- Fiber: 2 g
- Protein: 10 g
- Cholesterol: 20 mg
Keywords: Use plastic wrap to achieve a tight roll and chill the roll before slicing for clean cuts. Balance flavors and textures by mixing creamy, salty, fresh, and tangy ingredients. Avoid overfilling to ensure easier rolling.