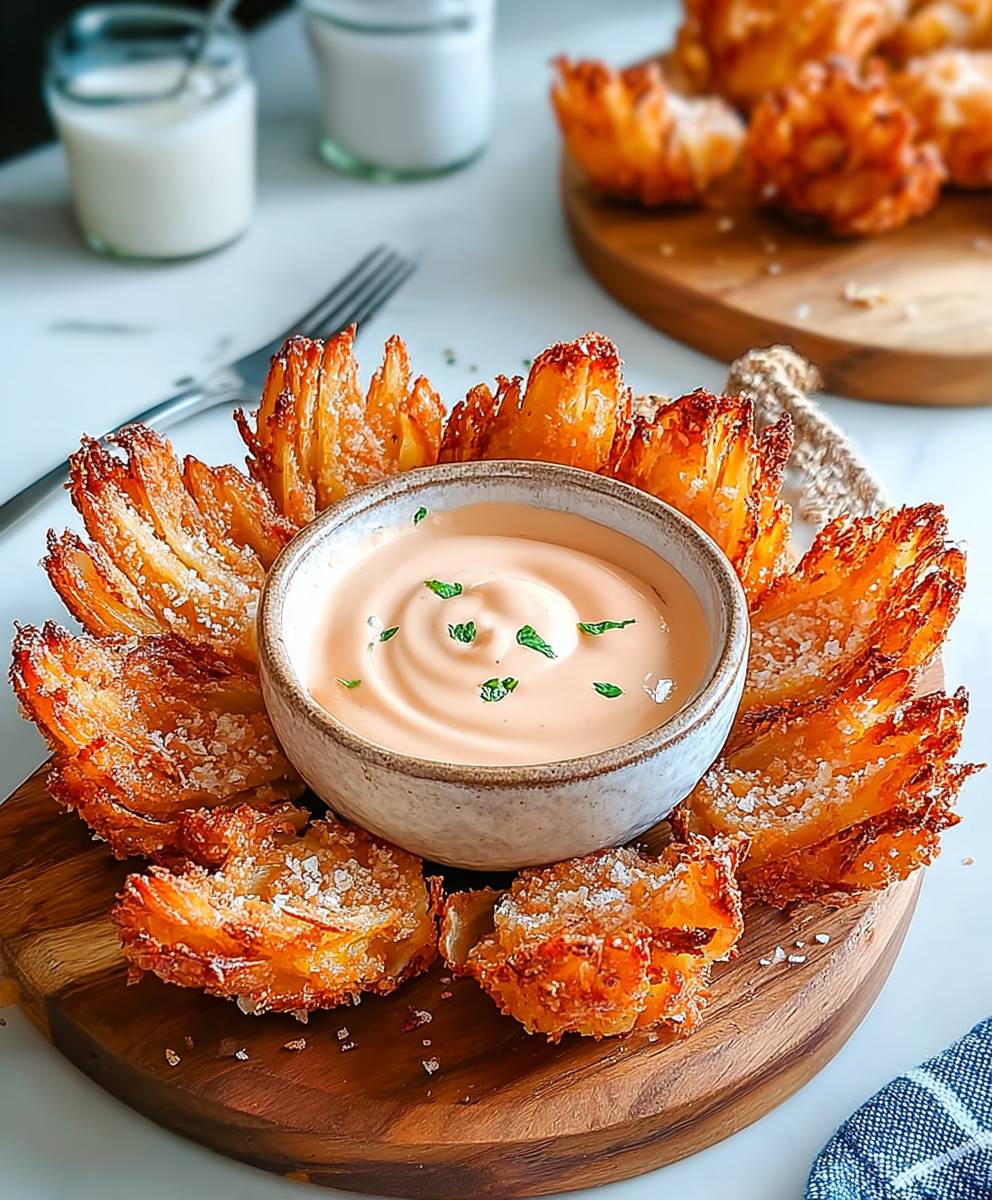
Air Fryer Blooming Onion: Prepare to be amazed! Imagine sinking your teeth into perfectly crispy, golden-brown petals of onion, each bite bursting with savory flavor. This isn’t your average appetizer; it’s a showstopper that’s surprisingly easy to make right in your own kitchen. Forget the deep-fried version loaded with extra calories; we’re bringing you a healthier, equally delicious take on this classic fair food using the magic of the air fryer.
The blooming onion, with its dramatic presentation, has become a beloved staple at restaurants and events across the United States. While its exact origins are debated, it’s widely believed to have originated in the 1980s, quickly gaining popularity for its unique look and satisfying crunch. It’s a dish that’s meant to be shared, a communal experience of pulling apart those crispy petals and dipping them into your favorite sauce.
What makes the air fryer blooming onion so irresistible? It’s the perfect combination of textures – the satisfying crunch of the outer layers giving way to the tender, sweet onion inside. Plus, the air fryer method means you get all the flavor and crispiness with significantly less oil. It’s a crowd-pleaser that’s perfect for game day, parties, or even a fun weeknight treat. Get ready to impress your friends and family with this easy and delicious recipe!

Ingredients:
- 1 large Vidalia onion (or other sweet onion), about 3-4 inches in diameter
- 1 cup all-purpose flour
- 2 tablespoons cornstarch
- 2 teaspoons paprika
- 1 teaspoon garlic powder
- 1 teaspoon onion powder
- 1 teaspoon dried oregano
- 1/2 teaspoon cayenne pepper (optional, for a little heat)
- 1 teaspoon salt
- 1/2 teaspoon black pepper
- 1 cup buttermilk (or 1 cup milk + 1 tablespoon lemon juice or vinegar, let sit for 5 minutes)
- 1 large egg
- Cooking spray (high heat, like avocado or canola oil)
- Dipping sauce of your choice (ranch, blooming onion sauce, spicy mayo, etc.)
Preparing the Onion:
- First, the most important step: selecting the right onion! You want a large, firm onion, preferably a sweet variety like Vidalia. This will give you the best flavor and structure for your blooming onion. Peel the onion, leaving the root end intact. This is crucial because the root holds the onion together while you’re cutting and cooking it.
- Place the onion root-side up on a cutting board. Using a sharp knife, begin cutting downwards towards the cutting board, stopping about 1/2 inch from the root. You don’t want to cut all the way through!
- Make your first cut about 1 inch from the edge of the onion. Repeat this process, making cuts all the way around the onion, spacing them about 1/2 to 3/4 inch apart. Think of it like dividing the onion into petals.
- Now, carefully flip the onion over so the root is facing down. Repeat the cutting process, making cuts between the petals you created in the previous step. This will ensure that the onion blooms nicely. Again, be careful not to cut all the way through the root.
- Gently separate the petals of the onion with your fingers. This can be a little tricky, but be patient and work your way around the onion. You want to open up the petals as much as possible so the batter can get in between them. If some petals are sticking together, you can carefully use a knife to separate them further.
- Place the cut onion in a bowl of ice water for about 30 minutes. This helps the petals open up even more and makes the onion crispier when cooked. It also helps to remove some of the onion’s sharpness.
- After soaking, carefully remove the onion from the ice water and pat it completely dry with paper towels. This is very important! Excess moisture will prevent the batter from sticking properly.
Preparing the Batter:
- In a large bowl, whisk together the flour, cornstarch, paprika, garlic powder, onion powder, oregano, cayenne pepper (if using), salt, and pepper. The cornstarch helps to create a crispier coating.
- In a separate bowl, whisk together the buttermilk and egg. Make sure the egg is well incorporated into the buttermilk.
- Now, it’s time to dredge the onion. This is a two-step process. First, dredge the onion in the flour mixture, making sure to coat all the petals thoroughly, inside and out. Use your fingers to gently push the flour mixture between the petals. Shake off any excess flour.
- Next, dip the floured onion into the buttermilk mixture, again making sure to coat all the petals. Let any excess buttermilk drip off.
- Finally, dredge the onion in the flour mixture one more time, ensuring a thick and even coating. This double dredging is what gives the blooming onion its signature crispy texture. Shake off any excess flour.
Air Frying the Blooming Onion:
- Preheat your air fryer to 350°F (175°C). This temperature is ideal for cooking the onion through without burning the outside.
- While the air fryer is preheating, spray the basket with cooking spray. This will prevent the onion from sticking.
- Carefully place the battered onion in the air fryer basket, root-side down. Make sure the onion is not overcrowded in the basket. If your air fryer is small, you may need to cook the onion in batches.
- Spray the top of the onion generously with cooking spray. This will help it to brown evenly.
- Air fry for 15-20 minutes, or until the onion is golden brown and crispy. Flip the onion halfway through cooking to ensure even browning. Keep a close eye on it, as cooking times may vary depending on your air fryer.
- If the onion starts to brown too quickly, you can lower the temperature slightly.
- Once the onion is cooked through and golden brown, carefully remove it from the air fryer.
- Place the blooming onion on a wire rack to drain any excess oil. This will help it stay crispy.
Serving:
- Serve immediately with your favorite dipping sauce. Ranch dressing, blooming onion sauce (a creamy horseradish sauce), or spicy mayo are all great options.
- To make blooming onion sauce, combine mayonnaise, horseradish, ketchup, paprika, garlic powder, onion powder, and a pinch of cayenne pepper to taste. Adjust the ingredients to your liking.
- You can also serve the blooming onion with a variety of other dipping sauces, such as BBQ sauce, honey mustard, or even a simple vinaigrette.
- For a fun presentation, you can place the dipping sauce in the center of the blooming onion.
- Enjoy your delicious and crispy air fryer blooming onion! It’s a perfect appetizer for parties, game days, or any occasion.
Tips for Success:
- Don’t overcook the onion. Overcooked onions can become mushy and lose their shape.
- Make sure the onion is completely dry before dredging. Excess moisture will prevent the batter from sticking properly.
- Don’t overcrowd the air fryer basket. Overcrowding can prevent the onion from cooking evenly.
- Use a high-heat cooking spray. This will help the onion to brown evenly and prevent it from sticking.
- Experiment with different seasonings. You can add other spices to the flour mixture, such as chili powder, cumin, or smoked paprika.
- For a gluten-free version, use a gluten-free all-purpose flour blend.
- If you don’t have buttermilk, you can make a substitute by adding 1 tablespoon of lemon juice or vinegar to 1 cup of milk. Let it sit for 5 minutes before using.
- To keep the blooming onion warm, you can place it in a preheated oven at 200°F (95°C) for a short period of time.
Variations:
- Spicy Blooming Onion: Add more cayenne pepper to the flour mixture for a spicier kick. You can also add a pinch of red pepper flakes.
- Cheesy Blooming Onion: Sprinkle shredded cheese over the onion during the last few minutes of cooking. Cheddar, Monterey Jack, or pepper jack cheese would all be delicious.
- Blooming Onion Rings: Instead of cutting the onion into a blooming shape, you can cut it into rings and batter and air fry them.
- Mini Blooming Onions: Use smaller onions to make individual blooming onions. These are perfect for appetizers or snacks.
Troubleshooting:
- Onion is not blooming: Make sure you are cutting the onion deep enough, but not all the way through the root. Also, soaking the onion in ice water helps the petals to open up.
- Batter is not sticking: Make sure the onion is completely dry before dredging. Also, make sure you are using a thick enough batter.
- Onion is burning: Lower the temperature of the air fryer or reduce the cooking time.
- Onion is not cooking through: Increase the cooking time or raise the temperature of the air fryer slightly.
Conclusion:
This Air Fryer Blooming Onion recipe is truly a game-changer, and I wholeheartedly believe it deserves a spot in your regular cooking rotation. Forget the deep-fried, calorie-laden versions you get at restaurants! This method delivers all the crispy, flavorful goodness you crave, but with significantly less oil and effort. The perfectly seasoned onion petals, cooked to golden-brown perfection in the air fryer, are simply irresistible. It’s the kind of appetizer that disappears in minutes, leaving everyone wanting more.
But why is this recipe a must-try? It’s simple: it’s incredibly easy, surprisingly healthy (compared to traditional methods), and undeniably delicious. The air fryer does all the hard work, ensuring even cooking and maximum crispiness. Plus, the cleanup is a breeze! No more dealing with vats of hot oil or greasy messes. This recipe is perfect for weeknight snacks, weekend gatherings, or any time you’re craving a satisfying and impressive appetizer.
Beyond the basic recipe, there’s plenty of room for customization. Feel free to experiment with different spice blends to create your own signature flavor profile. A touch of smoked paprika adds a smoky depth, while a pinch of cayenne pepper brings a welcome kick. You could even try using different types of onions, like Vidalia for a sweeter flavor or red onions for a bolder taste.
Serving Suggestions and Variations:
* Serve your blooming onion with a variety of dipping sauces. Classic choices like ranch dressing, honey mustard, or a spicy mayo are always a hit. For a healthier option, try a Greek yogurt-based dip with fresh herbs and lemon juice.
* Consider using different coatings. Panko breadcrumbs will give you an extra crispy texture, while a cornmeal coating will add a subtle sweetness.
* For a fun twist, try stuffing the center of the blooming onion with cheese before air frying. Mozzarella, cheddar, or even a spicy pepper jack would be delicious.
* If you’re short on time, you can use pre-cut onion rings instead of making a blooming onion. Simply toss them with the seasoning and air fry until crispy.
* This recipe also works well with other vegetables. Try making a blooming zucchini or a blooming sweet potato for a unique and flavorful appetizer.
I’m confident that you’ll love this Air Fryer Blooming Onion recipe as much as I do. It’s a crowd-pleaser that’s sure to impress your family and friends. So, go ahead and give it a try! I promise you won’t be disappointed.
And most importantly, I’d love to hear about your experience! Did you make any modifications to the recipe? What dipping sauces did you use? What did your family think? Share your photos and comments below. Your feedback is invaluable and helps me continue to create recipes that you’ll love. Happy cooking! Let me know how your Air Fryer Blooming Onion turns out!
Air Fryer Blooming Onion: Crispy, Delicious Recipe You'll Love
Crispy, flavorful blooming onion made easy in the air fryer! A perfect appetizer with your favorite dipping sauce.
Ingredients
Instructions
Recipe Notes
- Selecting the Onion: Use a large, firm, sweet onion like Vidalia.
- Cutting the Onion: Don’t cut all the way through the root.
- Drying the Onion: Ensure the onion is completely dry before dredging for better batter adhesion.
- Double Dredging: This is key for a crispy texture.
- Air Fryer Temperature: Adjust temperature if the onion browns too quickly.
- Dipping Sauce: Ranch, blooming onion sauce, or spicy mayo are great options.
- Blooming Onion Sauce: Combine mayonnaise, horseradish, ketchup, paprika, garlic powder, onion powder, and cayenne pepper to taste.
- Don’t overcook the onion.
- Don’t overcrowd the air fryer basket.
- Experiment with different seasonings.
- For a gluten-free version, use a gluten-free all-purpose flour blend.
- If you don’t have buttermilk, you can make a substitute by adding 1 tablespoon of lemon juice or vinegar to 1 cup of milk. Let it sit for 5 minutes before using.
- To keep the blooming onion warm, you can place it in a preheated oven at 200°F (95°C) for a short period of time.