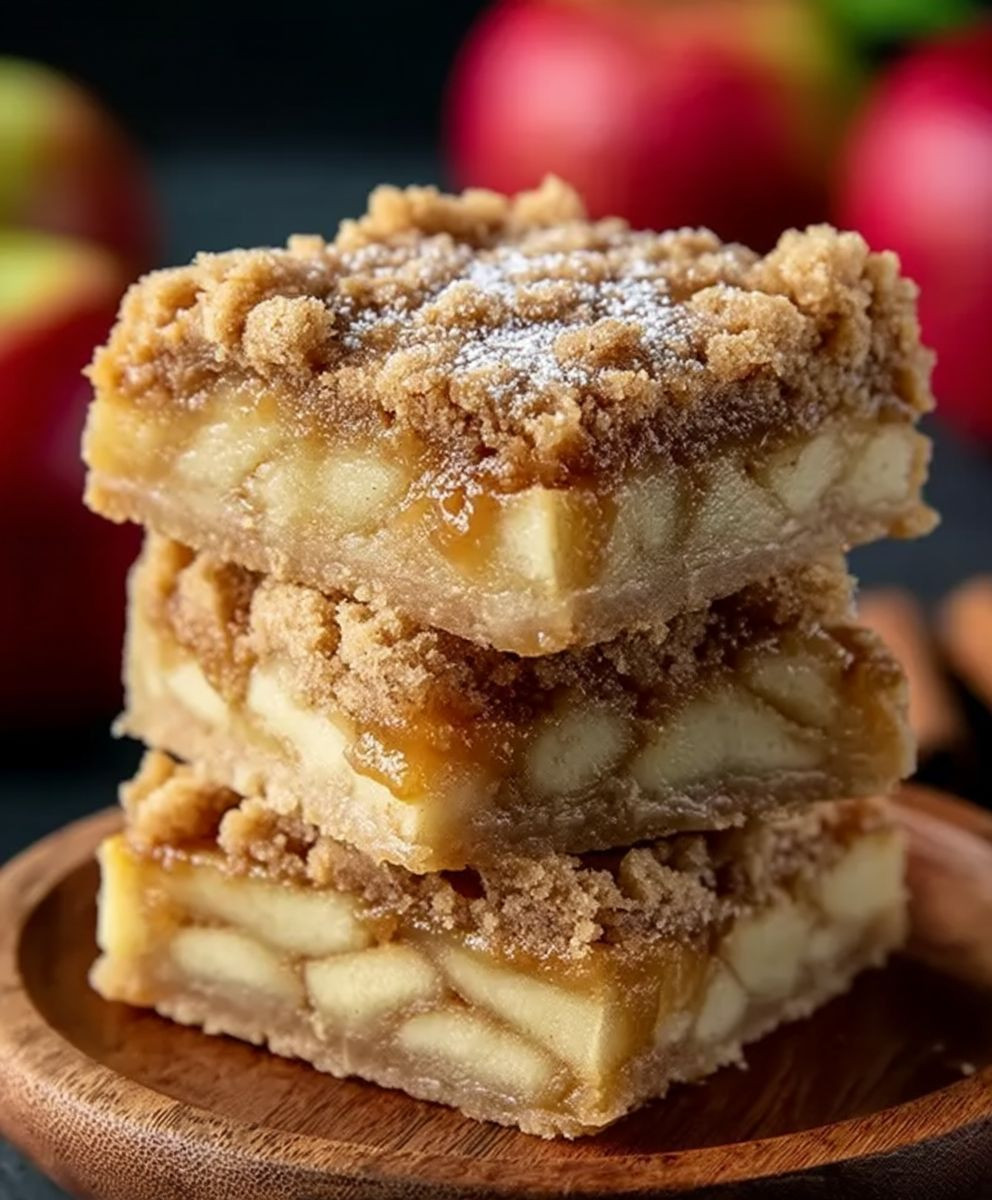
Apple pie bars: the quintessential taste of fall, reimagined! Imagine sinking your teeth into a buttery, crumbly crust, giving way to a sweet and spiced apple filling that practically melts in your mouth. Forget wrestling with finicky pie dough; these bars offer all the comforting flavors of classic apple pie in a convenient, easy-to-serve package.
Apple pie itself boasts a rich history, evolving from early European pies filled with meats to the sweet, fruit-filled dessert we know and love today. It arrived in America with the colonists and quickly became a symbol of home and hearth. While the traditional pie holds a special place in our hearts, these apple pie bars offer a modern twist, perfect for potlucks, bake sales, or a simple weeknight treat.
What’s not to love? The combination of warm spices like cinnamon and nutmeg with the tartness of apples creates an irresistible flavor profile. The buttery crust adds a delightful richness, while the soft, slightly chewy apple filling provides a satisfying texture. Plus, their portability and ease of preparation make them a winner for busy bakers. So, ditch the pie plate and get ready to experience apple pie bliss in bar form!

Ingredients:
- For the Crust:
- 2 cups all-purpose flour
- 1 cup (2 sticks) cold unsalted butter, cut into cubes
- 1/2 cup granulated sugar
- 1/4 teaspoon salt
- 1/4 cup ice water, plus more if needed
- For the Apple Filling:
- 6 medium apples (such as Honeycrisp, Granny Smith, or Gala), peeled, cored, and sliced
- 1/2 cup granulated sugar
- 1/4 cup packed light brown sugar
- 2 tablespoons all-purpose flour
- 1 teaspoon ground cinnamon
- 1/4 teaspoon ground nutmeg
- 1 tablespoon lemon juice
- 2 tablespoons unsalted butter, cut into small pieces
- For the Crumble Topping:
- 1 cup all-purpose flour
- 1/2 cup packed light brown sugar
- 1/2 cup rolled oats
- 1/2 cup (1 stick) cold unsalted butter, cut into cubes
- 1/4 teaspoon ground cinnamon
- Optional:
- Powdered sugar, for dusting
- Vanilla ice cream, for serving
Preparing the Crust:
Okay, let’s get started with the crust! This is the foundation of our apple pie bars, so we want to make sure it’s nice and flaky. Don’t be intimidated; it’s easier than you think!
- Combine Dry Ingredients: In a large bowl, whisk together the 2 cups of all-purpose flour, 1/2 cup of granulated sugar, and 1/4 teaspoon of salt. This ensures everything is evenly distributed before we add the butter.
- Cut in the Butter: Add the 1 cup (2 sticks) of cold, cubed unsalted butter to the flour mixture. Using a pastry blender (or your fingertips, if you’re feeling ambitious!), cut the butter into the flour until the mixture resembles coarse crumbs. You should still see some small pieces of butter – that’s what creates the flakiness! The key here is to work quickly so the butter doesn’t melt.
- Add Ice Water: Gradually add the 1/4 cup of ice water, one tablespoon at a time, mixing gently after each addition. The dough should start to come together but shouldn’t be too wet. If it’s still dry and crumbly, add a little more ice water, a teaspoon at a time, until it just holds together when you pinch it. Be careful not to overwork the dough!
- Form the Dough: Divide the dough in half. Gently flatten each half into a disc. Wrap each disc tightly in plastic wrap and refrigerate for at least 30 minutes. This chilling time is crucial; it allows the gluten to relax and the butter to firm up, resulting in a tender crust. You can even chill it for longer, up to a couple of hours, if you need to prep ahead.
Preparing the Apple Filling:
While the crust is chilling, let’s move on to the star of the show: the apple filling! I love using a mix of apple varieties for the best flavor and texture. Honeycrisp adds sweetness, Granny Smith adds tartness, and Gala provides a nice, soft bite.
- Prepare the Apples: Peel, core, and slice the 6 medium apples. I like to slice them about 1/4 inch thick – not too thin, not too thick.
- Combine Filling Ingredients: In a large bowl, combine the sliced apples, 1/2 cup of granulated sugar, 1/4 cup of packed light brown sugar, 2 tablespoons of all-purpose flour, 1 teaspoon of ground cinnamon, and 1/4 teaspoon of ground nutmeg. The flour helps to thicken the filling as it bakes.
- Add Lemon Juice and Butter: Toss the apple mixture with 1 tablespoon of lemon juice. This prevents the apples from browning and adds a touch of brightness to the flavor. Then, dot the apple mixture with 2 tablespoons of unsalted butter, cut into small pieces. This adds richness and helps to create a delicious, caramelized sauce as the bars bake.
Making the Crumble Topping:
Now for the crumble topping! This adds a delightful textural contrast to the soft apple filling and flaky crust. It’s super easy to make, too!
- Combine Dry Ingredients: In a medium bowl, combine the 1 cup of all-purpose flour, 1/2 cup of packed light brown sugar, 1/2 cup of rolled oats, and 1/4 teaspoon of ground cinnamon.
- Cut in the Butter: Add the 1/2 cup (1 stick) of cold, cubed unsalted butter to the flour mixture. Using a pastry blender or your fingertips, cut the butter into the flour until the mixture resembles coarse crumbs. Again, work quickly to keep the butter cold. The mixture should be crumbly and slightly clumpy.
Assembling and Baking the Apple Pie Bars:
Alright, we’re in the home stretch! It’s time to put everything together and bake these delicious apple pie bars.
- Preheat Oven and Prepare Pan: Preheat your oven to 375°F (190°C). Grease and flour a 9×13 inch baking pan. You can also line the pan with parchment paper, leaving an overhang on the sides, for easy removal of the bars after baking.
- Roll Out the First Layer of Crust: On a lightly floured surface, roll out one of the chilled dough discs into a rectangle slightly larger than the 9×13 inch pan. Carefully transfer the dough to the prepared pan and press it into the bottom and up the sides. Trim any excess dough.
- Dock the Crust: Use a fork to prick the bottom of the crust all over. This prevents the crust from puffing up during baking.
- Par-Bake the Crust: Bake the crust for 15 minutes, or until it’s lightly golden brown. This helps to prevent the bottom crust from becoming soggy.
- Add the Apple Filling: Remove the crust from the oven and spread the apple filling evenly over the par-baked crust.
- Roll Out the Second Layer of Crust OR Crumble Topping: This is where you have a choice! You can either roll out the second dough disc and place it over the apple filling, cutting slits in the top to allow steam to escape (like a traditional pie), OR you can use the crumble topping. I personally prefer the crumble topping for these bars, as it adds a wonderful texture.
- Sprinkle with Crumble Topping (if using): If you’re using the crumble topping, sprinkle it evenly over the apple filling.
- Bake the Bars: Bake the bars for 35-40 minutes, or until the topping is golden brown and the apple filling is bubbly. If the topping starts to brown too quickly, you can tent the pan with aluminum foil.
- Cool Completely: Let the bars cool completely in the pan before cutting into squares. This is important, as the filling will continue to set as it cools. If you try to cut them while they’re still warm, they’ll be messy.
- Dust with Powdered Sugar (Optional): Once the bars are completely cool, dust them with powdered sugar, if desired.
- Serve and Enjoy! Serve the apple pie bars as is, or with a scoop of vanilla ice cream. They’re also delicious slightly warmed up. Enjoy!
Tips and Variations:
- Apple Variety: Feel free to experiment with different apple varieties. Braeburn, Fuji, and Pink Lady apples also work well in this recipe.
- Nuts: Add 1/2 cup of chopped pecans or walnuts to the crumble topping for extra flavor and crunch.
- Spices: Adjust the amount of cinnamon and nutmeg to your liking. You can also add a pinch of ground cloves or allspice for a warmer flavor.
- Caramel Sauce: Drizzle the bars with caramel sauce before serving for an extra decadent treat.
- Make Ahead: The apple pie bars can be made ahead of time and stored in the refrigerator for up to 3 days.
- Freezing: You can also freeze the baked bars for up to 2 months. Wrap them tightly in plastic wrap and then in aluminum foil. Thaw them in the refrigerator overnight before serving.
Troubleshooting:
Conclusion:
And there you have it! These apple pie bars are truly a must-try, and I’m not just saying that because I created the recipe. The combination of the buttery, crumbly crust, the sweet and spiced apple filling, and that optional (but highly recommended!) drizzle of caramel creates a symphony of flavors and textures that will have everyone begging for more. Seriously, prepare to be the star baker of your friend group!
What makes these bars so special is their simplicity. You get all the comforting goodness of a classic apple pie without the fuss of rolling out a perfect pie crust. Plus, they’re incredibly portable, making them ideal for potlucks, picnics, or even just a sweet treat to pack in your lunch.
But the best part? They’re incredibly versatile! Feel free to experiment with different apple varieties. Granny Smith apples will give you a nice tartness, while Honeycrisp apples will add extra sweetness. You could even mix and match for a more complex flavor profile.
Looking for serving suggestions? These apple pie bars are delicious served warm with a scoop of vanilla ice cream or a dollop of whipped cream. A sprinkle of cinnamon or a dusting of powdered sugar adds a touch of elegance. For a truly decadent experience, try pairing them with a warm cup of coffee or a glass of chilled apple cider.
And don’t be afraid to get creative with variations! Add a handful of chopped walnuts or pecans to the crumble topping for extra crunch. Stir in some dried cranberries or raisins to the apple filling for a burst of fruity flavor. Or, for a truly indulgent treat, add a layer of cream cheese filling between the crust and the apple filling. The possibilities are endless!
I truly believe that this recipe for apple pie bars will become a staple in your baking repertoire. It’s easy, delicious, and always a crowd-pleaser. I’ve poured my heart into perfecting this recipe, and I’m so excited for you to try it.
Ready to Bake?
So, what are you waiting for? Preheat your oven, gather your ingredients, and get ready to create some magic in the kitchen. I promise you won’t regret it!
Share Your Creations!
Once you’ve made these amazing apple pie bars, I’d love to hear about your experience! Did you make any variations? What did your friends and family think? Share your photos and stories with me in the comments below or tag me on social media. I can’t wait to see your beautiful creations and hear all about your baking adventures. Happy baking! I hope you enjoy these as much as I do!
Apple Pie Bars: The Ultimate Guide to Baking Delicious Treats
Flaky crust, sweet and spiced apple filling, and buttery crumble topping make these easy apple pie bars the perfect fall treat for sharing.
Ingredients
Instructions
Recipe Notes
- Apple Variety: Feel free to experiment with different apple varieties. Braeburn, Fuji, and Pink Lady apples also work well in this recipe.
- Nuts: Add 1/2 cup of chopped pecans or walnuts to the crumble topping for extra flavor and crunch.
- Spices: Adjust the amount of cinnamon and nutmeg to your liking. You can also add a pinch of ground cloves or allspice for a warmer flavor.
- Caramel Sauce: Drizzle the bars with caramel sauce before serving for an extra decadent treat.
- Make Ahead: The apple pie bars can be made ahead of time and stored in the refrigerator for up to 3 days.
- Freezing: You can also freeze the baked bars for up to 2 months. Wrap them tightly in plastic wrap and then in aluminum foil. Thaw them in the refrigerator overnight before serving.
- Crust Option: Instead of the crumble topping, you can roll out the second dough disc and place it over the apple filling, cutting slits in the top to allow steam to escape.