Artisan Charcuterie Board Recipe – have you ever dreamt of effortlessly hosting an event that leaves your guests utterly charmed and impressed? There’s something undeniably magical about a beautifully arranged charcuterie board, transforming simple ingredients into an edible masterpiece and the ultimate conversation starter. It’s more than just an appetizer; it’s an experience, a centerpiece that beckons everyone to gather around and explore a world of flavors.
Originating from French culinary traditions, where “charcuterie” historically referred to a branch of cooking devoted to prepared meat products like ham, sausage, and pâtés, the modern charcuterie board has evolved into an art form. It’s a sophisticated tapestry of flavors and textures, inviting everyone to share and discover new pairings. I find immense joy in crafting these boards, not just for their stunning visual appeal but for the wonderful, relaxed social atmosphere they create, making entertaining both elegant and easy.
People adore charcuterie boards because they offer an unparalleled sensory journey. From the salty tang of cured meats and the creamy richness of artisanal cheeses to the sweet burst of fresh fruits, the briny kick of olives, and the satisfying crunch of crackers, every bite is a delightful surprise. Moreover, assembling an Artisan Charcuterie Board Recipe is surprisingly straightforward, offering maximum impact with minimal fuss. It’s the perfect solution for any host looking to impress without spending hours in the kitchen, making it the epitome of relaxed elegance!

Ingredients:
Creating an exquisite Artisan Charcuterie Board Recipe is all about thoughtful selection and artistic arrangement. Here’s what you’ll need to gather to delight your guests and yourself. Remember, quality ingredients truly shine here, so opt for the best you can find!
- For the Meats (a variety of 3-5 options is ideal):
- 4 oz thinly sliced Prosciutto di Parma or San Daniele
- 4 oz hard salami, such as Genoa or Calabrese, preferably a whole log to slice yourself for freshness
- 4 oz Soppressata, either spicy or mild, thinly sliced
- 4 oz Spanish Chorizo, thinly sliced (choose a cured variety, not raw)
- 3 oz Mortadella, thinly sliced (optional, for a different texture)
- Small jar of high-quality Pâté or Rillettes (optional, but adds a gourmet touch)
- For the Cheeses (aim for 3-4 diverse selections):
- 6-8 oz hard, aged cheese like Parmesan Reggiano, aged Cheddar, or Manchego (for sharp, nutty notes)
- 6-8 oz soft, creamy cheese like Brie, Camembert, or a fresh Goat Cheese (Chevre) (for rich, spreadable texture)
- 6-8 oz semi-hard cheese such as Gouda, Gruyère, or Swiss (for a milder, versatile option)
- 4-6 oz blue cheese like Gorgonzola or Roquefort (optional, for a bold flavor profile)
- For the Crackers and Breads (offer contrasting textures):
- 1 box artisan crackers (water crackers, rosemary crackers, or multigrain crackers)
- 1 small baguette, sliced and lightly toasted or served fresh
- 1 box gourmet breadsticks
- A handful of flatbreads or pita crackers (optional, for dipping)
- For the Fruits (fresh and dried for balance):
- 1-2 bunches of grapes (red and green for visual appeal)
- 2-3 fresh figs, quartered or halved (seasonal)
- 1-2 apples (e.g., Honeycrisp, Granny Smith), thinly sliced
- 1-2 pears (e.g., Bartlett, Bosc), thinly sliced
- 1 cup assorted fresh berries (raspberries, blueberries, blackberries)
- ½ cup dried apricots
- ½ cup dried cranberries or cherries
- ½ cup dates (pitted)
- For the Nuts (a crunchy element):
- ½ cup raw or roasted almonds
- ½ cup walnuts or pecans
- ¼ cup pistachios (shelled)
- A small handful of candied pecans or walnuts (optional, for sweetness)
- For the Spreads and Dips (for flavor complexity):
- Small jar of local honey or a honey dipper
- Small jar of fig jam, apricot preserves, or raspberry jam
- Small jar of whole-grain mustard or Dijon mustard
- Small jar of olive tapenade or a savory spread (optional)
- For the Pickles and Olives (for acidity and brininess):
- ½ cup cornichons (mini gherkins)
- ½ cup pickled pearl onions or other pickled vegetables
- ½ cup assorted olives (Kalamata, Castelvetrano, pitted or with pits)
- For the Garnishes (the final artistic touch):
- A few sprigs of fresh rosemary or thyme
- Edible flowers (optional, for visual elegance)
- A drizzle of high-quality balsamic glaze (optional)
- Equipment:
- Large wooden charcuterie board, slate board, or large platter
- Several small bowls or ramekins for olives, nuts, and spreads
- Cheese knives and spreading knives
- Small serving spoons or tongs
Crafting Your Artisan Charcuterie Board: The Process
Creating an Artisan Charcuterie Board Recipe is as much about the journey of selection and preparation as it is about the final, beautiful presentation. This isn’t just throwing ingredients on a platter; it’s about building a culinary landscape designed to delight the senses. Let’s walk through it together.
Phase 1: Preparing Your Components
-
Bring Cheeses to Room Temperature:
This is a crucial first step that many overlook! About 30-60 minutes before you plan to serve, remove your cheeses from the refrigerator. Cheeses reveal their full flavor profile and achieve their optimal texture when served at room temperature. Harder cheeses like Parmesan can be left out longer, while softer cheeses like Brie might need a slightly shorter period.
-
Prepare the Meats:
If you purchased whole logs of salami or chorizo, now is the time to slice them. Aim for thin, even slices, about 1/8-inch thick. If your prosciutto, mortadella, or other deli meats come pre-sliced, gently separate them. For presentation, you can fan out the slices, roll them loosely into cylinders, or create beautiful, wavy folds. Arrange them on a separate plate temporarily.
-
Wash and Slice Fruits:
Thoroughly wash all your fresh fruits. For apples and pears, slice them thinly, removing cores. To prevent browning, you can lightly toss apple and pear slices in a bowl with a squeeze of lemon juice diluted in a little water, then pat them dry. Separate grapes into smaller clusters, ideal for grabbing. Halve or quarter your fresh figs and stem your berries. Have your dried fruits ready to go.
-
Arrange Nuts, Pickles, and Olives:
Place your assorted nuts, cornichons, pickled onions, and olives into individual small bowls or ramekins. This keeps them contained, prevents flavors from mixing inappropriately, and adds height and structure to your board. Draining any brine from the pickles and olives before placing them in bowls is a good practice.
-
Prepare Spreads and Dips:
Spoon your honey, jams, and mustards into their own small bowls. Provide a small spreading knife or spoon for each, making it easy for guests to serve themselves. These colorful additions are not just for taste but also for visual appeal.
-
Slice and Prepare Breads/Crackers:
If using a baguette, slice it into thin rounds. You can lightly toast these slices in the oven for a few minutes until golden and crisp, or serve them fresh. Arrange your artisan crackers and breadsticks on a separate plate for now. You might even break some crackers into halves for a more rustic, varied look.
Phase 2: Arranging the Board – The Art of Presentation
This is where your inner artist comes out! The goal is to create a bountiful, inviting, and visually stunning display. There’s no single “right” way, but these steps provide a great framework for an Artisan Charcuterie Board Recipe that truly impresses.
-
Anchor with Cheeses:
Begin by placing your cheeses on the board. Spread them out across the board to serve as natural anchors. For hard cheeses like Parmesan, you can break off rustic chunks. Brie or Camembert can be placed whole with a small cheese knife inserted, or cut into wedges. Goat cheese can be rolled in herbs or simply placed in a small log. Think about varying their placement for visual interest rather than lining them up.
-
Integrate Small Bowls:
Nestle your small bowls of nuts, olives, pickles, and spreads around the cheeses. These bowls also act as anchors and help delineate different sections of the board. Try to distribute them evenly for balance.
-
Add the Meats:
This is a fun part! Drape the folded or rolled slices of meat artfully around the cheeses and bowls. You want to create soft, flowing lines and a sense of abundance. For example, fan out salami next to a wedge of Gouda, or create delicate waves with prosciutto beside a bowl of figs. Don’t be afraid to let them overlap slightly; this adds to the lavish look.
-
Introduce Fruits and Vegetables:
Begin to fill in the larger empty spaces with your fresh and dried fruits. Group grapes into small clusters and place them strategically. Fan out apple and pear slices. Scatter berries around the board, tucking them into crevices for pops of color. The dried fruits can be placed in small piles next to nuts or cheeses, adding textural contrast.
-
Incorporate Crackers and Breads:
Now, strategically place your crackers and bread slices. You can fan them out in arcs, create lines, or stack them in small piles. Some can be placed directly on the board, while others might be in a small holder nearby if board space is limited. Ensure they are accessible near the cheeses and spreads. Think about creating pathways for guests to navigate the board.
-
Fill in Gaps and Add Texture:
This is where you refine your board. Use any remaining small ingredients like nuts, extra berries, or dried fruit to fill in any sparse areas. The goal is for the board to look full and inviting, with minimal empty space. This creates that desirable “overflowing” effect that makes an artisan board so appealing.
-
Garnish with Fresh Herbs:
The final touch! Tuck sprigs of fresh rosemary or thyme amongst the ingredients. These not only add a beautiful aromatic element but also introduce a vibrant pop of green, elevating the overall aesthetic. If you’re using edible flowers, scatter them sparingly for a truly elegant finish. A light drizzle of balsamic glaze over certain cheeses or fruits can also be a delightful garnish.
Phase 3: Final Touches and Serving Suggestions
You’ve poured your heart into creating this magnificent Artisan Charcuterie Board Recipe, now let’s ensure it’s enjoyed to its fullest potential!
-
Inspect and Adjust:
Take a step back and look at your completed board. Does it look balanced? Is there a good distribution of colors and textures? Are all the little serving tools present? Make any final adjustments to make sure everything looks perfect and is easy to reach.
-
Temperature Check:
Ensuring your cheeses and meats are at the proper temperature is key for flavor. Ideally, the board should be served relatively soon after assembly to keep everything fresh and at optimal taste. If you’ve assembled it earlier, cover it loosely with plastic wrap and refrigerate. Just remember to pull it out about 20-30 minutes before serving to allow everything to come back to room temperature.
-
Pairing Recommendations:
An artisan charcuterie board pairs wonderfully with a variety of beverages. For wine lovers, consider a crisp Sauvignon Blanc, a medium-bodied Pinot Noir, or even a sparkling rosé. Craft beers, especially a Belgian Saison or a light IPA, also complement the diverse flavors beautifully. And of course, a good quality sparkling cider or even simply sparkling water with a lemon twist works wonderfully for non-alcoholic options.
-
Encourage Exploration:
When presenting your board, feel free to highlight some of the more unique cheeses or meats. Encourage your guests to experiment with different pairings—a slice of apple with cheddar and honey, or prosciutto wrapped around a fig. That’s part of the fun of an artisan board!
-
Replenishing Tips:
If you’re hosting a longer gathering, it’s wise to have extra provisions of crackers, fruits, and perhaps a backup block of cheese ready to replenish the board as needed. This ensures your beautiful spread remains bountiful throughout your event.
There you have it! Your stunning, delicious, and conversation-starting Artisan Charcuterie Board is ready to be enjoyed. This truly is more than just food; it’s an experience, a centerpiece, and a testament to the joy of shared culinary delights.
Conclusion:
If you’ve followed along with me, you now understand why this isn’t just another dish; it’s an experience. I truly believe that mastering the art of the charcuterie board is one of the most rewarding culinary skills you can acquire, and this specific Artisan Charcuterie Board Recipe is your definitive guide to achieving show-stopping results every single time. It’s more than just arranging ingredients; it’s about curating a symphony of flavors, textures, and aromas that delight the senses and spark conversation. I’ve laid out all the secrets to creating a visually stunning and palate-pleasing spread that looks incredibly impressive yet is surprisingly straightforward to assemble with the right approach. From selecting the perfect cheeses and cured meats to incorporating vibrant fresh fruits, crunchy nuts, tangy pickles, and artisan crackers, every element plays a crucial role. This recipe demystifies the process, making what might seem daunting completely accessible. You’re not just building a snack; you’re crafting a centerpiece that invites people to gather, graze, and make memories. It’s an instant elevate to any gathering, turning a simple get-together into an event people will fondly remember. The impact a thoughtfully prepared board makes is truly unmatched, effortlessly conveying elegance and generosity.
The beauty of an artisan charcuterie board lies in its incredible versatility. While perfect as a sophisticated appetizer for a dinner party, I often find myself putting one together for much simpler occasions. Imagine it as the star of a casual weekend brunch, paired with mimosas or freshly brewed coffee, offering a delightful mix of savory and sweet options. For a romantic evening in, a smaller, more intimate version can be incredibly special, perhaps focusing on a few exquisite cheeses, some dark chocolate, and a fine bottle of wine. During the holidays, you can expand it into a grand festive display, incorporating seasonal elements like sugared cranberries, gingerbread cookies, or even miniature quiches to add a warm component. Don’t be afraid to experiment with themes! You could create a ‘Mediterranean Magic’ board with hummus, olives, feta, and pita bread, or a ‘Local Harvest’ board featuring only ingredients sourced from your local farmers’ market. For dietary variations, the possibilities are endless. Craft a stunning vegetarian board by emphasizing gourmet cheeses, plant-based pâtés, an abundance of fresh and dried fruits, roasted vegetables, and a variety of artisanal breads. A gluten-free board is easily achievable by swapping out traditional crackers for rice crackers, gluten-free breadsticks, or an array of crudités. Consider adding a warm dip, like a baked brie or a spinach artichoke dip, served directly on the board for an extra layer of comfort and indulgence, especially on a chilly evening. And remember, the beverages you pair are just as important! A robust red wine like a Cabernet Sauvignon will complement strong cheeses and meats, while a crisp Sauvignon Blanc might suit lighter options. Craft beers, sparkling ciders, or even a selection of infused waters can also elevate the experience, making every bite and sip a harmonious delight.
Now that you have all the knowledge and inspiration, I truly hope you feel empowered to dive in and create your own masterpiece. Don’t let perfection be the enemy of good – the most charming boards often have a slightly organic, abundant feel. Trust me, once you create your first charcuterie board using this guide, you’ll wonder why you waited so long. It’s a wonderfully interactive way to entertain, allowing your guests to explore and discover their own favorite combinations, fostering genuine connection and conversation. I wholeheartedly encourage you to try this Artisan Charcuterie Board Recipe for your next gathering, or even just for a special treat for yourself and your loved ones. It’s a culinary adventure that promises big rewards for minimal stress, transforming simple ingredients into something truly spectacular. And when you do, please, please, please share your experience with me! I absolutely adore seeing your creations and hearing about your successes, your clever variations, and the joy your boards bring to your table. Snap a picture, tell me what you loved, what you changed, and how it was received. Your culinary journey is important to me, and I can’t wait to celebrate your delicious achievements. Happy assembling!
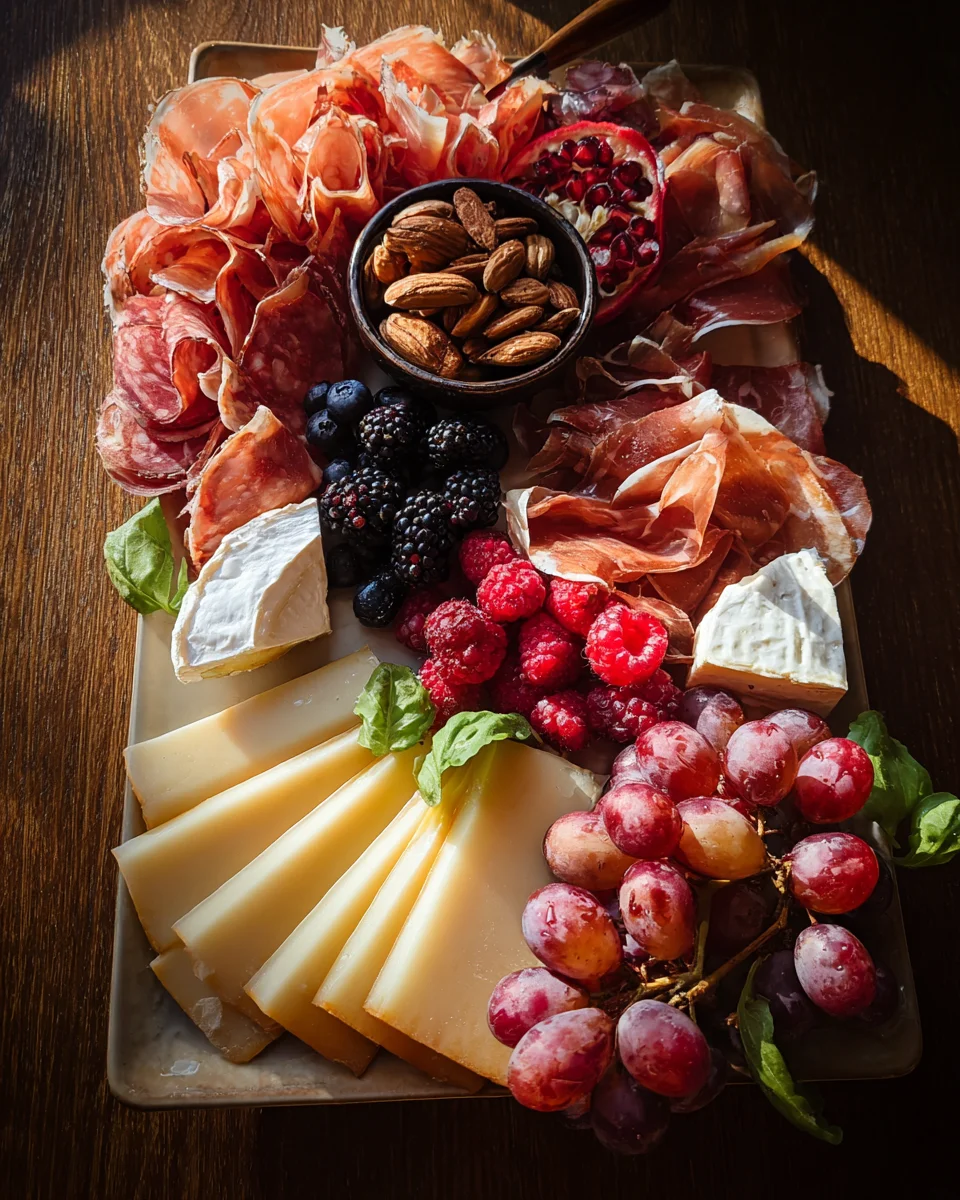
Artisan Charcuterie Board Recipe
Effortlessly host with a stunning Artisan Charcuterie Board! This elegant appetizer transforms simple ingredients into an edible masterpiece, creating a beautiful centerpiece and a delightful sensory journey for your guests.
Ingredients
Instructions
Important Information
Nutrition Facts (Per Serving)
It is important to consider this information as approximate and not to use it as definitive health advice.
Allergy Information
Please check ingredients for potential allergens and consult a health professional if in doubt.