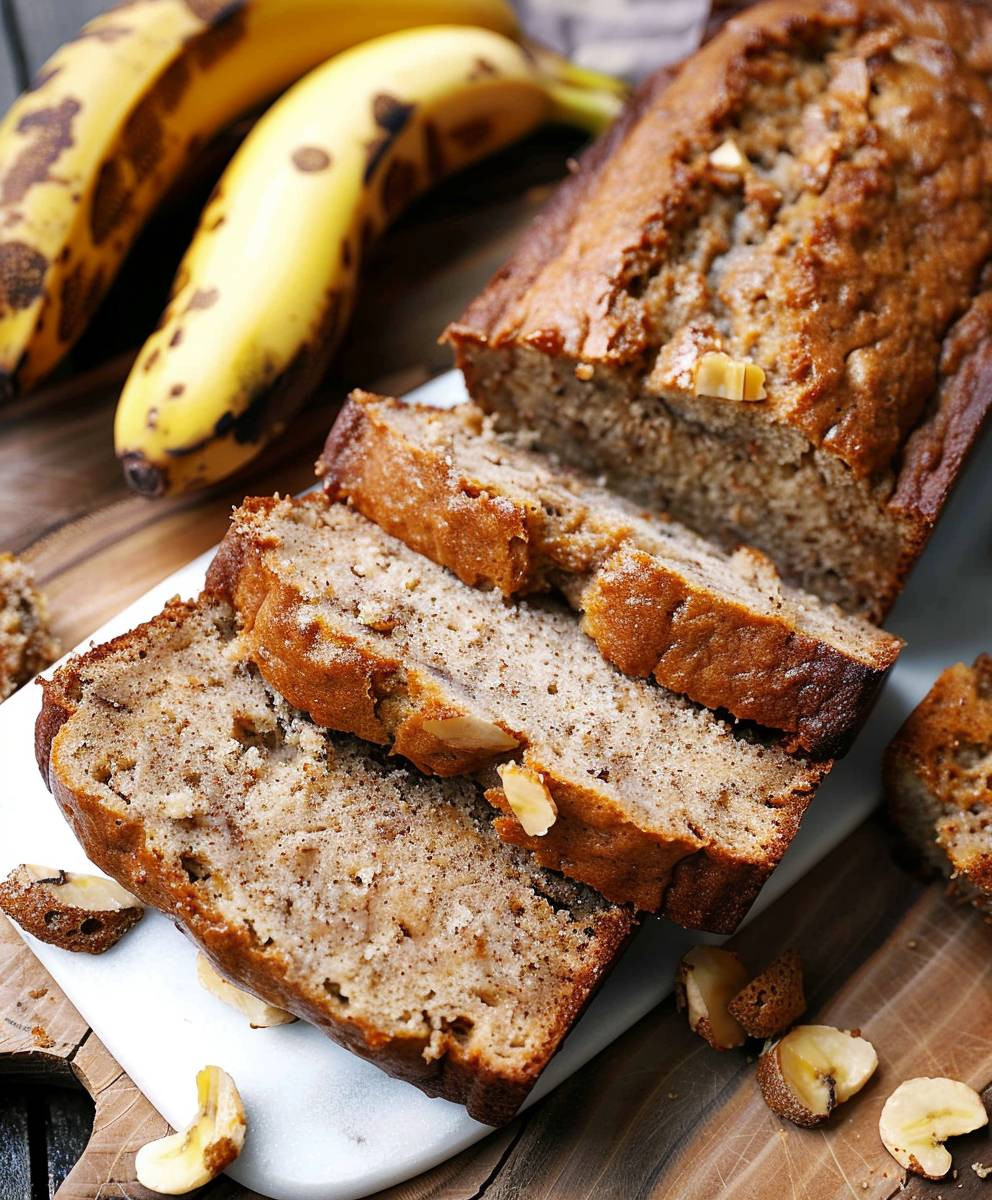
Bananenbrot einfach backen – klingt das nicht herrlich? Stellen Sie sich vor: Der Duft von warmem, süßem Brot erfüllt Ihr Zuhause, während draußen der Regen gegen die Scheiben trommelt. Dieses Bananenbrot ist mehr als nur ein Kuchen; es ist ein Stück Geborgenheit, ein Trostspender und ein köstlicher Weg, überreife Bananen zu verwerten.
Bananenbrot hat eine interessante Geschichte. Es erlebte seinen Aufstieg in den 1930er Jahren in den USA, als die Verbreitung von Backpulver und Backnatron es einfacher machte, Kuchen zu Hause zu backen. Gleichzeitig wurden Bananen durch den Import aus Lateinamerika erschwinglicher. So entstand eine perfekte Symbiose: überreife Bananen, die nicht mehr zum direkten Verzehr geeignet waren, fanden eine neue, schmackhafte Bestimmung.
Warum lieben wir Bananenbrot so sehr? Es ist die perfekte Kombination aus Süße und Würze, die saftige Textur und die einfache Zubereitung. Es ist ein Kuchen, der ohne viel Aufwand gelingt und trotzdem unglaublich lecker schmeckt. Ob zum Frühstück, als Nachmittagssnack oder als Dessert – Bananenbrot einfach backen ist immer eine gute Idee. In diesem Rezept zeige ich Ihnen, wie Sie mit wenigen Zutaten und einfachen Schritten ein unwiderstehliches Bananenbrot zaubern können, das Ihre Familie und Freunde begeistern wird. Also, schnappen Sie sich Ihre überreifen Bananen und legen Sie los!

Ingredients:
- 3 very ripe bananas, mashed
- 1/3 cup melted butter, unsalted
- 3/4 cup granulated sugar
- 1 large egg, beaten
- 1 teaspoon vanilla extract
- 1 1/2 cups all-purpose flour
- 1 teaspoon baking soda
- 1/2 teaspoon salt
- 1/2 cup chopped walnuts or pecans (optional)
- 1/4 cup chocolate chips (optional)
- 1 tablespoon brown sugar (for topping, optional)
Preparing the Banana Mixture
Okay, let’s get started! First things first, we need to get those bananas ready. Make sure they are really ripe – the browner, the better! This is key for that intense banana flavor and moist texture we’re after.
- Mash the Bananas: In a large bowl, mash the bananas really well with a fork. You can leave a few small chunks if you like a bit of texture, but mostly you want them smooth. I usually use a potato masher for this, but a fork works just fine.
- Add Melted Butter: Pour in the melted butter and stir it into the mashed bananas. Make sure the butter isn’t too hot, or it might start to cook the bananas.
- Incorporate the Sugar: Add the granulated sugar to the banana and butter mixture. Stir until everything is well combined. The mixture should look a bit smoother and less lumpy.
- Add the Egg and Vanilla: Pour in the beaten egg and add the vanilla extract. Stir well until everything is thoroughly mixed together. The mixture will become a bit more liquid at this point.
Combining the Dry Ingredients
Now, let’s move on to the dry ingredients. This part is crucial for ensuring the banana bread has the right texture and rise. We want to avoid overmixing later, so getting this step right is important.
- Whisk the Dry Ingredients: In a separate medium bowl, whisk together the all-purpose flour, baking soda, and salt. Whisking helps to evenly distribute the baking soda and salt throughout the flour, which is essential for proper leavening and flavor.
- Gradually Add Dry to Wet: Gradually add the dry ingredients to the wet ingredients (the banana mixture). Stir until just combined. It’s okay if there are a few streaks of flour remaining. The key here is to avoid overmixing, which can lead to a tough banana bread.
- Fold in Nuts and Chocolate Chips (Optional): If you’re using nuts or chocolate chips, gently fold them into the batter until they are evenly distributed. Be careful not to overmix at this stage.
Baking the Banana Bread
Almost there! Now for the exciting part – baking! This is where the magic happens, and your kitchen will start to smell amazing.
- Prepare the Loaf Pan: Preheat your oven to 350°F (175°C). Grease and flour a 9×5 inch loaf pan. You can also line the pan with parchment paper, leaving an overhang on the sides for easy removal. This is my preferred method, as it guarantees the banana bread won’t stick.
- Pour Batter into Pan: Pour the batter into the prepared loaf pan and spread it evenly.
- Sprinkle with Brown Sugar (Optional): If you want a slightly caramelized top, sprinkle a tablespoon of brown sugar evenly over the batter. This adds a nice touch of sweetness and texture.
- Bake: Bake for 50-60 minutes, or until a wooden skewer inserted into the center comes out clean. Start checking for doneness around 50 minutes. If the top is browning too quickly, you can loosely tent the loaf pan with aluminum foil.
- Cool in Pan: Once the banana bread is done, remove it from the oven and let it cool in the pan for 10-15 minutes. This allows it to firm up slightly, making it easier to remove.
- Remove from Pan and Cool Completely: After 10-15 minutes, carefully remove the banana bread from the pan and place it on a wire rack to cool completely. This is important to prevent the bottom from becoming soggy.
Tips for the Perfect Banana Bread
Here are a few extra tips to ensure your banana bread turns out perfectly every time:
- Use Ripe Bananas: Seriously, the riper the better! Overripe bananas are sweeter and have a stronger banana flavor. They also mash more easily.
- Don’t Overmix: Overmixing develops the gluten in the flour, which can result in a tough banana bread. Mix until just combined.
- Measure Flour Accurately: Use a kitchen scale for the most accurate measurement. If you’re using measuring cups, spoon the flour into the cup and level it off with a knife. Avoid scooping the flour directly from the bag, as this can pack it down and result in too much flour.
- Adjust Baking Time: Baking times can vary depending on your oven. Start checking for doneness around 50 minutes and adjust the baking time as needed.
- Let it Cool Completely: Resist the urge to slice into the banana bread while it’s still warm. Letting it cool completely allows the flavors to develop and the texture to set.
- Add-Ins: Feel free to experiment with different add-ins! Walnuts, pecans, chocolate chips, blueberries, dried cranberries – the possibilities are endless.
- Storage: Store leftover banana bread in an airtight container at room temperature for up to 3 days, or in the refrigerator for up to a week. You can also freeze it for longer storage.
Variations
Want to mix things up a bit? Here are a few variations you can try:
- Chocolate Chip Banana Bread: Add 1 cup of chocolate chips to the batter.
- Nutella Swirl Banana Bread: Swirl a few tablespoons of Nutella into the batter before baking.
- Peanut Butter Banana Bread: Add 1/2 cup of peanut butter to the batter.
- Cinnamon Streusel Banana Bread: Top the banana bread with a cinnamon streusel topping before baking. To make the streusel, combine 1/2 cup all-purpose flour, 1/4 cup brown sugar, 1/4 cup cold butter (cut into small pieces), and 1 teaspoon cinnamon. Crumble the mixture together with your fingers until it resembles coarse crumbs.
- Vegan Banana Bread: Substitute the egg with a flax egg (1 tablespoon ground flaxseed mixed with 3 tablespoons water). Use vegan butter or oil.
Troubleshooting
Sometimes things don’t go exactly as planned. Here are a few common problems and how to fix them:
- Banana Bread is Dry: This could be due to overbaking, using too much flour, or not using enough ripe bananas. Make sure to measure the flour accurately and use very ripe bananas.
- Banana Bread is Soggy: This could be due to underbaking or not letting it cool completely. Make sure to bake it until a wooden skewer inserted into the center comes out clean.
- Banana Bread is Dense: This could be due to overmixing the batter or using old baking soda. Make sure to mix until just combined and use fresh baking soda.
- Banana Bread is Burning on Top: If the top is browning too quickly, loosely tent the loaf pan with aluminum foil.
Serving Suggestions
Banana bread is delicious on its own, but here are a few serving suggestions to take it to the next level:
- Warm with Butter: A classic! Serve warm slices of banana bread with a pat of butter.
- Toasted with Cream Cheese: Toast slices of banana bread and spread with cream cheese.
- With Ice Cream: Serve warm banana bread with a scoop of vanilla ice cream.
- As French Toast: Dip slices of banana bread in an egg mixture and fry them like French toast.
- In a Trifle: Crumble banana bread into a trifle with layers of custard, fruit, and whipped cream.
Enjoy your homemade banana bread! I hope these tips and tricks help you bake the perfect loaf every time. Happy baking!
Conclusion:
And there you have it! This isn’t just another banana bread recipe; it’s a gateway to warm, comforting goodness that’s incredibly easy to achieve. I truly believe this recipe for Bananenbrot einfach backen is a must-try for anyone, regardless of their baking experience. The simplicity of the ingredients and the straightforward instructions make it virtually foolproof, guaranteeing a moist, flavorful loaf every single time. Forget those dry, crumbly banana breads of the past – this one is a game-changer!
Why is it a must-try? Because it’s more than just a recipe; it’s an experience. It’s the aroma that fills your kitchen as it bakes, the anticipation of that first warm slice, and the satisfaction of creating something delicious from simple ingredients. It’s the perfect way to use up those overripe bananas that are sitting on your counter, transforming them into a treat that everyone will love. Plus, it’s incredibly versatile!
Speaking of versatility, let’s talk serving suggestions and variations. A classic slice of this banana bread is divine on its own, especially when it’s still slightly warm from the oven. But don’t stop there! Try spreading it with a little butter or cream cheese for an extra layer of richness. Toasting a slice and topping it with a dollop of Greek yogurt and a drizzle of honey is another fantastic option for a quick and healthy breakfast.
For variations, the possibilities are endless! Want to add a little crunch? Throw in a handful of chopped walnuts or pecans. Craving something a bit more decadent? Chocolate chips are always a welcome addition. You could even swirl in some peanut butter or Nutella for a truly indulgent treat. For a spicier kick, add a pinch of cinnamon, nutmeg, or even a dash of cayenne pepper. Get creative and experiment with different flavors to find your perfect banana bread combination!
Here are a few more ideas to spark your imagination:
Serving Suggestions:
- Warm with a scoop of vanilla ice cream
- Grilled with a smear of ricotta cheese and a sprinkle of sea salt
- Cut into cubes and used as croutons for a banana bread pudding
- Served alongside a cup of coffee or tea for a cozy afternoon snack
Variations:
- Add a streusel topping for extra sweetness and texture
- Incorporate dried cranberries or raisins for a chewy bite
- Use different types of flour, such as whole wheat or almond flour, for a healthier twist
- Add a glaze made with powdered sugar and milk for a beautiful finish
I’m so excited for you to try this recipe and discover just how easy and delicious it is to Bananenbrot einfach backen. I’m confident that it will become a staple in your baking repertoire.
So, what are you waiting for? Gather your ingredients, preheat your oven, and get ready to bake! I promise you won’t be disappointed. And most importantly, I’d love to hear about your experience. Did you try any of the variations? What did you think of the recipe? Share your photos and comments with me – I can’t wait to see what you create! Happy baking! Let me know if you have any questions, and I’ll do my best to help. Enjoy!
Bananenbrot einfach backen: Das beste Rezept für Anfänger
Moist banana bread made with ripe bananas, perfect for breakfast, snack, or dessert. Optional nuts or chocolate chips add flavor.
Ingredients
Instructions
Recipe Notes
- Use very ripe bananas for the best flavor and moisture.
- Do not overmix the batter, as this can result in a tough banana bread.
- Measure flour accurately (spoon and level or use a kitchen scale).
- Baking times may vary depending on your oven.
- Let the banana bread cool completely before slicing.
- Store in an airtight container at room temperature for up to 3 days or in the refrigerator for up to a week. Can also be frozen.
- Experiment with different add-ins like blueberries, dried cranberries, or Nutella.