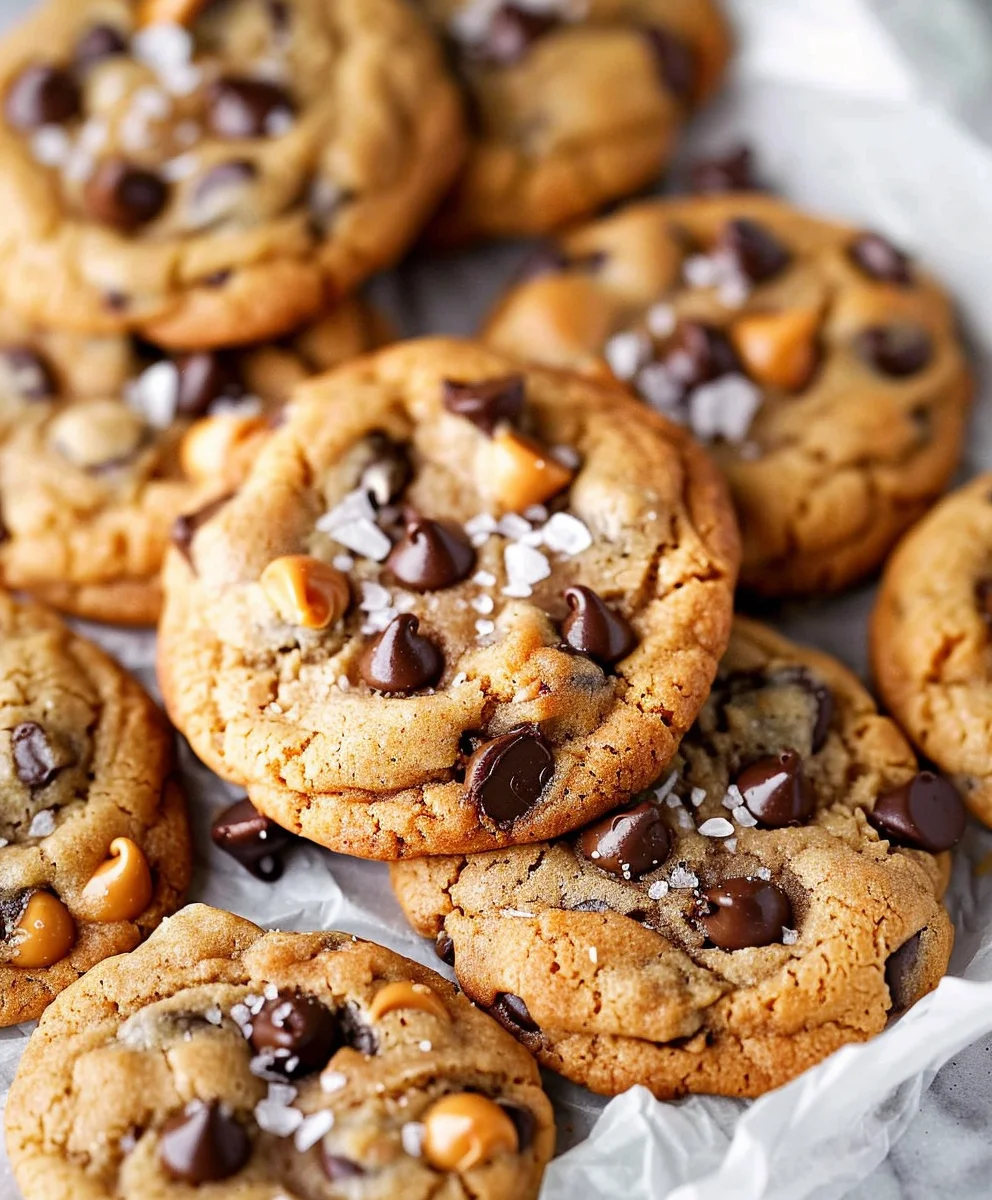
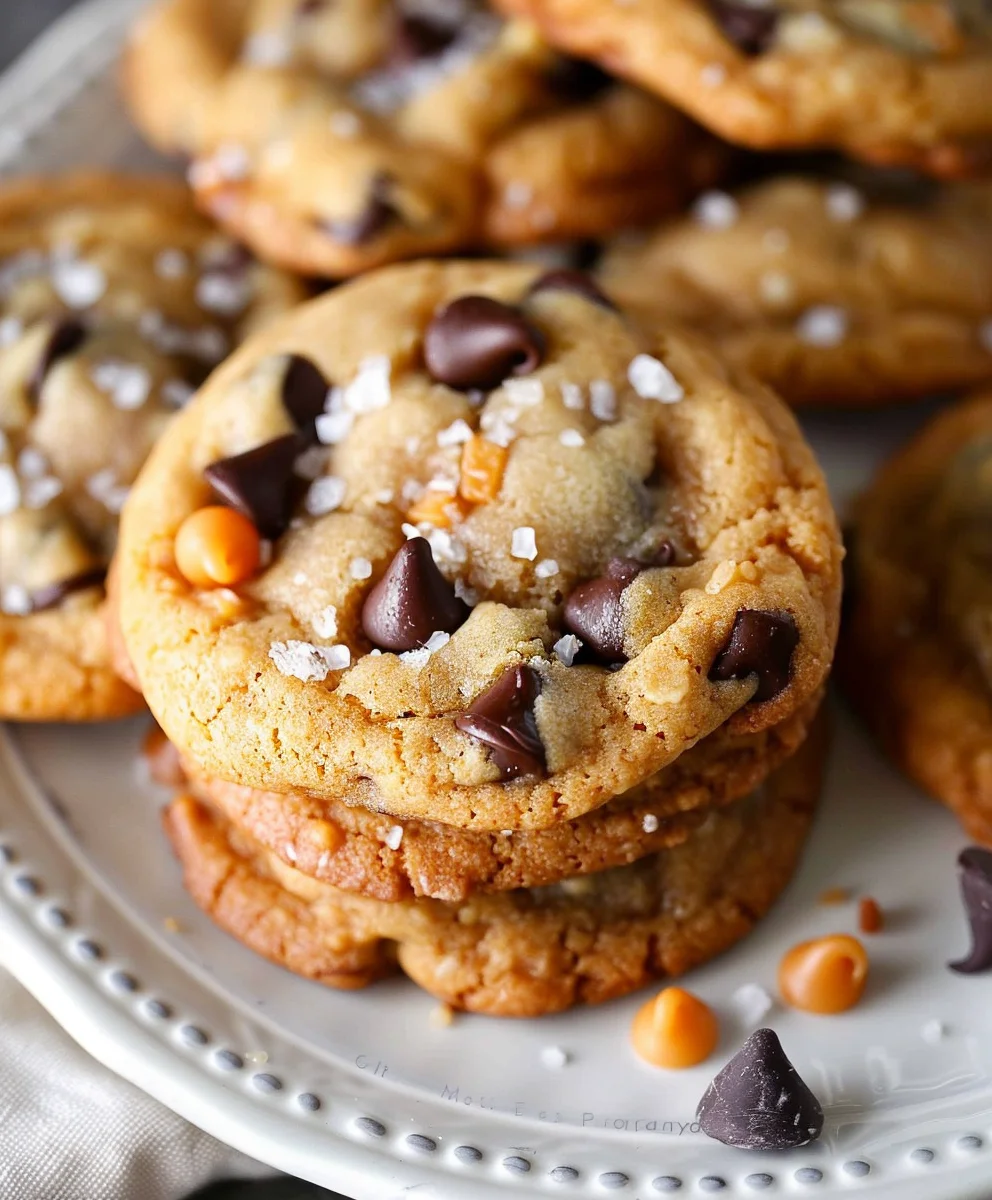
Best Ever Butterscotch Chocolate Chip Cookies With Sea Salt – just reading those words probably conjures up an irresistible aroma and a craving for pure indulgence, doesn’t it? I know it does for me! If you’ve ever dreamt of a cookie that perfectly balances multiple layers of sweetness with a sophisticated touch, then prepare yourself for a truly transformative baking experience. While the classic chocolate chip cookie has a storied American history, becoming a beloved staple since the 1930s, we’re taking that legacy to a whole new level.
We’re introducing the warm, caramelized notes of butterscotch, a flavor profile that echoes old-world confectionery charm, and then elevating everything with a sprinkle of flaky sea salt. This isn’t just a cookie; it’s a symphony of flavors designed to delight every single one of your taste buds. People adore this particular combination because it hits all the right notes: the deep, rich chocolate melds beautifully with the buttery, toffee-like butterscotch, while the sea salt provides that essential pop, cutting through the sweetness and enhancing every single bite. The result is a cookie that’s chewy in the center, perfectly crisp at the edges, and bursting with melty chips. Get ready to discover why this recipe truly earns its title as the “Best Ever Butterscotch Chocolate Chip Cookies With Sea Salt.”

Ingredients:
- For the Dough:
- 1 cup (2 sticks or 226g) unsalted butter, softened to room temperature
- 1 cup (200g) granulated sugar
- 1 cup (220g) packed light brown sugar
- 2 large eggs, at room temperature
- 2 teaspoons pure vanilla extract
- 3 cups (360g) all-purpose flour
- 1 teaspoon baking soda
- ½ teaspoon fine sea salt (for the dough mixture)
- For the Mix-ins:
- 1 ½ cups (about 250g) butterscotch chips
- 1 ½ cups (about 250g) semi-sweet chocolate chips or chunks
- For Finishing:
- 1-2 tablespoons flaky sea salt, such as Maldon (for sprinkling)
Getting Started: Your Mise en Place for Cookie Perfection
Prepare Your Baking Environment and Ingredients: Before we dive into mixing up these incredible cookies, let’s get everything ready. Trust me, a little preparation goes a long way towards a smooth and successful baking experience. Start by taking your unsalted butter and eggs out of the refrigerator well in advance, ideally at least 1-2 hours before you plan to bake. We want that butter to be perfectly softened – it should yield slightly when you gently press it with your finger, but not be greasy or melted. Room temperature butter creams beautifully with sugar, incorporating air that makes your cookies light and tender. Similarly, room temperature eggs emulsify much better with the butter and sugar mixture, preventing a curdled appearance and ensuring a homogeneous dough.
Why Room Temperature Matters:
The Science of Soft Butter:
When butter is at room temperature, its fat molecules are more pliable and able to trap air bubbles when creamed with sugar. This aeration is crucial for creating that coveted chewy-yet-soft texture in your finished cookies. Cold butter won’t cream properly, leading to a dense cookie, while melted butter will result in a greasy, flat cookie.
Eggs and Emulsification:
Room temperature eggs mix more evenly into your batter. If you add cold eggs to creamed butter and sugar, the sudden temperature drop can cause the butter to seize up, leading to a lumpy, separated mixture. A smooth, emulsified batter is the foundation for our Best Ever Butterscotch Chocolate Chip Cookies With Sea Salt.
While your butter and eggs are warming up, go ahead and measure out all your other ingredients. It’s always a good idea to have everything portioned and ready to go before you start mixing, avoiding any last-minute scrambling.
Preheat Your Oven and Line Baking Sheets: Once you’re ready to start mixing, preheat your oven to 375°F (190°C). It’s essential for the oven to be fully preheated before your cookies go in, as a consistent temperature from the start ensures even baking and proper spread. While the oven preheats, line two large baking sheets with parchment paper or silicone baking mats. This prevents sticking, promotes even browning on the bottom of the cookies, and makes for super easy cleanup. You might need more than two sheets, or you can bake in batches if you only have two.
Parchment Paper vs. Silicone Mats:
Both options are fantastic! Parchment paper is single-use and can be a bit more economical for occasional baking. Silicone mats are reusable, offer superior non-stick properties, and tend to provide slightly more even heat distribution, which can be a real game-changer for those perfectly golden bottoms. Either way, avoid greasing your baking sheets directly, as this can cause the cookies to spread too much.
Crafting the Best Ever Butterscotch Chocolate Chip Cookie Dough
Whisk Together Your Dry Ingredients: In a medium bowl, whisk together the all-purpose flour, baking soda, and ½ teaspoon of fine sea salt. Make sure to whisk these ingredients thoroughly for at least 30 seconds to a minute.
The Importance of Whisking Dry Ingredients:
This seemingly simple step is crucial. Whisking ensures that the baking soda and salt are evenly distributed throughout the flour. If these leavening agents and flavor enhancers aren’t spread out uniformly, you might end up with unevenly leavened cookies (some flat, some puffy) or pockets of saltiness. It also helps to aerate the flour slightly, preventing clumping when it’s added to the wet ingredients. Set this bowl aside for now.
Cream the Butter and Sugars: In the bowl of a stand mixer fitted with the paddle attachment (or a large bowl with a handheld electric mixer), add the softened unsalted butter, granulated sugar, and packed light brown sugar. Beat on medium-high speed for about 3 to 5 minutes, or until the mixture is truly light, fluffy, and noticeably pale in color.
Achieving the Perfect Creaming:
This step is perhaps the most critical for the texture of your cookies. We’re not just mixing; we’re incorporating air into the butter and sugar mixture. As the sugar crystals cut through the butter, they create tiny air pockets. These air pockets are what expand in the oven, giving our cookies their soft, chewy, and slightly airy texture. Don’t rush this step! Scrape down the sides of the bowl with a rubber spatula once or twice during the process to ensure everything is evenly incorporated. When it’s done right, the mixture will look almost like a cloud, significantly lighter in both texture and color than when you started. This is the secret to starting your Best Ever Butterscotch Chocolate Chip Cookies With Sea Salt off right.
Add the Eggs and Vanilla: Reduce the mixer speed to low. Add the eggs one at a time, beating well after each addition until just combined. After both eggs are incorporated, add the pure vanilla extract and mix until fully combined.
Incorporating Eggs Correctly:
Adding eggs one by one allows each egg to fully emulsify with the butter and sugar mixture before the next is added, preventing the mixture from separating. You want to mix until just combined – overmixing at this stage can start to develop the gluten in the flour too early, which we want to avoid for a tender cookie. Again, scrape down the sides of the bowl to catch any stray bits and ensure everything is thoroughly mixed.
Gradually Add the Dry Ingredients: With the mixer still on low speed, gradually add the whisked dry ingredients (flour, baking soda, salt) to the wet mixture. Add about a third of the flour mixture at a time, mixing until just combined before adding the next portion. Stop mixing as soon as no streaks of flour are visible.
Preventing Overmixing:
This is another point where you need to be careful not to overdo it. Once you add flour, gluten development begins. Overmixing will lead to tough, dense cookies. We want a tender, chewy cookie, so mix only until the flour is barely incorporated. A few small flour streaks are okay at this point, as you’ll give it one final mix when you fold in the chips. Switch off the mixer as soon as you’ve added the last of the flour and it’s mostly combined.
Fold in the Butterscotch and Chocolate Chips: Remove the bowl from the stand mixer. Using a sturdy rubber spatula or wooden spoon, gently fold in the butterscotch chips and semi-sweet chocolate chips until they are evenly distributed throughout the dough. Avoid crushing the chips.
The Gentle Fold:
Folding by hand at this stage is preferred over using the mixer, as it allows for better control and prevents further gluten development. You want to distribute those delicious mix-ins evenly so every bite of your Best Ever Butterscotch Chocolate Chip Cookies With Sea Salt is packed with flavor, without overworking the dough.
The Essential Chill: Developing Flavor and Texture
Chill the Cookie Dough – Do NOT Skip This Step!: Cover the bowl tightly with plastic wrap and refrigerate the cookie dough for at least 2 hours, but preferably 24-72 hours.
Why Chilling is Non-Negotiable for the Best Cookies:
This is arguably the most important step for achieving truly Best Ever Butterscotch Chocolate Chip Cookies With Sea Salt. While it requires patience, the benefits are immense and transform an ordinary cookie into an extraordinary one.
Hydration and Flavor Development:
Chilling allows the flour to fully hydrate. As the flour absorbs moisture from the wet ingredients, it creates a more tender, chewier cookie texture. More importantly, chilling allows the flavors to meld and deepen. The sugars, butterscotch, and chocolate notes all intensify and become more complex, resulting in a richer, more nuanced flavor profile that you simply cannot achieve with unchilled dough. It’s like marinating meat – time allows the flavors to really develop.
Reduced Spread and Enhanced Texture:
Cold butter takes longer to melt in the hot oven. This means your cookies will spread less, resulting in thicker, chewier cookies with slightly crisp edges and soft, gooey centers. Without chilling, the butter melts too quickly, leading to thin, flat, and often greasy cookies. The chilled dough also helps to set the gluten, further contributing to that perfect chewy texture.
A Note on Chilling Time:
While 2 hours is the minimum to see some benefits, I personally find that chilling for 24 hours yields a significantly better cookie, and up to 72 hours can make them even more incredible. Plan ahead for this step – it’s worth every minute of waiting! If you’re short on time, even 30 minutes in the freezer can help a little, but it won’t give you the full benefits of a proper chill.
Baking Your Best Ever Butterscotch Chocolate Chip Cookies
Portion the Dough: Once your dough is nicely chilled, remove it from the refrigerator. If it’s been chilling for a long time and is very firm, let it sit at room temperature for about 10-15 minutes to make it easier to scoop, but don’t let it get too warm. Use a 2-tablespoon cookie scoop (a standard ice cream scoop) or your hands to roll uniform balls of dough, roughly 1.5 to 2 inches in diameter.
Uniformity is Key:
Scooping consistent sizes ensures that all your cookies bake evenly at the same rate. This avoids having some cookies burnt while others are underbaked. You can also lightly flatten the tops of the dough balls slightly for a more rustic look if desired, but I usually leave them as spheres for a beautiful crackle top.
Arrange on Baking Sheets: Place the dough balls onto your prepared baking sheets, leaving about 2 inches of space between each cookie. They will spread, and we want to give them plenty of room to grow without running into each other. Typically, I can fit 9-12 cookies per standard baking sheet, depending on their size.
Bake to Golden Perfection: Place one baking sheet at a time into your preheated 375°F (190°C) oven. Bake for 10 to 13 minutes.
Visual Cues for Doneness:
The exact baking time can vary slightly depending on your oven and the size of your cookies. You’re looking for cookies that have golden brown edges, but still look slightly soft and underbaked in the very center. The centers will continue to set as they cool, resulting in that perfectly chewy texture we’re aiming for. If the centers look completely set and firm in the oven, you’ve likely overbaked them, and they’ll be hard rather than chewy. For a truly gooey center, err on the side of slightly underbaking.
Rotating Your Baking Sheets:
If your oven has hot spots, you might want to rotate the baking sheet halfway through baking (around 6-7 minutes) to ensure even browning.
Sprinkle with Flaky Sea Salt: Immediately after taking the cookies out of the oven, while they are still hot on the baking sheet, generously sprinkle the tops of each cookie with flaky sea salt.
The Magic of Flaky Sea Salt:
This step is what elevates these from great cookies to the Best Ever Butterscotch Chocolate Chip Cookies With Sea Salt. The salt adheres beautifully to the warm, slightly molten tops of the cookies. The subtle crunch and burst of salinity from the flaky sea salt perfectly balance the intense sweetness of the butterscotch and chocolate, creating an irresistible sweet-and-salty combination that will have everyone reaching for more. Don’t be shy with the salt; it truly makes a difference.
Cooling and Enjoying Your Masterpiece
Cool the Cookies Properly: Allow the baked cookies to cool on the baking sheet for about 5 to 10 minutes. This initial cooling period allows the cookies to set up properly and prevents them from falling apart when you transfer them. After this initial cooling, carefully transfer the cookies to a wire rack to cool completely.
Why a Two-Step Cooling Process?
Cooling on the baking sheet allows the carry-over heat to finish cooking the centers gently and helps the cookies solidify without losing their shape. Transferring them to a wire rack then allows air to circulate around all sides, preventing them from becoming soggy on the bottom and ensuring an even cool-down. Patience here is key for that perfect texture!
Storage: Once completely cool, these Best Ever Butterscotch Chocolate Chip Cookies With Sea Salt can be stored in an airtight container at room temperature for up to 3-4 days. They tend to stay delightfully soft and chewy thanks to the brown sugar and the chilling process.
Freezing Baked Cookies:
If you want to enjoy them for longer, these cookies freeze beautifully! Once completely cooled, place them in a single layer on a baking sheet and freeze until solid (about 1-2 hours). Then, transfer the frozen cookies to a freezer-safe zip-top bag or airtight container. They will keep well in the freezer for up to 2-3 months. Thaw them at room temperature or gently warm them in a low oven for a “freshly baked” experience.
Freezing Dough:
You can also freeze the portioned cookie dough balls! Scoop the dough as directed, place them on a parchment-lined baking sheet, and freeze until solid. Then transfer to a freezer-safe bag. When ready to bake, you can bake them directly from frozen, adding a few extra minutes to the baking time (about 14-16 minutes), or let them thaw slightly on the counter for 20-30 minutes before baking.
Enjoy!: Serve these cookies slightly warm or at room temperature. They are absolutely divine on their own, with a cold glass of milk, a scoop of vanilla ice cream, or alongside your favorite hot beverage. Prepare for rave reviews – these truly are the Best Ever Butterscotch Chocolate Chip Cookies With Sea Salt you’ll ever make!
Conclusion:
Why These Cookies Will Become Your New Obsession
So, we’ve journeyed through the simple steps to create a truly extraordinary treat, and I hope you’re as excited as I am about the prospect of these golden delights emerging from your oven. What truly sets this recipe apart, making it an absolute must-try, is the masterful symphony of flavors and textures. Imagine a cookie that’s perfectly chewy at its heart, with just the right amount of crispness at the edges, a testament to thoughtful baking. But beyond the impeccable texture lies the magic of the flavor profile: the rich, caramelized sweetness of butterscotch chips mingling harmoniously with the deep, comforting notes of semi-sweet chocolate. This isn’t just a cookie; it’s an experience, a moment of pure, unadulterated bliss that truly redefines what a homemade treat can be.
The secret ingredient, the one that elevates these from merely good to undeniably great, is that delicate sprinkle of flaky sea salt. It’s not just an afterthought; it’s a vital counterpoint, cutting through the sweetness, enhancing the chocolate and butterscotch, and awakening your taste buds in the most delightful way. It’s this thoughtful balance that earns them the title of the Best Ever Butterscotch Chocolate Chip Cookies With Sea Salt. Every bite offers a complex dance of sweet, salty, and rich, making it incredibly difficult to stop at just one. Trust me, once you experience that perfect combination, you’ll understand why this recipe is destined to become a staple in your baking repertoire. It’s more than just a sweet treat; it’s a little piece of comfort and joy, crafted right in your own kitchen.
Serving Suggestions and Creative Twists
Now that you’re armed with the knowledge to bake these beauties, let’s talk about how to enjoy them to the fullest. While they are undeniably glorious straight from the cooling rack, still warm and slightly gooey, there are so many wonderful ways to serve and savor them. Picture this: a tall glass of cold milk or a steaming mug of your favorite coffee, perfectly accompanying a warm, chewy cookie for an afternoon pick-me-up. For an indulgent dessert, crumble one over a scoop of vanilla bean ice cream, perhaps with a drizzle of extra butterscotch sauce – pure heaven! They also make magnificent edible gifts; package them in a cute box or cellophane bag for friends, family, or neighbors, and prepare for endless compliments. They’re perfect for potlucks, bake sales, or simply as a well-deserved treat after a long day.
Feeling adventurous? While the original recipe is stellar, don’t hesitate to play around with variations. You could swap out a portion of the semi-sweet chocolate chips for dark chocolate for a more intense cocoa hit, or even milk chocolate for an even sweeter, creamier profile. For an added textural crunch, consider folding in a handful of toasted chopped pecans or walnuts – they pair wonderfully with both butterscotch and chocolate. A tiny pinch of cinnamon or a dash of vanilla extract added to the dough can also introduce another layer of warmth and complexity. Or, for a truly decadent twist, try pressing a small piece of caramel into the center of each dough ball before baking; as it bakes, it will melt into a luscious, gooey surprise. The possibilities are truly endless, allowing you to customize this already incredible recipe to your personal taste.
Your Baking Adventure Awaits!
I genuinely hope you feel inspired to roll up your sleeves and give this recipe a try. There’s an immense satisfaction that comes from baking something so delicious from scratch, and these cookies promise to deliver on every front: ease of preparation, incredible aroma, and unforgettable taste. Don’t just take my word for it – experience the magic yourself! Once you’ve pulled that first batch of the Best Ever Butterscotch Chocolate Chip Cookies With Sea Salt from your oven, I’m confident you’ll understand exactly what I mean.
And here’s the exciting part: I absolutely love hearing about your baking adventures! Please don’t hesitate to share your experiences, your photos, and any creative twists you came up with. Did you serve them with ice cream? Did you add nuts? What was your favorite part of the baking process? Your feedback and stories inspire me and our whole baking community. So go ahead, bake a batch, make memories, and share the joy! Happy baking, my friends!
Best Ever Butterscotch Chocolate Chip Cookies With Sea Salt
Experience a symphony of flavors with these Best Ever Butterscotch Chocolate Chip Cookies. This recipe perfectly balances the deep, rich notes of chocolate with buttery, toffee-like butterscotch, all elevated by a sophisticated sprinkle of flaky sea salt. The result is a cookie that’s chewy in the center, perfectly crisp at the edges, and bursting with melty chips.
Ingredients
-
1/2 cup unsalted butter, softened
-
1/4 cup packed light brown sugar
-
1/2 cup granulated sugar
-
1 large egg, room temperature
-
1 tsp pure vanilla extract
-
1 1/2 cups all-purpose flour
-
1 tsp baking soda
-
1/2 tsp fine sea salt (for dough)
-
1 cup butterscotch chips
-
1 cup semi-sweet chocolate chips
-
Flaky sea salt (for sprinkling)
-
Optional: Walnuts
Instructions
-
Step 1
Ensure butter and egg are at room temperature. Preheat oven to 375°F (190°C). Line two large baking sheets with parchment paper or silicone mats. -
Step 2
In a medium bowl, whisk together the all-purpose flour, baking soda, and 1/2 teaspoon of fine sea salt for 30-60 seconds to ensure even distribution. Set aside. -
Step 3
In the bowl of a stand mixer with the paddle attachment (or using a handheld electric mixer), cream the softened unsalted butter, granulated sugar, and packed light brown sugar on medium-high speed for 3 to 5 minutes, until the mixture is light, fluffy, and noticeably pale. Scrape down the sides of the bowl as needed. -
Step 4
Reduce mixer speed to low. Add the large egg, beating until just combined. Stir in the pure vanilla extract until fully incorporated. Scrape the bowl sides. -
Step 5
With the mixer still on low speed, gradually add the whisked dry ingredients to the wet mixture in three additions, mixing until just combined after each. Stop mixing as soon as no streaks of flour are visible to avoid overmixing. -
Step 6
Remove the bowl from the mixer. Using a sturdy rubber spatula, gently fold in the butterscotch chips and semi-sweet chocolate chips (and optional walnuts) until evenly distributed throughout the dough. -
Step 7
Cover the bowl tightly with plastic wrap and refrigerate the cookie dough for a minimum of 2 hours, but preferably 24-72 hours. This crucial step deepens flavor and improves cookie texture. -
Step 8
Once chilled, scoop 1.5 to 2-inch uniform balls of dough onto the prepared baking sheets, leaving about 2 inches between each. Bake one sheet at a time in the preheated oven for 10 to 13 minutes, until the edges are golden brown and the centers still look slightly soft. Rotate the baking sheet halfway through if your oven has hot spots. -
Step 9
Immediately after removing the cookies from the oven, while still hot on the baking sheet, generously sprinkle the tops of each cookie with flaky sea salt. -
Step 10
Allow cookies to cool on the baking sheet for 5-10 minutes before transferring them to a wire rack to cool completely. Store cooled cookies in an airtight container at room temperature for 3-4 days, or freeze for up to 2-3 months.
Important Information
Nutrition Facts (Per Serving)
It is important to consider this information as approximate and not to use it as definitive health advice.
Allergy Information
Please check ingredients for potential allergens and consult a health professional if in doubt.