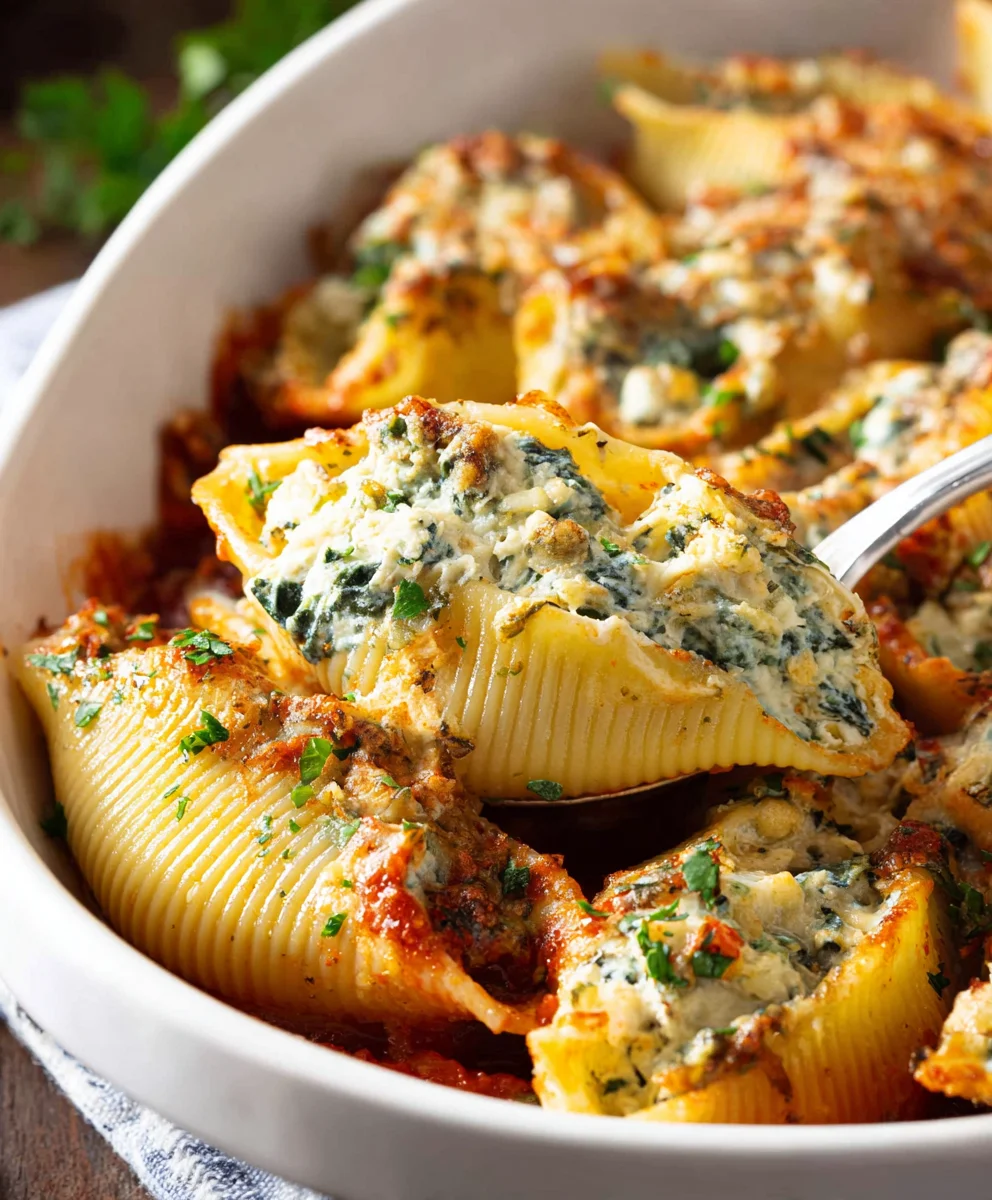
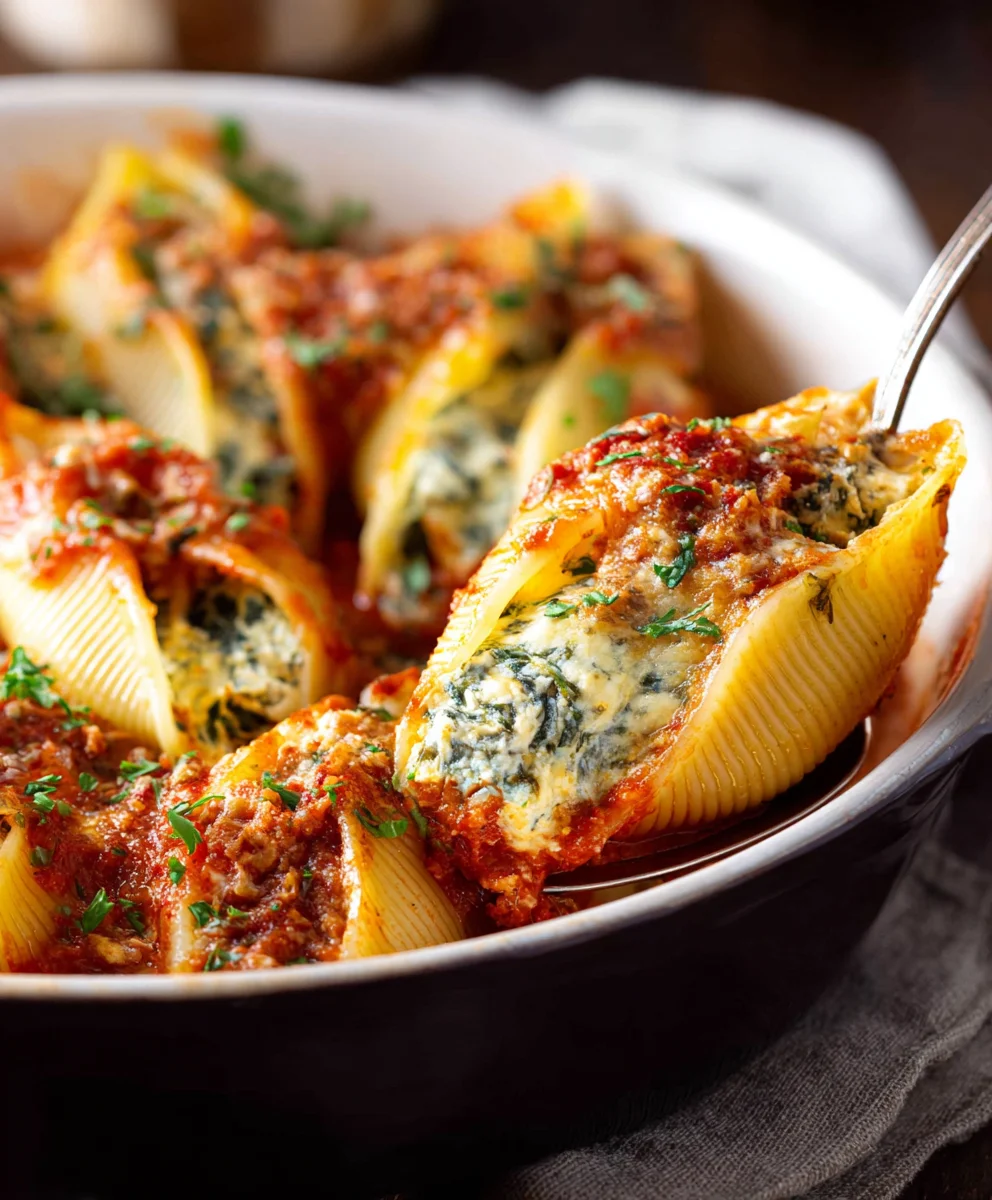
Spinach And Ricotta Stuffed Shells Recipe – it’s more than just a dish; it’s a culinary embrace, a testament to the simple yet profound joy that food can bring. Imagine perfectly al dente jumbo pasta shells, each generously cradling a luscious filling of creamy ricotta cheese, earthy sautéed spinach, and a hint of fragrant herbs, all nestled in a bed of robust marinara sauce and blanketed with melted mozzarella. This classic Italian-American creation is a true comfort food masterpiece, deeply rooted in the traditions of resourceful Italian kitchens where humble ingredients were transformed into heartwarming meals for the whole family.
What makes this dish so universally adored? It’s the exquisite balance of textures and flavors. The tender pasta provides the perfect vessel for the rich, savory filling, while the bright tomato sauce adds a refreshing counterpoint to the indulgent cheese. Whether you’re preparing a cozy family dinner or hosting a larger gathering, this recipe never fails to impress and satisfy. Its make-ahead potential also makes it a fantastic option for busy weeknights or stress-free entertaining. When you’re seeking a dish that embodies both elegance and soul-satisfying flavor, our comprehensive Spinach And Ricotta Stuffed Shells Recipe is the ultimate choice to bring warmth and deliciousness to your table.
Ingredients:
-
For the Jumbo Pasta Shells:
- 1 (12-ounce) box jumbo pasta shells (approximately 30-35 shells)
- 1 tablespoon olive oil (for cooking pasta water)
- 1 teaspoon salt (for cooking pasta water)
-
For the Rich Marinara Sauce:
- 2 tablespoons extra virgin olive oil
- 1 large yellow onion, finely diced
- 4-5 cloves garlic, minced
- 2 (28-ounce) cans crushed tomatoes (good quality, preferably San Marzano)
- 1 (15-ounce) can tomato sauce
- 1/2 cup dry red wine (optional, but adds depth)
- 1/2 teaspoon dried oregano
- 1/4 teaspoon dried basil
- 1/4 teaspoon red pepper flakes (optional, for a little kick)
- 1 bay leaf
- 1 teaspoon granulated sugar (to balance acidity, optional)
- Salt and freshly ground black pepper, to taste
- 1/4 cup fresh basil, chopped, plus more for garnish
-
For the Creamy Spinach and Ricotta Filling:
- 2 (10-ounce) packages frozen chopped spinach, thawed and very well-drained
- 2 pounds whole milk ricotta cheese
- 1 cup freshly grated Parmesan cheese, plus 1/2 cup for topping
- 1/2 cup freshly grated Pecorino Romano cheese (optional, for sharper flavor)
- 1 large egg, lightly beaten
- 1/4 cup chopped fresh parsley
- 1 teaspoon dried oregano
- 1/2 teaspoon garlic powder
- 1/4 teaspoon freshly grated nutmeg (enhances flavor beautifully)
- Salt and freshly ground black pepper, to taste (I usually start with 1 teaspoon salt, 1/2 teaspoon pepper)
-
For Layering and Topping:
- 2 cups shredded mozzarella cheese (low-moisture, part-skim works best for melt)
- 1/2 cup freshly grated Parmesan cheese (from the extra amount listed for filling)
- Fresh basil leaves, for garnish (optional)
Crafting Your Homemade Marinara Sauce
Embarking on this Spinach And Ricotta Stuffed Shells Recipe journey often begins with a robust, flavorful sauce. While a good quality store-bought marinara can certainly work in a pinch, taking the time to simmer your own creates an unparalleled depth of flavor that truly elevates the entire dish. I find it’s incredibly satisfying to build the flavors from scratch, and it fills your kitchen with the most wonderful aroma.
- First things first, grab a large, heavy-bottomed pot or Dutch oven. Place it over medium heat and add your 2 tablespoons of extra virgin olive oil. Once the oil shimmers, toss in your finely diced yellow onion. We’re looking for the onion to soften and become translucent, which usually takes about 5-7 minutes. Stir frequently to prevent any browning. The goal here is to sweeten the onion, laying a foundational flavor for our sauce.
- Next, introduce your minced garlic. Add it to the pot with the softened onions and cook for just about 60 seconds, stirring continuously. Be very careful here, as garlic can burn quickly, and burnt garlic will impart a bitter taste that we absolutely want to avoid in our delicious marinara. We’re just looking for it to become fragrant.
- Now, if you’re using red wine, this is the perfect moment to deglaze the pot. Pour in the 1/2 cup of dry red wine and scrape up any browned bits from the bottom of the pot with a wooden spoon. Let the wine simmer and reduce by about half, which should take another 3-5 minutes. This step adds a wonderful complexity and richness to the sauce.
- It’s time for the tomatoes! Carefully pour in the two 28-ounce cans of crushed tomatoes and the 15-ounce can of tomato sauce. Give everything a good stir to combine.
- Add your dried herbs: 1/2 teaspoon of dried oregano, 1/4 teaspoon of dried basil, and the 1/4 teaspoon of red pepper flakes if you’re keen on a little warmth. Don’t forget to tuck in the bay leaf. This is also when I like to add the 1 teaspoon of granulated sugar; it’s completely optional, but I find it helps to balance the acidity of the tomatoes, creating a more harmonious flavor profile.
- Bring the sauce to a gentle simmer, then reduce the heat to low, cover the pot, and let it cook for at least 45 minutes to an hour, or even longer if you have the time. The longer it simmers, the more the flavors will meld and deepen. Stir occasionally to prevent sticking and to check on the consistency. If it seems too thick, you can add a splash of water or vegetable broth.
- Once the sauce has had ample time to simmer and develop, remove the bay leaf. Season generously with salt and freshly ground black pepper to your liking. Remember, you’re seasoning a large batch, so don’t be shy, but always taste as you go. Finally, stir in the 1/4 cup of fresh chopped basil right at the end; this preserves its vibrant flavor and color. Set your magnificent marinara aside while we prepare the rest of the components for our Spinach And Ricotta Stuffed Shells Recipe.
Preparing the Jumbo Pasta Shells to Perfection
Cooking the pasta shells correctly is a crucial step in ensuring your Spinach And Ricotta Stuffed Shells Recipe turns out beautifully. We want them pliable enough to stuff without tearing, but not mushy.
- Fill a very large pot with water, ensuring there’s plenty of room for the shells to move freely. Add 1 tablespoon of olive oil and 1 teaspoon of salt to the water. Bring it to a rolling boil over high heat. The olive oil helps prevent the shells from sticking together, and the salt seasons the pasta from within.
- Once the water is boiling vigorously, carefully add the jumbo pasta shells. Cook according to package directions, but aim for a firm al dente – about 8-10 minutes. You want them cooked enough to be flexible, but still have a slight bite and firmness, as they will finish cooking in the oven. Avoid overcooking, as mushy shells are difficult to stuff and won’t hold their shape.
- Once cooked to your desired al dente, immediately drain the shells in a colander. Rinse them briefly with cool water to stop the cooking process and prevent them from sticking. Gently spread them out on a baking sheet lined with parchment paper or a clean kitchen towel in a single layer to cool slightly. This prevents them from clumping together and makes them much easier to handle when it’s time for stuffing.
Crafting the Creamy Spinach and Ricotta Filling
The heart of our Spinach And Ricotta Stuffed Shells Recipe lies in its incredibly rich and flavorful filling. This is where you bring together the freshness of spinach with the creamy indulgence of ricotta and the sharp notes of Parmesan.
- The most critical step for the spinach is drainage. Take your thawed frozen chopped spinach (from the two 10-ounce packages). Place it in a clean kitchen towel or several layers of cheesecloth. Now, squeeze, squeeze, squeeze! You need to remove as much liquid as humanly possible. This is not an exaggeration; excess moisture will make your filling watery and can lead to a soupy final product. Keep squeezing until you think you can’t get any more out; then squeeze a little more. You’ll be surprised how much water comes out.
- Once the spinach is thoroughly drained, transfer it to a large mixing bowl.
- Add the star of the show: the 2 pounds of whole milk ricotta cheese. For the best texture and flavor, I always recommend whole milk ricotta; it’s creamier and less watery than part-skim.
- Now, let’s incorporate the cheeses. Add 1 cup of freshly grated Parmesan cheese and the 1/2 cup of freshly grated Pecorino Romano (if using). Freshly grated cheese makes a huge difference in flavor compared to pre-shredded varieties, which often contain anti-caking agents that affect melt and texture.
- Crack in the large egg, which acts as a binder, helping the filling to hold its shape during baking.
- Stir in the fresh chopped parsley, 1 teaspoon of dried oregano, 1/2 teaspoon of garlic powder, and a good pinch (about 1/4 teaspoon) of freshly grated nutmeg. Don’t skip the nutmeg! It’s a classic Italian pairing with spinach and ricotta and really brings out a wonderful warmth and depth that you might not expect.
- Season the filling generously with salt and freshly ground black pepper. I usually start with about 1 teaspoon of salt and 1/2 teaspoon of black pepper, but always taste a tiny bit (before the egg is added, or after if you’re comfortable) and adjust to your preference. The cheese also adds saltiness, so be mindful.
- Using a large spoon or your clean hands, mix all the ingredients together thoroughly until everything is well combined and evenly distributed. The mixture should be thick and easily scoopable.
Assembling Your Spinach And Ricotta Stuffed Shells Masterpiece
This is where all our hard work comes together! Assembling the Spinach And Ricotta Stuffed Shells Recipe is a straightforward process, but taking a little care here ensures a beautifully baked dish.
- Preheat your oven to 375°F (190°C).
- Take a large 9×13-inch baking dish (or two smaller ones, depending on your preference and the number of shells). Ladle about 1 to 1.5 cups of your glorious homemade marinara sauce onto the bottom of the dish, spreading it evenly. This layer of sauce will prevent the shells from sticking and will keep them moist during baking.
- Now for the fun part: stuffing the shells! Pick up a cooked jumbo shell. Gently open it up with your fingers. Using a small spoon (a teaspoon or dessert spoon works perfectly) or a small cookie scoop, generously fill each shell with the spinach and ricotta mixture. I aim for about 2-3 tablespoons of filling per shell, making sure they are plump but not bursting. Be careful not to overfill them, as the filling can expand slightly during baking.
- As you stuff each shell, arrange it snugly in a single layer in the prepared baking dish. You can place them seam-side up or down, it’s mostly for aesthetic preference. Continue until all the shells are stuffed and arranged in your baking dish. Depending on the size of your shells and dish, you might have enough for a second layer or need a second dish. If you do a second layer, add a thin layer of sauce between the layers of shells.
- Once all the shells are nestled in the dish, pour the remaining marinara sauce evenly over the top of the stuffed shells. Make sure most of the shells are covered with sauce; this keeps them from drying out and infuses them with flavor.
- Sprinkle the 2 cups of shredded mozzarella cheese evenly over the sauced shells. Then, sprinkle the remaining 1/2 cup of freshly grated Parmesan cheese over the mozzarella. This creates a beautiful, bubbly, golden-brown crust when baked.
Baking Your Perfect Spinach And Ricotta Stuffed Shells
The final phase of our Spinach And Ricotta Stuffed Shells Recipe is the baking. This is where the magic happens, and all those wonderful flavors meld together into a comforting, irresistible meal.
- Carefully cover the baking dish tightly with aluminum foil. This is a crucial step for the initial baking phase, as it helps to steam the shells, ensuring they cook through evenly and the cheese filling gets wonderfully hot and melty without drying out.
- Place the covered baking dish into your preheated 375°F (190°C) oven. Bake for 25 minutes.
- After 25 minutes, remove the foil. This allows the cheese on top to bubble and turn golden brown, and for any excess moisture to evaporate, concentrating the flavors.
- Return the uncovered dish to the oven and continue baking for another 15-20 minutes, or until the cheese is beautifully melted, bubbly, and slightly golden brown at the edges, and the sauce is simmering enthusiastically. You should see little pockets of sauce bubbling up around the shells. If you like your cheese topping extra golden and crispy, you can even put it under the broiler for the last 1-2 minutes, but watch it very closely to prevent burning.
- Once baked to perfection, carefully remove the dish from the oven.
Serving Your Hearty Spinach And Ricotta Stuffed Shells
Your incredible Spinach And Ricotta Stuffed Shells Recipe is now ready! But a little patience goes a long way for the best serving experience.
- Allow the baked dish to rest for 10-15 minutes before serving. This resting period is important because it allows the molten cheese and hot filling to set slightly, making it much easier to serve without everything collapsing, and preventing immediate tongue burns. It also gives the flavors a final moment to truly meld.
- To serve, use a large spoon or spatula to carefully lift the stuffed shells onto individual plates. Each serving usually consists of 3-4 shells, depending on appetites.
- Garnish each plate with a sprinkle of fresh chopped basil leaves for a burst of color and fresh herbaceousness. A final dusting of freshly grated Parmesan cheese is also never a bad idea!
- These Spinach and Ricotta Stuffed Shells are a complete meal on their own, but they pair wonderfully with a simple green salad dressed with a vinaigrette, or some crusty garlic bread for dipping into the delicious sauce. Enjoy the fruits of your labor – this comforting, homemade dish is sure to be a crowd-pleaser!
Conclusion:
And there you have it, friends! We’ve journeyed together through the simple yet profoundly satisfying creation of what I truly believe is one of the most comforting and delightful dishes you can bring to your dinner table: the incredible Spinach And Ricotta Stuffed Shells. This isn’t just a meal; it’s an experience, a symphony of textures and flavors that will undoubtedly leave everyone at your table asking for a second helping. I can confidently tell you that this particular Spinach And Ricotta Stuffed Shells Recipe is a must-try for so many reasons, going beyond just its mouth-watering taste.
Firstly, the sheer joy of seeing those perfectly baked, golden-brown shells, brimming with their creamy, savory filling, is a reward in itself. The combination of tender pasta, rich ricotta, wholesome spinach, and the tangy embrace of a well-seasoned marinara sauce is simply unparalleled. It’s a dish that feels simultaneously elegant enough for a special occasion and wonderfully comforting for a casual weeknight dinner. The beauty of this recipe lies in its balanced profile – the earthy notes of spinach perfectly complement the sweet and mild creaminess of the ricotta, all tied together with the robust, bright flavors of your favorite tomato sauce and a generous sprinkle of melting mozzarella. It’s a complete package, offering a fantastic source of nutrients from the spinach and protein from the cheese, making it a wholesome choice for the whole family.
When it comes to serving, the possibilities are delightfully simple and complement the dish beautifully. I always recommend pairing your delicious stuffed shells with a crisp, green side salad dressed with a light vinaigrette. The freshness of the salad cuts through the richness of the pasta, creating a perfectly balanced meal. And, of course, no pasta dish is truly complete without a generous basket of warm, crusty garlic bread or focaccia for dipping into that glorious extra sauce. For a more elevated experience, consider a glass of a medium-bodied red wine, like a Chianti or a Merlot, which will harmonize wonderfully with the tomato sauce and rich cheese. For those cooler evenings, a sprinkle of freshly grated Parmesan cheese and a dash of red pepper flakes for a subtle kick can elevate each bite even further.
Endless Variations to Make It Yours
But don’t stop there! This recipe is incredibly versatile, inviting you to put your own creative spin on it. If you’re a mushroom lover, sautéed mushrooms can be folded into the ricotta mixture for an extra layer of umami. For a heartier dish, consider browning some lean ground beef or Italian sausage and stirring it into your marinara sauce before baking. This adds a fantastic depth of flavor and turns it into a more substantial meal. You could also experiment with different cheeses – a touch of smoked mozzarella could add a wonderful complexity, or a blend of Parmesan and Pecorino Romano for a sharper, saltier kick. Feel free to swap out some of the spinach for finely chopped kale or even roasted red peppers for a different vegetable profile. For those looking to make it a bit spicier, a pinch more red pepper flakes in the filling or sauce will do the trick. If you’re catering to dietary needs, gluten-free jumbo shells are readily available and work perfectly with this recipe, ensuring everyone can enjoy this amazing dish.
Ultimately, this recipe is about creating cherished moments around the dinner table. It’s about the joy of sharing a homemade meal that’s bursting with flavor and made with love. I truly hope you’ll gather your ingredients, follow along with our steps, and give this Spinach And Ricotta Stuffed Shells a try very soon. It’s a culinary adventure that promises delicious rewards. Once you’ve experienced the magic, I would absolutely love to hear about it! Please, don’t hesitate to come back and share your cooking experience in the comments below. Did you try a unique variation? What did your family think? Your insights and feedback are invaluable, and they inspire me to keep sharing more wonderful recipes with our amazing community. Happy cooking, everyone!
People Also Ask (FAQs):
Can I make stuffed shells ahead of time?
Absolutely! Stuffed shells are a fantastic make-ahead meal. You can assemble them completely, place them in your baking dish, cover tightly with plastic wrap or foil, and refrigerate for up to 24-48 hours before baking. When ready to bake, you might need to add an extra 10-15 minutes to the baking time if they are going directly from the fridge into the oven, ensuring they are heated through completely.
How do I store leftover stuffed shells?
Leftover stuffed shells should be stored in an airtight container in the refrigerator. They will remain fresh and delicious for 3-4 days. To reheat, you can either microwave individual portions or place the entire dish, covered, in a preheated oven at 350°F (175°C) until warmed through, usually about 20-30 minutes.
Can I freeze stuffed shells?
Yes, stuffed shells freeze beautifully! You can freeze them either unbaked or baked. For unbaked, assemble the dish, cover tightly with a double layer of foil, and freeze for up to 3 months. When ready to bake, thaw overnight in the fridge and then bake as directed, or bake from frozen (this will significantly increase baking time, often doubling it, and ensure it’s fully cooked). For baked shells, allow them to cool completely, then portion into freezer-safe containers or wrap individual servings before freezing. Thaw overnight in the fridge and reheat gently.
What kind of shells should I use for this recipe?
You’ll want to use jumbo pasta shells, sometimes labeled “conchiglioni.” These large shells are specifically designed to be stuffed with fillings. Ensure you buy the right size, as smaller shells won’t hold enough filling, and larger ones might be difficult to manage.
What if I don’t have ricotta cheese? Are there substitutes?
While ricotta is traditional and provides a unique creamy texture, you can try some substitutions in a pinch. A good quality cottage cheese (preferably small curd) can work, though it might be slightly less smooth. You could also create a blend of cream cheese and a little milk to thin it, or even a very thick Greek yogurt, though these will alter the flavor and texture more significantly. For the best results, stick with ricotta if possible!
Can I add meat to these Spinach And Ricotta Stuffed Shells?
Absolutely! Adding meat is a popular variation. You can brown about 1 pound of ground beef, Italian sausage, or a mixture of both, drain any excess fat, and then stir it into your marinara sauce before layering. Alternatively, some people like to mix a small amount of cooked, crumbled meat directly into the ricotta filling for an even richer stuffing.
Is it necessary to boil the shells before stuffing?
Yes, it is crucial to boil the jumbo shells before stuffing them. You’ll want to cook them al dente, meaning they should still have a slight bite and not be overly soft. If you overcook them, they will tear easily when you try to stuff them. Follow the package directions for “al dente” cooking time, usually about 8-10 minutes. Rinse them with cold water after draining to stop the cooking process and prevent sticking.
Best Creamy Spinach And Ricotta Stuffed Shells Recipe
Spinach And Ricotta Stuffed Shells Recipe – it’s more than just a dish; it’s a culinary embrace, a testament to the simple yet profound joy that food can bring. Imagine perfectly al dente jumbo pasta shells, each generously cradling a luscious filling of creamy ricotta cheese, earthy sautéed spinach, and a hint of fragrant herbs, all nestled in a bed of robust marinara sauce and blanketed with melted mozzarella. This classic Italian-American creation is a true comfort food masterpiece, deeply rooted in the traditions of resourceful Italian kitchens where humble ingredients were transformed into heartwarming meals for the whole family.
What makes this dish so universally adored? It’s the exquisite balance of textures and flavors. The tender pasta provides the perfect vessel for the rich, savory filling, while the bright tomato sauce adds a refreshing counterpoint to the indulgent cheese. Whether you’re preparing a cozy family dinner or hosting a larger gathering, this recipe never fails to impress and satisfy. Its make-ahead potential also makes it a fantastic option for busy weeknights or stress-free entertaining. When you’re seeking a dish that embodies both elegance and soul-satisfying flavor, our comprehensive Spinach And Ricotta Stuffed Shells Recipe is the ultimate choice to bring warmth and deliciousness to your table.
Ingredients
-
1 (12-ounce) box jumbo pasta shells
-
1 tablespoon olive oil
-
1 teaspoon salt
-
2 tablespoons extra virgin olive oil
-
1 large yellow onion, diced
-
4-5 cloves garlic, minced
-
2 (28-ounce) cans crushed tomatoes
-
1 (15-ounce) can tomato sauce
-
1/2 cup non-alcoholic red wine substitute (or vegetable broth)
-
1/2 teaspoon dried oregano
-
1/4 teaspoon dried basil
-
1/4 teaspoon red pepper flakes (optional)
-
1 bay leaf
-
1 teaspoon granulated sugar (optional)
-
Salt and freshly ground black pepper, to taste
-
1/4 cup fresh basil, chopped, plus more for garnish
-
2 (10-ounce) packages frozen chopped spinach, thawed and well-drained
-
2 pounds whole milk ricotta cheese
-
1 cup freshly grated Parmesan cheese
-
1/2 cup freshly grated Pecorino Romano cheese (optional)
-
1 large egg, lightly beaten
-
1/4 cup chopped fresh parsley
-
1 teaspoon dried oregano
-
1/2 teaspoon garlic powder
-
1/4 teaspoon freshly grated nutmeg
-
Salt and freshly ground black pepper, to taste
-
2 cups shredded mozzarella cheese
-
1/2 cup freshly grated Parmesan cheese (for topping)
Instructions
-
Step 1
Heat 2 tablespoons olive oil in a large pot over medium heat. Sauté diced onion until translucent (5-7 mins). Add minced garlic; cook for 1 minute until fragrant. If using, add 1/2 cup non-alcoholic red wine substitute; scrape bottom of pot and simmer until reduced by half (3-5 mins). Stir in crushed tomatoes and tomato sauce. Add 1/2 teaspoon dried oregano, 1/4 teaspoon dried basil, 1/4 teaspoon red pepper flakes (optional), 1 bay leaf, and 1 teaspoon granulated sugar (optional). Bring to a gentle simmer, then reduce heat to low, cover, and cook for 45-60 minutes, stirring occasionally. Remove bay leaf. Season with salt and pepper to taste. Stir in 1/4 cup fresh chopped basil. Set aside. -
Step 2
Fill a large pot with water, 1 tablespoon olive oil, and 1 teaspoon salt. Bring to a rolling boil. Add jumbo pasta shells and cook to a firm al dente (8-10 minutes), according to package directions. Drain immediately, rinse briefly with cool water, and spread on a baking sheet to cool slightly to prevent sticking. -
Step 3
Thoroughly drain thawed chopped spinach by squeezing out as much liquid as possible using a clean kitchen towel. Transfer to a large mixing bowl. Add whole milk ricotta cheese, 1 cup Parmesan cheese, Pecorino Romano (optional), beaten egg, fresh parsley, 1 teaspoon dried oregano, 1/2 teaspoon garlic powder, and 1/4 teaspoon freshly grated nutmeg. Season generously with salt and freshly ground black pepper. Mix all ingredients well until thoroughly combined and thick. -
Step 4
Preheat oven to 375°F (190°C). Ladle 1 to 1.5 cups of marinara sauce onto the bottom of a 9×13-inch baking dish. Gently open each cooked jumbo shell and generously fill with 2-3 tablespoons of the spinach and ricotta mixture. Arrange stuffed shells snugly in a single layer in the baking dish. Pour remaining marinara sauce evenly over the shells. Sprinkle with 2 cups shredded mozzarella cheese and the remaining 1/2 cup Parmesan cheese. -
Step 5
Cover the baking dish tightly with aluminum foil. Bake for 25 minutes. Remove foil and continue baking for another 15-20 minutes, or until cheese is melted, bubbly, and lightly golden brown, and sauce is simmering. -
Step 6
Carefully remove from oven and let rest for 10-15 minutes before serving. Garnish with fresh chopped basil leaves and an optional dusting of Parmesan cheese. Serve warm.
Important Information
Nutrition Facts (Per Serving)
It is important to consider this information as approximate and not to use it as definitive health advice.
Allergy Information
Please check ingredients for potential allergens and consult a health professional if in doubt.