• Skip to primary navigation
  • Skip to main content
  • Skip to primary sidebar
Homesmad

Homesmad

  • Home
  • Breakfast & Brunch
  • Appetizers & Snacks
  • Dinner
  • Dessert
  • About
  • Privacy Policy
  • Contact
Homesmad
  • Home
  • Breakfast & Brunch
  • Appetizers & Snacks
  • Dinner
  • Dessert
  • About
  • Privacy Policy
  • Contact

Best Spicy Chicken Sandwich & Creamy Homemade Sauce!

October 21, 2025 by Lily author

Spicy Chicken Sandwich With Creamy Homemade Sauce – are you ready to embark on a culinary adventure that will forever change your perception of the humble chicken sandwich? I am absolutely thrilled to share with you a recipe that promises an explosion of flavors and textures, transforming your mealtime into an unforgettable experience. For years, the spicy chicken sandwich has transcended its humble fast-food origins, evolving into a gourmet sensation cherished by food enthusiasts worldwide. Its universal appeal lies in that perfect symphony of sensations: the satisfying crunch of perfectly fried, seasoned chicken, followed by a delightful kick of heat that awakens your palate.

The Secret to Unforgettable Flavor: Our Homemade Sauce

But what truly elevates this dish, making it a homemade masterpiece, is our secret weapon: a cool, tangy, and incredibly luxurious homemade sauce. This sauce isn’t just an accompaniment; it’s the harmonizing element that tames the spice and adds an unparalleled richness, ensuring every bite is balanced and deeply satisfying. People adore this dish not only for its incredible taste and contrasting textures – crispy, juicy chicken against a soft bun and silken sauce – but also for the pure comfort and joy it brings. Imagine recreating that coveted restaurant-quality sandwich right in your own kitchen, customized exactly to your liking. Preparing your own Spicy Chicken Sandwich With Creamy Homemade Sauce means you control the ingredients, the spice level, and the generous dollops of that irresistible sauce. Get ready to ditch the drive-thru and embrace the superior flavor of homemade!

Best Spicy Chicken Sandwich & Creamy Homemade Sauce! this RECIPE

Welcome to my kitchen! Today, I’m absolutely thrilled to share with you the definitive recipe for a truly incredible Spicy Chicken Sandwich With Creamy Homemade Sauce. This isn’t just any fried chicken sandwich; it’s a labor of love that promises a symphony of flavors and textures – from the incredibly juicy, spicy chicken to the crisp, golden-brown crust, all brought together by a tangy, cooling, and utterly delicious homemade sauce. Get ready to elevate your sandwich game to legendary status!

Ingredients:

  • For the Spicy Chicken Marinade:

    • 4 boneless, skinless chicken thighs (about 1.5 – 2 lbs total), trimmed of excess fat. While breasts can be used, I find thighs offer superior juiciness and flavor for this spicy chicken sandwich.
    • 2 cups buttermilk
    • 1/4 cup hot sauce (your favorite brand, I often go for a Louisiana-style hot sauce)
    • 1 tablespoon smoked paprika
    • 1 teaspoon cayenne pepper (adjust to your preferred spice level, or omit for less heat)
    • 1 teaspoon garlic powder
    • 1 teaspoon onion powder
    • 1 teaspoon salt
    • 1/2 teaspoon freshly ground black pepper
  • For the Crispy Breading:

    • 2 cups all-purpose flour
    • 1/2 cup cornstarch (this is my secret for extra crispiness!)
    • 1 tablespoon baking powder (another crispiness booster!)
    • 1 tablespoon smoked paprika
    • 1 teaspoon cayenne pepper
    • 1 teaspoon garlic powder
    • 1 teaspoon onion powder
    • 1 teaspoon salt
    • 1/2 teaspoon freshly ground black pepper
  • For the Creamy Homemade Sauce:

    • 1 cup good quality mayonnaise
    • 1/4 cup hot sauce (match the one used in the marinade for consistency, or use a different one for a layered flavor)
    • 2 tablespoons pickle juice (from a jar of dill pickles, don’t skip this for that essential tang!)
    • 1 teaspoon granulated sugar or honey (to balance the acidity)
    • 1/2 teaspoon garlic powder
    • 1/2 teaspoon onion powder
    • 1/4 teaspoon smoked paprika
    • Pinch of salt and black pepper to taste
  • For Frying:

    • 6-8 cups peanut oil, canola oil, or vegetable oil (enough to submerge the chicken in a heavy-bottomed pot or Dutch oven)
  • For Assembling the Spicy Chicken Sandwich:

    • 4 brioche buns, split and lightly toasted
    • 1/2 cup dill pickle chips (bread and butter pickles also work if you prefer a sweeter crunch)
    • Green leaf lettuce or iceberg lettuce, shredded or whole leaves
    • Tomato slices (optional, but I love the freshness)

Marinating the Chicken: The Foundation of Flavor and Tenderness

The journey to a truly exceptional Spicy Chicken Sandwich With Creamy Homemade Sauce begins with a proper marinade. This isn’t just about infusing flavor; it’s crucial for tenderizing the chicken and ensuring it remains incredibly juicy, even after frying.

  1. First, prepare your chicken. If using chicken thighs, trim off any excessive fat or gristle. If you’ve opted for chicken breasts, I recommend slicing them horizontally to create two thinner cutlets from each breast, or pounding them lightly with a meat mallet to an even 1/2-inch thickness. This ensures they cook evenly and fit perfectly onto your brioche bun.
  2. In a large bowl or a gallon-sized freezer bag, combine the buttermilk, 1/4 cup hot sauce, 1 tablespoon smoked paprika, 1 teaspoon cayenne pepper, 1 teaspoon garlic powder, 1 teaspoon onion powder, 1 teaspoon salt, and 1/2 teaspoon black pepper. Whisk everything together until well combined. The buttermilk’s acidity will naturally tenderize the chicken, while the hot sauce and spices will penetrate deep into the meat, laying down a robust flavor base for our spicy chicken sandwich.
  3. Add the trimmed or pounded chicken pieces to the marinade, ensuring each piece is fully submerged and coated. If using a bowl, cover it tightly with plastic wrap.
  4. Refrigerate the chicken for at least 4 hours, but for the absolute best results, aim for an overnight marinade (8-12 hours). Do not skip this step! The longer the chicken marinates, the more tender, juicy, and flavorful your final spicy chicken sandwich will be. This long soak is truly what sets a good fried chicken sandwich apart from a phenomenal one.

Crafting the Creamy Homemade Sauce: The Perfect Counterpoint

While your chicken is marinating, let’s turn our attention to the star condiment: the Creamy Homemade Sauce. This sauce is designed to be the ultimate flavor enhancer for your Spicy Chicken Sandwich With Creamy Homemade Sauce. It’s creamy, tangy, with just enough heat to complement the chicken without overpowering it, and it brings a beautiful balance to every bite.

  1. In a medium-sized bowl, combine 1 cup mayonnaise, 1/4 cup hot sauce, 2 tablespoons pickle juice, 1 teaspoon granulated sugar or honey, 1/2 teaspoon garlic powder, 1/2 teaspoon onion powder, and 1/4 teaspoon smoked paprika.
  2. Whisk all the ingredients together thoroughly until the sauce is smooth and beautifully integrated.
  3. Taste the sauce and adjust the seasonings as needed. Do you prefer it a little spicier? Add a dash more hot sauce. Want more tang? A tiny bit more pickle juice will do the trick. A touch more sweetness? Add a pinch more sugar. This is your chance to customize it to your personal preference.
  4. Cover the bowl and refrigerate the sauce for at least 30 minutes. This allows the flavors to meld and develop, making it even more delicious. A chilled sauce is also delightful against the warm, crispy chicken. This creamy homemade sauce is so good, you might just want to put it on everything!

Setting Up the Breading Station: Layers of Crispiness

The magic of a perfectly crispy fried chicken sandwich lies in its breading. We’re aiming for a craggy, golden-brown crust that audibly crunches with every bite. The cornstarch and baking powder are key players here, contributing to that desirable airy crispness. This breading will encapsulate all the delicious flavors of our spicy chicken and ensure it stays incredibly moist inside.

  1. In a wide, shallow dish or pie plate, combine the 2 cups all-purpose flour, 1/2 cup cornstarch, 1 tablespoon baking powder, 1 tablespoon smoked paprika, 1 teaspoon cayenne pepper, 1 teaspoon garlic powder, 1 teaspoon onion powder, 1 teaspoon salt, and 1/2 teaspoon black pepper.
  2. Whisk these dry ingredients together thoroughly until they are completely combined and there are no lumps. It’s important to make sure the spices are evenly distributed for consistent flavor.
  3. Prepare your dredging station: You’ll want your marinated chicken (straight from the fridge), the dry flour mixture, and a clean plate or wire rack ready to hold the breaded chicken.
  4. Working with one piece of chicken at a time, remove it from the buttermilk marinade, allowing any excess to drip off briefly. Do not pat it dry; the wet marinade is essential for the breading to adhere properly.
  5. Place the chicken into the dry flour mixture, pressing down firmly to ensure every inch is coated. Really pack that flour mixture onto the chicken.
  6. Now, here’s my pro tip for an extra crispy crust: Gently lift the chicken, shake off any loose flour, and then dip it back into the marinade very briefly – just a quick dip to re-moisten the surface without washing off the initial flour layer.
  7. Immediately return the chicken to the dry flour mixture for a second coating. Press firmly again, ensuring a thick, shaggy layer of breading forms. This double-dredging technique creates those coveted craggy bits that become super crispy when fried.
  8. Place the breaded chicken on a clean plate or a wire rack set over a baking sheet. Repeat this process with the remaining chicken pieces.
  9. Important: Let the breaded chicken rest at room temperature for at least 15-20 minutes before frying. This allows the breading to hydrate and adhere firmly to the chicken, preventing it from falling off during frying. This resting period is a small step that makes a huge difference in the crispiness and integrity of your spicy chicken sandwich crust.

Frying the Chicken: Achieving Golden, Crispy Perfection

Frying can seem intimidating, but with a few key principles, you’ll be turning out perfectly golden, crispy chicken every time. The goal is to cook the chicken through without burning the crust, and achieving that requires precise temperature control. This is the heart of our Spicy Chicken Sandwich With Creamy Homemade Sauce, where the magic truly happens.

  1. Pour the peanut, canola, or vegetable oil into a heavy-bottomed pot, Dutch oven, or deep fryer. You need enough oil to submerge the chicken pieces, usually about 3-4 inches deep.
  2. Heat the oil over medium-high heat until it reaches a temperature of 350°F (175°C). A deep-fry thermometer is your best friend here. Do not guess the temperature! If the oil is too cold, the chicken will be greasy; if it’s too hot, the outside will burn before the inside cooks.
  3. Once the oil is at the correct temperature, carefully lower 1-2 pieces of breaded chicken into the hot oil. Do not overcrowd the pot! Overcrowding will drop the oil temperature significantly, leading to soggy, poorly cooked chicken. Fry in batches if necessary.
  4. Fry the chicken for about 6-8 minutes per side, or until it’s deep golden brown, beautifully crispy, and cooked through. The internal temperature of the chicken should reach 165°F (74°C). Use an instant-read thermometer to check the thickest part of the chicken. The exact cooking time will depend on the thickness of your chicken pieces and the consistency of your oil temperature.
  5. Once cooked, carefully remove the chicken from the oil using tongs and transfer it to a wire rack set over a baking sheet lined with paper towels. This allows any excess oil to drain off and helps maintain the chicken’s crispiness. Immediately sprinkle a little extra salt over the hot chicken for enhanced flavor.
  6. Allow the cooked chicken to rest for a few minutes while you fry the remaining pieces. This resting period helps the juices redistribute, ensuring your chicken remains incredibly moist and tender.
  7. Keep an eye on your oil temperature between batches, adjusting the heat as needed to maintain that consistent 350°F (175°C). Patience and attention to detail here will result in the best fried chicken for your ultimate spicy chicken sandwich.

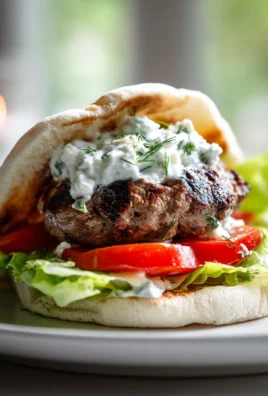
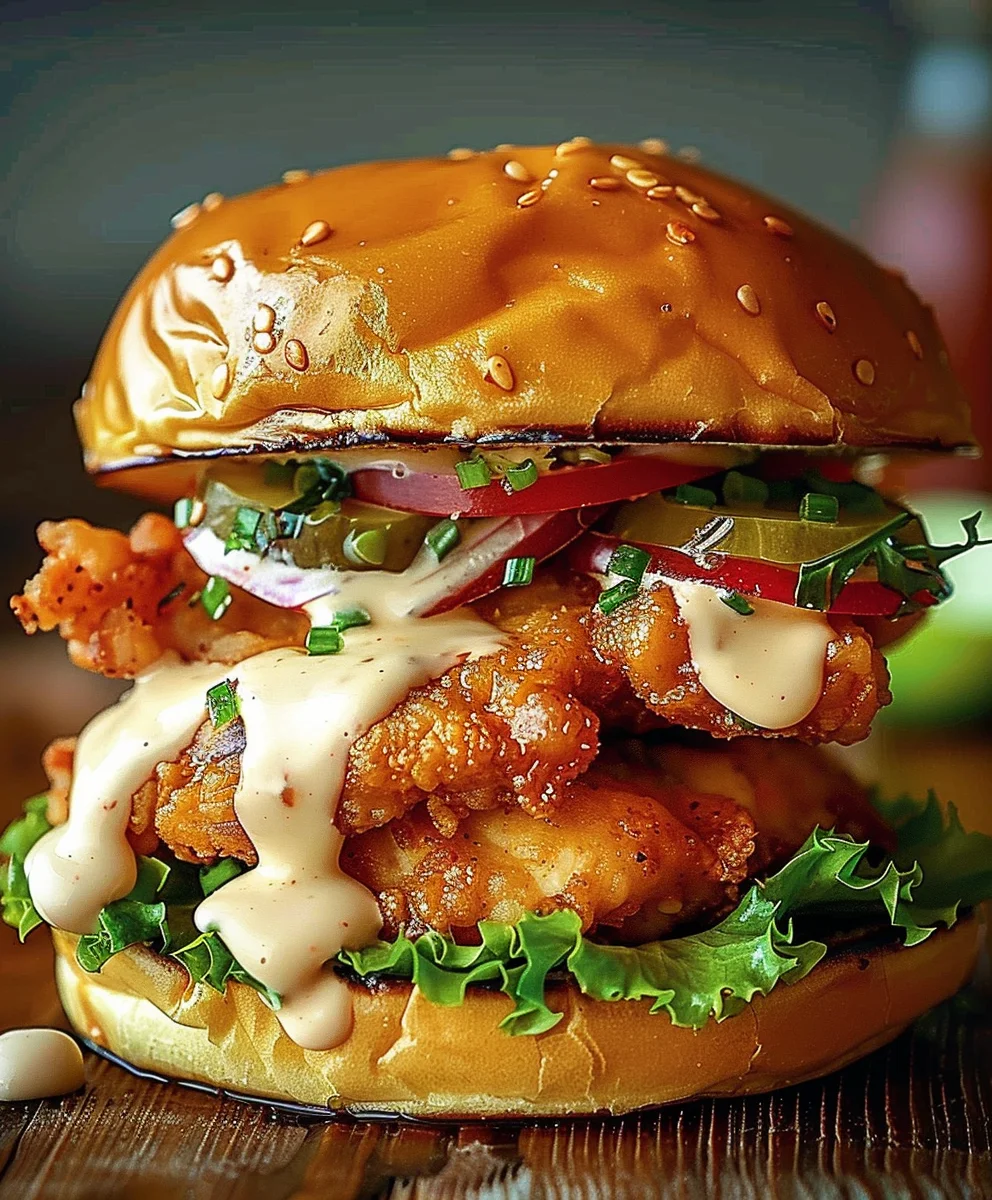
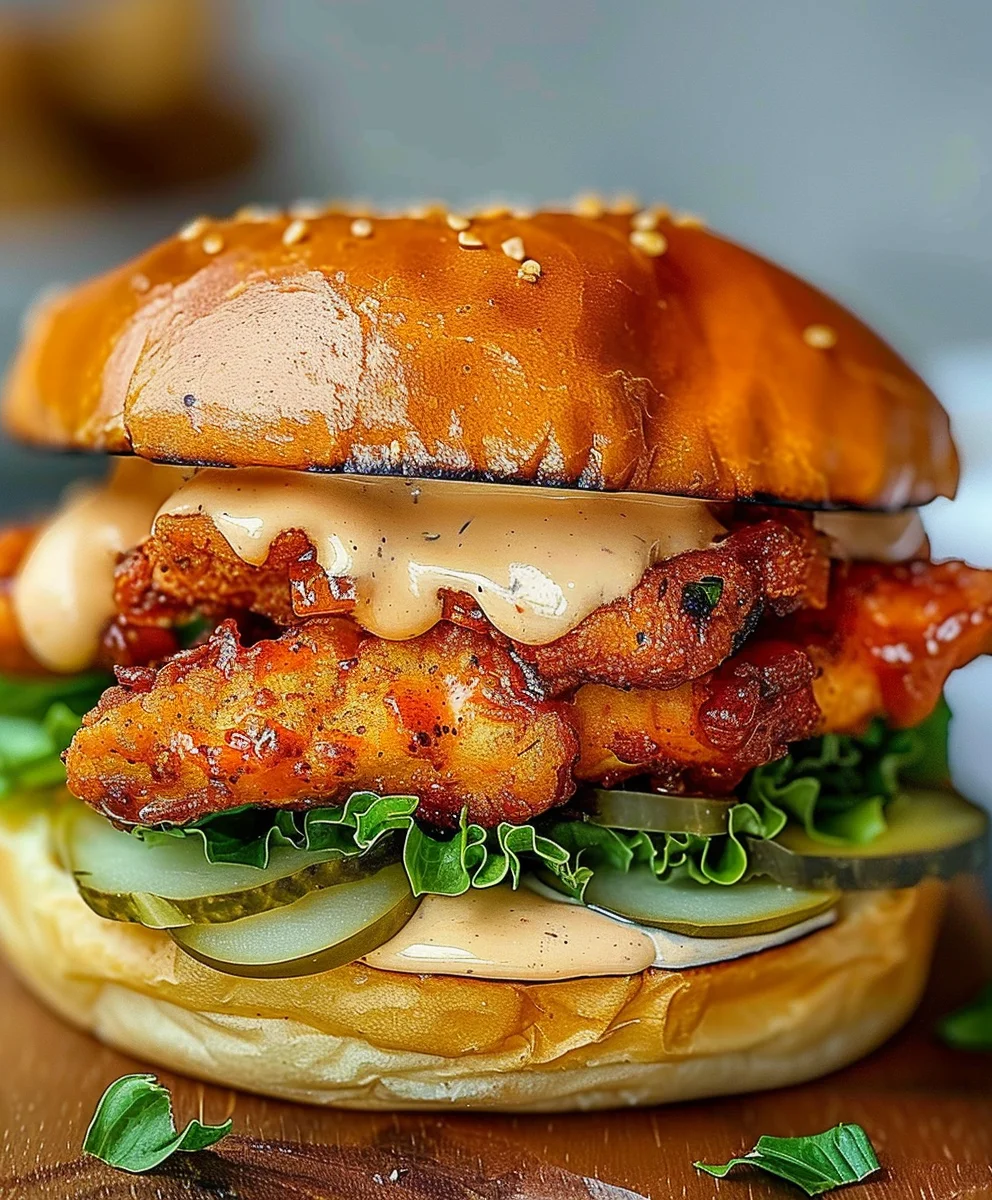
Assembling Your Ultimate Spicy Chicken Sandwich: The Grand Finale

With the chicken perfectly fried and the creamy homemade sauce chilled and ready, it’s time for the moment of truth: assembling your extraordinary Spicy Chicken Sandwich With Creamy Homemade Sauce. This is where all your hard work comes together in one glorious bite.

  1. Take your brioche buns and lightly toast them. You can do this in a dry pan, under the broiler, or in a toaster. A lightly toasted bun adds texture and prevents it from getting soggy from the sauce and chicken juices.
  2. On the bottom half of each toasted bun, spread a generous layer of your delicious Creamy Homemade Sauce. Don’t be shy; this sauce is absolutely essential!
  3. Next, layer on a few pickle chips. The briny, tangy crunch of the pickles is a crucial component that perfectly cuts through the richness of the fried chicken and sauce.
  4. Place a hot, crispy piece of fried spicy chicken on top of the pickles.
  5. Add a few leaves of fresh lettuce or some shredded lettuce. If you’re using tomato slices, now’s the time to add them. The fresh greens and optional tomato add a welcome crispness and freshness.
  6. Finish with another dollop of that amazing creamy homemade sauce on the top bun, then gently place the top bun onto your stacked masterpiece.
  7. Serve your Spicy Chicken Sandwich With Creamy Homemade Sauce immediately and prepare for an explosion of flavors and textures. Each bite delivers that incredible crunch, followed by juicy, spicy chicken, and the cooling, tangy embrace of the homemade sauce. This is truly a sandwich worth savoring!

Chef’s Notes & Variations for Your Spicy Chicken Sandwich:

  • Spice Level Adjustment: Feel free to adjust the amount of cayenne pepper in both the marinade and the breading to suit your heat preference. For a milder sandwich, you can reduce or omit the cayenne and use a less spicy hot sauce in the marinade and sauce. For extra heat, consider adding a pinch of dried chili flakes to the breading or a few dashes of ghost pepper hot sauce to the creamy homemade sauce.
  • Pickle Power: If you’re a pickle enthusiast, don’t hesitate to add extra pickle slices! The acidity and crunch are fantastic. You can even try different types of pickles, like spicy dill pickles, for an added kick.
  • Toppings Galore: While I prefer a classic build, feel free to experiment with other toppings like coleslaw for a different texture, or thinly sliced red onion for a sharper bite. A slice of melty cheddar or pepper jack cheese could also be added to the hot chicken right after frying.
  • Oil Management: If you’re frying multiple batches, the oil will inevitably get a bit dirty. You can strain the oil after cooling it down and reuse it for another fry, though its quality will diminish over time. Always discard oil safely once it’s no longer suitable for frying.
  • Make Ahead Tips: The chicken can be marinated overnight. The creamy homemade sauce can be made up to 2-3 days in advance and stored in the refrigerator. This makes the assembly much quicker on the day you plan to enjoy your spicy chicken sandwich.

Enjoy every glorious, crispy, juicy, and spicy bite of your homemade Spicy Chicken Sandwich With Creamy Homemade Sauce!

Best Spicy Chicken Sandwich & Creamy Homemade Sauce!

After walking you through every exciting step, from breading that succulent chicken to whipping up that irresistible, velvety sauce, we’ve finally arrived at the heart of the matter: why this recipe isn’t just another dish, but truly an experience you simply must create in your own kitchen. I genuinely believe that once you take that first bite, you’ll understand why I’m so passionate about this particular creation. This isn’t just about assembling ingredients; it’s about crafting a symphony of textures and flavors that dance on your palate. The perfect crunch of the expertly fried chicken, the tender and juicy interior, the exhilarating kick of spice that awakens your taste buds, and then, the hero of the hour – that utterly divine, creamy homemade sauce that brings everything into a harmonious, unforgettable balance. It’s a bold statement, but I promise, this isn’t just a sandwich; it’s an event, a culinary triumph that elevates a familiar comfort food into something truly extraordinary. Every element has been carefully considered to ensure maximum deliciousness, making this a recipe I’m incredibly proud to share with you, and one I can confidently say will earn a permanent spot in your rotation.

I know you’re eager to dig in, but before you do, let’s talk about enhancing this already perfect meal and making it uniquely yours. A classic accompaniment for any magnificent sandwich is, of course, a generous serving of crispy, golden fries – perhaps even seasoned with a dash of paprika or garlic powder for an extra layer of flavor. But don’t stop there! To truly complete the experience, I highly recommend pairing your creation with a refreshingly tangy coleslaw. The crisp cabbage and the slightly sweet, acidic dressing will provide a wonderful counterpoint to the richness and spice of the sandwich, cleansing your palate and inviting you back for more. Don’t forget a side of crunchy dill pickles, too; their sharp, briny kick is just what you need to cut through the creamy sauce and spicy chicken. For a lighter touch, a simple green salad with a bright vinaigrette can also be a fantastic option, adding freshness and a vibrant pop of color to your plate. The beauty of this meal is its versatility, allowing you to tailor the sides to your mood or what you have on hand, ensuring every serving is exactly what you crave.

Serving Suggestions & Creative Variations

Beyond the classic pairings, feel empowered to get creative with your serving! This Spicy Chicken Sandwich With Creamy Homemade Sauce is incredibly adaptable. Think about what goes inside: while I’ve provided the ultimate combination, feel free to experiment with additional toppings. A crisp piece of lettuce and a slice of ripe tomato can add a lovely freshness, while thinly sliced red onion might provide a delightful peppery bite. For those who love extra indulgence, a slice of melted cheese – perhaps sharp cheddar, zesty pepper jack, or mild provolone – can take the sandwich to another level of gooey deliciousness. Imagine the spicy chicken, the creamy sauce, and then that warm, melted cheese all coming together! And for the ultimate treat, a few strips of crispy, smoked bacon would add an incredible layer of savory depth and texture that is simply irresistible. Don’t be afraid to play with the buns either; while a classic brioche bun provides rich softness, a potato bun offers a delicate chew, and even a toasted ciabatta roll could add a wonderful crusty element. You could even swap out the protein entirely for a vegetarian twist; a perfectly grilled halloumi slice or a thick portobello mushroom cap could be a fantastic alternative, still allowing that incredible creamy sauce to shine. Want to adjust the spice level? Feel free to add more cayenne pepper or a dash of your favorite hot sauce to the chicken marinade for an extra fiery kick, or temper it down by reducing the amount of chili in the sauce. The possibilities are truly endless, limited only by your imagination, and each variation promises a delightful new adventure for your taste buds.

Your Turn to Create and Share!

Now, it’s your moment to shine! I’ve poured my heart into crafting this recipe for you, and I am absolutely confident that you’ll fall in love with the process and, most importantly, the incredible flavors you’ll create. Don’t be intimidated by making the sauce from scratch; it’s genuinely simpler than you might think, and the payoff is immense – far superior to any store-bought alternative. This is your invitation to step into the kitchen, gather those ingredients, and embark on a culinary adventure that promises to be both rewarding and utterly delicious. I truly believe that once you experience the magic of preparing and tasting your very own Spicy Chicken Sandwich With Creamy Homemade Sauce, it will become a cherished recipe in your home. I would absolutely love to hear about your experience! Please, don’t keep your triumphs to yourself. Share your photos, tell me about any creative twists you added, and let me know how it turned out in the comments below or on social media. Your feedback and personal stories are what truly inspire me and make this whole sharing process so incredibly rewarding. So go forth, cook with passion, and enjoy every single mouthwatering bite of this spectacular sandwich!


Spicy Chicken Sandwich With Creamy Homemade Sauce

Spicy Chicken Sandwich With Creamy Homemade Sauce

Embark on a culinary adventure with this definitive recipe for a truly incredible Spicy Chicken Sandwich. Featuring incredibly juicy, spicy chicken with a crisp, golden-brown crust, all brought together by a tangy, cooling, and utterly delicious homemade sauce. This recipe elevates your sandwich game to legendary status, offering a gourmet experience cherished by food enthusiasts worldwide.

Prep Time
45 Minutes

Cook Time
30 Minutes

Total Time
15 Minutes

Servings
4 servings

Ingredients

  • 4 boneless, skinless chicken thighs (1.5-2 lbs total) OR chicken breasts, butterflied/pounded
  • 2 cups buttermilk
  • 1/4 cup hot sauce (Louisiana-style preferred)
  • 1 tbsp smoked paprika
  • 1 tsp cayenne pepper (adjust to taste)
  • 1 tsp garlic powder
  • 1 tsp onion powder
  • 1 tsp salt
  • 1/2 tsp freshly ground black pepper
  • 2 cups all-purpose flour
  • 1/2 cup cornstarch
  • 1 tbsp baking powder
  • 1 tbsp smoked paprika
  • 1 tsp cayenne pepper
  • 1 tsp garlic powder
  • 1 tsp onion powder
  • 1 tsp salt
  • 1/2 tsp freshly ground black pepper
  • 1 cup good quality mayonnaise
  • 1/4 cup hot sauce
  • 2 tbsp pickle juice (dill)
  • 1 tsp granulated sugar or honey
  • 1/2 tsp garlic powder
  • 1/2 tsp onion powder
  • 1/4 tsp smoked paprika
  • Pinch of salt and black pepper to taste
  • 6-8 cups peanut, canola, or vegetable oil (for frying)
  • 4 brioche buns, split and lightly toasted
  • 1/2 cup dill pickle chips
  • Green leaf or iceberg lettuce
  • Tomato slices (optional)

Instructions

  1. Step 1
    Trim chicken thighs or pound chicken breasts to an even 1/2-inch thickness. In a large bowl or bag, combine buttermilk, 1/4 cup hot sauce, 1 tbsp smoked paprika, 1 tsp cayenne, 1 tsp garlic powder, 1 tsp onion powder, 1 tsp salt, and 1/2 tsp black pepper. Whisk well. Add chicken, ensuring it’s fully coated. Refrigerate for at least 4 hours, or ideally 8-12 hours (overnight).
  2. Step 2
    In a medium bowl, combine 1 cup mayonnaise, 1/4 cup hot sauce, 2 tbsp pickle juice, 1 tsp sugar or honey, 1/2 tsp garlic powder, 1/2 tsp onion powder, and 1/4 tsp smoked paprika. Whisk until smooth. Taste and adjust seasonings. Cover and refrigerate for at least 30 minutes to allow flavors to meld.
  3. Step 3
    In a wide dish, combine 2 cups all-purpose flour, 1/2 cup cornstarch, 1 tbsp baking powder, 1 tbsp smoked paprika, 1 tsp cayenne, 1 tsp garlic powder, 1 tsp onion powder, 1 tsp salt, and 1/2 tsp black pepper. Whisk thoroughly. Remove chicken from marinade (do not pat dry). Coat firmly in flour mixture. For extra crispiness, dip briefly back into marinade, then return to flour for a second coating, pressing firmly. Place breaded chicken on a wire rack and let rest at room temperature for 15-20 minutes before frying.
  4. Step 4
    Heat 6-8 cups peanut, canola, or vegetable oil in a heavy pot or Dutch oven to 350°F (175°C), using a deep-fry thermometer. Carefully lower 1-2 pieces of breaded chicken into the hot oil, avoiding overcrowding. Fry for about 6-8 minutes per side, until deep golden brown, crispy, and cooked through (internal temperature 165°F/74°C). Remove to a wire rack set over paper towels. Immediately sprinkle with a little extra salt. Let rest a few minutes while frying remaining pieces, maintaining oil temperature.
  5. Step 5
    Lightly toast brioche buns. Spread a generous layer of Creamy Homemade Sauce on the bottom bun. Layer on pickle chips, then a hot, crispy fried chicken piece. Add lettuce and optional tomato slices. Add another dollop of sauce to the top bun, then place onto your stacked masterpiece. Serve immediately and enjoy!

Important Information

Nutrition Facts (Per Serving)

It is important to consider this information as approximate and not to use it as definitive health advice.

Allergy Information

Please check ingredients for potential allergens and consult a health professional if in doubt.

« Previous Post
Delicious Pumpkin Cornbread & Cinnamon Honey Butter Recipe
Next Post »
Huli Huli Chicken Recipe: Sweet, Smoky & Easy BBQ!

If you enjoyed this…

Das Butter Chicken: Rich, Creamy Tomato Chicken Recipe

Crispy Teriyaki Tofu & Avocado Rice Stack – Easy Recipe!

Best Rotisserie Chicken Mushroom Soup for Quick Meals

Primary Sidebar

Browse by Diet

BreakfastDinnerLunchDessertAppetizer

Sweet Peach Yogurt Parfait Delight

One of my fondest memories is from a lazy summer afternoon spent at my grandmother’s house. The sun filtered through the kitchen window, casting a warm glow over the table where she would create her culinary magic. It was during one of those blissful moments that I first tasted her Peach Yogurt Parfait with Honey and Granola. The sweet aroma of ripe peaches mingling with creamy yogurt and the crunch of granola was nothing short of heavenly. It felt like summer captured in a bowl, and I still remember the joy of diving in with a spoon, each layer revealing a new burst of flavor.

When I think about that parfait, I can almost hear the gentle hum of the bees outside, reminding me of the floral notes that honey brings to every bite. The vibrant yellows and soft oranges of the peaches contrast beautifully with the creamy white yogurt and the golden crunch of granola. It’s a dish that not only looks delightful but also tastes like a celebration of fresh, wholesome ingredients.

What makes my version of this Peach Yogurt Parfait special is the careful balance of flavors and textures. I use ripe, juicy peaches, drizzled with locally sourced honey, and a homemade granola that’s bursting with nuts and seeds for an extra crunch. It’s a simple dish, but every layer is crafted with love and attention.

Let me show you exactly how to make this delightful parfait, so you can bring a bit of that summer magic into your kitchen!

Sweet Peach Yogurt Parfait Delight

Why You’ll Love This Recipe

  • Delightfully creamy texture from the Greek yogurt, paired with the juicy sweetness of fresh peaches.
  • Ready in under 20 minutes, making it a quick and satisfying breakfast or snack option.
  • Budget-friendly, using common ingredients that you may already have in your pantry.
  • Customizable with your favorite granola and nuts, allowing you to tailor each parfait to your taste.
  • Perfectly balanced flavors with the bright acidity of lemon juice and the sweetness of honey enhancing the peaches.

Ingredients

  • For the Parfait:
  • 2 cups plain Greek yogurt (or vanilla yogurt for a sweeter option)
  • 2 large ripe peaches, diced (about 2 cups)
  • 1 tablespoon fresh lemon juice (to prevent browning of peaches)
  • 2 tablespoons honey (plus more for drizzling)
  • 1 teaspoon vanilla extract (optional for extra flavor)
  • For the Granola:
  • 1 cup granola (store-bought or homemade; see notes for a simple granola recipe)
  • 1/4 cup sliced almonds (optional for added crunch)
  • 1/4 cup shredded coconut (optional for added flavor)

Let’s dive into some key ingredients that make this Peach Yogurt Parfait so delightful! First, the Greek yogurt is not only creamy but also packed with protein, making it a satisfying option for breakfast or a snack. If you’re looking for a sweeter option, you can easily substitute it with vanilla yogurt, though it may alter the overall flavor balance. Next, the ripe peaches are the star of the show; their natural sweetness shines through, so I recommend choosing peaches that yield slightly to pressure, indicating they’re perfectly ripe. If peaches aren’t in season, feel free to use nectarines or even frozen peaches—just thaw them before use. Finally, honey adds a lovely floral sweetness that ties everything together. If you prefer, maple syrup can serve as a delicious substitute.

Step-by-Step Instructions

  1. Start by preparing the peaches. Wash them thoroughly, then slice and dice them into bite-sized pieces. In a medium bowl, toss the diced peaches with 1 tablespoon of fresh lemon juice to prevent browning. Set aside for about 5 minutes while the lemon juice works its magic.
  2. In a separate bowl, combine the Greek yogurt, 2 tablespoons of honey, and 1 teaspoon of vanilla extract if using. Stir the mixture until smooth and thoroughly blended. This should take about a minute. Avoid overmixing to maintain the creaminess of the yogurt.
  3. Now it’s time to layer your parfait. Grab a clear glass or bowl to showcase your beautiful creation. Start with a generous spoonful of the yogurt mixture at the bottom—about 1/4 cup will do. Use a spoon to spread it evenly.
  4. Add a layer of the diced peaches over the yogurt, ensuring they cover the yogurt completely. You might want to use about half of what you have prepared—roughly 1 cup. This layer should be visually appealing, so arrange the peaches neatly.
  5. Sprinkle 1/4 cup of granola over the peaches. This adds a delightful crunch. Make sure to distribute it evenly to ensure every bite has that satisfying texture. Avoid packing it down too tightly, as you want it to maintain its crunch.
  6. Repeat the layers: spoon in another 1/4 cup of yogurt, followed by another cup of peaches, and another sprinkle of granola. You should have at least two layers, but feel free to add more depending on your glass size.
  7. Finish off your parfait with a drizzle of honey on top for added sweetness and a touch of elegance. If you’re using sliced almonds or shredded coconut, sprinkle them on top now. It adds a lovely visual contrast and extra flavor.
  8. Serve immediately or refrigerate for up to 30 minutes before serving to allow the flavors to meld together. However, I recommend enjoying it fresh to maintain the granola’s crunch.

Pro Tips for the Best Peach Yogurt Parfait With Honey And Granola

  • Make sure to choose ripe peaches for the best flavor and texture. A common mistake is using unripe fruit, which can lead to a less enjoyable parfait. Look for peaches that are fragrant and slightly soft to the touch.
  • Use a clear glass to assemble your parfait; this not only makes for a beautiful presentation but also allows you to see the colorful layers, which adds to the enjoyment of eating it.
  • For an even creamier texture, consider whipping the Greek yogurt with a hand mixer for a couple of minutes before layering. This small adjustment makes a huge difference in mouthfeel.
  • Be mindful of the granola-to-yogurt ratio. Too much granola can overwhelm the parfait, while too little can make it feel too creamy. Aim for about 1/4 cup of granola per layer for the perfect balance.
  • If you’re making this for a gathering, consider preparing the yogurt and peaches ahead of time and layering them just before serving. This ensures the granola stays crunchy!

Variations & Serving Ideas

There are so many ways to get creative with your Peach Yogurt Parfait! For a tropical twist, swap out the peaches for mangoes or pineapples and top with coconut flakes. If you prefer a berry flavor, mix in some blueberries or strawberries with the peaches for added color and taste. For a nutty version, incorporate chopped walnuts or pecans instead of almonds.

As for serving ideas, this parfait pairs beautifully with a side of scrambled eggs for a hearty breakfast or fresh fruit salad for a light lunch. You might also enjoy it alongside whole grain toast with almond butter for an energizing snack. The contrast of flavors and textures will elevate your meal experience!

Storage, Make-Ahead & Reheating

The Peach Yogurt Parfait is best enjoyed fresh, but you can prepare some components ahead of time. Store the layered parfait in an airtight container in the refrigerator for up to 24 hours. However, be cautious; the granola may lose its crunch if stored too long. You can freeze the yogurt and peach mixture for up to 2 months; just remember to thaw it in the refrigerator overnight before serving.

If you plan to enjoy this dish the next day, it can taste even better as the flavors meld together. Just remember to add the granola right before serving to keep its delightful crunch!

Frequently Asked Questions

Can I make Peach Yogurt Parfait With Honey And Granola ahead of time?

Yes — in fact, it tastes even better the next day as the flavors meld. However, I recommend waiting to add the granola until just before serving to maintain its crunch.

What can I substitute for Greek yogurt?

If you prefer a lighter option, you can substitute Greek yogurt with regular yogurt or a dairy-free alternative like coconut yogurt. Just remember that this may alter the creaminess and flavor profile slightly.

Can I use frozen peaches for this parfait?

Absolutely! Just make sure to thaw the frozen peaches before using them. They will still add great flavor, though the texture may be slightly softer than fresh peaches.

How do I make the parfait vegan?

To make a vegan version, substitute the Greek yogurt with a plant-based yogurt alternative, and replace honey with maple syrup or agave nectar. This keeps the parfait sweet while adhering to a vegan diet.

What other fruits can I use in this recipe?

You can mix and match fruits based on your preference. Try using strawberries, blueberries, raspberries, or even bananas. Just make sure to adjust the lemon juice as needed to prevent browning.

Sweet Peach Yogurt Parfait Delight

Final Thoughts

The Peach Yogurt Parfait with Honey and Granola is a delightful blend of creamy yogurt, sweet peaches, and crunchy granola that creates a satisfying and nourishing treat. Each layer bursts with flavor, making it a perfect choice for breakfast or a light dessert.

This is the kind of recipe I come back to again and again, especially when I want something refreshing and wholesome to start my day. The harmony of sweet and tart flavors, combined with the delightful crunch, never fails to lift my spirits!

I encourage you to give this parfait a try and indulge in its comforting goodness. Feel free to share your results or even add your own twist—perhaps a sprinkle of cinnamon or a handful of nuts. Enjoy creating your perfect parfait!

Print
clock clock iconcutlery cutlery iconflag flag iconfolder folder iconinstagram instagram iconpinterest pinterest iconfacebook facebook iconprint print iconsquares squares iconheart heart iconheart solid heart solid icon

Peach Yogurt Parfait


  • Author: Lily author
  • Total Time: 15 minutes
  • Yield: 4 servings 1x
Pin Recipe
Print Recipe

Description

This Peach Yogurt Parfait combines creamy Greek yogurt, juicy peaches, and crunchy granola for a delightful treat. It’s a perfect breakfast or snack that captures the essence of summer in every bite.


Ingredients

Scale
  • For the Parfait:
  • 2 cups plain Greek yogurt (or vanilla yogurt for a sweeter option)
  • 2 large ripe peaches, diced (about 2 cups)
  • 1 tablespoon fresh lemon juice (to prevent browning of peaches)
  • 2 tablespoons honey (plus more for drizzling)
  • 1 teaspoon vanilla extract (optional for extra flavor)
  • For the Granola:
  • 1 cup granola (store-bought or homemade; see notes for a simple granola recipe)
  • 1/4 cup sliced almonds (optional for added crunch)
  • 1/4 cup shredded coconut (optional for added flavor)

Instructions

  1. Start by preparing the peaches. Wash them thoroughly, then slice and dice them into bite-sized pieces. In a medium bowl, toss the diced peaches with 1 tablespoon of fresh lemon juice to prevent browning. Set aside for about 5 minutes while the lemon juice works its magic.
  2. In a separate bowl, combine the Greek yogurt, 2 tablespoons of honey, and 1 teaspoon of vanilla extract if using. Stir the mixture until smooth and thoroughly blended. This should take about a minute. Avoid overmixing to maintain the creaminess of the yogurt.
  3. Now it’s time to layer your parfait. Grab a clear glass or bowl to showcase your beautiful creation. Start with a generous spoonful of the yogurt mixture at the bottom—about 1/4 cup will do. Use a spoon to spread it evenly.
  4. Add a layer of the diced peaches over the yogurt, ensuring they cover the yogurt completely. You might want to use about half of what you have prepared—roughly 1 cup. This layer should be visually appealing, so arrange the peaches neatly.
  5. Sprinkle 1/4 cup of granola over the peaches. This adds a delightful crunch. Make sure to distribute it evenly to ensure every bite has that satisfying texture. Avoid packing it down too tightly, as you want it to maintain its crunch.
  6. Repeat the layers: spoon in another 1/4 cup of yogurt, followed by another cup of peaches, and another sprinkle of granola. You should have at least two layers, but feel free to add more depending on your glass size.
  7. Finish off your parfait with a drizzle of honey on top for added sweetness and a touch of elegance. If you’re using sliced almonds or shredded coconut, sprinkle them on top now. It adds a lovely visual contrast and extra flavor.
  8. Serve immediately or refrigerate for up to 30 minutes before serving to allow the flavors to meld together. However, I recommend enjoying it fresh to maintain the granola’s crunch.
  • Prep Time: 15 mins
  • Cook Time: 0 mins
  • Category: Breakfast
  • Method: No-cook
  • Cuisine: American

Nutrition

  • Serving Size: 1 parfait
  • Calories: 250
  • Sugar: 20 g
  • Sodium: 50 mg
  • Fat: 5 g
  • Saturated Fat: 2 g
  • Unsaturated Fat: 3 g
  • Trans Fat: 0 g
  • Carbohydrates: 40 g
  • Fiber: 3 g
  • Protein: 10 g
  • Cholesterol: 10 mg

Keywords: Choose ripe peaches for the best flavor and texture. Use a clear glass for a beautiful presentation. For creaminess, consider whipping the yogurt before layering. Be mindful of the granola-to-yogurt ratio. Prepare yogurt and peaches ahead of time for gatherings, layering just before serving.

Did you make this recipe?

Share a photo and tag us — we can't wait to see what you've made!

Sun-Kissed Frozen Orange Cream Slush

As a child, summer days felt like they lasted forever. I remember the sticky heat wrapping around me as I played outside, my laughter mingling with the sounds of the neighborhood. But nothing could cool me down quite like the moment I’d spot my grandmother, laboring over her blender, whipping up her famous Frozen Orange Creamsicle Slush. That vibrant orange treat, with its frosty texture and sweet citrus aroma, was like a burst of sunshine in a cup. Just one sip, and I could feel the coolness wash over me, sparking pure joy.

This Frozen Orange Creamsicle Slush has a way of making you feel like a kid again. Its creamy, dreamy consistency is a delightful balance of bright orange and soft vanilla, inviting you to dive right in. The refreshing tang of orange dances on your tongue, while the smooth creaminess envelops you in a comforting embrace. It’s a nostalgic treat that’s perfect for hot summer afternoons or anytime you need a little pick-me-up.

What makes my version of this slush stand out is the addition of a hint of vanilla bean, which elevates the flavor and adds an extra layer of richness. Plus, it’s super easy to whip up with just a few simple ingredients that you probably already have on hand! So, if you’re ready to relive those sun-soaked memories, let me show you exactly how to make it.

Sun-Kissed Frozen Orange Cream Slush

Why You’ll Love This Recipe

  • Each slush is a perfect blend of creamy vanilla and zesty orange, creating a nostalgic flavor reminiscent of summer days.
  • This refreshing treat is ready in under 15 minutes, making it an ideal quick dessert for unexpected guests or hot afternoons.
  • With just 8 simple ingredients, it’s budget-friendly, ensuring you don’t have to break the bank to enjoy a delicious slush.
  • The slush has a perfectly smooth texture, thanks to the combination of ice and ice cream, providing a delightful contrast to the bright citrus flavors.
  • It’s highly customizable; you can easily adjust the sweetness and add fresh herbs for a unique twist that suits your taste.

Ingredients

  • 2 cups orange juice (freshly squeezed or store-bought)
  • 1 cup vanilla ice cream
  • 1 cup crushed ice
  • 1/2 cup milk (whole or 2%)
  • 1/4 cup granulated sugar (adjust based on sweetness preference)
  • 1 teaspoon vanilla extract
  • Zest of 1 orange (for added flavor)
  • Fresh orange slices and mint leaves (for garnish)

The star of this Frozen Orange Creamsicle Slush is the orange juice, which provides the vibrant, citrusy base. Freshly squeezed juice will yield the brightest flavor, but store-bought options can be just as convenient. If you’re opting for store-bought, choose 100% pure juice with no added sugars for the best results. Another essential ingredient is the vanilla ice cream; it adds creaminess and sweetness. You can substitute it with dairy-free ice cream if you’re looking for a vegan option. Whole or 2% milk complements the ice cream, creating a smooth blend. If you want a lower-calorie version, almond or oat milk can be good alternatives.

Lastly, the granulated sugar can be adjusted based on your sweetness preference. If you prefer a more natural sweetener, consider using honey or agave syrup. The orange zest enhances the flavor profile, providing an aromatic pop that brings the whole slush together. Don’t skip it! It adds an extra layer of brightness that makes this slush truly special.

Step-by-Step Instructions

  1. Start by preparing your ingredients. Gather 2 cups of orange juice, 1 cup of vanilla ice cream, and 1 cup of crushed ice. Make sure the ice is finely crushed, as larger chunks can make blending difficult.
  2. In a blender, combine the orange juice, vanilla ice cream, crushed ice, and 1/2 cup of milk. Add 1/4 cup of granulated sugar and 1 teaspoon of vanilla extract. If you like a sweeter slush, consider adding a bit more sugar at this stage.
  3. Add the zest of 1 orange to the blender. This step is crucial for enhancing the citrus flavor of your slush. Make sure not to include the bitter white pith—only the flavorful zest.
  4. Blend the mixture on medium-high speed for about 30-45 seconds. Stop once the ingredients are fully combined and the slush has a smooth, even consistency. If you notice large chunks of ice, blend for an additional 10-15 seconds. Avoid over-blending, as this can make the slush too liquidy.
  5. Once blended, taste the slush. If it needs more sweetness, add a little more sugar and blend for a few more seconds. If it’s too thick, you can add a splash of milk to reach your desired consistency.
  6. Pour the slush into glasses. This recipe typically serves 4, but you can easily double it for larger gatherings. Use a spoon to help guide the slush into the glasses if needed.
  7. Garnish each serving with fresh orange slices and mint leaves. The mint not only adds a pop of color but also a refreshing aroma that complements the citrus flavors beautifully.
  8. Serve immediately and enjoy! If you’ve made extra, you can refrigerate it for a short time, but it’s best enjoyed fresh.

Pro Tips for the Best Frozen Orange Creamsicle Slush

  • Don’t skip the orange zest! It’s a game-changer for flavor. Always zest before juicing to make it easier.
  • Use a high-powered blender for the best texture. A standard blender may struggle with ice, leading to uneven consistency. If you have a food processor, that can work too, but ensure the ice is finely crushed.
  • Adjust the ice-to-liquid ratio carefully. If your slush is too thick, it won’t blend well. Start with less ice and add more until you reach your preferred texture.
  • Be cautious with the sugar! Always start with the lower amount, as you can easily add more, but it’s hard to fix an overly sweet slush.
  • For a fun twist, consider adding a splash of coconut milk or a handful of fresh fruit like strawberries or pineapple. This not only enhances the flavor but also adds a beautiful color contrast.

Variations & Serving Ideas

There are countless ways to put a spin on your Frozen Orange Creamsicle Slush. Consider making a tropical version by adding in some pineapple juice or coconut milk for a delightful tropical twist. If you’re feeling adventurous, try incorporating a handful of frozen mango or peach slices for added sweetness. For a lighter version, swap out the vanilla ice cream for Greek yogurt for a creamy yet tangy alternative.

As for serving ideas, this refreshing slush pairs wonderfully with light summer dishes like grilled chicken skewers, fish tacos, or a simple salad topped with citrus vinaigrette. The bright, zesty flavors of the slush complement these dishes perfectly, making them an ideal pairing for a sunny day.

Storage, Make-Ahead & Reheating

This Frozen Orange Creamsicle Slush is best enjoyed fresh, but if you have leftovers, you can store them in an airtight container in the fridge for up to 2 days. Just keep in mind that the slush may lose some of its texture over time as the ice melts. It doesn’t freeze well, as the ice will turn into a solid block. If you must freeze it, blend again after thawing to restore the slushy consistency. This treat is best the day you make it, as the flavors meld together beautifully overnight, enhancing its deliciousness.

Frequently Asked Questions

Can I make Frozen Orange Creamsicle Slush ahead of time?

Yes — in fact, it tastes even better the next day as the flavors meld. However, it’s best to enjoy it fresh, as the texture can change if stored for too long. If you need to prepare it ahead, keep it in the fridge and re-blend before serving.

What kind of orange juice should I use?

For the best flavor, use freshly squeezed orange juice. However, if you’re short on time, opt for 100% pure store-bought juice without added sugars. This will ensure that your slush remains flavorful and refreshing.

Can I substitute the vanilla ice cream?

Absolutely! If you’re looking for a dairy-free option, coconut milk ice cream or a non-dairy vanilla ice cream can work wonderfully. They will still provide the creamy texture and sweetness you desire.

How can I adjust the sweetness of my slush?

You can easily adjust the sweetness by modifying the amount of sugar added. Start with 1/4 cup and taste the mixture before blending. If you prefer it sweeter, add more sugar gradually until it reaches your desired level.

What should I do if my slush is too thick?

If your slush is too thick, simply add a splash of milk or orange juice and blend again. This will help achieve a more drinkable consistency while maintaining the slushy texture. Adjust gradually to reach your preferred thickness.

Sun-Kissed Frozen Orange Cream Slush

Final Thoughts

The Frozen Orange Creamsicle Slush is a delightful blend of refreshing citrus and creamy goodness, making it a perfect treat for warm days or any time you crave a taste of nostalgia. The way the bright orange flavor dances with the creamy texture truly elevates this slush, transforming it into a satisfying escape from the everyday.

This is the kind of recipe I come back to again and again, especially when I’m looking to cool down or impress guests at a summer gathering. It’s simple to make and always brings smiles all around! I encourage you to try this recipe for yourself—don’t hesitate to share your results or even put your own spin on it. Happy slushing!

Print
clock clock iconcutlery cutlery iconflag flag iconfolder folder iconinstagram instagram iconpinterest pinterest iconfacebook facebook iconprint print iconsquares squares iconheart heart iconheart solid heart solid icon

Frozen Orange Creamsicle Slush


  • Author: Lily author
  • Total Time: 15 minutes
  • Yield: 4 servings 1x
Pin Recipe
Print Recipe

Description

This Frozen Orange Creamsicle Slush is a refreshing treat that combines creamy vanilla and zesty orange flavors. Perfect for hot summer days, it brings back nostalgic memories with every sip.


Ingredients

Scale
  • 2 cups orange juice (freshly squeezed or store-bought)
  • 1 cup vanilla ice cream
  • 1 cup crushed ice
  • 1/2 cup milk (whole or 2%)
  • 1/4 cup granulated sugar (adjust based on sweetness preference)
  • 1 teaspoon vanilla extract
  • Zest of 1 orange (for added flavor)
  • Fresh orange slices and mint leaves (for garnish)

Instructions

  1. Start by preparing your ingredients. Gather 2 cups of orange juice, 1 cup of vanilla ice cream, and 1 cup of crushed ice. Make sure the ice is finely crushed, as larger chunks can make blending difficult.
  2. In a blender, combine the orange juice, vanilla ice cream, crushed ice, and 1/2 cup of milk. Add 1/4 cup of granulated sugar and 1 teaspoon of vanilla extract. If you like a sweeter slush, consider adding a bit more sugar at this stage.
  3. Add the zest of 1 orange to the blender. This step is crucial for enhancing the citrus flavor of your slush. Make sure not to include the bitter white pith—only the flavorful zest.
  4. Blend the mixture on medium-high speed for about 30-45 seconds. Stop once the ingredients are fully combined and the slush has a smooth, even consistency. If you notice large chunks of ice, blend for an additional 10-15 seconds. Avoid over-blending, as this can make the slush too liquidy.
  5. Once blended, taste the slush. If it needs more sweetness, add a little more sugar and blend for a few more seconds. If it’s too thick, you can add a splash of milk to reach your desired consistency.
  6. Pour the slush into glasses. This recipe typically serves 4, but you can easily double it for larger gatherings. Use a spoon to help guide the slush into the glasses if needed.
  7. Garnish each serving with fresh orange slices and mint leaves. The mint not only adds a pop of color but also a refreshing aroma that complements the citrus flavors beautifully.
  8. Serve immediately and enjoy! If you’ve made extra, you can refrigerate it for a short time, but it's best enjoyed fresh.
  • Prep Time: 15 min
  • Cook Time: 0 min
  • Category: Dessert
  • Method: Blending
  • Cuisine: American

Nutrition

  • Serving Size: 1 serving
  • Calories: 200
  • Sugar: 30 g
  • Sodium: 50 mg
  • Fat: 5 g
  • Saturated Fat: 3 g
  • Unsaturated Fat: 2 g
  • Trans Fat: 0 g
  • Carbohydrates: 40 g
  • Fiber: 1 g
  • Protein: 2 g
  • Cholesterol: 20 mg

Keywords: Don't skip the orange zest! It's a game-changer for flavor. Always zest before juicing to make it easier.

Did you make this recipe?

Share a photo and tag us — we can't wait to see what you've made!

Zesty Lemon Poppy Seed Delight

One rainy afternoon, I found myself in my grandmother’s cozy kitchen, the kind that always smelled like warmth and love. She was whipping up her famous Lemon Poppy Seed Loaf, a recipe that had been passed down through generations. As the batter came together, the zesty aroma of fresh lemons filled the air, mingling perfectly with the nutty fragrance of poppy seeds. I can still picture her, apron-clad, as she expertly drizzled a vibrant citrus icing over the loaf, creating a glossy, sun-kissed finish that beckoned us to dive in. It was a moment that sparked my own passion for baking, and this recipe has become a cherished staple in my home ever since.

When you take a bite of this Lemon Poppy Seed Loaf, it’s like a burst of sunshine on your palate. The loaf is beautifully golden, with a tender crumb that melts in your mouth. Each slice is speckled with tiny poppy seeds, adding a delightful crunch that contrasts beautifully with the tangy sweetness of the lemon. And that citrus icing? It’s the finishing touch that elevates this loaf from ordinary to extraordinary, with its bright, zesty flavor dancing on your taste buds.

This recipe stands out because it embraces simplicity while delivering on flavor. I’ve added a hint of vanilla to the batter, enhancing the overall taste and making it even more indulgent. Trust me, once you make this Lemon Poppy Seed Loaf With Citrus Icing, it’ll become a go-to in your baking repertoire.

So, let me show you exactly how to make it!

Zesty Lemon Poppy Seed Delight

Why You’ll Love This Recipe

  • Moist and tender crumb that melts in your mouth, thanks to the perfect balance of butter and buttermilk.
  • Bright, zesty lemon flavor paired with crunchy poppy seeds, creating a delightful texture and taste experience.
  • Easy to whip up in just about an hour, perfect for last-minute gatherings or a cozy afternoon treat.
  • Budget-friendly with everyday ingredients, making it an accessible option for all home bakers.
  • The citrus icing adds a sweet tang that elevates the loaf, turning a simple recipe into a showstopper!

Ingredients

  • 1 ½ cups (190g) all-purpose flour
  • 1 teaspoon baking powder
  • ½ teaspoon baking soda
  • ½ teaspoon salt
  • 3 tablespoons poppy seeds
  • ½ cup (115g) unsalted butter, softened to room temperature
  • 1 cup (200g) granulated sugar
  • 2 large eggs
  • 1 teaspoon vanilla extract
  • 1 teaspoon lemon zest (from about 1 medium lemon)
  • ½ cup (120ml) buttermilk
  • 2 tablespoons fresh lemon juice

For the Citrus Icing:

  • 1 cup (120g) powdered sugar
  • 2 tablespoons fresh lemon juice
  • 1 tablespoon orange juice
  • 1 teaspoon lemon zest (for garnish, optional)

Let’s dive into the key ingredients that make this Lemon Poppy Seed Loaf so special. The all-purpose flour provides the structure and base for the loaf, while the baking powder and baking soda ensure it rises perfectly, giving the loaf a light texture. For a gluten-free variation, you could substitute the flour with a gluten-free all-purpose blend. Poppy seeds not only add a delightful crunch but also contribute to the unique flavor profile that pairs well with the citrus notes.

Unsalted butter is crucial for achieving the buttery richness that makes this loaf so moist. If you’re looking for a dairy-free option, coconut oil or a vegan butter can be used instead. The buttermilk is another essential component, providing acidity that activates the baking soda for a fluffy texture. If you don’t have buttermilk on hand, you can easily make a substitute by mixing ½ cup of milk with 1 tablespoon of vinegar or lemon juice and letting it sit for about 5 minutes.

Step-by-Step Instructions

  1. Preheat your oven to 350°F (175°C). Grease a 9×5-inch loaf pan or line it with parchment paper for easy removal later.
  2. In a medium mixing bowl, whisk together 1 ½ cups of all-purpose flour, 1 teaspoon of baking powder, ½ teaspoon of baking soda, ½ teaspoon of salt, and 3 tablespoons of poppy seeds. This helps to evenly distribute the baking agents and ensures a uniform rise.
  3. In a large mixing bowl, cream together ½ cup of softened unsalted butter and 1 cup of granulated sugar using an electric mixer on medium speed for about 3-4 minutes, until the mixture is light and fluffy. Make sure to scrape down the sides of the bowl occasionally.
  4. Add 2 large eggs, 1 teaspoon of vanilla extract, and 1 teaspoon of lemon zest to the creamed butter and sugar, mixing until fully combined. You want a smooth consistency, so ensure there are no lumps of butter.
  5. In a small bowl, combine ½ cup of buttermilk and 2 tablespoons of fresh lemon juice. Alternately add the dry ingredients and buttermilk mixture to the butter mixture, starting and ending with the dry ingredients. Mix just until combined; do not overmix, as this can lead to a dense loaf.
  6. Pour the batter into the prepared loaf pan. Smooth the top with a spatula, ensuring it’s even. Bake in the preheated oven for 50-60 minutes, or until a toothpick inserted in the center comes out clean. The edges should be lightly golden brown, and the center should feel just set.
  7. Once baked, remove the loaf from the oven and allow it to cool in the pan for about 10 minutes. Then, transfer it to a wire rack to cool completely. Resist the urge to slice too soon, as it will be crumbly if it’s still warm.
  8. While the loaf is cooling, prepare the citrus icing. In a medium bowl, whisk together 1 cup of powdered sugar, 2 tablespoons of fresh lemon juice, and 1 tablespoon of orange juice until smooth. If the icing is too thick, you can add a little more juice to reach your desired consistency.
  9. Once the loaf is completely cool, drizzle the citrus icing over the top. If you like, sprinkle with an additional teaspoon of lemon zest for an extra pop of flavor and color.

Pro Tips for the Best Lemon Poppy Seed Loaf With Citrus Icing

  • Be careful not to overmix your batter; this is a common mistake that can lead to a dense loaf. Mix just until the dry ingredients are incorporated for a light and fluffy texture.
  • Use room temperature ingredients, especially the butter and eggs. This helps to create a smoother batter and ensures even baking. Take your eggs out of the fridge about 30 minutes before you start.
  • For a more pronounced lemon flavor, consider adding a little lemon extract in addition to the zest and juice. Just a half teaspoon can elevate the citrus notes significantly.
  • When measuring your flour, spoon it into the measuring cup and level it off with a knife instead of scooping directly from the bag. This prevents packing and ensures you don’t end up with a dry loaf.
  • Invest in a good quality loaf pan; it makes a difference in heat distribution, which ensures even baking. If your pan is dark-coated, reduce the oven temperature by 25°F to prevent over-browning.

Variations & Serving Ideas

For a delightful twist, consider adding blueberries or raspberries to the batter for a fruity burst of flavor. You can also experiment with different citrus fruits—try lime or grapefruit zest and juice for a refreshing change. For a healthier option, substitute half of the all-purpose flour with whole wheat flour for added fiber without compromising too much on texture.

This Lemon Poppy Seed Loaf pairs beautifully with a light salad, such as a mixed greens salad with a vinaigrette, or a cup of tea for a cozy afternoon treat. It also complements a creamy cheese platter, as the acidity of the loaf balances rich cheeses perfectly. Lastly, a scoop of vanilla ice cream on the side creates a delightful contrast of temperatures and flavors!

Storage, Make-Ahead & Reheating

This Lemon Poppy Seed Loaf can be stored at room temperature for up to 3 days if wrapped tightly in plastic wrap. If you want to keep it longer, it freezes well for up to 3 months. To freeze, wrap the loaf tightly in plastic wrap and then in aluminum foil to prevent freezer burn.

When you’re ready to enjoy it again, simply thaw it in the fridge overnight. Reheat individual slices in the microwave for 15-20 seconds or in a toaster oven until warmed through. Interestingly, many people find that this loaf tastes even better the next day, as the flavors have time to meld!

Frequently Asked Questions

Can I make Lemon Poppy Seed Loaf With Citrus Icing ahead of time?

Yes — in fact, it tastes even better the next day! You can make the loaf a day in advance, allowing the flavors to develop. Just be sure to store it in an airtight container to maintain its moisture.

Can I substitute the poppy seeds?

Absolutely! If you don’t have poppy seeds on hand or prefer an alternative, you can use sesame seeds for a similar crunch or omit them entirely for a smooth loaf.

What can I use instead of buttermilk?

If you don’t have buttermilk, you can easily create a substitute by mixing ½ cup of milk (dairy or plant-based) with 1 tablespoon of vinegar or lemon juice. Let it sit for 5 minutes before using in the recipe.

How can I make this recipe gluten-free?

To make a gluten-free version of this Lemon Poppy Seed Loaf, substitute the all-purpose flour with a gluten-free all-purpose flour blend. Just ensure that the blend contains a binding agent like xanthan gum for the best results.

What is the best way to store leftover loaf?

Leftover Lemon Poppy Seed Loaf should be stored in an airtight container at room temperature for up to 3 days. For longer storage, wrap it tightly and freeze for up to 3 months. Thaw it before serving for the best texture.

Zesty Lemon Poppy Seed Delight

Final Thoughts

The Lemon Poppy Seed Loaf with Citrus Icing is truly a delightful treat that brings a burst of brightness to any occasion. The zesty lemon flavor combined with the subtle crunch of poppy seeds creates a satisfying balance, while the citrus icing adds a touch of sweetness that perfectly complements the loaf’s tanginess.

This is the kind of recipe I come back to again and again, especially when I want to brighten up a gloomy day or celebrate a small victory. The aroma that fills the kitchen as it bakes is absolutely heavenly! I encourage you to give this recipe a try; you might just find it becoming a beloved staple in your home. Don’t forget to share your results or even add your own unique twist—I can’t wait to see what you create!

Print
clock clock iconcutlery cutlery iconflag flag iconfolder folder iconinstagram instagram iconpinterest pinterest iconfacebook facebook iconprint print iconsquares squares iconheart heart iconheart solid heart solid icon

Lemon Poppy Seed Loaf


  • Author: Lily author
  • Total Time: 37 minute
  • Yield: 1 loaf 1x
Pin Recipe
Print Recipe

Description

This Lemon Poppy Seed Loaf is a delightful treat that combines zesty lemon flavor with crunchy poppy seeds. Topped with a citrus icing, it’s perfect for any occasion.


Ingredients

Scale
  • 1 ½ cups (190g) all-purpose flour
  • 1 teaspoon baking powder
  • ½ teaspoon baking soda
  • ½ teaspoon salt
  • 3 tablespoons poppy seeds
  • ½ cup (115g) unsalted butter, softened to room temperature
  • 1 cup (200g) granulated sugar
  • 2 large eggs
  • 1 teaspoon vanilla extract
  • 1 teaspoon lemon zest (from about 1 medium lemon)
  • ½ cup (120ml) buttermilk
  • 2 tablespoons fresh lemon juice
  • 1 cup (120g) powdered sugar
  • 2 tablespoons fresh lemon juice
  • 1 tablespoon orange juice
  • 1 teaspoon lemon zest (for garnish, optional)

Instructions

  1. Preheat your oven to 350°F (175°C). Grease a 9×5-inch loaf pan or line it with parchment paper for easy removal later.
  2. In a medium mixing bowl, whisk together 1 ½ cups of all-purpose flour, 1 teaspoon of baking powder, ½ teaspoon of baking soda, ½ teaspoon of salt, and 3 tablespoons of poppy seeds. This helps to evenly distribute the baking agents and ensures a uniform rise.
  3. In a large mixing bowl, cream together ½ cup of softened unsalted butter and 1 cup of granulated sugar using an electric mixer on medium speed for about 3-4 minutes, until the mixture is light and fluffy. Make sure to scrape down the sides of the bowl occasionally.
  4. Add 2 large eggs, 1 teaspoon of vanilla extract, and 1 teaspoon of lemon zest to the creamed butter and sugar, mixing until fully combined. You want a smooth consistency, so ensure there are no lumps of butter.
  5. In a small bowl, combine ½ cup of buttermilk and 2 tablespoons of fresh lemon juice. Alternately add the dry ingredients and buttermilk mixture to the butter mixture, starting and ending with the dry ingredients. Mix just until combined; do not overmix, as this can lead to a dense loaf.
  6. Pour the batter into the prepared loaf pan. Smooth the top with a spatula, ensuring it’s even. Bake in the preheated oven for 50-60 minutes, or until a toothpick inserted in the center comes out clean. The edges should be lightly golden brown, and the center should feel just set.
  7. Once baked, remove the loaf from the oven and allow it to cool in the pan for about 10 minutes. Then, transfer it to a wire rack to cool completely. Resist the urge to slice too soon, as it will be crumbly if it’s still warm.
  8. While the loaf is cooling, prepare the citrus icing. In a medium bowl, whisk together 1 cup of powdered sugar, 2 tablespoons of fresh lemon juice, and 1 tablespoon of orange juice until smooth. If the icing is too thick, you can add a little more juice to reach your desired consistency.
  9. Once the loaf is completely cool, drizzle the citrus icing over the top. If you like, sprinkle with an additional teaspoon of lemon zest for an extra pop of flavor and color.
  • Prep Time: 15 mins
  • Cook Time: 50-60 mins
  • Category: Dessert
  • Method: Baking
  • Cuisine: American

Nutrition

  • Serving Size: 1 slice
  • Calories: 200
  • Sugar: 15 g
  • Sodium: 150 mg
  • Fat: 8 g
  • Saturated Fat: 5 g
  • Unsaturated Fat: 3 g
  • Trans Fat: 0 g
  • Carbohydrates: 30 g
  • Fiber: 1 g
  • Protein: 3 g
  • Cholesterol: 40 mg

Keywords: Be careful not to overmix your batter; this is a common mistake that can lead to a dense loaf. Use room temperature ingredients for a smoother batter and even baking.

Did you make this recipe?

Share a photo and tag us — we can't wait to see what you've made!

  • Privacy Policy
  • Terms Of Service
  • Contact
  • About
  • GDPR

Copyright © 2025 Homesmad