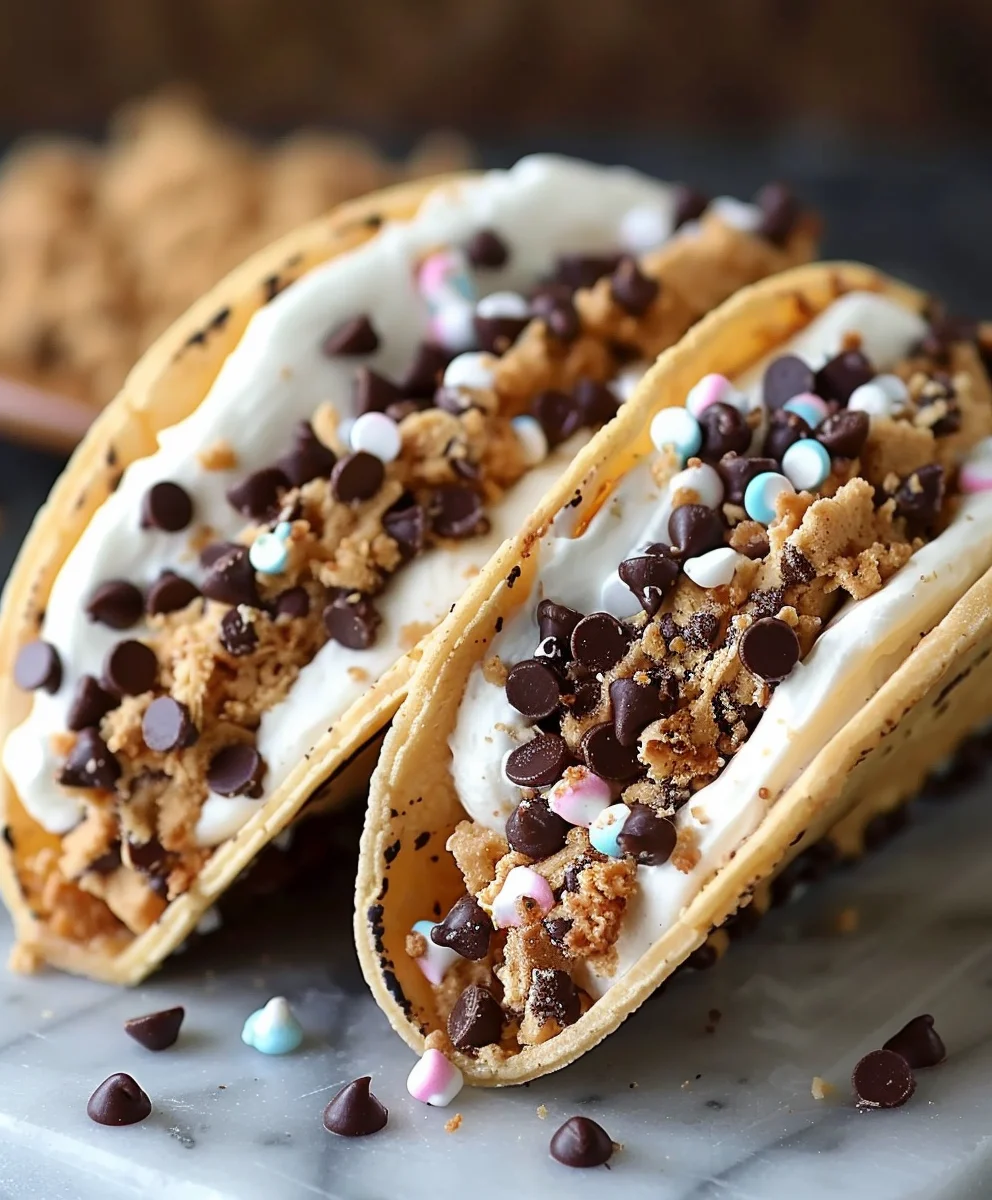
Cheesecake Cookie Dough Tacos are more than just a dessert; they are a revolutionary culinary experience designed to delight your taste buds and spark joy. Have you ever dreamed of a treat that perfectly marries the creamy, tangy indulgence of cheesecake with the comforting, sweet chewiness of raw cookie dough, all contained within a fun, portable taco shell? Well, prepare for that dream to become a delicious reality!
I am absolutely thrilled to present this innovative recipe, which I believe is destined to become a new favorite in your kitchen. This creation isn’t merely a dessert; it’s a celebration of bold flavors and playful textures. While there isn’t a centuries-old history behind this particular fusion, it embodies the modern spirit of inventive baking, bringing together beloved American classics into an exciting new format. It’s a testament to the idea that the best culinary experiences often come from unexpected combinations.
People adore these Cheesecake Cookie Dough Tacos for countless reasons. Beyond their undeniable photogenic appeal, it’s the incredible interplay of flavors and textures that truly captivates. Imagine the smooth, rich cheesecake filling, perfectly balanced with the sweet, irresistible cookie dough, offering a delightful chewiness. Each bite delivers a harmonious blend of creamy, sweet, and slightly tangy notes, making it an unforgettable treat for any occasion. They offer a unique, fun way to enjoy dessert, perfect for gatherings, parties, or simply treating yourself to something extraordinarily special. Join me as we embark on this exciting dessert adventure!

Ingredients:
For the Cookie Taco Shells:
- 1 ½ cups (3 sticks or 340g) Unsalted butter, softened to room temperature
- 1 ½ cups (300g) Granulated sugar
- 2 large Eggs, at room temperature
- 2 teaspoons Pure vanilla extract
- 3 ½ cups (420g) All-purpose flour
- 1 teaspoon Baking powder
- ½ teaspoon Salt
For the No-Bake Cookie Dough Filling:
- ½ cup (1 stick or 113g) Unsalted butter, softened
- ¼ cup (50g) Granulated sugar
- ½ cup (100g) Packed light brown sugar
- 1 teaspoon Pure vanilla extract
- 2 tablespoons Milk (any kind, I prefer whole milk for richness)
- 1 ½ cups (180g) All-purpose flour, heat-treated (see instructions for details)
- ½ teaspoon Salt
- 1 cup (170g) Mini chocolate chips (or regular, if you prefer chunkier bits)
For the Creamy Cheesecake Filling:
- 16 ounces (450g) Full-fat cream cheese, softened to room temperature
- ¾ cup (150g) Granulated sugar
- 1 teaspoon Pure vanilla extract
- ½ cup (120ml) Heavy cream, cold
For the Toppings and Garnish:
- Chocolate sauce or ganache, for drizzling
- Rainbow sprinkles or chocolate sprinkles
- Whipped cream (optional, for serving)
- Extra mini chocolate chips
Let’s Get Cooking! Preparing Your Cheesecake Cookie Dough Tacos:
My culinary journey has led me to many delightful places, but few have been as exciting and utterly delicious as creating these Cheesecake Cookie Dough Tacos. This isn’t just a dessert; it’s an experience, a symphony of textures and flavors that will have everyone asking for more. Trust me, the effort is absolutely worth it for these truly show-stopping treats!
Phase 1: Crafting the Perfect Cookie Taco Shells
This is where the magic begins, creating the crispy yet pliable vessel for our decadent fillings. I’ve found that patience and a keen eye are your best friends here.
- Prepare Your Workstation: First things first, let’s get organized! Preheat your oven to 375°F (190°C). Line two large baking sheets with parchment paper or silicone baking mats. This is crucial for preventing sticking and ensuring easy removal of our delicate cookie shells. I usually grab a few clean kitchen towels too, as we’ll be shaping these cookies while they’re still warm.
- Cream the Butter and Sugar: In a large mixing bowl, using an electric mixer (either a stand mixer with the paddle attachment or a hand mixer), cream together the softened unsalted butter and granulated sugar on medium-high speed. You’ll want to beat this mixture until it’s light, fluffy, and pale in color, which usually takes about 2 to 3 minutes. This step incorporates air, contributing to the cookies’ lovely texture.
- Add Wet Ingredients: Reduce the mixer speed to medium. Add the eggs one at a time, beating well after each addition until fully incorporated. Scrape down the sides of the bowl as needed to ensure everything is evenly mixed. Then, stir in the pure vanilla extract. The aroma alone at this stage is absolutely heavenly!
- Combine Dry Ingredients: In a separate medium bowl, whisk together the all-purpose flour, baking powder, and salt. Make sure these dry ingredients are thoroughly combined to ensure even distribution throughout the dough.
- Gradually Add Dry to Wet: With the mixer on low speed, gradually add the dry ingredient mixture to the wet ingredients, mixing until just combined. Be careful not to overmix! Overmixing can develop the gluten in the flour, leading to tough cookies, and we want tender, pliable shells. The dough will be soft but shouldn’t be overly sticky.
- Chill the Dough (Optional, but Recommended for Ease): While not strictly necessary, I highly recommend chilling the dough for at least 30 minutes in the refrigerator. This firms it up, making it much easier to roll and ensuring the cookies hold their shape better during baking. If you’re in a rush, you can skip this, but you might find the dough a bit more challenging to work with.
- Roll and Cut the Cookies: Lightly flour a clean surface. Take half of the chilled dough (leaving the other half in the fridge) and roll it out to about ⅛-inch thickness. You’ll want it thin enough to be pliable for shaping, but not so thin that it becomes brittle. Using a 3-inch round cookie cutter (or even the rim of a glass if you don’t have a cutter), cut out as many circles as you can. Gather the scraps, gently re-roll, and cut out more circles until all the dough is used.
- Bake the Cookie Rounds: Carefully transfer the cookie rounds to your prepared baking sheets, leaving about an inch between them. Place the baking sheet into your preheated oven and bake for approximately 8 to 10 minutes. Keep a very close eye on them, as baking times can vary significantly between ovens. You’re looking for the edges to be just lightly golden, but the centers should still appear soft and slightly underbaked. This ensures they remain pliable enough for shaping. Overbaking will make them brittle and difficult to fold. Once they come out, their aroma will fill your kitchen with the most delightful buttery sweetness, a hint of what’s to come!
- Shape the Taco Shells (Work Quickly!): This is the most crucial step for forming our “taco shells.” As soon as you remove the baking sheet from the oven, immediately use a thin spatula to carefully lift each warm cookie. Drape each cookie over the handle of a wooden spoon or a rolling pin, or even a taco holder placed upside down, to create the taco shape. You must do this while the cookies are still hot and pliable. They will firm up quickly as they cool. If a cookie hardens before you can shape it, you can pop it back into the warm oven for about 30 seconds to soften it again. Allow the shaped cookies to cool completely on the spoons or rolling pins before gently removing them. Repeat the baking and shaping process with the remaining dough. This part can be a bit of a dance, but it’s incredibly satisfying when you get that perfect curve!
Phase 2: Whipping Up the Dreamy Cheesecake Filling
This creamy, tangy filling provides a wonderful contrast to the sweet cookie dough and shell. It’s light, airy, and oh-so-delicious!
- Soften the Cream Cheese: Ensure your full-fat cream cheese is truly at room temperature. This makes a world of difference in achieving a smooth, lump-free filling. If it’s too cold, you’ll end up with lumps, no matter how much you beat it.
- Beat Cream Cheese and Sugar: In a clean, large mixing bowl, beat the softened cream cheese and granulated sugar together using an electric mixer on medium-high speed. Continue beating for 2 to 3 minutes, scraping down the sides of the bowl frequently, until the mixture is completely smooth, light, and fluffy.
- Add Vanilla: Stir in the pure vanilla extract until just combined. Vanilla adds that classic warmth and depth to our cheesecake.
- Whip the Heavy Cream: In a separate, chilled bowl (I like to chill my bowl and whisk attachment in the freezer for 10-15 minutes beforehand), pour in the cold heavy cream. Beat on high speed until stiff peaks form. Be careful not to overbeat, or you’ll end up with butter! Stiff peaks mean that when you lift the whisk, the cream holds its shape firmly.
- Fold in Whipped Cream: Gently fold the whipped cream into the cream cheese mixture using a spatula. Do this in two or three additions, being careful not to deflate the air you’ve incorporated. The goal is a light, airy, and homogenous mixture. This cheesecake filling is simply divine on its own, but it truly shines in these tacos.
- Chill: Cover the bowl with plastic wrap and refrigerate the cheesecake filling for at least 30 minutes, or until you’re ready to assemble. Chilling allows it to firm up slightly and makes it easier to pipe or spread.
Phase 3: Preparing the Safe-to-Eat Cookie Dough Filling
No raw eggs here, just pure, unadulterated cookie dough bliss! This is the star of our “Cheesecake Cookie Dough Tacos” and deserves a moment in the spotlight.
-
Heat-Treat the Flour: This is a crucial step for food safety. Raw flour can contain bacteria, so we need to heat-treat it. Spread the all-purpose flour evenly on a microwave-safe plate or baking sheet.
- Microwave Method: Microwave on high for 1 minute and 15 seconds, stirring after 45 seconds. Check the temperature with an instant-read thermometer; it should reach 160°F (71°C). If not, microwave in 15-second intervals until it does.
- Oven Method: Bake in a preheated oven at 300°F (150°C) for about 5-7 minutes, stirring halfway through. Again, verify the temperature reaches 160°F (71°C).
Allow the heat-treated flour to cool completely before using. This is so important – don’t skip it!
- Cream Butter and Sugars: In a medium mixing bowl, cream together the softened unsalted butter, granulated sugar, and packed light brown sugar using an electric mixer on medium speed. Beat until light and fluffy, about 2-3 minutes. The brown sugar adds that wonderful molasses note that we all love in classic cookie dough.
- Add Vanilla and Milk: Stir in the pure vanilla extract and milk until just combined. The milk helps achieve that perfect, soft cookie dough consistency without needing any eggs.
- Incorporate Dry Ingredients: Add the cooled, heat-treated flour and salt to the wet mixture. Mix on low speed until just combined. Again, avoid overmixing. The dough will be thick and well-formed.
- Fold in Chocolate Chips: Gently fold in the mini chocolate chips using a spatula. I love mini chocolate chips here because they distribute so well and give you a little chocolatey burst in every bite. Feel free to use your favorite type of chocolate chip, though!
- Set Aside: Cover the cookie dough and set it aside at room temperature, or refrigerate if you’re not assembling immediately. If refrigerated, let it sit out for 10-15 minutes to soften slightly before filling the tacos.
Phase 4: Assembling Your Epic Cheesecake Cookie Dough Tacos
This is where all our hard work comes together into the most incredible dessert. Get ready for some serious edible art!
- Gather Your Components: Bring out your cooled cookie taco shells, the chilled cheesecake filling, and the ready-to-eat cookie dough filling. Arrange them on your counter. I usually place my taco shells on a serving platter or a clean baking sheet to make the filling process easier and minimize mess.
- Prepare for Filling: For cleaner and more precise filling, I highly recommend transferring both the cheesecake filling and the cookie dough filling into separate piping bags. If you don’t have piping bags, you can use a sturdy ziploc bag with a corner snipped off, or simply use small spoons and spreaders.
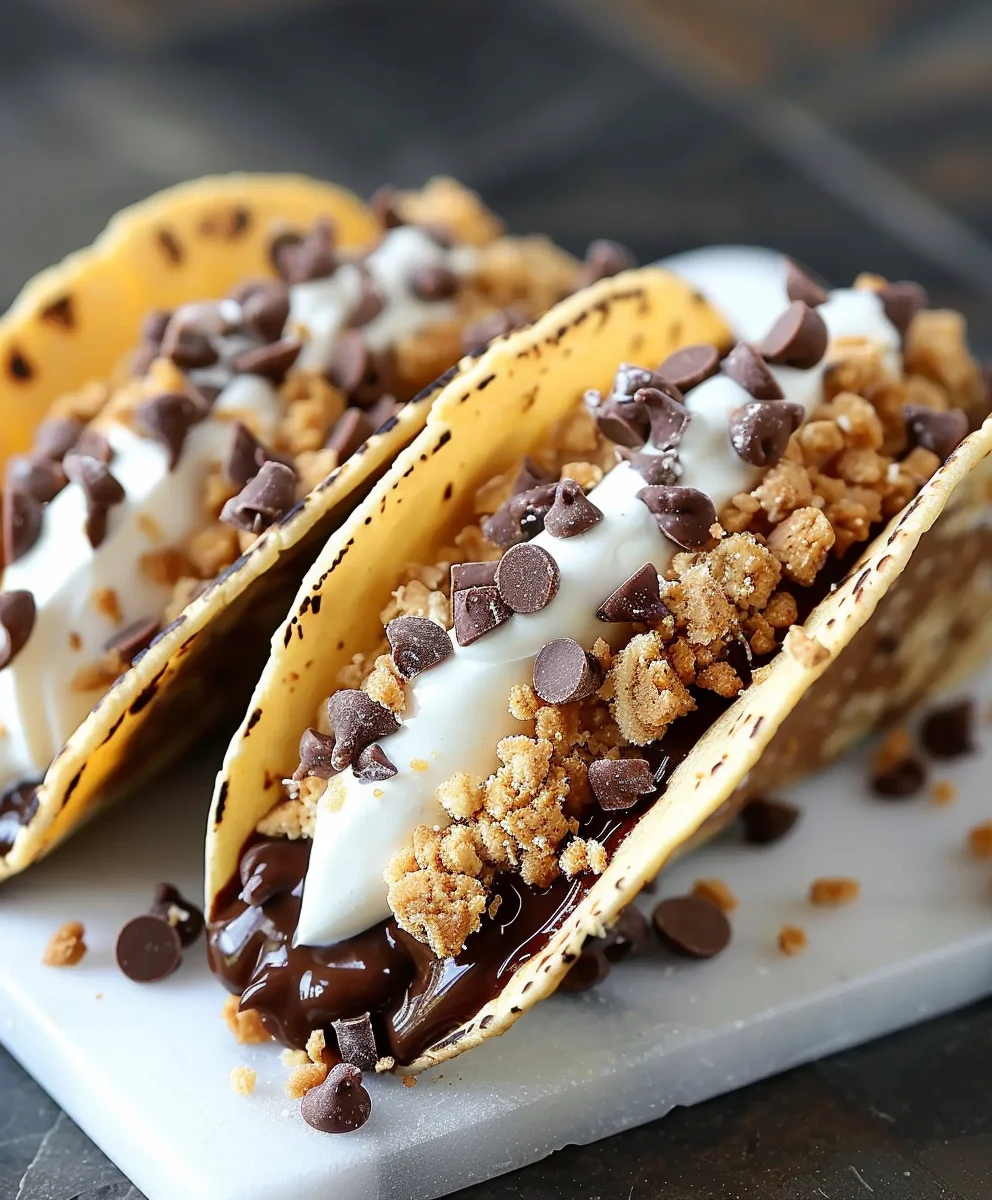
- Fill with Cookie Dough: Carefully pick up a cookie taco shell. First, pipe or spoon a generous layer of the no-bake cookie dough filling along the bottom interior of the taco shell. Use a small offset spatula or the back of a spoon to spread it evenly from one end to the other, creating a substantial base. Don’t be shy – this is a “Cheesecake Cookie Dough Taco” after all!
- Add the Cheesecake Layer: Next, pipe or spoon the creamy cheesecake filling directly on top of the cookie dough layer. You can make this layer a bit decorative, perhaps a wavy line or a smooth mound. The contrast in color is lovely, and the textures are going to be absolutely phenomenal together.
- Repeat and Arrange: Continue this process, filling all your cookie taco shells. As you fill them, you can arrange them upright in a taco holder or carefully lean them against each other on a platter to keep them stable. My favorite part about this is seeing the assembly line of deliciousness come to life!
Phase 5: Chilling and Serving Your Masterpiece
The final touches make all the difference, enhancing both flavor and presentation.
- Chill for Stability: Once all the tacos are filled, carefully transfer the platter or baking sheet into the refrigerator. Chill them for at least 30 minutes. This chilling time allows both fillings to firm up a bit more, making the tacos easier to handle and ensuring the flavors meld beautifully. If you have the time, an hour is even better!
- Decorate and Garnish: Just before serving, it’s time for the fun part – decorating! Drizzle each Cheesecake Cookie Dough Taco generously with chocolate sauce or ganache. I love creating a zig-zag pattern across the top. Then, sprinkle with your favorite rainbow sprinkles or extra mini chocolate chips. For an extra touch of indulgence, a dollop of fresh whipped cream on the side or just inside the taco can be a delightful addition.
- Serve and Enjoy: Serve these decadent Cheesecake Cookie Dough Tacos immediately after garnishing. They are best enjoyed fresh, but any leftovers can be stored in an airtight container in the refrigerator for up to 3 days. However, I highly doubt you’ll have any leftovers once your friends and family get a taste of this unique and incredibly satisfying dessert! They are truly a conversation starter and an unforgettable treat.
Conclusion:
As we wrap up our delightful journey with this truly innovative dessert, I truly hope you’re feeling as excited and inspired as I am about what we’ve created here. This isn’t just another sweet treat; it’s an experience, a conversation starter, and quite frankly, a revelation for your taste buds. We’ve managed to take two universally adored desserts – the creamy, tangy lusciousness of cheesecake and the comforting, indulgent richness of cookie dough – and fuse them into something spectacular, something utterly unique. When you bite into these, you’re not just tasting a dessert; you’re experiencing a symphony of textures and flavors that dance together in perfect harmony. The slight crisp of the taco shell, the smooth, cool cheesecake filling, and the delightfully chewy cookie dough, all combine to create an unforgettable sensation. It’s a bold combination, yes, but one that absolutely pays off, proving that some of the best culinary inventions come from daring to mix and match. I’ve found that these treats bring an instant smile to everyone’s face, making them an absolute triumph for any occasion, from a casual family gathering to a festive celebration. They encapsulate everything wonderful about home baking: creativity, comfort, and pure, unadulterated joy in every single bite.
Now that you have the blueprint for these magnificent confections, let’s talk about how you can truly make them your own and elevate the experience even further. While they are undeniably perfect on their own, a little extra flourish never hurts! For a touch of elegant indulgence, consider serving your finished creations alongside a generous scoop of your favorite vanilla bean ice cream; the way the ice cream slowly melts and mingles with the components of the taco is simply divine. Or, for those who love a bit of contrasting flavor, a scoop of raspberry sorbet could add a lovely tart counterpoint. Drizzle them with a homemade raspberry coulis or a rich dark chocolate sauce for an added layer of sophistication. Fresh berries – strawberries, blueberries, or raspberries – also make fantastic accompaniments, adding a burst of freshness and a beautiful pop of color. Imagine a plate of these, garnished with a sprig of fresh mint and a dusting of powdered sugar – truly Instagram-worthy! If you’re feeling extra festive, you could even offer a small bowl of sprinkles or miniature chocolate chips on the side, allowing your guests to customize their own dessert tacos, turning the dessert course into an interactive and fun experience. The possibilities for presentation and pairing are as endless as your imagination, allowing you to tailor them to any event or personal preference.
Creative Twists and Personalizations for Your Masterpiece
Beyond serving suggestions, don’t be afraid to experiment with variations to truly personalize your Cheesecake Cookie Dough Tacos. Instead of the classic chocolate chip cookie dough, why not try a peanut butter cookie dough for a nutty twist, or a double chocolate chip dough for the ultimate chocoholic? You could even infuse the cheesecake filling with different flavors – a hint of lemon zest for brightness, a touch of almond extract for warmth, or even a swirl of salted caramel for an extra layer of decadence. Consider switching up the “taco shell” itself; while the crispy waffle cone is fantastic, perhaps a thin, delicate pizzelle or even a lightly sweetened crepe could offer a different textural experience. For a seasonal touch, imagine a pumpkin spice cheesecake filling during autumn, or a peppermint-infused version around the holidays. The beauty of this recipe lies not just in its deliciousness, but in its incredible versatility, encouraging you to unleash your inner pastry chef and truly make it your signature dessert. Think about different toppings too: toasted coconut flakes, chopped nuts like pecans or walnuts, or even a sprinkle of sea salt to balance the sweetness. Each variation offers a new adventure for your palate, making this recipe one you’ll want to revisit and reinvent time and time again.
So, now it’s your turn! I’ve shared all my tips, tricks, and enthusiasm for this incredible creation, and I genuinely believe it’s one of those recipes that needs to be experienced to be fully appreciated. Don’t let the unique name intimidate you; the process is straightforward, fun, and incredibly rewarding. Gather your ingredients, clear your counter, and prepare to embark on a delightful baking adventure. I promise you, the joy of seeing these come to life and the sheer delight on the faces of those who taste them will be worth every moment. Once you’ve whipped up your very own batch, I absolutely implore you to share your experience with me and our wonderful community. Snap some photos – get creative with your plating! Tell us about any variations you tried, how your family and friends reacted, or simply share your favorite part of making and devouring them. Your feedback and creativity inspire us all, and I can’t wait to see the amazing versions you come up with. Let’s spread the word about this fantastic dessert and bring a little more sweetness and creativity into the world, one delicious taco at a time. Happy baking!
Cheesecake Cookie Dough Tacos
A revolutionary dessert combining creamy, tangy cheesecake with sweet, chewy, safe-to-eat cookie dough, all served in a fun, portable cookie taco shell. Perfect for parties or a unique treat!
Ingredients
-
1 ½ cups (3 sticks / 340g) Unsalted butter, softened
-
1 ½ cups (300g) Granulated sugar
-
2 large Eggs, room temperature
-
2 tsp Pure vanilla extract
-
3 ½ cups (420g) All-purpose flour
-
1 tsp Baking powder
-
½ tsp Salt
-
½ cup (1 stick / 113g) Unsalted butter, softened
-
¼ cup (50g) Granulated sugar
-
½ cup (100g) Packed light brown sugar
-
1 tsp Pure vanilla extract
-
2 tbsp Milk (any kind)
-
1 ½ cups (180g) All-purpose flour, heat-treated
-
½ tsp Salt
-
1 cup (170g) Mini chocolate chips
-
16 oz (450g) Full-fat cream cheese, softened
-
¾ cup (150g) Granulated sugar
-
1 tsp Pure vanilla extract
-
½ cup (120ml) Heavy cream, cold
-
Chocolate sauce or ganache, for drizzling
-
Rainbow or chocolate sprinkles
-
Whipped cream (optional)
-
Extra mini chocolate chips
Instructions
-
Step 1
Preheat oven to 375°F (190°C). Line two baking sheets. Cream 1 ½ cups butter and 1 ½ cups granulated sugar until light. Beat in 2 eggs, then 2 tsp vanilla. In a separate bowl, whisk 3 ½ cups flour, 1 tsp baking powder, and ½ tsp salt. Gradually add dry ingredients to wet mixture on low speed until just combined (do not overmix). Chill dough for 30 minutes. Roll dough to ⅛-inch thick and cut into 3-inch rounds. Bake for 8-10 minutes until edges are lightly golden. Immediately drape warm cookies over wooden spoon handles or rolling pins to shape into taco shells. Let cool completely on forms. Repeat with remaining dough. -
Step 2
Ensure 16 oz cream cheese is at room temperature. Beat cream cheese and ¾ cup granulated sugar until smooth, light, and fluffy (2-3 minutes). Stir in 1 tsp vanilla. In a separate chilled bowl, whip ½ cup cold heavy cream until stiff peaks form. Gently fold whipped cream into the cream cheese mixture until airy and homogenous. Cover and chill for at least 30 minutes. -
Step 3
Heat-treat 1 ½ cups flour: Spread flour on a microwave-safe plate and microwave on high for 1 min 15 secs (stirring after 45 secs) until 160°F (71°C), or bake at 300°F (150°C) for 5-7 minutes. Cool completely. Cream ½ cup butter, ¼ cup granulated sugar, and ½ cup brown sugar until light and fluffy. Stir in 1 tsp vanilla extract and 2 tbsp milk. Add the cooled, heat-treated flour and ½ tsp salt; mix on low speed until just combined. Gently fold in 1 cup mini chocolate chips. Set aside or refrigerate if not assembling immediately. -
Step 4
Transfer the chilled cheesecake filling and the ready cookie dough filling into separate piping bags. Pipe a generous layer of cookie dough filling along the bottom interior of each cooled cookie taco shell. Then, pipe the creamy cheesecake filling directly on top of the cookie dough layer. Continue this process for all taco shells. -
Step 5
Carefully transfer the assembled tacos to the refrigerator and chill for at least 30 minutes (up to 1 hour) to allow the fillings to firm up. Just before serving, drizzle each taco generously with chocolate sauce or ganache, and sprinkle with rainbow/chocolate sprinkles or extra mini chocolate chips. An optional dollop of whipped cream can be added. Serve immediately. Store any leftovers in an airtight container in the refrigerator for up to 3 days.
Important Information
Nutrition Facts (Per Serving)
It is important to consider this information as approximate and not to use it as definitive health advice.
Allergy Information
Please check ingredients for potential allergens and consult a health professional if in doubt.