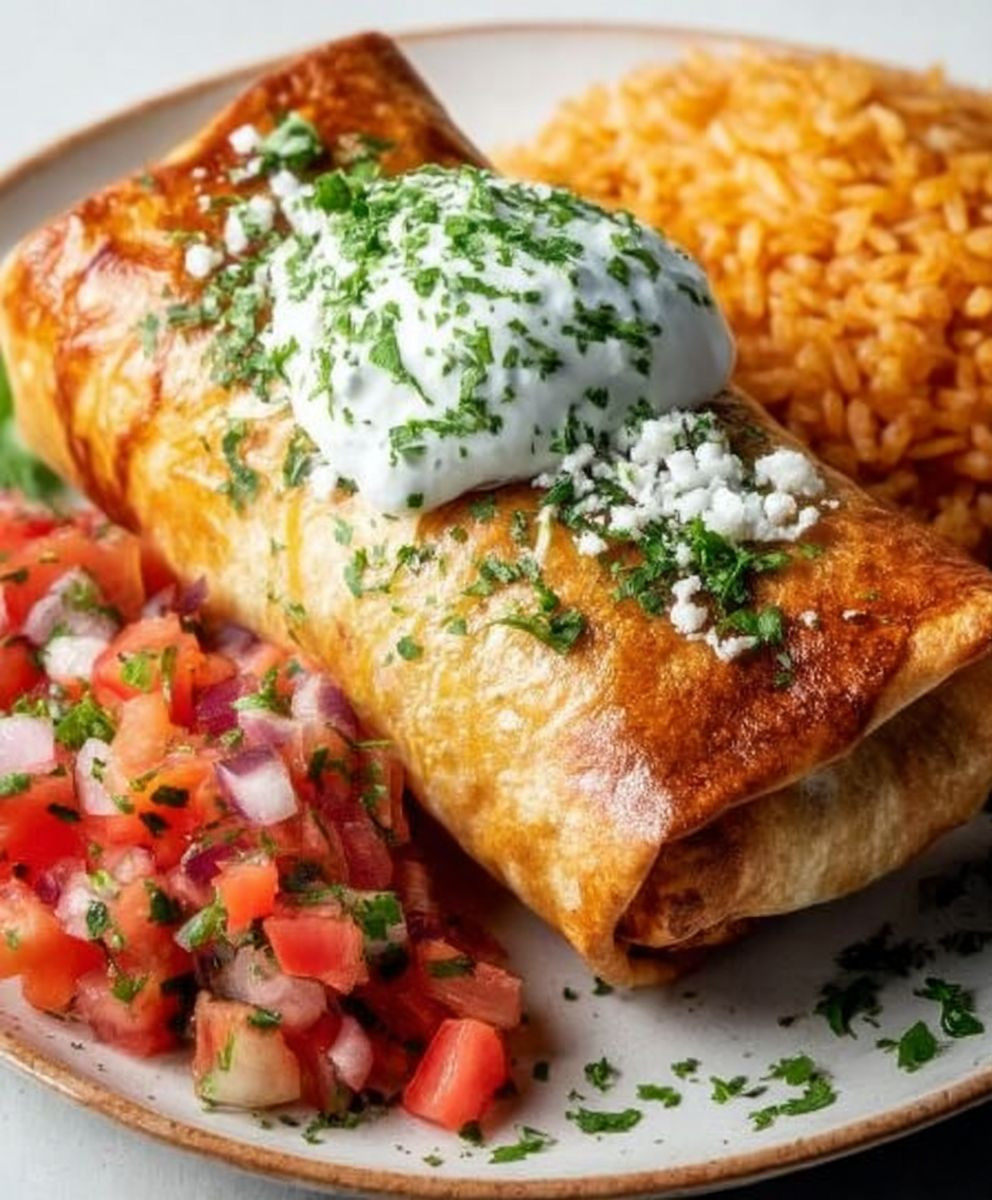
Chicken Chimichangas: Just the name conjures up images of crispy, golden-brown perfection, doesn’t it? Imagine sinking your teeth into a warm, savory filling encased in a delightfully crunchy tortilla. This isn’t just a meal; it’s an experience! Have you ever wondered about the origins of this Tex-Mex favorite? While the exact story is debated, legend has it that the chimichanga was accidentally created in Tucson, Arizona, when a burrito was dropped into a deep fryer. The cook, rather than uttering a curse word, exclaimed “chimichanga!” – a playful, minced version of a Spanish swear word.
But regardless of its somewhat accidental beginnings, the Chicken Chimichanga has become a beloved staple in Mexican and Southwestern cuisine. What’s not to love? The combination of tender, flavorful chicken, melted cheese, and your favorite toppings, all wrapped in a crispy, deep-fried tortilla, is simply irresistible. People adore chimichangas for their satisfying crunch, their customizable fillings, and their sheer convenience. They’re perfect for a quick weeknight dinner, a fun weekend gathering, or even a delicious leftover lunch. So, are you ready to learn how to make the best Chicken Chimichangas you’ve ever tasted? Let’s get started!

Ingredients:
- For the Chicken Filling:
- 2 boneless, skinless chicken breasts (about 1.5 lbs total)
- 1 tablespoon olive oil
- 1 medium onion, chopped
- 2 cloves garlic, minced
- 1 green bell pepper, chopped
- 1 red bell pepper, chopped
- 1 (15 ounce) can black beans, rinsed and drained
- 1 (15 ounce) can corn, drained
- 1 (10 ounce) can diced tomatoes and green chilies (like Rotel), undrained
- 1 packet (1 ounce) taco seasoning
- 1/2 teaspoon cumin
- 1/4 teaspoon chili powder
- 1/4 teaspoon smoked paprika
- Salt and pepper to taste
- 1/4 cup chopped cilantro, fresh
- For the Chimichangas:
- 8 large flour tortillas (burrito size, about 10-12 inches)
- Vegetable oil, for frying (about 2-3 cups)
- For Serving (Optional):
- Sour cream
- Guacamole
- Salsa
- Shredded cheese (cheddar, Monterey Jack, or a Mexican blend)
- Hot sauce
- Chopped green onions
Preparing the Chicken Filling:
- Cook the Chicken: I like to start by cooking my chicken. You can do this in a few ways. My preferred method is to poach it. Place the chicken breasts in a large pot and cover with water. Bring to a boil, then reduce heat and simmer for about 15-20 minutes, or until the chicken is cooked through and no longer pink inside. Alternatively, you can bake the chicken at 375°F (190°C) for about 20-25 minutes, or until cooked through. You can also use leftover cooked chicken or rotisserie chicken to save time! If using leftover chicken, skip this step and shred it.
- Shred the Chicken: Once the chicken is cool enough to handle, shred it using two forks. This is a crucial step for even distribution of the chicken in the chimichangas. Make sure you get nice, even shreds.
- Sauté the Vegetables: Heat the olive oil in a large skillet over medium heat. Add the chopped onion and cook until softened, about 5 minutes. Then, add the minced garlic and cook for another minute until fragrant. Be careful not to burn the garlic!
- Add the Bell Peppers: Add the chopped green and red bell peppers to the skillet and cook until they are slightly softened, about 5-7 minutes. I like my peppers to still have a little bit of a bite to them, but cook them to your preference.
- Combine the Ingredients: Add the shredded chicken, black beans, corn, diced tomatoes and green chilies (Rotel), taco seasoning, cumin, chili powder, smoked paprika, salt, and pepper to the skillet. Stir well to combine all the ingredients.
- Simmer the Filling: Bring the mixture to a simmer and cook for about 10-15 minutes, stirring occasionally, to allow the flavors to meld together. This step is important because it allows the spices to really infuse into the chicken and vegetables. If the mixture seems too dry, you can add a splash of chicken broth or water.
- Add Cilantro: Stir in the chopped fresh cilantro. This adds a nice fresh flavor to the filling.
- Taste and Adjust: Taste the filling and adjust the seasoning as needed. You might want to add more salt, pepper, cumin, or chili powder to suit your taste.
Assembling the Chimichangas:
- Warm the Tortillas: This is a very important step! Warm the tortillas slightly to make them more pliable and easier to roll without tearing. You can warm them in the microwave for about 15-20 seconds, wrapped in a damp paper towel, or in a dry skillet over medium heat for a few seconds per side.
- Fill the Tortillas: Place about 1/2 to 3/4 cup of the chicken filling in the center of each tortilla. Don’t overfill the tortillas, or they will be difficult to roll and may burst open during frying.
- Fold the Chimichangas: Fold in the sides of the tortilla over the filling, then tightly roll up the tortilla from the bottom. Think of it like rolling a burrito. Make sure the seam is facing down to help keep the chimichanga closed during frying.
- Secure the Chimichangas (Optional): If you’re concerned about the chimichangas opening up during frying, you can secure them with toothpicks. Insert toothpicks through the seam to hold it together. Remember to remove the toothpicks before serving!
Frying the Chimichangas:
- Heat the Oil: Pour about 2-3 inches of vegetable oil into a large, heavy-bottomed pot or deep fryer. Heat the oil over medium-high heat until it reaches a temperature of 350-375°F (175-190°C). You can use a deep-fry thermometer to monitor the temperature. If you don’t have a thermometer, you can test the oil by dropping a small piece of tortilla into it. If the tortilla sizzles and turns golden brown in about 30 seconds, the oil is ready.
- Fry the Chimichangas: Carefully place the chimichangas into the hot oil, seam-side down. Fry them in batches, being careful not to overcrowd the pot. Overcrowding the pot will lower the oil temperature and result in soggy chimichangas.
- Cook Until Golden Brown: Fry the chimichangas for about 2-3 minutes per side, or until they are golden brown and crispy. Use tongs to carefully flip them over.
- Remove and Drain: Remove the fried chimichangas from the oil using tongs or a slotted spoon and place them on a wire rack lined with paper towels to drain off any excess oil. This will help them stay crispy.
Baking the Chimichangas (Alternative to Frying):
If you prefer a healthier option, you can bake the chimichangas instead of frying them. This will result in a less crispy, but still delicious, chimichanga.
- Preheat Oven: Preheat your oven to 400°F (200°C).
- Prepare Baking Sheet: Lightly grease a baking sheet with cooking spray.
- Place Chimichangas: Place the assembled chimichangas on the prepared baking sheet, seam-side down.
- Brush with Oil: Brush the tops of the chimichangas with a little bit of olive oil or melted butter. This will help them brown nicely.
- Bake: Bake for about 15-20 minutes, or until the chimichangas are golden brown and crispy. Flip them halfway through baking to ensure even browning.
Serving the Chimichangas:
Now for the best part – serving and enjoying your delicious homemade chicken chimichangas! There are so many ways to customize your chimichangas with your favorite toppings.
- Plate the Chimichangas: Place the fried or baked chimichangas on plates.
- Add Toppings: Top the chimichangas with your favorite toppings, such as sour cream, guacamole, salsa, shredded cheese, hot sauce, and chopped green onions. I personally love a generous dollop of sour cream and a sprinkle of shredded cheddar cheese.
- Serve Immediately: Serve the chimichangas immediately while they are still hot and crispy.
Tips and Variations:
- Make it Spicy: Add a pinch of cayenne pepper or a dash of hot sauce to the chicken filling for a spicier kick.
- Add Cheese to the Filling: Stir in some shredded cheese (like cheddar or Monterey Jack) to the chicken filling for extra cheesy goodness.
- Use Different Beans: Substitute pinto beans or kidney beans for the black beans.
- Add Rice: Add cooked rice to the filling for a heartier chimichanga.
- Make it Vegetarian: Omit the chicken and add more beans and vegetables for a vegetarian version.
- Freezing Instructions: You can freeze assembled chimichangas before frying or baking. Wrap them individually in plastic wrap and then place them in a freezer bag. They can be stored in the freezer for up to 2

Conclusion:
This isn’t just another recipe; it’s a passport to flavor town! These Chicken Chimichangas are a guaranteed crowd-pleaser, offering a delightful combination of crispy, golden-brown tortillas and a savory, perfectly seasoned chicken filling. The ease of preparation, coupled with the incredible taste, makes this a must-try for any home cook, regardless of skill level. I truly believe that once you experience the satisfying crunch and the explosion of flavors within, you’ll be adding this recipe to your regular rotation.
But the best part? The versatility! While I’ve shared my go-to method, feel free to get creative and personalize these chimichangas to your liking.
Serving Suggestions and Variations:
* The Classic Plating: Serve these golden beauties with a generous dollop of sour cream, a vibrant scoop of guacamole, and a sprinkle of fresh cilantro. A side of Mexican rice and refried beans completes the ultimate chimichanga experience.
* Spice It Up: If you’re a fan of heat, add a pinch of cayenne pepper to the chicken filling or serve with your favorite hot sauce. A drizzle of sriracha mayo would also be a fantastic addition.
* Cheese Lover’s Dream: Amp up the cheesiness by adding a layer of shredded Monterey Jack or cheddar cheese to the filling before frying. The melted cheese will create an extra gooey and delicious interior.
* Vegetarian Option: Swap out the chicken for black beans, corn, and your favorite vegetables for a satisfying vegetarian alternative. Season with chili powder, cumin, and a touch of smoked paprika for a smoky flavor.
* Sauce Sensations: Experiment with different sauces! A creamy cilantro-lime sauce, a tangy tomatillo salsa, or even a simple cheese sauce would all complement the flavors of the chimichangas beautifully.
* Make-Ahead Magic: Prepare the chicken filling ahead of time and store it in the refrigerator for up to 2 days. This makes assembling the chimichangas a breeze when you’re ready to cook. You can even assemble the chimichangas and freeze them before frying. Just thaw them completely before cooking.
* Baked Chimichangas: For a healthier option, bake the chimichangas instead of frying. Brush them with olive oil and bake at 400°F (200°C) for about 20-25 minutes, or until golden brown and crispy.
* Breakfast Chimichangas: Scramble some eggs with chorizo and cheese, and use that as your filling for a delicious and hearty breakfast chimichanga. Serve with salsa and avocado.I’m confident that you’ll absolutely love these Chicken Chimichangas. They’re perfect for a weeknight dinner, a weekend fiesta, or any occasion that calls for delicious, satisfying food. The crispy texture, the flavorful filling, and the endless possibilities for customization make this recipe a true winner.
So, what are you waiting for? Head to the kitchen, gather your ingredients, and get ready to create some culinary magic! I can’t wait to hear about your experience. Don’t forget to share your photos and variations in the comments below. Let me know what you think, what you changed, and how much everyone loved them! Happy cooking, and enjoy your homemade chimichangas! I’m sure you’ll agree that this recipe is a keeper.
Chicken Chimichangas: The Ultimate Recipe & Guide
Crispy, golden-brown chicken chimichangas filled with a flavorful mix of shredded chicken, black beans, corn, and Southwestern spices. Perfect for a satisfying and customizable meal!
By: LilyCategory: DinnerDifficulty: EasyCuisine: AmericanYield: 8 chimichangasDietary: VegetarianIngredients
Instructions
Recipe Notes
- Warming the tortillas is crucial for preventing tearing when rolling.
- Don’t overfill the tortillas, or they may burst during frying or baking.
- Use a deep-fry thermometer for accurate oil temperature.
- Drain the fried chimichangas well to remove excess oil.
- Baking is a healthier alternative to frying, but the chimichangas will be less crispy.
- Customize with your favorite toppings!
Frequently Asked Questions
→ How do I ensure the bread stays moist?Use fresh, ripe ingredients and avoid overmixing the batter. Store in an airtight container.→ Can I substitute ingredients?Yes, you can substitute similar ingredients while maintaining the basic ratios for best results.→ How long does this bread keep?Store tightly wrapped at room temperature for 2-3 days, or refrigerate for up to a week.→ What if I don't have all the spices?You can adjust spices to taste or substitute with similar warming spices.→ Can I freeze this bread?Yes, wrap individual slices and freeze for up to 3 months. Thaw at room temperature before serving.