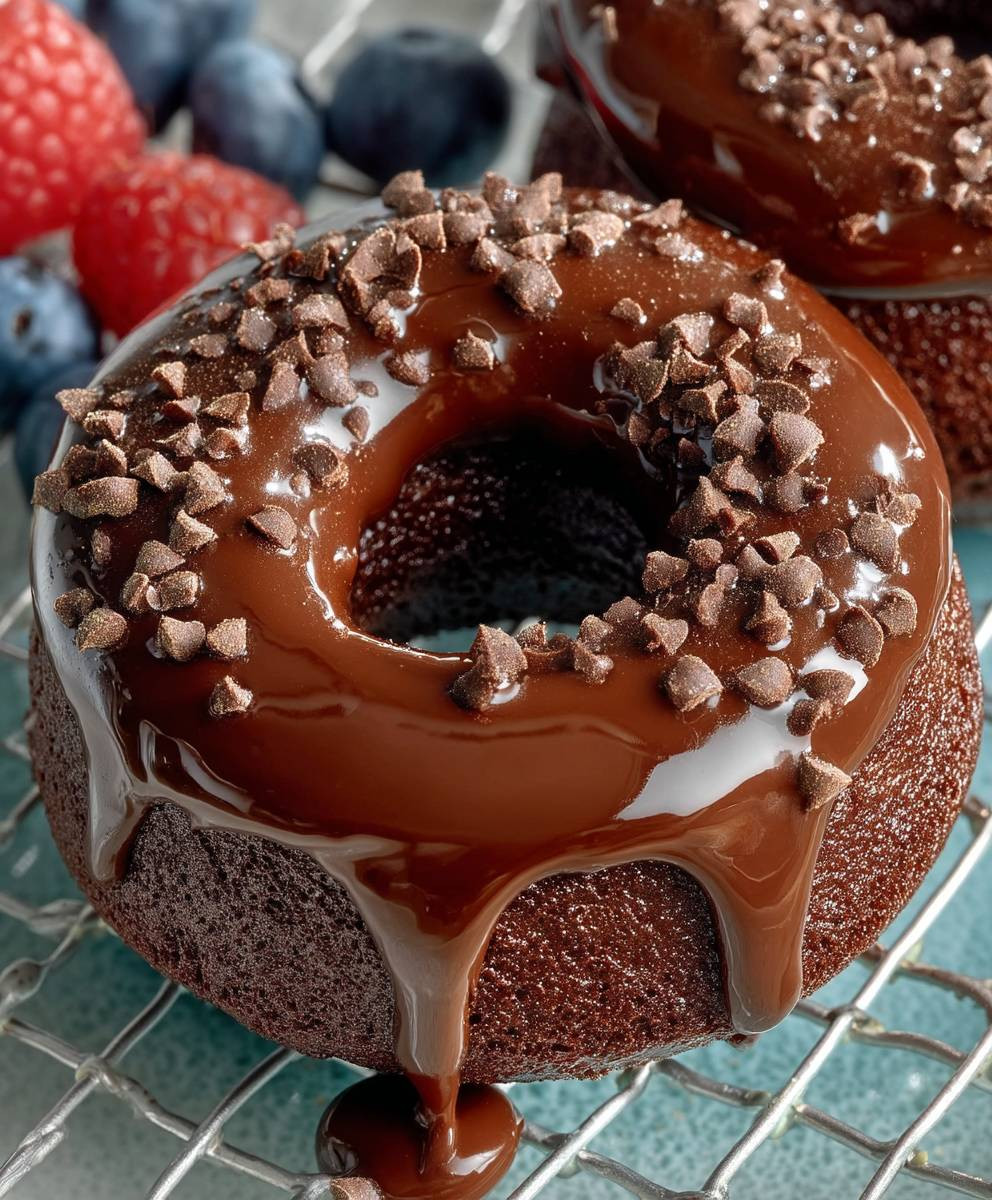
Chocolate Protein Donuts: the guilt-free indulgence you’ve been dreaming of! Imagine sinking your teeth into a moist, decadent chocolate donut, but instead of a sugar crash, you get a boost of protein to power through your day. Sounds too good to be true? It’s not! These aren’t your average fried dough rings; they’re a healthier, baked alternative that satisfies your sweet cravings without derailing your fitness goals.
While donuts, in their various fried forms, have a long and delicious history dating back centuries, these Chocolate Protein Donuts offer a modern twist on a classic treat. They cleverly combine the comforting familiarity of a donut with the nutritional benefits of protein powder. This makes them perfect for a post-workout snack, a quick breakfast on the go, or even a guilt-free dessert.
People adore donuts for their soft, pillowy texture and the endless possibilities for flavor combinations. These protein-packed versions retain that delightful texture while adding a rich chocolate flavor that’s simply irresistible. Plus, the added protein helps keep you feeling full and satisfied, making them a smarter choice than traditional donuts. Get ready to experience the best of both worlds – a delicious treat that supports your healthy lifestyle!

Ingredients:
- Dry Ingredients:
- 1 ½ cups oat flour (or almond flour for a gluten-free option)
- ½ cup unsweetened cocoa powder
- ½ cup chocolate protein powder (whey or plant-based)
- 1 teaspoon baking powder
- ½ teaspoon baking soda
- ¼ teaspoon salt
- ½ cup granulated sweetener of choice (erythritol, stevia, or regular sugar)
- Wet Ingredients:
- 1 cup unsweetened applesauce
- ½ cup milk (dairy or non-dairy)
- 2 large eggs
- 2 tablespoons melted coconut oil (or any neutral oil)
- 1 teaspoon vanilla extract
- Chocolate Glaze (Optional):
- ½ cup dark chocolate chips
- 1 tablespoon coconut oil
- Optional: sprinkles, chopped nuts, or shredded coconut for topping
Preparing the Donut Batter:
- Combine the Dry Ingredients: In a large bowl, whisk together the oat flour, cocoa powder, protein powder, baking powder, baking soda, salt, and sweetener. Make sure everything is evenly distributed to avoid clumps of baking powder or protein powder in your donuts. I like to whisk for at least 30 seconds to ensure a good mix.
- Combine the Wet Ingredients: In a separate bowl, whisk together the applesauce, milk, eggs, melted coconut oil, and vanilla extract. Ensure the eggs are well beaten and the wet ingredients are fully emulsified. This helps create a smooth and consistent batter.
- Combine Wet and Dry: Gradually add the wet ingredients to the dry ingredients, mixing until just combined. Be careful not to overmix! Overmixing can develop the gluten in the oat flour (or almond flour), resulting in tough donuts. A few streaks of flour are okay at this stage.
- Let the Batter Rest (Optional but Recommended): Allow the batter to rest for 5-10 minutes. This allows the oat flour to absorb the moisture and helps the baking powder and baking soda activate, resulting in a lighter and fluffier donut.
Baking the Donuts:
- Preheat the Oven: Preheat your oven to 350°F (175°C). Make sure your oven rack is in the center position for even baking.
- Prepare the Donut Pan: Grease a donut pan thoroughly with cooking spray. I prefer using a non-stick donut pan, but greasing is still essential to prevent the donuts from sticking. You can also lightly dust the pan with cocoa powder after greasing for an extra layer of protection and a richer chocolate flavor.
- Fill the Donut Pan: Transfer the batter to a piping bag or a large zip-top bag. If using a zip-top bag, snip off one corner. Pipe the batter into the donut cavities, filling them about ¾ full. Avoid overfilling, as the donuts will rise during baking. If you don’t have a piping bag, you can carefully spoon the batter into the donut pan, but piping ensures a more even distribution.
- Bake the Donuts: Bake for 12-15 minutes, or until a toothpick inserted into the center comes out clean. The baking time may vary depending on your oven, so keep a close eye on them. The donuts should be springy to the touch and slightly golden brown around the edges.
- Cool the Donuts: Let the donuts cool in the pan for a few minutes before carefully transferring them to a wire rack to cool completely. This prevents them from breaking or sticking to the pan.
Making the Chocolate Glaze (Optional):
- Melt the Chocolate: In a microwave-safe bowl, combine the dark chocolate chips and coconut oil. Microwave in 30-second intervals, stirring in between, until the chocolate is completely melted and smooth. Be careful not to overheat the chocolate, as it can burn.
- Glaze the Donuts: Dip each cooled donut into the melted chocolate glaze, ensuring it’s evenly coated. You can also drizzle the glaze over the donuts using a spoon or fork.
- Add Toppings (Optional): Immediately sprinkle the glazed donuts with your desired toppings, such as sprinkles, chopped nuts, or shredded coconut. The glaze will set quickly, so it’s important to add the toppings right away.
- Let the Glaze Set: Place the glazed donuts back on the wire rack and let the glaze set completely before serving. This usually takes about 15-20 minutes. You can speed up the process by placing the donuts in the refrigerator for a few minutes.
Tips and Variations:
- Gluten-Free Option: Use almond flour instead of oat flour for a gluten-free version.
- Vegan Option: Use plant-based protein powder, non-dairy milk, and a flax egg (1 tablespoon ground flaxseed mixed with 3 tablespoons water, let sit for 5 minutes) instead of regular eggs.
- Add-Ins: Get creative with add-ins! Try adding chocolate chips, chopped nuts, or dried fruit to the batter.
- Spice it Up: Add a pinch of cinnamon or nutmeg to the batter for a warm and cozy flavor.
- Storage: Store the donuts in an airtight container at room temperature for up to 2 days or in the refrigerator for up to 5 days.
- Freezing: These donuts freeze well. Wrap them individually in plastic wrap and store them in a freezer-safe bag for up to 2 months. Thaw at room temperature before serving.
- Protein Powder Choice: The type of protein powder you use can affect the texture of the donuts. Whey protein tends to make them slightly denser, while plant-based protein can sometimes make them a bit drier. Adjust the amount of milk as needed to achieve the desired consistency.
- Sweetener Adjustment: Adjust the amount of sweetener to your liking. If you prefer a less sweet donut, reduce the amount of sweetener. If you prefer a sweeter donut, add a little more.
- Donut Pan Size: This recipe is designed for a standard-sized donut pan. If you are using a mini donut pan, you will need to adjust the baking time accordingly.
- Preventing Sticking: Even with a non-stick donut pan, it’s important to grease it well to prevent the donuts from sticking. You can also use a pastry brush to apply a thin layer of melted butter or coconut oil to the pan.
- Even Baking: To ensure even baking, rotate the donut pan halfway through the baking time. This will help prevent some donuts from browning faster than others.
- Testing for Doneness: The toothpick test is the best way to determine if the donuts are done. Insert a toothpick into the center of a donut. If it comes out clean or with a few moist crumbs, the donuts are done. If it comes out with wet batter, continue baking for a few more minutes.
- Cooling Time: Allowing the donuts to cool completely before glazing is important. If the donuts are still warm, the glaze will melt and run off.
- Glaze Consistency: If the chocolate glaze is too thick, add a teaspoon of coconut oil or milk at a time until it reaches the desired consistency. If it’s too thin, add a little more melted chocolate.
- Glaze Variations: Get creative with your glaze! Try adding a teaspoon of peanut butter to the chocolate glaze for a peanut butter chocolate flavor. You can also add a few drops of peppermint extract for a mint chocolate flavor.
- Presentation: Arrange the glazed donuts on a platter or cake stand for an elegant presentation. You can also dust them with powdered sugar or cocoa powder for a finishing touch.
Enjoy your delicious and healthy Chocolate Protein Donuts!
Conclusion:
So there you have it! These Chocolate Protein Donuts are more than just a treat; they’re a guilt-free indulgence that fits perfectly into a healthy lifestyle. I truly believe this recipe is a must-try for anyone looking to satisfy their sweet tooth without derailing their fitness goals. The rich chocolate flavor, combined with the added protein, makes them incredibly satisfying and keeps you feeling fuller for longer. Forget those store-bought donuts loaded with sugar and artificial ingredients – these are the real deal!
Why are these donuts a must-try? Well, firstly, they’re incredibly easy to make. The recipe is straightforward, and you probably already have most of the ingredients in your pantry. Secondly, they’re packed with protein, which is essential for muscle recovery and overall health. And finally, they taste amazing! The combination of cocoa powder, protein powder, and a touch of sweetener creates a flavor that’s both decadent and delicious. It’s a win-win-win!
Looking for serving suggestions? These Chocolate Protein Donuts are fantastic on their own, but you can also dress them up to create a truly special treat. Try drizzling them with melted dark chocolate or a homemade glaze. A sprinkle of chopped nuts, shredded coconut, or even a few chocolate chips adds a delightful textural element. For a truly decadent experience, serve them with a scoop of your favorite protein ice cream.
Variations to Explore:
* Peanut Butter Bliss: Add a tablespoon or two of peanut butter to the batter for a peanut butter chocolate explosion. You can also drizzle melted peanut butter on top.
* Mint Chocolate Chip: Add a few drops of peppermint extract and some mini chocolate chips to the batter for a refreshing twist.
* Mocha Magic: Add a teaspoon of instant coffee to the batter for a mocha-flavored donut.
* Spice it Up: Add a pinch of cinnamon or nutmeg to the batter for a warm and comforting flavor.
* Gluten-Free Goodness: Ensure all your ingredients, especially the flour, are certified gluten-free for a gluten-free version.
Don’t be afraid to experiment and get creative with your toppings and flavor combinations. The possibilities are endless! I encourage you to make this recipe your own and tailor it to your specific preferences.
I’m so excited for you to try these Chocolate Protein Donuts! I know you’ll love them as much as I do. They’re the perfect way to satisfy your cravings without compromising your health. So, go ahead, gather your ingredients, and get baking!
Once you’ve made them, I’d love to hear about your experience. Did you try any of the variations? What toppings did you use? Share your photos and comments on social media using [Your Hashtag] so we can all see your creations. I can’t wait to see what you come up with! Happy baking, and enjoy your delicious and healthy donuts! Let me know if you have any questions, and I’ll do my best to help. I’m confident that this recipe will become a staple in your healthy baking repertoire.
Chocolate Protein Donuts: The Ultimate Guilt-Free Recipe
Delicious and healthy baked chocolate protein donuts, optionally topped with a rich chocolate glaze. A guilt-free treat perfect for breakfast or dessert!
Ingredients
- 1 ½ cups oat flour (or almond flour for gluten-free)
- ½ cup unsweetened cocoa powder
- ½ cup chocolate protein powder (whey or plant-based)
- 1 teaspoon baking powder
- ½ teaspoon baking soda
- ¼ teaspoon salt
- ½ cup granulated sweetener of choice (erythritol, stevia, or regular sugar)
- 1 cup unsweetened applesauce
- ½ cup milk (dairy or non-dairy)
- 2 large eggs
- 2 tablespoons melted coconut oil (or any neutral oil)
- 1 teaspoon vanilla extract
- ½ cup dark chocolate chips
- 1 tablespoon coconut oil
- Optional: sprinkles, chopped nuts, or shredded coconut for topping
Instructions
- In a large bowl, whisk together the oat flour, cocoa powder, protein powder, baking powder, baking soda, salt, and sweetener. Whisk for at least 30 seconds to ensure a good mix.
- In a separate bowl, whisk together the applesauce, milk, eggs, melted coconut oil, and vanilla extract. Ensure the eggs are well beaten.
- Gradually add the wet ingredients to the dry ingredients, mixing until just combined. Be careful not to overmix. A few streaks of flour are okay.
- Allow the batter to rest for 5-10 minutes.
- Preheat your oven to 350°F (175°C).
- Grease a donut pan thoroughly with cooking spray. Lightly dust the pan with cocoa powder after greasing for an extra layer of protection and a richer chocolate flavor.
- Transfer the batter to a piping bag or zip-top bag. Pipe the batter into the donut cavities, filling them about ¾ full.
- Bake for 12-15 minutes, or until a toothpick inserted into the center comes out clean.
- Let the donuts cool in the pan for a few minutes before carefully transferring them to a wire rack to cool completely.
- In a microwave-safe bowl, combine the dark chocolate chips and coconut oil. Microwave in 30-second intervals, stirring in between, until the chocolate is completely melted and smooth.
- Dip each cooled donut into the melted chocolate glaze, ensuring it’s evenly coated.
- Immediately sprinkle the glazed donuts with your desired toppings, such as sprinkles, chopped nuts, or shredded coconut.
- Place the glazed donuts back on the wire rack and let the glaze set completely before serving. This usually takes about 15-20 minutes.
Notes
- Gluten-Free Option: Use almond flour instead of oat flour.
- Vegan Option: Use plant-based protein powder, non-dairy milk, and a flax egg (1 tablespoon ground flaxseed mixed with 3 tablespoons water, let sit for 5 minutes) instead of regular eggs.
- Add-Ins: Get creative with add-ins! Try adding chocolate chips, chopped nuts, or dried fruit to the batter.
- Spice it Up: Add a pinch of cinnamon or nutmeg to the batter for a warm and cozy flavor.
- Storage: Store the donuts in an airtight container at room temperature for up to 2 days or in the refrigerator for up to 5 days.
- Freezing: These donuts freeze well. Wrap them individually in plastic wrap and store them in a freezer-safe bag for up to 2 months. Thaw at room temperature before serving.
- Protein Powder Choice: The type of protein powder you use can affect the texture of the donuts. Whey protein tends to make them slightly denser, while plant-based protein can sometimes make them a bit drier. Adjust the amount of milk as needed to achieve the desired consistency.
- Sweetener Adjustment: Adjust the amount of sweetener to your liking. If you prefer a less sweet donut, reduce the amount of sweetener. If you prefer a sweeter donut, add a little more.
- Donut Pan Size: This recipe is designed for a standard-sized donut pan. If you are using a mini donut pan, you will need to adjust the baking time accordingly.
- Preventing Sticking: Even with a non-stick donut pan, it’s important to grease it well to prevent the donuts from sticking. You can also use a pastry brush to apply a thin layer of melted butter or coconut oil to the pan.
- Even Baking: To ensure even baking, rotate the donut pan halfway through the baking time. This will help prevent some donuts from browning faster than others.
- Testing for Doneness: The toothpick test is the best way to determine if the donuts are done. Insert a toothpick into the center of a donut. If it comes out clean or with a few moist crumbs, the donuts are done. If it comes out with wet batter, continue baking for a few more minutes.
- Cooling Time: Allowing the donuts to cool completely before glazing is important. If the donuts are still warm, the glaze will melt and run off.
- Glaze Consistency: If the chocolate glaze is too thick, add a teaspoon of coconut oil or milk at a time until it reaches the desired consistency. If it’s too thin, add a little more melted chocolate.
- Glaze Variations: Get creative with your glaze! Try adding a teaspoon of peanut butter to the chocolate glaze for a peanut butter chocolate flavor. You can also add a few drops of peppermint extract for a mint chocolate flavor.
- Presentation: Arrange the glazed donuts on a platter or cake stand for an elegant presentation. You can also dust them with powdered sugar or cocoa powder for a finishing touch.