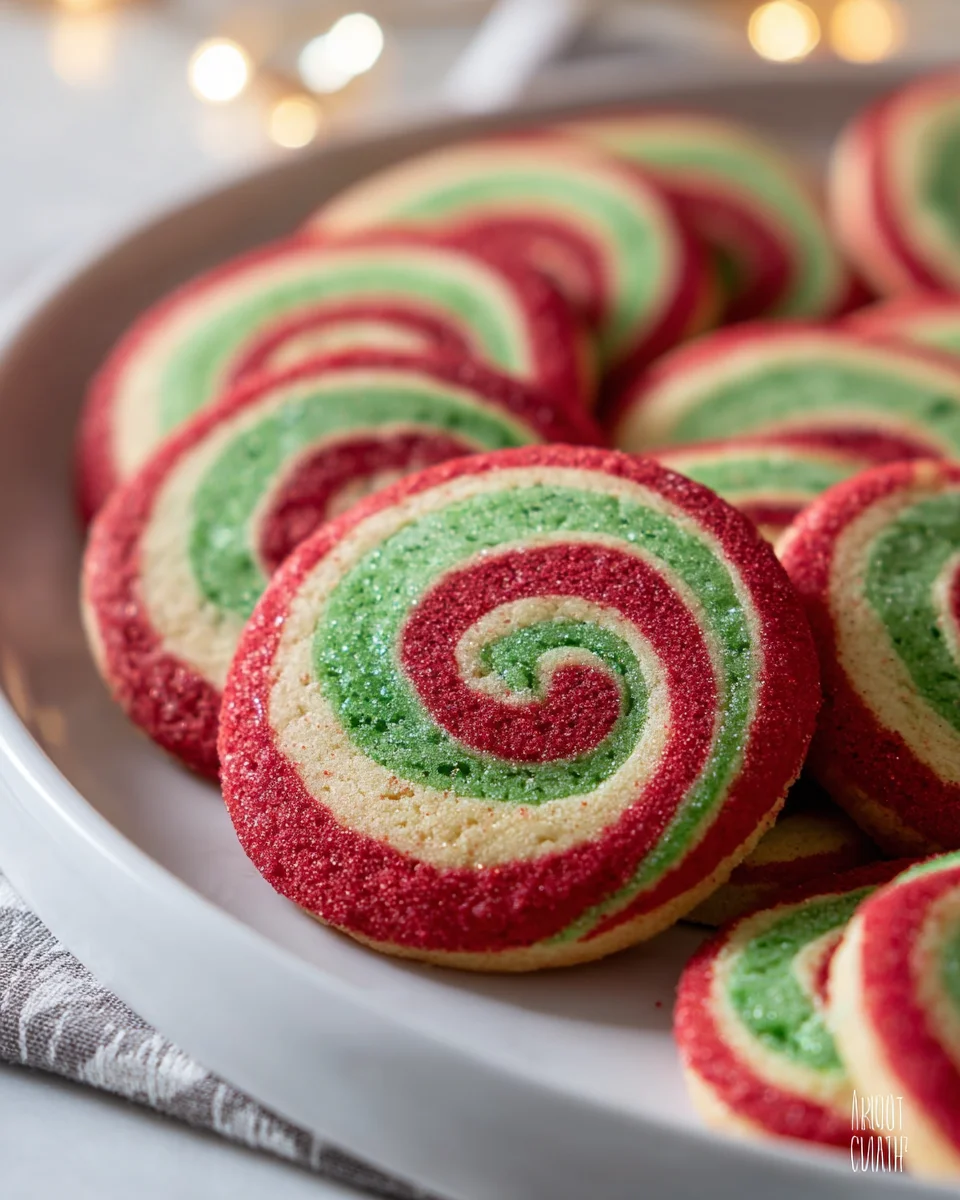
Christmas Pinwheel Cookies are more than just a treat; they are miniature works of art that capture the joyous spirit of the holiday season in every delightful swirl.
As soon as these vibrant, spiraled beauties emerge from the oven, their enchanting appearance promises something truly special. I find myself marveling at how a simple dough can transform into such an iconic festive confection, instantly evoking cherished memories of family gatherings and cozy winter evenings around the cookie platter. These festive swirls aren’t just baked goods; they’re edible expressions of holiday cheer, a visual delight before they even reach your palate.
These delightful cookies have a storied place in holiday baking traditions, gracing dessert platters for generations. Their mesmerizing design, often achieved with contrasting vanilla and chocolate doughs, makes them a standout addition to any cookie exchange or festive spread. People adore Christmas Pinwheel Cookies not just for their stunning visual appeal, but also for their perfectly balanced flavor—a rich, buttery sweetness complemented by a hint of cocoa, all wrapped in a wonderfully soft and tender bite. They are undeniably a Christmas classic for a reason!

Ingredients:
- For the Basic Cookie Dough:
- 2 ½ cups (300g) all-purpose flour, plus more for dusting
- 1 teaspoon baking powder
- ½ teaspoon salt
- 1 cup (226g) unsalted butter, softened at room temperature
- 1 ½ cups (300g) granulated sugar
- 2 large eggs, at room temperature
- 2 teaspoons pure vanilla extract
- For the Chocolate Dough:
- ¼ cup (22g) unsweetened cocoa powder
- 1 tablespoon milk (whole or 2%)
- Optional:
- Assorted Christmas sprinkles or sanding sugar for decoration
Making the Vanilla Dough for Your Christmas Pinwheel Cookies
- Combine Dry Ingredients: In a medium bowl, I always start by whisking together the flour, baking powder, and salt. This ensures all the leavening agents and flavor enhancers are evenly distributed throughout the flour, which is crucial for a consistent texture in our finished Christmas Pinwheel Cookies. Set this bowl aside for a moment.
- Cream Butter and Sugar: In a large mixing bowl, using either a stand mixer fitted with the paddle attachment or a hand mixer, I beat the softened unsalted butter on medium speed until it’s wonderfully creamy, which usually takes about 1-2 minutes. Then, I gradually add the granulated sugar, continuing to beat until the mixture is light, fluffy, and noticeably pale in color. This creaming process is incredibly important; it incorporates air into the butter and sugar, which contributes to the cookies’ tenderness and delicate crumb. You should beat this for at least 3-5 minutes, scraping down the sides of the bowl once or twice to ensure everything is fully combined.
- Incorporate Eggs and Vanilla: Next, I add the large eggs, one at a time, beating well after each addition. It’s essential to let each egg fully incorporate before adding the next to avoid a curdled appearance. Once both eggs are in and the mixture looks smooth, I stir in the pure vanilla extract. The vanilla is key for that classic, comforting cookie flavor that perfectly complements the chocolate swirl in our Christmas Pinwheel Cookies. Beat for another minute or so until everything is thoroughly mixed.
- Gradually Add Dry to Wet Ingredients: Now, it’s time to bring our dry ingredients into the mix. With the mixer on low speed, I gradually add the flour mixture to the wet ingredients, a third at a time, mixing just until combined. It’s crucial not to overmix the dough at this stage. Overmixing can develop the gluten in the flour too much, leading to tough cookies, which is definitely not what we want for our lovely, tender Christmas Pinwheel Cookies. Stop mixing as soon as no dry streaks of flour remain. The dough will be soft and pliable.
- Divide the Dough: Carefully divide the completed dough into two equal halves. I find weighing them to be the most accurate way to ensure even division, but estimating by eye works perfectly fine too. Each half will form the basis of our contrasting colors. One half will remain vanilla, and the other will become our rich chocolate dough.
Creating the Chocolate Dough for a Striking Contrast
- Prepare the Chocolate Mixture: In a small bowl, I whisk together the unsweetened cocoa powder and the milk until a smooth, thick paste forms. This step helps prevent lumps of cocoa powder in the dough and ensures a vibrant, even chocolate color.
- Incorporate into One Dough Half: Take one half of the prepared vanilla cookie dough and place it back into the mixing bowl. Add the cocoa paste to this half. Beat on low speed until the cocoa paste is fully incorporated and the dough is uniformly chocolate brown. Again, avoid overmixing. The goal here is just to achieve a consistent color and flavor. This chocolate half will create the beautiful dark swirl that makes these Christmas Pinwheel Cookies so visually appealing and delicious.
Chilling the Dough for Perfect Christmas Pinwheel Cookies
- Shape and Wrap Each Dough: I typically shape each ball of dough (one vanilla, one chocolate) into a flat disc, about 1-inch thick. This shape makes it easier to roll out later. Then, I individually wrap each disc tightly in plastic wrap.
- Refrigerate Thoroughly: Transfer both wrapped dough discs to the refrigerator and chill for at least 2 hours, or preferably up to 4 hours. This chilling step is non-negotiable for Christmas Pinwheel Cookies! It allows the gluten to relax, makes the dough much easier to handle without becoming sticky, and prevents the cookies from spreading excessively during baking. A properly chilled dough ensures your pinwheel pattern stays crisp and defined. If you try to rush this step, you’ll find the dough very difficult to work with, and your pinwheels might lose their shape. I often chill them overnight if I’m preparing them for a special occasion.
Rolling and Assembling Your Festive Pinwheel Cookies
- Prepare Your Workspace: Once the dough is thoroughly chilled, remove one disc (either vanilla or chocolate) from the refrigerator. Allow it to sit at room temperature for about 10-15 minutes to soften just slightly. This makes it easier to roll without cracking, but don’t let it get too warm. Lightly flour a clean work surface and your rolling pin. I prefer to roll my doughs on parchment paper, which makes transferring and lifting them much easier.
- Roll the Vanilla Dough: Place one dough disc on your lightly floured surface or parchment paper. Using your rolling pin, roll the dough into a rectangle approximately 12×9 inches and about ⅛-inch thick. Try to make the edges as straight as possible, as this will help create a neat pinwheel. If the dough starts to stick, gently lift it and dust a little more flour underneath. If it becomes too soft, pop it back into the fridge for 5-10 minutes.
- Roll the Chocolate Dough: Repeat the exact same process with the other dough disc. Roll the chocolate dough into an identical 12×9-inch rectangle, also about ⅛-inch thick. It’s important that both rectangles are as close to the same size as possible for even layering and a beautiful swirl in your Christmas Pinwheel Cookies.
- Layer the Doughs: This is where the magic starts to happen! Carefully transfer one of the rolled dough rectangles (I usually start with the vanilla) onto a fresh piece of parchment paper. Then, gently lay the other dough rectangle (the chocolate one) directly on top of the first, aligning the edges as perfectly as you can. Press lightly with your hands or the rolling pin to ensure they adhere to each other without air pockets. Take your time here; a neat layering results in a visually stunning pinwheel.
- Roll into a Log: Starting from one of the longer 12-inch sides, carefully and tightly roll the layered dough into a snug log. As you roll, try to keep it as tight as possible to prevent gaps in the pinwheel pattern. Gently press along the seam to seal it securely. This log will eventually give us the distinct spirals of our Christmas Pinwheel Cookies. If you wish, you can sprinkle some festive Christmas sprinkles or sanding sugar on the top of the log at this point, pressing them gently so they adhere before the final chill.
- Chill the Log Again: Wrap the dough log tightly in plastic wrap. Place it back in the refrigerator and chill for at least 1 hour, or up to 2 hours. This second chilling period is absolutely essential to firm up the log, making it much easier to slice neatly without squishing the pinwheel shape. A well-chilled log is the secret to perfectly shaped Christmas Pinwheel Cookies.
Slicing and Baking Your Beautiful Christmas Pinwheel Cookies
- Preheat Oven and Prep Baking Sheets: About 15-20 minutes before you plan to bake, preheat your oven to 375°F (190°C). Line two large baking sheets with parchment paper or silicone baking mats. This prevents sticking and makes cleanup a breeze.
- Slice the Log: Remove the chilled dough log from the refrigerator. Using a sharp, non-serrated knife, carefully slice the log into rounds about ¼-inch thick. Aim for consistent thickness for even baking. If the dough is too cold, it might crack; if it’s too warm, it might squish. If the log starts to soften too much while you’re slicing, pop it back into the freezer for 5-10 minutes to firm up again. Rotate the log slightly after each slice to help maintain its round shape. You should see those gorgeous pinwheel swirls appearing as you slice!
- Arrange on Baking Sheets: Place the sliced Christmas Pinwheel Cookies about 1 inch apart on the prepared baking sheets. They don’t spread a great deal, but leaving enough space ensures even air circulation around each cookie.
- Bake to Perfection: Bake for 8-10 minutes, or until the edges are lightly golden. I find that 9 minutes is often the sweet spot in my oven, but every oven is different, so keep an eye on them. The cookies will still seem soft in the center when you remove them from the oven, but they will firm up as they cool. Overbaking will make them dry and hard, so err on the side of slightly underbaked for a chewier texture.
- Cooling: Let the Christmas Pinwheel Cookies cool on the baking sheets for about 5 minutes before carefully transferring them to a wire rack to cool completely. Cooling completely is important for the texture to set and for the flavors to fully develop.
Tips for Perfect Christmas Pinwheel Cookies and Storage
- Temperature Matters: As I’ve emphasized, dough temperature is paramount for these Christmas Pinwheel Cookies. Ensure your butter is softened for creaming, but your dough is always well-chilled before rolling and slicing. This careful temperature control is the biggest secret to crisp lines and easy handling.
- Even Rolling: Strive for evenly thick dough rectangles when rolling. Inconsistent thickness can lead to uneven baking and a less defined pinwheel pattern. A rolling pin with thickness guides can be a fantastic tool here if you have one.
- Tight Rolling: When rolling the layered dough into a log, really try to make it as tight as possible. This minimizes air pockets between the layers, resulting in a dense, beautiful swirl in every single Christmas Pinwheel Cookie.
- Storage: Once completely cooled, store your beautiful Christmas Pinwheel Cookies in an airtight container at room temperature for up to 5-7 days. They maintain their delicious flavor and festive appearance wonderfully.
- Freezing Dough: If you want to get ahead, you can freeze the unbaked dough log! Wrap it very tightly in plastic wrap, then again in aluminum foil, and freeze for up to 2-3 months. When you’re ready to bake, simply thaw the log in the refrigerator overnight, then slice and bake as directed. This makes a fresh batch of Christmas Pinwheel Cookies incredibly convenient for holiday entertaining.
- Freezing Baked Cookies: You can also freeze the baked Christmas Pinwheel Cookies. Once fully cooled, arrange them in a single layer on a baking sheet and freeze until solid. Then transfer them to an airtight freezer-safe container or bag, separating layers with parchment paper. They will keep well for up to 1 month. Thaw at room temperature before serving.
Conclusion:
Well, my fellow bakers, we’ve reached the sweet end of our journey with this incredible recipe, and I truly hope you’re feeling inspired to get into your kitchen and create some magic. If you’ve followed along, you already know that these delightful treats aren’t just any ordinary cookie; they are a vibrant celebration in every bite, a testament to how simple ingredients can transform into something truly extraordinary. I genuinely believe that once you try making these, they’ll earn a permanent spot on your holiday baking roster. They are remarkably straightforward to prepare, yet they deliver an undeniable “wow” factor that will impress everyone lucky enough to taste them.
The beauty of this recipe lies not only in its stunning visual appeal—those mesmerizing spirals of color are simply captivating—but also in its utterly comforting, buttery vanilla flavor that evokes pure nostalgia. Imagine the joyous anticipation as you slice through the chilled dough, revealing those perfect concentric circles, each one promising a moment of bliss. These cookies are more than just a treat; they’re an experience, a memory in the making. They are robust enough to handle packaging and sharing, yet delicate enough to melt in your mouth, leaving a lovely, lingering sweetness. Plus, the sheer joy of watching them bake, seeing those colors intensify, is a reward in itself. Trust me when I say, you really don’t want to miss out on the pure delight these offer.
Serving Suggestions and Creative Variations:
Now, let’s talk about how to elevate your baking triumph even further. Once your beautiful cookies are cooled, there are countless ways to enjoy them. Naturally, they are absolutely perfect on their own with a steaming mug of coffee or a cozy cup of herbal tea. For the little ones (and the young at heart!), a tall glass of cold milk is the ultimate companion. They make a fantastic addition to any holiday dessert platter, standing out with their unique visual charm among the usual suspects. Think about arranging them artfully on a festive serving dish, perhaps alongside some sugared cranberries or a sprig of fresh rosemary for an extra touch of elegance. They also make truly thoughtful and cherished homemade gifts. Imagine bundling a dozen or so into a charming cellophane bag tied with a festive ribbon – who wouldn’t be thrilled to receive such a delicious and visually stunning present?
But why stop there? Let’s get creative with some variations! While the classic red and green combination is undeniably iconic and truly embodies the spirit of Christmas Pinwheel Cookies, don’t be afraid to experiment with other color pairings. How about a striking chocolate and vanilla swirl using cocoa powder in one half of the dough? Or perhaps a sophisticated blue and silver for a winter wonderland theme? You could even introduce different flavor extracts. A touch of almond extract instead of vanilla offers a delightful nuance, or a hint of orange zest kneaded into the dough would bring a bright, zesty twist. For a truly decadent experience, consider adding a sprinkle of edible glitter or fine sanding sugar to the dough before rolling it, creating a lovely sparkle that catches the light. If you’re feeling adventurous, you could even try a subtle hint of peppermint extract in one of the dough portions for a refreshing, festive kick that pairs beautifully with the sweet vanilla.
Your Turn to Bake and Share!
So, there you have it. My heartfelt encouragement for you to dive into this recipe. These aren’t just cookies; they’re a blank canvas for your holiday creativity and a surefire way to spread cheer. I am genuinely excited for you to experience the immense satisfaction that comes from baking a batch of these exquisite treats. The delightful aroma filling your home, the smiles they’ll bring to faces young and old, and the simple joy of creating something beautiful with your own hands – these are the true rewards. Don’t hesitate any longer! Gather your ingredients, put on your favorite holiday tunes, and let the baking begin.
Once you’ve whipped up your own batch of these incredible cookies, I would absolutely love to hear about your experience. Did you stick to the classic colors, or did you venture into new flavor combinations? How did your family and friends react? Please, share your baking triumphs, your creative twists, and even any tips you discovered along the way. Your stories and photos inspire me and our entire baking community. Together, let’s make this holiday season the most delicious one yet, filled with the joy of homemade goodness and the shared love for delightful treats like these perfect pinwheels!
Christmas Pinwheel Cookies: Festive Swirls for Your Holiday Table
Christmas Pinwheel Cookies are miniature works of art that capture the joyous spirit of the holiday season in every delightful swirl. These vibrant, spiraled beauties evoke cherished memories of holiday gatherings.
Ingredients
Instructions
Important Information
Nutrition Facts (Per Serving)
It is important to consider this information as approximate and not to use it as definitive health advice.
Allergy Information
Please check ingredients for potential allergens and consult a health professional if in doubt.