• Skip to primary navigation
  • Skip to main content
  • Skip to primary sidebar
Homesmad

Homesmad

  • Home
  • Breakfast & Brunch
  • Appetizers & Snacks
  • Dinner
  • Dessert
  • About
  • Privacy Policy
  • Contact
Homesmad
  • Home
  • Breakfast & Brunch
  • Appetizers & Snacks
  • Dinner
  • Dessert
  • About
  • Privacy Policy
  • Contact

Christmas Sprinkle Buttermilk Bread: Festive & Easy!

October 7, 2025 by Lily author

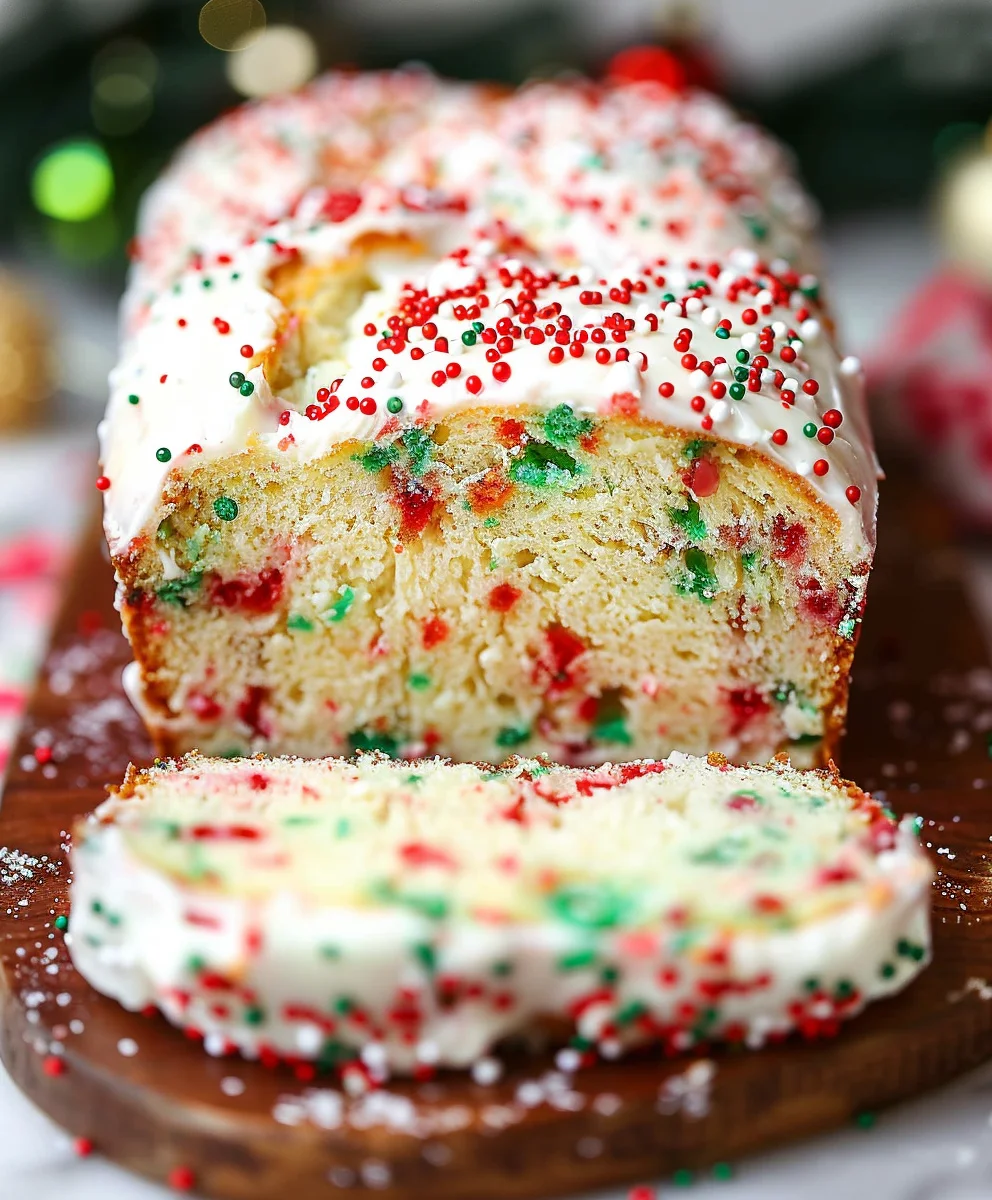
Christmas Sprinkle Buttermilk Bread is more than just a seasonal treat; it’s a slice of pure holiday joy, beautifully adorned and bursting with comforting flavors. I’ve always found that the holidays are best celebrated with warm, homemade goods, and this vibrant bread truly embodies that spirit. Imagine a perfectly tender, moist loaf, subtly sweet with a delightful buttermilk tang, all studded with a kaleidoscope of festive sprinkles that shimmer like tiny ornaments. It’s incredibly inviting, not only to taste but also to behold.

While it might not have ancient roots, the tradition of baking special breads for Christmas is deeply cherished in many cultures, symbolizing warmth, generosity, and sharing. This particular recipe brings a playful, modern twist to that beloved custom, making it an ideal centerpiece for a holiday brunch or a heartwarming gift for loved ones. You’ll discover that making this Christmas Sprinkle Buttermilk Bread is surprisingly simple, yet yields results that are absolutely show-stopping. Its delightful combination of sweet cheer and comforting richness makes it an instant favorite, capturing the magic of the season in every single bite. Prepare to spread smiles with this wonderfully festive creation!

Christmas Sprinkle Buttermilk Bread: Festive & Easy! this RECIPE

Ingredients:

  • For the Christmas Sprinkle Buttermilk Bread:
    • 2 ½ cups (300g) all-purpose flour, sifted
    • 1 ½ cups (300g) granulated sugar
    • 1 tablespoon baking powder
    • 1 teaspoon baking soda
    • ½ teaspoon fine sea salt
    • ¾ cup (1 ½ sticks or 170g) unsalted butter, softened to room temperature
    • 2 large eggs, also at room temperature
    • 1 cup (240ml) buttermilk, room temperature is best
    • 2 teaspoons pure vanilla extract
    • ½ cup (about 90-100g) high-quality Christmas sprinkles (I highly recommend using jimmie-style sprinkles as they are less prone to bleeding their colors during baking compared to nonpareils, ensuring your bread looks vibrantly festive!)
  • For the Festive Vanilla Glaze:
    • 1 ½ cups (180g) powdered sugar (confectioners’ sugar), sifted
    • 3-4 tablespoons milk (whole milk or half-and-half works wonderfully for richness)
    • ½ teaspoon pure vanilla extract
    • A tiny pinch of fine sea salt (this really brightens the flavor!)
    • Extra Christmas sprinkles for garnish (optional, but highly encouraged for maximum festive cheer!)

Preparing Your Workspace and Ingredients (Mise en Place)

Before we dive into the delightful process of creating our Christmas Sprinkle Buttermilk Bread, it’s always a fantastic idea to get all your ingredients measured out and ready. This practice, known as “mise en place,” which is a French culinary term meaning “everything in its place,” makes the baking process so much smoother and more enjoyable. It minimizes stress and ensures you don’t miss any crucial steps or ingredients.

  1. First things first, let’s preheat our oven. Set it to a cozy 350°F (175°C). A properly preheated oven is key to even baking and a beautiful rise for our loaf.
  2. Next, prepare your loaf pan. I use a standard 9×5-inch (23×13 cm) loaf pan. Generously grease it with butter or a non-stick cooking spray. For an extra layer of non-stick insurance and easy removal, I like to line the bottom and two long sides with parchment paper, leaving an overhang on the sides. This creates convenient “handles” to lift the bread out once it’s baked. This step is incredibly helpful for maintaining the bread’s perfect shape and prevents any sticking frustrations.
  3. Ensure all your cold ingredients, like butter, eggs, and buttermilk, have had ample time to come to room temperature. This is not just a suggestion; it’s a critical step! Room temperature ingredients emulsify much better, meaning they blend together seamlessly, creating a smoother, more uniform batter and ultimately a lighter, more tender crumb in your finished Christmas Sprinkle Buttermilk Bread. If your butter is too cold, it won’t cream properly with the sugar; if your eggs are too cold, they can cause the butter mixture to curdle slightly.
  4. Take a moment to sift your all-purpose flour. Sifting removes any lumps and aerates the flour, contributing to a lighter texture in the final bread. I always recommend this step for quick breads.

Crafting the Irresistible Buttermilk Bread Batter

Now that everything is prepped and ready, let’s get to the heart of the matter – mixing up this incredibly delicious and festive batter! This stage is where the magic truly begins to happen, and your kitchen will soon be filled with the most comforting aromas.

  1. In a large mixing bowl, combine all your dry ingredients: the sifted all-purpose flour, granulated sugar, baking powder, baking soda, and fine sea salt. Whisk them together thoroughly for about 30 seconds to a minute. This ensures that the leavening agents (baking powder and baking soda) and salt are evenly distributed throughout the flour, which is vital for a consistent rise and flavor in every slice of your Christmas Sprinkle Buttermilk Bread. Set this bowl aside for a moment.
  2. In a separate, even larger mixing bowl (or the bowl of your stand mixer fitted with the paddle attachment), place the softened unsalted butter. Begin to beat the butter on medium speed until it’s wonderfully creamy and light, about 1-2 minutes.
  3. Next, add the granulated sugar to the softened butter. Cream these two ingredients together for a full 3-5 minutes on medium-high speed. This creaming process is essential: you want the mixture to become light in color, pale yellow, and noticeably fluffy. The sugar crystals will cut into the butter, creating tiny air pockets. These air pockets are what give our bread its delicate texture and help it rise beautifully in the oven. Scrape down the sides of the bowl occasionally to ensure everything is incorporated.
  4. One by one, add the room temperature eggs to the creamed butter and sugar mixture. Beat well after each addition, ensuring each egg is fully incorporated before adding the next. This typically takes about 1 minute per egg. The mixture might look a little curdled after the first egg, but it will smooth out as you continue to beat and add the others. The eggs add richness, moisture, and help bind our batter together. Don’t rush this step!
  5. In a small bowl or liquid measuring cup, whisk together the room temperature buttermilk and pure vanilla extract. The vanilla extract is going to infuse our bread with that classic, warm, comforting flavor that pairs so perfectly with the festive sprinkles.
  6. Now, we’re going to combine the wet and dry ingredients in an alternating fashion, a technique that helps build a stable emulsion and prevents overmixing. With your mixer on low speed, or by hand with a spatula, begin by adding about one-third of your dry ingredient mixture to the butter-egg mixture. Mix just until combined, don’t overdo it.
  7. Immediately follow with about half of your buttermilk mixture. Mix until just combined.
  8. Repeat this process: add the second third of the dry ingredients, mix, then the remaining half of the buttermilk mixture, mix.
  9. Finally, add the last third of the dry ingredients. Mix on low speed just until no streaks of flour remain and the batter is smooth and homogeneous. This is a critical point: do not overmix! Overmixing develops the gluten in the flour too much, which can lead to a tough, dry bread. We want our Christmas Sprinkle Buttermilk Bread to be tender and moist, so mix just until combined. The batter will be thick and luxurious.
  10. And now for the fun part – the Christmas sprinkles! Gently fold the ½ cup of high-quality Christmas sprinkles into the batter using a spatula. Be careful not to overmix here either; we want the sprinkles to be evenly distributed throughout the batter without their colors bleeding too much before baking. A few gentle folds are all it takes. This step transforms our lovely buttermilk bread into a truly festive creation, bursting with color and holiday cheer!

Baking the Festive Christmas Sprinkle Buttermilk Bread

The moment of truth is upon us! Getting this beautiful batter into the oven is the next exciting step. Soon, your home will be filled with the most incredible aroma of baking butter, vanilla, and sweet goodness.

  1. Carefully spoon the prepared batter into your greased and parchment-lined loaf pan. Use your spatula to spread the batter evenly, making sure it reaches into all the corners of the pan. For an even more professional look and to help prevent a domed top from cracking excessively, I often create a slight “trough” down the center of the batter with the back of my spatula. This encourages the bread to rise more evenly.
  2. Place the loaf pan in your preheated 350°F (175°C) oven. Now, let the magic happen!
  3. Bake for approximately 60-70 minutes. Baking times can vary slightly depending on your oven, so it’s essential to keep an eye on your bread. The precise timing is key to ensuring it’s cooked through without being dry.
  4. How do you know it’s perfectly baked? The Christmas Sprinkle Buttermilk Bread will have a gorgeous golden-brown crust. A wooden skewer or a toothpick inserted into the very center of the loaf should come out clean, or with just a few moist crumbs attached. If it comes out with wet batter, it needs a little more time. If the top is browning too quickly, you can loosely tent it with aluminum foil during the last 15-20 minutes of baking to prevent over-browning.
  5. Once baked to perfection, carefully remove the loaf pan from the oven. Let the bread cool in the pan for about 10-15 minutes on a wire rack. This initial cooling period allows the bread to set and firm up, preventing it from crumbling when you remove it. It’s also crucial for developing that tender crumb.
  6. After the initial cooling, use the parchment paper overhangs to gently lift the Christmas Sprinkle Buttermilk Bread out of the pan and transfer it directly to the wire rack. Allow it to cool completely, and I mean completely, before you even think about glazing it. This usually takes at least 1 to 2 hours. If you glaze a warm loaf, the glaze will simply melt and run off, rather than setting into that lovely, opaque finish we’re aiming for. Patience is a virtue, especially when it comes to quick breads!

Whipping Up the Festive Vanilla Glaze

While our beautiful Christmas Sprinkle Buttermilk Bread is cooling, let’s prepare the final touch – a smooth, sweet, and wonderfully vanilla-infused glaze. This glaze is not just for visual appeal; it adds an extra layer of moisture and a delightful sweetness that truly complements the bread.

  1. In a medium bowl, combine the sifted powdered sugar, 3 tablespoons of milk, ½ teaspoon of pure vanilla extract, and that tiny pinch of salt. The salt might seem insignificant, but trust me, it’s a flavor enhancer that balances the sweetness beautifully.
  2. Whisk all these ingredients together until the mixture is completely smooth and free of any lumps. You’re aiming for a consistency that is thick enough to coat the back of a spoon but still pourable.
  3. If the glaze is too thick, add the remaining tablespoon of milk (or even half a teaspoon at a time) until you reach your desired consistency. If, by chance, it turns out too thin, you can always whisk in a little more sifted powdered sugar, a tablespoon at a time, until it thickens up. It’s all about finding that perfect balance for a beautiful drape over our Christmas Sprinkle Buttermilk Bread.

The Grand Finale: Glazing and Serving

With our bread completely cool and our glaze perfectly prepared, it’s time to bring it all together for a truly show-stopping Christmas Sprinkle Buttermilk Bread. This final step is where all your efforts come to fruition, resulting in a treat that’s as beautiful to look at as it is delicious to eat!

  1. Once the bread is fully cooled, place the wire rack with the bread over a piece of parchment paper or a baking sheet. This will catch any drips from the glaze, making cleanup a breeze.
  2. Generously pour the prepared vanilla glaze over the top of the cooled Christmas Sprinkle Buttermilk Bread. You can use the back of a spoon or an offset spatula to gently spread it, ensuring it cascades down the sides in luscious rivulets. Don’t be shy; a good layer of glaze is part of the charm!
  3. Immediately after glazing, and while the glaze is still wet, liberally scatter your extra Christmas sprinkles over the top. This is where you can truly make it your own and add as much festive sparkle as your heart desires! The sprinkles will adhere to the wet glaze, creating a dazzling finish that practically screams “happy holidays!”
  4. Allow the glaze to set for about 15-30 minutes at room temperature. It will firm up slightly, creating a beautiful, slightly crackled shell that perfectly complements the soft interior of the bread.
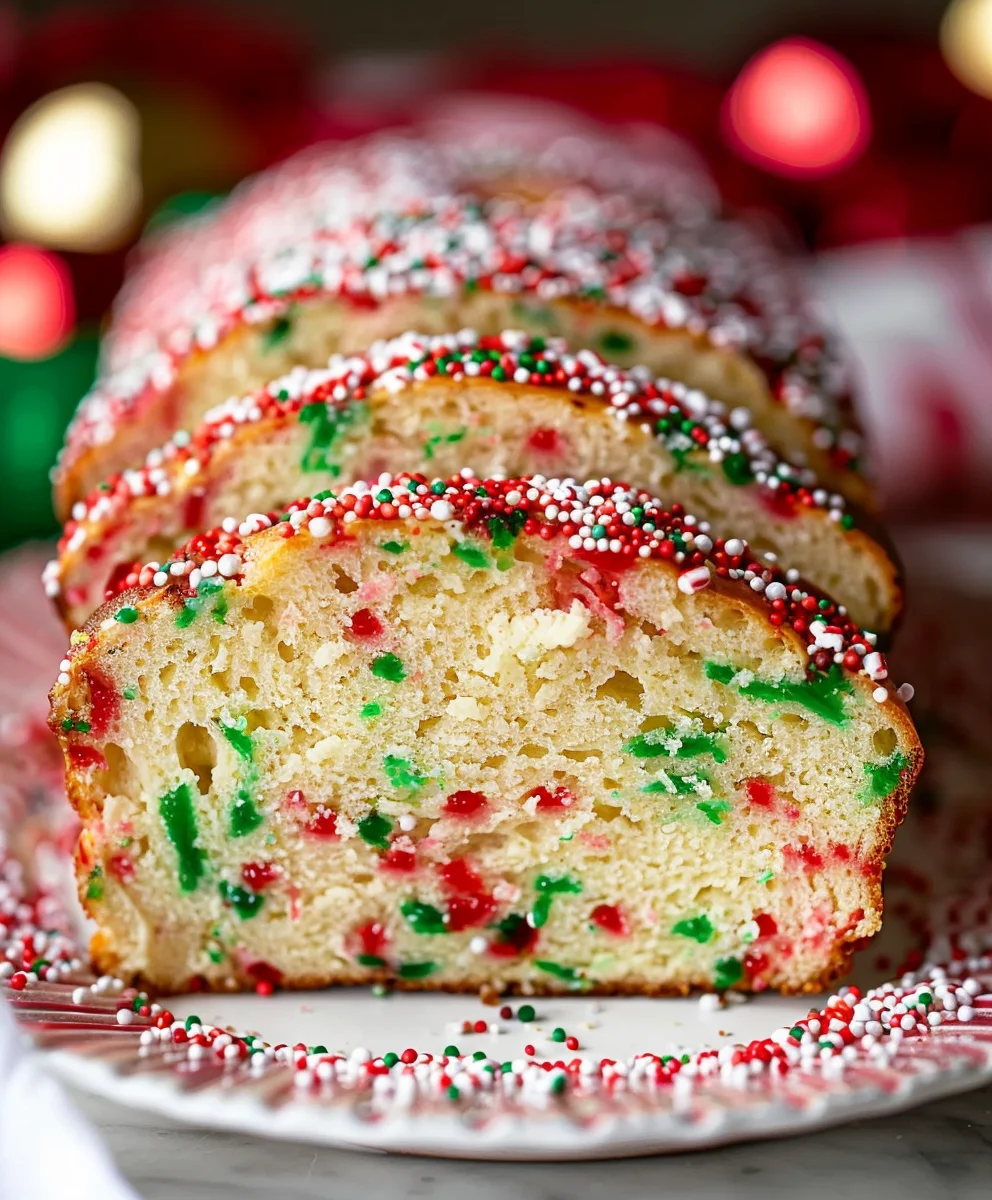
  5. Once the glaze is set, your magnificent Christmas Sprinkle Buttermilk Bread is ready to be sliced and served! Use a serrated knife for clean, even slices. Each slice will reveal a tender, moist crumb dotted with vibrant, colorful sprinkles – a delightful surprise in every bite.
  6. This bread is absolutely perfect for a holiday breakfast, a festive brunch, an afternoon tea treat, or a delightful dessert. It’s a wonderful addition to any Christmas gathering and makes a charming edible gift for friends, family, and neighbors. I just love seeing the joy on people’s faces when they see the colorful sprinkles peeking out!
  7. To store any leftover Christmas Sprinkle Buttermilk Bread, keep it tightly wrapped in plastic wrap or in an airtight container at room temperature for up to 3-4 days. The buttermilk keeps it incredibly moist, so it stays fresh and delicious for quite a while. You can also freeze individual slices, well-wrapped, for up to a month, allowing you to enjoy a taste of Christmas cheer whenever the mood strikes!

Christmas Sprinkle Buttermilk Bread: Festive & Easy!

Conclusion:

And there you have it, my friends! We’ve reached the delicious conclusion of our journey with what I truly believe will become a staple in your holiday baking repertoire. This isn’t just another quick bread; it’s a celebration in loaf form, a testament to the simple joy that a beautifully baked treat can bring. If you’ve been searching for a recipe that combines comforting familiarity with an undeniable festive flair, then your quest ends here. I can confidently say that the unique combination of rich, tangy buttermilk with that perfectly tender crumb, all crowned with a kaleidoscope of festive sprinkles, makes this Christmas Sprinkle Buttermilk Bread an absolute must-try.

What truly sets this bread apart is its incredible versatility and heartwarming appeal. It’s so much more than just a dessert; it’s an experience. The buttermilk works wonders, not only imparting a delightful subtle tang that balances the sweetness beautifully but also ensuring an incredibly moist and tender texture that simply melts in your mouth with every single bite. The visual appeal, of course, is undeniable. Those bright, cheerful sprinkles aren’t just for show; they add a playful crunch and a burst of color that instantly transports you to a place of festive cheer and childlike wonder. Imagine the smiles this bread will bring to faces young and old alike when they see it gracing your holiday table.

Elevate Your Serving Experience: Beyond the Slice

Now, let’s talk about how to truly make this bread shine in various settings. While a simple slice is absolutely divine on its own, especially with a hot cup of coffee or a warming mug of cocoa, there are so many ways to elevate its serving. For a decadent breakfast or brunch, consider toasting a slice lightly and spreading it with a dollop of cream cheese, perhaps even a lightly sweetened vanilla cream cheese. The tang of the bread paired with the creamy richness is truly a match made in heaven. It also makes an exceptional base for a French toast casserole; imagine slices of this festive bread soaked in a custardy batter, baked until golden, and then drizzled with maple syrup. Talk about a showstopper for Christmas morning!

Looking for a more dessert-focused presentation? Try warming slices slightly and serving them alongside a scoop of vanilla bean ice cream, allowing the ice cream to gently melt over the tender bread. For an extra touch of elegance, a light dusting of powdered sugar or a simple glaze made from powdered sugar and a touch of milk or lemon juice would be absolutely delightful. You could even get creative with the glazes – a cranberry glaze for added tartness, or an eggnog-flavored glaze for an even richer holiday feel. The possibilities are truly endless, allowing you to tailor this bread to any occasion or personal preference.

Creative Twists and Flavor Adventures

And don’t hesitate to experiment with variations to make this recipe uniquely yours! While I adore the classic festive sprinkles, you could swap them out for different colors to suit other celebrations – pastels for Easter, red and blue for patriotic holidays, or even Halloween-themed sprinkles. For an added layer of flavor and texture, consider folding in some chopped candied ginger, dried cranberries, or toasted pecans along with the sprinkles. A touch of orange or lemon zest grated into the batter would also brighten the flavor profile beautifully, adding another dimension to the bread’s already fantastic taste. For those who adore chocolate, miniature chocolate chips could be a delightful addition, creating a slightly more indulgent treat. Remember, the base recipe is incredibly forgiving and robust, making it the perfect canvas for your culinary creativity.

I truly hope you feel inspired to bring this delightful creation into your home this holiday season, or any time you need a sprinkle of joy. There’s an unparalleled satisfaction that comes from baking something so visually appealing and utterly delicious from scratch. I poured my heart into perfecting this recipe for you, and I genuinely believe it will become a cherished part of your family’s traditions. So, gather your ingredients, turn on some festive tunes, and let the magic happen in your kitchen. Once you’ve baked your very own loaf of this incredible Christmas Sprinkle Buttermilk Bread, please, please, please share your experience with me! I absolutely adore seeing your creations. Tag me on social media, leave a comment below, or send me an email. Tell me how it tasted, what variations you tried, and most importantly, how much joy it brought to your table. Happy baking, my dear friends!


Christmas Sprinkle Buttermilk Bread

Christmas Sprinkle Buttermilk Bread

A festive, tender, and moist buttermilk bread, subtly sweet with a delightful tang, studded with vibrant Christmas sprinkles and topped with a vanilla glaze. This easy-to-make bread is a pure slice of holiday joy, perfect for holiday brunch, dessert, or a heartwarming edible gift.

Prep Time
40 Minutes

Cook Time
70 Minutes

Total Time
35 Minutes

Servings
1 loaf (approx. 10-12 servings)

Ingredients

  • 2 cups all-purpose flour
  • 1 cup granulated sugar
  • 1 ½ teaspoons baking powder
  • ½ teaspoon baking soda
  • 1 teaspoon kosher salt
  • 1 cup buttermilk
  • 1 large egg, lightly beaten
  • ½ cup unsalted butter, melted and cooled
  • ½ teaspoon almond extract
  • ½ cup Christmas sprinkles
  • 2 cups powdered sugar, sifted
  • 3 tablespoons buttermilk, plus more as needed
  • 1 tablespoon light corn syrup
  • ½ teaspoon pure vanilla extract (for glaze)
  • Nonpareils (for garnish)

Instructions

  1. Step 1
    Preheat oven to 350°F (175°C). Grease and line a 9×5-inch loaf pan with parchment paper, leaving overhangs for easy removal.
  2. Step 2
    In a large mixing bowl, whisk together 2 cups all-purpose flour, 1 cup granulated sugar, 1 ½ teaspoons baking powder, ½ teaspoon baking soda, and 1 teaspoon kosher salt until well combined. Set aside.
  3. Step 3
    In a separate bowl, whisk together 1 cup room temperature buttermilk, 1 large lightly beaten egg, ½ cup melted and cooled unsalted butter, and ½ teaspoon almond extract.
  4. Step 4
    Pour the wet ingredient mixture into the dry ingredients. Mix gently with a spatula until just combined and no dry streaks of flour remain. Do not overmix to ensure a tender bread.
  5. Step 5
    Gently fold ½ cup Christmas sprinkles into the batter until evenly distributed. Be careful not to overmix.
  6. Step 6
    Spoon the batter into the prepared loaf pan, spreading evenly. Bake for 60-70 minutes, or until a wooden skewer inserted into the center comes out clean. If the top browns too quickly, loosely tent with aluminum foil during the last 15-20 minutes.
  7. Step 7
    Remove the loaf from the oven and let it cool in the pan for 10-15 minutes on a wire rack. Then, use the parchment overhangs to gently lift the bread out and transfer it directly to the wire rack. Allow it to cool completely (1-2 hours) before glazing.
  8. Step 8
    While the bread cools, whisk together 2 cups sifted powdered sugar, 3 tablespoons buttermilk, 1 tablespoon light corn syrup, and ½ teaspoon pure vanilla extract in a medium bowl until smooth and pourable. Adjust consistency with more buttermilk (for thinner) or powdered sugar (for thicker) as needed.
  9. Step 9
    Once the bread is fully cooled, place the wire rack with the bread over parchment paper or a baking sheet to catch drips. Generously pour the prepared glaze over the top, spreading gently to cascade down the sides. Immediately scatter Nonpareils (or extra Christmas sprinkles) over the wet glaze.
  10. Step 10
    Allow the glaze to set for 15-30 minutes at room temperature. Once set, slice with a serrated knife and serve. Store any leftover bread tightly wrapped at room temperature for up to 3-4 days, or freeze individual slices for up to a month.

Important Information

Nutrition Facts (Per Serving)

It is important to consider this information as approximate and not to use it as definitive health advice.

Allergy Information

Please check ingredients for potential allergens and consult a health professional if in doubt.

« Previous Post
Delicious Breakfast Fried Rice Recipe for a Great Start
Next Post »
Pizza Grilled Cheese: The Ultimate Comfort Food Mashup!

If you enjoyed this…

Keto Protein Muffins: The Ultimate Guide to Baking Low-Carb Treats

Cinnamon Sugar Butter Swim Biscuits: The Ultimate Guide & Recipe

Healthy Avocado Toast with Poached Egg – Quick Recipe!

Primary Sidebar

Browse by Diet

BreakfastDinnerLunchDessertAppetizer

Sweet Peach Yogurt Parfait Delight

One of my fondest memories is from a lazy summer afternoon spent at my grandmother’s house. The sun filtered through the kitchen window, casting a warm glow over the table where she would create her culinary magic. It was during one of those blissful moments that I first tasted her Peach Yogurt Parfait with Honey and Granola. The sweet aroma of ripe peaches mingling with creamy yogurt and the crunch of granola was nothing short of heavenly. It felt like summer captured in a bowl, and I still remember the joy of diving in with a spoon, each layer revealing a new burst of flavor.

When I think about that parfait, I can almost hear the gentle hum of the bees outside, reminding me of the floral notes that honey brings to every bite. The vibrant yellows and soft oranges of the peaches contrast beautifully with the creamy white yogurt and the golden crunch of granola. It’s a dish that not only looks delightful but also tastes like a celebration of fresh, wholesome ingredients.

What makes my version of this Peach Yogurt Parfait special is the careful balance of flavors and textures. I use ripe, juicy peaches, drizzled with locally sourced honey, and a homemade granola that’s bursting with nuts and seeds for an extra crunch. It’s a simple dish, but every layer is crafted with love and attention.

Let me show you exactly how to make this delightful parfait, so you can bring a bit of that summer magic into your kitchen!

Sweet Peach Yogurt Parfait Delight

Why You’ll Love This Recipe

  • Delightfully creamy texture from the Greek yogurt, paired with the juicy sweetness of fresh peaches.
  • Ready in under 20 minutes, making it a quick and satisfying breakfast or snack option.
  • Budget-friendly, using common ingredients that you may already have in your pantry.
  • Customizable with your favorite granola and nuts, allowing you to tailor each parfait to your taste.
  • Perfectly balanced flavors with the bright acidity of lemon juice and the sweetness of honey enhancing the peaches.

Ingredients

  • For the Parfait:
  • 2 cups plain Greek yogurt (or vanilla yogurt for a sweeter option)
  • 2 large ripe peaches, diced (about 2 cups)
  • 1 tablespoon fresh lemon juice (to prevent browning of peaches)
  • 2 tablespoons honey (plus more for drizzling)
  • 1 teaspoon vanilla extract (optional for extra flavor)
  • For the Granola:
  • 1 cup granola (store-bought or homemade; see notes for a simple granola recipe)
  • 1/4 cup sliced almonds (optional for added crunch)
  • 1/4 cup shredded coconut (optional for added flavor)

Let’s dive into some key ingredients that make this Peach Yogurt Parfait so delightful! First, the Greek yogurt is not only creamy but also packed with protein, making it a satisfying option for breakfast or a snack. If you’re looking for a sweeter option, you can easily substitute it with vanilla yogurt, though it may alter the overall flavor balance. Next, the ripe peaches are the star of the show; their natural sweetness shines through, so I recommend choosing peaches that yield slightly to pressure, indicating they’re perfectly ripe. If peaches aren’t in season, feel free to use nectarines or even frozen peaches—just thaw them before use. Finally, honey adds a lovely floral sweetness that ties everything together. If you prefer, maple syrup can serve as a delicious substitute.

Step-by-Step Instructions

  1. Start by preparing the peaches. Wash them thoroughly, then slice and dice them into bite-sized pieces. In a medium bowl, toss the diced peaches with 1 tablespoon of fresh lemon juice to prevent browning. Set aside for about 5 minutes while the lemon juice works its magic.
  2. In a separate bowl, combine the Greek yogurt, 2 tablespoons of honey, and 1 teaspoon of vanilla extract if using. Stir the mixture until smooth and thoroughly blended. This should take about a minute. Avoid overmixing to maintain the creaminess of the yogurt.
  3. Now it’s time to layer your parfait. Grab a clear glass or bowl to showcase your beautiful creation. Start with a generous spoonful of the yogurt mixture at the bottom—about 1/4 cup will do. Use a spoon to spread it evenly.
  4. Add a layer of the diced peaches over the yogurt, ensuring they cover the yogurt completely. You might want to use about half of what you have prepared—roughly 1 cup. This layer should be visually appealing, so arrange the peaches neatly.
  5. Sprinkle 1/4 cup of granola over the peaches. This adds a delightful crunch. Make sure to distribute it evenly to ensure every bite has that satisfying texture. Avoid packing it down too tightly, as you want it to maintain its crunch.
  6. Repeat the layers: spoon in another 1/4 cup of yogurt, followed by another cup of peaches, and another sprinkle of granola. You should have at least two layers, but feel free to add more depending on your glass size.
  7. Finish off your parfait with a drizzle of honey on top for added sweetness and a touch of elegance. If you’re using sliced almonds or shredded coconut, sprinkle them on top now. It adds a lovely visual contrast and extra flavor.
  8. Serve immediately or refrigerate for up to 30 minutes before serving to allow the flavors to meld together. However, I recommend enjoying it fresh to maintain the granola’s crunch.

Pro Tips for the Best Peach Yogurt Parfait With Honey And Granola

  • Make sure to choose ripe peaches for the best flavor and texture. A common mistake is using unripe fruit, which can lead to a less enjoyable parfait. Look for peaches that are fragrant and slightly soft to the touch.
  • Use a clear glass to assemble your parfait; this not only makes for a beautiful presentation but also allows you to see the colorful layers, which adds to the enjoyment of eating it.
  • For an even creamier texture, consider whipping the Greek yogurt with a hand mixer for a couple of minutes before layering. This small adjustment makes a huge difference in mouthfeel.
  • Be mindful of the granola-to-yogurt ratio. Too much granola can overwhelm the parfait, while too little can make it feel too creamy. Aim for about 1/4 cup of granola per layer for the perfect balance.
  • If you’re making this for a gathering, consider preparing the yogurt and peaches ahead of time and layering them just before serving. This ensures the granola stays crunchy!

Variations & Serving Ideas

There are so many ways to get creative with your Peach Yogurt Parfait! For a tropical twist, swap out the peaches for mangoes or pineapples and top with coconut flakes. If you prefer a berry flavor, mix in some blueberries or strawberries with the peaches for added color and taste. For a nutty version, incorporate chopped walnuts or pecans instead of almonds.

As for serving ideas, this parfait pairs beautifully with a side of scrambled eggs for a hearty breakfast or fresh fruit salad for a light lunch. You might also enjoy it alongside whole grain toast with almond butter for an energizing snack. The contrast of flavors and textures will elevate your meal experience!

Storage, Make-Ahead & Reheating

The Peach Yogurt Parfait is best enjoyed fresh, but you can prepare some components ahead of time. Store the layered parfait in an airtight container in the refrigerator for up to 24 hours. However, be cautious; the granola may lose its crunch if stored too long. You can freeze the yogurt and peach mixture for up to 2 months; just remember to thaw it in the refrigerator overnight before serving.

If you plan to enjoy this dish the next day, it can taste even better as the flavors meld together. Just remember to add the granola right before serving to keep its delightful crunch!

Frequently Asked Questions

Can I make Peach Yogurt Parfait With Honey And Granola ahead of time?

Yes — in fact, it tastes even better the next day as the flavors meld. However, I recommend waiting to add the granola until just before serving to maintain its crunch.

What can I substitute for Greek yogurt?

If you prefer a lighter option, you can substitute Greek yogurt with regular yogurt or a dairy-free alternative like coconut yogurt. Just remember that this may alter the creaminess and flavor profile slightly.

Can I use frozen peaches for this parfait?

Absolutely! Just make sure to thaw the frozen peaches before using them. They will still add great flavor, though the texture may be slightly softer than fresh peaches.

How do I make the parfait vegan?

To make a vegan version, substitute the Greek yogurt with a plant-based yogurt alternative, and replace honey with maple syrup or agave nectar. This keeps the parfait sweet while adhering to a vegan diet.

What other fruits can I use in this recipe?

You can mix and match fruits based on your preference. Try using strawberries, blueberries, raspberries, or even bananas. Just make sure to adjust the lemon juice as needed to prevent browning.

Sweet Peach Yogurt Parfait Delight

Final Thoughts

The Peach Yogurt Parfait with Honey and Granola is a delightful blend of creamy yogurt, sweet peaches, and crunchy granola that creates a satisfying and nourishing treat. Each layer bursts with flavor, making it a perfect choice for breakfast or a light dessert.

This is the kind of recipe I come back to again and again, especially when I want something refreshing and wholesome to start my day. The harmony of sweet and tart flavors, combined with the delightful crunch, never fails to lift my spirits!

I encourage you to give this parfait a try and indulge in its comforting goodness. Feel free to share your results or even add your own twist—perhaps a sprinkle of cinnamon or a handful of nuts. Enjoy creating your perfect parfait!

Print
clock clock iconcutlery cutlery iconflag flag iconfolder folder iconinstagram instagram iconpinterest pinterest iconfacebook facebook iconprint print iconsquares squares iconheart heart iconheart solid heart solid icon

Peach Yogurt Parfait


  • Author: Lily author
  • Total Time: 15 minutes
  • Yield: 4 servings 1x
Pin Recipe
Print Recipe

Description

This Peach Yogurt Parfait combines creamy Greek yogurt, juicy peaches, and crunchy granola for a delightful treat. It’s a perfect breakfast or snack that captures the essence of summer in every bite.


Ingredients

Scale
  • For the Parfait:
  • 2 cups plain Greek yogurt (or vanilla yogurt for a sweeter option)
  • 2 large ripe peaches, diced (about 2 cups)
  • 1 tablespoon fresh lemon juice (to prevent browning of peaches)
  • 2 tablespoons honey (plus more for drizzling)
  • 1 teaspoon vanilla extract (optional for extra flavor)
  • For the Granola:
  • 1 cup granola (store-bought or homemade; see notes for a simple granola recipe)
  • 1/4 cup sliced almonds (optional for added crunch)
  • 1/4 cup shredded coconut (optional for added flavor)

Instructions

  1. Start by preparing the peaches. Wash them thoroughly, then slice and dice them into bite-sized pieces. In a medium bowl, toss the diced peaches with 1 tablespoon of fresh lemon juice to prevent browning. Set aside for about 5 minutes while the lemon juice works its magic.
  2. In a separate bowl, combine the Greek yogurt, 2 tablespoons of honey, and 1 teaspoon of vanilla extract if using. Stir the mixture until smooth and thoroughly blended. This should take about a minute. Avoid overmixing to maintain the creaminess of the yogurt.
  3. Now it’s time to layer your parfait. Grab a clear glass or bowl to showcase your beautiful creation. Start with a generous spoonful of the yogurt mixture at the bottom—about 1/4 cup will do. Use a spoon to spread it evenly.
  4. Add a layer of the diced peaches over the yogurt, ensuring they cover the yogurt completely. You might want to use about half of what you have prepared—roughly 1 cup. This layer should be visually appealing, so arrange the peaches neatly.
  5. Sprinkle 1/4 cup of granola over the peaches. This adds a delightful crunch. Make sure to distribute it evenly to ensure every bite has that satisfying texture. Avoid packing it down too tightly, as you want it to maintain its crunch.
  6. Repeat the layers: spoon in another 1/4 cup of yogurt, followed by another cup of peaches, and another sprinkle of granola. You should have at least two layers, but feel free to add more depending on your glass size.
  7. Finish off your parfait with a drizzle of honey on top for added sweetness and a touch of elegance. If you’re using sliced almonds or shredded coconut, sprinkle them on top now. It adds a lovely visual contrast and extra flavor.
  8. Serve immediately or refrigerate for up to 30 minutes before serving to allow the flavors to meld together. However, I recommend enjoying it fresh to maintain the granola’s crunch.
  • Prep Time: 15 mins
  • Cook Time: 0 mins
  • Category: Breakfast
  • Method: No-cook
  • Cuisine: American

Nutrition

  • Serving Size: 1 parfait
  • Calories: 250
  • Sugar: 20 g
  • Sodium: 50 mg
  • Fat: 5 g
  • Saturated Fat: 2 g
  • Unsaturated Fat: 3 g
  • Trans Fat: 0 g
  • Carbohydrates: 40 g
  • Fiber: 3 g
  • Protein: 10 g
  • Cholesterol: 10 mg

Keywords: Choose ripe peaches for the best flavor and texture. Use a clear glass for a beautiful presentation. For creaminess, consider whipping the yogurt before layering. Be mindful of the granola-to-yogurt ratio. Prepare yogurt and peaches ahead of time for gatherings, layering just before serving.

Did you make this recipe?

Share a photo and tag us — we can't wait to see what you've made!

Sun-Kissed Frozen Orange Cream Slush

As a child, summer days felt like they lasted forever. I remember the sticky heat wrapping around me as I played outside, my laughter mingling with the sounds of the neighborhood. But nothing could cool me down quite like the moment I’d spot my grandmother, laboring over her blender, whipping up her famous Frozen Orange Creamsicle Slush. That vibrant orange treat, with its frosty texture and sweet citrus aroma, was like a burst of sunshine in a cup. Just one sip, and I could feel the coolness wash over me, sparking pure joy.

This Frozen Orange Creamsicle Slush has a way of making you feel like a kid again. Its creamy, dreamy consistency is a delightful balance of bright orange and soft vanilla, inviting you to dive right in. The refreshing tang of orange dances on your tongue, while the smooth creaminess envelops you in a comforting embrace. It’s a nostalgic treat that’s perfect for hot summer afternoons or anytime you need a little pick-me-up.

What makes my version of this slush stand out is the addition of a hint of vanilla bean, which elevates the flavor and adds an extra layer of richness. Plus, it’s super easy to whip up with just a few simple ingredients that you probably already have on hand! So, if you’re ready to relive those sun-soaked memories, let me show you exactly how to make it.

Sun-Kissed Frozen Orange Cream Slush

Why You’ll Love This Recipe

  • Each slush is a perfect blend of creamy vanilla and zesty orange, creating a nostalgic flavor reminiscent of summer days.
  • This refreshing treat is ready in under 15 minutes, making it an ideal quick dessert for unexpected guests or hot afternoons.
  • With just 8 simple ingredients, it’s budget-friendly, ensuring you don’t have to break the bank to enjoy a delicious slush.
  • The slush has a perfectly smooth texture, thanks to the combination of ice and ice cream, providing a delightful contrast to the bright citrus flavors.
  • It’s highly customizable; you can easily adjust the sweetness and add fresh herbs for a unique twist that suits your taste.

Ingredients

  • 2 cups orange juice (freshly squeezed or store-bought)
  • 1 cup vanilla ice cream
  • 1 cup crushed ice
  • 1/2 cup milk (whole or 2%)
  • 1/4 cup granulated sugar (adjust based on sweetness preference)
  • 1 teaspoon vanilla extract
  • Zest of 1 orange (for added flavor)
  • Fresh orange slices and mint leaves (for garnish)

The star of this Frozen Orange Creamsicle Slush is the orange juice, which provides the vibrant, citrusy base. Freshly squeezed juice will yield the brightest flavor, but store-bought options can be just as convenient. If you’re opting for store-bought, choose 100% pure juice with no added sugars for the best results. Another essential ingredient is the vanilla ice cream; it adds creaminess and sweetness. You can substitute it with dairy-free ice cream if you’re looking for a vegan option. Whole or 2% milk complements the ice cream, creating a smooth blend. If you want a lower-calorie version, almond or oat milk can be good alternatives.

Lastly, the granulated sugar can be adjusted based on your sweetness preference. If you prefer a more natural sweetener, consider using honey or agave syrup. The orange zest enhances the flavor profile, providing an aromatic pop that brings the whole slush together. Don’t skip it! It adds an extra layer of brightness that makes this slush truly special.

Step-by-Step Instructions

  1. Start by preparing your ingredients. Gather 2 cups of orange juice, 1 cup of vanilla ice cream, and 1 cup of crushed ice. Make sure the ice is finely crushed, as larger chunks can make blending difficult.
  2. In a blender, combine the orange juice, vanilla ice cream, crushed ice, and 1/2 cup of milk. Add 1/4 cup of granulated sugar and 1 teaspoon of vanilla extract. If you like a sweeter slush, consider adding a bit more sugar at this stage.
  3. Add the zest of 1 orange to the blender. This step is crucial for enhancing the citrus flavor of your slush. Make sure not to include the bitter white pith—only the flavorful zest.
  4. Blend the mixture on medium-high speed for about 30-45 seconds. Stop once the ingredients are fully combined and the slush has a smooth, even consistency. If you notice large chunks of ice, blend for an additional 10-15 seconds. Avoid over-blending, as this can make the slush too liquidy.
  5. Once blended, taste the slush. If it needs more sweetness, add a little more sugar and blend for a few more seconds. If it’s too thick, you can add a splash of milk to reach your desired consistency.
  6. Pour the slush into glasses. This recipe typically serves 4, but you can easily double it for larger gatherings. Use a spoon to help guide the slush into the glasses if needed.
  7. Garnish each serving with fresh orange slices and mint leaves. The mint not only adds a pop of color but also a refreshing aroma that complements the citrus flavors beautifully.
  8. Serve immediately and enjoy! If you’ve made extra, you can refrigerate it for a short time, but it’s best enjoyed fresh.

Pro Tips for the Best Frozen Orange Creamsicle Slush

  • Don’t skip the orange zest! It’s a game-changer for flavor. Always zest before juicing to make it easier.
  • Use a high-powered blender for the best texture. A standard blender may struggle with ice, leading to uneven consistency. If you have a food processor, that can work too, but ensure the ice is finely crushed.
  • Adjust the ice-to-liquid ratio carefully. If your slush is too thick, it won’t blend well. Start with less ice and add more until you reach your preferred texture.
  • Be cautious with the sugar! Always start with the lower amount, as you can easily add more, but it’s hard to fix an overly sweet slush.
  • For a fun twist, consider adding a splash of coconut milk or a handful of fresh fruit like strawberries or pineapple. This not only enhances the flavor but also adds a beautiful color contrast.

Variations & Serving Ideas

There are countless ways to put a spin on your Frozen Orange Creamsicle Slush. Consider making a tropical version by adding in some pineapple juice or coconut milk for a delightful tropical twist. If you’re feeling adventurous, try incorporating a handful of frozen mango or peach slices for added sweetness. For a lighter version, swap out the vanilla ice cream for Greek yogurt for a creamy yet tangy alternative.

As for serving ideas, this refreshing slush pairs wonderfully with light summer dishes like grilled chicken skewers, fish tacos, or a simple salad topped with citrus vinaigrette. The bright, zesty flavors of the slush complement these dishes perfectly, making them an ideal pairing for a sunny day.

Storage, Make-Ahead & Reheating

This Frozen Orange Creamsicle Slush is best enjoyed fresh, but if you have leftovers, you can store them in an airtight container in the fridge for up to 2 days. Just keep in mind that the slush may lose some of its texture over time as the ice melts. It doesn’t freeze well, as the ice will turn into a solid block. If you must freeze it, blend again after thawing to restore the slushy consistency. This treat is best the day you make it, as the flavors meld together beautifully overnight, enhancing its deliciousness.

Frequently Asked Questions

Can I make Frozen Orange Creamsicle Slush ahead of time?

Yes — in fact, it tastes even better the next day as the flavors meld. However, it’s best to enjoy it fresh, as the texture can change if stored for too long. If you need to prepare it ahead, keep it in the fridge and re-blend before serving.

What kind of orange juice should I use?

For the best flavor, use freshly squeezed orange juice. However, if you’re short on time, opt for 100% pure store-bought juice without added sugars. This will ensure that your slush remains flavorful and refreshing.

Can I substitute the vanilla ice cream?

Absolutely! If you’re looking for a dairy-free option, coconut milk ice cream or a non-dairy vanilla ice cream can work wonderfully. They will still provide the creamy texture and sweetness you desire.

How can I adjust the sweetness of my slush?

You can easily adjust the sweetness by modifying the amount of sugar added. Start with 1/4 cup and taste the mixture before blending. If you prefer it sweeter, add more sugar gradually until it reaches your desired level.

What should I do if my slush is too thick?

If your slush is too thick, simply add a splash of milk or orange juice and blend again. This will help achieve a more drinkable consistency while maintaining the slushy texture. Adjust gradually to reach your preferred thickness.

Sun-Kissed Frozen Orange Cream Slush

Final Thoughts

The Frozen Orange Creamsicle Slush is a delightful blend of refreshing citrus and creamy goodness, making it a perfect treat for warm days or any time you crave a taste of nostalgia. The way the bright orange flavor dances with the creamy texture truly elevates this slush, transforming it into a satisfying escape from the everyday.

This is the kind of recipe I come back to again and again, especially when I’m looking to cool down or impress guests at a summer gathering. It’s simple to make and always brings smiles all around! I encourage you to try this recipe for yourself—don’t hesitate to share your results or even put your own spin on it. Happy slushing!

Print
clock clock iconcutlery cutlery iconflag flag iconfolder folder iconinstagram instagram iconpinterest pinterest iconfacebook facebook iconprint print iconsquares squares iconheart heart iconheart solid heart solid icon

Frozen Orange Creamsicle Slush


  • Author: Lily author
  • Total Time: 15 minutes
  • Yield: 4 servings 1x
Pin Recipe
Print Recipe

Description

This Frozen Orange Creamsicle Slush is a refreshing treat that combines creamy vanilla and zesty orange flavors. Perfect for hot summer days, it brings back nostalgic memories with every sip.


Ingredients

Scale
  • 2 cups orange juice (freshly squeezed or store-bought)
  • 1 cup vanilla ice cream
  • 1 cup crushed ice
  • 1/2 cup milk (whole or 2%)
  • 1/4 cup granulated sugar (adjust based on sweetness preference)
  • 1 teaspoon vanilla extract
  • Zest of 1 orange (for added flavor)
  • Fresh orange slices and mint leaves (for garnish)

Instructions

  1. Start by preparing your ingredients. Gather 2 cups of orange juice, 1 cup of vanilla ice cream, and 1 cup of crushed ice. Make sure the ice is finely crushed, as larger chunks can make blending difficult.
  2. In a blender, combine the orange juice, vanilla ice cream, crushed ice, and 1/2 cup of milk. Add 1/4 cup of granulated sugar and 1 teaspoon of vanilla extract. If you like a sweeter slush, consider adding a bit more sugar at this stage.
  3. Add the zest of 1 orange to the blender. This step is crucial for enhancing the citrus flavor of your slush. Make sure not to include the bitter white pith—only the flavorful zest.
  4. Blend the mixture on medium-high speed for about 30-45 seconds. Stop once the ingredients are fully combined and the slush has a smooth, even consistency. If you notice large chunks of ice, blend for an additional 10-15 seconds. Avoid over-blending, as this can make the slush too liquidy.
  5. Once blended, taste the slush. If it needs more sweetness, add a little more sugar and blend for a few more seconds. If it’s too thick, you can add a splash of milk to reach your desired consistency.
  6. Pour the slush into glasses. This recipe typically serves 4, but you can easily double it for larger gatherings. Use a spoon to help guide the slush into the glasses if needed.
  7. Garnish each serving with fresh orange slices and mint leaves. The mint not only adds a pop of color but also a refreshing aroma that complements the citrus flavors beautifully.
  8. Serve immediately and enjoy! If you’ve made extra, you can refrigerate it for a short time, but it's best enjoyed fresh.
  • Prep Time: 15 min
  • Cook Time: 0 min
  • Category: Dessert
  • Method: Blending
  • Cuisine: American

Nutrition

  • Serving Size: 1 serving
  • Calories: 200
  • Sugar: 30 g
  • Sodium: 50 mg
  • Fat: 5 g
  • Saturated Fat: 3 g
  • Unsaturated Fat: 2 g
  • Trans Fat: 0 g
  • Carbohydrates: 40 g
  • Fiber: 1 g
  • Protein: 2 g
  • Cholesterol: 20 mg

Keywords: Don't skip the orange zest! It's a game-changer for flavor. Always zest before juicing to make it easier.

Did you make this recipe?

Share a photo and tag us — we can't wait to see what you've made!

Zesty Lemon Poppy Seed Delight

One rainy afternoon, I found myself in my grandmother’s cozy kitchen, the kind that always smelled like warmth and love. She was whipping up her famous Lemon Poppy Seed Loaf, a recipe that had been passed down through generations. As the batter came together, the zesty aroma of fresh lemons filled the air, mingling perfectly with the nutty fragrance of poppy seeds. I can still picture her, apron-clad, as she expertly drizzled a vibrant citrus icing over the loaf, creating a glossy, sun-kissed finish that beckoned us to dive in. It was a moment that sparked my own passion for baking, and this recipe has become a cherished staple in my home ever since.

When you take a bite of this Lemon Poppy Seed Loaf, it’s like a burst of sunshine on your palate. The loaf is beautifully golden, with a tender crumb that melts in your mouth. Each slice is speckled with tiny poppy seeds, adding a delightful crunch that contrasts beautifully with the tangy sweetness of the lemon. And that citrus icing? It’s the finishing touch that elevates this loaf from ordinary to extraordinary, with its bright, zesty flavor dancing on your taste buds.

This recipe stands out because it embraces simplicity while delivering on flavor. I’ve added a hint of vanilla to the batter, enhancing the overall taste and making it even more indulgent. Trust me, once you make this Lemon Poppy Seed Loaf With Citrus Icing, it’ll become a go-to in your baking repertoire.

So, let me show you exactly how to make it!

Zesty Lemon Poppy Seed Delight

Why You’ll Love This Recipe

  • Moist and tender crumb that melts in your mouth, thanks to the perfect balance of butter and buttermilk.
  • Bright, zesty lemon flavor paired with crunchy poppy seeds, creating a delightful texture and taste experience.
  • Easy to whip up in just about an hour, perfect for last-minute gatherings or a cozy afternoon treat.
  • Budget-friendly with everyday ingredients, making it an accessible option for all home bakers.
  • The citrus icing adds a sweet tang that elevates the loaf, turning a simple recipe into a showstopper!

Ingredients

  • 1 ½ cups (190g) all-purpose flour
  • 1 teaspoon baking powder
  • ½ teaspoon baking soda
  • ½ teaspoon salt
  • 3 tablespoons poppy seeds
  • ½ cup (115g) unsalted butter, softened to room temperature
  • 1 cup (200g) granulated sugar
  • 2 large eggs
  • 1 teaspoon vanilla extract
  • 1 teaspoon lemon zest (from about 1 medium lemon)
  • ½ cup (120ml) buttermilk
  • 2 tablespoons fresh lemon juice

For the Citrus Icing:

  • 1 cup (120g) powdered sugar
  • 2 tablespoons fresh lemon juice
  • 1 tablespoon orange juice
  • 1 teaspoon lemon zest (for garnish, optional)

Let’s dive into the key ingredients that make this Lemon Poppy Seed Loaf so special. The all-purpose flour provides the structure and base for the loaf, while the baking powder and baking soda ensure it rises perfectly, giving the loaf a light texture. For a gluten-free variation, you could substitute the flour with a gluten-free all-purpose blend. Poppy seeds not only add a delightful crunch but also contribute to the unique flavor profile that pairs well with the citrus notes.

Unsalted butter is crucial for achieving the buttery richness that makes this loaf so moist. If you’re looking for a dairy-free option, coconut oil or a vegan butter can be used instead. The buttermilk is another essential component, providing acidity that activates the baking soda for a fluffy texture. If you don’t have buttermilk on hand, you can easily make a substitute by mixing ½ cup of milk with 1 tablespoon of vinegar or lemon juice and letting it sit for about 5 minutes.

Step-by-Step Instructions

  1. Preheat your oven to 350°F (175°C). Grease a 9×5-inch loaf pan or line it with parchment paper for easy removal later.
  2. In a medium mixing bowl, whisk together 1 ½ cups of all-purpose flour, 1 teaspoon of baking powder, ½ teaspoon of baking soda, ½ teaspoon of salt, and 3 tablespoons of poppy seeds. This helps to evenly distribute the baking agents and ensures a uniform rise.
  3. In a large mixing bowl, cream together ½ cup of softened unsalted butter and 1 cup of granulated sugar using an electric mixer on medium speed for about 3-4 minutes, until the mixture is light and fluffy. Make sure to scrape down the sides of the bowl occasionally.
  4. Add 2 large eggs, 1 teaspoon of vanilla extract, and 1 teaspoon of lemon zest to the creamed butter and sugar, mixing until fully combined. You want a smooth consistency, so ensure there are no lumps of butter.
  5. In a small bowl, combine ½ cup of buttermilk and 2 tablespoons of fresh lemon juice. Alternately add the dry ingredients and buttermilk mixture to the butter mixture, starting and ending with the dry ingredients. Mix just until combined; do not overmix, as this can lead to a dense loaf.
  6. Pour the batter into the prepared loaf pan. Smooth the top with a spatula, ensuring it’s even. Bake in the preheated oven for 50-60 minutes, or until a toothpick inserted in the center comes out clean. The edges should be lightly golden brown, and the center should feel just set.
  7. Once baked, remove the loaf from the oven and allow it to cool in the pan for about 10 minutes. Then, transfer it to a wire rack to cool completely. Resist the urge to slice too soon, as it will be crumbly if it’s still warm.
  8. While the loaf is cooling, prepare the citrus icing. In a medium bowl, whisk together 1 cup of powdered sugar, 2 tablespoons of fresh lemon juice, and 1 tablespoon of orange juice until smooth. If the icing is too thick, you can add a little more juice to reach your desired consistency.
  9. Once the loaf is completely cool, drizzle the citrus icing over the top. If you like, sprinkle with an additional teaspoon of lemon zest for an extra pop of flavor and color.

Pro Tips for the Best Lemon Poppy Seed Loaf With Citrus Icing

  • Be careful not to overmix your batter; this is a common mistake that can lead to a dense loaf. Mix just until the dry ingredients are incorporated for a light and fluffy texture.
  • Use room temperature ingredients, especially the butter and eggs. This helps to create a smoother batter and ensures even baking. Take your eggs out of the fridge about 30 minutes before you start.
  • For a more pronounced lemon flavor, consider adding a little lemon extract in addition to the zest and juice. Just a half teaspoon can elevate the citrus notes significantly.
  • When measuring your flour, spoon it into the measuring cup and level it off with a knife instead of scooping directly from the bag. This prevents packing and ensures you don’t end up with a dry loaf.
  • Invest in a good quality loaf pan; it makes a difference in heat distribution, which ensures even baking. If your pan is dark-coated, reduce the oven temperature by 25°F to prevent over-browning.

Variations & Serving Ideas

For a delightful twist, consider adding blueberries or raspberries to the batter for a fruity burst of flavor. You can also experiment with different citrus fruits—try lime or grapefruit zest and juice for a refreshing change. For a healthier option, substitute half of the all-purpose flour with whole wheat flour for added fiber without compromising too much on texture.

This Lemon Poppy Seed Loaf pairs beautifully with a light salad, such as a mixed greens salad with a vinaigrette, or a cup of tea for a cozy afternoon treat. It also complements a creamy cheese platter, as the acidity of the loaf balances rich cheeses perfectly. Lastly, a scoop of vanilla ice cream on the side creates a delightful contrast of temperatures and flavors!

Storage, Make-Ahead & Reheating

This Lemon Poppy Seed Loaf can be stored at room temperature for up to 3 days if wrapped tightly in plastic wrap. If you want to keep it longer, it freezes well for up to 3 months. To freeze, wrap the loaf tightly in plastic wrap and then in aluminum foil to prevent freezer burn.

When you’re ready to enjoy it again, simply thaw it in the fridge overnight. Reheat individual slices in the microwave for 15-20 seconds or in a toaster oven until warmed through. Interestingly, many people find that this loaf tastes even better the next day, as the flavors have time to meld!

Frequently Asked Questions

Can I make Lemon Poppy Seed Loaf With Citrus Icing ahead of time?

Yes — in fact, it tastes even better the next day! You can make the loaf a day in advance, allowing the flavors to develop. Just be sure to store it in an airtight container to maintain its moisture.

Can I substitute the poppy seeds?

Absolutely! If you don’t have poppy seeds on hand or prefer an alternative, you can use sesame seeds for a similar crunch or omit them entirely for a smooth loaf.

What can I use instead of buttermilk?

If you don’t have buttermilk, you can easily create a substitute by mixing ½ cup of milk (dairy or plant-based) with 1 tablespoon of vinegar or lemon juice. Let it sit for 5 minutes before using in the recipe.

How can I make this recipe gluten-free?

To make a gluten-free version of this Lemon Poppy Seed Loaf, substitute the all-purpose flour with a gluten-free all-purpose flour blend. Just ensure that the blend contains a binding agent like xanthan gum for the best results.

What is the best way to store leftover loaf?

Leftover Lemon Poppy Seed Loaf should be stored in an airtight container at room temperature for up to 3 days. For longer storage, wrap it tightly and freeze for up to 3 months. Thaw it before serving for the best texture.

Zesty Lemon Poppy Seed Delight

Final Thoughts

The Lemon Poppy Seed Loaf with Citrus Icing is truly a delightful treat that brings a burst of brightness to any occasion. The zesty lemon flavor combined with the subtle crunch of poppy seeds creates a satisfying balance, while the citrus icing adds a touch of sweetness that perfectly complements the loaf’s tanginess.

This is the kind of recipe I come back to again and again, especially when I want to brighten up a gloomy day or celebrate a small victory. The aroma that fills the kitchen as it bakes is absolutely heavenly! I encourage you to give this recipe a try; you might just find it becoming a beloved staple in your home. Don’t forget to share your results or even add your own unique twist—I can’t wait to see what you create!

Print
clock clock iconcutlery cutlery iconflag flag iconfolder folder iconinstagram instagram iconpinterest pinterest iconfacebook facebook iconprint print iconsquares squares iconheart heart iconheart solid heart solid icon

Lemon Poppy Seed Loaf


  • Author: Lily author
  • Total Time: 37 minute
  • Yield: 1 loaf 1x
Pin Recipe
Print Recipe

Description

This Lemon Poppy Seed Loaf is a delightful treat that combines zesty lemon flavor with crunchy poppy seeds. Topped with a citrus icing, it’s perfect for any occasion.


Ingredients

Scale
  • 1 ½ cups (190g) all-purpose flour
  • 1 teaspoon baking powder
  • ½ teaspoon baking soda
  • ½ teaspoon salt
  • 3 tablespoons poppy seeds
  • ½ cup (115g) unsalted butter, softened to room temperature
  • 1 cup (200g) granulated sugar
  • 2 large eggs
  • 1 teaspoon vanilla extract
  • 1 teaspoon lemon zest (from about 1 medium lemon)
  • ½ cup (120ml) buttermilk
  • 2 tablespoons fresh lemon juice
  • 1 cup (120g) powdered sugar
  • 2 tablespoons fresh lemon juice
  • 1 tablespoon orange juice
  • 1 teaspoon lemon zest (for garnish, optional)

Instructions

  1. Preheat your oven to 350°F (175°C). Grease a 9×5-inch loaf pan or line it with parchment paper for easy removal later.
  2. In a medium mixing bowl, whisk together 1 ½ cups of all-purpose flour, 1 teaspoon of baking powder, ½ teaspoon of baking soda, ½ teaspoon of salt, and 3 tablespoons of poppy seeds. This helps to evenly distribute the baking agents and ensures a uniform rise.
  3. In a large mixing bowl, cream together ½ cup of softened unsalted butter and 1 cup of granulated sugar using an electric mixer on medium speed for about 3-4 minutes, until the mixture is light and fluffy. Make sure to scrape down the sides of the bowl occasionally.
  4. Add 2 large eggs, 1 teaspoon of vanilla extract, and 1 teaspoon of lemon zest to the creamed butter and sugar, mixing until fully combined. You want a smooth consistency, so ensure there are no lumps of butter.
  5. In a small bowl, combine ½ cup of buttermilk and 2 tablespoons of fresh lemon juice. Alternately add the dry ingredients and buttermilk mixture to the butter mixture, starting and ending with the dry ingredients. Mix just until combined; do not overmix, as this can lead to a dense loaf.
  6. Pour the batter into the prepared loaf pan. Smooth the top with a spatula, ensuring it’s even. Bake in the preheated oven for 50-60 minutes, or until a toothpick inserted in the center comes out clean. The edges should be lightly golden brown, and the center should feel just set.
  7. Once baked, remove the loaf from the oven and allow it to cool in the pan for about 10 minutes. Then, transfer it to a wire rack to cool completely. Resist the urge to slice too soon, as it will be crumbly if it’s still warm.
  8. While the loaf is cooling, prepare the citrus icing. In a medium bowl, whisk together 1 cup of powdered sugar, 2 tablespoons of fresh lemon juice, and 1 tablespoon of orange juice until smooth. If the icing is too thick, you can add a little more juice to reach your desired consistency.
  9. Once the loaf is completely cool, drizzle the citrus icing over the top. If you like, sprinkle with an additional teaspoon of lemon zest for an extra pop of flavor and color.
  • Prep Time: 15 mins
  • Cook Time: 50-60 mins
  • Category: Dessert
  • Method: Baking
  • Cuisine: American

Nutrition

  • Serving Size: 1 slice
  • Calories: 200
  • Sugar: 15 g
  • Sodium: 150 mg
  • Fat: 8 g
  • Saturated Fat: 5 g
  • Unsaturated Fat: 3 g
  • Trans Fat: 0 g
  • Carbohydrates: 30 g
  • Fiber: 1 g
  • Protein: 3 g
  • Cholesterol: 40 mg

Keywords: Be careful not to overmix your batter; this is a common mistake that can lead to a dense loaf. Use room temperature ingredients for a smoother batter and even baking.

Did you make this recipe?

Share a photo and tag us — we can't wait to see what you've made!

  • Privacy Policy
  • Terms Of Service
  • Contact
  • About
  • GDPR

Copyright © 2025 Homesmad