Looking for a comforting, flavorful, and seriously satisfying side dish that doesn’t skimp on nutrition? This Cheesy Baked Cauliflower recipe is a total game changer—and I’m so thrilled to be sharing it with you today. Right after the first bite, you’ll see why this has become a weekly staple in my kitchen. The gooey cheese, the tender cauliflower, the golden, bubbly top—cheesy baked cauliflower hits all the right notes.
???? Want to make sure you don’t miss recipes like this one? Sign up for my email list and I’ll send them right to your inbox!
What Is Cheesy Baked Cauliflower?
Cheesy baked cauliflower is a cozy, oven-baked side dish where cauliflower florets are smothered in a rich, creamy cheese sauce, then baked until beautifully golden and bubbly. It’s essentially like mac and cheese got a veggie glow-up—and it’s anything but boring!!
Whether you’re cooking for a family dinner, holiday table, or just want to sneak in more vegetables in a way that feels indulgent, this recipe delivers big flavor with very little fuss.
Why You’ll Love This Recipe
- Crowd-pleaser: Kids and adults alike rave about this one.
- Low-carb comfort food: A great alternative to pasta or potatoes.
- Versatile: You can change up the cheeses, seasonings, or even add protein.
- Easy to prep ahead: Assemble in advance, then bake when you’re ready!
What Does Cheesy Baked Cauliflower Taste Like?
Imagine your favorite cheesy casserole, but lighter and with a subtle nuttiness from roasted cauliflower. The cheese sauce is rich without being heavy, and the crispy cheese on top adds an irresistible layer of texture. It’s creamy, melty, and loaded with flavor—think comfort food with a conscience.
Benefits of This Recipe
- Gluten-free option: Just use gluten-free flour!
- Keto-friendly: With low carbs and high fat from cheese, it’s keto-approved.
- Vegetarian: Satisfying enough to stand on its own without meat.
- Great for meal prep: Leftovers reheat beautifully.
Ingredients
Here’s what you’ll need to whip up your own cheesy cauliflower goodness:
- 1 large head of cauliflower, cut into bite-sized florets
- 2 tablespoons butter
- 2 tablespoons all-purpose flour (or gluten-free flour)
- 1 ½ cups milk (whole or 2% recommended)
- 1 teaspoon Dijon mustard
- 1 ½ cups shredded sharp cheddar cheese, divided
- ½ cup grated Parmesan cheese
- Salt and black pepper, to taste
- ¼ teaspoon garlic powder (optional)
- ¼ teaspoon smoked paprika (optional)
- Chopped fresh parsley for garnish (optional)
Tools You’ll Need
- Medium saucepan
- Whisk
- Large mixing bowl
- 9×13-inch baking dish or similar casserole dish
- Cutting board and knife
Ingredient Additions and Substitutions
I promised you versatile, and here’s proof!
- Cheese options: Swap in Gruyère, mozzarella, Monterey Jack, or a blend.
- Milk: Use cream for a richer dish, or almond milk for dairy-light.
- Boost the flavor: Stir in sautéed onions, chopped spinach, or cooked bacon bits.
- Make it spicy: Add a dash of cayenne pepper or chopped jalapeños.
How to Make Cheesy Baked Cauliflower
Step-by-Step Instructions
1. Preheat and prep:
Preheat your oven to 400°F (200°C). Lightly grease your baking dish.
2. Cook the cauliflower:
Bring a large pot of salted water to a boil. Add the cauliflower florets and cook for 5 minutes until just tender. Drain well and set aside.
3. Make the cheese sauce:
In a saucepan, melt the butter over medium heat. Whisk in the flour and cook for 1-2 minutes until bubbly. Gradually whisk in the milk, stirring constantly, until the sauce thickens (about 5 minutes). Stir in the mustard, garlic powder, paprika, salt, and pepper.
4. Add the cheese:
Remove from heat and stir in 1 cup of cheddar cheese and all of the Parmesan until melted and smooth.
5. Combine:
Place the cauliflower in your prepared baking dish. Pour the cheese sauce over and gently stir to coat evenly.
6. Top and bake:
Sprinkle the remaining ½ cup cheddar over the top. Bake for 20-25 minutes or until golden and bubbly.
7. Garnish and serve:
Let cool slightly, then sprinkle with parsley and serve warm!
What to Serve With Cheesy Baked Cauliflower
This side pairs perfectly with:
- Grilled chicken or pork chops
- Baked salmon
- Veggie burgers or lentil loaf
- A fresh green salad or roasted Brussels sprouts
Or let it shine as a main dish—just add a hearty green salad and crusty bread!
Tips for the Best Baked Cauliflower
- Don’t overcook the cauliflower: Boil just until fork-tender, not mushy.
- Drain well: Extra water will make your casserole watery.
- Shred your own cheese: Pre-shredded cheese doesn’t melt as smoothly.
- Let it rest before serving: Gives the cheese sauce time to set a little.
Storage Instructions
- Refrigerate: Store leftovers in an airtight container for up to 4 days.
- Reheat: Warm in a 350°F oven or microwave until heated through.
- Freeze: You can freeze before baking—just thaw overnight before baking.
Frequently Asked Questions
Can I make this ahead of time?
Absolutely! Assemble everything, cover tightly, and refrigerate for up to 24 hours. Bake when ready.
Is this recipe keto-friendly?
Yes! It’s low in carbs, high in fat, and cauliflower is a keto superstar. Just make sure to use a low-carb thickener like almond flour instead of all-purpose.
Can I make it dairy-free?
You can try dairy-free milk and vegan cheese alternatives, though the texture and flavor may vary. Nutritional yeast can also help boost the cheesy taste.
How can I make it more filling?
Add cooked chicken, ham, or even lentils right into the mix for a more robust, meal-style dish.
In Conclusion
This Cheesy Baked Cauliflower recipe is everything you want in a side dish—creamy, cheesy, and endlessly satisfying. It’s easy to whip up, even easier to fall in love with, and the kind of thing that gets scraped clean every time it hits the table. I hope it brings warmth and joy to your dinner just like it does to mine.
If you loved this, you might also enjoy:
- Hot Honey Chicken Rice Bowl – spicy, sticky, and absolutely addictive
- Baked Boursin Salmon – creamy, herbaceous, and perfectly flaky
- Creamy Garlic Sauce with Grilled Chicken Bites – a quick and flavorful weeknight hit
???? I’d LOVE to see how your cauliflower turned out! Tag your photos on Pinterest @TheKitchenJoyy and leave a review below!
Nutritional Information (Per Serving, approx.)
- Calories: 220
- Carbohydrates: 9g
- Protein: 10g
- Fat: 16g
- Fiber: 3g
- Sugar: 4g
- Sodium: 310mg
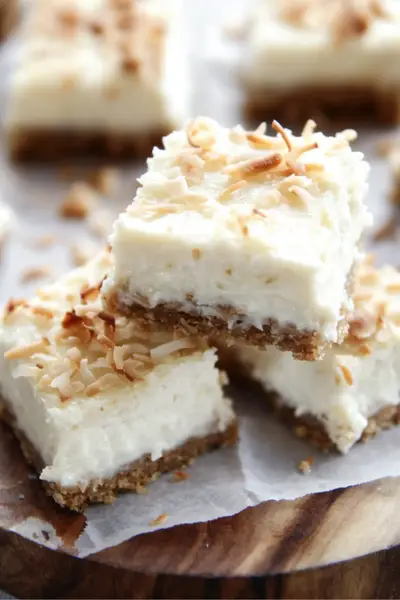
Cheesy Baked Cauliflower Recipe
- Total Time: 3 hours 50 minutes
- Yield: 9 bars 1x
Description
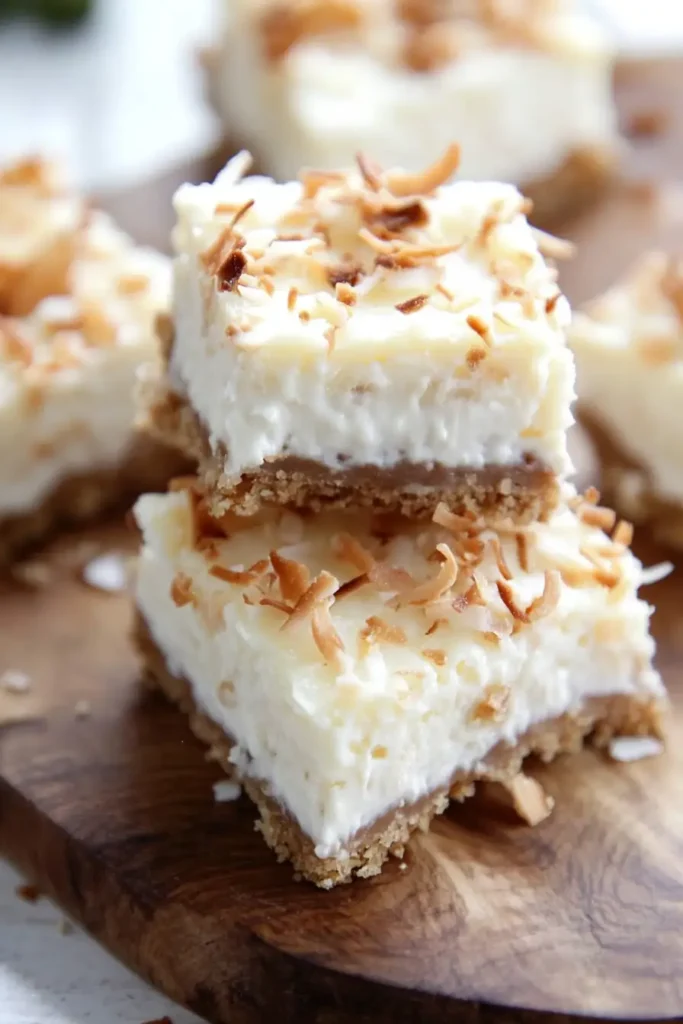
Creamy, dreamy, and perfectly tropical—these Coconut Cheesecake Bars are a lightened-up twist on a classic favorite! Made with Greek yogurt and a touch of coconut, these cheesecake squares are lower in calories but full of flavor. Perfect for coconut dessert lovers or anyone looking for healthier desserts that still feel like a treat. Save this for your next summer gathering or weeknight sweet tooth!
Ingredients
Crust:
-
1 cup graham cracker crumbs
-
2 tablespoons coconut oil, melted
-
1 tablespoon honey (or maple syrup)
Filling:
-
8 oz reduced-fat cream cheese, softened
-
1 cup plain Greek yogurt
-
1/3 cup coconut sugar (or granulated sugar)
-
2 large eggs
-
1 teaspoon pure vanilla extract
-
1/2 teaspoon coconut extract
-
1/4 cup unsweetened shredded coconut
Topping (optional):
-
2 tablespoons toasted shredded coconut
Instructions
-
Preheat oven to 325°F (160°C). Line an 8×8-inch baking pan with parchment paper.
-
Make the crust: In a bowl, combine graham cracker crumbs, melted coconut oil, and honey. Press evenly into the bottom of the pan. Bake for 8 minutes. Let cool.
-
Prepare the filling: In a large bowl, beat cream cheese until smooth. Add Greek yogurt, sugar, eggs, vanilla, and coconut extract. Mix until fully combined and creamy. Stir in shredded coconut.
-
Pour filling over crust and smooth the top with a spatula.
-
Bake for 30–35 minutes or until the center is just set and doesn’t jiggle.
-
Cool completely, then refrigerate at least 3 hours (overnight is best) before slicing.
-
Top with toasted coconut, slice into squares, and serve chilled!
Notes
-
For a gluten-free crust, use gluten-free graham crackers.
-
Light cream cheese works well here, but avoid fat-free—it can affect the texture.
-
Toast the coconut topping in a dry skillet over low heat for 2–3 minutes until golden.
-
Store bars in the fridge up to 5 days or freeze for up to a month!
- Prep Time: 15 minutes
- Chill Time: 3 hours
- Cook Time: 35 minutes
- Category: Dessert
- Method: Baking
- Cuisine: American
Keywords: Coconut Cheesecake Bars