Cookie Dough Bars: Prepare to be amazed! Imagine sinking your teeth into a thick, chewy layer of irresistible cookie dough, perfectly balanced with a smooth, decadent topping. These aren’t just any dessert bars; they’re a nostalgic trip back to childhood, a celebration of simple pleasures, and a guaranteed crowd-pleaser all rolled into one delightful package.
While the exact origins of cookie dough bars are shrouded in mystery, their popularity is undeniable. They represent a modern twist on the classic chocolate chip cookie, offering a convenient and shareable format that’s perfect for parties, potlucks, or simply satisfying your own sweet cravings. Think of them as the ultimate evolution of sneaking a spoonful of raw cookie dough – but now, it’s perfectly safe (and encouraged!) to indulge.
What makes cookie dough bars so universally loved? It’s the combination of textures and flavors. The soft, slightly underbaked cookie dough base provides a comforting chewiness, while the topping adds a layer of richness and sweetness. The ease of preparation is another major draw. Forget rolling individual cookies; these bars come together quickly and easily, making them a perfect choice for busy bakers. So, get ready to experience the ultimate cookie dough indulgence – you won’t be disappointed!

Ingredients:
- For the Cookie Dough Layer:
- 1 cup (2 sticks) unsalted butter, softened
- ¾ cup granulated sugar
- ¾ cup packed light brown sugar
- 2 large eggs
- 1 tablespoon vanilla extract
- 3 cups all-purpose flour
- 1 teaspoon baking soda
- 1 teaspoon salt
- 1 ½ cups semi-sweet chocolate chips
- For the Brownie Layer:
- ½ cup (1 stick) unsalted butter
- 1 cup granulated sugar
- ½ cup unsweetened cocoa powder
- ¼ teaspoon salt
- 1 teaspoon vanilla extract
- 2 large eggs
- ½ cup all-purpose flour
- For the Chocolate Ganache (Optional):
- 4 ounces semi-sweet chocolate, finely chopped
- ⅓ cup heavy cream
Preparing the Brownie Layer:
- Melt the butter: In a medium saucepan over low heat, melt the butter. Remove from heat.
- Combine wet ingredients: Stir in the granulated sugar, cocoa powder, and salt until well combined. The mixture will be thick.
- Add vanilla and eggs: Stir in the vanilla extract. Add the eggs one at a time, mixing well after each addition. Make sure everything is fully incorporated.
- Incorporate the flour: Gradually add the all-purpose flour, mixing until just combined. Be careful not to overmix. Overmixing can lead to a tough brownie.
Preparing the Cookie Dough Layer:
- Cream the butter and sugars: In a large bowl, cream together the softened butter, granulated sugar, and brown sugar until light and fluffy. This usually takes about 3-5 minutes with an electric mixer. The mixture should be pale and airy.
- Add eggs and vanilla: Beat in the eggs one at a time, then stir in the vanilla extract. Make sure each egg is fully incorporated before adding the next.
- Combine dry ingredients: In a separate bowl, whisk together the all-purpose flour, baking soda, and salt. This ensures that the baking soda and salt are evenly distributed throughout the flour.
- Gradually add dry ingredients to wet ingredients: Gradually add the dry ingredients to the wet ingredients, mixing until just combined. Be careful not to overmix. Overmixing develops the gluten in the flour, which can result in a tough cookie dough.
- Stir in chocolate chips: Stir in the chocolate chips until evenly distributed throughout the cookie dough.
Assembling and Baking the Cookie Dough Bars:
- Prepare the baking pan: Preheat your oven to 350°F (175°C). Grease and flour a 9×13 inch baking pan. Alternatively, you can line the pan with parchment paper, leaving an overhang on the sides for easy removal. This is my preferred method!
- Spread the brownie layer: Pour the brownie batter into the prepared baking pan and spread it evenly.
- Top with cookie dough: Drop spoonfuls of the cookie dough over the brownie layer. Use your fingers or the back of a spoon to gently spread the cookie dough to cover the brownie layer as much as possible. It’s okay if the brownie layer isn’t completely covered; the cookie dough will spread as it bakes.
- Bake: Bake for 30-35 minutes, or until the cookie dough is golden brown and a toothpick inserted into the center comes out with moist crumbs. The baking time may vary depending on your oven, so keep a close eye on them.
- Cool completely: Let the bars cool completely in the pan before cutting. This is important because the bars will continue to set as they cool. If you try to cut them while they’re still warm, they’ll be messy and fall apart.
Making the Chocolate Ganache (Optional):
- Heat the cream: Place the heavy cream in a small saucepan and heat over medium heat until it just begins to simmer. Do not boil.
- Pour over chocolate: Place the finely chopped chocolate in a heatproof bowl. Pour the hot cream over the chocolate and let it sit for 1 minute to soften the chocolate.
- Stir until smooth: Gently stir the chocolate and cream together until the chocolate is completely melted and the ganache is smooth and glossy.
- Spread over bars: Once the cookie dough bars have cooled completely, spread the chocolate ganache evenly over the top.
- Chill (Optional): For a firmer ganache, chill the bars in the refrigerator for 30 minutes to an hour before cutting.
Cutting and Serving:
- Cut into bars: Once the bars are completely cooled (and the ganache is set, if using), cut them into squares or rectangles. A sharp knife is essential for clean cuts. You can also use a pizza cutter for easier slicing.
- Serve: Serve the cookie dough bars at room temperature. They are delicious on their own or with a scoop of vanilla ice cream.
- Storage: Store the cookie dough bars in an airtight container at room temperature for up to 3 days, or in the refrigerator for up to a week. They can also be frozen for longer storage. Wrap them individually in plastic wrap and then place them in a freezer-safe bag or container.
Tips for Success:
- Use room temperature ingredients: Using room temperature butter and eggs will help the ingredients combine more easily and create a smoother batter.
- Don’t overmix: Overmixing the batter can lead to tough bars. Mix until just combined.
- Line the pan with parchment paper: Lining the pan with parchment paper makes it easy to remove the bars and prevents them from sticking.
- Cool completely before cutting: This is crucial for clean cuts and prevents the bars from falling apart.
- Adjust baking time as needed: Baking times may vary depending on your oven, so keep a close eye on the bars and adjust the baking time as needed.
- Get creative with toppings: Feel free to add other toppings to the bars, such as sprinkles, chopped nuts, or a drizzle of caramel sauce.
Variations:
- Peanut Butter Cookie Dough Bars: Substitute ½ cup of the butter in the cookie dough layer with peanut butter.
- Oatmeal Cookie Dough Bars: Add 1 cup of rolled oats to the cookie dough layer.
- White Chocolate Macadamia Nut Cookie Dough Bars: Substitute the semi-sweet chocolate chips with white chocolate chips and add ½ cup of chopped macadamia nuts to the cookie dough layer.
- Salted Caramel Cookie Dough Bars: Drizzle the bars with salted caramel sauce after baking.
- Different Chocolate Chips: Use dark chocolate, milk chocolate, or even peanut butter chips instead of semi-sweet.
Troubleshooting:
- Bars are too dry: Make sure you are using the correct amount of butter and eggs. Also, be careful not to overbake the bars.
- Bars are too gooey: Make sure you are baking the bars long enough. Also, be sure to let them cool completely before cutting.
- Bars are too tough: Be careful not to overmix the batter. Overmixing develops the gluten in the flour, which can result in tough bars.
- Cookie dough is too crumbly: Make sure your butter is properly softened. If it’s too cold, it won’t cream properly with the sugar.
- Brownie layer is too thin: Ensure you’re using the correct pan size. A larger pan will result in a thinner brownie layer.
These cookie dough bars are a delightful treat that combines the best of both worlds: the fudgy goodness of brownies and the irresistible sweetness of cookie dough. The optional chocolate ganache adds an extra layer of indulgence, making them perfect for special occasions or simply satisfying your sweet tooth. Enjoy!
Conclusion:
And there you have it! These Cookie Dough Bars are truly a must-try for anyone who loves the taste of cookie dough but wants something a little more substantial and shareable. Forget sneaking bites of raw dough (we’ve all been there!), this recipe gives you all the deliciousness without any of the worry. The combination of the buttery, slightly salty base, the rich and decadent cookie dough filling, and that optional (but highly recommended!) chocolate ganache topping creates a symphony of flavors and textures that will have everyone begging for more.
But why are these bars so special? It’s the perfect balance. They’re sweet, but not cloyingly so. They’re rich, but not heavy. And they’re incredibly easy to make, meaning you can whip up a batch in no time, even on a busy weeknight. Plus, they’re a total crowd-pleaser, perfect for parties, potlucks, or just a special treat for your family. I’ve made these for countless gatherings, and they’re always the first thing to disappear.
Now, let’s talk serving suggestions and variations, because the possibilities are endless! For a classic presentation, cut the bars into neat squares and serve them chilled or at room temperature. A scoop of vanilla ice cream on top takes them to the next level, especially on a warm day. You could also drizzle them with caramel sauce or sprinkle them with chopped nuts for added texture and flavor.
If you’re feeling adventurous, try these variations:
* Peanut Butter Cookie Dough Bars: Add a cup of peanut butter chips to the cookie dough filling for a nutty twist.
* Oatmeal Cookie Dough Bars: Incorporate a half cup of rolled oats into the base for a chewier texture and a hint of wholesome goodness.
* White Chocolate Macadamia Cookie Dough Bars: Swap the semi-sweet chocolate chips for white chocolate chips and add a half cup of chopped macadamia nuts to the cookie dough.
* Birthday Cake Cookie Dough Bars: Mix in some sprinkles into the cookie dough filling and top with a simple buttercream frosting for a festive treat.
* S’mores Cookie Dough Bars: Add crushed graham crackers to the base and mini marshmallows to the cookie dough filling. After baking, broil for a minute or two until the marshmallows are golden brown and gooey.
Don’t be afraid to experiment and create your own unique version of these Cookie Dough Bars! That’s the beauty of baking – it’s all about having fun and making something delicious that you and your loved ones will enjoy.
I truly believe that this recipe will become a staple in your baking repertoire. It’s simple, satisfying, and guaranteed to bring a smile to everyone’s face. So, what are you waiting for? Gather your ingredients, preheat your oven, and get ready to experience the magic of homemade cookie dough bars.
I’m so excited for you to try this recipe! And more importantly, I’d love to hear about your experience. Did you make any variations? Did you serve them with ice cream or caramel sauce? What did your friends and family think? Please, share your photos and stories in the comments below. I can’t wait to see what you create! Happy baking!
Cookie Dough Bars: The Ultimate Guide to Delicious No-Bake Treats
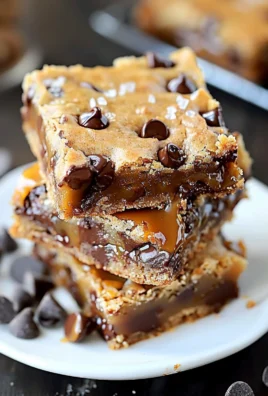
Fudgy brownie base topped with a layer of delicious chocolate chip cookie dough, optionally finished with a rich chocolate ganache. The ultimate dessert mashup!
Ingredients
Instructions
Recipe Notes
- Use room temperature ingredients for best results.
- Don’t overmix the batter.
- Lining the pan with parchment paper makes removal easy.
- Cool completely before cutting for clean slices.
- Adjust baking time as needed based on your oven.
- Get creative with toppings!