• Skip to primary navigation
  • Skip to main content
  • Skip to primary sidebar
Homesmad

Homesmad

  • Home
  • Breakfast & Brunch
  • Appetizers & Snacks
  • Dinner
  • Dessert
  • About
  • Privacy Policy
  • Contact
Homesmad
  • Home
  • Breakfast & Brunch
  • Appetizers & Snacks
  • Dinner
  • Dessert
  • About
  • Privacy Policy
  • Contact

Creepy-Good Halloween Buffalo Chicken Dip Recipe

September 29, 2025 by Lily author

Halloween Buffalo Chicken Dip is arguably the quintessential party appetizer, and I am absolutely thrilled to share a festive twist on this beloved classic just in time for your spooky celebrations! There’s something truly magical about turning a tried-and-true favorite into a holiday-themed showstopper, and this dip does exactly that. While buffalo chicken dip itself boasts a relatively modern history, emerging from the vibrant food scene of Buffalo, New York, and quickly becoming a game-day and potluck staple across America, adapting it for Halloween truly elevates its charm and appeal, transforming it into a thematic delight.

I find that people absolutely adore this dish for its incredible versatility and its unforgettable flavor profile. It masterfully combines the tangy kick of buffalo sauce, the rich creaminess of various cheeses, and tender shredded chicken, creating an irresistible concoction that keeps everyone coming back for more. It’s the perfect centerpiece for any ghoulish gathering, offering both comfort and an exciting burst of flavor that perfectly complements the fun and frights of the season.

This particular Halloween Buffalo Chicken Dip recipe is not only incredibly easy to prepare but also offers that delightful balance of savory, spicy, and cheesy textures that makes it an instant crowd-pleaser. Imagine your guests delighting in each warm, gooey scoop, perhaps even adorned with some spooky spider web designs! It’s this combination of ease, incredible taste, and festive presentation that solidifies its status as a must-have for your autumn festivities, promising to be the highlight of your spooky spread.

Creepy-Good Halloween Buffalo Chicken Dip Recipe this RECIPE

Ingredients:

  • For the Chicken:
    • 2 large boneless, skinless chicken breasts (about 1.5 – 2 lbs total), cooked and shredded. I highly recommend cooking your own chicken for the best texture and flavor, but a rotisserie chicken works beautifully for a shortcut!
  • For the Creamy Base:
    • 2 (8-ounce) packages full-fat cream cheese, softened to room temperature. This is crucial for a smooth, lump-free dip!
    • ¾ cup good quality buffalo wing sauce (I always reach for Frank’s RedHot Buffalo Wing Sauce for that authentic flavor).
    • ½ cup ranch dressing (or blue cheese dressing if you’re a purist and prefer that tang!).
    • 1 teaspoon garlic powder.
    • ½ teaspoon onion powder.
    • ¼ teaspoon cayenne pepper (optional, for an extra kick!).
    • Pinch of salt and freshly ground black pepper, to taste.
  • For the Cheesy Layer:
    • 1 ½ cups shredded sharp cheddar cheese, divided.
    • 1 cup shredded Monterey Jack cheese (or a cheddar-jack blend), divided.
    • ½ cup crumbled blue cheese (optional, but a fantastic addition for depth of flavor).
  • For the Halloween Decoration:
    • ½ cup sour cream or extra ranch dressing, for the spiderweb design.
    • A few drops of black food coloring (optional, if you want a truly dark web).
    • Plastic spider rings or other small Halloween-themed decor (ensure they are food-safe or placed on the serving platter, not directly in the dip if not food-safe).
  • For Serving:
    • An assortment of dippers: tortilla chips (blue corn chips can be fun for a spooky touch!), celery sticks, carrot sticks, bell pepper strips, pita chips, or toasted baguette slices.
    • ¼ cup chopped fresh green onions or chives, for garnish.

Prepping Your Spooky Base: The Chicken

Alright, let’s get our hands on some chicken! The quality of your shredded chicken truly makes a difference in this Halloween Buffalo Chicken Dip, so take a little extra care here. You want it tender, juicy, and easily shreddable.

  1. Method 1: Roasting and Shredding (My Preferred Way for Flavor)

    Preheat your oven to 375°F (190°C). Place the two boneless, skinless chicken breasts on a baking sheet. Drizzle them lightly with olive oil and season generously with salt, black pepper, and a tiny pinch of garlic powder. Roast for about 20-25 minutes, or until the internal temperature reaches 165°F (74°C) and the chicken is cooked through and no longer pink. Make sure not to overcook it, as dry chicken will lead to a dry dip!

    Once cooked, remove from the oven and let the chicken rest for 5-10 minutes. This resting period allows the juices to redistribute, keeping your chicken moist. Then, using two forks, or even your hands (careful, it’s hot!), shred the chicken into bite-sized pieces. I like a mix of finely shredded and slightly chunkier pieces for texture.

  2. Method 2: Poaching for Tenderness

    If you prefer a super tender and moist result, poaching is a great option. Place the chicken breasts in a pot and cover them with water or chicken broth. Add a bay leaf, a few peppercorns, and a pinch of salt for flavor. Bring to a gentle simmer over medium heat, then reduce the heat to low, cover, and cook for 15-20 minutes, or until cooked through. Remove the chicken, let it cool slightly, and then shred it as described above.

  3. Method 3: Rotisserie Shortcut (When Time is of the Essence)

    No shame in this game! A pre-cooked rotisserie chicken is a fantastic time-saver. Simply remove the skin and bones, then shred the meat. You’ll need about 3-4 cups of shredded chicken for this recipe. This is perfect for busy Halloween party prep!

Set your beautifully shredded chicken aside; it’s ready for its starring role!

Crafting the Creamy, Zesty Dip Foundation

This is where the magic happens and our dip starts to take on its signature creamy, spicy, and utterly addictive texture. Having your cream cheese at room temperature is genuinely non-negotiable for a smooth dip, so please don’t skip that step!

  1. Softening the Cream Cheese:

    In a large mixing bowl, place your two packages of softened cream cheese. You want it pliable and easy to work with. If you forgot to take it out ahead of time, a quick trick is to unwrap it, place it on a microwave-safe plate, and microwave on low power (30%) for 15-30 seconds, checking frequently until just softened, not melted.

  2. Whisking in the Buffalo Kick:

    To the softened cream cheese, add the ¾ cup of buffalo wing sauce, the ½ cup of ranch dressing (or blue cheese dressing), the 1 teaspoon of garlic powder, ½ teaspoon of onion powder, and the optional ¼ teaspoon of cayenne pepper. Using a sturdy spatula, a hand mixer, or even a stand mixer on low speed, mix everything together until it’s completely smooth and well combined. You’re aiming for a uniform, pale orange mixture with no lumps of cream cheese remaining. This creamy base is the heart and soul of your Halloween Buffalo Chicken Dip!

  3. Seasoning to Perfection:

    Give your creamy mixture a taste. Now is the time to adjust the seasonings. Add a pinch of salt and freshly ground black pepper. If you like it spicier, add a bit more buffalo sauce or cayenne. If you prefer it tangier, a splash more ranch. Trust your taste buds here!

Assembling Your Halloween Buffalo Chicken Dip

Now that we have our wonderfully flavorful components ready, it’s time to bring them all together into one glorious, bubbling, cheesy dip!

  1. Incorporating the Chicken:

    Add your shredded chicken to the large mixing bowl with the creamy buffalo mixture. Gently fold the chicken into the base, ensuring every strand of chicken is coated in that delicious sauce. You want every bite to be bursting with flavor!

  2. Adding the First Layer of Cheese:

    Next, add 1 cup of the shredded sharp cheddar cheese and ¾ cup of the shredded Monterey Jack cheese (or cheddar-jack blend) to the bowl with the chicken and cream cheese mixture. If you’re using blue cheese crumbles, now’s the time to fold in your ½ cup of crumbled blue cheese as well. Stir everything together until the cheese is evenly distributed throughout the dip. This cheese will melt into the dip, making it extra gooey and rich.

  3. Transferring to Your Baking Dish:

    Lightly grease an 8×8-inch or 9×9-inch baking dish (or a similar sized oven-safe serving dish). Spoon the entire dip mixture into the prepared dish and spread it out evenly with your spatula. Make sure it’s nice and level so it bakes consistently.

  4. The Grand Cheesy Topping:

    Sprinkle the remaining ½ cup of shredded sharp cheddar cheese and ¼ cup of shredded Monterey Jack cheese (or cheddar-jack blend) evenly over the top of the dip. This will form that beautiful, bubbling, golden-brown crust we all crave in a good baked dip.

Baking Your Bewitching Creation

The oven is where our dip transforms from a delicious mixture into a truly irresistible, bubbling, and aromatic party centerpiece. The smells that will soon waft from your kitchen will be absolutely amazing!

  1. Preheat the Oven:

    Preheat your oven to 375°F (190°C). This ensures the oven is at the correct temperature for even baking and melting.

  2. Baking to Perfection:

    Place the baking dish with your Halloween Buffalo Chicken Dip into the preheated oven. Bake for 20-25 minutes, or until the dip is hot and bubbly around the edges, and the cheese on top is melted, golden brown, and slightly caramelized in spots. Keep an eye on it in the last few minutes to prevent over-browning. If you notice the cheese browning too quickly, you can loosely tent it with aluminum foil.

  3. The Essential Rest:

    Once baked, carefully remove the dish from the oven. It will be incredibly hot! Let the dip rest for 5-10 minutes before serving. This brief resting period allows the dip to set slightly, making it less runny and easier to scoop. It also prevents anyone from burning their tongue on the first eager bite!

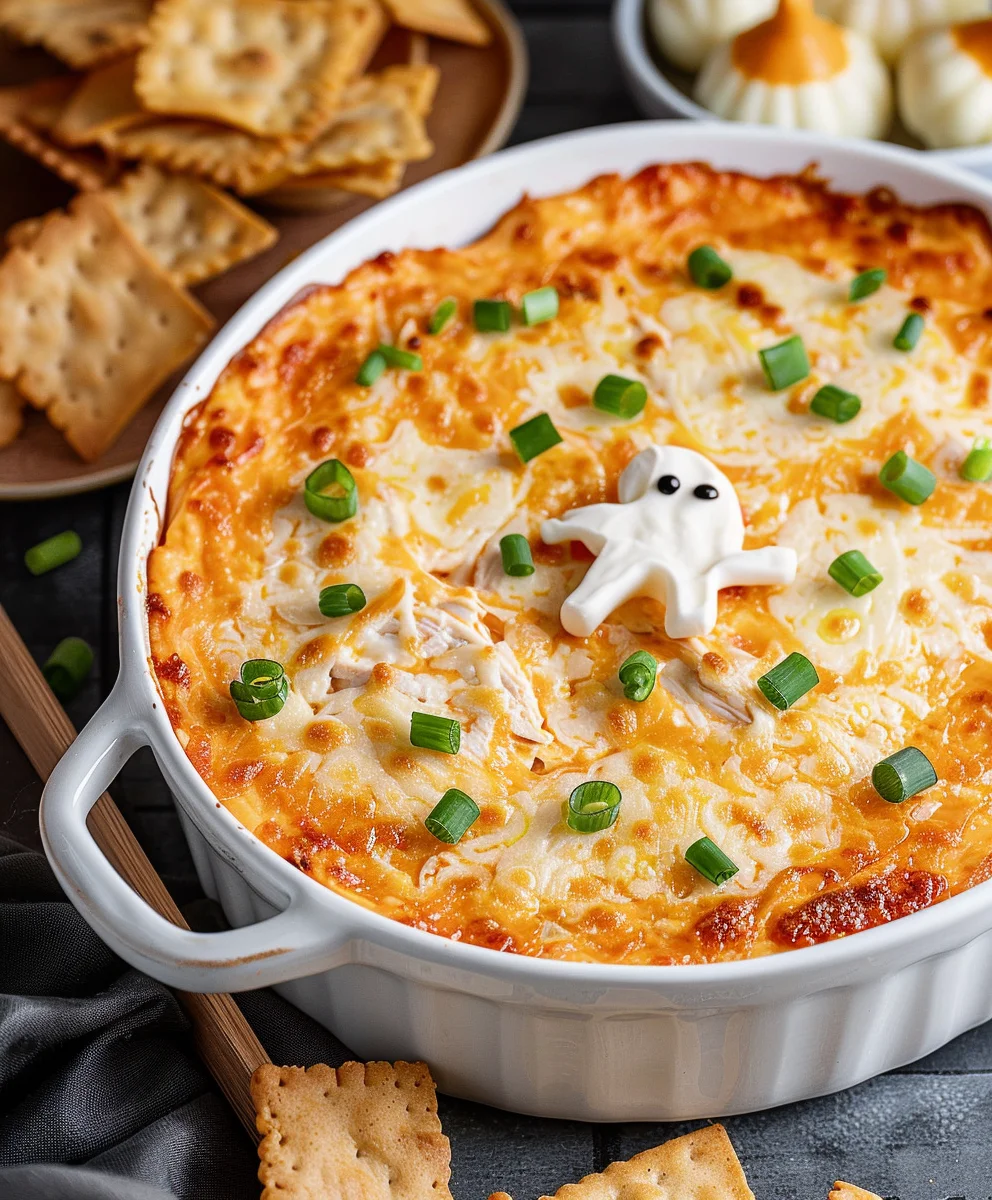
The Grand Reveal: Decorating Your Halloween Masterpiece

Now for the fun part that truly makes this a Halloween Buffalo Chicken Dip! This step is all about presentation and adding that spooky flair that will impress your guests.

  1. Creating the Spiderweb Design:

    While the dip is still warm (but after it has rested for a few minutes), take your ½ cup of sour cream or extra ranch dressing. Spoon it into a small piping bag (or a Ziploc bag with a tiny corner snipped off). Starting from the center of the dip, pipe concentric circles of sour cream/ranch across the top. Make about 3-4 circles, spaced evenly apart.

    Then, take a toothpick or a skewer. Starting from the center and dragging outwards towards the edge of the dish, draw lines through the sour cream circles. Repeat this motion in several spots around the dip, creating a beautiful, eerie spiderweb pattern. This simple trick instantly elevates the dip from delicious to delightful and spooky!

  2. Optional Spooky Enhancement (Black Web):

    For an even more dramatic effect, you can mix a few drops of black food coloring into the sour cream/ranch before piping. This will create a truly dark, gothic spiderweb that really stands out against the orange dip!

  3. Adding Your Creepy Crawlies:

    Carefully place your plastic spider rings or other small Halloween-themed decorations around the edges of the dish or directly onto the spiderweb design. If using plastic decor that isn’t food-safe, make sure to place them strategically on the serving platter around the dish rather than directly in the dip, so guests can easily avoid them. These little touches are what make your Halloween Buffalo Chicken Dip truly memorable!

  4. The Fresh Finish:

    Finally, sprinkle the chopped fresh green onions or chives over the entire dip. Not only do they add a lovely pop of color, but their fresh, oniony bite perfectly complements the rich, spicy flavors of the dip.

Serving Suggestions and Enjoyment

Your stunning and scrumptious Halloween Buffalo Chicken Dip is now ready to be devoured! It’s best served warm, right out of the oven, so the cheese is perfectly gooey and stretchy.

  1. Gather Your Dippers:

    Arrange an impressive platter of dippers around your beautifully decorated dip. I love offering a variety: classic tortilla chips (blue corn chips are a fantastic Halloween choice!), crisp celery sticks (which provide a refreshing crunch against the richness of the dip), crunchy carrot sticks, colorful bell pepper strips, and even sturdy pita chips or toasted baguette slices. Having options ensures there’s something for everyone.

  2. Keep it Warm (if needed):

    If you’re serving this at a party and want to keep it warm for an extended period, you can transfer the baking dish to a slow cooker set to the “warm” setting. Just be sure to stir it occasionally to prevent a skin from forming and to keep the cheese melty.

  3. Storage and Reheating:

    Should you miraculously have any leftovers (which rarely happens in my house!), cover the baking dish tightly with plastic wrap or aluminum foil and store it in the refrigerator for up to 3-4 days. To reheat, you can pop it back into a preheated oven at 350°F (175°C) for 15-20 minutes, or until hot and bubbly again. Alternatively, individual portions can be reheated in the microwave. Add a splash of milk if it seems a bit dry after refrigeration before reheating.

There you have it! A perfectly spooky and utterly delicious Halloween Buffalo Chicken Dip that’s sure to be the star of any ghoulish gathering. Enjoy watching your guests rave about this fantastic creation!

Trust me, this Halloween Buffalo Chicken Dip is so much more than just a dish; it’s an experience! It’s the kind of appetizer that brings people together, sparking conversation and delight with its vibrant flavors and fun, festive presentation. Every scoop is a blend of creamy, spicy, and cheesy goodness, with that delightful bite of tender chicken. The little bit of effort you put into the Halloween spiderweb design truly pays off, transforming a beloved classic into a show-stopping seasonal treat. So go ahead, whip up a batch, and prepare for some very happy ghouls and goblins at your next Halloween celebration!

This dip is versatile, satisfying, and incredibly easy to adapt to your preferred level of heat. If you’re a heat-seeker, feel free to add an extra dash of your favorite hot sauce or a few pinches of red pepper flakes to the mix. For those who prefer a milder flavor, simply reduce the amount of buffalo sauce slightly, or opt for a less intense brand. The beauty of this Halloween Buffalo Chicken Dip lies in its customizability, ensuring everyone can enjoy its deliciousness. It’s truly a crowd-pleaser that I find myself making year after year, not just for Halloween, but whenever I crave that irresistible buffalo chicken flavor.

The combination of textures in this dip is also a huge part of its appeal. You have the silky-smooth, tangy cream cheese base, the tender shreds of chicken, and the glorious melty, stretchy cheese pull on top, all complemented by the crispness of your chosen dippers. It’s a symphony of culinary delights that ensures every mouthful is interesting and satisfying. I often find myself having to make a double batch when hosting larger gatherings, as it disappears remarkably fast! So, be warned: this Halloween Buffalo Chicken Dip is seriously addictive!

Remember to keep a close eye on your dip during the final minutes of baking. Ovens can vary, and you want that top cheese layer to be perfectly golden and bubbly, not burnt. A little char on some of the edges adds character and flavor, but nobody wants an entirely crispy, overdone cheese top! The aroma filling your kitchen will be your best guide – a rich, savory scent with hints of spice. That’s your cue that deliciousness is just moments away!

One final tip for making your Halloween Buffalo Chicken Dip extra special: don’t be afraid to experiment with your cheese choices. While cheddar and Monterey Jack are classics for a reason, adding a touch of smoked gouda or even pepper jack could introduce some exciting new dimensions of flavor and a little more kick. The goal is to create a dip that you and your guests will absolutely adore, a true highlight of your Halloween festivities. This recipe provides a solid foundation, but your personal touches are what make it truly unique!

The warm, bubbling nature of this Halloween Buffalo Chicken Dip makes it incredibly comforting, perfect for a cool autumn evening. Imagine gathering around with friends and family, a big bowl of this dip at the center of your table, creating a cozy and festive atmosphere. It’s not just food; it’s a vehicle for joy and shared moments. This dip is guaranteed to be a hit, bringing smiles and satisfied groans of pleasure with every delightful scoop.

From the moment you start shredding the chicken to the final flourish of the spiderweb, every step in preparing this Halloween Buffalo Chicken Dip is an act of love. It’s a recipe that I truly enjoy making because the results are always so rewarding. The vibrant colors, the incredible aroma, and of course, the unforgettable taste make it a staple in my kitchen, especially as the spooky season approaches. I hope you find as much joy in preparing and sharing it as I do!

Creepy-Good Halloween Buffalo Chicken Dip Recipe

Conclusion:

And there you have it, my friends! We’ve reached the delicious culmination of our journey with this incredible recipe. If there’s one dish I implore you to add to your culinary repertoire, it’s this one. Why is it a must-try, you ask? Because it effortlessly blends the comforting creaminess of a classic dip with that unmistakable, zesty kick of buffalo sauce, all enveloped in a delightful cheesy embrace. It’s the kind of dish that disappears from the serving bowl at an astonishing rate, leaving a trail of happy, satisfied smiles in its wake. Whether you’re hosting a casual get-together, a lively game day party, or specifically looking for a festive, crowd-pleasing appetizer like the ultimate Halloween Buffalo Chicken Dip, this recipe is your golden ticket to culinary success. It’s not just a dip; it’s an experience, a conversation starter, and quite frankly, a guaranteed party highlight. I’ve seen it firsthand, time and again, how people gather around this dip, forks and chips at the ready, eager for just one more scoop of its irresistible goodness. Its simplicity in preparation belies the complex, satisfying flavors it delivers, making you look like a seasoned chef with minimal effort. Trust me, the aroma alone as it bakes will have everyone clamoring for a taste!

Now, let’s talk about how to truly make this dip shine on your table, or even how to tweak it to your heart’s content. For serving, the classics are always winners: sturdy tortilla chips, crisp celery sticks, and crunchy carrot sticks are perfect for scooping up every last bit. But don’t stop there! Consider serving it with bell pepper strips in various colors for an added pop of freshness and crunch, or even some sturdy crackers and toasted baguette slices, which become wonderfully infused with the dip’s rich flavor. For a slightly healthier angle, cucumber slices offer a refreshing counterpoint to the dip’s richness. And for those who love to experiment, imagine these variations: want more heat? Amp up the hot sauce, or perhaps stir in some finely diced jalapeños for a fresh, fiery bite. Prefer it milder? Dial back the hot sauce and increase the cream cheese or a milder cheese like Monterey Jack. You can also play with the cheese blend – a mix of sharp cheddar and smoked gouda could add an incredible depth of flavor. For a touch of textural intrigue, a sprinkle of crispy bacon bits or chopped green onions on top just before serving adds both flavor and visual appeal. This dip is also surprisingly versatile beyond just a dipper; it makes a fantastic filling for mini phyllo cups, a delicious topping for baked potatoes, or even a creative stuffing for bell peppers for a more substantial appetizer. Imagine transforming this into a hearty sandwich or wrap filling for lunch the next day – the possibilities are truly endless!

So, now it’s your turn! I’ve shared my absolute go-to recipe for a reason, and I genuinely cannot wait for you to experience the joy of making and sharing it. Seriously, gather your ingredients, follow these simple steps, and prepare to impress everyone (including yourself!). This isn’t just a recipe; it’s an invitation to create, to share, and to savor. Once you’ve whipped up your own batch of this glorious dip, whether it’s for a special occasion or just a cozy night in, please come back and tell me all about it. I absolutely adore hearing about your culinary adventures. Share your photos on social media, tag me, or simply drop a comment below and let me know how it turned out. Did you try a fun variation? What did your guests think? Your feedback and experiences are incredibly valuable and inspiring. So, go forth, embrace the deliciousness, and get ready for rave reviews. Happy dipping, my friends!


Creepy-Good Halloween Buffalo Chicken Dip

Creepy-Good Halloween Buffalo Chicken Dip

A festive, easy-to-make Halloween Buffalo Chicken Dip recipe that transforms a classic appetizer into a spooky showstopper. Combining tender shredded chicken, tangy buffalo sauce, creamy cheese, and fun decorations, it’s the perfect centerpiece for any ghoulish gathering.

Prep Time
45 Minutes

Cook Time
25 Minutes

Total Time
20 Minutes

Servings
8-10 servings

Ingredients

  • 2 cups cooked shredded chicken
  • 8 oz cream cheese, softened
  • ½ cup buffalo sauce
  • ½ cup ranch dressing
  • 1 cup shredded mozzarella cheese
  • 1 tsp garlic powder
  • ½ tsp onion powder
  • ¼ tsp cayenne pepper (optional)
  • Pinch salt and black pepper, to taste
  • 6–8 slices white cheese (for ghost shapes)
  • Black decorating gel or mini olives (for ghost eyes)
  • ½ cup sour cream or ranch dressing (for spiderweb)
  • A few drops black food coloring (optional, for dark web)
  • Plastic spider rings or small Halloween decor (food-safe)
  • ¼ cup chopped fresh green onions or chives (for garnish)
  • Assorted dippers (e.g., tortilla chips, celery, carrots)

Instructions

  1. Step 1
    Cook boneless, skinless chicken breasts (roast or poach) until internal temperature reaches 165°F (74°C). Let rest, then shred into bite-sized pieces. Alternatively, use pre-cooked rotisserie chicken. Set aside.
  2. Step 2
    In a large mixing bowl, combine softened cream cheese, buffalo sauce, ranch dressing, garlic powder, onion powder, and optional cayenne pepper. Mix thoroughly until smooth and well combined. Season with salt and pepper to taste.
  3. Step 3
    Fold the shredded chicken and 1 cup shredded mozzarella cheese into the creamy buffalo mixture. Gently stir until all ingredients are evenly distributed. Lightly grease an 8×8-inch or 9×9-inch baking dish, then spoon the entire dip mixture into it, spreading evenly.
  4. Step 4
    Preheat your oven to 375°F (190°C). Bake the dip for 20-25 minutes, or until it’s hot and bubbly around the edges and the cheese on top is melted and golden brown. Carefully remove from oven and let rest for 5-10 minutes before decorating.
  5. Step 5
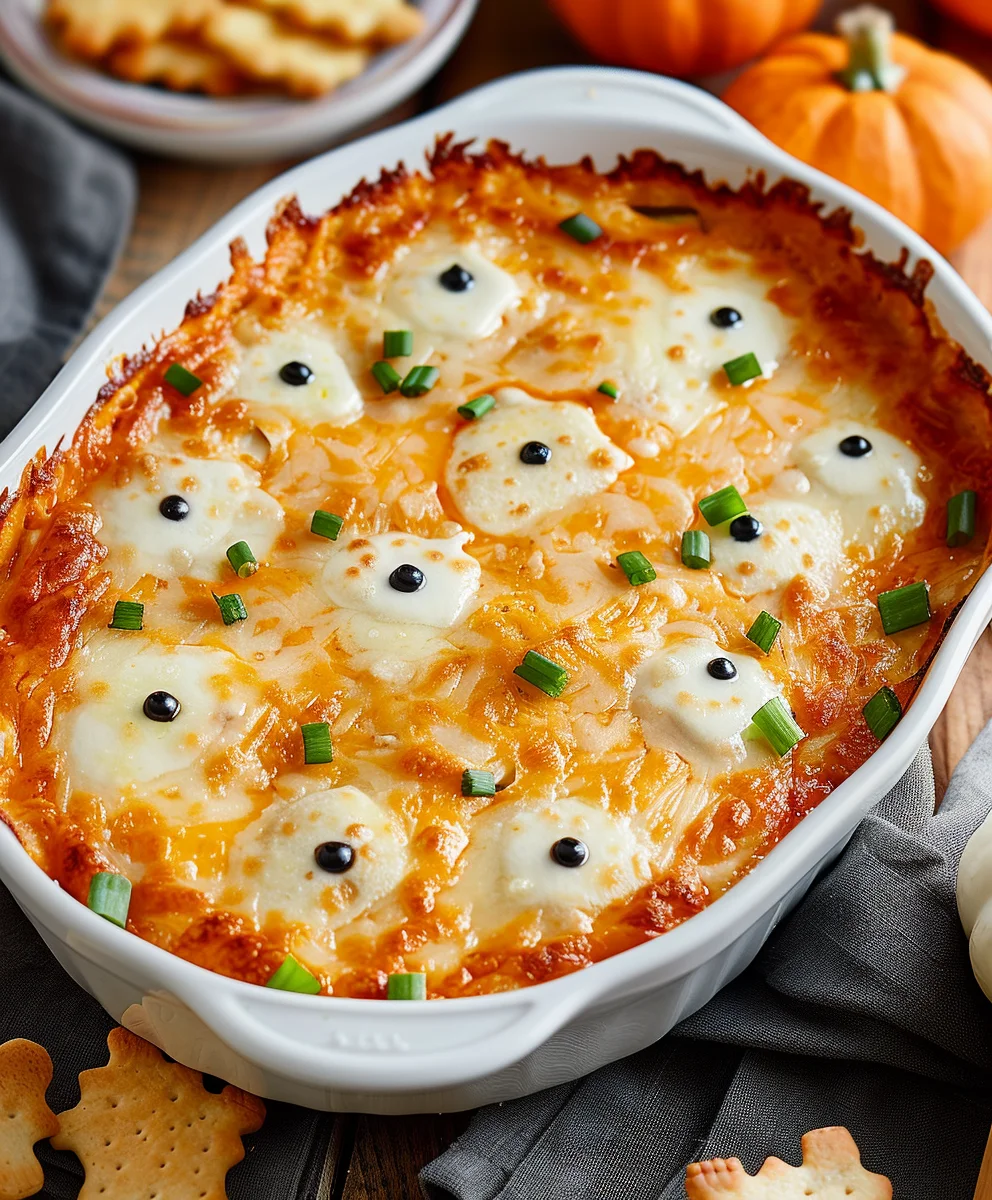
    For the spiderweb: Pipe concentric circles of sour cream (optionally mixed with black food coloring) onto the warm dip. Use a toothpick to drag lines from the center outwards, creating a web pattern. For ghosts: Cut ghost shapes from white cheese slices using a cookie cutter and place them on the dip. Add eyes using black decorating gel or small pieces of mini olives.
  6. Step 6
    Place plastic spider rings or other Halloween decor around the dish (ensure food-safe or on the platter). Sprinkle with chopped fresh green onions or chives. Serve warm with an assortment of dippers like tortilla chips, celery sticks, and carrot sticks.
  7. Step 7
    Store any leftovers tightly covered in the refrigerator for up to 3-4 days. To reheat, bake in a preheated oven at 350°F (175°C) for 15-20 minutes, or microwave individual portions, adding a splash of milk if needed.

Important Information

Nutrition Facts (Per Serving)

It is important to consider this information as approximate and not to use it as definitive health advice.

Allergy Information

Please check ingredients for potential allergens and consult a health professional if in doubt.

« Previous Post
Refreshing Non-Alcoholic Apple Cider Margarita Recipe!
Next Post »
Spooky Cheesy Halloween Breadstick Bones Recipe

If you enjoyed this…

Festive Mistletoe Margarita Recipe – Cheers Without Alcohol!

Million Dollar Beef Bacon Goat Cheese Appetizer Log Recipe

Cowboy Caviar Dip: The Ultimate Guide to This Delicious Texas Caviar

Primary Sidebar

Browse by Diet

BreakfastDinnerLunchDessertAppetizer

Sweet Peach Yogurt Parfait Delight

One of my fondest memories is from a lazy summer afternoon spent at my grandmother’s house. The sun filtered through the kitchen window, casting a warm glow over the table where she would create her culinary magic. It was during one of those blissful moments that I first tasted her Peach Yogurt Parfait with Honey and Granola. The sweet aroma of ripe peaches mingling with creamy yogurt and the crunch of granola was nothing short of heavenly. It felt like summer captured in a bowl, and I still remember the joy of diving in with a spoon, each layer revealing a new burst of flavor.

When I think about that parfait, I can almost hear the gentle hum of the bees outside, reminding me of the floral notes that honey brings to every bite. The vibrant yellows and soft oranges of the peaches contrast beautifully with the creamy white yogurt and the golden crunch of granola. It’s a dish that not only looks delightful but also tastes like a celebration of fresh, wholesome ingredients.

What makes my version of this Peach Yogurt Parfait special is the careful balance of flavors and textures. I use ripe, juicy peaches, drizzled with locally sourced honey, and a homemade granola that’s bursting with nuts and seeds for an extra crunch. It’s a simple dish, but every layer is crafted with love and attention.

Let me show you exactly how to make this delightful parfait, so you can bring a bit of that summer magic into your kitchen!

Sweet Peach Yogurt Parfait Delight

Why You’ll Love This Recipe

  • Delightfully creamy texture from the Greek yogurt, paired with the juicy sweetness of fresh peaches.
  • Ready in under 20 minutes, making it a quick and satisfying breakfast or snack option.
  • Budget-friendly, using common ingredients that you may already have in your pantry.
  • Customizable with your favorite granola and nuts, allowing you to tailor each parfait to your taste.
  • Perfectly balanced flavors with the bright acidity of lemon juice and the sweetness of honey enhancing the peaches.

Ingredients

  • For the Parfait:
  • 2 cups plain Greek yogurt (or vanilla yogurt for a sweeter option)
  • 2 large ripe peaches, diced (about 2 cups)
  • 1 tablespoon fresh lemon juice (to prevent browning of peaches)
  • 2 tablespoons honey (plus more for drizzling)
  • 1 teaspoon vanilla extract (optional for extra flavor)
  • For the Granola:
  • 1 cup granola (store-bought or homemade; see notes for a simple granola recipe)
  • 1/4 cup sliced almonds (optional for added crunch)
  • 1/4 cup shredded coconut (optional for added flavor)

Let’s dive into some key ingredients that make this Peach Yogurt Parfait so delightful! First, the Greek yogurt is not only creamy but also packed with protein, making it a satisfying option for breakfast or a snack. If you’re looking for a sweeter option, you can easily substitute it with vanilla yogurt, though it may alter the overall flavor balance. Next, the ripe peaches are the star of the show; their natural sweetness shines through, so I recommend choosing peaches that yield slightly to pressure, indicating they’re perfectly ripe. If peaches aren’t in season, feel free to use nectarines or even frozen peaches—just thaw them before use. Finally, honey adds a lovely floral sweetness that ties everything together. If you prefer, maple syrup can serve as a delicious substitute.

Step-by-Step Instructions

  1. Start by preparing the peaches. Wash them thoroughly, then slice and dice them into bite-sized pieces. In a medium bowl, toss the diced peaches with 1 tablespoon of fresh lemon juice to prevent browning. Set aside for about 5 minutes while the lemon juice works its magic.
  2. In a separate bowl, combine the Greek yogurt, 2 tablespoons of honey, and 1 teaspoon of vanilla extract if using. Stir the mixture until smooth and thoroughly blended. This should take about a minute. Avoid overmixing to maintain the creaminess of the yogurt.
  3. Now it’s time to layer your parfait. Grab a clear glass or bowl to showcase your beautiful creation. Start with a generous spoonful of the yogurt mixture at the bottom—about 1/4 cup will do. Use a spoon to spread it evenly.
  4. Add a layer of the diced peaches over the yogurt, ensuring they cover the yogurt completely. You might want to use about half of what you have prepared—roughly 1 cup. This layer should be visually appealing, so arrange the peaches neatly.
  5. Sprinkle 1/4 cup of granola over the peaches. This adds a delightful crunch. Make sure to distribute it evenly to ensure every bite has that satisfying texture. Avoid packing it down too tightly, as you want it to maintain its crunch.
  6. Repeat the layers: spoon in another 1/4 cup of yogurt, followed by another cup of peaches, and another sprinkle of granola. You should have at least two layers, but feel free to add more depending on your glass size.
  7. Finish off your parfait with a drizzle of honey on top for added sweetness and a touch of elegance. If you’re using sliced almonds or shredded coconut, sprinkle them on top now. It adds a lovely visual contrast and extra flavor.
  8. Serve immediately or refrigerate for up to 30 minutes before serving to allow the flavors to meld together. However, I recommend enjoying it fresh to maintain the granola’s crunch.

Pro Tips for the Best Peach Yogurt Parfait With Honey And Granola

  • Make sure to choose ripe peaches for the best flavor and texture. A common mistake is using unripe fruit, which can lead to a less enjoyable parfait. Look for peaches that are fragrant and slightly soft to the touch.
  • Use a clear glass to assemble your parfait; this not only makes for a beautiful presentation but also allows you to see the colorful layers, which adds to the enjoyment of eating it.
  • For an even creamier texture, consider whipping the Greek yogurt with a hand mixer for a couple of minutes before layering. This small adjustment makes a huge difference in mouthfeel.
  • Be mindful of the granola-to-yogurt ratio. Too much granola can overwhelm the parfait, while too little can make it feel too creamy. Aim for about 1/4 cup of granola per layer for the perfect balance.
  • If you’re making this for a gathering, consider preparing the yogurt and peaches ahead of time and layering them just before serving. This ensures the granola stays crunchy!

Variations & Serving Ideas

There are so many ways to get creative with your Peach Yogurt Parfait! For a tropical twist, swap out the peaches for mangoes or pineapples and top with coconut flakes. If you prefer a berry flavor, mix in some blueberries or strawberries with the peaches for added color and taste. For a nutty version, incorporate chopped walnuts or pecans instead of almonds.

As for serving ideas, this parfait pairs beautifully with a side of scrambled eggs for a hearty breakfast or fresh fruit salad for a light lunch. You might also enjoy it alongside whole grain toast with almond butter for an energizing snack. The contrast of flavors and textures will elevate your meal experience!

Storage, Make-Ahead & Reheating

The Peach Yogurt Parfait is best enjoyed fresh, but you can prepare some components ahead of time. Store the layered parfait in an airtight container in the refrigerator for up to 24 hours. However, be cautious; the granola may lose its crunch if stored too long. You can freeze the yogurt and peach mixture for up to 2 months; just remember to thaw it in the refrigerator overnight before serving.

If you plan to enjoy this dish the next day, it can taste even better as the flavors meld together. Just remember to add the granola right before serving to keep its delightful crunch!

Frequently Asked Questions

Can I make Peach Yogurt Parfait With Honey And Granola ahead of time?

Yes — in fact, it tastes even better the next day as the flavors meld. However, I recommend waiting to add the granola until just before serving to maintain its crunch.

What can I substitute for Greek yogurt?

If you prefer a lighter option, you can substitute Greek yogurt with regular yogurt or a dairy-free alternative like coconut yogurt. Just remember that this may alter the creaminess and flavor profile slightly.

Can I use frozen peaches for this parfait?

Absolutely! Just make sure to thaw the frozen peaches before using them. They will still add great flavor, though the texture may be slightly softer than fresh peaches.

How do I make the parfait vegan?

To make a vegan version, substitute the Greek yogurt with a plant-based yogurt alternative, and replace honey with maple syrup or agave nectar. This keeps the parfait sweet while adhering to a vegan diet.

What other fruits can I use in this recipe?

You can mix and match fruits based on your preference. Try using strawberries, blueberries, raspberries, or even bananas. Just make sure to adjust the lemon juice as needed to prevent browning.

Sweet Peach Yogurt Parfait Delight

Final Thoughts

The Peach Yogurt Parfait with Honey and Granola is a delightful blend of creamy yogurt, sweet peaches, and crunchy granola that creates a satisfying and nourishing treat. Each layer bursts with flavor, making it a perfect choice for breakfast or a light dessert.

This is the kind of recipe I come back to again and again, especially when I want something refreshing and wholesome to start my day. The harmony of sweet and tart flavors, combined with the delightful crunch, never fails to lift my spirits!

I encourage you to give this parfait a try and indulge in its comforting goodness. Feel free to share your results or even add your own twist—perhaps a sprinkle of cinnamon or a handful of nuts. Enjoy creating your perfect parfait!

Print
clock clock iconcutlery cutlery iconflag flag iconfolder folder iconinstagram instagram iconpinterest pinterest iconfacebook facebook iconprint print iconsquares squares iconheart heart iconheart solid heart solid icon

Peach Yogurt Parfait


  • Author: Lily author
  • Total Time: 15 minutes
  • Yield: 4 servings 1x
Pin Recipe
Print Recipe

Description

This Peach Yogurt Parfait combines creamy Greek yogurt, juicy peaches, and crunchy granola for a delightful treat. It’s a perfect breakfast or snack that captures the essence of summer in every bite.


Ingredients

Scale
  • For the Parfait:
  • 2 cups plain Greek yogurt (or vanilla yogurt for a sweeter option)
  • 2 large ripe peaches, diced (about 2 cups)
  • 1 tablespoon fresh lemon juice (to prevent browning of peaches)
  • 2 tablespoons honey (plus more for drizzling)
  • 1 teaspoon vanilla extract (optional for extra flavor)
  • For the Granola:
  • 1 cup granola (store-bought or homemade; see notes for a simple granola recipe)
  • 1/4 cup sliced almonds (optional for added crunch)
  • 1/4 cup shredded coconut (optional for added flavor)

Instructions

  1. Start by preparing the peaches. Wash them thoroughly, then slice and dice them into bite-sized pieces. In a medium bowl, toss the diced peaches with 1 tablespoon of fresh lemon juice to prevent browning. Set aside for about 5 minutes while the lemon juice works its magic.
  2. In a separate bowl, combine the Greek yogurt, 2 tablespoons of honey, and 1 teaspoon of vanilla extract if using. Stir the mixture until smooth and thoroughly blended. This should take about a minute. Avoid overmixing to maintain the creaminess of the yogurt.
  3. Now it’s time to layer your parfait. Grab a clear glass or bowl to showcase your beautiful creation. Start with a generous spoonful of the yogurt mixture at the bottom—about 1/4 cup will do. Use a spoon to spread it evenly.
  4. Add a layer of the diced peaches over the yogurt, ensuring they cover the yogurt completely. You might want to use about half of what you have prepared—roughly 1 cup. This layer should be visually appealing, so arrange the peaches neatly.
  5. Sprinkle 1/4 cup of granola over the peaches. This adds a delightful crunch. Make sure to distribute it evenly to ensure every bite has that satisfying texture. Avoid packing it down too tightly, as you want it to maintain its crunch.
  6. Repeat the layers: spoon in another 1/4 cup of yogurt, followed by another cup of peaches, and another sprinkle of granola. You should have at least two layers, but feel free to add more depending on your glass size.
  7. Finish off your parfait with a drizzle of honey on top for added sweetness and a touch of elegance. If you’re using sliced almonds or shredded coconut, sprinkle them on top now. It adds a lovely visual contrast and extra flavor.
  8. Serve immediately or refrigerate for up to 30 minutes before serving to allow the flavors to meld together. However, I recommend enjoying it fresh to maintain the granola’s crunch.
  • Prep Time: 15 mins
  • Cook Time: 0 mins
  • Category: Breakfast
  • Method: No-cook
  • Cuisine: American

Nutrition

  • Serving Size: 1 parfait
  • Calories: 250
  • Sugar: 20 g
  • Sodium: 50 mg
  • Fat: 5 g
  • Saturated Fat: 2 g
  • Unsaturated Fat: 3 g
  • Trans Fat: 0 g
  • Carbohydrates: 40 g
  • Fiber: 3 g
  • Protein: 10 g
  • Cholesterol: 10 mg

Keywords: Choose ripe peaches for the best flavor and texture. Use a clear glass for a beautiful presentation. For creaminess, consider whipping the yogurt before layering. Be mindful of the granola-to-yogurt ratio. Prepare yogurt and peaches ahead of time for gatherings, layering just before serving.

Did you make this recipe?

Share a photo and tag us — we can't wait to see what you've made!

Sun-Kissed Frozen Orange Cream Slush

As a child, summer days felt like they lasted forever. I remember the sticky heat wrapping around me as I played outside, my laughter mingling with the sounds of the neighborhood. But nothing could cool me down quite like the moment I’d spot my grandmother, laboring over her blender, whipping up her famous Frozen Orange Creamsicle Slush. That vibrant orange treat, with its frosty texture and sweet citrus aroma, was like a burst of sunshine in a cup. Just one sip, and I could feel the coolness wash over me, sparking pure joy.

This Frozen Orange Creamsicle Slush has a way of making you feel like a kid again. Its creamy, dreamy consistency is a delightful balance of bright orange and soft vanilla, inviting you to dive right in. The refreshing tang of orange dances on your tongue, while the smooth creaminess envelops you in a comforting embrace. It’s a nostalgic treat that’s perfect for hot summer afternoons or anytime you need a little pick-me-up.

What makes my version of this slush stand out is the addition of a hint of vanilla bean, which elevates the flavor and adds an extra layer of richness. Plus, it’s super easy to whip up with just a few simple ingredients that you probably already have on hand! So, if you’re ready to relive those sun-soaked memories, let me show you exactly how to make it.

Sun-Kissed Frozen Orange Cream Slush

Why You’ll Love This Recipe

  • Each slush is a perfect blend of creamy vanilla and zesty orange, creating a nostalgic flavor reminiscent of summer days.
  • This refreshing treat is ready in under 15 minutes, making it an ideal quick dessert for unexpected guests or hot afternoons.
  • With just 8 simple ingredients, it’s budget-friendly, ensuring you don’t have to break the bank to enjoy a delicious slush.
  • The slush has a perfectly smooth texture, thanks to the combination of ice and ice cream, providing a delightful contrast to the bright citrus flavors.
  • It’s highly customizable; you can easily adjust the sweetness and add fresh herbs for a unique twist that suits your taste.

Ingredients

  • 2 cups orange juice (freshly squeezed or store-bought)
  • 1 cup vanilla ice cream
  • 1 cup crushed ice
  • 1/2 cup milk (whole or 2%)
  • 1/4 cup granulated sugar (adjust based on sweetness preference)
  • 1 teaspoon vanilla extract
  • Zest of 1 orange (for added flavor)
  • Fresh orange slices and mint leaves (for garnish)

The star of this Frozen Orange Creamsicle Slush is the orange juice, which provides the vibrant, citrusy base. Freshly squeezed juice will yield the brightest flavor, but store-bought options can be just as convenient. If you’re opting for store-bought, choose 100% pure juice with no added sugars for the best results. Another essential ingredient is the vanilla ice cream; it adds creaminess and sweetness. You can substitute it with dairy-free ice cream if you’re looking for a vegan option. Whole or 2% milk complements the ice cream, creating a smooth blend. If you want a lower-calorie version, almond or oat milk can be good alternatives.

Lastly, the granulated sugar can be adjusted based on your sweetness preference. If you prefer a more natural sweetener, consider using honey or agave syrup. The orange zest enhances the flavor profile, providing an aromatic pop that brings the whole slush together. Don’t skip it! It adds an extra layer of brightness that makes this slush truly special.

Step-by-Step Instructions

  1. Start by preparing your ingredients. Gather 2 cups of orange juice, 1 cup of vanilla ice cream, and 1 cup of crushed ice. Make sure the ice is finely crushed, as larger chunks can make blending difficult.
  2. In a blender, combine the orange juice, vanilla ice cream, crushed ice, and 1/2 cup of milk. Add 1/4 cup of granulated sugar and 1 teaspoon of vanilla extract. If you like a sweeter slush, consider adding a bit more sugar at this stage.
  3. Add the zest of 1 orange to the blender. This step is crucial for enhancing the citrus flavor of your slush. Make sure not to include the bitter white pith—only the flavorful zest.
  4. Blend the mixture on medium-high speed for about 30-45 seconds. Stop once the ingredients are fully combined and the slush has a smooth, even consistency. If you notice large chunks of ice, blend for an additional 10-15 seconds. Avoid over-blending, as this can make the slush too liquidy.
  5. Once blended, taste the slush. If it needs more sweetness, add a little more sugar and blend for a few more seconds. If it’s too thick, you can add a splash of milk to reach your desired consistency.
  6. Pour the slush into glasses. This recipe typically serves 4, but you can easily double it for larger gatherings. Use a spoon to help guide the slush into the glasses if needed.
  7. Garnish each serving with fresh orange slices and mint leaves. The mint not only adds a pop of color but also a refreshing aroma that complements the citrus flavors beautifully.
  8. Serve immediately and enjoy! If you’ve made extra, you can refrigerate it for a short time, but it’s best enjoyed fresh.

Pro Tips for the Best Frozen Orange Creamsicle Slush

  • Don’t skip the orange zest! It’s a game-changer for flavor. Always zest before juicing to make it easier.
  • Use a high-powered blender for the best texture. A standard blender may struggle with ice, leading to uneven consistency. If you have a food processor, that can work too, but ensure the ice is finely crushed.
  • Adjust the ice-to-liquid ratio carefully. If your slush is too thick, it won’t blend well. Start with less ice and add more until you reach your preferred texture.
  • Be cautious with the sugar! Always start with the lower amount, as you can easily add more, but it’s hard to fix an overly sweet slush.
  • For a fun twist, consider adding a splash of coconut milk or a handful of fresh fruit like strawberries or pineapple. This not only enhances the flavor but also adds a beautiful color contrast.

Variations & Serving Ideas

There are countless ways to put a spin on your Frozen Orange Creamsicle Slush. Consider making a tropical version by adding in some pineapple juice or coconut milk for a delightful tropical twist. If you’re feeling adventurous, try incorporating a handful of frozen mango or peach slices for added sweetness. For a lighter version, swap out the vanilla ice cream for Greek yogurt for a creamy yet tangy alternative.

As for serving ideas, this refreshing slush pairs wonderfully with light summer dishes like grilled chicken skewers, fish tacos, or a simple salad topped with citrus vinaigrette. The bright, zesty flavors of the slush complement these dishes perfectly, making them an ideal pairing for a sunny day.

Storage, Make-Ahead & Reheating

This Frozen Orange Creamsicle Slush is best enjoyed fresh, but if you have leftovers, you can store them in an airtight container in the fridge for up to 2 days. Just keep in mind that the slush may lose some of its texture over time as the ice melts. It doesn’t freeze well, as the ice will turn into a solid block. If you must freeze it, blend again after thawing to restore the slushy consistency. This treat is best the day you make it, as the flavors meld together beautifully overnight, enhancing its deliciousness.

Frequently Asked Questions

Can I make Frozen Orange Creamsicle Slush ahead of time?

Yes — in fact, it tastes even better the next day as the flavors meld. However, it’s best to enjoy it fresh, as the texture can change if stored for too long. If you need to prepare it ahead, keep it in the fridge and re-blend before serving.

What kind of orange juice should I use?

For the best flavor, use freshly squeezed orange juice. However, if you’re short on time, opt for 100% pure store-bought juice without added sugars. This will ensure that your slush remains flavorful and refreshing.

Can I substitute the vanilla ice cream?

Absolutely! If you’re looking for a dairy-free option, coconut milk ice cream or a non-dairy vanilla ice cream can work wonderfully. They will still provide the creamy texture and sweetness you desire.

How can I adjust the sweetness of my slush?

You can easily adjust the sweetness by modifying the amount of sugar added. Start with 1/4 cup and taste the mixture before blending. If you prefer it sweeter, add more sugar gradually until it reaches your desired level.

What should I do if my slush is too thick?

If your slush is too thick, simply add a splash of milk or orange juice and blend again. This will help achieve a more drinkable consistency while maintaining the slushy texture. Adjust gradually to reach your preferred thickness.

Sun-Kissed Frozen Orange Cream Slush

Final Thoughts

The Frozen Orange Creamsicle Slush is a delightful blend of refreshing citrus and creamy goodness, making it a perfect treat for warm days or any time you crave a taste of nostalgia. The way the bright orange flavor dances with the creamy texture truly elevates this slush, transforming it into a satisfying escape from the everyday.

This is the kind of recipe I come back to again and again, especially when I’m looking to cool down or impress guests at a summer gathering. It’s simple to make and always brings smiles all around! I encourage you to try this recipe for yourself—don’t hesitate to share your results or even put your own spin on it. Happy slushing!

Print
clock clock iconcutlery cutlery iconflag flag iconfolder folder iconinstagram instagram iconpinterest pinterest iconfacebook facebook iconprint print iconsquares squares iconheart heart iconheart solid heart solid icon

Frozen Orange Creamsicle Slush


  • Author: Lily author
  • Total Time: 15 minutes
  • Yield: 4 servings 1x
Pin Recipe
Print Recipe

Description

This Frozen Orange Creamsicle Slush is a refreshing treat that combines creamy vanilla and zesty orange flavors. Perfect for hot summer days, it brings back nostalgic memories with every sip.


Ingredients

Scale
  • 2 cups orange juice (freshly squeezed or store-bought)
  • 1 cup vanilla ice cream
  • 1 cup crushed ice
  • 1/2 cup milk (whole or 2%)
  • 1/4 cup granulated sugar (adjust based on sweetness preference)
  • 1 teaspoon vanilla extract
  • Zest of 1 orange (for added flavor)
  • Fresh orange slices and mint leaves (for garnish)

Instructions

  1. Start by preparing your ingredients. Gather 2 cups of orange juice, 1 cup of vanilla ice cream, and 1 cup of crushed ice. Make sure the ice is finely crushed, as larger chunks can make blending difficult.
  2. In a blender, combine the orange juice, vanilla ice cream, crushed ice, and 1/2 cup of milk. Add 1/4 cup of granulated sugar and 1 teaspoon of vanilla extract. If you like a sweeter slush, consider adding a bit more sugar at this stage.
  3. Add the zest of 1 orange to the blender. This step is crucial for enhancing the citrus flavor of your slush. Make sure not to include the bitter white pith—only the flavorful zest.
  4. Blend the mixture on medium-high speed for about 30-45 seconds. Stop once the ingredients are fully combined and the slush has a smooth, even consistency. If you notice large chunks of ice, blend for an additional 10-15 seconds. Avoid over-blending, as this can make the slush too liquidy.
  5. Once blended, taste the slush. If it needs more sweetness, add a little more sugar and blend for a few more seconds. If it’s too thick, you can add a splash of milk to reach your desired consistency.
  6. Pour the slush into glasses. This recipe typically serves 4, but you can easily double it for larger gatherings. Use a spoon to help guide the slush into the glasses if needed.
  7. Garnish each serving with fresh orange slices and mint leaves. The mint not only adds a pop of color but also a refreshing aroma that complements the citrus flavors beautifully.
  8. Serve immediately and enjoy! If you’ve made extra, you can refrigerate it for a short time, but it's best enjoyed fresh.
  • Prep Time: 15 min
  • Cook Time: 0 min
  • Category: Dessert
  • Method: Blending
  • Cuisine: American

Nutrition

  • Serving Size: 1 serving
  • Calories: 200
  • Sugar: 30 g
  • Sodium: 50 mg
  • Fat: 5 g
  • Saturated Fat: 3 g
  • Unsaturated Fat: 2 g
  • Trans Fat: 0 g
  • Carbohydrates: 40 g
  • Fiber: 1 g
  • Protein: 2 g
  • Cholesterol: 20 mg

Keywords: Don't skip the orange zest! It's a game-changer for flavor. Always zest before juicing to make it easier.

Did you make this recipe?

Share a photo and tag us — we can't wait to see what you've made!

Zesty Lemon Poppy Seed Delight

One rainy afternoon, I found myself in my grandmother’s cozy kitchen, the kind that always smelled like warmth and love. She was whipping up her famous Lemon Poppy Seed Loaf, a recipe that had been passed down through generations. As the batter came together, the zesty aroma of fresh lemons filled the air, mingling perfectly with the nutty fragrance of poppy seeds. I can still picture her, apron-clad, as she expertly drizzled a vibrant citrus icing over the loaf, creating a glossy, sun-kissed finish that beckoned us to dive in. It was a moment that sparked my own passion for baking, and this recipe has become a cherished staple in my home ever since.

When you take a bite of this Lemon Poppy Seed Loaf, it’s like a burst of sunshine on your palate. The loaf is beautifully golden, with a tender crumb that melts in your mouth. Each slice is speckled with tiny poppy seeds, adding a delightful crunch that contrasts beautifully with the tangy sweetness of the lemon. And that citrus icing? It’s the finishing touch that elevates this loaf from ordinary to extraordinary, with its bright, zesty flavor dancing on your taste buds.

This recipe stands out because it embraces simplicity while delivering on flavor. I’ve added a hint of vanilla to the batter, enhancing the overall taste and making it even more indulgent. Trust me, once you make this Lemon Poppy Seed Loaf With Citrus Icing, it’ll become a go-to in your baking repertoire.

So, let me show you exactly how to make it!

Zesty Lemon Poppy Seed Delight

Why You’ll Love This Recipe

  • Moist and tender crumb that melts in your mouth, thanks to the perfect balance of butter and buttermilk.
  • Bright, zesty lemon flavor paired with crunchy poppy seeds, creating a delightful texture and taste experience.
  • Easy to whip up in just about an hour, perfect for last-minute gatherings or a cozy afternoon treat.
  • Budget-friendly with everyday ingredients, making it an accessible option for all home bakers.
  • The citrus icing adds a sweet tang that elevates the loaf, turning a simple recipe into a showstopper!

Ingredients

  • 1 ½ cups (190g) all-purpose flour
  • 1 teaspoon baking powder
  • ½ teaspoon baking soda
  • ½ teaspoon salt
  • 3 tablespoons poppy seeds
  • ½ cup (115g) unsalted butter, softened to room temperature
  • 1 cup (200g) granulated sugar
  • 2 large eggs
  • 1 teaspoon vanilla extract
  • 1 teaspoon lemon zest (from about 1 medium lemon)
  • ½ cup (120ml) buttermilk
  • 2 tablespoons fresh lemon juice

For the Citrus Icing:

  • 1 cup (120g) powdered sugar
  • 2 tablespoons fresh lemon juice
  • 1 tablespoon orange juice
  • 1 teaspoon lemon zest (for garnish, optional)

Let’s dive into the key ingredients that make this Lemon Poppy Seed Loaf so special. The all-purpose flour provides the structure and base for the loaf, while the baking powder and baking soda ensure it rises perfectly, giving the loaf a light texture. For a gluten-free variation, you could substitute the flour with a gluten-free all-purpose blend. Poppy seeds not only add a delightful crunch but also contribute to the unique flavor profile that pairs well with the citrus notes.

Unsalted butter is crucial for achieving the buttery richness that makes this loaf so moist. If you’re looking for a dairy-free option, coconut oil or a vegan butter can be used instead. The buttermilk is another essential component, providing acidity that activates the baking soda for a fluffy texture. If you don’t have buttermilk on hand, you can easily make a substitute by mixing ½ cup of milk with 1 tablespoon of vinegar or lemon juice and letting it sit for about 5 minutes.

Step-by-Step Instructions

  1. Preheat your oven to 350°F (175°C). Grease a 9×5-inch loaf pan or line it with parchment paper for easy removal later.
  2. In a medium mixing bowl, whisk together 1 ½ cups of all-purpose flour, 1 teaspoon of baking powder, ½ teaspoon of baking soda, ½ teaspoon of salt, and 3 tablespoons of poppy seeds. This helps to evenly distribute the baking agents and ensures a uniform rise.
  3. In a large mixing bowl, cream together ½ cup of softened unsalted butter and 1 cup of granulated sugar using an electric mixer on medium speed for about 3-4 minutes, until the mixture is light and fluffy. Make sure to scrape down the sides of the bowl occasionally.
  4. Add 2 large eggs, 1 teaspoon of vanilla extract, and 1 teaspoon of lemon zest to the creamed butter and sugar, mixing until fully combined. You want a smooth consistency, so ensure there are no lumps of butter.
  5. In a small bowl, combine ½ cup of buttermilk and 2 tablespoons of fresh lemon juice. Alternately add the dry ingredients and buttermilk mixture to the butter mixture, starting and ending with the dry ingredients. Mix just until combined; do not overmix, as this can lead to a dense loaf.
  6. Pour the batter into the prepared loaf pan. Smooth the top with a spatula, ensuring it’s even. Bake in the preheated oven for 50-60 minutes, or until a toothpick inserted in the center comes out clean. The edges should be lightly golden brown, and the center should feel just set.
  7. Once baked, remove the loaf from the oven and allow it to cool in the pan for about 10 minutes. Then, transfer it to a wire rack to cool completely. Resist the urge to slice too soon, as it will be crumbly if it’s still warm.
  8. While the loaf is cooling, prepare the citrus icing. In a medium bowl, whisk together 1 cup of powdered sugar, 2 tablespoons of fresh lemon juice, and 1 tablespoon of orange juice until smooth. If the icing is too thick, you can add a little more juice to reach your desired consistency.
  9. Once the loaf is completely cool, drizzle the citrus icing over the top. If you like, sprinkle with an additional teaspoon of lemon zest for an extra pop of flavor and color.

Pro Tips for the Best Lemon Poppy Seed Loaf With Citrus Icing

  • Be careful not to overmix your batter; this is a common mistake that can lead to a dense loaf. Mix just until the dry ingredients are incorporated for a light and fluffy texture.
  • Use room temperature ingredients, especially the butter and eggs. This helps to create a smoother batter and ensures even baking. Take your eggs out of the fridge about 30 minutes before you start.
  • For a more pronounced lemon flavor, consider adding a little lemon extract in addition to the zest and juice. Just a half teaspoon can elevate the citrus notes significantly.
  • When measuring your flour, spoon it into the measuring cup and level it off with a knife instead of scooping directly from the bag. This prevents packing and ensures you don’t end up with a dry loaf.
  • Invest in a good quality loaf pan; it makes a difference in heat distribution, which ensures even baking. If your pan is dark-coated, reduce the oven temperature by 25°F to prevent over-browning.

Variations & Serving Ideas

For a delightful twist, consider adding blueberries or raspberries to the batter for a fruity burst of flavor. You can also experiment with different citrus fruits—try lime or grapefruit zest and juice for a refreshing change. For a healthier option, substitute half of the all-purpose flour with whole wheat flour for added fiber without compromising too much on texture.

This Lemon Poppy Seed Loaf pairs beautifully with a light salad, such as a mixed greens salad with a vinaigrette, or a cup of tea for a cozy afternoon treat. It also complements a creamy cheese platter, as the acidity of the loaf balances rich cheeses perfectly. Lastly, a scoop of vanilla ice cream on the side creates a delightful contrast of temperatures and flavors!

Storage, Make-Ahead & Reheating

This Lemon Poppy Seed Loaf can be stored at room temperature for up to 3 days if wrapped tightly in plastic wrap. If you want to keep it longer, it freezes well for up to 3 months. To freeze, wrap the loaf tightly in plastic wrap and then in aluminum foil to prevent freezer burn.

When you’re ready to enjoy it again, simply thaw it in the fridge overnight. Reheat individual slices in the microwave for 15-20 seconds or in a toaster oven until warmed through. Interestingly, many people find that this loaf tastes even better the next day, as the flavors have time to meld!

Frequently Asked Questions

Can I make Lemon Poppy Seed Loaf With Citrus Icing ahead of time?

Yes — in fact, it tastes even better the next day! You can make the loaf a day in advance, allowing the flavors to develop. Just be sure to store it in an airtight container to maintain its moisture.

Can I substitute the poppy seeds?

Absolutely! If you don’t have poppy seeds on hand or prefer an alternative, you can use sesame seeds for a similar crunch or omit them entirely for a smooth loaf.

What can I use instead of buttermilk?

If you don’t have buttermilk, you can easily create a substitute by mixing ½ cup of milk (dairy or plant-based) with 1 tablespoon of vinegar or lemon juice. Let it sit for 5 minutes before using in the recipe.

How can I make this recipe gluten-free?

To make a gluten-free version of this Lemon Poppy Seed Loaf, substitute the all-purpose flour with a gluten-free all-purpose flour blend. Just ensure that the blend contains a binding agent like xanthan gum for the best results.

What is the best way to store leftover loaf?

Leftover Lemon Poppy Seed Loaf should be stored in an airtight container at room temperature for up to 3 days. For longer storage, wrap it tightly and freeze for up to 3 months. Thaw it before serving for the best texture.

Zesty Lemon Poppy Seed Delight

Final Thoughts

The Lemon Poppy Seed Loaf with Citrus Icing is truly a delightful treat that brings a burst of brightness to any occasion. The zesty lemon flavor combined with the subtle crunch of poppy seeds creates a satisfying balance, while the citrus icing adds a touch of sweetness that perfectly complements the loaf’s tanginess.

This is the kind of recipe I come back to again and again, especially when I want to brighten up a gloomy day or celebrate a small victory. The aroma that fills the kitchen as it bakes is absolutely heavenly! I encourage you to give this recipe a try; you might just find it becoming a beloved staple in your home. Don’t forget to share your results or even add your own unique twist—I can’t wait to see what you create!

Print
clock clock iconcutlery cutlery iconflag flag iconfolder folder iconinstagram instagram iconpinterest pinterest iconfacebook facebook iconprint print iconsquares squares iconheart heart iconheart solid heart solid icon

Lemon Poppy Seed Loaf


  • Author: Lily author
  • Total Time: 23 minute
  • Yield: 1 loaf 1x
Pin Recipe
Print Recipe

Description

This Lemon Poppy Seed Loaf is a delightful treat that combines zesty lemon flavor with crunchy poppy seeds. Topped with a citrus icing, it’s perfect for any occasion.


Ingredients

Scale
  • 1 ½ cups (190g) all-purpose flour
  • 1 teaspoon baking powder
  • ½ teaspoon baking soda
  • ½ teaspoon salt
  • 3 tablespoons poppy seeds
  • ½ cup (115g) unsalted butter, softened to room temperature
  • 1 cup (200g) granulated sugar
  • 2 large eggs
  • 1 teaspoon vanilla extract
  • 1 teaspoon lemon zest (from about 1 medium lemon)
  • ½ cup (120ml) buttermilk
  • 2 tablespoons fresh lemon juice
  • 1 cup (120g) powdered sugar
  • 2 tablespoons fresh lemon juice
  • 1 tablespoon orange juice
  • 1 teaspoon lemon zest (for garnish, optional)

Instructions

  1. Preheat your oven to 350°F (175°C). Grease a 9×5-inch loaf pan or line it with parchment paper for easy removal later.
  2. In a medium mixing bowl, whisk together 1 ½ cups of all-purpose flour, 1 teaspoon of baking powder, ½ teaspoon of baking soda, ½ teaspoon of salt, and 3 tablespoons of poppy seeds. This helps to evenly distribute the baking agents and ensures a uniform rise.
  3. In a large mixing bowl, cream together ½ cup of softened unsalted butter and 1 cup of granulated sugar using an electric mixer on medium speed for about 3-4 minutes, until the mixture is light and fluffy. Make sure to scrape down the sides of the bowl occasionally.
  4. Add 2 large eggs, 1 teaspoon of vanilla extract, and 1 teaspoon of lemon zest to the creamed butter and sugar, mixing until fully combined. You want a smooth consistency, so ensure there are no lumps of butter.
  5. In a small bowl, combine ½ cup of buttermilk and 2 tablespoons of fresh lemon juice. Alternately add the dry ingredients and buttermilk mixture to the butter mixture, starting and ending with the dry ingredients. Mix just until combined; do not overmix, as this can lead to a dense loaf.
  6. Pour the batter into the prepared loaf pan. Smooth the top with a spatula, ensuring it’s even. Bake in the preheated oven for 50-60 minutes, or until a toothpick inserted in the center comes out clean. The edges should be lightly golden brown, and the center should feel just set.
  7. Once baked, remove the loaf from the oven and allow it to cool in the pan for about 10 minutes. Then, transfer it to a wire rack to cool completely. Resist the urge to slice too soon, as it will be crumbly if it’s still warm.
  8. While the loaf is cooling, prepare the citrus icing. In a medium bowl, whisk together 1 cup of powdered sugar, 2 tablespoons of fresh lemon juice, and 1 tablespoon of orange juice until smooth. If the icing is too thick, you can add a little more juice to reach your desired consistency.
  9. Once the loaf is completely cool, drizzle the citrus icing over the top. If you like, sprinkle with an additional teaspoon of lemon zest for an extra pop of flavor and color.
  • Prep Time: 15 mins
  • Cook Time: 50-60 mins
  • Category: Dessert
  • Method: Baking
  • Cuisine: American

Nutrition

  • Serving Size: 1 slice
  • Calories: 200
  • Sugar: 15 g
  • Sodium: 150 mg
  • Fat: 8 g
  • Saturated Fat: 5 g
  • Unsaturated Fat: 3 g
  • Trans Fat: 0 g
  • Carbohydrates: 30 g
  • Fiber: 1 g
  • Protein: 3 g
  • Cholesterol: 40 mg

Keywords: Be careful not to overmix your batter; this is a common mistake that can lead to a dense loaf. Use room temperature ingredients for a smoother batter and even baking.

Did you make this recipe?

Share a photo and tag us — we can't wait to see what you've made!

  • Privacy Policy
  • Terms Of Service
  • Contact
  • About
  • GDPR

Copyright © 2025 Homesmad