Crunchy Zucchini Chips are a delightful snack that has taken the culinary world by storm. As someone who loves experimenting in the kitchen, I can confidently say that these chips are not only a healthier alternative to traditional potato chips but also a fantastic way to enjoy the bounty of summer zucchini. Originating from the need to utilize excess garden produce, zucchini chips have become a beloved staple in many households, offering a satisfying crunch that keeps you coming back for more.
What makes Crunchy Zucchini Chips so irresistible is their perfect balance of flavor and texture. The light seasoning enhances the natural sweetness of the zucchini, while the baking process transforms them into crispy, golden bites that are simply addictive. Whether you’re looking for a quick snack, a party appetizer, or a crunchy topping for salads, these chips are incredibly versatile and easy to make. Join me as we dive into this delicious recipe that will surely become a favorite in your home!

Ingredients:
- 2 medium zucchinis
- 1 tablespoon olive oil
- 1 teaspoon sea salt
- 1 teaspoon garlic powder
- 1 teaspoon onion powder
- 1 teaspoon smoked paprika (optional)
- 1/2 teaspoon black pepper
- 1/4 cup grated Parmesan cheese (optional for a cheesy flavor)
Preparing the Zucchini
1. **Wash the Zucchini**: Start by rinsing the zucchinis under cold water to remove any dirt or debris. Pat them dry with a clean kitchen towel. 2. **Slice the Zucchini**: Using a sharp knife or a mandoline slicer, cut the zucchinis into thin, even slices. Aim for about 1/8 inch thick. The thinner the slices, the crunchier the chips will be. If you’re using a mandoline, be sure to use the hand guard for safety. 3. **Remove Excess Moisture**: Place the zucchini slices on a clean kitchen towel or paper towels. Sprinkle a little salt over them and let them sit for about 15-20 minutes. This will help draw out excess moisture, which is key to achieving that perfect crunch. 4. **Pat Dry**: After the zucchini has rested, use another towel to pat the slices dry. This step is crucial, as it will help the chips crisp up in the oven.Seasoning the Zucchini
5. **Prepare the Seasoning Mix**: In a small bowl, combine the sea salt, garlic powder, onion powder, smoked paprika (if using), and black pepper. If you’re adding Parmesan cheese, mix it in as well. 6. **Toss with Olive Oil**: In a large mixing bowl, add the zucchini slices and drizzle the olive oil over them. Toss gently to coat all the slices evenly with the oil. 7. **Add the Seasoning**: Sprinkle the seasoning mix over the zucchini slices. Toss again to ensure that each slice is well-coated with the seasoning. This is where the flavor really comes to life!Cooking Process
8. **Preheat the Oven**: Preheat your oven to 225°F (107°C). A low temperature is essential for drying out the zucchini without burning them. 9. **Prepare the Baking Sheets**: Line two baking sheets with parchment paper. This will prevent the zucchini from sticking and make cleanup a breeze. 10. **Arrange the Zucchini Slices**: Lay the seasoned zucchini slices in a single layer on the prepared baking sheets. Make sure they are not overlapping; this will help them cook evenly and become crispy. 11. **Bake the Zucchini Chips**: Place the baking sheets in the preheated oven. Bake for about 1.5 to 2 hours, flipping the chips halfway through the cooking time. Keep an eye on them towards the end, as cooking times can vary based on the thickness of your slices and your oven. 12. **Check for Crispiness**: The chips are done when they are golden brown and crispy. If some slices are still soft, you can leave them in the oven for an additional 10-15 minutes, checking frequently to avoid burning.Cooling and Storing
13. **Cool the Chips**: Once the zucchini chips are done baking, remove them from the oven and let them cool on the baking sheets for about 10 minutes. They will continue to crisp up as they cool. 14. **Store the Chips**: If you have any leftovers (which is rare because they’re so delicious!), store the cooled zucchini chips in an airtight container at room temperature. They are best enjoyed within a few days, but I bet they won’t last that long!Serving Suggestions
15. **Enjoy Your Chips**: Serve the crunchy zucchini chips as a healthy snack on their own, or pair them with your favorite dip. They go wonderfully with hummus, guacamole, or a yogurt-based dip. 16. **Experiment with Flavors**: Feel free to get creative with the seasonings! You can try adding cayenne pepper for a spicy kick, or even some Italian herbs for a different flavor profile. The possibilities are endless! 17. **Share with Friends**: These zucchini chips make a fantastic party snack. Share them with friends and family, and watch them disappear in no time! By following these steps, you’ll have a batch of crunchy zucchini chips that are not only delicious but also a healthy alternative to traditional potato chips. Enjoy the process, and happy cooking!
Conclusion:
In summary, these Crunchy Zucchini Chips are an absolute must-try for anyone looking to add a deliciously healthy snack to their repertoire. Not only are they incredibly easy to make, but they also offer a satisfying crunch that will keep you coming back for more. The versatility of this recipe allows you to experiment with various seasonings, from classic sea salt to zesty garlic powder or even a sprinkle of parmesan cheese for an extra flavor kick. You can serve them as a delightful appetizer at your next gathering, pair them with your favorite dip, or simply enjoy them as a guilt-free snack while binge-watching your favorite show. I encourage you to give these Crunchy Zucchini Chips a try and see for yourself how they can transform your snacking habits. Once you’ve made them, I’d love to hear about your experience! Share your thoughts, any variations you tried, or even a photo of your crispy creations. Let’s spread the love for these tasty chips together! Happy cooking! Print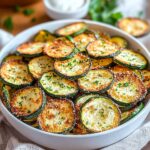
Crunchy Zucchini Chips: The Ultimate Healthy Snack Recipe
- Total Time: 135 minutes
- Yield: 4 servings 1x
Description
These crunchy zucchini chips are a healthy and tasty alternative to potato chips, baked with flavorful seasonings. Perfect as a snack or party treat, they can be enjoyed alone or with your favorite dip.
Ingredients
- 2 medium zucchinis
- 1 tablespoon olive oil
- 1 teaspoon sea salt
- 1 teaspoon garlic powder
- 1 teaspoon onion powder
- 1 teaspoon smoked paprika (optional)
- 1/2 teaspoon black pepper
- 1/4 cup grated Parmesan cheese (optional)
Instructions
- Wash the Zucchini: Rinse the zucchinis under cold water to remove dirt. Pat dry with a clean towel.
- Slice the Zucchini: Cut the zucchinis into thin, even slices (about 1/8 inch thick) using a sharp knife or mandoline slicer.
- Remove Excess Moisture: Place zucchini slices on a towel, sprinkle with salt, and let sit for 15-20 minutes to draw out moisture.
- Pat Dry: After resting, pat the slices dry with another towel.
- Prepare the Seasoning Mix: In a small bowl, combine sea salt, garlic powder, onion powder, smoked paprika (if using), and black pepper. Mix in Parmesan cheese if desired.
- Toss with Olive Oil: In a large bowl, add zucchini slices and drizzle with olive oil. Toss gently to coat.
- Add the Seasoning: Sprinkle the seasoning mix over the zucchini and toss again to ensure even coating.
- Preheat the Oven: Preheat your oven to 225°F (107°C).
- Prepare the Baking Sheets: Line two baking sheets with parchment paper.
- Arrange the Zucchini Slices: Lay the seasoned zucchini slices in a single layer on the baking sheets, ensuring they do not overlap.
- Bake the Zucchini Chips: Bake for 1.5 to 2 hours, flipping halfway through. Check for doneness towards the end.
- Check for Crispiness: The chips should be golden brown and crispy. If some are still soft, bake for an additional 10-15 minutes.
- Cool the Chips: Remove from the oven and let cool on the baking sheets for about 10 minutes.
- Store the Chips: Store cooled chips in an airtight container at room temperature. Best enjoyed within a few days.
- Enjoy Your Chips: Serve as a healthy snack or with dips like hummus or guacamole.
- Experiment with Flavors: Try adding cayenne pepper for spice or Italian herbs for a different flavor.
- Share with Friends: Perfect for parties, these chips are sure to be a hit!
Notes
- Ensure zucchini slices are evenly cut for consistent cooking.
- Adjust seasoning to your taste; feel free to experiment with different spices.
- Store in an airtight container to maintain crispiness.
- Prep Time: 15 minutes
- Cook Time: 90 minutes