Deviled Egg Christmas Trees
Oh my goodness, get ready to dive into the most adorable and festive appetizer of the season: Deviled Egg Christmas Trees! I don’t know about you, but deviled eggs are always a hit at any gathering, and when the holidays roll around, I love to find ways to infuse that extra bit of cheer into everything I make. That’s exactly what we’re doing here!
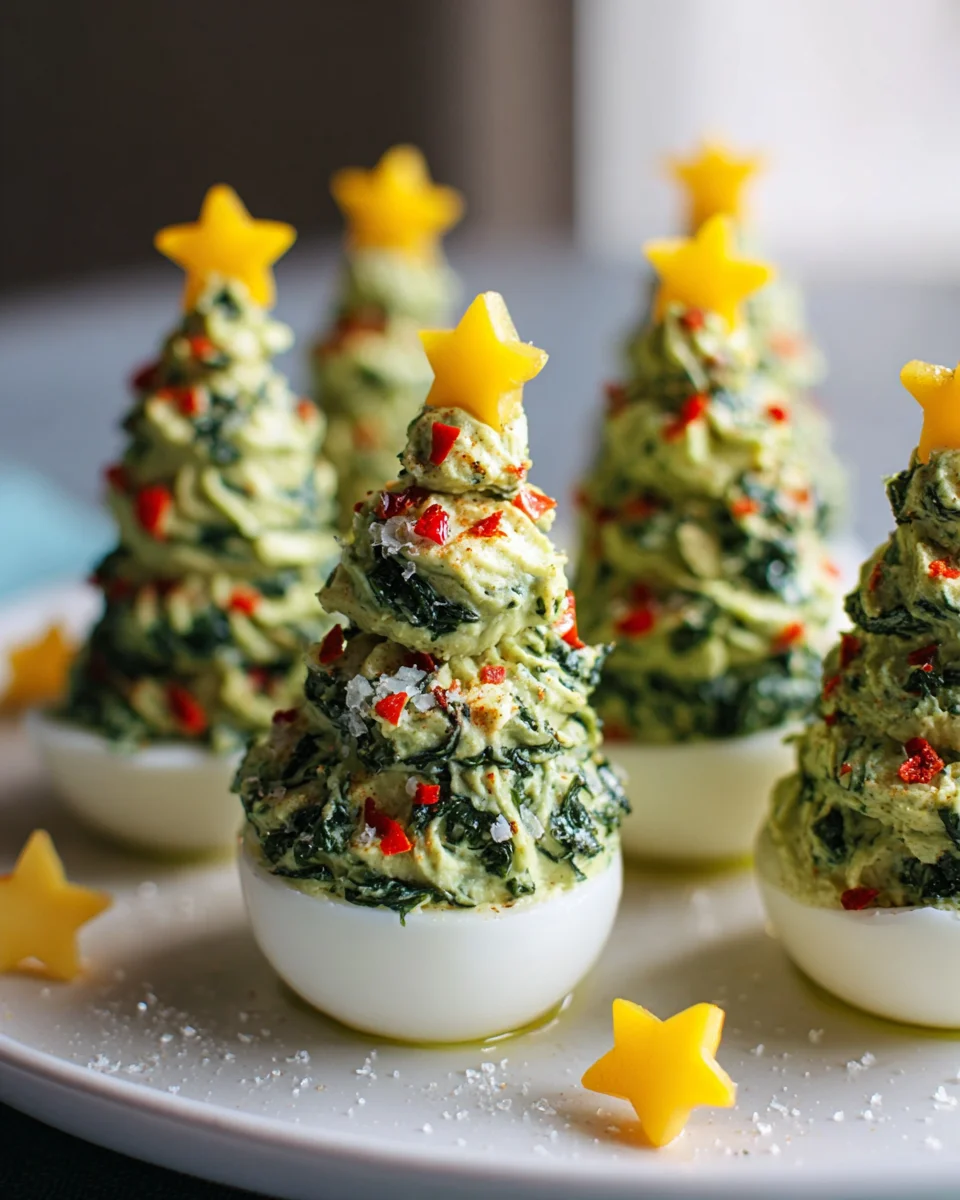
What makes this recipe so incredibly special, you ask? Well, it takes the humble, beloved deviled egg and transforms it into a whimsical, edible miniature Christmas tree! Imagine the smiles when your guests see these charming little trees gracing your holiday spread. It’s a delightful surprise that instantly elevates a classic dish into something truly spectacular and memorable. I guarantee they’ll be the first to disappear from the plate!
You’re absolutely going to love making these because they’re surprisingly simple to put together, incredibly fun to decorate, and an absolute showstopper. They combine the creamy, tangy goodness of your favorite deviled egg filling with a playful, festive presentation that’s perfect for holiday parties, family dinners, or even a cozy Christmas Eve snack. We’ll start with perfectly hard-boiled eggs, carefully cut them into adorable tree shapes, whip up that irresistible yolk filling, and then get creative with “decorations” like fresh dill “garland” or a tiny red bell pepper “star.” Get ready to spread some serious holiday joy, one delicious little tree at a time!

Ingredient Notes
Creating these festive Deviled Egg Christmas Trees is all about starting with great ingredients and adding that special holiday touch. Here’s what you’ll need to make your appetizers shine!
Eggs
- Hard-Boiled Eggs: You’ll need a dozen large hard-boiled eggs. The fresher your eggs, the harder they can be to peel, so if you plan ahead, use eggs that are a few days old. Properly hard-boiling them is key – I like to place them in a pot, cover with cold water, bring to a rolling boil, then turn off the heat, cover, and let sit for 10-12 minutes. Immediately transfer them to an ice bath for at least 5 minutes to stop the cooking and make peeling easier. Once peeled, you’ll slice them in half lengthwise. We’ll use all the yolks for the creamy filling, but for the “tree” base, we’ll choose the halves that sit most flat, possibly trimming a tiny sliver off the rounded bottom if needed.
The Creamy Filling
- Mayonnaise: About ½ cup of good quality mayonnaise forms the creamy base of our filling. I always opt for full-fat mayonnaise for the richest flavor and silkiest texture, but if you prefer, a lighter mayonnaise or even a blend of mayo and Greek yogurt can work. The yogurt will add a slight tang, so adjust other seasonings accordingly.
- Dijon Mustard: 1-2 teaspoons of Dijon mustard adds that classic deviled egg tang and a subtle spice. Yellow mustard can be used for a milder flavor, or for a touch of heat, a tiny pinch of cayenne pepper could be included.
- White Vinegar or Fresh Lemon Juice: Just a teaspoon is enough to brighten the flavors and cut through the richness. Either works beautifully, so use what you have on hand.
- Salt and Freshly Ground Black Pepper: To taste, of course! Don’t be shy; deviled eggs need proper seasoning to truly sing.
- Green Food Coloring: This is critical for our Christmas trees! I recommend using gel food coloring as it’s more concentrated and won’t thin out your filling. Start with a tiny drop and add more until you achieve a vibrant, festive green.
The Festive Decorations
These are what transform your deviled eggs into mini edible Christmas trees!
- Pimentos or Roasted Red Pepper: Finely diced pimentos or a small piece of roasted red pepper make perfect little red “ornaments.” You’ll want just tiny specks to stud your trees.
- Fresh Dill or Chives: A few small sprigs of fresh dill or finely snipped chives can act as green “garland” or even small branches on your trees, adding freshness and an herbaceous note.
- Star Topping: For the star atop your tree, think small! A tiny piece of yellow bell pepper, a sliver of carrot, or even a small piece of cheddar cheese cut with a mini star cookie cutter works wonderfully. Precision is key here!
- Optional Garnishes: A light dusting of paprika can add another layer of color, or for a touch of sparkle, consider using edible gold or silver glitter (food-grade only!).
Step-by-Step Instructions
Let’s turn those humble hard-boiled eggs into a whimsical forest of Deviled Egg Christmas Trees! Follow these steps carefully for a stunning holiday appetizer.
- Prepare the Eggs:
- Start with your dozen hard-boiled eggs. Once they’re completely cooled (an ice bath is your best friend here!), carefully peel them.
- Slice each egg in half lengthwise, from top to bottom. Gently scoop out all the yolks into a medium-sized bowl.
- For the egg white bases, you’ll need 24 halves. Look for the halves that sit most stably on a flat surface. If any are a bit wobbly, use a sharp paring knife to carefully trim a very thin slice off the rounded bottom of the egg white so it sits flat and upright like a little platform. Arrange these egg white halves on your serving platter.
- Create the Creamy Filling:
- Using a fork, mash the egg yolks thoroughly in the bowl until they are completely smooth and free of lumps. For an extra-creamy filling, you can push the yolks through a fine-mesh sieve or use a potato ricer.
- Add the mayonnaise, Dijon mustard, white vinegar (or lemon juice), salt, and black pepper to the mashed yolks.
- Mix everything together really well, making sure all the ingredients are fully incorporated and the mixture is smooth and creamy. Taste and adjust seasoning as needed – remember, balance is key!
- Color Your “Tree” Filling:
- Now for the fun part! Add a very small drop of green gel food coloring to your deviled egg filling.
- Stir well, observing the color. Continue adding tiny amounts of food coloring, stirring after each addition, until you achieve a vibrant, festive green that resembles a Christmas tree. Be careful not to add too much at once, as a little goes a long way with gel coloring.
- Pipe the Christmas Trees:
- Transfer your green deviled egg filling into a piping bag fitted with a star tip (a Wilton 1M or 21 works beautifully for a tree-like texture). If you don’t have a star tip, you can simply snip off a corner of the piping bag to create a round opening, though the star tip adds lovely texture.
- Hold the piping bag vertically over the center of an egg white half. Starting at the base, pipe the filling in a circular motion, building up the height in a conical shape. Think of it like building a soft-serve ice cream cone, wider at the bottom and narrowing as you reach the top, creating a classic Christmas tree silhouette.
- Repeat this process for all the egg white halves.
- Decorate Your Trees:
- Time for the ornaments! Carefully place tiny diced pimentos or roasted red pepper pieces onto the piped green filling to act as festive red “ornaments.”
- Add small sprigs of fresh dill or tiny snipped chives around the trees to mimic garland or delicate branches.
- Finally, for the star on top, gently place your tiny star-shaped yellow bell pepper, carrot, or cheese cutout onto the peak of each deviled egg tree.
- Chill and Serve:
- Once all your Deviled Egg Christmas Trees are decorated, carefully transfer the platter to the refrigerator.
- Chill for at least 30 minutes to allow the flavors to meld and the filling to firm up slightly. Serve cold and enjoy the delightful reactions!
Tips & Suggestions
Making Deviled Egg Christmas Trees is a delightful holiday project! Here are some of my top tips and suggestions to ensure your festive appetizers are nothing short of spectacular.
- Perfect Hard-Boiled Eggs are Key: The foundation of any great deviled egg is a perfectly cooked and easily peeled egg. To achieve this, try using eggs that are about a week old, as they tend to peel more easily than very fresh ones. After boiling, an immediate ice bath is crucial. It stops the cooking process and helps the egg white separate from the shell membrane, leading to smoother, less torn egg whites, which are essential for your “tree” bases.
- Silky Smooth Filling: To get that incredibly creamy, lump-free filling, don’t just mash the yolks with a fork. For extra smoothness, push the cooked yolks through a fine-mesh sieve or use a potato ricer before mixing in the other ingredients. This extra step makes a huge difference in texture, especially when piping.
- Mastering the Piping: If you’re new to piping, don’t fret! Practice on a plate or a piece of parchment paper first. Hold the piping bag perpendicular to the egg white. Start at the base and pipe in a continuous, swirling motion, gradually decreasing the diameter as you build upwards to create a conical tree shape. A steady hand and consistent pressure are your best friends here. A star tip (like Wilton 1M) will give your trees that lovely textured, branch-like appearance.
- Coloring Gradually: When adding green food coloring, always start with a very tiny drop, especially if using gel coloring, which is highly concentrated. Mix thoroughly and then add more if needed, drop by drop. It’s much easier to add more color than to try and dilute it if you’ve gone too dark!
- Get Creative with Garnishes: While pimentos, dill, and star cutouts are classic, feel free to get creative! Small pieces of red bell pepper, finely chopped chives, tiny capers, or even sprinkles of finely crumbled crispy beef bacon bits (as long as they don’t overpower the delicate egg flavor) can add extra flair. For a snowy effect, a very light dusting of finely grated Parmesan cheese or even a tiny bit of edible white glitter can be charming.
- Make Ahead Magic: You can prepare the deviled egg filling (without the green coloring) a day in advance and store it in an airtight container in the refrigerator. On the day of serving, mix in the green food coloring, pipe, and decorate. This streamlines your party prep significantly.
- Serving Suggestions: Arrange your Deviled Egg Christmas Trees on a beautiful platter, perhaps surrounded by fresh sprigs of rosemary or parsley to mimic a snowy forest floor. They make a fantastic centerpiece for any holiday appetizer spread.
Storage
Deviled Egg Christmas Trees are best enjoyed fresh, but sometimes you need to make them a little in advance or store leftovers. Here’s how I handle storage to keep them as delicious and presentable as possible.
- Refrigeration is Crucial: Due to the mayonnaise and eggs, these deviled eggs must be kept refrigerated at all times until serving. Mayonnaise is a perishable ingredient, and eggs themselves should not be left at room temperature for extended periods. Plan to pull them out of the fridge just before your guests arrive.
- Covering Properly: The biggest challenge with storing deviled eggs is preventing them from drying out or absorbing refrigerator odors. I recommend storing them in an airtight container with a lid. If you don’t have one large enough, you can gently cover the platter with plastic wrap, ensuring the wrap doesn’t touch the piped “trees” too much, which could smudge your beautiful decorations. You might even use toothpicks inserted into the egg whites to create a “tent” for the plastic wrap if needed, though with the tree shape, this can be tricky. A container with a slightly higher lid is ideal.
- Shelf Life: For the best quality and food safety, Deviled Egg Christmas Trees should be consumed within 1-2 days of preparation. The texture of the egg white can become rubbery, and the filling can lose its fresh zest if kept for too long.
- Serving Temperature: Always serve your Deviled Egg Christmas Trees chilled. The cool temperature enhances their refreshing flavor and creamy texture.
- Do Not Freeze: Deviled eggs, like most egg-based dishes containing mayonnaise, do not freeze well. The texture of both the egg whites and the filling will become rubbery, watery, and unappetizing upon thawing. So, please avoid freezing them entirely.
Final Thoughts
And there you have it! Your delightful Deviled Egg Christmas Trees are ready to bring some festive cheer to your holiday table. I just love how simple it is to transform a classic into something so incredibly special and visually stunning. This isn’t just a snack; it’s a conversation starter, a burst of creamy flavor, and a truly fun activity for all ages. Forget about boring appetizers – these Deviled Egg Christmas Trees are a must-try for anyone looking to add a touch of magic and deliciousness to their celebrations. I promise, they’ll be a hit!

Deviled Egg Christmas Trees: Festive & Easy Holiday Appetizer
- Total Time: 42 minutes
- Yield: 24 servings 1x
Description
These adorable Deviled Egg Christmas Trees are a whimsical twist on a classic appetizer, perfect for holiday gatherings. With creamy filling and festive decorations, they are sure to be a hit at any celebration!
Ingredients
- 12 large hard-boiled eggs
- ½ cup mayonnaise
- 1–2 teaspoons Dijon mustard
- 1 teaspoon white vinegar or fresh lemon juice
- Salt and freshly ground black pepper to taste
- Green food coloring (gel recommended)
- Finely diced pimentos or roasted red pepper
- Fresh dill or chives
- Small piece of yellow bell pepper, sliver of carrot, or small piece of cheddar cheese for star topping
- Optional: Paprika, edible gold or silver glitter
Instructions
- Prepare the Eggs: Start with your dozen hard-boiled eggs. Once they’re completely cooled, carefully peel them. Slice each egg in half lengthwise, from top to bottom. Gently scoop out all the yolks into a medium-sized bowl. For the egg white bases, you'll need 24 halves. Look for the halves that sit most stably on a flat surface. If any are a bit wobbly, use a sharp paring knife to carefully trim a very thin slice off the rounded bottom of the egg white so it sits flat and upright. Arrange these egg white halves on your serving platter.
- Create the Creamy Filling: Using a fork, mash the egg yolks thoroughly in the bowl until they are completely smooth and free of lumps. Add the mayonnaise, Dijon mustard, white vinegar (or lemon juice), salt, and black pepper to the mashed yolks. Mix everything together really well, making sure all the ingredients are fully incorporated and the mixture is smooth and creamy. Taste and adjust seasoning as needed.
- Color Your 'Tree' Filling: Add a very small drop of green gel food coloring to your deviled egg filling. Stir well, observing the color. Continue adding tiny amounts of food coloring, stirring after each addition, until you achieve a vibrant, festive green.
- Pipe the Christmas Trees: Transfer your green deviled egg filling into a piping bag fitted with a star tip. Hold the piping bag vertically over the center of an egg white half. Starting at the base, pipe the filling in a circular motion, building up the height in a conical shape. Repeat this process for all the egg white halves.
- Decorate Your Trees: Carefully place tiny diced pimentos or roasted red pepper pieces onto the piped green filling to act as festive red 'ornaments.' Add small sprigs of fresh dill or tiny snipped chives around the trees. For the star on top, gently place your tiny star-shaped yellow bell pepper, carrot, or cheese cutout onto the peak of each deviled egg tree.
- Chill and Serve: Once all your Deviled Egg Christmas Trees are decorated, carefully transfer the platter to the refrigerator. Chill for at least 30 minutes to allow the flavors to meld and the filling to firm up slightly. Serve cold and enjoy.
- Prep Time: 30 mins
- Cook Time: 12 mins
- Category: Appetizer
- Method: Boiling and Piping
- Cuisine: American
Nutrition
- Serving Size: 1 deviled egg tree
- Calories: 90
- Sugar: 0 g
- Sodium: 100 mg
- Fat: 7 g
- Saturated Fat: 1 g
- Unsaturated Fat: 6 g
- Trans Fat: 0 g
- Carbohydrates: 1 g
- Fiber: 0 g
- Protein: 6 g
- Cholesterol: 186 mg
Keywords: For the best results, use eggs that are about a week old for easier peeling. For a smoother filling, push the yolks through a fine-mesh sieve or use a potato ricer. Always serve chilled and avoid freezing.