• Skip to primary navigation
  • Skip to main content
  • Skip to primary sidebar
Homesmad

Homesmad

  • Home
  • Breakfast & Brunch
  • Appetizers & Snacks
  • Dinner
  • Dessert
  • About
  • Privacy Policy
  • Contact
Homesmad
  • Home
  • Breakfast & Brunch
  • Appetizers & Snacks
  • Dinner
  • Dessert
  • About
  • Privacy Policy
  • Contact

Easy Banana Pudding & Cookie Butter Cheesecake Cake Recipe

November 30, 2025 by Lily author

The Banana Pudding Cookie Butter Cheesecake Cake Recipe is not just a dessert; it’s an experience, a symphony of flavors and textures designed to captivate your palate from the very first bite. I confess, when I first dreamt up this ambitious creation, I knew it had the potential to be truly extraordinary, blending the beloved, comforting notes of classic Southern banana pudding with the rich, tangy indulgence of a creamy cheesecake, all elevated by the spiced, caramel magic of cookie butter. This is a dish born from a desire to combine the familiar with the fantastically new, offering a spectacular centerpiece for any celebration or a decadent treat for a special evening.

While banana pudding itself holds a cherished place in Southern culinary history, evoking images of family gatherings and Sunday dinners, and cheesecake boasts a heritage stretching back to ancient Greece, this particular combination is a delightful modern innovation. People simply adore this multifaceted dessert because it delivers on every front: the silky-smooth banana custard, the delicate vanilla wafers, the dense and luxurious cookie butter cheesecake layer, and the moist cake base all come together for an unparalleled taste sensation. Every component plays its part perfectly, ensuring that this Banana Pudding Cookie Butter Cheesecake Cake Recipe is more than the sum of its incredible parts; it’s a new classic in the making that promises unforgettable flavor and an impressive presentation.

Easy Banana Pudding & Cookie Butter Cheesecake Cake Recipe this RECIPE

Ingredients:

  • For the Banana Cake Layers:

    • 2 ½ cups (300g) all-purpose flour, spooned and leveled
    • 1 ½ teaspoons baking powder
    • ½ teaspoon baking soda
    • ½ teaspoon salt
    • 1 cup (226g) unsalted butter, softened to room temperature
    • 1 ½ cups (300g) granulated sugar
    • 3 large eggs, at room temperature
    • 1 teaspoon pure vanilla extract
    • 1 ½ cups (about 3-4 medium) very ripe mashed bananas (the spottier, the better!)
    • ½ cup (120ml) buttermilk, at room temperature (or make your own by adding ½ tablespoon lemon juice or white vinegar to ½ cup milk and letting it sit for 5 minutes)
  • For the Cookie Butter Cheesecake Layer:

    • 2 (8-ounce) blocks full-fat cream cheese, softened to room temperature
    • ½ cup (100g) granulated sugar
    • 2 large eggs, at room temperature
    • 1 teaspoon pure vanilla extract
    • ½ cup (120g) sour cream, at room temperature
    • ½ cup (120g) creamy cookie butter (like Biscoff spread), plus extra for drizzling
  • For the Banana Pudding Filling:

    • 2 (3.4-ounce) packages instant vanilla pudding mix
    • 4 cups (960ml) cold whole milk
    • 4-5 ripe bananas, sliced (about 3-4 cups)
    • 1 (12-ounce) box Nilla Wafers
  • For the Whipped Cream Frosting:

    • 3 cups (720ml) heavy cream, very cold
    • ¾ cup (90g) confectioners’ sugar (powdered sugar), sifted
    • 1 ½ teaspoons pure vanilla extract
  • Optional Garnishes:

    • Extra Nilla Wafers, crushed or whole
    • Fresh banana slices (tossed lightly in lemon juice to prevent browning, if desired)
    • Melted cookie butter for drizzling

Preparing the Banana Cake Layers

  1. Preheat and Prepare: First things first, let’s get our oven ready. Preheat your oven to 350°F (175°C). This ensures an even bake. Then, generously grease and flour three 8-inch round cake pans. If you only have two, you can bake in batches, just make sure to let the pans cool slightly before re-greasing and adding more batter. Line the bottoms with parchment paper for extra insurance against sticking. Trust me, it makes removal so much easier.
  2. Whisk Dry Ingredients: In a medium bowl, whisk together your all-purpose flour, baking powder, baking soda, and salt. Whisking ensures these dry ingredients are evenly distributed, which is crucial for a consistent rise in your cake. Set this aside for a moment.
  3. Cream Butter and Sugar: In a large bowl, using an electric mixer fitted with a paddle attachment (or a hand mixer), beat the softened unsalted butter and granulated sugar together on medium-high speed until the mixture is light, fluffy, and pale in color. This process, known as creaming, incorporates air into the butter, which will give your cake a lovely tender crumb. This usually takes about 3-5 minutes. Scrape down the sides of the bowl as needed to ensure everything is well combined.
  4. Add Eggs and Vanilla: Reduce the mixer speed to medium and add the eggs one at a time, beating well after each addition. It’s important to give each egg a chance to fully incorporate into the butter mixture before adding the next. Once the eggs are in, stir in the pure vanilla extract. Vanilla adds such a beautiful depth of flavor to any dessert, and this Banana Pudding Cookie Butter Cheesecake Cake Recipe is no exception!
  5. Incorporate Bananas: Now for the star flavor! Add the very ripe mashed bananas to the wet mixture and mix on low speed until just combined. You want those dark, spotty bananas – they offer the most intense banana flavor and natural sweetness, which is absolutely essential for a truly delicious banana cake.
  6. Alternate Dry and Wet: With the mixer on low speed, gradually add the dry ingredients to the wet ingredients in three additions, alternating with the buttermilk in two additions, beginning and ending with the dry ingredients. For example, add about a third of the flour mixture, mix until just combined, then half the buttermilk, mix, then another third of the flour, mix, the remaining buttermilk, mix, and finally the last third of the flour. Be careful not to overmix! Overmixing can develop the gluten too much, leading to a tough cake. Mix only until just combined and no streaks of flour remain.
  7. Divide and Bake: Divide the cake batter evenly among your three prepared 8-inch cake pans. Use an offset spatula to gently smooth the tops. Bake for 25-30 minutes, or until a wooden skewer or toothpick inserted into the center of the cakes comes out clean. Baking times can vary depending on your oven, so keep an eye on them.
  8. Cooling Process: Once baked, remove the cakes from the oven and let them cool in their pans on a wire rack for about 10-15 minutes. This allows the cakes to set up properly before you try to remove them. After 10-15 minutes, invert the cakes onto the wire rack, carefully remove the parchment paper, and let them cool completely. It’s crucial that the cake layers are completely cool before assembling, otherwise, your frosting will melt, and your beautiful cake will slide. This might take up to an hour or two.

Crafting the Cookie Butter Cheesecake Layer

  1. Preheat and Prepare for Cheesecake: While your cake layers are cooling, let’s get started on the creamy cookie butter cheesecake. Adjust your oven rack to the middle position and preheat the oven to 325°F (160°C). Prepare a 9-inch springform pan by lightly greasing it. For a richer, creamier cheesecake and to prevent cracks, I highly recommend using a water bath. Wrap the bottom and sides of your springform pan tightly with several layers of heavy-duty aluminum foil to prevent water from seeping in.
  2. Beat Cream Cheese and Sugar: In a large bowl, using an electric mixer on medium speed, beat the softened cream cheese and granulated sugar together until smooth and creamy, with no lumps. This should take about 2-3 minutes. Ensure your cream cheese is truly at room temperature; cold cream cheese will result in a lumpy batter. Scrape down the sides of the bowl as needed.
  3. Add Eggs and Vanilla: Reduce the mixer speed to low and add the eggs one at a time, mixing just until each egg is incorporated. Overmixing eggs can add too much air, which can lead to cracks in your cheesecake. Stir in the pure vanilla extract.
  4. Incorporate Sour Cream and Cookie Butter: Gently fold in the sour cream until just combined. Sour cream adds a lovely tang and helps to create that signature smooth, dense cheesecake texture. Finally, add the creamy cookie butter and mix on low speed until it’s evenly distributed throughout the batter. If you want a swirl effect, you can add dollops of cookie butter and gently swirl with a knife rather than fully incorporating it. For this Banana Pudding Cookie Butter Cheesecake Cake Recipe, I love having the distinct cookie butter flavor integrated throughout.
  5. Pour and Bake (Water Bath Method): Pour the cheesecake batter into the prepared springform pan. Place the springform pan inside a larger roasting pan. Carefully pour hot water into the roasting pan until it reaches about halfway up the sides of the springform pan. This water bath creates a moist, even heat environment, preventing cracks and ensuring a super creamy cheesecake.
  6. Bake the Cheesecake: Carefully transfer the roasting pan with the cheesecake to the preheated oven. Bake for 60-75 minutes, or until the edges are set, but the center still has a slight jiggle when gently shaken. This slight jiggle is key; it means it’s not overbaked.
  7. Cooling the Cheesecake: Once baked, turn off the oven and prop the oven door open slightly (you can use a wooden spoon). Let the cheesecake cool in the oven for 1 hour. This slow cooling process helps prevent cracking. After an hour, carefully remove the cheesecake from the water bath and the roasting pan (if applicable), remove the foil, and let it cool completely on a wire rack at room temperature. Once completely cooled, cover the cheesecake tightly with plastic wrap and refrigerate for at least 6 hours, or preferably overnight. This chilling step is non-negotiable – it allows the cheesecake to firm up and develop its full flavor and texture. This cheesecake layer is a star component of our “Banana Pudding Cookie Butter Cheesecake Cake Recipe” masterpiece.

Assembling the Banana Pudding Filling

  1. Prepare the Pudding: In a large bowl, whisk together the two packages of instant vanilla pudding mix with 4 cups of cold whole milk. Whisk continuously for about 2 minutes until the mixture begins to thicken. It will continue to thicken as it sits. Place the bowl in the refrigerator for 5-10 minutes to allow it to set up even more.
  2. Slice Bananas: While the pudding is setting, slice your 4-5 ripe bananas into about ¼-inch thick rounds. If you’re not assembling immediately, you can toss them lightly with a tablespoon of lemon juice to prevent browning, though for this recipe, they’ll be encased in pudding and frosting, so it’s less critical.
  3. Prepare Wafers: Open your box of Nilla Wafers. You’ll use these whole for layering. This traditional element is fundamental to any authentic banana pudding experience, and it’s essential for our “Banana Pudding Cookie Butter Cheesecake Cake Recipe” too!

Making the Whipped Cream Frosting

  1. Chill Your Bowl: For the best whipped cream, I like to chill my mixing bowl (preferably a metal one) and whisk attachment in the freezer for about 15 minutes before I start. This helps the cream whip up faster and hold its shape better.
  2. Whip the Cream: Pour the very cold heavy cream into the chilled bowl. Using an electric mixer (either stand mixer with a whisk attachment or a hand mixer) on medium-high speed, begin to whip the cream.
  3. Add Sugar and Vanilla: As the cream starts to thicken and form soft peaks (this usually takes a couple of minutes), gradually add the sifted confectioners’ sugar and the pure vanilla extract. Continue to beat on medium-high speed until the cream holds stiff peaks. Be careful not to overbeat, or you’ll end up with butter! Stiff peaks mean that when you lift the whisk, the peaks stand up straight without flopping over. This glorious, light whipped cream will be the final touch on your “Banana Pudding Cookie Butter Cheesecake Cake Recipe.”

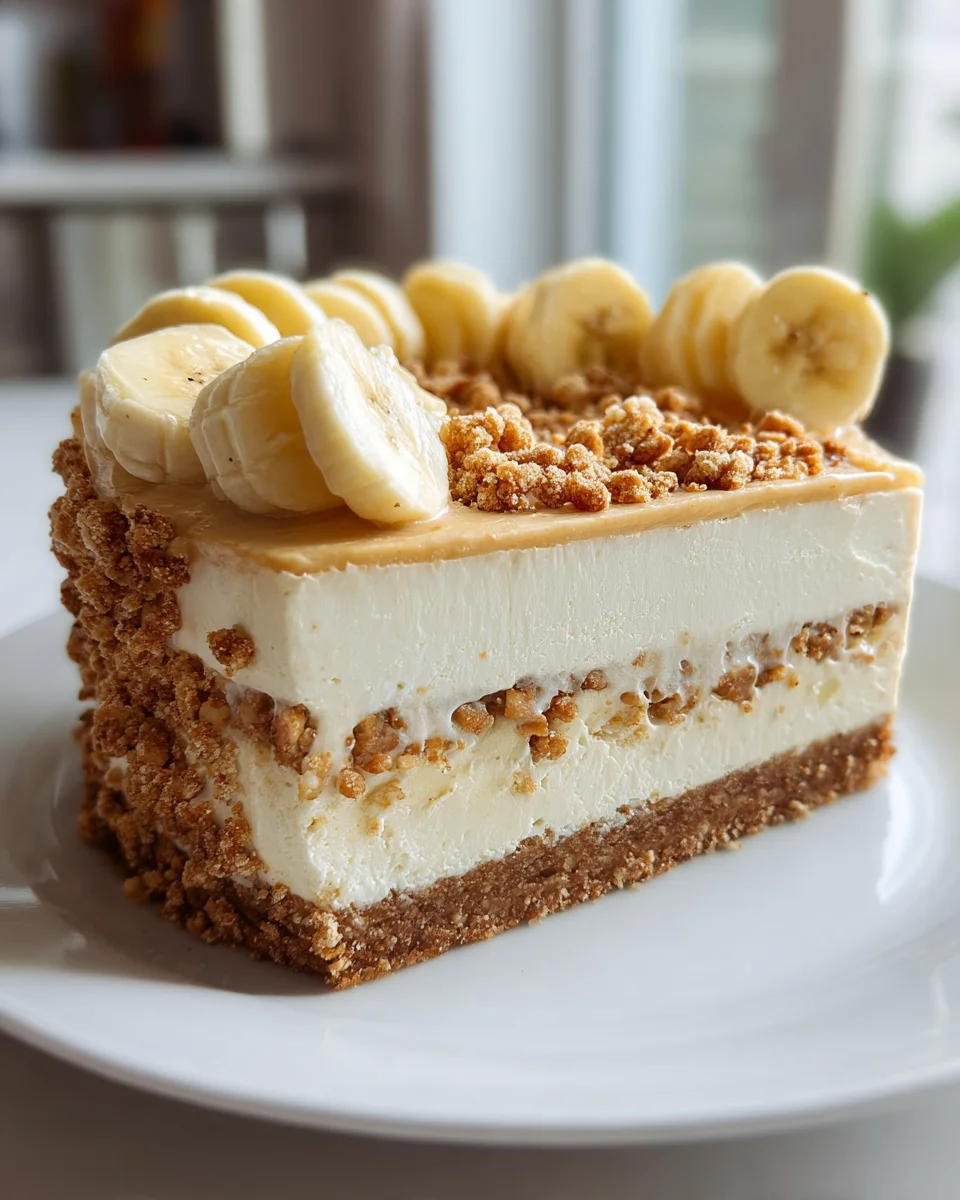
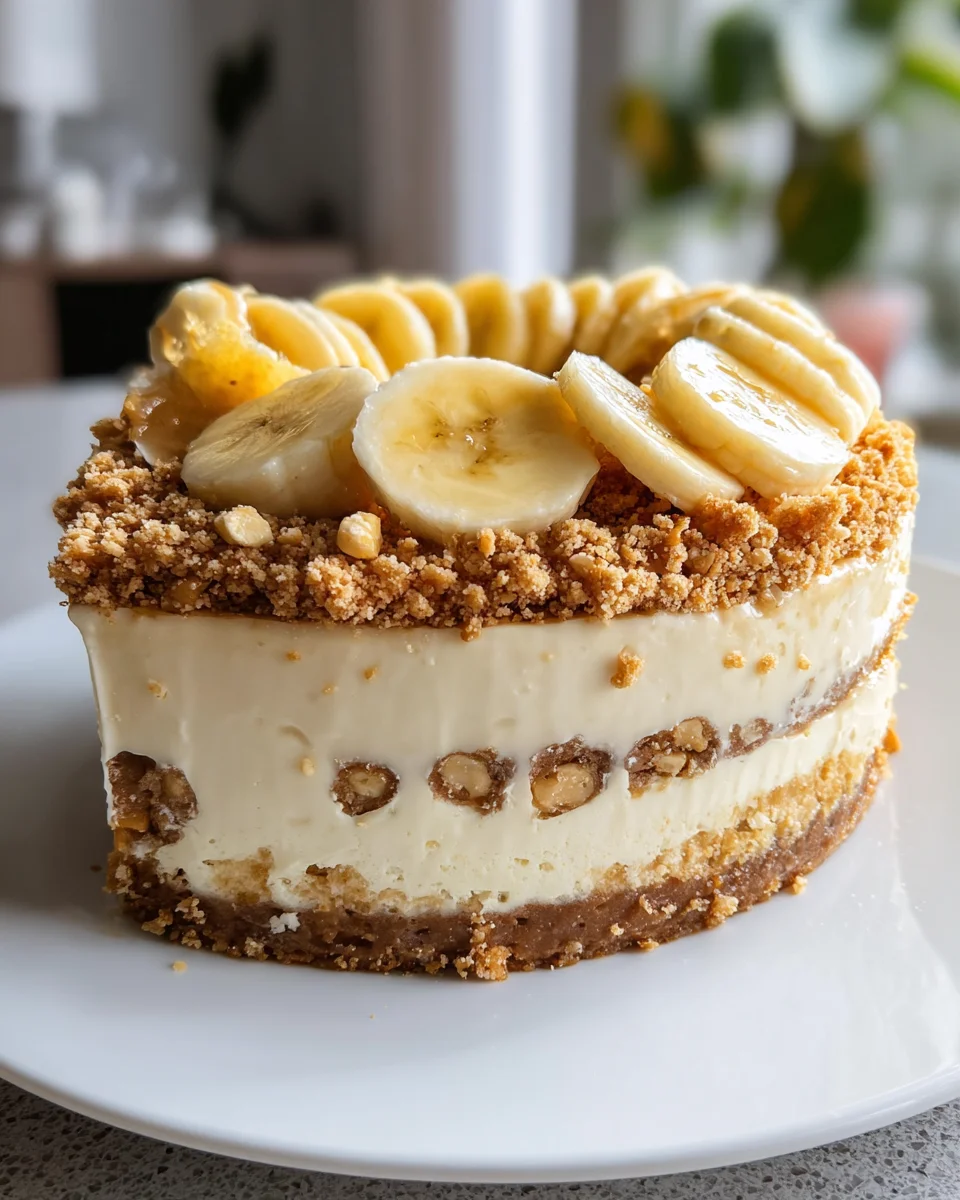
Building the “Banana Pudding Cookie Butter Cheesecake Cake Recipe” Masterpiece

  1. Level Your Cakes (Optional but Recommended): If your cake layers have domed tops, use a serrated knife or a cake leveler to carefully trim them level. This will ensure your cake stacks neatly and looks professional.
  2. First Cake Layer: Place one of your cooled banana cake layers onto your serving plate or cake stand. If you plan to move the cake later, you can place a few strips of parchment paper under the edges of the cake to keep your serving plate clean.
  3. Cheesecake Layer Application: Carefully unmold your chilled cookie butter cheesecake. It should be firm and easy to handle. Center the cheesecake layer directly on top of the first banana cake layer. This is where the magic of the Banana Pudding Cookie Butter Cheesecake Cake Recipe truly begins to take shape!
  4. Second Cake Layer: Gently place the second banana cake layer on top of the cheesecake. Press down lightly to ensure it’s secure.
  5. Banana Pudding Layer: Now for the banana pudding filling! Spread about half of the prepared vanilla pudding evenly over the second cake layer. Don’t be shy with it!
  6. Nilla Wafer and Banana Layer: Arrange a single layer of Nilla Wafers over the pudding. You might need to break some to fit them snugly. Then, arrange about half of your sliced fresh bananas on top of the Nilla Wafers.
  7. Third Cake Layer: Place the final banana cake layer on top of the bananas and Nilla Wafers.
  8. Remaining Pudding, Wafers, and Bananas: Spread the remaining vanilla pudding over the third cake layer. Repeat with another layer of Nilla Wafers and the remaining sliced bananas. This creates a really thick, luscious layer of banana pudding goodness within the cake.
  9. Crumb Coat (Optional but Recommended): Take a small amount of your prepared whipped cream frosting and spread a very thin layer all over the top and sides of the cake. This is called a crumb coat, and it traps any loose crumbs, preventing them from showing up in your final, pristine frosting layer. Refrigerate the cake for 15-20 minutes to allow the crumb coat to set.
  10. Final Frosting: Once the crumb coat is set, retrieve the remaining whipped cream frosting. Spread a generous, even layer of whipped cream over the top and sides of the entire cake. Use an offset spatula or a bench scraper to smooth it out. You can also create decorative swirls or peaks with the back of a spoon or a piping bag.
  11. Decorate and Chill: This is your chance to make it look extra special! Arrange extra Nilla Wafers around the top edge or in the center. You can crush some for a sprinkle effect. If desired, drizzle a little melted cookie butter over the top for an extra touch of flavor and visual appeal. Place fresh banana slices on top for garnish, but remember they will brown over time, so add these closer to serving if presentation is paramount.
  12. Final Chill: Refrigerate your finished Banana Pudding Cookie Butter Cheesecake Cake Recipe for at least 2-4 hours before slicing and serving. This allows all the flavors to meld beautifully and ensures the cake is firm enough for clean slices. The flavors will deepen and the Nilla Wafers will soften just enough to integrate perfectly into the pudding.
Serving Suggestions:

When you’re ready to serve, bring the cake out of the fridge about 15-20 minutes beforehand to allow the cake and cheesecake to soften slightly for the best texture. Slice with a sharp, warm knife for clean cuts. Each slice will reveal stunning layers of moist banana cake, creamy cookie butter cheesecake, and classic banana pudding, all enveloped in a cloud of whipped cream. It’s truly a showstopper dessert that combines so many beloved flavors into one unforgettable creation.

Enjoy sharing this magnificent cake with friends and family! It’s quite the undertaking, but the reward of seeing everyone’s delight when they taste this incredible combination of flavors is absolutely worth every single step. This isn’t just a dessert; it’s an experience. The “Banana Pudding Cookie Butter Cheesecake Cake Recipe” truly delivers on every front, blending nostalgic comfort with gourmet indulgence. Prepare for compliments!

Easy Banana Pudding & Cookie Butter Cheesecake Cake Recipe

Conclusion:

Okay, so we’ve reached the end of our journey through what I truly believe is one of the most exciting and utterly delicious dessert creations you’ll ever encounter. This isn’t just another cake; it’s an experience, a symphony of textures and flavors that will redefine your expectations for what a dessert can be. I’m talking about the unparalleled joy of biting into something that perfectly marries the comforting nostalgia of classic banana pudding with the rich, creamy decadence of cheesecake, all elevated by that unique, warm spice of cookie butter, and presented in a stunning cake form. It’s a bold statement, I know, but trust me when I say this recipe isn’t just good, it’s truly phenomenal. The careful layering ensures every forkful delivers a harmonious blend: the crisp vanilla wafer crust, the smooth, tangy cheesecake, the sweet banana pudding, and those delightful cookie butter swirls that weave through it all. It’s a masterpiece designed to impress, to delight, and to leave a lasting, happy memory.

What truly makes this recipe a non-negotiable addition to your baking repertoire is its ability to transcend expectations. Imagine the gasps of delight when you present this towering beauty at your next gathering. It’s more than just a dessert; it’s a conversation starter, a centerpiece, and a testament to your culinary adventurousness. The contrast between the cool, luscious cheesecake and the tender banana pudding, punctuated by the slight crunch of the wafers and the rich, spiced notes of the cookie butter, creates an incredibly dynamic mouthfeel that keeps you coming back for more. It’s surprisingly balanced, preventing it from being overly sweet, and the fresh banana slices add a wonderful, natural sweetness and moisture. This cake isn’t just for special occasions, either; while it absolutely shines at celebrations, it’s also perfectly suited for a luxurious weekend treat, a comforting indulgence after a long week, or simply a way to brighten any ordinary day with extraordinary flavor.

Now, while this dessert is absolutely divine on its own, there are a few ways I love to serve it to really elevate the experience. For a truly elegant presentation, a delicate dusting of cocoa powder or a fine grate of dark chocolate over the top can add a touch of sophistication and a hint of bitterness to cut through the sweetness. A dollop of freshly whipped cream, lightly sweetened and perhaps infused with a whisper of vanilla bean paste, is always a welcome accompaniment, adding another layer of creamy luxury. If you’re feeling extra indulgent, a very light drizzle of warmed cookie butter or a sprinkle of crushed vanilla wafers just before serving can highlight those core flavors and add visual appeal. For something a little different, consider pairing a slice with a strong espresso or a robust dark roast coffee – the coffee notes perfectly complement the richness of the cake. During warmer months, a scoop of vanilla bean ice cream on the side can create a wonderful hot-cold contrast that is simply irresistible.

Unleash Your Creativity: Recipe Variations!

And for those who love to experiment, this recipe is a fantastic canvas for your own culinary creativity. If you’re not a fan of vanilla wafers, consider using graham cracker crumbs or even Biscoff cookies themselves for the crust to amp up the cookie butter flavor even further. For a fun twist, you could try incorporating a layer of caramelized bananas in between the cheesecake and pudding layers, adding an extra dimension of richness and a slightly different texture. Seasonal fruit additions could also be intriguing; while it’s primarily a banana pudding cake, a thin layer of toasted coconut flakes or even a berry compote could offer a delightful counterpoint, though I personally stick to the classic banana for this specific iteration. For individual servings, bake the cheesecake and pudding layers in small ramekins or mason jars; this makes for beautiful, portion-controlled desserts perfect for parties or lunchboxes. Don’t be afraid to play with the spices in your cookie butter if you’re making it from scratch, or even try a different nut butter for a unique twist, although the classic speculoos flavor of cookie butter is truly what makes this rendition sing.

So, what are you waiting for? I genuinely hope you feel inspired to dive into your kitchen and give this incredible Banana Pudding Cookie Butter Cheesecake Cake Recipe a try. It might seem like a lot of steps, but I promise you, every single one is worth the effort when you see the joy it brings to your table and the smiles it puts on the faces of those lucky enough to taste it. It’s a recipe that truly delivers on its promise of extraordinary flavor and unforgettable indulgence. I can’t wait for you to experience the magic firsthand.

Once you’ve made it, please don’t keep the experience to yourself! I would absolutely love to hear about your baking adventures and how this delightful creation turned out for you. Did you try any variations? What was your favorite part? Share your photos, your stories, and your feedback in the comments section below. Your insights not only help me, but they also inspire other home bakers to embark on their own delicious journeys. Baking should be a shared joy, and I believe this particular dessert is one that simply begs to be celebrated. So, go forth, bake with passion, and prepare to be amazed!


Easy Banana Pudding Cookie Butter Cheesecake (Simplified No-Bake)

A delightful and easy no-bake dessert combining creamy cookie butter cheesecake with layers of mashed bananas, crushed vanilla wafers, and whipped cream. This simplified version focuses on core flavors for a quick and impressive treat, perfect for any occasion.

Prep Time
30 Minutes
Cook Time
0 Minutes
Total Time
30 Minutes
Servings
8 servings

Ingredients


Instructions


Important Information

Nutrition Facts (Per Serving)

It is important to consider this information as approximate and not to use it as definitive health advice.

Allergy Information

Please check ingredients for potential allergens and consult a health professional if in doubt.

« Previous Post
Craveable Honey Cinnamon Dessert: Simple, Sweet & Scrumptious
Next Post »
Warm Boursin Dip: Easy & Irresistible Crostini Appetizer

If you enjoyed this…

Whipped Pink Lemonade

Whipped Pink Lemonade – Creamy, Refreshing & Perfect for Summer!

Decadent Spiced Gingerbread Brownies with Non-Alcohol Extracts

Lemon Posset Dessert: The Ultimate Guide to Making This Classic Treat

Primary Sidebar

Browse by Diet

BreakfastDinnerLunchDessertAppetizer

Sweet Peach Yogurt Parfait Delight

One of my fondest memories is from a lazy summer afternoon spent at my grandmother’s house. The sun filtered through the kitchen window, casting a warm glow over the table where she would create her culinary magic. It was during one of those blissful moments that I first tasted her Peach Yogurt Parfait with Honey and Granola. The sweet aroma of ripe peaches mingling with creamy yogurt and the crunch of granola was nothing short of heavenly. It felt like summer captured in a bowl, and I still remember the joy of diving in with a spoon, each layer revealing a new burst of flavor.

When I think about that parfait, I can almost hear the gentle hum of the bees outside, reminding me of the floral notes that honey brings to every bite. The vibrant yellows and soft oranges of the peaches contrast beautifully with the creamy white yogurt and the golden crunch of granola. It’s a dish that not only looks delightful but also tastes like a celebration of fresh, wholesome ingredients.

What makes my version of this Peach Yogurt Parfait special is the careful balance of flavors and textures. I use ripe, juicy peaches, drizzled with locally sourced honey, and a homemade granola that’s bursting with nuts and seeds for an extra crunch. It’s a simple dish, but every layer is crafted with love and attention.

Let me show you exactly how to make this delightful parfait, so you can bring a bit of that summer magic into your kitchen!

Sweet Peach Yogurt Parfait Delight

Why You’ll Love This Recipe

  • Delightfully creamy texture from the Greek yogurt, paired with the juicy sweetness of fresh peaches.
  • Ready in under 20 minutes, making it a quick and satisfying breakfast or snack option.
  • Budget-friendly, using common ingredients that you may already have in your pantry.
  • Customizable with your favorite granola and nuts, allowing you to tailor each parfait to your taste.
  • Perfectly balanced flavors with the bright acidity of lemon juice and the sweetness of honey enhancing the peaches.

Ingredients

  • For the Parfait:
  • 2 cups plain Greek yogurt (or vanilla yogurt for a sweeter option)
  • 2 large ripe peaches, diced (about 2 cups)
  • 1 tablespoon fresh lemon juice (to prevent browning of peaches)
  • 2 tablespoons honey (plus more for drizzling)
  • 1 teaspoon vanilla extract (optional for extra flavor)
  • For the Granola:
  • 1 cup granola (store-bought or homemade; see notes for a simple granola recipe)
  • 1/4 cup sliced almonds (optional for added crunch)
  • 1/4 cup shredded coconut (optional for added flavor)

Let’s dive into some key ingredients that make this Peach Yogurt Parfait so delightful! First, the Greek yogurt is not only creamy but also packed with protein, making it a satisfying option for breakfast or a snack. If you’re looking for a sweeter option, you can easily substitute it with vanilla yogurt, though it may alter the overall flavor balance. Next, the ripe peaches are the star of the show; their natural sweetness shines through, so I recommend choosing peaches that yield slightly to pressure, indicating they’re perfectly ripe. If peaches aren’t in season, feel free to use nectarines or even frozen peaches—just thaw them before use. Finally, honey adds a lovely floral sweetness that ties everything together. If you prefer, maple syrup can serve as a delicious substitute.

Step-by-Step Instructions

  1. Start by preparing the peaches. Wash them thoroughly, then slice and dice them into bite-sized pieces. In a medium bowl, toss the diced peaches with 1 tablespoon of fresh lemon juice to prevent browning. Set aside for about 5 minutes while the lemon juice works its magic.
  2. In a separate bowl, combine the Greek yogurt, 2 tablespoons of honey, and 1 teaspoon of vanilla extract if using. Stir the mixture until smooth and thoroughly blended. This should take about a minute. Avoid overmixing to maintain the creaminess of the yogurt.
  3. Now it’s time to layer your parfait. Grab a clear glass or bowl to showcase your beautiful creation. Start with a generous spoonful of the yogurt mixture at the bottom—about 1/4 cup will do. Use a spoon to spread it evenly.
  4. Add a layer of the diced peaches over the yogurt, ensuring they cover the yogurt completely. You might want to use about half of what you have prepared—roughly 1 cup. This layer should be visually appealing, so arrange the peaches neatly.
  5. Sprinkle 1/4 cup of granola over the peaches. This adds a delightful crunch. Make sure to distribute it evenly to ensure every bite has that satisfying texture. Avoid packing it down too tightly, as you want it to maintain its crunch.
  6. Repeat the layers: spoon in another 1/4 cup of yogurt, followed by another cup of peaches, and another sprinkle of granola. You should have at least two layers, but feel free to add more depending on your glass size.
  7. Finish off your parfait with a drizzle of honey on top for added sweetness and a touch of elegance. If you’re using sliced almonds or shredded coconut, sprinkle them on top now. It adds a lovely visual contrast and extra flavor.
  8. Serve immediately or refrigerate for up to 30 minutes before serving to allow the flavors to meld together. However, I recommend enjoying it fresh to maintain the granola’s crunch.

Pro Tips for the Best Peach Yogurt Parfait With Honey And Granola

  • Make sure to choose ripe peaches for the best flavor and texture. A common mistake is using unripe fruit, which can lead to a less enjoyable parfait. Look for peaches that are fragrant and slightly soft to the touch.
  • Use a clear glass to assemble your parfait; this not only makes for a beautiful presentation but also allows you to see the colorful layers, which adds to the enjoyment of eating it.
  • For an even creamier texture, consider whipping the Greek yogurt with a hand mixer for a couple of minutes before layering. This small adjustment makes a huge difference in mouthfeel.
  • Be mindful of the granola-to-yogurt ratio. Too much granola can overwhelm the parfait, while too little can make it feel too creamy. Aim for about 1/4 cup of granola per layer for the perfect balance.
  • If you’re making this for a gathering, consider preparing the yogurt and peaches ahead of time and layering them just before serving. This ensures the granola stays crunchy!

Variations & Serving Ideas

There are so many ways to get creative with your Peach Yogurt Parfait! For a tropical twist, swap out the peaches for mangoes or pineapples and top with coconut flakes. If you prefer a berry flavor, mix in some blueberries or strawberries with the peaches for added color and taste. For a nutty version, incorporate chopped walnuts or pecans instead of almonds.

As for serving ideas, this parfait pairs beautifully with a side of scrambled eggs for a hearty breakfast or fresh fruit salad for a light lunch. You might also enjoy it alongside whole grain toast with almond butter for an energizing snack. The contrast of flavors and textures will elevate your meal experience!

Storage, Make-Ahead & Reheating

The Peach Yogurt Parfait is best enjoyed fresh, but you can prepare some components ahead of time. Store the layered parfait in an airtight container in the refrigerator for up to 24 hours. However, be cautious; the granola may lose its crunch if stored too long. You can freeze the yogurt and peach mixture for up to 2 months; just remember to thaw it in the refrigerator overnight before serving.

If you plan to enjoy this dish the next day, it can taste even better as the flavors meld together. Just remember to add the granola right before serving to keep its delightful crunch!

Frequently Asked Questions

Can I make Peach Yogurt Parfait With Honey And Granola ahead of time?

Yes — in fact, it tastes even better the next day as the flavors meld. However, I recommend waiting to add the granola until just before serving to maintain its crunch.

What can I substitute for Greek yogurt?

If you prefer a lighter option, you can substitute Greek yogurt with regular yogurt or a dairy-free alternative like coconut yogurt. Just remember that this may alter the creaminess and flavor profile slightly.

Can I use frozen peaches for this parfait?

Absolutely! Just make sure to thaw the frozen peaches before using them. They will still add great flavor, though the texture may be slightly softer than fresh peaches.

How do I make the parfait vegan?

To make a vegan version, substitute the Greek yogurt with a plant-based yogurt alternative, and replace honey with maple syrup or agave nectar. This keeps the parfait sweet while adhering to a vegan diet.

What other fruits can I use in this recipe?

You can mix and match fruits based on your preference. Try using strawberries, blueberries, raspberries, or even bananas. Just make sure to adjust the lemon juice as needed to prevent browning.

Sweet Peach Yogurt Parfait Delight

Final Thoughts

The Peach Yogurt Parfait with Honey and Granola is a delightful blend of creamy yogurt, sweet peaches, and crunchy granola that creates a satisfying and nourishing treat. Each layer bursts with flavor, making it a perfect choice for breakfast or a light dessert.

This is the kind of recipe I come back to again and again, especially when I want something refreshing and wholesome to start my day. The harmony of sweet and tart flavors, combined with the delightful crunch, never fails to lift my spirits!

I encourage you to give this parfait a try and indulge in its comforting goodness. Feel free to share your results or even add your own twist—perhaps a sprinkle of cinnamon or a handful of nuts. Enjoy creating your perfect parfait!

Print
clock clock iconcutlery cutlery iconflag flag iconfolder folder iconinstagram instagram iconpinterest pinterest iconfacebook facebook iconprint print iconsquares squares iconheart heart iconheart solid heart solid icon

Peach Yogurt Parfait


  • Author: Lily author
  • Total Time: 15 minutes
  • Yield: 4 servings 1x
Pin Recipe
Print Recipe

Description

This Peach Yogurt Parfait combines creamy Greek yogurt, juicy peaches, and crunchy granola for a delightful treat. It’s a perfect breakfast or snack that captures the essence of summer in every bite.


Ingredients

Scale
  • For the Parfait:
  • 2 cups plain Greek yogurt (or vanilla yogurt for a sweeter option)
  • 2 large ripe peaches, diced (about 2 cups)
  • 1 tablespoon fresh lemon juice (to prevent browning of peaches)
  • 2 tablespoons honey (plus more for drizzling)
  • 1 teaspoon vanilla extract (optional for extra flavor)
  • For the Granola:
  • 1 cup granola (store-bought or homemade; see notes for a simple granola recipe)
  • 1/4 cup sliced almonds (optional for added crunch)
  • 1/4 cup shredded coconut (optional for added flavor)

Instructions

  1. Start by preparing the peaches. Wash them thoroughly, then slice and dice them into bite-sized pieces. In a medium bowl, toss the diced peaches with 1 tablespoon of fresh lemon juice to prevent browning. Set aside for about 5 minutes while the lemon juice works its magic.
  2. In a separate bowl, combine the Greek yogurt, 2 tablespoons of honey, and 1 teaspoon of vanilla extract if using. Stir the mixture until smooth and thoroughly blended. This should take about a minute. Avoid overmixing to maintain the creaminess of the yogurt.
  3. Now it’s time to layer your parfait. Grab a clear glass or bowl to showcase your beautiful creation. Start with a generous spoonful of the yogurt mixture at the bottom—about 1/4 cup will do. Use a spoon to spread it evenly.
  4. Add a layer of the diced peaches over the yogurt, ensuring they cover the yogurt completely. You might want to use about half of what you have prepared—roughly 1 cup. This layer should be visually appealing, so arrange the peaches neatly.
  5. Sprinkle 1/4 cup of granola over the peaches. This adds a delightful crunch. Make sure to distribute it evenly to ensure every bite has that satisfying texture. Avoid packing it down too tightly, as you want it to maintain its crunch.
  6. Repeat the layers: spoon in another 1/4 cup of yogurt, followed by another cup of peaches, and another sprinkle of granola. You should have at least two layers, but feel free to add more depending on your glass size.
  7. Finish off your parfait with a drizzle of honey on top for added sweetness and a touch of elegance. If you’re using sliced almonds or shredded coconut, sprinkle them on top now. It adds a lovely visual contrast and extra flavor.
  8. Serve immediately or refrigerate for up to 30 minutes before serving to allow the flavors to meld together. However, I recommend enjoying it fresh to maintain the granola’s crunch.
  • Prep Time: 15 mins
  • Cook Time: 0 mins
  • Category: Breakfast
  • Method: No-cook
  • Cuisine: American

Nutrition

  • Serving Size: 1 parfait
  • Calories: 250
  • Sugar: 20 g
  • Sodium: 50 mg
  • Fat: 5 g
  • Saturated Fat: 2 g
  • Unsaturated Fat: 3 g
  • Trans Fat: 0 g
  • Carbohydrates: 40 g
  • Fiber: 3 g
  • Protein: 10 g
  • Cholesterol: 10 mg

Keywords: Choose ripe peaches for the best flavor and texture. Use a clear glass for a beautiful presentation. For creaminess, consider whipping the yogurt before layering. Be mindful of the granola-to-yogurt ratio. Prepare yogurt and peaches ahead of time for gatherings, layering just before serving.

Did you make this recipe?

Share a photo and tag us — we can't wait to see what you've made!

Sun-Kissed Frozen Orange Cream Slush

As a child, summer days felt like they lasted forever. I remember the sticky heat wrapping around me as I played outside, my laughter mingling with the sounds of the neighborhood. But nothing could cool me down quite like the moment I’d spot my grandmother, laboring over her blender, whipping up her famous Frozen Orange Creamsicle Slush. That vibrant orange treat, with its frosty texture and sweet citrus aroma, was like a burst of sunshine in a cup. Just one sip, and I could feel the coolness wash over me, sparking pure joy.

This Frozen Orange Creamsicle Slush has a way of making you feel like a kid again. Its creamy, dreamy consistency is a delightful balance of bright orange and soft vanilla, inviting you to dive right in. The refreshing tang of orange dances on your tongue, while the smooth creaminess envelops you in a comforting embrace. It’s a nostalgic treat that’s perfect for hot summer afternoons or anytime you need a little pick-me-up.

What makes my version of this slush stand out is the addition of a hint of vanilla bean, which elevates the flavor and adds an extra layer of richness. Plus, it’s super easy to whip up with just a few simple ingredients that you probably already have on hand! So, if you’re ready to relive those sun-soaked memories, let me show you exactly how to make it.

Sun-Kissed Frozen Orange Cream Slush

Why You’ll Love This Recipe

  • Each slush is a perfect blend of creamy vanilla and zesty orange, creating a nostalgic flavor reminiscent of summer days.
  • This refreshing treat is ready in under 15 minutes, making it an ideal quick dessert for unexpected guests or hot afternoons.
  • With just 8 simple ingredients, it’s budget-friendly, ensuring you don’t have to break the bank to enjoy a delicious slush.
  • The slush has a perfectly smooth texture, thanks to the combination of ice and ice cream, providing a delightful contrast to the bright citrus flavors.
  • It’s highly customizable; you can easily adjust the sweetness and add fresh herbs for a unique twist that suits your taste.

Ingredients

  • 2 cups orange juice (freshly squeezed or store-bought)
  • 1 cup vanilla ice cream
  • 1 cup crushed ice
  • 1/2 cup milk (whole or 2%)
  • 1/4 cup granulated sugar (adjust based on sweetness preference)
  • 1 teaspoon vanilla extract
  • Zest of 1 orange (for added flavor)
  • Fresh orange slices and mint leaves (for garnish)

The star of this Frozen Orange Creamsicle Slush is the orange juice, which provides the vibrant, citrusy base. Freshly squeezed juice will yield the brightest flavor, but store-bought options can be just as convenient. If you’re opting for store-bought, choose 100% pure juice with no added sugars for the best results. Another essential ingredient is the vanilla ice cream; it adds creaminess and sweetness. You can substitute it with dairy-free ice cream if you’re looking for a vegan option. Whole or 2% milk complements the ice cream, creating a smooth blend. If you want a lower-calorie version, almond or oat milk can be good alternatives.

Lastly, the granulated sugar can be adjusted based on your sweetness preference. If you prefer a more natural sweetener, consider using honey or agave syrup. The orange zest enhances the flavor profile, providing an aromatic pop that brings the whole slush together. Don’t skip it! It adds an extra layer of brightness that makes this slush truly special.

Step-by-Step Instructions

  1. Start by preparing your ingredients. Gather 2 cups of orange juice, 1 cup of vanilla ice cream, and 1 cup of crushed ice. Make sure the ice is finely crushed, as larger chunks can make blending difficult.
  2. In a blender, combine the orange juice, vanilla ice cream, crushed ice, and 1/2 cup of milk. Add 1/4 cup of granulated sugar and 1 teaspoon of vanilla extract. If you like a sweeter slush, consider adding a bit more sugar at this stage.
  3. Add the zest of 1 orange to the blender. This step is crucial for enhancing the citrus flavor of your slush. Make sure not to include the bitter white pith—only the flavorful zest.
  4. Blend the mixture on medium-high speed for about 30-45 seconds. Stop once the ingredients are fully combined and the slush has a smooth, even consistency. If you notice large chunks of ice, blend for an additional 10-15 seconds. Avoid over-blending, as this can make the slush too liquidy.
  5. Once blended, taste the slush. If it needs more sweetness, add a little more sugar and blend for a few more seconds. If it’s too thick, you can add a splash of milk to reach your desired consistency.
  6. Pour the slush into glasses. This recipe typically serves 4, but you can easily double it for larger gatherings. Use a spoon to help guide the slush into the glasses if needed.
  7. Garnish each serving with fresh orange slices and mint leaves. The mint not only adds a pop of color but also a refreshing aroma that complements the citrus flavors beautifully.
  8. Serve immediately and enjoy! If you’ve made extra, you can refrigerate it for a short time, but it’s best enjoyed fresh.

Pro Tips for the Best Frozen Orange Creamsicle Slush

  • Don’t skip the orange zest! It’s a game-changer for flavor. Always zest before juicing to make it easier.
  • Use a high-powered blender for the best texture. A standard blender may struggle with ice, leading to uneven consistency. If you have a food processor, that can work too, but ensure the ice is finely crushed.
  • Adjust the ice-to-liquid ratio carefully. If your slush is too thick, it won’t blend well. Start with less ice and add more until you reach your preferred texture.
  • Be cautious with the sugar! Always start with the lower amount, as you can easily add more, but it’s hard to fix an overly sweet slush.
  • For a fun twist, consider adding a splash of coconut milk or a handful of fresh fruit like strawberries or pineapple. This not only enhances the flavor but also adds a beautiful color contrast.

Variations & Serving Ideas

There are countless ways to put a spin on your Frozen Orange Creamsicle Slush. Consider making a tropical version by adding in some pineapple juice or coconut milk for a delightful tropical twist. If you’re feeling adventurous, try incorporating a handful of frozen mango or peach slices for added sweetness. For a lighter version, swap out the vanilla ice cream for Greek yogurt for a creamy yet tangy alternative.

As for serving ideas, this refreshing slush pairs wonderfully with light summer dishes like grilled chicken skewers, fish tacos, or a simple salad topped with citrus vinaigrette. The bright, zesty flavors of the slush complement these dishes perfectly, making them an ideal pairing for a sunny day.

Storage, Make-Ahead & Reheating

This Frozen Orange Creamsicle Slush is best enjoyed fresh, but if you have leftovers, you can store them in an airtight container in the fridge for up to 2 days. Just keep in mind that the slush may lose some of its texture over time as the ice melts. It doesn’t freeze well, as the ice will turn into a solid block. If you must freeze it, blend again after thawing to restore the slushy consistency. This treat is best the day you make it, as the flavors meld together beautifully overnight, enhancing its deliciousness.

Frequently Asked Questions

Can I make Frozen Orange Creamsicle Slush ahead of time?

Yes — in fact, it tastes even better the next day as the flavors meld. However, it’s best to enjoy it fresh, as the texture can change if stored for too long. If you need to prepare it ahead, keep it in the fridge and re-blend before serving.

What kind of orange juice should I use?

For the best flavor, use freshly squeezed orange juice. However, if you’re short on time, opt for 100% pure store-bought juice without added sugars. This will ensure that your slush remains flavorful and refreshing.

Can I substitute the vanilla ice cream?

Absolutely! If you’re looking for a dairy-free option, coconut milk ice cream or a non-dairy vanilla ice cream can work wonderfully. They will still provide the creamy texture and sweetness you desire.

How can I adjust the sweetness of my slush?

You can easily adjust the sweetness by modifying the amount of sugar added. Start with 1/4 cup and taste the mixture before blending. If you prefer it sweeter, add more sugar gradually until it reaches your desired level.

What should I do if my slush is too thick?

If your slush is too thick, simply add a splash of milk or orange juice and blend again. This will help achieve a more drinkable consistency while maintaining the slushy texture. Adjust gradually to reach your preferred thickness.

Sun-Kissed Frozen Orange Cream Slush

Final Thoughts

The Frozen Orange Creamsicle Slush is a delightful blend of refreshing citrus and creamy goodness, making it a perfect treat for warm days or any time you crave a taste of nostalgia. The way the bright orange flavor dances with the creamy texture truly elevates this slush, transforming it into a satisfying escape from the everyday.

This is the kind of recipe I come back to again and again, especially when I’m looking to cool down or impress guests at a summer gathering. It’s simple to make and always brings smiles all around! I encourage you to try this recipe for yourself—don’t hesitate to share your results or even put your own spin on it. Happy slushing!

Print
clock clock iconcutlery cutlery iconflag flag iconfolder folder iconinstagram instagram iconpinterest pinterest iconfacebook facebook iconprint print iconsquares squares iconheart heart iconheart solid heart solid icon

Frozen Orange Creamsicle Slush


  • Author: Lily author
  • Total Time: 15 minutes
  • Yield: 4 servings 1x
Pin Recipe
Print Recipe

Description

This Frozen Orange Creamsicle Slush is a refreshing treat that combines creamy vanilla and zesty orange flavors. Perfect for hot summer days, it brings back nostalgic memories with every sip.


Ingredients

Scale
  • 2 cups orange juice (freshly squeezed or store-bought)
  • 1 cup vanilla ice cream
  • 1 cup crushed ice
  • 1/2 cup milk (whole or 2%)
  • 1/4 cup granulated sugar (adjust based on sweetness preference)
  • 1 teaspoon vanilla extract
  • Zest of 1 orange (for added flavor)
  • Fresh orange slices and mint leaves (for garnish)

Instructions

  1. Start by preparing your ingredients. Gather 2 cups of orange juice, 1 cup of vanilla ice cream, and 1 cup of crushed ice. Make sure the ice is finely crushed, as larger chunks can make blending difficult.
  2. In a blender, combine the orange juice, vanilla ice cream, crushed ice, and 1/2 cup of milk. Add 1/4 cup of granulated sugar and 1 teaspoon of vanilla extract. If you like a sweeter slush, consider adding a bit more sugar at this stage.
  3. Add the zest of 1 orange to the blender. This step is crucial for enhancing the citrus flavor of your slush. Make sure not to include the bitter white pith—only the flavorful zest.
  4. Blend the mixture on medium-high speed for about 30-45 seconds. Stop once the ingredients are fully combined and the slush has a smooth, even consistency. If you notice large chunks of ice, blend for an additional 10-15 seconds. Avoid over-blending, as this can make the slush too liquidy.
  5. Once blended, taste the slush. If it needs more sweetness, add a little more sugar and blend for a few more seconds. If it’s too thick, you can add a splash of milk to reach your desired consistency.
  6. Pour the slush into glasses. This recipe typically serves 4, but you can easily double it for larger gatherings. Use a spoon to help guide the slush into the glasses if needed.
  7. Garnish each serving with fresh orange slices and mint leaves. The mint not only adds a pop of color but also a refreshing aroma that complements the citrus flavors beautifully.
  8. Serve immediately and enjoy! If you’ve made extra, you can refrigerate it for a short time, but it's best enjoyed fresh.
  • Prep Time: 15 min
  • Cook Time: 0 min
  • Category: Dessert
  • Method: Blending
  • Cuisine: American

Nutrition

  • Serving Size: 1 serving
  • Calories: 200
  • Sugar: 30 g
  • Sodium: 50 mg
  • Fat: 5 g
  • Saturated Fat: 3 g
  • Unsaturated Fat: 2 g
  • Trans Fat: 0 g
  • Carbohydrates: 40 g
  • Fiber: 1 g
  • Protein: 2 g
  • Cholesterol: 20 mg

Keywords: Don't skip the orange zest! It's a game-changer for flavor. Always zest before juicing to make it easier.

Did you make this recipe?

Share a photo and tag us — we can't wait to see what you've made!

Zesty Lemon Poppy Seed Delight

One rainy afternoon, I found myself in my grandmother’s cozy kitchen, the kind that always smelled like warmth and love. She was whipping up her famous Lemon Poppy Seed Loaf, a recipe that had been passed down through generations. As the batter came together, the zesty aroma of fresh lemons filled the air, mingling perfectly with the nutty fragrance of poppy seeds. I can still picture her, apron-clad, as she expertly drizzled a vibrant citrus icing over the loaf, creating a glossy, sun-kissed finish that beckoned us to dive in. It was a moment that sparked my own passion for baking, and this recipe has become a cherished staple in my home ever since.

When you take a bite of this Lemon Poppy Seed Loaf, it’s like a burst of sunshine on your palate. The loaf is beautifully golden, with a tender crumb that melts in your mouth. Each slice is speckled with tiny poppy seeds, adding a delightful crunch that contrasts beautifully with the tangy sweetness of the lemon. And that citrus icing? It’s the finishing touch that elevates this loaf from ordinary to extraordinary, with its bright, zesty flavor dancing on your taste buds.

This recipe stands out because it embraces simplicity while delivering on flavor. I’ve added a hint of vanilla to the batter, enhancing the overall taste and making it even more indulgent. Trust me, once you make this Lemon Poppy Seed Loaf With Citrus Icing, it’ll become a go-to in your baking repertoire.

So, let me show you exactly how to make it!

Zesty Lemon Poppy Seed Delight

Why You’ll Love This Recipe

  • Moist and tender crumb that melts in your mouth, thanks to the perfect balance of butter and buttermilk.
  • Bright, zesty lemon flavor paired with crunchy poppy seeds, creating a delightful texture and taste experience.
  • Easy to whip up in just about an hour, perfect for last-minute gatherings or a cozy afternoon treat.
  • Budget-friendly with everyday ingredients, making it an accessible option for all home bakers.
  • The citrus icing adds a sweet tang that elevates the loaf, turning a simple recipe into a showstopper!

Ingredients

  • 1 ½ cups (190g) all-purpose flour
  • 1 teaspoon baking powder
  • ½ teaspoon baking soda
  • ½ teaspoon salt
  • 3 tablespoons poppy seeds
  • ½ cup (115g) unsalted butter, softened to room temperature
  • 1 cup (200g) granulated sugar
  • 2 large eggs
  • 1 teaspoon vanilla extract
  • 1 teaspoon lemon zest (from about 1 medium lemon)
  • ½ cup (120ml) buttermilk
  • 2 tablespoons fresh lemon juice

For the Citrus Icing:

  • 1 cup (120g) powdered sugar
  • 2 tablespoons fresh lemon juice
  • 1 tablespoon orange juice
  • 1 teaspoon lemon zest (for garnish, optional)

Let’s dive into the key ingredients that make this Lemon Poppy Seed Loaf so special. The all-purpose flour provides the structure and base for the loaf, while the baking powder and baking soda ensure it rises perfectly, giving the loaf a light texture. For a gluten-free variation, you could substitute the flour with a gluten-free all-purpose blend. Poppy seeds not only add a delightful crunch but also contribute to the unique flavor profile that pairs well with the citrus notes.

Unsalted butter is crucial for achieving the buttery richness that makes this loaf so moist. If you’re looking for a dairy-free option, coconut oil or a vegan butter can be used instead. The buttermilk is another essential component, providing acidity that activates the baking soda for a fluffy texture. If you don’t have buttermilk on hand, you can easily make a substitute by mixing ½ cup of milk with 1 tablespoon of vinegar or lemon juice and letting it sit for about 5 minutes.

Step-by-Step Instructions

  1. Preheat your oven to 350°F (175°C). Grease a 9×5-inch loaf pan or line it with parchment paper for easy removal later.
  2. In a medium mixing bowl, whisk together 1 ½ cups of all-purpose flour, 1 teaspoon of baking powder, ½ teaspoon of baking soda, ½ teaspoon of salt, and 3 tablespoons of poppy seeds. This helps to evenly distribute the baking agents and ensures a uniform rise.
  3. In a large mixing bowl, cream together ½ cup of softened unsalted butter and 1 cup of granulated sugar using an electric mixer on medium speed for about 3-4 minutes, until the mixture is light and fluffy. Make sure to scrape down the sides of the bowl occasionally.
  4. Add 2 large eggs, 1 teaspoon of vanilla extract, and 1 teaspoon of lemon zest to the creamed butter and sugar, mixing until fully combined. You want a smooth consistency, so ensure there are no lumps of butter.
  5. In a small bowl, combine ½ cup of buttermilk and 2 tablespoons of fresh lemon juice. Alternately add the dry ingredients and buttermilk mixture to the butter mixture, starting and ending with the dry ingredients. Mix just until combined; do not overmix, as this can lead to a dense loaf.
  6. Pour the batter into the prepared loaf pan. Smooth the top with a spatula, ensuring it’s even. Bake in the preheated oven for 50-60 minutes, or until a toothpick inserted in the center comes out clean. The edges should be lightly golden brown, and the center should feel just set.
  7. Once baked, remove the loaf from the oven and allow it to cool in the pan for about 10 minutes. Then, transfer it to a wire rack to cool completely. Resist the urge to slice too soon, as it will be crumbly if it’s still warm.
  8. While the loaf is cooling, prepare the citrus icing. In a medium bowl, whisk together 1 cup of powdered sugar, 2 tablespoons of fresh lemon juice, and 1 tablespoon of orange juice until smooth. If the icing is too thick, you can add a little more juice to reach your desired consistency.
  9. Once the loaf is completely cool, drizzle the citrus icing over the top. If you like, sprinkle with an additional teaspoon of lemon zest for an extra pop of flavor and color.

Pro Tips for the Best Lemon Poppy Seed Loaf With Citrus Icing

  • Be careful not to overmix your batter; this is a common mistake that can lead to a dense loaf. Mix just until the dry ingredients are incorporated for a light and fluffy texture.
  • Use room temperature ingredients, especially the butter and eggs. This helps to create a smoother batter and ensures even baking. Take your eggs out of the fridge about 30 minutes before you start.
  • For a more pronounced lemon flavor, consider adding a little lemon extract in addition to the zest and juice. Just a half teaspoon can elevate the citrus notes significantly.
  • When measuring your flour, spoon it into the measuring cup and level it off with a knife instead of scooping directly from the bag. This prevents packing and ensures you don’t end up with a dry loaf.
  • Invest in a good quality loaf pan; it makes a difference in heat distribution, which ensures even baking. If your pan is dark-coated, reduce the oven temperature by 25°F to prevent over-browning.

Variations & Serving Ideas

For a delightful twist, consider adding blueberries or raspberries to the batter for a fruity burst of flavor. You can also experiment with different citrus fruits—try lime or grapefruit zest and juice for a refreshing change. For a healthier option, substitute half of the all-purpose flour with whole wheat flour for added fiber without compromising too much on texture.

This Lemon Poppy Seed Loaf pairs beautifully with a light salad, such as a mixed greens salad with a vinaigrette, or a cup of tea for a cozy afternoon treat. It also complements a creamy cheese platter, as the acidity of the loaf balances rich cheeses perfectly. Lastly, a scoop of vanilla ice cream on the side creates a delightful contrast of temperatures and flavors!

Storage, Make-Ahead & Reheating

This Lemon Poppy Seed Loaf can be stored at room temperature for up to 3 days if wrapped tightly in plastic wrap. If you want to keep it longer, it freezes well for up to 3 months. To freeze, wrap the loaf tightly in plastic wrap and then in aluminum foil to prevent freezer burn.

When you’re ready to enjoy it again, simply thaw it in the fridge overnight. Reheat individual slices in the microwave for 15-20 seconds or in a toaster oven until warmed through. Interestingly, many people find that this loaf tastes even better the next day, as the flavors have time to meld!

Frequently Asked Questions

Can I make Lemon Poppy Seed Loaf With Citrus Icing ahead of time?

Yes — in fact, it tastes even better the next day! You can make the loaf a day in advance, allowing the flavors to develop. Just be sure to store it in an airtight container to maintain its moisture.

Can I substitute the poppy seeds?

Absolutely! If you don’t have poppy seeds on hand or prefer an alternative, you can use sesame seeds for a similar crunch or omit them entirely for a smooth loaf.

What can I use instead of buttermilk?

If you don’t have buttermilk, you can easily create a substitute by mixing ½ cup of milk (dairy or plant-based) with 1 tablespoon of vinegar or lemon juice. Let it sit for 5 minutes before using in the recipe.

How can I make this recipe gluten-free?

To make a gluten-free version of this Lemon Poppy Seed Loaf, substitute the all-purpose flour with a gluten-free all-purpose flour blend. Just ensure that the blend contains a binding agent like xanthan gum for the best results.

What is the best way to store leftover loaf?

Leftover Lemon Poppy Seed Loaf should be stored in an airtight container at room temperature for up to 3 days. For longer storage, wrap it tightly and freeze for up to 3 months. Thaw it before serving for the best texture.

Zesty Lemon Poppy Seed Delight

Final Thoughts

The Lemon Poppy Seed Loaf with Citrus Icing is truly a delightful treat that brings a burst of brightness to any occasion. The zesty lemon flavor combined with the subtle crunch of poppy seeds creates a satisfying balance, while the citrus icing adds a touch of sweetness that perfectly complements the loaf’s tanginess.

This is the kind of recipe I come back to again and again, especially when I want to brighten up a gloomy day or celebrate a small victory. The aroma that fills the kitchen as it bakes is absolutely heavenly! I encourage you to give this recipe a try; you might just find it becoming a beloved staple in your home. Don’t forget to share your results or even add your own unique twist—I can’t wait to see what you create!

Print
clock clock iconcutlery cutlery iconflag flag iconfolder folder iconinstagram instagram iconpinterest pinterest iconfacebook facebook iconprint print iconsquares squares iconheart heart iconheart solid heart solid icon

Lemon Poppy Seed Loaf


  • Author: Lily author
  • Total Time: 18 minute
  • Yield: 1 loaf 1x
Pin Recipe
Print Recipe

Description

This Lemon Poppy Seed Loaf is a delightful treat that combines zesty lemon flavor with crunchy poppy seeds. Topped with a citrus icing, it’s perfect for any occasion.


Ingredients

Scale
  • 1 ½ cups (190g) all-purpose flour
  • 1 teaspoon baking powder
  • ½ teaspoon baking soda
  • ½ teaspoon salt
  • 3 tablespoons poppy seeds
  • ½ cup (115g) unsalted butter, softened to room temperature
  • 1 cup (200g) granulated sugar
  • 2 large eggs
  • 1 teaspoon vanilla extract
  • 1 teaspoon lemon zest (from about 1 medium lemon)
  • ½ cup (120ml) buttermilk
  • 2 tablespoons fresh lemon juice
  • 1 cup (120g) powdered sugar
  • 2 tablespoons fresh lemon juice
  • 1 tablespoon orange juice
  • 1 teaspoon lemon zest (for garnish, optional)

Instructions

  1. Preheat your oven to 350°F (175°C). Grease a 9×5-inch loaf pan or line it with parchment paper for easy removal later.
  2. In a medium mixing bowl, whisk together 1 ½ cups of all-purpose flour, 1 teaspoon of baking powder, ½ teaspoon of baking soda, ½ teaspoon of salt, and 3 tablespoons of poppy seeds. This helps to evenly distribute the baking agents and ensures a uniform rise.
  3. In a large mixing bowl, cream together ½ cup of softened unsalted butter and 1 cup of granulated sugar using an electric mixer on medium speed for about 3-4 minutes, until the mixture is light and fluffy. Make sure to scrape down the sides of the bowl occasionally.
  4. Add 2 large eggs, 1 teaspoon of vanilla extract, and 1 teaspoon of lemon zest to the creamed butter and sugar, mixing until fully combined. You want a smooth consistency, so ensure there are no lumps of butter.
  5. In a small bowl, combine ½ cup of buttermilk and 2 tablespoons of fresh lemon juice. Alternately add the dry ingredients and buttermilk mixture to the butter mixture, starting and ending with the dry ingredients. Mix just until combined; do not overmix, as this can lead to a dense loaf.
  6. Pour the batter into the prepared loaf pan. Smooth the top with a spatula, ensuring it’s even. Bake in the preheated oven for 50-60 minutes, or until a toothpick inserted in the center comes out clean. The edges should be lightly golden brown, and the center should feel just set.
  7. Once baked, remove the loaf from the oven and allow it to cool in the pan for about 10 minutes. Then, transfer it to a wire rack to cool completely. Resist the urge to slice too soon, as it will be crumbly if it’s still warm.
  8. While the loaf is cooling, prepare the citrus icing. In a medium bowl, whisk together 1 cup of powdered sugar, 2 tablespoons of fresh lemon juice, and 1 tablespoon of orange juice until smooth. If the icing is too thick, you can add a little more juice to reach your desired consistency.
  9. Once the loaf is completely cool, drizzle the citrus icing over the top. If you like, sprinkle with an additional teaspoon of lemon zest for an extra pop of flavor and color.
  • Prep Time: 15 mins
  • Cook Time: 50-60 mins
  • Category: Dessert
  • Method: Baking
  • Cuisine: American

Nutrition

  • Serving Size: 1 slice
  • Calories: 200
  • Sugar: 15 g
  • Sodium: 150 mg
  • Fat: 8 g
  • Saturated Fat: 5 g
  • Unsaturated Fat: 3 g
  • Trans Fat: 0 g
  • Carbohydrates: 30 g
  • Fiber: 1 g
  • Protein: 3 g
  • Cholesterol: 40 mg

Keywords: Be careful not to overmix your batter; this is a common mistake that can lead to a dense loaf. Use room temperature ingredients for a smoother batter and even baking.

Did you make this recipe?

Share a photo and tag us — we can't wait to see what you've made!

  • Privacy Policy
  • Terms Of Service
  • Contact
  • About
  • GDPR

Copyright © 2025 Homesmad