• Skip to primary navigation
  • Skip to main content
  • Skip to primary sidebar
Homesmad

Homesmad

  • Home
  • Breakfast & Brunch
  • Appetizers & Snacks
  • Dinner
  • Dessert
  • About
  • Privacy Policy
  • Contact
Homesmad
  • Home
  • Breakfast & Brunch
  • Appetizers & Snacks
  • Dinner
  • Dessert
  • About
  • Privacy Policy
  • Contact

Easy Caprese Dip Recipe: Quick, Fresh & Delicious Appetizer!

October 17, 2025 by Lily author

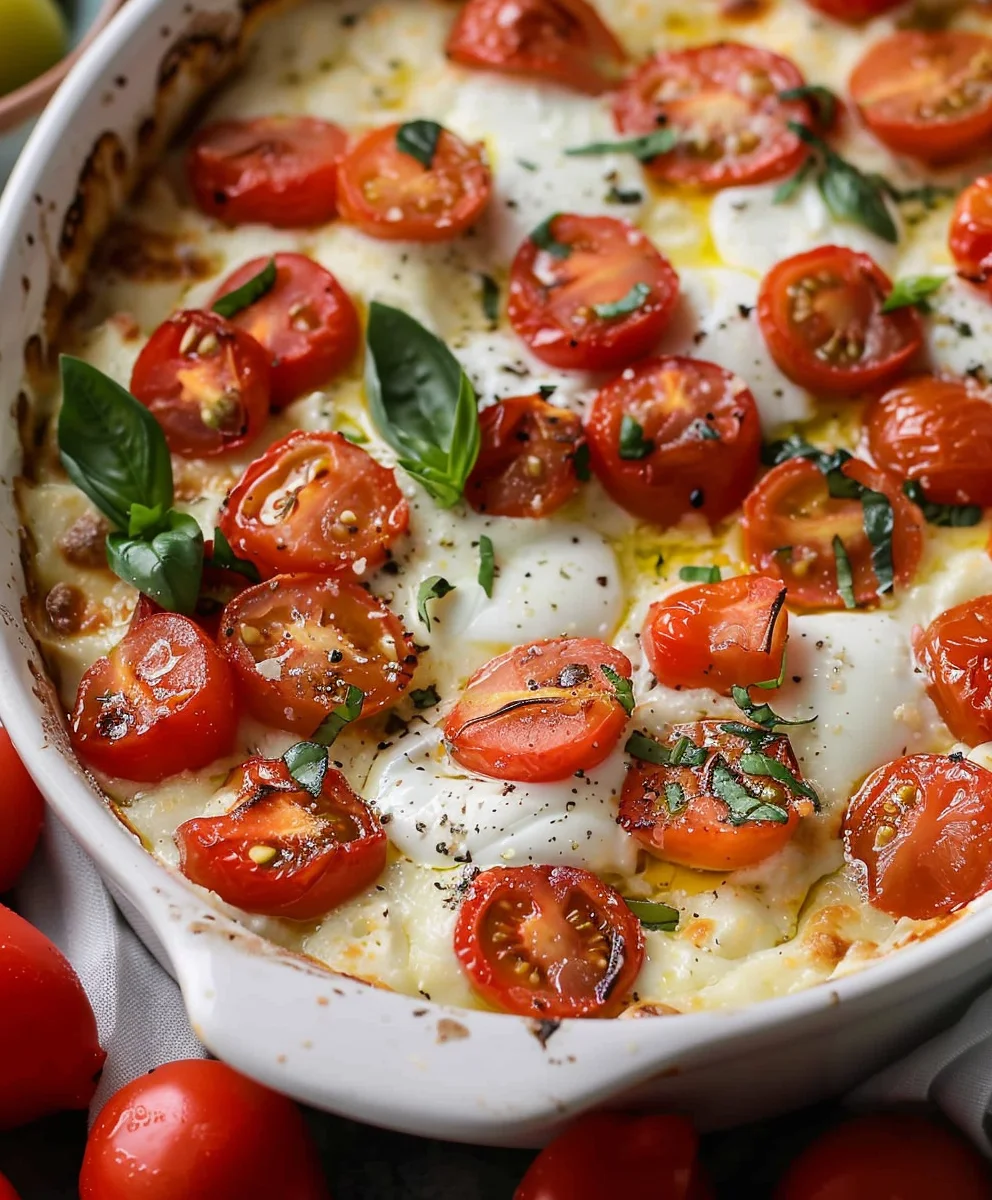
Easy Caprese Dip is the answer to your quest for a refreshingly simple yet incredibly flavorful appetizer that always impresses. Imagine capturing the vibrant essence of a classic Caprese salad—those iconic layers of ripe tomatoes, creamy fresh mozzarella, and aromatic basil—and transforming it into an irresistible, spoonable delight. As someone who appreciates both tradition and convenience, I find this dish to be an absolute revelation. The original Caprese salad, originating from the stunning island of Capri in Italy, is a testament to the beauty of simple, high-quality ingredients, reflecting the colors of the Italian flag. It’s a celebration of Italian freshness, made effortlessly accessible for any occasion.

This particular Easy Caprese Dip recipe honors that heritage by focusing on freshness and bold flavors, but with the added benefit of being wonderfully convenient. People adore this dip not just for its stunning visual appeal, but for its exquisite balance of textures and tastes: the juiciness of the tomatoes, the melt-in-your-mouth creaminess of the mozzarella, the herbaceous kick of fresh basil, all brightened by a delicate balsamic glaze. It’s a dish that feels sophisticated yet takes mere minutes to assemble, making it perfect for last-minute gatherings, backyard BBQs, or simply a delightful snack. Get ready to fall in love with its undeniable charm and effortless elegance!

Easy Caprese Dip Recipe: Quick, Fresh & Delicious Appetizer! this RECIPE

Ingredients:

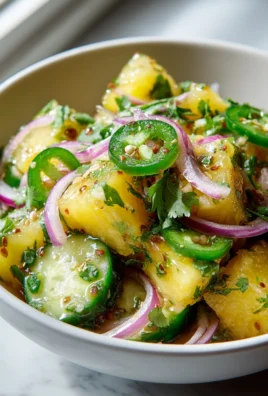
  • 1.5 pounds (approximately 680g) ripe cherry tomatoes (or grape tomatoes). I love using a mix of red, yellow, and orange varieties for a beautiful color pop, but any ripe, sweet small tomatoes will do the trick for our Easy Caprese Dip.
  • 1 pound (approximately 450g) fresh mozzarella cheese. I typically opt for small mozzarella balls like bocconcini or ciliegine as they’re already perfectly bite-sized, saving us a step. If you can only find a large ball of fresh mozzarella, no worries, we’ll just dice it up.
  • 1 large bunch (about 2 ounces or 60g) fresh basil leaves. This is absolutely essential for that authentic Caprese flavor. Look for vibrant, unblemished leaves.
  • 1/4 cup (60ml) high-quality extra virgin olive oil. Since this is a no-cook dish, the quality of your olive oil truly shines through. Choose one with a fruity, peppery, or buttery note that you adore.
  • 2-3 tablespoons balsamic glaze. You can find this pre-made in most grocery stores, often near the vinegars. If you want to make your own, simply simmer balsamic vinegar over low heat until it reduces and thickens to a syrupy consistency – it’s a wonderful project!
  • 1 teaspoon sea salt, or to taste. I prefer flaky sea salt for a little textural crunch, but fine sea salt works perfectly too.
  • 1/2 teaspoon freshly ground black pepper, or to taste. Freshly ground makes a huge difference in aroma and flavor.
  • Optional additions for an extra layer of flavor:
    • 1 clove garlic, minced very finely. This adds a lovely subtle aromatic kick without overpowering the fresh ingredients.
    • 1/2 teaspoon dried oregano. While not traditional for Caprese, a tiny hint can complement the other flavors beautifully.
    • A pinch of red pepper flakes. If you like a very slight warmth, this is a fun addition to elevate your Easy Caprese Dip.

Preparing the Fresh Ingredients for Your Easy Caprese Dip

  1. Wash and Dry the Tomatoes: First things first, let’s get those beautiful tomatoes ready. Gently rinse your cherry or grape tomatoes under cool running water. This step is super important, especially if they’ve come straight from the garden or farmer’s market. After washing, lay them out on a clean kitchen towel or paper towels and pat them thoroughly dry. Why is drying crucial? Excess water can dilute the flavors of our dip and prevent the olive oil and balsamic glaze from clinging properly to the ingredients. Trust me, it makes a difference!
  2. Prepare the Tomatoes: Once dry, it’s time to cut them. If you’re using cherry or grape tomatoes, simply halve them lengthwise. If you have any particularly large ones, you can quarter them to ensure every piece is bite-sized. Aim for uniform pieces so that each scoop of our Easy Caprese Dip has a balanced distribution of ingredients. Place all the cut tomatoes into a large mixing bowl. This will be the main vessel for our dip.
  3. Drain and Prepare the Mozzarella: Now, let’s tackle the fresh mozzarella. If you’re using bocconcini or ciliegine (the small balls), drain them thoroughly from their liquid packaging. I usually gently press them between a few layers of paper towels to absorb any excess moisture. If you’re using a larger ball of fresh mozzarella, slice it into about 1/2-inch thick pieces, then dice those pieces into roughly 1/2-inch cubes. The goal here is to match the size of your cut tomatoes so that every bite is perfectly balanced. Add the prepared mozzarella to the bowl with your tomatoes.
  4. Wash and Prepare the Basil: Fresh basil is the heart of Caprese, so let’s treat it right. Gently rinse your basil leaves under cool water. Just like with the tomatoes, it’s vital to dry them thoroughly. You can lay them out on paper towels or even use a salad spinner for efficiency. Once dry, stack several leaves on top of each other, roll them tightly like a cigar, and then thinly slice across the roll to create beautiful basil ribbons, also known as a chiffonade. Alternatively, for a more rustic look and feel, you can simply tear the basil leaves into smaller pieces by hand. I personally love the chiffonade technique as it releases more of that aromatic basil oil and makes for a more elegant presentation in our Easy Caprese Dip. Add the prepared basil to the bowl with the tomatoes and mozzarella.
  5. (Optional) Prepare the Garlic: If you’re opting for a hint of garlic, mince one clove very, very finely. You want it to almost disappear into the dip, providing just a subtle background note, not an overwhelming garlicky punch. A garlic press works wonderfully here, or you can finely chop it with a sharp knife. Add the minced garlic to the bowl.

Assembling Your Easy Caprese Dip: The Magic Happens Here!

  1. Add the Olive Oil: Drizzle the high-quality extra virgin olive oil generously over the tomatoes, mozzarella, and basil in the bowl. As mentioned before, because this is a simple, fresh dish, the olive oil’s flavor truly stands out. Don’t skimp on quality here! This oil will coat all the ingredients, enriching their flavors and adding a lovely silkiness to our Easy Caprese Dip.
  2. Season with Salt and Pepper: Sprinkle the sea salt and freshly ground black pepper over the ingredients. Start with the recommended amounts (1 teaspoon sea salt, 1/2 teaspoon black pepper) but remember that seasoning is always to taste. You can always add more later, but you can’t take it away! The salt will help draw out the natural sweetness of the tomatoes and enhance all the other flavors.
  3. (Optional) Add Dried Oregano and Red Pepper Flakes: If you’re using the optional dried oregano, sprinkle it in now. For the red pepper flakes, add a pinch if you desire that subtle warmth. Remember, these are entirely optional and cater to personal preference, but they can add an intriguing depth to your Easy Caprese Dip.
  4. Gently Toss to Combine: Using two spoons or clean hands, gently toss all the ingredients together until everything is well combined and coated with the olive oil, salt, and pepper. Be gentle! We want to keep the mozzarella and tomatoes intact, not mash them. The goal is to ensure every component gets a chance to mingle and absorb the delicious seasonings. This step is where the flavors truly begin to marry.
  5. Drizzle with Balsamic Glaze: Now for the grand finale – the balsamic glaze! Drizzle 2-3 tablespoons of balsamic glaze over the mixture. You can do this in a decorative swirl or just cover the top. The dark, sweet-tart glaze provides a beautiful contrast to the fresh, creamy, and acidic notes of the other ingredients. You can also save some glaze for serving, allowing guests to add more if they wish.
  6. Taste and Adjust: This is arguably the most important step for any recipe. Take a small spoonful of your Easy Caprese Dip and taste it. Does it need more salt? A little more pepper? Perhaps a touch more olive oil or balsamic glaze? Adjust the seasonings to your liking. Don’t be afraid to trust your palate! Everyone’s preferences are a little different, and perfecting the seasoning is what makes a good dish great.

Serving and Enjoying Your Caprese Masterpiece

  1. Chill for Optimal Flavor (Highly Recommended!): While you can certainly serve this Easy Caprese Dip immediately, I highly recommend allowing it to chill in the refrigerator for at least 30 minutes, or even up to 2 hours. This chilling time allows all the beautiful flavors to meld and deepen, creating a more harmonious and delicious experience. The tomatoes will release a bit more of their juice, combining with the olive oil and balsamic to create an irresistible dressing. Cover the bowl loosely with plastic wrap before refrigerating.
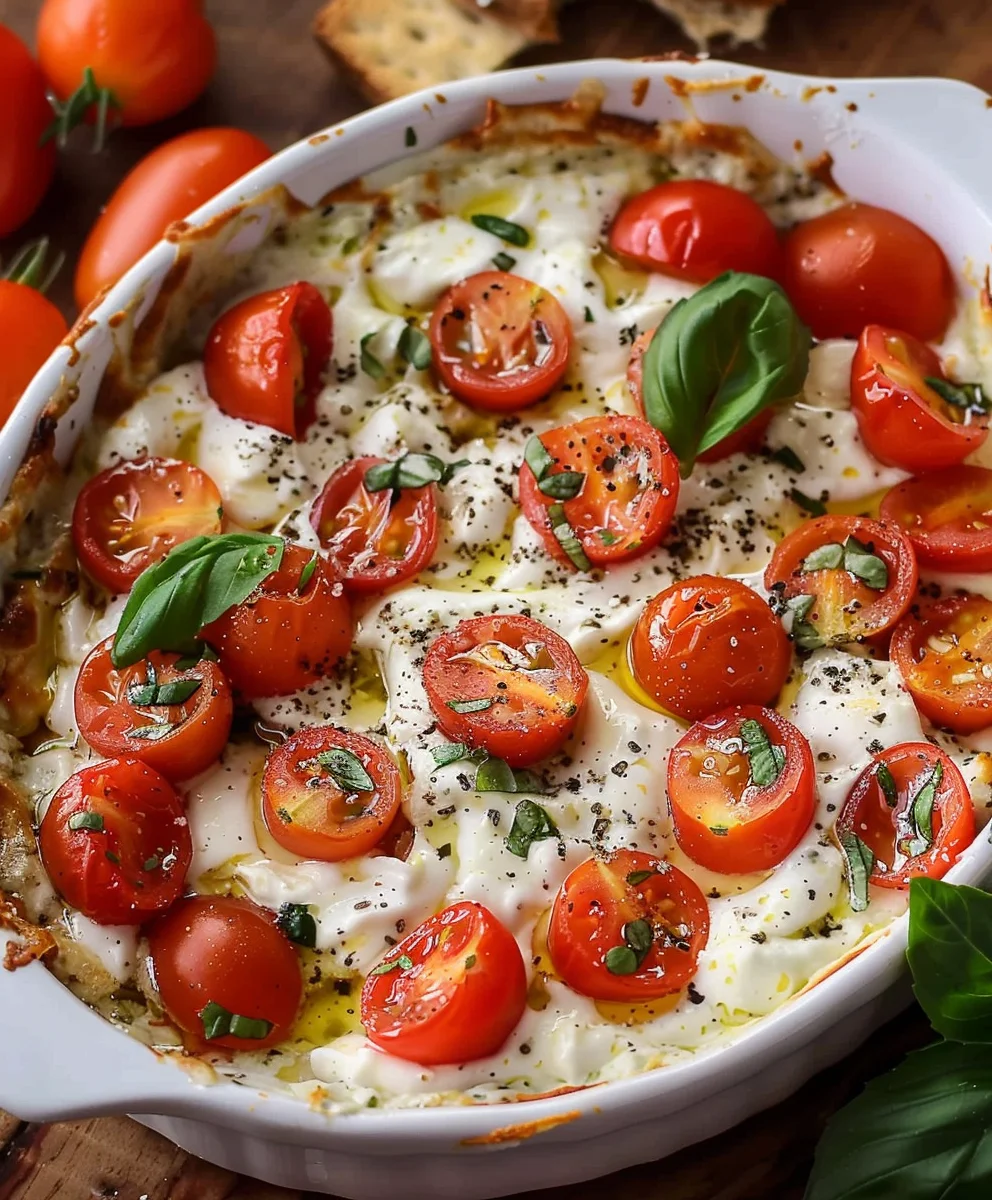
  2. Prepare for Serving: When you’re ready to serve, give the dip another gentle stir. You’ll notice how all the colors have brightened and the aromas have intensified. Transfer the Easy Caprese Dip to an attractive serving bowl or platter. If you like, you can garnish it with a few fresh basil leaves or another light drizzle of balsamic glaze just before presenting it.
  3. Serving Suggestions for Your Easy Caprese Dip: This versatile dip pairs wonderfully with a variety of accompaniments.

    • Crusty Bread: A sliced baguette, ciabatta, or your favorite artisan bread is perfect for scooping up all the deliciousness.
    • Toasted Crostini: Brush slices of baguette with olive oil and toast them until golden brown for an elegant serving option.
    • Crackers: Simple water crackers or gourmet crackers provide a neutral base.
    • Pita Chips: The sturdiness of pita chips makes them excellent for dipping.
    • Vegetable Sticks: For a lighter, gluten-free option, serve with cucumber slices, bell pepper strips, or carrot sticks.
    • As a Side Dish: It also makes a fantastic side salad or topping for grilled chicken or fish. Think beyond just dipping!
  4. Storage: If by some miracle you have any leftovers of this delicious Easy Caprese Dip, store them in an airtight container in the refrigerator for up to 2-3 days. The flavors tend to get even better on the second day, though the basil might start to darken a little. I find it’s best enjoyed chilled or at room temperature. Avoid freezing, as the fresh mozzarella will change texture upon thawing.

There you have it! A truly effortless yet incredibly flavorful Easy Caprese Dip that’s perfect for parties, picnics, or just a simple, delightful snack. Enjoy every fresh, vibrant bite!

Easy Caprese Dip Recipe: Quick, Fresh & Delicious Appetizer!

Conclusion:

And there you have it, my friends! I truly hope you’re feeling as inspired as I am to whip up this incredible creation in your own kitchen. I’ve shared countless recipes over the years, but this one holds a special place because it perfectly encapsulates everything I believe great food should be: simple, utterly delicious, and capable of bringing smiles to everyone at the table. This isn’t just another appetizer; it’s a vibrant celebration of fresh, high-quality ingredients that come together in a symphony of flavors. What makes this recipe an absolute must-try, in my humble opinion, is its unparalleled ease coupled with a gourmet taste profile. You get all the sophisticated, sun-drenched goodness of a classic Caprese salad, transformed into a delightful, scoopable format that’s incredibly versatile and always a crowd-pleaser. It’s the kind of dish that disappears almost as quickly as you can make it, leaving everyone clamoring for more.

I’ve witnessed firsthand how this particular recipe, my beloved Easy Caprese Dip, turns hesitant tasters into instant fans. The balance of sweet, juicy tomatoes, creamy mozzarella, fragrant basil, and a tangy drizzle of balsamic glaze is simply irresistible. It’s light yet satisfying, refreshing yet comforting, and visually stunning despite its minimal effort. It speaks to the soul of summer, but honestly, I find myself craving it year-round. Whether you’re a seasoned home cook or someone just starting their culinary journey, this recipe guarantees success and a dish you’ll be proud to serve. It’s proof that you don’t need complicated techniques or exotic ingredients to create something truly memorable.

Get Creative with Your Serving Style!

Now, let’s talk about how you can best enjoy this magnificent dip. While it shines brightly served with classic accompaniments like crispy crostini, toasted baguette slices, or your favorite sturdy crackers, don’t be afraid to think outside the box! I love offering a variety of dippers to cater to all tastes. Think fresh vegetable sticks – crisp cucumber, vibrant bell pepper strips, crunchy celery, or even radishes – for a lighter, gluten-free option. For something a bit heartier, try serving it alongside grilled pita bread or warm focaccia. But the versatility doesn’t stop there! This dip makes an exceptional spread for sandwiches and wraps, adding a burst of fresh flavor to your lunch. Imagine it slathered on a grilled chicken breast or as a vibrant topping for pan-seared fish. I’ve even spooned it over scrambled eggs for a gourmet breakfast twist, and it was absolutely divine. Consider it your secret weapon for elevating everyday meals into something extraordinary.

Endless Variations to Explore!

And for those of you who love to experiment, the beauty of this recipe lies in its adaptability. While the core ingredients are sacred, there are delightful variations you can explore. Instead of fresh mozzarella balls, try using creamy burrata for an even richer, melt-in-your-mouth experience, or smoked mozzarella for a unique depth of flavor. If you’re feeling adventurous, a crumbled goat cheese or even a mild feta could offer an intriguing twist, though it would diverge slightly from the traditional Caprese profile. Beyond basil, feel free to incorporate other fresh herbs like a sprinkle of fresh oregano, a hint of mint, or some finely chopped chives for an extra layer of aroma. For a touch of heat, a tiny pinch of red pepper flakes can awaken the palate. Sun-dried tomatoes, finely chopped and mixed in, can add a concentrated sweetness, or you might consider adding a few pitted Kalamata olives for a salty, briny counterpoint. And of course, the balsamic glaze itself can be played with – a fig-infused balsamic or even a white balsamic glaze could offer different nuances. Don’t be shy; let your culinary imagination run wild and make this recipe truly your own!

Your Culinary Journey Begins Now!

So, what are you waiting for? I wholeheartedly encourage you to carve out a little time in your day, gather these simple yet magical ingredients, and create this delightful dip. I promise you, the joy it brings to your table, whether for a casual snack, a family dinner, or a festive gathering, will be immeasurable. It’s a recipe that not only tastes incredible but also fosters connection and shared moments. Once you’ve had the pleasure of making and tasting this, I would absolutely love to hear about your experience! Did you stick to the classic version, or did you put your own creative spin on it? What were your favorite serving suggestions? Please feel free to share your thoughts, your successes, and even your “oops” moments. I thrive on hearing from my wonderful community of home cooks. Tag me in your photos, leave a comment below, or just drop me a line. Your feedback inspires me and helps us all grow as culinary enthusiasts. Happy cooking, my friends, and enjoy every single delightful scoop of this wonderful creation!


Easy Caprese Dip

Easy Caprese Dip

This Easy Caprese Dip transforms the vibrant essence of a classic Caprese salad into an irresistible, spoonable appetizer. Combining ripe tomatoes, creamy cheeses, aromatic basil pesto, and fresh basil, it’s a celebration of Italian freshness, made effortlessly accessible for any occasion. Perfect for last-minute gatherings or a delightful snack, it offers an exquisite balance of textures and tastes, requiring mere minutes to assemble.

Prep Time
15 Minutes

Cook Time
0 Minutes

Total Time
45 Minutes

Servings
8-10 servings

Ingredients

  • 2 cups cherry tomatoes
  • 1 Tablespoon olive oil
  • 2 Tablespoons basil pesto (homemade or store-bought)
  • 5 cloves garlic, minced
  • Kosher salt and black pepper to taste
  • 1 cup sour cream
  • 1/2 cup fresh chopped basil
  • 8 ounces low-moisture mozzarella cheese, cut into chunks
  • 8 ounces shredded provolone cheese
  • ¼ cup freshly grated parmesan cheese
  • Crusty bread, crackers, or tortilla chips for serving

Instructions

  1. Step 1
    Halve the cherry tomatoes. In a large mixing bowl, combine the halved tomatoes, olive oil, basil pesto, and minced garlic. Season generously with kosher salt and freshly ground black pepper.
  2. Step 2
    Add the sour cream, fresh chopped basil, low-moisture mozzarella chunks, shredded provolone cheese, and freshly grated parmesan cheese to the bowl with the tomato mixture.
  3. Step 3
    Gently toss all ingredients together using two spoons or clean hands until everything is well combined and evenly coated.
  4. Step 4
    Taste the dip and adjust the seasonings (salt, pepper, or garlic) as desired, ensuring a perfect balance of flavors.
  5. Step 5
    Cover the bowl loosely with plastic wrap and refrigerate for at least 30 minutes (or up to 2 hours) to allow the flavors to meld and deepen for an optimal taste experience.
  6. Step 6
    Once chilled, give the dip a final gentle stir and transfer it to an attractive serving bowl. Serve immediately with crusty bread, crackers, or tortilla chips.

Important Information

Nutrition Facts (Per Serving)

It is important to consider this information as approximate and not to use it as definitive health advice.

Allergy Information

Please check ingredients for potential allergens and consult a health professional if in doubt.

« Previous Post
No-Bake Pumpkin Cheesecake Truffles - Perfect Fall Dessert!
Next Post »
Creamy Jalapeno Chicken Skillet Recipe | Quick & Flavorful

If you enjoyed this…

Crispy Homemade Mozzarella Sticks Recipe You’ll Love!

Strawberry Dirty Sprite Drink: Recipe, Tips, and Refreshing Twists

Garlic Parmesan Focaccia Bread: A Deliciously Easy Recipe to Try Today

Primary Sidebar

Browse by Diet

BreakfastDinnerLunchDessertAppetizer

Sweet Peach Yogurt Parfait Delight

One of my fondest memories is from a lazy summer afternoon spent at my grandmother’s house. The sun filtered through the kitchen window, casting a warm glow over the table where she would create her culinary magic. It was during one of those blissful moments that I first tasted her Peach Yogurt Parfait with Honey and Granola. The sweet aroma of ripe peaches mingling with creamy yogurt and the crunch of granola was nothing short of heavenly. It felt like summer captured in a bowl, and I still remember the joy of diving in with a spoon, each layer revealing a new burst of flavor.

When I think about that parfait, I can almost hear the gentle hum of the bees outside, reminding me of the floral notes that honey brings to every bite. The vibrant yellows and soft oranges of the peaches contrast beautifully with the creamy white yogurt and the golden crunch of granola. It’s a dish that not only looks delightful but also tastes like a celebration of fresh, wholesome ingredients.

What makes my version of this Peach Yogurt Parfait special is the careful balance of flavors and textures. I use ripe, juicy peaches, drizzled with locally sourced honey, and a homemade granola that’s bursting with nuts and seeds for an extra crunch. It’s a simple dish, but every layer is crafted with love and attention.

Let me show you exactly how to make this delightful parfait, so you can bring a bit of that summer magic into your kitchen!

Sweet Peach Yogurt Parfait Delight

Why You’ll Love This Recipe

  • Delightfully creamy texture from the Greek yogurt, paired with the juicy sweetness of fresh peaches.
  • Ready in under 20 minutes, making it a quick and satisfying breakfast or snack option.
  • Budget-friendly, using common ingredients that you may already have in your pantry.
  • Customizable with your favorite granola and nuts, allowing you to tailor each parfait to your taste.
  • Perfectly balanced flavors with the bright acidity of lemon juice and the sweetness of honey enhancing the peaches.

Ingredients

  • For the Parfait:
  • 2 cups plain Greek yogurt (or vanilla yogurt for a sweeter option)
  • 2 large ripe peaches, diced (about 2 cups)
  • 1 tablespoon fresh lemon juice (to prevent browning of peaches)
  • 2 tablespoons honey (plus more for drizzling)
  • 1 teaspoon vanilla extract (optional for extra flavor)
  • For the Granola:
  • 1 cup granola (store-bought or homemade; see notes for a simple granola recipe)
  • 1/4 cup sliced almonds (optional for added crunch)
  • 1/4 cup shredded coconut (optional for added flavor)

Let’s dive into some key ingredients that make this Peach Yogurt Parfait so delightful! First, the Greek yogurt is not only creamy but also packed with protein, making it a satisfying option for breakfast or a snack. If you’re looking for a sweeter option, you can easily substitute it with vanilla yogurt, though it may alter the overall flavor balance. Next, the ripe peaches are the star of the show; their natural sweetness shines through, so I recommend choosing peaches that yield slightly to pressure, indicating they’re perfectly ripe. If peaches aren’t in season, feel free to use nectarines or even frozen peaches—just thaw them before use. Finally, honey adds a lovely floral sweetness that ties everything together. If you prefer, maple syrup can serve as a delicious substitute.

Step-by-Step Instructions

  1. Start by preparing the peaches. Wash them thoroughly, then slice and dice them into bite-sized pieces. In a medium bowl, toss the diced peaches with 1 tablespoon of fresh lemon juice to prevent browning. Set aside for about 5 minutes while the lemon juice works its magic.
  2. In a separate bowl, combine the Greek yogurt, 2 tablespoons of honey, and 1 teaspoon of vanilla extract if using. Stir the mixture until smooth and thoroughly blended. This should take about a minute. Avoid overmixing to maintain the creaminess of the yogurt.
  3. Now it’s time to layer your parfait. Grab a clear glass or bowl to showcase your beautiful creation. Start with a generous spoonful of the yogurt mixture at the bottom—about 1/4 cup will do. Use a spoon to spread it evenly.
  4. Add a layer of the diced peaches over the yogurt, ensuring they cover the yogurt completely. You might want to use about half of what you have prepared—roughly 1 cup. This layer should be visually appealing, so arrange the peaches neatly.
  5. Sprinkle 1/4 cup of granola over the peaches. This adds a delightful crunch. Make sure to distribute it evenly to ensure every bite has that satisfying texture. Avoid packing it down too tightly, as you want it to maintain its crunch.
  6. Repeat the layers: spoon in another 1/4 cup of yogurt, followed by another cup of peaches, and another sprinkle of granola. You should have at least two layers, but feel free to add more depending on your glass size.
  7. Finish off your parfait with a drizzle of honey on top for added sweetness and a touch of elegance. If you’re using sliced almonds or shredded coconut, sprinkle them on top now. It adds a lovely visual contrast and extra flavor.
  8. Serve immediately or refrigerate for up to 30 minutes before serving to allow the flavors to meld together. However, I recommend enjoying it fresh to maintain the granola’s crunch.

Pro Tips for the Best Peach Yogurt Parfait With Honey And Granola

  • Make sure to choose ripe peaches for the best flavor and texture. A common mistake is using unripe fruit, which can lead to a less enjoyable parfait. Look for peaches that are fragrant and slightly soft to the touch.
  • Use a clear glass to assemble your parfait; this not only makes for a beautiful presentation but also allows you to see the colorful layers, which adds to the enjoyment of eating it.
  • For an even creamier texture, consider whipping the Greek yogurt with a hand mixer for a couple of minutes before layering. This small adjustment makes a huge difference in mouthfeel.
  • Be mindful of the granola-to-yogurt ratio. Too much granola can overwhelm the parfait, while too little can make it feel too creamy. Aim for about 1/4 cup of granola per layer for the perfect balance.
  • If you’re making this for a gathering, consider preparing the yogurt and peaches ahead of time and layering them just before serving. This ensures the granola stays crunchy!

Variations & Serving Ideas

There are so many ways to get creative with your Peach Yogurt Parfait! For a tropical twist, swap out the peaches for mangoes or pineapples and top with coconut flakes. If you prefer a berry flavor, mix in some blueberries or strawberries with the peaches for added color and taste. For a nutty version, incorporate chopped walnuts or pecans instead of almonds.

As for serving ideas, this parfait pairs beautifully with a side of scrambled eggs for a hearty breakfast or fresh fruit salad for a light lunch. You might also enjoy it alongside whole grain toast with almond butter for an energizing snack. The contrast of flavors and textures will elevate your meal experience!

Storage, Make-Ahead & Reheating

The Peach Yogurt Parfait is best enjoyed fresh, but you can prepare some components ahead of time. Store the layered parfait in an airtight container in the refrigerator for up to 24 hours. However, be cautious; the granola may lose its crunch if stored too long. You can freeze the yogurt and peach mixture for up to 2 months; just remember to thaw it in the refrigerator overnight before serving.

If you plan to enjoy this dish the next day, it can taste even better as the flavors meld together. Just remember to add the granola right before serving to keep its delightful crunch!

Frequently Asked Questions

Can I make Peach Yogurt Parfait With Honey And Granola ahead of time?

Yes — in fact, it tastes even better the next day as the flavors meld. However, I recommend waiting to add the granola until just before serving to maintain its crunch.

What can I substitute for Greek yogurt?

If you prefer a lighter option, you can substitute Greek yogurt with regular yogurt or a dairy-free alternative like coconut yogurt. Just remember that this may alter the creaminess and flavor profile slightly.

Can I use frozen peaches for this parfait?

Absolutely! Just make sure to thaw the frozen peaches before using them. They will still add great flavor, though the texture may be slightly softer than fresh peaches.

How do I make the parfait vegan?

To make a vegan version, substitute the Greek yogurt with a plant-based yogurt alternative, and replace honey with maple syrup or agave nectar. This keeps the parfait sweet while adhering to a vegan diet.

What other fruits can I use in this recipe?

You can mix and match fruits based on your preference. Try using strawberries, blueberries, raspberries, or even bananas. Just make sure to adjust the lemon juice as needed to prevent browning.

Sweet Peach Yogurt Parfait Delight

Final Thoughts

The Peach Yogurt Parfait with Honey and Granola is a delightful blend of creamy yogurt, sweet peaches, and crunchy granola that creates a satisfying and nourishing treat. Each layer bursts with flavor, making it a perfect choice for breakfast or a light dessert.

This is the kind of recipe I come back to again and again, especially when I want something refreshing and wholesome to start my day. The harmony of sweet and tart flavors, combined with the delightful crunch, never fails to lift my spirits!

I encourage you to give this parfait a try and indulge in its comforting goodness. Feel free to share your results or even add your own twist—perhaps a sprinkle of cinnamon or a handful of nuts. Enjoy creating your perfect parfait!

Print
clock clock iconcutlery cutlery iconflag flag iconfolder folder iconinstagram instagram iconpinterest pinterest iconfacebook facebook iconprint print iconsquares squares iconheart heart iconheart solid heart solid icon

Peach Yogurt Parfait


  • Author: Lily author
  • Total Time: 15 minutes
  • Yield: 4 servings 1x
Pin Recipe
Print Recipe

Description

This Peach Yogurt Parfait combines creamy Greek yogurt, juicy peaches, and crunchy granola for a delightful treat. It’s a perfect breakfast or snack that captures the essence of summer in every bite.


Ingredients

Scale
  • For the Parfait:
  • 2 cups plain Greek yogurt (or vanilla yogurt for a sweeter option)
  • 2 large ripe peaches, diced (about 2 cups)
  • 1 tablespoon fresh lemon juice (to prevent browning of peaches)
  • 2 tablespoons honey (plus more for drizzling)
  • 1 teaspoon vanilla extract (optional for extra flavor)
  • For the Granola:
  • 1 cup granola (store-bought or homemade; see notes for a simple granola recipe)
  • 1/4 cup sliced almonds (optional for added crunch)
  • 1/4 cup shredded coconut (optional for added flavor)

Instructions

  1. Start by preparing the peaches. Wash them thoroughly, then slice and dice them into bite-sized pieces. In a medium bowl, toss the diced peaches with 1 tablespoon of fresh lemon juice to prevent browning. Set aside for about 5 minutes while the lemon juice works its magic.
  2. In a separate bowl, combine the Greek yogurt, 2 tablespoons of honey, and 1 teaspoon of vanilla extract if using. Stir the mixture until smooth and thoroughly blended. This should take about a minute. Avoid overmixing to maintain the creaminess of the yogurt.
  3. Now it’s time to layer your parfait. Grab a clear glass or bowl to showcase your beautiful creation. Start with a generous spoonful of the yogurt mixture at the bottom—about 1/4 cup will do. Use a spoon to spread it evenly.
  4. Add a layer of the diced peaches over the yogurt, ensuring they cover the yogurt completely. You might want to use about half of what you have prepared—roughly 1 cup. This layer should be visually appealing, so arrange the peaches neatly.
  5. Sprinkle 1/4 cup of granola over the peaches. This adds a delightful crunch. Make sure to distribute it evenly to ensure every bite has that satisfying texture. Avoid packing it down too tightly, as you want it to maintain its crunch.
  6. Repeat the layers: spoon in another 1/4 cup of yogurt, followed by another cup of peaches, and another sprinkle of granola. You should have at least two layers, but feel free to add more depending on your glass size.
  7. Finish off your parfait with a drizzle of honey on top for added sweetness and a touch of elegance. If you’re using sliced almonds or shredded coconut, sprinkle them on top now. It adds a lovely visual contrast and extra flavor.
  8. Serve immediately or refrigerate for up to 30 minutes before serving to allow the flavors to meld together. However, I recommend enjoying it fresh to maintain the granola’s crunch.
  • Prep Time: 15 mins
  • Cook Time: 0 mins
  • Category: Breakfast
  • Method: No-cook
  • Cuisine: American

Nutrition

  • Serving Size: 1 parfait
  • Calories: 250
  • Sugar: 20 g
  • Sodium: 50 mg
  • Fat: 5 g
  • Saturated Fat: 2 g
  • Unsaturated Fat: 3 g
  • Trans Fat: 0 g
  • Carbohydrates: 40 g
  • Fiber: 3 g
  • Protein: 10 g
  • Cholesterol: 10 mg

Keywords: Choose ripe peaches for the best flavor and texture. Use a clear glass for a beautiful presentation. For creaminess, consider whipping the yogurt before layering. Be mindful of the granola-to-yogurt ratio. Prepare yogurt and peaches ahead of time for gatherings, layering just before serving.

Did you make this recipe?

Share a photo and tag us — we can't wait to see what you've made!

Sun-Kissed Frozen Orange Cream Slush

As a child, summer days felt like they lasted forever. I remember the sticky heat wrapping around me as I played outside, my laughter mingling with the sounds of the neighborhood. But nothing could cool me down quite like the moment I’d spot my grandmother, laboring over her blender, whipping up her famous Frozen Orange Creamsicle Slush. That vibrant orange treat, with its frosty texture and sweet citrus aroma, was like a burst of sunshine in a cup. Just one sip, and I could feel the coolness wash over me, sparking pure joy.

This Frozen Orange Creamsicle Slush has a way of making you feel like a kid again. Its creamy, dreamy consistency is a delightful balance of bright orange and soft vanilla, inviting you to dive right in. The refreshing tang of orange dances on your tongue, while the smooth creaminess envelops you in a comforting embrace. It’s a nostalgic treat that’s perfect for hot summer afternoons or anytime you need a little pick-me-up.

What makes my version of this slush stand out is the addition of a hint of vanilla bean, which elevates the flavor and adds an extra layer of richness. Plus, it’s super easy to whip up with just a few simple ingredients that you probably already have on hand! So, if you’re ready to relive those sun-soaked memories, let me show you exactly how to make it.

Sun-Kissed Frozen Orange Cream Slush

Why You’ll Love This Recipe

  • Each slush is a perfect blend of creamy vanilla and zesty orange, creating a nostalgic flavor reminiscent of summer days.
  • This refreshing treat is ready in under 15 minutes, making it an ideal quick dessert for unexpected guests or hot afternoons.
  • With just 8 simple ingredients, it’s budget-friendly, ensuring you don’t have to break the bank to enjoy a delicious slush.
  • The slush has a perfectly smooth texture, thanks to the combination of ice and ice cream, providing a delightful contrast to the bright citrus flavors.
  • It’s highly customizable; you can easily adjust the sweetness and add fresh herbs for a unique twist that suits your taste.

Ingredients

  • 2 cups orange juice (freshly squeezed or store-bought)
  • 1 cup vanilla ice cream
  • 1 cup crushed ice
  • 1/2 cup milk (whole or 2%)
  • 1/4 cup granulated sugar (adjust based on sweetness preference)
  • 1 teaspoon vanilla extract
  • Zest of 1 orange (for added flavor)
  • Fresh orange slices and mint leaves (for garnish)

The star of this Frozen Orange Creamsicle Slush is the orange juice, which provides the vibrant, citrusy base. Freshly squeezed juice will yield the brightest flavor, but store-bought options can be just as convenient. If you’re opting for store-bought, choose 100% pure juice with no added sugars for the best results. Another essential ingredient is the vanilla ice cream; it adds creaminess and sweetness. You can substitute it with dairy-free ice cream if you’re looking for a vegan option. Whole or 2% milk complements the ice cream, creating a smooth blend. If you want a lower-calorie version, almond or oat milk can be good alternatives.

Lastly, the granulated sugar can be adjusted based on your sweetness preference. If you prefer a more natural sweetener, consider using honey or agave syrup. The orange zest enhances the flavor profile, providing an aromatic pop that brings the whole slush together. Don’t skip it! It adds an extra layer of brightness that makes this slush truly special.

Step-by-Step Instructions

  1. Start by preparing your ingredients. Gather 2 cups of orange juice, 1 cup of vanilla ice cream, and 1 cup of crushed ice. Make sure the ice is finely crushed, as larger chunks can make blending difficult.
  2. In a blender, combine the orange juice, vanilla ice cream, crushed ice, and 1/2 cup of milk. Add 1/4 cup of granulated sugar and 1 teaspoon of vanilla extract. If you like a sweeter slush, consider adding a bit more sugar at this stage.
  3. Add the zest of 1 orange to the blender. This step is crucial for enhancing the citrus flavor of your slush. Make sure not to include the bitter white pith—only the flavorful zest.
  4. Blend the mixture on medium-high speed for about 30-45 seconds. Stop once the ingredients are fully combined and the slush has a smooth, even consistency. If you notice large chunks of ice, blend for an additional 10-15 seconds. Avoid over-blending, as this can make the slush too liquidy.
  5. Once blended, taste the slush. If it needs more sweetness, add a little more sugar and blend for a few more seconds. If it’s too thick, you can add a splash of milk to reach your desired consistency.
  6. Pour the slush into glasses. This recipe typically serves 4, but you can easily double it for larger gatherings. Use a spoon to help guide the slush into the glasses if needed.
  7. Garnish each serving with fresh orange slices and mint leaves. The mint not only adds a pop of color but also a refreshing aroma that complements the citrus flavors beautifully.
  8. Serve immediately and enjoy! If you’ve made extra, you can refrigerate it for a short time, but it’s best enjoyed fresh.

Pro Tips for the Best Frozen Orange Creamsicle Slush

  • Don’t skip the orange zest! It’s a game-changer for flavor. Always zest before juicing to make it easier.
  • Use a high-powered blender for the best texture. A standard blender may struggle with ice, leading to uneven consistency. If you have a food processor, that can work too, but ensure the ice is finely crushed.
  • Adjust the ice-to-liquid ratio carefully. If your slush is too thick, it won’t blend well. Start with less ice and add more until you reach your preferred texture.
  • Be cautious with the sugar! Always start with the lower amount, as you can easily add more, but it’s hard to fix an overly sweet slush.
  • For a fun twist, consider adding a splash of coconut milk or a handful of fresh fruit like strawberries or pineapple. This not only enhances the flavor but also adds a beautiful color contrast.

Variations & Serving Ideas

There are countless ways to put a spin on your Frozen Orange Creamsicle Slush. Consider making a tropical version by adding in some pineapple juice or coconut milk for a delightful tropical twist. If you’re feeling adventurous, try incorporating a handful of frozen mango or peach slices for added sweetness. For a lighter version, swap out the vanilla ice cream for Greek yogurt for a creamy yet tangy alternative.

As for serving ideas, this refreshing slush pairs wonderfully with light summer dishes like grilled chicken skewers, fish tacos, or a simple salad topped with citrus vinaigrette. The bright, zesty flavors of the slush complement these dishes perfectly, making them an ideal pairing for a sunny day.

Storage, Make-Ahead & Reheating

This Frozen Orange Creamsicle Slush is best enjoyed fresh, but if you have leftovers, you can store them in an airtight container in the fridge for up to 2 days. Just keep in mind that the slush may lose some of its texture over time as the ice melts. It doesn’t freeze well, as the ice will turn into a solid block. If you must freeze it, blend again after thawing to restore the slushy consistency. This treat is best the day you make it, as the flavors meld together beautifully overnight, enhancing its deliciousness.

Frequently Asked Questions

Can I make Frozen Orange Creamsicle Slush ahead of time?

Yes — in fact, it tastes even better the next day as the flavors meld. However, it’s best to enjoy it fresh, as the texture can change if stored for too long. If you need to prepare it ahead, keep it in the fridge and re-blend before serving.

What kind of orange juice should I use?

For the best flavor, use freshly squeezed orange juice. However, if you’re short on time, opt for 100% pure store-bought juice without added sugars. This will ensure that your slush remains flavorful and refreshing.

Can I substitute the vanilla ice cream?

Absolutely! If you’re looking for a dairy-free option, coconut milk ice cream or a non-dairy vanilla ice cream can work wonderfully. They will still provide the creamy texture and sweetness you desire.

How can I adjust the sweetness of my slush?

You can easily adjust the sweetness by modifying the amount of sugar added. Start with 1/4 cup and taste the mixture before blending. If you prefer it sweeter, add more sugar gradually until it reaches your desired level.

What should I do if my slush is too thick?

If your slush is too thick, simply add a splash of milk or orange juice and blend again. This will help achieve a more drinkable consistency while maintaining the slushy texture. Adjust gradually to reach your preferred thickness.

Sun-Kissed Frozen Orange Cream Slush

Final Thoughts

The Frozen Orange Creamsicle Slush is a delightful blend of refreshing citrus and creamy goodness, making it a perfect treat for warm days or any time you crave a taste of nostalgia. The way the bright orange flavor dances with the creamy texture truly elevates this slush, transforming it into a satisfying escape from the everyday.

This is the kind of recipe I come back to again and again, especially when I’m looking to cool down or impress guests at a summer gathering. It’s simple to make and always brings smiles all around! I encourage you to try this recipe for yourself—don’t hesitate to share your results or even put your own spin on it. Happy slushing!

Print
clock clock iconcutlery cutlery iconflag flag iconfolder folder iconinstagram instagram iconpinterest pinterest iconfacebook facebook iconprint print iconsquares squares iconheart heart iconheart solid heart solid icon

Frozen Orange Creamsicle Slush


  • Author: Lily author
  • Total Time: 15 minutes
  • Yield: 4 servings 1x
Pin Recipe
Print Recipe

Description

This Frozen Orange Creamsicle Slush is a refreshing treat that combines creamy vanilla and zesty orange flavors. Perfect for hot summer days, it brings back nostalgic memories with every sip.


Ingredients

Scale
  • 2 cups orange juice (freshly squeezed or store-bought)
  • 1 cup vanilla ice cream
  • 1 cup crushed ice
  • 1/2 cup milk (whole or 2%)
  • 1/4 cup granulated sugar (adjust based on sweetness preference)
  • 1 teaspoon vanilla extract
  • Zest of 1 orange (for added flavor)
  • Fresh orange slices and mint leaves (for garnish)

Instructions

  1. Start by preparing your ingredients. Gather 2 cups of orange juice, 1 cup of vanilla ice cream, and 1 cup of crushed ice. Make sure the ice is finely crushed, as larger chunks can make blending difficult.
  2. In a blender, combine the orange juice, vanilla ice cream, crushed ice, and 1/2 cup of milk. Add 1/4 cup of granulated sugar and 1 teaspoon of vanilla extract. If you like a sweeter slush, consider adding a bit more sugar at this stage.
  3. Add the zest of 1 orange to the blender. This step is crucial for enhancing the citrus flavor of your slush. Make sure not to include the bitter white pith—only the flavorful zest.
  4. Blend the mixture on medium-high speed for about 30-45 seconds. Stop once the ingredients are fully combined and the slush has a smooth, even consistency. If you notice large chunks of ice, blend for an additional 10-15 seconds. Avoid over-blending, as this can make the slush too liquidy.
  5. Once blended, taste the slush. If it needs more sweetness, add a little more sugar and blend for a few more seconds. If it’s too thick, you can add a splash of milk to reach your desired consistency.
  6. Pour the slush into glasses. This recipe typically serves 4, but you can easily double it for larger gatherings. Use a spoon to help guide the slush into the glasses if needed.
  7. Garnish each serving with fresh orange slices and mint leaves. The mint not only adds a pop of color but also a refreshing aroma that complements the citrus flavors beautifully.
  8. Serve immediately and enjoy! If you’ve made extra, you can refrigerate it for a short time, but it's best enjoyed fresh.
  • Prep Time: 15 min
  • Cook Time: 0 min
  • Category: Dessert
  • Method: Blending
  • Cuisine: American

Nutrition

  • Serving Size: 1 serving
  • Calories: 200
  • Sugar: 30 g
  • Sodium: 50 mg
  • Fat: 5 g
  • Saturated Fat: 3 g
  • Unsaturated Fat: 2 g
  • Trans Fat: 0 g
  • Carbohydrates: 40 g
  • Fiber: 1 g
  • Protein: 2 g
  • Cholesterol: 20 mg

Keywords: Don't skip the orange zest! It's a game-changer for flavor. Always zest before juicing to make it easier.

Did you make this recipe?

Share a photo and tag us — we can't wait to see what you've made!

Zesty Lemon Poppy Seed Delight

One rainy afternoon, I found myself in my grandmother’s cozy kitchen, the kind that always smelled like warmth and love. She was whipping up her famous Lemon Poppy Seed Loaf, a recipe that had been passed down through generations. As the batter came together, the zesty aroma of fresh lemons filled the air, mingling perfectly with the nutty fragrance of poppy seeds. I can still picture her, apron-clad, as she expertly drizzled a vibrant citrus icing over the loaf, creating a glossy, sun-kissed finish that beckoned us to dive in. It was a moment that sparked my own passion for baking, and this recipe has become a cherished staple in my home ever since.

When you take a bite of this Lemon Poppy Seed Loaf, it’s like a burst of sunshine on your palate. The loaf is beautifully golden, with a tender crumb that melts in your mouth. Each slice is speckled with tiny poppy seeds, adding a delightful crunch that contrasts beautifully with the tangy sweetness of the lemon. And that citrus icing? It’s the finishing touch that elevates this loaf from ordinary to extraordinary, with its bright, zesty flavor dancing on your taste buds.

This recipe stands out because it embraces simplicity while delivering on flavor. I’ve added a hint of vanilla to the batter, enhancing the overall taste and making it even more indulgent. Trust me, once you make this Lemon Poppy Seed Loaf With Citrus Icing, it’ll become a go-to in your baking repertoire.

So, let me show you exactly how to make it!

Zesty Lemon Poppy Seed Delight

Why You’ll Love This Recipe

  • Moist and tender crumb that melts in your mouth, thanks to the perfect balance of butter and buttermilk.
  • Bright, zesty lemon flavor paired with crunchy poppy seeds, creating a delightful texture and taste experience.
  • Easy to whip up in just about an hour, perfect for last-minute gatherings or a cozy afternoon treat.
  • Budget-friendly with everyday ingredients, making it an accessible option for all home bakers.
  • The citrus icing adds a sweet tang that elevates the loaf, turning a simple recipe into a showstopper!

Ingredients

  • 1 ½ cups (190g) all-purpose flour
  • 1 teaspoon baking powder
  • ½ teaspoon baking soda
  • ½ teaspoon salt
  • 3 tablespoons poppy seeds
  • ½ cup (115g) unsalted butter, softened to room temperature
  • 1 cup (200g) granulated sugar
  • 2 large eggs
  • 1 teaspoon vanilla extract
  • 1 teaspoon lemon zest (from about 1 medium lemon)
  • ½ cup (120ml) buttermilk
  • 2 tablespoons fresh lemon juice

For the Citrus Icing:

  • 1 cup (120g) powdered sugar
  • 2 tablespoons fresh lemon juice
  • 1 tablespoon orange juice
  • 1 teaspoon lemon zest (for garnish, optional)

Let’s dive into the key ingredients that make this Lemon Poppy Seed Loaf so special. The all-purpose flour provides the structure and base for the loaf, while the baking powder and baking soda ensure it rises perfectly, giving the loaf a light texture. For a gluten-free variation, you could substitute the flour with a gluten-free all-purpose blend. Poppy seeds not only add a delightful crunch but also contribute to the unique flavor profile that pairs well with the citrus notes.

Unsalted butter is crucial for achieving the buttery richness that makes this loaf so moist. If you’re looking for a dairy-free option, coconut oil or a vegan butter can be used instead. The buttermilk is another essential component, providing acidity that activates the baking soda for a fluffy texture. If you don’t have buttermilk on hand, you can easily make a substitute by mixing ½ cup of milk with 1 tablespoon of vinegar or lemon juice and letting it sit for about 5 minutes.

Step-by-Step Instructions

  1. Preheat your oven to 350°F (175°C). Grease a 9×5-inch loaf pan or line it with parchment paper for easy removal later.
  2. In a medium mixing bowl, whisk together 1 ½ cups of all-purpose flour, 1 teaspoon of baking powder, ½ teaspoon of baking soda, ½ teaspoon of salt, and 3 tablespoons of poppy seeds. This helps to evenly distribute the baking agents and ensures a uniform rise.
  3. In a large mixing bowl, cream together ½ cup of softened unsalted butter and 1 cup of granulated sugar using an electric mixer on medium speed for about 3-4 minutes, until the mixture is light and fluffy. Make sure to scrape down the sides of the bowl occasionally.
  4. Add 2 large eggs, 1 teaspoon of vanilla extract, and 1 teaspoon of lemon zest to the creamed butter and sugar, mixing until fully combined. You want a smooth consistency, so ensure there are no lumps of butter.
  5. In a small bowl, combine ½ cup of buttermilk and 2 tablespoons of fresh lemon juice. Alternately add the dry ingredients and buttermilk mixture to the butter mixture, starting and ending with the dry ingredients. Mix just until combined; do not overmix, as this can lead to a dense loaf.
  6. Pour the batter into the prepared loaf pan. Smooth the top with a spatula, ensuring it’s even. Bake in the preheated oven for 50-60 minutes, or until a toothpick inserted in the center comes out clean. The edges should be lightly golden brown, and the center should feel just set.
  7. Once baked, remove the loaf from the oven and allow it to cool in the pan for about 10 minutes. Then, transfer it to a wire rack to cool completely. Resist the urge to slice too soon, as it will be crumbly if it’s still warm.
  8. While the loaf is cooling, prepare the citrus icing. In a medium bowl, whisk together 1 cup of powdered sugar, 2 tablespoons of fresh lemon juice, and 1 tablespoon of orange juice until smooth. If the icing is too thick, you can add a little more juice to reach your desired consistency.
  9. Once the loaf is completely cool, drizzle the citrus icing over the top. If you like, sprinkle with an additional teaspoon of lemon zest for an extra pop of flavor and color.

Pro Tips for the Best Lemon Poppy Seed Loaf With Citrus Icing

  • Be careful not to overmix your batter; this is a common mistake that can lead to a dense loaf. Mix just until the dry ingredients are incorporated for a light and fluffy texture.
  • Use room temperature ingredients, especially the butter and eggs. This helps to create a smoother batter and ensures even baking. Take your eggs out of the fridge about 30 minutes before you start.
  • For a more pronounced lemon flavor, consider adding a little lemon extract in addition to the zest and juice. Just a half teaspoon can elevate the citrus notes significantly.
  • When measuring your flour, spoon it into the measuring cup and level it off with a knife instead of scooping directly from the bag. This prevents packing and ensures you don’t end up with a dry loaf.
  • Invest in a good quality loaf pan; it makes a difference in heat distribution, which ensures even baking. If your pan is dark-coated, reduce the oven temperature by 25°F to prevent over-browning.

Variations & Serving Ideas

For a delightful twist, consider adding blueberries or raspberries to the batter for a fruity burst of flavor. You can also experiment with different citrus fruits—try lime or grapefruit zest and juice for a refreshing change. For a healthier option, substitute half of the all-purpose flour with whole wheat flour for added fiber without compromising too much on texture.

This Lemon Poppy Seed Loaf pairs beautifully with a light salad, such as a mixed greens salad with a vinaigrette, or a cup of tea for a cozy afternoon treat. It also complements a creamy cheese platter, as the acidity of the loaf balances rich cheeses perfectly. Lastly, a scoop of vanilla ice cream on the side creates a delightful contrast of temperatures and flavors!

Storage, Make-Ahead & Reheating

This Lemon Poppy Seed Loaf can be stored at room temperature for up to 3 days if wrapped tightly in plastic wrap. If you want to keep it longer, it freezes well for up to 3 months. To freeze, wrap the loaf tightly in plastic wrap and then in aluminum foil to prevent freezer burn.

When you’re ready to enjoy it again, simply thaw it in the fridge overnight. Reheat individual slices in the microwave for 15-20 seconds or in a toaster oven until warmed through. Interestingly, many people find that this loaf tastes even better the next day, as the flavors have time to meld!

Frequently Asked Questions

Can I make Lemon Poppy Seed Loaf With Citrus Icing ahead of time?

Yes — in fact, it tastes even better the next day! You can make the loaf a day in advance, allowing the flavors to develop. Just be sure to store it in an airtight container to maintain its moisture.

Can I substitute the poppy seeds?

Absolutely! If you don’t have poppy seeds on hand or prefer an alternative, you can use sesame seeds for a similar crunch or omit them entirely for a smooth loaf.

What can I use instead of buttermilk?

If you don’t have buttermilk, you can easily create a substitute by mixing ½ cup of milk (dairy or plant-based) with 1 tablespoon of vinegar or lemon juice. Let it sit for 5 minutes before using in the recipe.

How can I make this recipe gluten-free?

To make a gluten-free version of this Lemon Poppy Seed Loaf, substitute the all-purpose flour with a gluten-free all-purpose flour blend. Just ensure that the blend contains a binding agent like xanthan gum for the best results.

What is the best way to store leftover loaf?

Leftover Lemon Poppy Seed Loaf should be stored in an airtight container at room temperature for up to 3 days. For longer storage, wrap it tightly and freeze for up to 3 months. Thaw it before serving for the best texture.

Zesty Lemon Poppy Seed Delight

Final Thoughts

The Lemon Poppy Seed Loaf with Citrus Icing is truly a delightful treat that brings a burst of brightness to any occasion. The zesty lemon flavor combined with the subtle crunch of poppy seeds creates a satisfying balance, while the citrus icing adds a touch of sweetness that perfectly complements the loaf’s tanginess.

This is the kind of recipe I come back to again and again, especially when I want to brighten up a gloomy day or celebrate a small victory. The aroma that fills the kitchen as it bakes is absolutely heavenly! I encourage you to give this recipe a try; you might just find it becoming a beloved staple in your home. Don’t forget to share your results or even add your own unique twist—I can’t wait to see what you create!

Print
clock clock iconcutlery cutlery iconflag flag iconfolder folder iconinstagram instagram iconpinterest pinterest iconfacebook facebook iconprint print iconsquares squares iconheart heart iconheart solid heart solid icon

Lemon Poppy Seed Loaf


  • Author: Lily author
  • Total Time: 25 minute
  • Yield: 1 loaf 1x
Pin Recipe
Print Recipe

Description

This Lemon Poppy Seed Loaf is a delightful treat that combines zesty lemon flavor with crunchy poppy seeds. Topped with a citrus icing, it’s perfect for any occasion.


Ingredients

Scale
  • 1 ½ cups (190g) all-purpose flour
  • 1 teaspoon baking powder
  • ½ teaspoon baking soda
  • ½ teaspoon salt
  • 3 tablespoons poppy seeds
  • ½ cup (115g) unsalted butter, softened to room temperature
  • 1 cup (200g) granulated sugar
  • 2 large eggs
  • 1 teaspoon vanilla extract
  • 1 teaspoon lemon zest (from about 1 medium lemon)
  • ½ cup (120ml) buttermilk
  • 2 tablespoons fresh lemon juice
  • 1 cup (120g) powdered sugar
  • 2 tablespoons fresh lemon juice
  • 1 tablespoon orange juice
  • 1 teaspoon lemon zest (for garnish, optional)

Instructions

  1. Preheat your oven to 350°F (175°C). Grease a 9×5-inch loaf pan or line it with parchment paper for easy removal later.
  2. In a medium mixing bowl, whisk together 1 ½ cups of all-purpose flour, 1 teaspoon of baking powder, ½ teaspoon of baking soda, ½ teaspoon of salt, and 3 tablespoons of poppy seeds. This helps to evenly distribute the baking agents and ensures a uniform rise.
  3. In a large mixing bowl, cream together ½ cup of softened unsalted butter and 1 cup of granulated sugar using an electric mixer on medium speed for about 3-4 minutes, until the mixture is light and fluffy. Make sure to scrape down the sides of the bowl occasionally.
  4. Add 2 large eggs, 1 teaspoon of vanilla extract, and 1 teaspoon of lemon zest to the creamed butter and sugar, mixing until fully combined. You want a smooth consistency, so ensure there are no lumps of butter.
  5. In a small bowl, combine ½ cup of buttermilk and 2 tablespoons of fresh lemon juice. Alternately add the dry ingredients and buttermilk mixture to the butter mixture, starting and ending with the dry ingredients. Mix just until combined; do not overmix, as this can lead to a dense loaf.
  6. Pour the batter into the prepared loaf pan. Smooth the top with a spatula, ensuring it’s even. Bake in the preheated oven for 50-60 minutes, or until a toothpick inserted in the center comes out clean. The edges should be lightly golden brown, and the center should feel just set.
  7. Once baked, remove the loaf from the oven and allow it to cool in the pan for about 10 minutes. Then, transfer it to a wire rack to cool completely. Resist the urge to slice too soon, as it will be crumbly if it’s still warm.
  8. While the loaf is cooling, prepare the citrus icing. In a medium bowl, whisk together 1 cup of powdered sugar, 2 tablespoons of fresh lemon juice, and 1 tablespoon of orange juice until smooth. If the icing is too thick, you can add a little more juice to reach your desired consistency.
  9. Once the loaf is completely cool, drizzle the citrus icing over the top. If you like, sprinkle with an additional teaspoon of lemon zest for an extra pop of flavor and color.
  • Prep Time: 15 mins
  • Cook Time: 50-60 mins
  • Category: Dessert
  • Method: Baking
  • Cuisine: American

Nutrition

  • Serving Size: 1 slice
  • Calories: 200
  • Sugar: 15 g
  • Sodium: 150 mg
  • Fat: 8 g
  • Saturated Fat: 5 g
  • Unsaturated Fat: 3 g
  • Trans Fat: 0 g
  • Carbohydrates: 30 g
  • Fiber: 1 g
  • Protein: 3 g
  • Cholesterol: 40 mg

Keywords: Be careful not to overmix your batter; this is a common mistake that can lead to a dense loaf. Use room temperature ingredients for a smoother batter and even baking.

Did you make this recipe?

Share a photo and tag us — we can't wait to see what you've made!

  • Privacy Policy
  • Terms Of Service
  • Contact
  • About
  • GDPR

Copyright © 2025 Homesmad