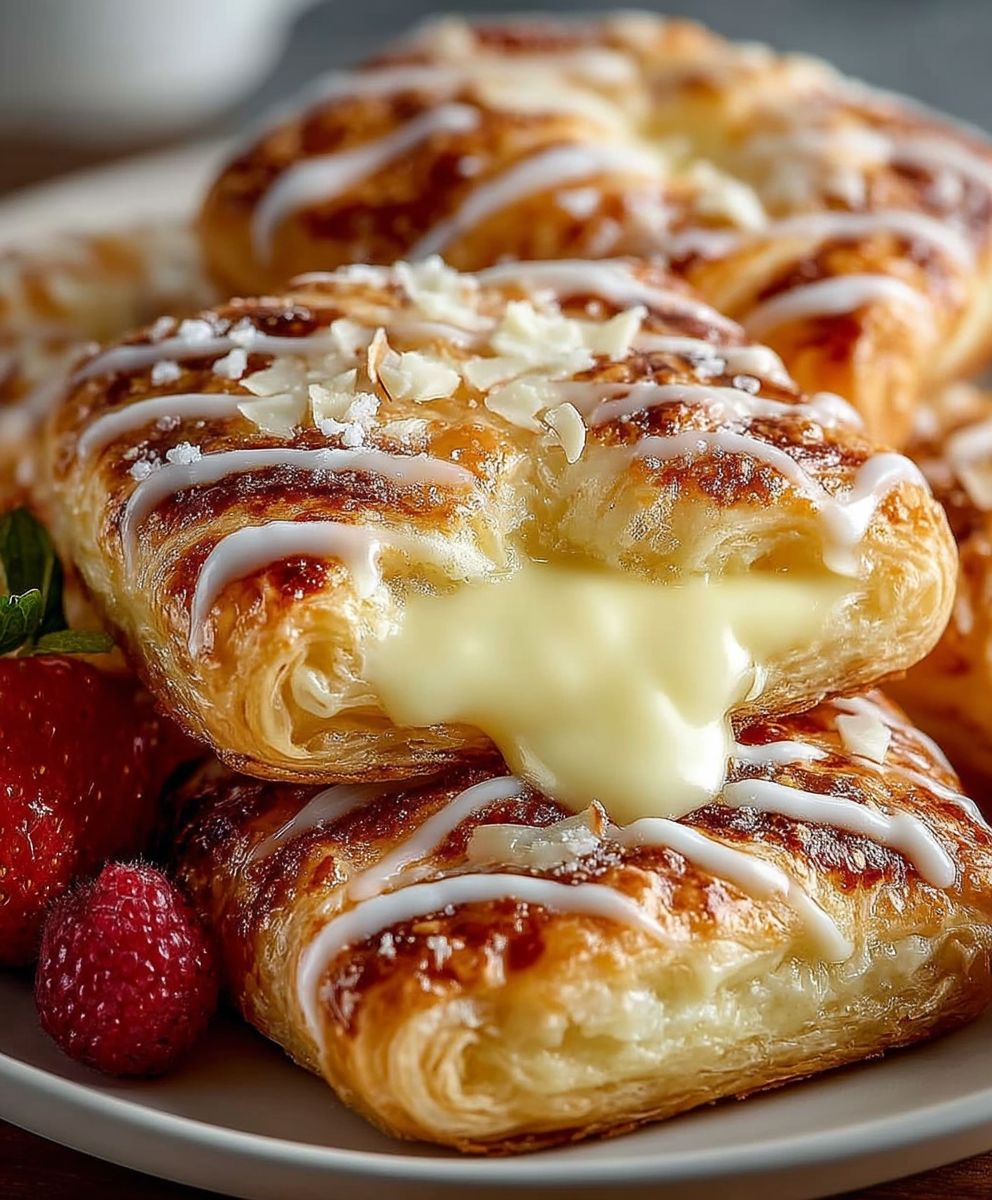
Easy Cheese Danish: the mere mention of it conjures images of flaky pastry, creamy filling, and a dusting of sweet powdered sugar. Have you ever craved a bakery-worthy treat without the fuss of complicated recipes? Well, you’re in the right place! I’m about to share a recipe that will have you whipping up these delightful pastries in no time.
The Danish pastry, or “wienerbrød” as it’s known in Denmark, has a fascinating history. Despite its name, it actually originated in Austria! Bakers from Vienna brought their techniques to Denmark in the mid-19th century, and the Danes quickly adapted and perfected the recipe, creating the delicious pastry we know and love today. While traditionally made with layers upon layers of laminated dough, this easy cheese danish recipe simplifies the process without sacrificing flavor or that signature flaky texture.
What makes the cheese danish so irresistible? It’s the perfect combination of textures and tastes. The slightly crisp, buttery pastry gives way to a smooth, rich, and subtly tangy cheese filling. It’s a treat that’s both comforting and elegant, perfect for breakfast, brunch, or a sweet afternoon snack. Plus, this simplified version is so convenient to make, you can satisfy your cravings any time!

Ingredients:
- 1 package (8 ounces) refrigerated crescent roll dough
- 4 ounces cream cheese, softened
- 1/4 cup granulated sugar
- 1/2 teaspoon vanilla extract
- 1 egg, beaten
- Optional: Fruit preserves (strawberry, raspberry, apricot), for topping
- Optional: Powdered sugar, for dusting
Preparing the Cream Cheese Filling
Okay, let’s start with the heart of our Easy Cheese Danish – the creamy, dreamy filling! This is where the magic happens, and it’s surprisingly simple to whip up.
- Soften the Cream Cheese: This is crucial! You want your cream cheese to be nice and soft so it blends smoothly with the other ingredients. If you’re short on time, you can microwave it for about 15-20 seconds, but keep a close eye on it to prevent it from melting. It should be soft enough to easily stir with a spoon.
- Combine Cream Cheese and Sugar: In a medium-sized bowl, add your softened cream cheese and granulated sugar. Using an electric mixer (handheld or stand mixer), beat the cream cheese and sugar together until they are light and fluffy. This usually takes about 2-3 minutes. You can also do this by hand with a whisk, but it will require a bit more elbow grease! Make sure there are no lumps of cream cheese remaining.
- Add Vanilla Extract: Pour in the vanilla extract and mix until well combined. The vanilla adds a lovely warmth and depth of flavor to the filling. Don’t skip this step!
- Incorporate the Egg: Now, add the beaten egg to the cream cheese mixture. Mix until everything is thoroughly combined. The egg helps to bind the filling together and gives it a nice richness. Be careful not to overmix at this stage, as it can make the filling a bit too runny. Just mix until everything is just combined.
- Taste and Adjust: Give the filling a quick taste! If you prefer a sweeter filling, you can add a little more sugar. If you want a tangier flavor, you can add a tiny squeeze of lemon juice. This is your chance to customize the filling to your liking.
Assembling the Cheese Danishes
Now for the fun part – putting everything together! This is where your cheese danishes start to take shape and look like the delicious treats they’re destined to be.
- Preheat Oven and Prepare Baking Sheet: Preheat your oven to 375°F (190°C). Line a baking sheet with parchment paper. This will prevent the danishes from sticking and make cleanup a breeze. If you don’t have parchment paper, you can lightly grease the baking sheet.
- Unroll the Crescent Roll Dough: Carefully unroll the crescent roll dough onto a clean, flat surface. You should have one large sheet of dough. If the dough is perforated into triangles, gently pinch the seams together to create a solid sheet.
- Spread the Cream Cheese Filling: Evenly spread the cream cheese filling over the entire surface of the crescent roll dough, leaving a small border around the edges. This will prevent the filling from oozing out too much during baking.
- Optional: Add Fruit Preserves: If you’re using fruit preserves, now’s the time to add them! Spoon small dollops of your favorite preserves (strawberry, raspberry, or apricot work great) over the cream cheese filling. Don’t overdo it, as too much filling can make the danishes soggy.
- Roll Up the Dough: Starting from one long edge, carefully roll up the dough into a log. Try to roll it tightly to create a nice, even spiral.
- Slice the Log: Using a sharp knife, slice the log into approximately 1-inch thick slices. You should get about 8-10 slices, depending on the length of your log.
- Arrange on Baking Sheet: Place the sliced danishes onto the prepared baking sheet, leaving a little space between each one. This will allow them to bake evenly.
Baking the Cheese Danishes
Almost there! Now it’s time to bake these beauties until they’re golden brown and irresistible.
- Brush with Egg Wash: In a small bowl, whisk the remaining beaten egg. Brush the tops of the danishes with the egg wash. This will give them a beautiful golden-brown color and a slightly glossy finish.
- Bake: Place the baking sheet in the preheated oven and bake for 12-15 minutes, or until the danishes are golden brown and the filling is set. Keep a close eye on them, as baking times can vary depending on your oven.
- Cool: Once the danishes are baked, remove them from the oven and let them cool on the baking sheet for a few minutes before transferring them to a wire rack to cool completely.
Finishing Touches
These final touches are optional, but they really elevate the cheese danishes and make them look extra special.
- Dust with Powdered Sugar: Once the danishes are completely cooled, you can dust them with powdered sugar for a touch of sweetness and elegance. Simply sprinkle powdered sugar over the tops of the danishes using a sifter or a fine-mesh sieve.
- Drizzle with Glaze (Optional): For an extra touch of sweetness, you can drizzle the danishes with a simple glaze. To make the glaze, whisk together 1 cup of powdered sugar with 2-3 tablespoons of milk or lemon juice until smooth. Drizzle the glaze over the cooled danishes.
Serving Suggestions
These Easy Cheese Danishes are perfect for breakfast, brunch, or a sweet treat any time of day. Serve them warm or at room temperature. They’re also great for potlucks, parties, or any occasion where you want to impress your friends and family with a delicious homemade treat.
Storage Instructions
Store any leftover cheese danishes in an airtight container at room temperature for up to 2 days, or in the refrigerator for up to 4 days. They can also be frozen for longer storage. To freeze, wrap the danishes individually in plastic wrap and then place them in a freezer-safe bag or container. Thaw in the refrigerator before serving.
Tips and Tricks
- Don’t Overmix the Filling: Overmixing the cream cheese filling can make it too runny. Mix just until the ingredients are combined.
- Use Cold Crescent Roll Dough: Cold dough is easier to work with and will result in flakier danishes.
- Adjust Baking Time as Needed: Baking times can vary depending on your oven. Keep a close eye on the danishes and adjust the baking time as needed.
- Get Creative with Fillings: Feel free to experiment with different fillings! Try adding chocolate chips, nuts, or different types of fruit preserves.
- Make Ahead: You can assemble the danishes ahead of time and store them in the refrigerator until you’re ready to bake them. Just add a few minutes to the baking time.
Conclusion:
This Easy Cheese Danish recipe isn’t just another baked good; it’s a shortcut to pure, unadulterated joy. Seriously! From the flaky, golden crust to the creamy, sweet cheese filling, every bite is a little piece of heaven. And the best part? You don’t need to be a pastry chef to pull it off. This recipe is designed for busy people who crave deliciousness without the fuss. It’s a guaranteed crowd-pleaser, perfect for a weekend brunch, a special occasion, or even just a “treat yourself” kind of day.
But why is this recipe a must-try? Because it delivers maximum flavor with minimal effort. We’re talking about a fraction of the time and ingredients compared to traditional Danish pastries, but with all the satisfying taste. It’s the kind of recipe you’ll find yourself making again and again, not just because it’s easy, but because everyone will rave about it. Trust me, you’ll be fielding requests for this one!
Now, let’s talk about serving suggestions and variations. While these Easy Cheese Danishes are absolutely divine on their own, a few simple additions can elevate them even further. Consider a dusting of powdered sugar for an extra touch of sweetness. A dollop of your favorite fruit preserves – raspberry, apricot, or strawberry work beautifully – adds a burst of fruity flavor that complements the creamy cheese filling perfectly. For a more decadent treat, drizzle a simple glaze made from powdered sugar and milk over the cooled pastries.
Feeling adventurous? Try adding a sprinkle of chopped nuts, like almonds or pecans, before baking for a delightful crunch. Or, incorporate a hint of citrus zest – lemon or orange – into the cheese filling for a brighter, more aromatic flavor. You could even swirl in a spoonful of Nutella for a chocolatey twist that will have everyone begging for more. The possibilities are endless!
These Easy Cheese Danishes are also incredibly versatile. They’re fantastic warm, straight from the oven, but they’re equally delicious at room temperature. They can be made ahead of time and stored in an airtight container for a few days, making them perfect for entertaining. You can even freeze them for longer storage, ensuring you always have a sweet treat on hand. Just thaw them completely before serving.
I truly believe that everyone deserves a little bit of happiness in their lives, and sometimes, that happiness comes in the form of a warm, delicious pastry. This Easy Cheese Danish recipe is my way of sharing that happiness with you. So, go ahead, give it a try! I promise you won’t be disappointed.
And finally, I’d love to hear about your experience! Did you try the recipe? What variations did you make? What did your family and friends think? Share your photos and comments below. Let’s create a community of Easy Cheese Danish lovers and inspire each other with our delicious creations! Happy baking!
Easy Cheese Danish: The Simplest Recipe You’ll Ever Need
Easy cheese danishes with crescent roll dough, cream cheese filling, and optional fruit. Perfect for breakfast, brunch, or a sweet treat!
Ingredients
Instructions
Recipe Notes
- Don’t overmix the cream cheese filling.
- Use cold crescent roll dough for flakier danishes.
- Adjust baking time as needed, depending on your oven.
- Get creative with fillings! Try chocolate chips, nuts, or different fruit preserves.
- You can assemble the danishes ahead of time and store them in the refrigerator until you’re ready to bake them. Just add a few minutes to the baking time.
- For an extra touch of sweetness, you can drizzle the danishes with a simple glaze. To make the glaze, whisk together 1 cup of powdered sugar with 2-3 tablespoons of milk or lemon juice until smooth. Drizzle the glaze over the cooled danishes.
- Store any leftover cheese danishes in an airtight container at room temperature for up to 2 days, or in the refrigerator for up to 4 days. They can also be frozen for longer storage. To freeze, wrap the danishes individually in plastic wrap and then place them in a freezer-safe bag or container. Thaw in the refrigerator before serving.