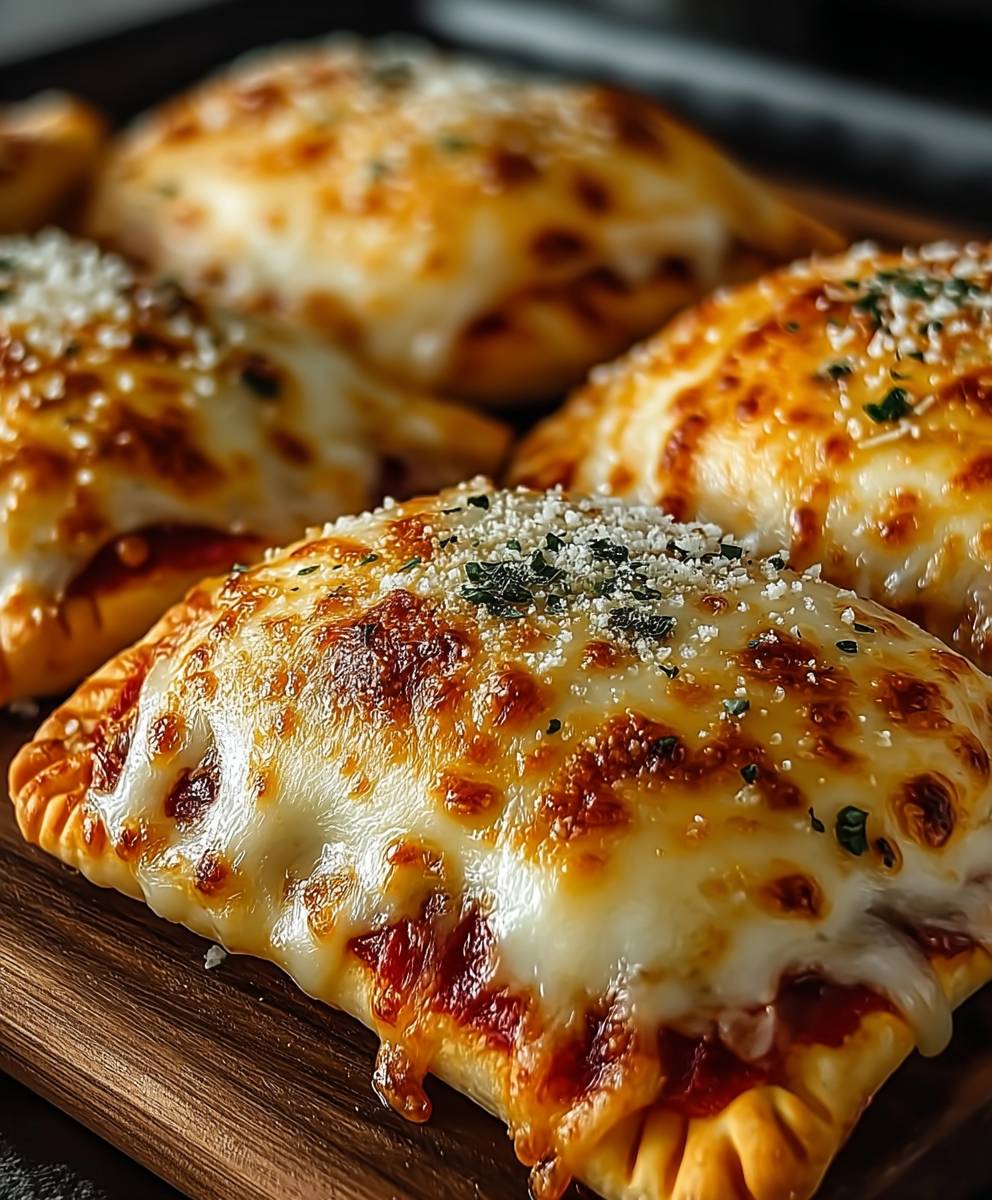
Easy cheesy pizza pockets – who doesn’t love the sound of that? Imagine biting into a warm, golden, perfectly portable parcel filled with gooey, melted cheese and your favorite pizza toppings. It’s pure comfort food bliss, and I’m thrilled to share my foolproof recipe with you!
While pizza itself has a rich history dating back to ancient flatbreads, the pizza pocket is a more modern invention, born from our desire for convenient and delicious snacks. Think of it as the ultimate grab-and-go meal, perfect for busy weeknights, lunchboxes, or even a fun party appetizer. It’s a delightful twist on the classic pizza, offering a satisfyingly self-contained experience.
People adore easy cheesy pizza pockets for so many reasons. First, there’s the taste: that irresistible combination of savory sauce, melted cheese, and your choice of toppings, all encased in a perfectly baked crust. Then there’s the texture – the satisfying crunch of the exterior giving way to the soft, cheesy interior. But perhaps the biggest draw is the convenience. They’re incredibly easy to make, customizable to your preferences, and portable enough to take anywhere. Get ready to experience pizza in a whole new, incredibly satisfying way!

Ingredients:
- 1 package (13.8 ounces) refrigerated pizza dough
- 1 cup pizza sauce
- 2 cups shredded mozzarella cheese
- 1/2 cup pepperoni slices, quartered
- 1/4 cup grated Parmesan cheese
- 1 tablespoon olive oil
- 1 teaspoon garlic powder
- 1/2 teaspoon dried oregano
- 1/4 teaspoon red pepper flakes (optional)
- 1 egg, beaten (for egg wash)
Preparing the Filling:
Alright, let’s get started with the heart of our pizza pockets – the delicious filling! This is where you can really customize things to your liking, but I’m going to walk you through my favorite combination.
- Prep the Pepperoni: First things first, grab your pepperoni slices and quarter them. This makes them easier to distribute evenly throughout the pizza pockets and ensures you get a little bit of pepperoni in every bite. Nobody wants a pocket with just cheese!
- Combine the Ingredients: In a medium-sized bowl, combine the pizza sauce, mozzarella cheese, quartered pepperoni, Parmesan cheese, garlic powder, dried oregano, and red pepper flakes (if you’re using them). Give it a good mix until everything is nicely incorporated. This ensures that each pocket has a balanced flavor profile.
- Taste and Adjust: Now, here’s the fun part – taste the filling! This is your chance to adjust the seasonings to your preference. If you want a little more kick, add a pinch more red pepper flakes. If you prefer a more garlicky flavor, add a little more garlic powder. Don’t be afraid to experiment!
Assembling the Pizza Pockets:
Now comes the slightly fiddly, but totally rewarding, part – assembling our pizza pockets. Don’t worry if your first few aren’t perfect; practice makes perfect, and they’ll still taste amazing!
- Preheat and Prep: Preheat your oven to 400°F (200°C). Line a baking sheet with parchment paper. This will prevent the pizza pockets from sticking and make cleanup a breeze.
- Unroll the Dough: Carefully unroll the refrigerated pizza dough onto a lightly floured surface. Try to avoid tearing the dough. If it’s a little sticky, sprinkle a bit more flour underneath.
- Cut the Dough: Using a pizza cutter or a sharp knife, cut the dough into equal-sized squares. The size of the squares will determine the size of your pizza pockets. I usually aim for squares that are about 4×4 inches. You should get around 8-12 squares, depending on the size of your dough sheet.
- Add the Filling: Place a spoonful (about 2-3 tablespoons) of the pizza filling in the center of each square. Be careful not to overfill them, or they’ll be difficult to seal.
- Seal the Pockets: Now, this is where the magic happens! Fold one corner of the square over to the opposite corner, forming a triangle. Press the edges firmly together to seal. You can use a fork to crimp the edges for extra security and a decorative touch. Make sure the edges are completely sealed to prevent the filling from leaking out during baking.
- Repeat: Repeat steps 4 and 5 for all the remaining dough squares and filling.
- Egg Wash: In a small bowl, whisk the egg with a tablespoon of water to create an egg wash. Brush the tops of the sealed pizza pockets with the egg wash. This will give them a beautiful golden-brown color and a slightly glossy finish.
- Sprinkle with Parmesan: Sprinkle the tops of the egg-washed pizza pockets with a little extra grated Parmesan cheese. This adds a nice cheesy flavor and visual appeal.
Baking the Pizza Pockets:
Almost there! Now it’s time to bake these little pockets of cheesy goodness to perfection.
- Arrange on Baking Sheet: Carefully transfer the assembled pizza pockets to the prepared baking sheet, leaving a little space between each one. This allows for even baking.
- Bake: Bake in the preheated oven for 15-20 minutes, or until the pizza pockets are golden brown and the filling is bubbly. Keep a close eye on them, as baking times may vary depending on your oven.
- Cool Slightly: Once they’re done, remove the baking sheet from the oven and let the pizza pockets cool slightly on the baking sheet for a few minutes before transferring them to a wire rack to cool completely. This prevents them from sticking to the baking sheet and allows the filling to set a bit.
Serving and Enjoying:
The best part! These pizza pockets are delicious served warm, straight from the oven. They’re perfect as a snack, appetizer, or even a light meal. Here are a few serving suggestions:
- Dipping Sauces: Serve with extra pizza sauce, marinara sauce, ranch dressing, or your favorite dipping sauce.
- Side Salad: Pair them with a simple side salad for a more complete meal.
- Party Platter: Arrange them on a platter with other appetizers for a party or gathering.
Tips and Variations:
Want to make these pizza pockets even more amazing? Here are a few tips and variations to try:
- Different Cheeses: Experiment with different types of cheese, such as provolone, cheddar, or a blend of Italian cheeses.
- Vegetarian Option: Omit the pepperoni and add your favorite vegetables, such as mushrooms, onions, bell peppers, or olives.
- Spicy Kick: Add a pinch of cayenne pepper or a dash of hot sauce to the filling for a spicy kick.
- Different Dough: Use homemade pizza dough or store-bought puff pastry for a different texture.
- Air Fryer: You can also cook these in an air fryer! Preheat your air fryer to 375°F (190°C) and cook for 8-10 minutes, or until golden brown.
- Freezing: These pizza pockets freeze well! Assemble them, but don’t bake them. Place them on a baking sheet and freeze until solid. Then, transfer them to a freezer bag or container. When ready to bake, bake from frozen for 20-25 minutes, or until golden brown.
Troubleshooting:
Sometimes things don’t go exactly as planned. Here are a few common issues and how to fix them:
- Filling Leaking Out: Make sure the edges of the pizza pockets are completely sealed. If the filling is too wet, drain off some of the excess liquid before filling the pockets.
- Dough Tearing: If the dough is tearing, it may be too cold. Let it sit at room temperature for a few minutes to soften slightly. Also, be gentle when unrolling and cutting the dough.
- Pizza Pockets Not Browning: Make sure your oven is preheated to the correct temperature. If the pizza pockets are not browning, brush them with a little more egg wash.
- Pizza Pockets Burning: If the pizza pockets are browning too quickly, reduce the oven temperature slightly or cover them loosely with aluminum foil.
Nutritional Information (Approximate):
Please note that the nutritional information is an estimate and may vary depending on the specific ingredients used.
- Calories: Approximately 250-300 per pizza pocket
- Fat: 12-15 grams
- Saturated Fat: 6-8 grams
- Cholesterol: 40-50 mg
- Sodium: 400-500 mg
- Carbohydrates: 25-30 grams
- Fiber: 1-2 grams
- Sugar: 3-5 grams
- Protein: 10-12 grams
Enjoy your homemade pizza pockets! I hope you and your family love them as much as we do!
Conclusion:
And there you have it! These easy cheesy pizza pockets are truly a must-try for anyone craving a comforting, customizable, and incredibly satisfying snack or meal. I know, I know, I might be biased, but seriously, the combination of that warm, flaky crust and the gooey, flavorful filling is simply irresistible. It’s the kind of recipe that becomes a family favorite, requested time and time again.
But why are these pizza pockets so special? Well, beyond the sheer deliciousness, they’re incredibly versatile. Need a quick lunch for the kids? Pizza pockets to the rescue! Hosting a casual get-together? These are always a hit. Want a fun and interactive cooking activity? Get the whole family involved in assembling their own personalized pockets!
Speaking of personalization, the possibilities are endless! While I’ve shared my go-to recipe, feel free to experiment with different fillings. Craving something meaty? Add cooked sausage, pepperoni, or ground beef. Prefer a vegetarian option? Load them up with mushrooms, bell peppers, onions, and spinach. You can even get creative with the cheese! Try a blend of mozzarella and provolone for extra stretch, or add a sprinkle of parmesan for a sharper flavor.
Serving Suggestions and Variations:
For a complete meal, serve these pizza pockets with a side salad and a dipping sauce of your choice. Marinara sauce is a classic, of course, but ranch dressing, pesto, or even a spicy sriracha mayo would be fantastic.
Want to take your pizza pocket game to the next level? Consider these variations:
* Mini Pizza Pockets: Use smaller circles of dough to create bite-sized appetizers. Perfect for parties!
* Garlic Butter Crust: Brush the tops of the pockets with garlic butter before baking for an extra layer of flavor.
* Stuffed Crust Pizza Pockets: Add a string cheese stick along the edge of the dough before folding it over to create a cheesy stuffed crust.
* Air Fryer Pizza Pockets: For a quicker cooking time and extra crispy crust, try air frying these pockets. Just be sure to adjust the cooking time accordingly.
I truly believe that everyone should have this recipe in their repertoire. It’s easy, adaptable, and always a crowd-pleaser. Plus, it’s a fantastic way to use up leftover ingredients in your fridge.
So, what are you waiting for? Gather your ingredients, preheat your oven, and get ready to experience the joy of homemade pizza pockets. I promise you won’t be disappointed.
And now for the most important part: I want to hear from you! Once you’ve tried this recipe, please let me know what you think. Did you make any modifications? What were your favorite fillings? Share your photos and stories in the comments below. I’m always eager to learn from your experiences and see your creative variations. Happy baking, and enjoy your delicious, homemade easy cheesy pizza pockets! I can’t wait to see what you create!
Easy Cheesy Pizza Pockets: The Ultimate Guide to Homemade Goodness
Easy homemade pizza pockets filled with pizza sauce, mozzarella, pepperoni, and Parmesan. Great as a snack, appetizer, or light meal, customizable for any occasion.
Ingredients
Instructions
Recipe Notes
- Customization: Experiment with different cheeses, vegetables, or spices to create your own unique pizza pocket flavors.
- Freezing: Assemble pockets, but don’t bake. Freeze on a baking sheet until solid, then transfer to a freezer bag. Bake from frozen for 20-25 minutes.
- Air Fryer: Preheat air fryer to 375°F (190°C) and cook for 8-10 minutes, or until golden brown.
- Troubleshooting:
- Filling Leaking Out: Ensure edges are completely sealed. Drain excess liquid from filling.
- Dough Tearing: Let dough sit at room temperature to soften.
- Not Browning: Ensure oven is preheated. Brush with more egg wash.
- Burning: Reduce oven temperature or cover loosely with foil.