• Skip to primary navigation
  • Skip to main content
  • Skip to primary sidebar
Homesmad

Homesmad

  • Home
  • Breakfast & Brunch
  • Appetizers & Snacks
  • Dinner
  • Dessert
  • About
  • Privacy Policy
  • Contact
Homesmad
  • Home
  • Breakfast & Brunch
  • Appetizers & Snacks
  • Dinner
  • Dessert
  • About
  • Privacy Policy
  • Contact

Easy Das Butter Chicken: Velvety Tomato Butter Sauce

September 23, 2025 by Lily author

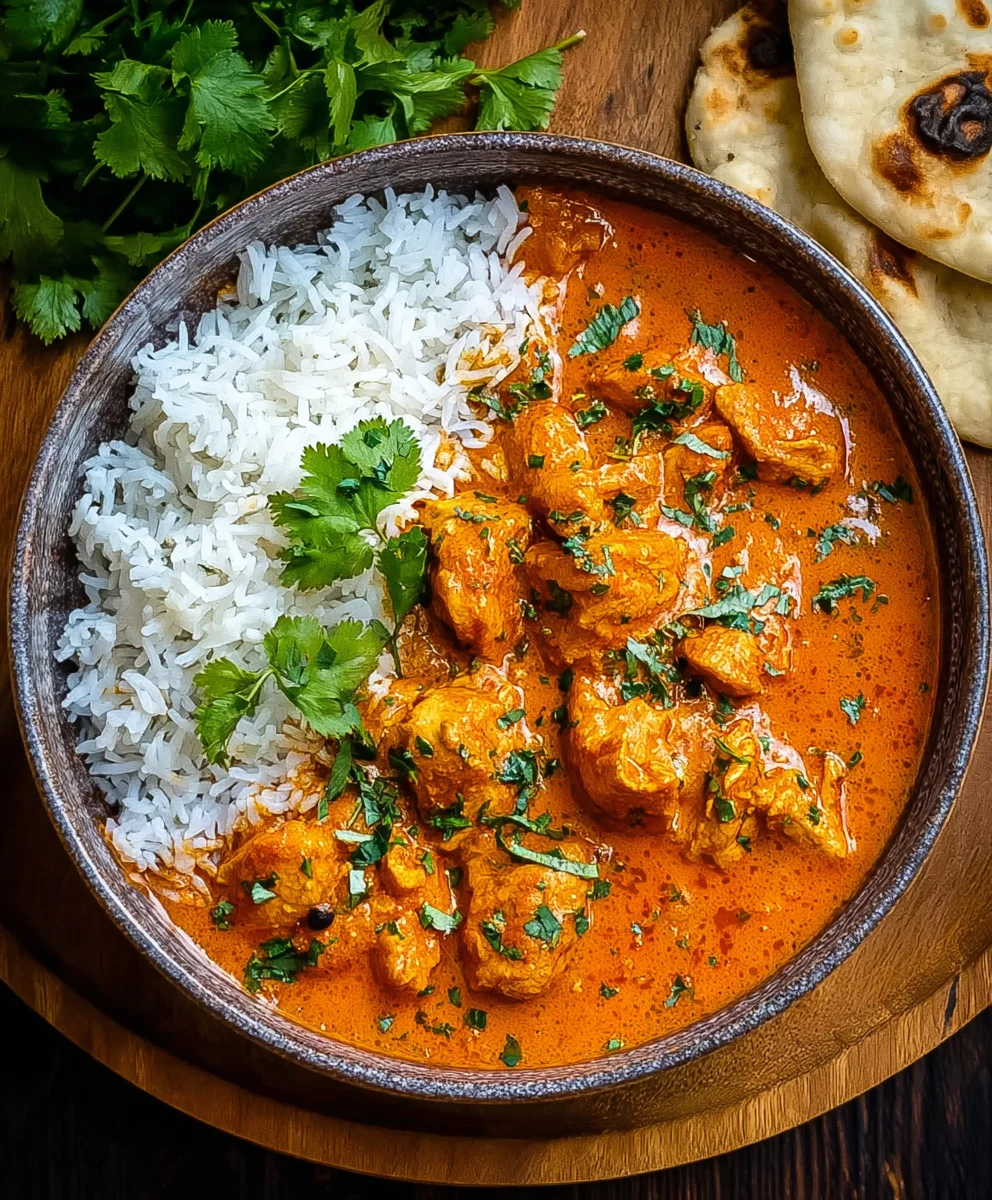
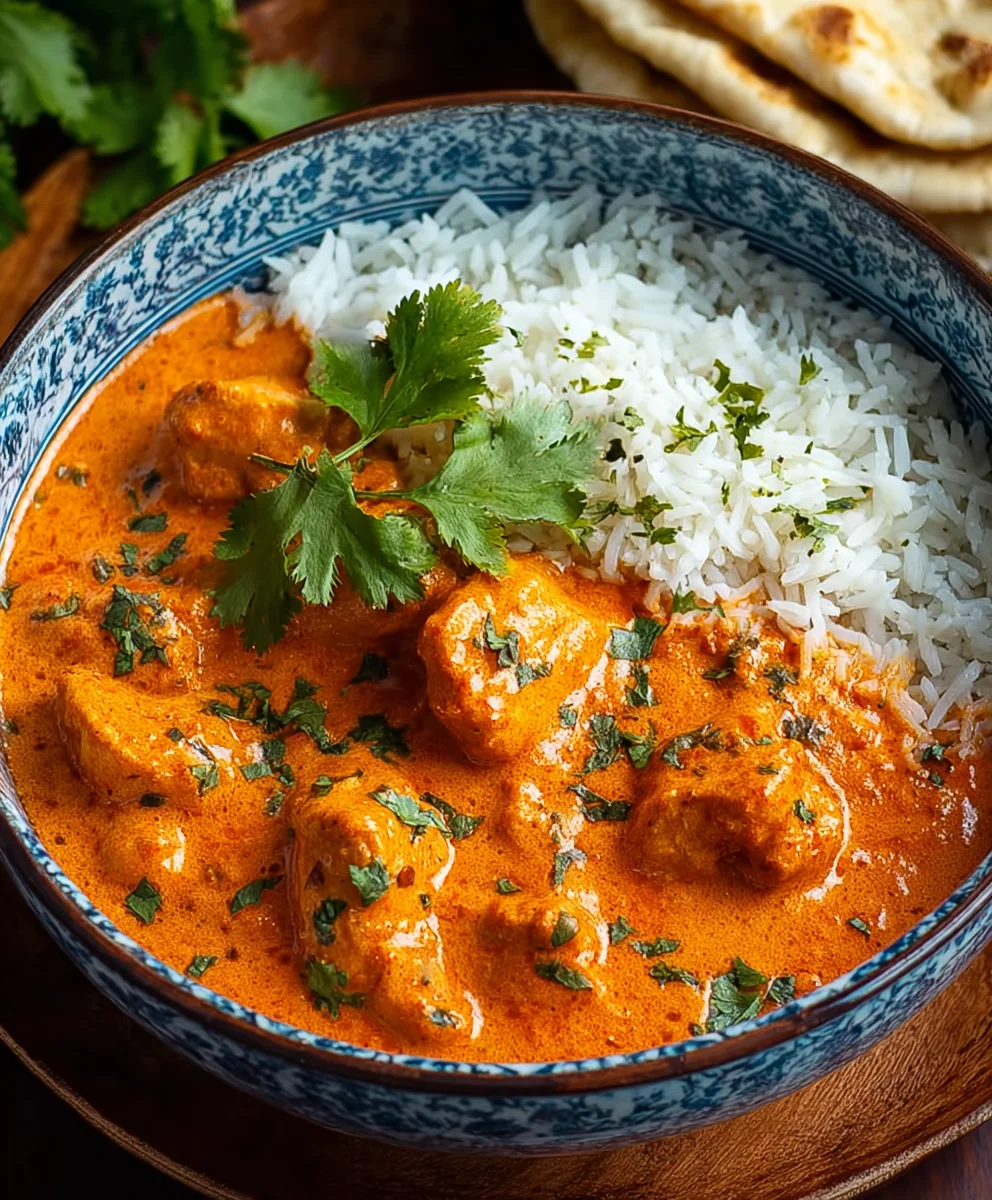
Das Butter Chicken, or Murgh Makhani as it’s known in its native India, is a dish that truly captures the heart of Indian culinary artistry. Imagine sinking your teeth into incredibly tender pieces of chicken, lovingly simmered in a rich, creamy tomato gravy, delicately spiced and imbued with a luxurious hint of butter and cream. It’s a symphony of flavors and textures that has garnered a devoted global following, and for very good reason!

Originating in Delhi in the 1950s, this iconic dish was born from the innovative spirit of the Moti Mahal restaurant post-partition. It quickly became a sensation, celebrated for its unique blend of tanginess from tomatoes, a gentle warmth from ginger and garlic, and the unparalleled smoothness that only fresh cream and butter can provide. People adore Das Butter Chicken not just for its exquisite taste and silky mouthfeel, but also for its comforting nature and remarkable versatility, making it a perfect meal for any occasion, from a family dinner to a special celebration. Its mild yet complex flavor profile appeals to nearly every palate, making it an approachable entry point for those new to Indian cuisine, while still satisfying seasoned connoisseurs.

Easy Das Butter Chicken: Velvety Tomato Butter Sauce this RECIPE

Ingredients:

Crafting the perfect Das Butter Chicken involves a harmonious blend of spices, rich tomatoes, and tender chicken. Here’s everything you’ll need for this truly indulgent experience:

For the Chicken Marinade:

  • Chicken: 1.5 kg (approximately 3.3 lbs) boneless, skinless chicken thighs or breasts, cut into 1.5-inch pieces. Thighs are recommended for their juiciness.
  • Plain Yogurt: ½ cup (120 ml) full-fat, plain yogurt. This helps tenderize the chicken and holds the spices.
  • Ginger-Garlic Paste: 2 tablespoons. Freshly made paste offers the best flavor.
  • Kashmiri Red Chili Powder: 1 tablespoon. Known for its vibrant red color and mild heat. If unavailable, use a mix of paprika and a pinch of cayenne.
  • Turmeric Powder: ½ teaspoon.
  • Garam Masala: 1 teaspoon. A warming spice blend crucial for authentic flavor.
  • Salt: 1 teaspoon, or to taste.
  • Lemon Juice: 1 tablespoon. Adds a touch of acidity and brightness.

For the Rich Butter Chicken Sauce Base:

  • Ghee or Unsalted Butter: 3 tablespoons ghee or 4 tablespoons unsalted butter, divided.
  • Yellow Onion: 1 large, finely chopped.
  • Ginger-Garlic Paste: 2 tablespoons.
  • Green Chilies: 1-2, deseeded and minced (optional, for a subtle heat).
  • Whole Spices:
    • 2-3 Green Cardamom Pods, lightly crushed.
    • 1 Cinnamon Stick (about 2 inches).
    • 2 Bay Leaves.
  • Ground Spices:
    • Coriander Powder: 1 tablespoon.
    • Cumin Powder: 1 teaspoon.
    • Kashmiri Red Chili Powder: 1 tablespoon (for color and mild heat).
    • Turmeric Powder: ½ teaspoon.
    • Garam Masala: 1 teaspoon.
  • Crushed Tomatoes: 1 can (400g / 14 oz) good quality crushed tomatoes, or 2 cups fresh tomato puree.
  • Cashew Nuts: ¼ cup (about 30g), unsalted and raw, soaked in hot water for 15-20 minutes. These create a creamy texture.
  • Sugar: 1-2 teaspoons, or to taste. Balances the acidity of the tomatoes.
  • Salt: 1 teaspoon, or to taste.
  • Water or Chicken Broth: ½ cup to 1 cup, as needed for blending.

For Finishing and Garnish:

  • Heavy Cream (or Half-and-Half): ½ cup (120 ml). For that signature richness and silky texture.
  • Unsalted Butter: 2-4 tablespoons, cold, cut into cubes. Stirred in at the end for ultimate creaminess and gloss.
  • Kasoori Methi (Dried Fenugreek Leaves): 1 teaspoon, crushed between your palms. This is a non-negotiable ingredient for authentic Das Butter Chicken flavor.
  • Fresh Coriander Leaves: ¼ cup, chopped, for garnish.
  • Julienned Ginger: 1 tablespoon, for garnish (optional).

Preparing the Chicken Marinade

The secret to incredibly tender and flavorful chicken in your Das Butter Chicken lies in a thorough and patient marinade. This step is foundational, infusing the chicken with a complex array of aromatic spices and ensuring it remains succulent through the cooking process.

  1. Prepare the Chicken: First, ensure your chicken pieces are uniformly cut, about 1.5 inches. This promotes even cooking. If you’re using chicken breasts, you might want to cut them slightly smaller as they tend to cook faster than thighs. Pat the chicken dry with paper towels; this helps the marinade adhere better and allows for better browning later.
  2. Combine Marinade Ingredients: In a large mixing bowl, combine the plain yogurt, ginger-garlic paste, Kashmiri red chili powder, turmeric powder, garam masala, salt, and lemon juice. Whisk everything together until you have a smooth, well-combined paste. The lemon juice not only adds a bright tang but also aids in tenderizing the chicken, while the yogurt acts as a natural tenderizer and helps the spices penetrate deep into the meat.
  3. Add the Chicken: Add the prepared chicken pieces to the bowl with the marinade. Using your hands (gloves recommended to avoid chili stains!), thoroughly mix the chicken, ensuring every piece is generously coated with the fragrant spice mixture. Massage the marinade into the chicken – this personal touch really helps the flavors sink in.
  4. Marinate for Flavor: Cover the bowl tightly with plastic wrap or transfer the chicken to a zip-top bag. Refrigerate for a minimum of 2 hours, but for the absolute best results, I highly recommend marinating it overnight (12-24 hours). The longer the chicken marinates, the more tender and flavorful it will become, making your Das Butter Chicken truly exceptional.

Cooking the Marinated Chicken

Once your chicken is beautifully marinated, the next step is to cook it until it’s tender and slightly charred, adding another layer of depth to the final dish. This process doesn’t fully cook the chicken but develops a wonderful crust and seals in the juices.

  1. Preheat Your Pan: Heat 1 tablespoon of ghee or 2 tablespoons of unsalted butter in a large heavy-bottomed pan, cast-iron skillet, or non-stick pan over medium-high heat until shimmering. You want a good hot pan to get a nice sear on the chicken.
  2. Sear the Chicken in Batches: Carefully add the marinated chicken pieces to the hot pan in a single layer, ensuring not to overcrowd the pan. Overcrowding will lower the pan’s temperature, steaming the chicken instead of searing it, and preventing that desirable golden-brown crust. You’ll likely need to do this in 2-3 batches.
  3. Cook Until Browned: Cook each batch for about 3-5 minutes per side, turning occasionally, until the chicken is nicely browned and slightly charred on the edges. The chicken doesn’t need to be cooked through at this stage, as it will finish cooking in the sauce. We are looking for that beautiful color and developing those rich, roasted flavors.
  4. Set Aside: Once a batch is seared, remove the chicken from the pan and transfer it to a plate. Repeat with the remaining chicken, adding more ghee or butter if needed. Reserve any juices left in the pan; these are packed with flavor and will be added to the sauce later.

Crafting the Luxurious Butter Chicken Sauce

The heart of Das Butter Chicken is its rich, creamy, and subtly sweet sauce. This section details how to build those complex layers of flavor, from sautéing aromatics to blending the perfect silky consistency.

  1. Sauté Aromatics and Whole Spices: In the same pan (or a large pot if your pan isn’t large enough for the sauce), melt the remaining 2 tablespoons of ghee or 2 tablespoons of unsalted butter over medium heat. Add the whole spices – green cardamom pods, cinnamon stick, and bay leaves. Sauté for about 30-60 seconds until they become fragrant. This gentle toasting releases their essential oils and infuses the ghee with their warm, complex aromas.
  2. Cook the Onions: Add the finely chopped yellow onion to the pot. Cook, stirring occasionally, for 8-10 minutes, or until the onions turn translucent and begin to caramelize to a light golden brown. Patience here is key; properly cooked onions form the sweet and savory foundation of your sauce.
  3. Add Ginger-Garlic Paste and Chilies: Stir in the 2 tablespoons of ginger-garlic paste and the minced green chilies (if using). Cook for another 1-2 minutes, stirring constantly, until the raw smell of ginger and garlic disappears. Be careful not to burn it.
  4. Introduce Ground Spices: Reduce the heat to low. Add the ground spices: coriander powder, cumin powder, Kashmiri red chili powder, turmeric powder, and garam masala. Stir continuously for just 30-60 seconds. This brief toasting of the ground spices in the warm oil releases their full flavor and aroma. Be very careful not to burn them, as burnt spices can make the sauce bitter.
  5. Incorporate Tomatoes and Cashews: Pour in the crushed tomatoes. Add the soaked cashew nuts (drained). Stir in the sugar and salt. Bring the mixture to a gentle simmer, then reduce the heat to low, cover, and cook for 15-20 minutes, stirring occasionally. During this time, the tomatoes will break down further, their acidity will mellow, and the cashews will soften, allowing all the flavors to meld beautifully. You’ll know it’s ready when the mixture thickens and you see some oil separating around the edges.
  6. Cool and Blend the Sauce: Remove the pot from the heat and let the sauce mixture cool down for about 10-15 minutes. This is important to prevent steam buildup and ensure safety when blending. Carefully transfer the slightly cooled mixture to a high-speed blender. Add ½ to 1 cup of water or chicken broth, starting with ½ cup, to aid in blending. Blend until the sauce is incredibly smooth and creamy, without any discernible pieces of onion or cashew. You might need to add a little more liquid to achieve a smooth consistency.
  7. Strain for Silky Perfection: This step is what truly elevates Das Butter Chicken to restaurant quality. Place a fine-mesh sieve over a clean large pot or back into the cleaned original pot. Pour the blended sauce through the sieve, using the back of a spoon or a spatula to press down on the solids and extract as much smooth sauce as possible. Discard any fibrous residue left in the sieve. This meticulous step ensures the incredibly silky, velvety texture that is characteristic of an authentic Butter Chicken.
  8. Gentle Simmer: Bring the strained sauce to a very gentle simmer over low heat. It should be thick and glossy.

Bringing it All Together: The Grand Finale of “Das Butter Chicken”

This is where all your hard work converges, and the individual components transform into the glorious, comforting dish known as Das Butter Chicken. The final simmering allows the flavors to deepen and the chicken to absorb the rich essence of the sauce.

  1. Combine Chicken and Sauce: Gently add the previously seared chicken pieces and any accumulated pan juices to the simmering, strained butter chicken sauce. Stir gently to ensure all the chicken is coated.
  2. Add Kasoori Methi and Cream: Crush the Kasoori Methi (dried fenugreek leaves) between your palms and sprinkle it into the sauce. This spice imparts a unique, slightly bitter, and aromatic flavor that is absolutely essential to the authentic taste of Das Butter Chicken. Pour in the heavy cream and stir gently until fully incorporated. The cream not only adds richness and body but also gives the sauce its characteristic pale orange hue.
  3. Simmer and Infuse: Continue to simmer the Das Butter Chicken on low heat, uncovered, for another 10-15 minutes. Stir occasionally to prevent sticking. During this simmering period, the chicken will finish cooking through, becoming incredibly tender, and will fully absorb the magnificent flavors of the sauce. The sauce will also thicken slightly and intensify in flavor.
  4. Stir in the Finishing Butter: Just before serving, remove the pot from the heat and stir in the cold, cubed unsalted butter. Let it melt slowly into the sauce, stirring gently. This final addition of butter is paramount; it adds an unparalleled richness, a beautiful gloss, and that signature ‘buttery’ mouthfeel that makes Das Butter Chicken so irresistible.
  5. Taste and Adjust: Taste the sauce and adjust seasonings as needed. You might want a little more salt, sugar to balance the acidity, or a pinch more garam masala if you desire a deeper spice note. Remember, the goal is a harmonious balance of sweet, tangy, and savory flavors.

Serving Suggestions and Tips for Your Perfect “Das Butter Chicken”

Your journey to making Das Butter Chicken is almost complete! Here are some final touches and tips to ensure your meal is a resounding success, from presentation to future enjoyment.

  1. Garnish with Freshness: Before serving, generously garnish your Das Butter Chicken with fresh chopped coriander leaves. For an extra touch of elegance and a burst of fresh flavor, sprinkle some julienned ginger on top. A final swirl of heavy cream or a tiny dollop of butter can also be added for visual appeal and an extra layer of decadence.
  2. Perfect Pairings:
    • Basmati Rice: Fluffy, aromatic basmati rice is the classic accompaniment, soaking up every drop of that rich sauce beautifully.
    • Naan Bread: Warm, soft naan (plain, garlic, or butter naan) is perfect for scooping up the sauce. You can even use it to wipe your plate clean!
    • Roti or Chapati: Lighter Indian flatbreads also make an excellent choice.
    • Cooling Side Salads: A simple cucumber and onion salad or a raita (yogurt with cucumber and spices) can offer a refreshing contrast to the richness of the butter chicken.
  3. Spice Level Adjustments:
    • For More Heat: If you prefer a spicier Das Butter Chicken, you can add more green chilies to the sauce base or include a pinch of cayenne pepper along with the Kashmiri chili powder. A small amount of red chili powder can also be added directly to the sauce during the final simmer.
    • For Less Heat: Omit the green chilies entirely. Kashmiri red chili powder primarily adds color rather than intense heat, so it’s usually safe for those sensitive to spice, but you can reduce its quantity slightly if preferred.
  4. Make-Ahead Magic: The sauce for Das Butter Chicken can be made a day or two in advance. Prepare the sauce up to the point before adding the chicken, cream, and final butter. Store it in an airtight container in the refrigerator. When ready to serve, gently reheat the sauce, then add the freshly cooked chicken, cream, and butter, and simmer as directed. The flavors often deepen beautifully overnight!
  5. Storage and Reheating: Leftover Das Butter Chicken stores wonderfully.
    • Refrigeration: Transfer any leftovers to an airtight container and refrigerate for up to 3-4 days.
    • Freezing: For longer storage, freeze in freezer-safe containers for up to 2-3 months. Thaw overnight in the refrigerator before reheating.
    • Reheating: Gently reheat on the stovetop over low heat, stirring occasionally, until heated through. If the sauce has thickened too much, you can add a splash of water or milk to reach your desired consistency. Avoid high heat, as it can cause the cream to separate.
  6. Chef’s Tip for Extra Richness: For an even more decadent version of Das Butter Chicken, if you have any leftover roasted chicken or Tandoori chicken, you can use that instead of pan-searing fresh marinated chicken. The smoky char of roasted chicken adds an incredible depth of flavor.

Enjoy the rich, creamy, and deeply satisfying flavors of your homemade Das Butter Chicken! It’s a dish that truly embodies comfort and luxury, perfect for any occasion.

Easy Das Butter Chicken: Velvety Tomato Butter Sauce

Conclusion:

Well, friends, we’ve journeyed through the steps of creating something truly magical in your own kitchen. After all that effort (which, let’s be honest, wasn’t that much for such a spectacular reward!), you’re now poised to experience one of the culinary world’s most beloved dishes. This isn’t just another chicken curry; this is a revelation, a dish that consistently tops popularity polls for a reason. Its unparalleled creaminess, the delicate balance of aromatic spices, and the tender, succulent chicken all combine to create a symphony of flavors that truly sings on your palate. I genuinely believe that making Das Butter Chicken at home is an experience every food lover deserves to have. It’s more than just a meal; it’s a hug in a bowl, a comforting embrace that warms you from the inside out, perfect for any occasion, from a cozy weeknight dinner to a celebratory gathering with loved ones. The satisfaction of creating such a restaurant-quality dish from scratch is truly immense, a testament to the power of fresh ingredients and a well-crafted recipe.

What makes this particular recipe a definite must-try, you ask? Beyond the incredible taste, it’s the sense of accomplishment you’ll feel. There’s something profoundly satisfying about transforming simple, wholesome ingredients into a dish that tastes like it came straight from your favorite Indian restaurant. The aroma alone, as it wafts through your home during the cooking process, is enough to get anyone excited for dinner. The vibrant colors of the rich, tomato-based sauce, the velvety texture, and that signature, slightly sweet and tangy undertone – it’s all there, waiting for you to create. This recipe is meticulously designed to be accessible, demystifying the process of Indian cooking without compromising on authenticity or the profound depth of flavor. Trust me, once you taste your homemade version, you’ll find yourself reaching for this recipe again and again, forever changed by the delicious simplicity of its execution and the profound satisfaction it brings. It truly is a dish that speaks volumes about the joy of home cooking and the transformative power of beautiful spices, bringing a piece of Indian culinary heritage right to your dining table.

Now, let’s talk about enhancing your experience even further. While Das Butter Chicken is utterly divine on its own, it truly shines when paired with the right accompaniments. My absolute go-to is a generous serving of fluffy basmati rice, which soaks up every last drop of that incredible, luscious sauce. But don’t stop there! Warm, pillowy naan bread is an absolute essential for scooping, ensuring no precious drop of sauce goes to waste. If you’re feeling adventurous, try garlic naan or even some crispy roti. For a refreshing counterpoint, a simple cucumber and onion raita (yogurt dip) can cut through the richness beautifully, adding a cooling element that balances the dish. And don’t forget a sprinkle of fresh cilantro for that burst of color and herbaceous freshness right before serving. For a complete meal, consider adding a side of steamed green beans or sautéed spinach; their slight bitterness offers a lovely contrast to the creamy chicken. Imagine a spread: the vibrant orange of the butter chicken, the pristine white of the rice, the golden-brown of the naan, and the fresh green of the cilantro. Pure culinary bliss awaits you!

Feeling creative? This recipe is incredibly versatile and truly encourages experimentation! If you prefer a bit more heat, don’t hesitate to add an extra pinch of cayenne pepper or a finely chopped green chili to the sauce – just adjust to your personal spice tolerance. For those who enjoy a smoky flavor, you could even grill your marinated chicken pieces lightly before adding them to the sauce; a quick marination in yogurt and spices before grilling would elevate it even further, mimicking the tandoor-cooked style often found in restaurants. And for my vegetarian friends, don’t feel left out! This sauce base is absolutely fantastic with paneer (Indian cheese) cubes, firm tofu (pressed and cubed to remove excess water), or even hearty chickpeas. Just substitute the chicken with your preferred protein and adjust cooking times accordingly. You can also toss in some colorful bell peppers, tender peas, or crunchy cauliflower florets during the simmering stage for added texture, nutrition, and visual appeal. The possibilities are truly endless, allowing you to tailor this classic dish to your personal taste and dietary preferences. It’s a recipe that encourages experimentation, inviting you to make it uniquely yours and truly reflective of your culinary style.

So, what are you waiting for? I wholeheartedly encourage you to roll up your sleeves, gather your ingredients, and dive into the delightful process of making this incredible dish. I promise you, the reward is well worth the journey. There’s nothing quite like the pride of serving a homemade meal that looks and tastes so professional, yet was created with love and care in your own kitchen. Once you’ve savored every bite, please, please, please come back and share your experience with me! I absolutely adore hearing about your kitchen adventures. Did you add a secret ingredient? Did you serve it with something unusual and delicious? What did your family and friends think? Tag me on social media or leave a comment below. Your stories, creative twists, and helpful tips are what make our cooking community so vibrant and inspiring. Let’s celebrate the joy of good food together, starting with your very own spectacular batch of Das Butter Chicken. Happy cooking, everyone!

People Also Ask (FAQs)

Is Butter Chicken supposed to be spicy?

Traditionally, Das Butter Chicken is known for its mild, rich, and creamy profile rather than intense heat. It gets its warmth from aromatic spices like garam masala, turmeric, and a touch of chili powder, but it’s generally not fiery. If you prefer more spice, you can absolutely customize it by adding extra cayenne pepper or a finely chopped green chili during the simmering stage. It’s all about personal preference, so feel free to adjust to your palate!

Can I make Butter Chicken ahead of time?

Absolutely! In fact, Das Butter Chicken often tastes even better the next day as the flavors have more time to meld and deepen. You can prepare the entire dish and store it in an airtight container in the refrigerator for up to 3-4 days. When reheating, do so gently on the stovetop over low heat, adding a splash of water or cream if it seems too thick. This makes it a fantastic meal prep option for busy weeknights, saving you time without sacrificing flavor.

What’s the best chicken to use for this recipe?

For the most tender and juicy results, I highly recommend using boneless, skinless chicken thighs. They stay incredibly moist and flavorful during cooking and absorb the rich sauce beautifully. Boneless, skinless chicken breasts can also be used, but be mindful not to overcook them, as they can dry out more easily. Cut your chosen chicken into 1-inch pieces for even cooking, ensuring every bite is perfect.

Can I make this recipe vegetarian?

Yes, you certainly can! The sauce base for Das Butter Chicken is incredibly versatile and pairs wonderfully with vegetarian alternatives. You can substitute the chicken with paneer (Indian cheese) cubes, firm tofu (pressed and cubed), or even hearty chickpeas. Simply add your chosen vegetarian protein during the last 10-15 minutes of simmering, allowing it to heat through and absorb all the delicious flavors. For extra veggies, consider adding bell peppers or cauliflower florets along with your protein.

How do I store and reheat leftover Butter Chicken?

Store any leftover Das Butter Chicken in an airtight container in the refrigerator for up to 3-4 days. To reheat, transfer the desired portion to a saucepan and warm gently over low heat on the stovetop. You might want to add a tablespoon or two of water or cream to loosen the sauce if it has thickened too much in the fridge. Alternatively, you can microwave it in a microwave-safe dish, stirring halfway through, until heated thoroughly. It also freezes beautifully for up to 2-3 months in freezer-safe containers, making it perfect for long-term meal planning.

What’s the difference between Butter Chicken and Chicken Tikka Masala?

While often confused due to their similar appearance and creamy tomato-based sauces, there are distinct differences. Das Butter Chicken (or Murgh Makhani) originated in Delhi, India, and typically features chicken marinated in yogurt and spices, then cooked in a rich, mild, and slightly sweet tomato-cream sauce with butter. Chicken Tikka Masala, on the other hand, is believed to have originated in the UK, often using tandoor-cooked (or grilled) chicken tikka pieces in a spicier, more robustly flavored tomato and onion-based sauce, which might also include cream or yogurt but generally has a more pronounced savory and sometimes smoky profile compared to the sweeter, milder Butter Chicken. Both are delicious, but they offer subtly different flavor experiences.


Easy Das Butter Chicken: Velvety Tomato Butter Sauce

Easy Das Butter Chicken: Velvety Tomato Butter Sauce

Das Butter Chicken, or Murgh Makhani, is a tender chicken dish simmered in a rich, creamy tomato gravy, delicately spiced with butter and cream. This recipe offers a symphony of flavors and textures, perfect for any occasion.

Prep Time
30 Minutes

Cook Time
15 Minutes

Total Time
45 Minutes

Servings
2-3 servings

Ingredients

  • 600g boneless, skinless chicken breast, diced
  • 150g full-fat plain yogurt
  • 1 large yellow onion, finely chopped
  • 2 cloves garlic, minced
  • 1 tablespoon grated ginger
  • 1 teaspoon turmeric powder
  • 1 teaspoon cumin powder
  • 2 teaspoons Garam Masala (divided)
  • 1 teaspoon sweet paprika powder
  • 1 teaspoon salt
  • 1 tablespoon lemon juice
  • 1 tablespoon oil
  • 2 tablespoons unsalted butter (for sauce base)
  • 1 teaspoon coriander powder
  • 1 can (400g / 14 oz) crushed tomatoes
  • ¼ cup (30g) unsalted raw cashew nuts, soaked
  • 1-2 teaspoons sugar
  • ½ to 1 cup water or chicken broth
  • ½ cup (120 ml) heavy cream
  • 1 teaspoon Kasoori Methi (dried fenugreek leaves)
  • 2 tablespoons cold unsalted butter (for finishing)

Instructions

  1. Step 1
    In a bowl, combine chicken with yogurt, half of the minced garlic (1 clove), half of the grated ginger (½ tbsp), sweet paprika, ½ teaspoon turmeric, 1 teaspoon Garam Masala, ½ teaspoon salt, and lemon juice. Mix well and marinate in the refrigerator for at least 2 hours, or ideally overnight (12-24 hours).
  2. Step 2
    Heat 1 tablespoon oil in a large pan over medium-high heat. Sear marinated chicken in batches until nicely browned and slightly charred on the edges. Remove chicken and set aside, reserving any pan juices.
  3. Step 3
    In the same pan, melt 2 tablespoons unsalted butter over medium heat. Sauté the finely chopped onion for 8-10 minutes until translucent and lightly golden. Add the remaining minced garlic (1 clove) and grated ginger (½ tbsp), cook for 1-2 minutes until fragrant.
  4. Step 4
    Reduce heat to low. Stir in coriander powder, cumin powder, the remaining ½ teaspoon turmeric, the remaining 1 teaspoon Garam Masala, and the remaining ½ teaspoon salt for 30-60 seconds. Pour in the crushed tomatoes, soaked cashew nuts (drained), sugar, and ½ to 1 cup water or chicken broth. Bring to a gentle simmer, then cover and cook for 15-20 minutes, stirring occasionally, until thickened.
  5. Step 5
    Remove the pot from heat and let the sauce mixture cool slightly (10-15 minutes). Transfer to a high-speed blender and blend until incredibly smooth. For a truly velvety texture, strain the blended sauce through a fine-mesh sieve into a clean pot.
  6. Step 6
    Bring the strained sauce to a very gentle simmer over low heat. Add the seared chicken pieces and any reserved pan juices. Crush Kasoori Methi between your palms and stir into the sauce. Pour in the heavy cream and stir gently. Simmer for 10-15 minutes, uncovered, allowing chicken to finish cooking and flavors to meld. Remove from heat and stir in 2 tablespoons cold, cubed unsalted butter until melted and incorporated. Taste and adjust seasonings as needed.
  7. Step 7
    Garnish with fresh chopped coriander leaves and julienned ginger (optional). Serve your Easy Das Butter Chicken hot with fluffy Basmati rice, naan bread, or roti.

Important Information

Nutrition Facts (Per Serving)

It is important to consider this information as approximate and not to use it as definitive health advice.

Allergy Information

Please check ingredients for potential allergens and consult a health professional if in doubt.

« Previous Post
Sticky Garlic Chicken Noodles Recipe: Easy Weeknight Dinner
Next Post »
Creamy Spinach And Ricotta Stuffed Shells Recipe

If you enjoyed this…

Ultimate Sourdough Pesto Grilled Cheese – Easy Recipe

Delicious Street Corn Chicken Bowl Recipe – Flavorful & Fresh

Creamy Beef Stroganoff with Egg Noodles

Creamy Beef Stroganoff with Egg Noodles – The Ultimate Comfort Food!

Primary Sidebar

Browse by Diet

BreakfastDinnerLunchDessertAppetizer

Sweet Peach Yogurt Parfait Delight

One of my fondest memories is from a lazy summer afternoon spent at my grandmother’s house. The sun filtered through the kitchen window, casting a warm glow over the table where she would create her culinary magic. It was during one of those blissful moments that I first tasted her Peach Yogurt Parfait with Honey and Granola. The sweet aroma of ripe peaches mingling with creamy yogurt and the crunch of granola was nothing short of heavenly. It felt like summer captured in a bowl, and I still remember the joy of diving in with a spoon, each layer revealing a new burst of flavor.

When I think about that parfait, I can almost hear the gentle hum of the bees outside, reminding me of the floral notes that honey brings to every bite. The vibrant yellows and soft oranges of the peaches contrast beautifully with the creamy white yogurt and the golden crunch of granola. It’s a dish that not only looks delightful but also tastes like a celebration of fresh, wholesome ingredients.

What makes my version of this Peach Yogurt Parfait special is the careful balance of flavors and textures. I use ripe, juicy peaches, drizzled with locally sourced honey, and a homemade granola that’s bursting with nuts and seeds for an extra crunch. It’s a simple dish, but every layer is crafted with love and attention.

Let me show you exactly how to make this delightful parfait, so you can bring a bit of that summer magic into your kitchen!

Sweet Peach Yogurt Parfait Delight

Why You’ll Love This Recipe

  • Delightfully creamy texture from the Greek yogurt, paired with the juicy sweetness of fresh peaches.
  • Ready in under 20 minutes, making it a quick and satisfying breakfast or snack option.
  • Budget-friendly, using common ingredients that you may already have in your pantry.
  • Customizable with your favorite granola and nuts, allowing you to tailor each parfait to your taste.
  • Perfectly balanced flavors with the bright acidity of lemon juice and the sweetness of honey enhancing the peaches.

Ingredients

  • For the Parfait:
  • 2 cups plain Greek yogurt (or vanilla yogurt for a sweeter option)
  • 2 large ripe peaches, diced (about 2 cups)
  • 1 tablespoon fresh lemon juice (to prevent browning of peaches)
  • 2 tablespoons honey (plus more for drizzling)
  • 1 teaspoon vanilla extract (optional for extra flavor)
  • For the Granola:
  • 1 cup granola (store-bought or homemade; see notes for a simple granola recipe)
  • 1/4 cup sliced almonds (optional for added crunch)
  • 1/4 cup shredded coconut (optional for added flavor)

Let’s dive into some key ingredients that make this Peach Yogurt Parfait so delightful! First, the Greek yogurt is not only creamy but also packed with protein, making it a satisfying option for breakfast or a snack. If you’re looking for a sweeter option, you can easily substitute it with vanilla yogurt, though it may alter the overall flavor balance. Next, the ripe peaches are the star of the show; their natural sweetness shines through, so I recommend choosing peaches that yield slightly to pressure, indicating they’re perfectly ripe. If peaches aren’t in season, feel free to use nectarines or even frozen peaches—just thaw them before use. Finally, honey adds a lovely floral sweetness that ties everything together. If you prefer, maple syrup can serve as a delicious substitute.

Step-by-Step Instructions

  1. Start by preparing the peaches. Wash them thoroughly, then slice and dice them into bite-sized pieces. In a medium bowl, toss the diced peaches with 1 tablespoon of fresh lemon juice to prevent browning. Set aside for about 5 minutes while the lemon juice works its magic.
  2. In a separate bowl, combine the Greek yogurt, 2 tablespoons of honey, and 1 teaspoon of vanilla extract if using. Stir the mixture until smooth and thoroughly blended. This should take about a minute. Avoid overmixing to maintain the creaminess of the yogurt.
  3. Now it’s time to layer your parfait. Grab a clear glass or bowl to showcase your beautiful creation. Start with a generous spoonful of the yogurt mixture at the bottom—about 1/4 cup will do. Use a spoon to spread it evenly.
  4. Add a layer of the diced peaches over the yogurt, ensuring they cover the yogurt completely. You might want to use about half of what you have prepared—roughly 1 cup. This layer should be visually appealing, so arrange the peaches neatly.
  5. Sprinkle 1/4 cup of granola over the peaches. This adds a delightful crunch. Make sure to distribute it evenly to ensure every bite has that satisfying texture. Avoid packing it down too tightly, as you want it to maintain its crunch.
  6. Repeat the layers: spoon in another 1/4 cup of yogurt, followed by another cup of peaches, and another sprinkle of granola. You should have at least two layers, but feel free to add more depending on your glass size.
  7. Finish off your parfait with a drizzle of honey on top for added sweetness and a touch of elegance. If you’re using sliced almonds or shredded coconut, sprinkle them on top now. It adds a lovely visual contrast and extra flavor.
  8. Serve immediately or refrigerate for up to 30 minutes before serving to allow the flavors to meld together. However, I recommend enjoying it fresh to maintain the granola’s crunch.

Pro Tips for the Best Peach Yogurt Parfait With Honey And Granola

  • Make sure to choose ripe peaches for the best flavor and texture. A common mistake is using unripe fruit, which can lead to a less enjoyable parfait. Look for peaches that are fragrant and slightly soft to the touch.
  • Use a clear glass to assemble your parfait; this not only makes for a beautiful presentation but also allows you to see the colorful layers, which adds to the enjoyment of eating it.
  • For an even creamier texture, consider whipping the Greek yogurt with a hand mixer for a couple of minutes before layering. This small adjustment makes a huge difference in mouthfeel.
  • Be mindful of the granola-to-yogurt ratio. Too much granola can overwhelm the parfait, while too little can make it feel too creamy. Aim for about 1/4 cup of granola per layer for the perfect balance.
  • If you’re making this for a gathering, consider preparing the yogurt and peaches ahead of time and layering them just before serving. This ensures the granola stays crunchy!

Variations & Serving Ideas

There are so many ways to get creative with your Peach Yogurt Parfait! For a tropical twist, swap out the peaches for mangoes or pineapples and top with coconut flakes. If you prefer a berry flavor, mix in some blueberries or strawberries with the peaches for added color and taste. For a nutty version, incorporate chopped walnuts or pecans instead of almonds.

As for serving ideas, this parfait pairs beautifully with a side of scrambled eggs for a hearty breakfast or fresh fruit salad for a light lunch. You might also enjoy it alongside whole grain toast with almond butter for an energizing snack. The contrast of flavors and textures will elevate your meal experience!

Storage, Make-Ahead & Reheating

The Peach Yogurt Parfait is best enjoyed fresh, but you can prepare some components ahead of time. Store the layered parfait in an airtight container in the refrigerator for up to 24 hours. However, be cautious; the granola may lose its crunch if stored too long. You can freeze the yogurt and peach mixture for up to 2 months; just remember to thaw it in the refrigerator overnight before serving.

If you plan to enjoy this dish the next day, it can taste even better as the flavors meld together. Just remember to add the granola right before serving to keep its delightful crunch!

Frequently Asked Questions

Can I make Peach Yogurt Parfait With Honey And Granola ahead of time?

Yes — in fact, it tastes even better the next day as the flavors meld. However, I recommend waiting to add the granola until just before serving to maintain its crunch.

What can I substitute for Greek yogurt?

If you prefer a lighter option, you can substitute Greek yogurt with regular yogurt or a dairy-free alternative like coconut yogurt. Just remember that this may alter the creaminess and flavor profile slightly.

Can I use frozen peaches for this parfait?

Absolutely! Just make sure to thaw the frozen peaches before using them. They will still add great flavor, though the texture may be slightly softer than fresh peaches.

How do I make the parfait vegan?

To make a vegan version, substitute the Greek yogurt with a plant-based yogurt alternative, and replace honey with maple syrup or agave nectar. This keeps the parfait sweet while adhering to a vegan diet.

What other fruits can I use in this recipe?

You can mix and match fruits based on your preference. Try using strawberries, blueberries, raspberries, or even bananas. Just make sure to adjust the lemon juice as needed to prevent browning.

Sweet Peach Yogurt Parfait Delight

Final Thoughts

The Peach Yogurt Parfait with Honey and Granola is a delightful blend of creamy yogurt, sweet peaches, and crunchy granola that creates a satisfying and nourishing treat. Each layer bursts with flavor, making it a perfect choice for breakfast or a light dessert.

This is the kind of recipe I come back to again and again, especially when I want something refreshing and wholesome to start my day. The harmony of sweet and tart flavors, combined with the delightful crunch, never fails to lift my spirits!

I encourage you to give this parfait a try and indulge in its comforting goodness. Feel free to share your results or even add your own twist—perhaps a sprinkle of cinnamon or a handful of nuts. Enjoy creating your perfect parfait!

Print
clock clock iconcutlery cutlery iconflag flag iconfolder folder iconinstagram instagram iconpinterest pinterest iconfacebook facebook iconprint print iconsquares squares iconheart heart iconheart solid heart solid icon

Peach Yogurt Parfait


  • Author: Lily author
  • Total Time: 15 minutes
  • Yield: 4 servings 1x
Pin Recipe
Print Recipe

Description

This Peach Yogurt Parfait combines creamy Greek yogurt, juicy peaches, and crunchy granola for a delightful treat. It’s a perfect breakfast or snack that captures the essence of summer in every bite.


Ingredients

Scale
  • For the Parfait:
  • 2 cups plain Greek yogurt (or vanilla yogurt for a sweeter option)
  • 2 large ripe peaches, diced (about 2 cups)
  • 1 tablespoon fresh lemon juice (to prevent browning of peaches)
  • 2 tablespoons honey (plus more for drizzling)
  • 1 teaspoon vanilla extract (optional for extra flavor)
  • For the Granola:
  • 1 cup granola (store-bought or homemade; see notes for a simple granola recipe)
  • 1/4 cup sliced almonds (optional for added crunch)
  • 1/4 cup shredded coconut (optional for added flavor)

Instructions

  1. Start by preparing the peaches. Wash them thoroughly, then slice and dice them into bite-sized pieces. In a medium bowl, toss the diced peaches with 1 tablespoon of fresh lemon juice to prevent browning. Set aside for about 5 minutes while the lemon juice works its magic.
  2. In a separate bowl, combine the Greek yogurt, 2 tablespoons of honey, and 1 teaspoon of vanilla extract if using. Stir the mixture until smooth and thoroughly blended. This should take about a minute. Avoid overmixing to maintain the creaminess of the yogurt.
  3. Now it’s time to layer your parfait. Grab a clear glass or bowl to showcase your beautiful creation. Start with a generous spoonful of the yogurt mixture at the bottom—about 1/4 cup will do. Use a spoon to spread it evenly.
  4. Add a layer of the diced peaches over the yogurt, ensuring they cover the yogurt completely. You might want to use about half of what you have prepared—roughly 1 cup. This layer should be visually appealing, so arrange the peaches neatly.
  5. Sprinkle 1/4 cup of granola over the peaches. This adds a delightful crunch. Make sure to distribute it evenly to ensure every bite has that satisfying texture. Avoid packing it down too tightly, as you want it to maintain its crunch.
  6. Repeat the layers: spoon in another 1/4 cup of yogurt, followed by another cup of peaches, and another sprinkle of granola. You should have at least two layers, but feel free to add more depending on your glass size.
  7. Finish off your parfait with a drizzle of honey on top for added sweetness and a touch of elegance. If you’re using sliced almonds or shredded coconut, sprinkle them on top now. It adds a lovely visual contrast and extra flavor.
  8. Serve immediately or refrigerate for up to 30 minutes before serving to allow the flavors to meld together. However, I recommend enjoying it fresh to maintain the granola’s crunch.
  • Prep Time: 15 mins
  • Cook Time: 0 mins
  • Category: Breakfast
  • Method: No-cook
  • Cuisine: American

Nutrition

  • Serving Size: 1 parfait
  • Calories: 250
  • Sugar: 20 g
  • Sodium: 50 mg
  • Fat: 5 g
  • Saturated Fat: 2 g
  • Unsaturated Fat: 3 g
  • Trans Fat: 0 g
  • Carbohydrates: 40 g
  • Fiber: 3 g
  • Protein: 10 g
  • Cholesterol: 10 mg

Keywords: Choose ripe peaches for the best flavor and texture. Use a clear glass for a beautiful presentation. For creaminess, consider whipping the yogurt before layering. Be mindful of the granola-to-yogurt ratio. Prepare yogurt and peaches ahead of time for gatherings, layering just before serving.

Did you make this recipe?

Share a photo and tag us — we can't wait to see what you've made!

Sun-Kissed Frozen Orange Cream Slush

As a child, summer days felt like they lasted forever. I remember the sticky heat wrapping around me as I played outside, my laughter mingling with the sounds of the neighborhood. But nothing could cool me down quite like the moment I’d spot my grandmother, laboring over her blender, whipping up her famous Frozen Orange Creamsicle Slush. That vibrant orange treat, with its frosty texture and sweet citrus aroma, was like a burst of sunshine in a cup. Just one sip, and I could feel the coolness wash over me, sparking pure joy.

This Frozen Orange Creamsicle Slush has a way of making you feel like a kid again. Its creamy, dreamy consistency is a delightful balance of bright orange and soft vanilla, inviting you to dive right in. The refreshing tang of orange dances on your tongue, while the smooth creaminess envelops you in a comforting embrace. It’s a nostalgic treat that’s perfect for hot summer afternoons or anytime you need a little pick-me-up.

What makes my version of this slush stand out is the addition of a hint of vanilla bean, which elevates the flavor and adds an extra layer of richness. Plus, it’s super easy to whip up with just a few simple ingredients that you probably already have on hand! So, if you’re ready to relive those sun-soaked memories, let me show you exactly how to make it.

Sun-Kissed Frozen Orange Cream Slush

Why You’ll Love This Recipe

  • Each slush is a perfect blend of creamy vanilla and zesty orange, creating a nostalgic flavor reminiscent of summer days.
  • This refreshing treat is ready in under 15 minutes, making it an ideal quick dessert for unexpected guests or hot afternoons.
  • With just 8 simple ingredients, it’s budget-friendly, ensuring you don’t have to break the bank to enjoy a delicious slush.
  • The slush has a perfectly smooth texture, thanks to the combination of ice and ice cream, providing a delightful contrast to the bright citrus flavors.
  • It’s highly customizable; you can easily adjust the sweetness and add fresh herbs for a unique twist that suits your taste.

Ingredients

  • 2 cups orange juice (freshly squeezed or store-bought)
  • 1 cup vanilla ice cream
  • 1 cup crushed ice
  • 1/2 cup milk (whole or 2%)
  • 1/4 cup granulated sugar (adjust based on sweetness preference)
  • 1 teaspoon vanilla extract
  • Zest of 1 orange (for added flavor)
  • Fresh orange slices and mint leaves (for garnish)

The star of this Frozen Orange Creamsicle Slush is the orange juice, which provides the vibrant, citrusy base. Freshly squeezed juice will yield the brightest flavor, but store-bought options can be just as convenient. If you’re opting for store-bought, choose 100% pure juice with no added sugars for the best results. Another essential ingredient is the vanilla ice cream; it adds creaminess and sweetness. You can substitute it with dairy-free ice cream if you’re looking for a vegan option. Whole or 2% milk complements the ice cream, creating a smooth blend. If you want a lower-calorie version, almond or oat milk can be good alternatives.

Lastly, the granulated sugar can be adjusted based on your sweetness preference. If you prefer a more natural sweetener, consider using honey or agave syrup. The orange zest enhances the flavor profile, providing an aromatic pop that brings the whole slush together. Don’t skip it! It adds an extra layer of brightness that makes this slush truly special.

Step-by-Step Instructions

  1. Start by preparing your ingredients. Gather 2 cups of orange juice, 1 cup of vanilla ice cream, and 1 cup of crushed ice. Make sure the ice is finely crushed, as larger chunks can make blending difficult.
  2. In a blender, combine the orange juice, vanilla ice cream, crushed ice, and 1/2 cup of milk. Add 1/4 cup of granulated sugar and 1 teaspoon of vanilla extract. If you like a sweeter slush, consider adding a bit more sugar at this stage.
  3. Add the zest of 1 orange to the blender. This step is crucial for enhancing the citrus flavor of your slush. Make sure not to include the bitter white pith—only the flavorful zest.
  4. Blend the mixture on medium-high speed for about 30-45 seconds. Stop once the ingredients are fully combined and the slush has a smooth, even consistency. If you notice large chunks of ice, blend for an additional 10-15 seconds. Avoid over-blending, as this can make the slush too liquidy.
  5. Once blended, taste the slush. If it needs more sweetness, add a little more sugar and blend for a few more seconds. If it’s too thick, you can add a splash of milk to reach your desired consistency.
  6. Pour the slush into glasses. This recipe typically serves 4, but you can easily double it for larger gatherings. Use a spoon to help guide the slush into the glasses if needed.
  7. Garnish each serving with fresh orange slices and mint leaves. The mint not only adds a pop of color but also a refreshing aroma that complements the citrus flavors beautifully.
  8. Serve immediately and enjoy! If you’ve made extra, you can refrigerate it for a short time, but it’s best enjoyed fresh.

Pro Tips for the Best Frozen Orange Creamsicle Slush

  • Don’t skip the orange zest! It’s a game-changer for flavor. Always zest before juicing to make it easier.
  • Use a high-powered blender for the best texture. A standard blender may struggle with ice, leading to uneven consistency. If you have a food processor, that can work too, but ensure the ice is finely crushed.
  • Adjust the ice-to-liquid ratio carefully. If your slush is too thick, it won’t blend well. Start with less ice and add more until you reach your preferred texture.
  • Be cautious with the sugar! Always start with the lower amount, as you can easily add more, but it’s hard to fix an overly sweet slush.
  • For a fun twist, consider adding a splash of coconut milk or a handful of fresh fruit like strawberries or pineapple. This not only enhances the flavor but also adds a beautiful color contrast.

Variations & Serving Ideas

There are countless ways to put a spin on your Frozen Orange Creamsicle Slush. Consider making a tropical version by adding in some pineapple juice or coconut milk for a delightful tropical twist. If you’re feeling adventurous, try incorporating a handful of frozen mango or peach slices for added sweetness. For a lighter version, swap out the vanilla ice cream for Greek yogurt for a creamy yet tangy alternative.

As for serving ideas, this refreshing slush pairs wonderfully with light summer dishes like grilled chicken skewers, fish tacos, or a simple salad topped with citrus vinaigrette. The bright, zesty flavors of the slush complement these dishes perfectly, making them an ideal pairing for a sunny day.

Storage, Make-Ahead & Reheating

This Frozen Orange Creamsicle Slush is best enjoyed fresh, but if you have leftovers, you can store them in an airtight container in the fridge for up to 2 days. Just keep in mind that the slush may lose some of its texture over time as the ice melts. It doesn’t freeze well, as the ice will turn into a solid block. If you must freeze it, blend again after thawing to restore the slushy consistency. This treat is best the day you make it, as the flavors meld together beautifully overnight, enhancing its deliciousness.

Frequently Asked Questions

Can I make Frozen Orange Creamsicle Slush ahead of time?

Yes — in fact, it tastes even better the next day as the flavors meld. However, it’s best to enjoy it fresh, as the texture can change if stored for too long. If you need to prepare it ahead, keep it in the fridge and re-blend before serving.

What kind of orange juice should I use?

For the best flavor, use freshly squeezed orange juice. However, if you’re short on time, opt for 100% pure store-bought juice without added sugars. This will ensure that your slush remains flavorful and refreshing.

Can I substitute the vanilla ice cream?

Absolutely! If you’re looking for a dairy-free option, coconut milk ice cream or a non-dairy vanilla ice cream can work wonderfully. They will still provide the creamy texture and sweetness you desire.

How can I adjust the sweetness of my slush?

You can easily adjust the sweetness by modifying the amount of sugar added. Start with 1/4 cup and taste the mixture before blending. If you prefer it sweeter, add more sugar gradually until it reaches your desired level.

What should I do if my slush is too thick?

If your slush is too thick, simply add a splash of milk or orange juice and blend again. This will help achieve a more drinkable consistency while maintaining the slushy texture. Adjust gradually to reach your preferred thickness.

Sun-Kissed Frozen Orange Cream Slush

Final Thoughts

The Frozen Orange Creamsicle Slush is a delightful blend of refreshing citrus and creamy goodness, making it a perfect treat for warm days or any time you crave a taste of nostalgia. The way the bright orange flavor dances with the creamy texture truly elevates this slush, transforming it into a satisfying escape from the everyday.

This is the kind of recipe I come back to again and again, especially when I’m looking to cool down or impress guests at a summer gathering. It’s simple to make and always brings smiles all around! I encourage you to try this recipe for yourself—don’t hesitate to share your results or even put your own spin on it. Happy slushing!

Print
clock clock iconcutlery cutlery iconflag flag iconfolder folder iconinstagram instagram iconpinterest pinterest iconfacebook facebook iconprint print iconsquares squares iconheart heart iconheart solid heart solid icon

Frozen Orange Creamsicle Slush


  • Author: Lily author
  • Total Time: 15 minutes
  • Yield: 4 servings 1x
Pin Recipe
Print Recipe

Description

This Frozen Orange Creamsicle Slush is a refreshing treat that combines creamy vanilla and zesty orange flavors. Perfect for hot summer days, it brings back nostalgic memories with every sip.


Ingredients

Scale
  • 2 cups orange juice (freshly squeezed or store-bought)
  • 1 cup vanilla ice cream
  • 1 cup crushed ice
  • 1/2 cup milk (whole or 2%)
  • 1/4 cup granulated sugar (adjust based on sweetness preference)
  • 1 teaspoon vanilla extract
  • Zest of 1 orange (for added flavor)
  • Fresh orange slices and mint leaves (for garnish)

Instructions

  1. Start by preparing your ingredients. Gather 2 cups of orange juice, 1 cup of vanilla ice cream, and 1 cup of crushed ice. Make sure the ice is finely crushed, as larger chunks can make blending difficult.
  2. In a blender, combine the orange juice, vanilla ice cream, crushed ice, and 1/2 cup of milk. Add 1/4 cup of granulated sugar and 1 teaspoon of vanilla extract. If you like a sweeter slush, consider adding a bit more sugar at this stage.
  3. Add the zest of 1 orange to the blender. This step is crucial for enhancing the citrus flavor of your slush. Make sure not to include the bitter white pith—only the flavorful zest.
  4. Blend the mixture on medium-high speed for about 30-45 seconds. Stop once the ingredients are fully combined and the slush has a smooth, even consistency. If you notice large chunks of ice, blend for an additional 10-15 seconds. Avoid over-blending, as this can make the slush too liquidy.
  5. Once blended, taste the slush. If it needs more sweetness, add a little more sugar and blend for a few more seconds. If it’s too thick, you can add a splash of milk to reach your desired consistency.
  6. Pour the slush into glasses. This recipe typically serves 4, but you can easily double it for larger gatherings. Use a spoon to help guide the slush into the glasses if needed.
  7. Garnish each serving with fresh orange slices and mint leaves. The mint not only adds a pop of color but also a refreshing aroma that complements the citrus flavors beautifully.
  8. Serve immediately and enjoy! If you’ve made extra, you can refrigerate it for a short time, but it's best enjoyed fresh.
  • Prep Time: 15 min
  • Cook Time: 0 min
  • Category: Dessert
  • Method: Blending
  • Cuisine: American

Nutrition

  • Serving Size: 1 serving
  • Calories: 200
  • Sugar: 30 g
  • Sodium: 50 mg
  • Fat: 5 g
  • Saturated Fat: 3 g
  • Unsaturated Fat: 2 g
  • Trans Fat: 0 g
  • Carbohydrates: 40 g
  • Fiber: 1 g
  • Protein: 2 g
  • Cholesterol: 20 mg

Keywords: Don't skip the orange zest! It's a game-changer for flavor. Always zest before juicing to make it easier.

Did you make this recipe?

Share a photo and tag us — we can't wait to see what you've made!

Zesty Lemon Poppy Seed Delight

One rainy afternoon, I found myself in my grandmother’s cozy kitchen, the kind that always smelled like warmth and love. She was whipping up her famous Lemon Poppy Seed Loaf, a recipe that had been passed down through generations. As the batter came together, the zesty aroma of fresh lemons filled the air, mingling perfectly with the nutty fragrance of poppy seeds. I can still picture her, apron-clad, as she expertly drizzled a vibrant citrus icing over the loaf, creating a glossy, sun-kissed finish that beckoned us to dive in. It was a moment that sparked my own passion for baking, and this recipe has become a cherished staple in my home ever since.

When you take a bite of this Lemon Poppy Seed Loaf, it’s like a burst of sunshine on your palate. The loaf is beautifully golden, with a tender crumb that melts in your mouth. Each slice is speckled with tiny poppy seeds, adding a delightful crunch that contrasts beautifully with the tangy sweetness of the lemon. And that citrus icing? It’s the finishing touch that elevates this loaf from ordinary to extraordinary, with its bright, zesty flavor dancing on your taste buds.

This recipe stands out because it embraces simplicity while delivering on flavor. I’ve added a hint of vanilla to the batter, enhancing the overall taste and making it even more indulgent. Trust me, once you make this Lemon Poppy Seed Loaf With Citrus Icing, it’ll become a go-to in your baking repertoire.

So, let me show you exactly how to make it!

Zesty Lemon Poppy Seed Delight

Why You’ll Love This Recipe

  • Moist and tender crumb that melts in your mouth, thanks to the perfect balance of butter and buttermilk.
  • Bright, zesty lemon flavor paired with crunchy poppy seeds, creating a delightful texture and taste experience.
  • Easy to whip up in just about an hour, perfect for last-minute gatherings or a cozy afternoon treat.
  • Budget-friendly with everyday ingredients, making it an accessible option for all home bakers.
  • The citrus icing adds a sweet tang that elevates the loaf, turning a simple recipe into a showstopper!

Ingredients

  • 1 ½ cups (190g) all-purpose flour
  • 1 teaspoon baking powder
  • ½ teaspoon baking soda
  • ½ teaspoon salt
  • 3 tablespoons poppy seeds
  • ½ cup (115g) unsalted butter, softened to room temperature
  • 1 cup (200g) granulated sugar
  • 2 large eggs
  • 1 teaspoon vanilla extract
  • 1 teaspoon lemon zest (from about 1 medium lemon)
  • ½ cup (120ml) buttermilk
  • 2 tablespoons fresh lemon juice

For the Citrus Icing:

  • 1 cup (120g) powdered sugar
  • 2 tablespoons fresh lemon juice
  • 1 tablespoon orange juice
  • 1 teaspoon lemon zest (for garnish, optional)

Let’s dive into the key ingredients that make this Lemon Poppy Seed Loaf so special. The all-purpose flour provides the structure and base for the loaf, while the baking powder and baking soda ensure it rises perfectly, giving the loaf a light texture. For a gluten-free variation, you could substitute the flour with a gluten-free all-purpose blend. Poppy seeds not only add a delightful crunch but also contribute to the unique flavor profile that pairs well with the citrus notes.

Unsalted butter is crucial for achieving the buttery richness that makes this loaf so moist. If you’re looking for a dairy-free option, coconut oil or a vegan butter can be used instead. The buttermilk is another essential component, providing acidity that activates the baking soda for a fluffy texture. If you don’t have buttermilk on hand, you can easily make a substitute by mixing ½ cup of milk with 1 tablespoon of vinegar or lemon juice and letting it sit for about 5 minutes.

Step-by-Step Instructions

  1. Preheat your oven to 350°F (175°C). Grease a 9×5-inch loaf pan or line it with parchment paper for easy removal later.
  2. In a medium mixing bowl, whisk together 1 ½ cups of all-purpose flour, 1 teaspoon of baking powder, ½ teaspoon of baking soda, ½ teaspoon of salt, and 3 tablespoons of poppy seeds. This helps to evenly distribute the baking agents and ensures a uniform rise.
  3. In a large mixing bowl, cream together ½ cup of softened unsalted butter and 1 cup of granulated sugar using an electric mixer on medium speed for about 3-4 minutes, until the mixture is light and fluffy. Make sure to scrape down the sides of the bowl occasionally.
  4. Add 2 large eggs, 1 teaspoon of vanilla extract, and 1 teaspoon of lemon zest to the creamed butter and sugar, mixing until fully combined. You want a smooth consistency, so ensure there are no lumps of butter.
  5. In a small bowl, combine ½ cup of buttermilk and 2 tablespoons of fresh lemon juice. Alternately add the dry ingredients and buttermilk mixture to the butter mixture, starting and ending with the dry ingredients. Mix just until combined; do not overmix, as this can lead to a dense loaf.
  6. Pour the batter into the prepared loaf pan. Smooth the top with a spatula, ensuring it’s even. Bake in the preheated oven for 50-60 minutes, or until a toothpick inserted in the center comes out clean. The edges should be lightly golden brown, and the center should feel just set.
  7. Once baked, remove the loaf from the oven and allow it to cool in the pan for about 10 minutes. Then, transfer it to a wire rack to cool completely. Resist the urge to slice too soon, as it will be crumbly if it’s still warm.
  8. While the loaf is cooling, prepare the citrus icing. In a medium bowl, whisk together 1 cup of powdered sugar, 2 tablespoons of fresh lemon juice, and 1 tablespoon of orange juice until smooth. If the icing is too thick, you can add a little more juice to reach your desired consistency.
  9. Once the loaf is completely cool, drizzle the citrus icing over the top. If you like, sprinkle with an additional teaspoon of lemon zest for an extra pop of flavor and color.

Pro Tips for the Best Lemon Poppy Seed Loaf With Citrus Icing

  • Be careful not to overmix your batter; this is a common mistake that can lead to a dense loaf. Mix just until the dry ingredients are incorporated for a light and fluffy texture.
  • Use room temperature ingredients, especially the butter and eggs. This helps to create a smoother batter and ensures even baking. Take your eggs out of the fridge about 30 minutes before you start.
  • For a more pronounced lemon flavor, consider adding a little lemon extract in addition to the zest and juice. Just a half teaspoon can elevate the citrus notes significantly.
  • When measuring your flour, spoon it into the measuring cup and level it off with a knife instead of scooping directly from the bag. This prevents packing and ensures you don’t end up with a dry loaf.
  • Invest in a good quality loaf pan; it makes a difference in heat distribution, which ensures even baking. If your pan is dark-coated, reduce the oven temperature by 25°F to prevent over-browning.

Variations & Serving Ideas

For a delightful twist, consider adding blueberries or raspberries to the batter for a fruity burst of flavor. You can also experiment with different citrus fruits—try lime or grapefruit zest and juice for a refreshing change. For a healthier option, substitute half of the all-purpose flour with whole wheat flour for added fiber without compromising too much on texture.

This Lemon Poppy Seed Loaf pairs beautifully with a light salad, such as a mixed greens salad with a vinaigrette, or a cup of tea for a cozy afternoon treat. It also complements a creamy cheese platter, as the acidity of the loaf balances rich cheeses perfectly. Lastly, a scoop of vanilla ice cream on the side creates a delightful contrast of temperatures and flavors!

Storage, Make-Ahead & Reheating

This Lemon Poppy Seed Loaf can be stored at room temperature for up to 3 days if wrapped tightly in plastic wrap. If you want to keep it longer, it freezes well for up to 3 months. To freeze, wrap the loaf tightly in plastic wrap and then in aluminum foil to prevent freezer burn.

When you’re ready to enjoy it again, simply thaw it in the fridge overnight. Reheat individual slices in the microwave for 15-20 seconds or in a toaster oven until warmed through. Interestingly, many people find that this loaf tastes even better the next day, as the flavors have time to meld!

Frequently Asked Questions

Can I make Lemon Poppy Seed Loaf With Citrus Icing ahead of time?

Yes — in fact, it tastes even better the next day! You can make the loaf a day in advance, allowing the flavors to develop. Just be sure to store it in an airtight container to maintain its moisture.

Can I substitute the poppy seeds?

Absolutely! If you don’t have poppy seeds on hand or prefer an alternative, you can use sesame seeds for a similar crunch or omit them entirely for a smooth loaf.

What can I use instead of buttermilk?

If you don’t have buttermilk, you can easily create a substitute by mixing ½ cup of milk (dairy or plant-based) with 1 tablespoon of vinegar or lemon juice. Let it sit for 5 minutes before using in the recipe.

How can I make this recipe gluten-free?

To make a gluten-free version of this Lemon Poppy Seed Loaf, substitute the all-purpose flour with a gluten-free all-purpose flour blend. Just ensure that the blend contains a binding agent like xanthan gum for the best results.

What is the best way to store leftover loaf?

Leftover Lemon Poppy Seed Loaf should be stored in an airtight container at room temperature for up to 3 days. For longer storage, wrap it tightly and freeze for up to 3 months. Thaw it before serving for the best texture.

Zesty Lemon Poppy Seed Delight

Final Thoughts

The Lemon Poppy Seed Loaf with Citrus Icing is truly a delightful treat that brings a burst of brightness to any occasion. The zesty lemon flavor combined with the subtle crunch of poppy seeds creates a satisfying balance, while the citrus icing adds a touch of sweetness that perfectly complements the loaf’s tanginess.

This is the kind of recipe I come back to again and again, especially when I want to brighten up a gloomy day or celebrate a small victory. The aroma that fills the kitchen as it bakes is absolutely heavenly! I encourage you to give this recipe a try; you might just find it becoming a beloved staple in your home. Don’t forget to share your results or even add your own unique twist—I can’t wait to see what you create!

Print
clock clock iconcutlery cutlery iconflag flag iconfolder folder iconinstagram instagram iconpinterest pinterest iconfacebook facebook iconprint print iconsquares squares iconheart heart iconheart solid heart solid icon

Lemon Poppy Seed Loaf


  • Author: Lily author
  • Total Time: 22 minute
  • Yield: 1 loaf 1x
Pin Recipe
Print Recipe

Description

This Lemon Poppy Seed Loaf is a delightful treat that combines zesty lemon flavor with crunchy poppy seeds. Topped with a citrus icing, it’s perfect for any occasion.


Ingredients

Scale
  • 1 ½ cups (190g) all-purpose flour
  • 1 teaspoon baking powder
  • ½ teaspoon baking soda
  • ½ teaspoon salt
  • 3 tablespoons poppy seeds
  • ½ cup (115g) unsalted butter, softened to room temperature
  • 1 cup (200g) granulated sugar
  • 2 large eggs
  • 1 teaspoon vanilla extract
  • 1 teaspoon lemon zest (from about 1 medium lemon)
  • ½ cup (120ml) buttermilk
  • 2 tablespoons fresh lemon juice
  • 1 cup (120g) powdered sugar
  • 2 tablespoons fresh lemon juice
  • 1 tablespoon orange juice
  • 1 teaspoon lemon zest (for garnish, optional)

Instructions

  1. Preheat your oven to 350°F (175°C). Grease a 9×5-inch loaf pan or line it with parchment paper for easy removal later.
  2. In a medium mixing bowl, whisk together 1 ½ cups of all-purpose flour, 1 teaspoon of baking powder, ½ teaspoon of baking soda, ½ teaspoon of salt, and 3 tablespoons of poppy seeds. This helps to evenly distribute the baking agents and ensures a uniform rise.
  3. In a large mixing bowl, cream together ½ cup of softened unsalted butter and 1 cup of granulated sugar using an electric mixer on medium speed for about 3-4 minutes, until the mixture is light and fluffy. Make sure to scrape down the sides of the bowl occasionally.
  4. Add 2 large eggs, 1 teaspoon of vanilla extract, and 1 teaspoon of lemon zest to the creamed butter and sugar, mixing until fully combined. You want a smooth consistency, so ensure there are no lumps of butter.
  5. In a small bowl, combine ½ cup of buttermilk and 2 tablespoons of fresh lemon juice. Alternately add the dry ingredients and buttermilk mixture to the butter mixture, starting and ending with the dry ingredients. Mix just until combined; do not overmix, as this can lead to a dense loaf.
  6. Pour the batter into the prepared loaf pan. Smooth the top with a spatula, ensuring it’s even. Bake in the preheated oven for 50-60 minutes, or until a toothpick inserted in the center comes out clean. The edges should be lightly golden brown, and the center should feel just set.
  7. Once baked, remove the loaf from the oven and allow it to cool in the pan for about 10 minutes. Then, transfer it to a wire rack to cool completely. Resist the urge to slice too soon, as it will be crumbly if it’s still warm.
  8. While the loaf is cooling, prepare the citrus icing. In a medium bowl, whisk together 1 cup of powdered sugar, 2 tablespoons of fresh lemon juice, and 1 tablespoon of orange juice until smooth. If the icing is too thick, you can add a little more juice to reach your desired consistency.
  9. Once the loaf is completely cool, drizzle the citrus icing over the top. If you like, sprinkle with an additional teaspoon of lemon zest for an extra pop of flavor and color.
  • Prep Time: 15 mins
  • Cook Time: 50-60 mins
  • Category: Dessert
  • Method: Baking
  • Cuisine: American

Nutrition

  • Serving Size: 1 slice
  • Calories: 200
  • Sugar: 15 g
  • Sodium: 150 mg
  • Fat: 8 g
  • Saturated Fat: 5 g
  • Unsaturated Fat: 3 g
  • Trans Fat: 0 g
  • Carbohydrates: 30 g
  • Fiber: 1 g
  • Protein: 3 g
  • Cholesterol: 40 mg

Keywords: Be careful not to overmix your batter; this is a common mistake that can lead to a dense loaf. Use room temperature ingredients for a smoother batter and even baking.

Did you make this recipe?

Share a photo and tag us — we can't wait to see what you've made!

  • Privacy Policy
  • Terms Of Service
  • Contact
  • About
  • GDPR

Copyright © 2025 Homesmad