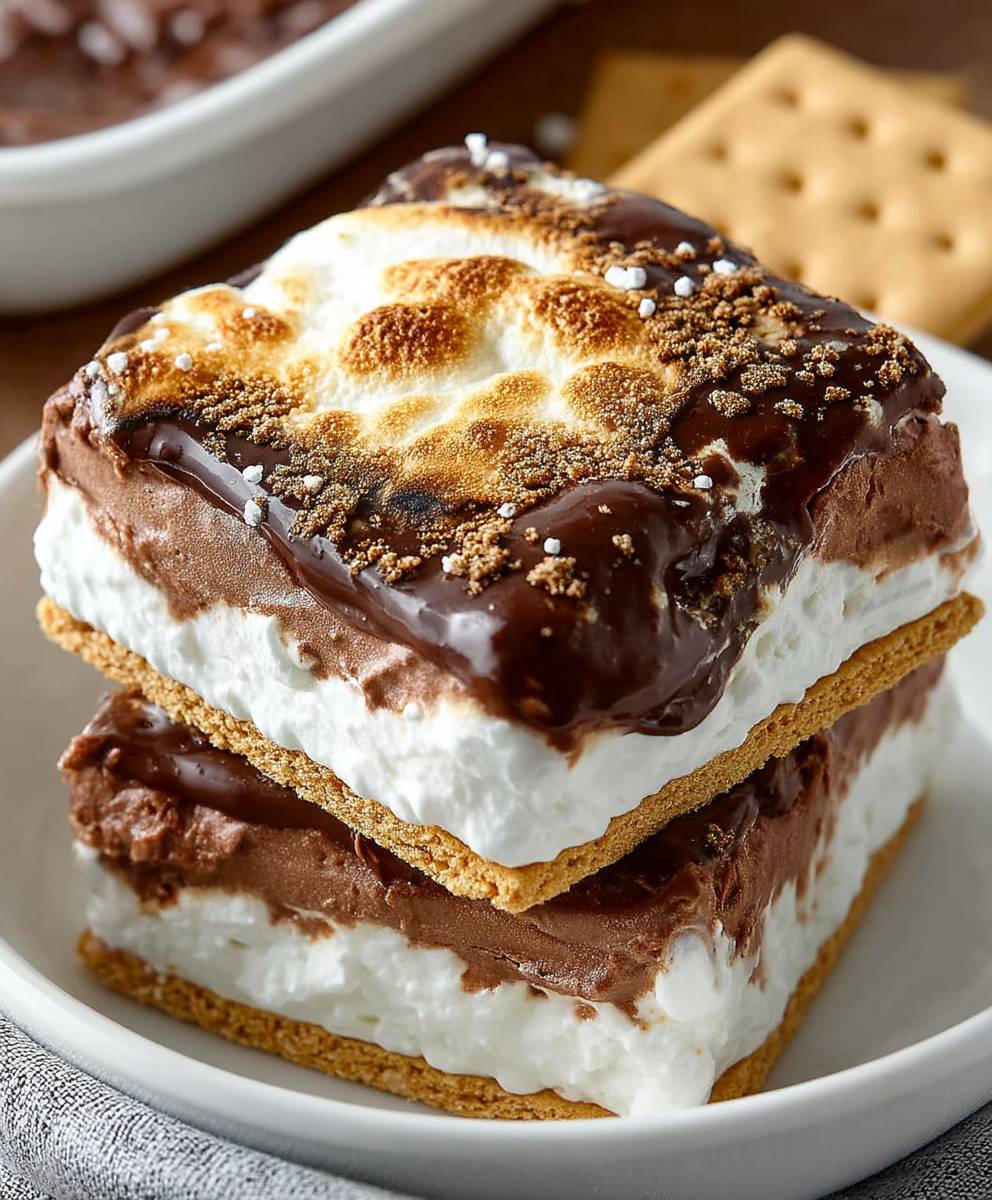
Easy frozen s’mores dessert: just the words conjure up images of crackling campfires and gooey marshmallows, don’t they? But what if I told you that you could enjoy that iconic s’mores flavor without the fire, the mess, or even turning on your oven? Prepare to be amazed because this recipe is about to revolutionize your dessert game!
S’mores, a quintessential American treat, have been delighting taste buds for nearly a century. Their origins can be traced back to the Girl Scouts, who first published a recipe for “Some More” in their 1927 cookbook. The name stuck, and the simple combination of graham crackers, chocolate, and toasted marshmallows became a beloved tradition. But let’s face it, sometimes you crave that s’mores goodness without the hassle. That’s where this easy frozen s’mores dessert comes in.
People adore s’mores for their perfect blend of textures and flavors. The crisp graham crackers, the melty chocolate, and the soft, toasted marshmallow create a symphony of deliciousness in every bite. This frozen version captures all of that magic, but with a cool and refreshing twist. It’s incredibly easy to make, requiring minimal ingredients and effort. Plus, it’s a fantastic make-ahead dessert, perfect for parties, potlucks, or simply satisfying your sweet tooth on a hot summer day. Get ready to experience s’mores in a whole new, incredibly convenient, and utterly irresistible way!

Ingredients:
- 1 (16 ounce) package of chocolate graham crackers, broken into squares
- 1/2 cup (1 stick) unsalted butter, melted
- 1/4 cup granulated sugar
- 1 (10 ounce) package large marshmallows
- 1/4 cup milk chocolate chips
- 1/4 cup semi-sweet chocolate chips
- 1/4 cup heavy cream
- 1 teaspoon vanilla extract
- Pinch of salt
- Optional: Extra graham cracker crumbs for topping
Preparing the Graham Cracker Crust
Okay, let’s get started with the foundation of our frozen s’mores dessert – the graham cracker crust! This is super easy, and it’s what gives the dessert that classic s’mores flavor.
- Crush the Graham Crackers: First, you’ll need to crush those graham crackers. You can do this in a couple of ways. My favorite method is to put the graham cracker squares into a large zip-top bag. Seal the bag, removing as much air as possible. Then, using a rolling pin, bash away until you have fine crumbs. You can also use a food processor if you have one. Just pulse the graham crackers until they are finely ground. Be careful not to over-process them into a powder. We want a crumbly texture.
- Combine with Butter and Sugar: In a medium-sized bowl, combine the graham cracker crumbs, melted butter, and granulated sugar. Mix well until all the crumbs are moistened and the mixture resembles wet sand. This is important because the butter and sugar act as a binder, holding the crust together.
- Press into Pan: Now, grab a 9×13 inch baking dish. I like to lightly grease the bottom of the dish with cooking spray or a little bit of butter to prevent the crust from sticking. Pour the graham cracker mixture into the baking dish and use the bottom of a measuring cup or your fingers to firmly press the mixture evenly across the bottom of the pan. Make sure the crust is compact and uniform in thickness. This will give you a nice, sturdy base for the rest of the dessert.
- Freeze the Crust: Place the baking dish with the graham cracker crust into the freezer. We want to freeze it for at least 30 minutes, or even longer if you have the time. This will help the crust set and prevent it from crumbling when we add the marshmallow layer.
Making the Marshmallow Layer
Next up, the star of the show – the marshmallow layer! This is where the magic happens, and it’s what makes this dessert taste like a campfire treat without the campfire.
- Prepare the Marshmallows: Take your package of large marshmallows and place them in a large, microwave-safe bowl. Make sure the bowl is big enough because the marshmallows will puff up quite a bit when heated.
- Melt the Marshmallows: Microwave the marshmallows on high for about 1 to 2 minutes, or until they are puffed up and melted. Keep a close eye on them, as they can burn quickly. You might need to stop and stir them halfway through to ensure even melting. The goal is to have them completely melted and smooth.
- Add Vanilla Extract: Once the marshmallows are melted, stir in the vanilla extract. This adds a lovely depth of flavor to the marshmallow layer.
- Cool Slightly: Let the melted marshmallows cool slightly for a few minutes. This will prevent them from melting the graham cracker crust when you pour them on top.
- Pour over Crust: Remove the baking dish with the frozen graham cracker crust from the freezer. Carefully pour the melted marshmallow mixture evenly over the crust. Use a spatula to spread the marshmallows to the edges of the pan, ensuring a uniform layer.
- Freeze Again: Return the baking dish to the freezer and freeze for at least 2 hours, or until the marshmallow layer is firm. This is crucial for creating those clean slices later on.
Creating the Chocolate Ganache
Now, let’s add that rich, decadent chocolate layer on top! This chocolate ganache is super simple to make and adds the perfect finishing touch to our frozen s’mores dessert.
- Combine Chocolate Chips and Cream: In a microwave-safe bowl, combine the milk chocolate chips, semi-sweet chocolate chips, and heavy cream.
- Microwave in Intervals: Microwave the mixture on high in 30-second intervals, stirring after each interval, until the chocolate is completely melted and smooth. Be careful not to overheat the chocolate, as it can seize up. If the chocolate is not melting evenly, you can add a teaspoon of vegetable oil to help smooth it out.
- Add Salt: Stir in a pinch of salt to enhance the chocolate flavor.
- Cool Slightly: Let the chocolate ganache cool slightly for a few minutes. This will prevent it from melting the marshmallow layer when you pour it on top.
- Pour over Marshmallow Layer: Remove the baking dish with the frozen marshmallow layer from the freezer. Carefully pour the chocolate ganache evenly over the marshmallow layer. Use a spatula to spread the ganache to the edges of the pan, creating a smooth, uniform layer.
- Optional Topping: If you want to add an extra touch of s’mores goodness, sprinkle some extra graham cracker crumbs over the chocolate ganache.
- Final Freeze: Return the baking dish to the freezer and freeze for at least 4 hours, or preferably overnight. This will ensure that the entire dessert is completely frozen and easy to slice.
Serving and Storing
Finally, the moment we’ve all been waiting for – serving and enjoying our frozen s’mores dessert!
- Thaw Slightly: Before serving, remove the baking dish from the freezer and let it sit at room temperature for about 10-15 minutes. This will make it easier to slice.
- Slice and Serve: Use a sharp knife to cut the dessert into squares or rectangles. You might need to run the knife under hot water for a few seconds to make slicing easier.
- Enjoy! Serve immediately and enjoy the delicious combination of graham cracker, marshmallow, and chocolate.
- Storing Leftovers: If you have any leftovers (which is unlikely!), store them in an airtight container in the freezer. They will keep for up to a week. Just remember to let them thaw slightly before serving again.
Conclusion:
And there you have it! Our easy frozen s’mores dessert is more than just a recipe; it’s a ticket to instant summer nostalgia, no campfire required. I truly believe this is a must-try for anyone who loves the classic s’mores flavor but wants a cool, refreshing twist, especially during those hot summer months. The combination of the crunchy graham cracker crust, the creamy, marshmallowy filling, and the rich chocolate ganache is simply irresistible. It’s the perfect balance of textures and flavors that will leave you wanting more.
But why is this recipe a must-try? Beyond the incredible taste, it’s the sheer simplicity. You don’t need any fancy equipment or advanced baking skills. It’s a recipe that anyone can master, even if you’re a complete beginner in the kitchen. Plus, it’s a fantastic make-ahead dessert. You can prepare it days in advance and simply pull it out of the freezer when you’re ready to serve. This makes it ideal for parties, potlucks, or even just a spontaneous sweet treat for yourself.
Serving suggestions and variations are endless! For a truly decadent experience, try drizzling some salted caramel sauce over the top before serving. The salty-sweet combination is divine! You could also sprinkle some chopped nuts, like pecans or walnuts, for added crunch and flavor. If you’re feeling adventurous, try using different flavored graham crackers, such as chocolate or cinnamon. Or, for a more intense chocolate flavor, use dark chocolate for the ganache.
Another fun variation is to add a layer of peanut butter between the graham cracker crust and the marshmallow filling. This creates a peanut butter cup-inspired s’mores dessert that is sure to be a crowd-pleaser. You could also experiment with different types of marshmallows. Vanilla marshmallows are classic, but you could also try chocolate, strawberry, or even toasted coconut marshmallows for a unique twist.
For a more elegant presentation, you can cut the frozen s’mores into individual squares and arrange them on a platter. Garnish with fresh berries, such as raspberries or strawberries, for a pop of color and flavor. You can also serve them with a dollop of whipped cream or a scoop of vanilla ice cream.
Don’t be afraid to get creative and experiment with different flavors and textures to create your own signature version of this easy frozen s’mores dessert. The possibilities are endless!
I truly hope you’ll give this recipe a try. I’m confident that you’ll love it as much as I do. It’s the perfect dessert for any occasion, and it’s guaranteed to put a smile on your face.
So, what are you waiting for? Head to the kitchen and whip up a batch of this delicious frozen treat. And when you do, please share your experience with me! I’d love to hear what you think and see your creations. You can leave a comment below, tag me on social media, or send me an email. I’m always excited to hear from my readers and see how they’re enjoying my recipes.
I can’t wait to hear about your frozen s’mores adventures! Happy baking (or should I say, freezing!) and enjoy! Remember, this easy frozen s’mores dessert is all about having fun and creating delicious memories.
Easy Frozen S'mores Dessert: The Perfect No-Bake Treat
No-bake frozen dessert with a graham cracker crust, fluffy marshmallow layer, and rich chocolate ganache. A cool and delightful treat for s'mores fans!
Ingredients
Instructions
Recipe Notes
- For easier slicing, run your knife under hot water before each cut.
- Be careful not to overheat the chocolate when making the ganache. Microwave in short intervals and stir frequently.
- If the chocolate ganache is not melting evenly, you can add a teaspoon of vegetable oil to help smooth it out.