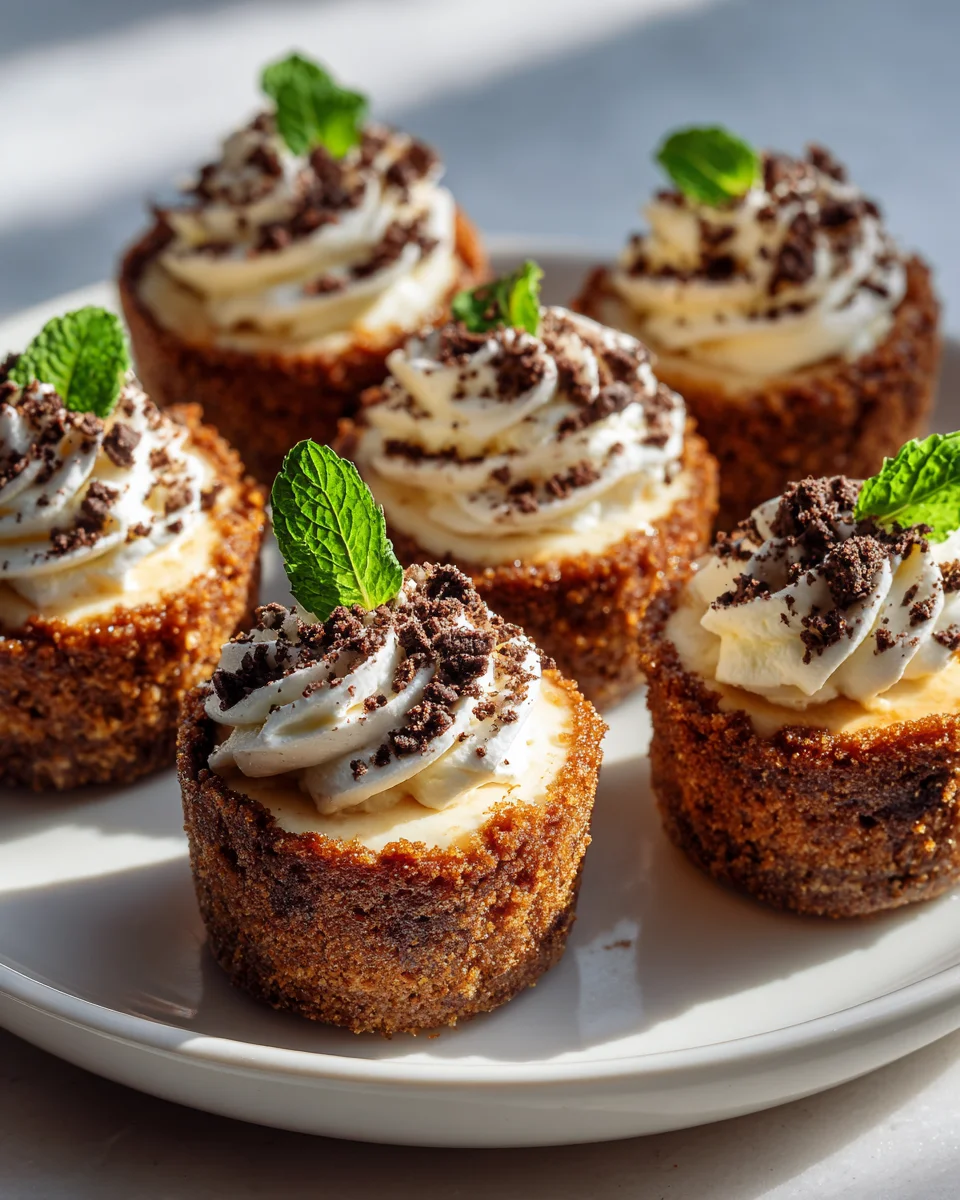
Mini Cookie Cheesecake Cups
Oh my goodness, get ready for a dessert that’s about to become your new obsession! I mean, who can resist a perfect little bite-sized treat? These Mini Cookie Cheesecake Cups are truly something special, and I’m absolutely thrilled to share them with you.
What makes this recipe so incredibly delightful? Imagine taking the best parts of a classic, creamy cheesecake – that smooth, rich, tangy filling – and combining it with the irresistible crunch and flavor of your favorite cookies, all in one adorable, individual serving. It’s like a party in your mouth, and every single cup is an invitation! You get all the luxuriousness of a full-sized cheesecake without any of the fuss, and honestly, the presentation is just too cute to handle.
I know you’re going to love these because they’re surprisingly simple to whip up, yet they look incredibly impressive. No need to worry about a fussy water bath or cracks in a big cheesecake; these individual portions are forgiving, perfectly portable, and disappear almost instantly at any gathering. Whether you’re treating yourself to a perfectly portioned indulgence after a long day or dazzling guests with an elegant dessert, these cups deliver. Each one features a delightful cookie crust, a luscious cheesecake filling, and often a sprinkle of extra cookie goodness on top, making every bite a heavenly experience. They’re the ultimate combination of convenience, charm, and pure deliciousness!

Ingredient Notes
Crafting delicious Mini Cookie Cheesecake Cups starts with understanding the role each ingredient plays. Getting these right, and knowing when you can make smart substitutions, will ensure your cheesecakes turn out perfectly every time. I always emphasize using good quality ingredients because they really do make a difference in the final taste and texture of these delightful little treats.
For the Cookie Crust
- Mini Cookies: I typically use store-bought mini chocolate chip cookies or mini Oreo cookies for convenience. The key here is something small and easily crushable that provides a nice contrast to the creamy filling. You’ll need about 1.5 cups of finely crushed cookies, which usually translates to one standard package of mini cookies.
- Substitution: If you don’t have mini cookies, you can absolutely use regular-sized cookies of your choice – graham crackers, Nilla wafers, shortbread, or even homemade chocolate chip cookies work beautifully. Just make sure to crush them finely into crumbs. For graham crackers, about 10-12 full sheets should yield enough crumbs.
- Unsalted Butter: Melted butter binds the cookie crumbs together to form a sturdy, flavorful crust. Using unsalted butter gives you control over the saltiness, allowing the other flavors to shine.
- Substitution: If you only have salted butter, reduce any added salt in your recipe slightly, or just use it as is; it rarely makes a huge difference in such a small quantity for the crust.
For the Cheesecake Filling
- Cream Cheese: This is the star of our show! I highly recommend using full-fat brick-style cream cheese, softened to room temperature. This is crucial for achieving a smooth, lump-free filling. Cold cream cheese will result in a lumpy batter, no matter how much you beat it.
- Substitution: While you can use reduced-fat cream cheese, be aware that it might yield a slightly softer, less rich texture. I’d advise sticking with the full-fat for the best results in these mini cups.
- Granulated Sugar: Sweetens the cheesecake and helps with its tender texture.
- Substitution: You can slightly adjust the amount of sugar to your preference, but don’t reduce it too drastically, as it affects the structure.
- Large Egg: The egg acts as a binder, providing structure and richness to the cheesecake filling. Just like the cream cheese, I recommend using a room-temperature egg to ensure it incorporates smoothly into the batter without curdling.
- Vanilla Extract: A classic flavor enhancer that complements the cream cheese beautifully. I always reach for pure vanilla extract for the best flavor.
- Substitution: You can experiment with other extracts like almond, lemon, or even a dash of coffee extract to change up the flavor profile.
- Sour Cream or Heavy Cream: A touch of sour cream or heavy cream adds moisture, richness, and a slight tang, contributing to the cheesecake’s characteristic smooth, creamy texture. Room temperature is again best here.
- Substitution: Plain full-fat Greek yogurt can be used as a substitute for sour cream, offering a similar tang and richness.
Optional Toppings
- Chocolate Ganache: A simple topping made from melted chocolate and heavy cream adds an extra layer of decadence.
- Fresh Berries: Strawberries, raspberries, or blueberries provide a beautiful color contrast and fresh, tart flavor.
- Whipped Cream: A dollop of homemade whipped cream is always a welcome addition.
- Mini Chocolate Chips or Sprinkles: For a fun, decorative touch, especially for parties.
Step-by-Step Instructions
Making Mini Cookie Cheesecake Cups is a straightforward process, but following these steps carefully will ensure your cheesecakes are perfectly set, creamy, and delicious. I’ve broken it down to make it super easy for you!
- Prepare for Baking: First, preheat your oven to 325°F (160°C). Then, line a standard 12-cup muffin tin with paper cupcake liners. These liners are essential for easy removal and presentation.
- Make the Cookie Crust: In a medium bowl, combine your finely crushed mini cookies (or other cookie crumbs) with the melted unsalted butter. Stir until the crumbs are evenly moistened and look like wet sand. This is your crust mixture.
- Form the Crusts: Divide the cookie mixture evenly among the 12 prepared cupcake liners. I usually use a tablespoon to scoop it in. Using the back of a spoon, or even your clean fingers, press the crumbs firmly and evenly into the bottom of each liner. You want a compact crust that won’t crumble apart when you eat it.
- Pre-bake the Crusts (Optional but Recommended): For a sturdier crust, you can bake these crusts for 5-7 minutes. This helps to set them. Then, remove them from the oven and let them cool while you prepare the filling. If you’re short on time, you can skip this step, but your crust might be slightly softer.
- Prepare the Cheesecake Filling: In a large bowl, using an electric mixer (either a stand mixer with a paddle attachment or a hand mixer), beat the softened cream cheese on medium speed until it’s completely smooth and creamy, with no lumps. This usually takes about 2-3 minutes.
- Add Sugar: Gradually add the granulated sugar to the cream cheese, continuing to beat on medium speed until well combined and fluffy. Scrape down the sides of the bowl as needed to ensure everything is incorporated.
- Incorporate the Egg: Beat in the room-temperature egg, just until it’s combined. Be careful not to overmix at this stage, as too much air can cause cracks in your cheesecake.
- Add Flavor and Creaminess: Stir in the vanilla extract and either the sour cream or heavy cream until just combined. Again, avoid overmixing. The filling should be smooth and luscious.
- Fill the Cups: Carefully spoon the cheesecake filling over the prepared cookie crusts in the muffin tin. Fill each liner about two-thirds full. I find an ice cream scoop helpful for this to ensure even portions.
- Bake the Cheesecakes: Place the muffin tin in the preheated oven. Bake for 18-22 minutes, or until the edges of the cheesecakes are set and slightly puffed, but the centers still have a slight jiggle when you gently shake the pan. Overbaking will lead to dry cheesecake and potential cracks.
- Cool Gradually: Once baked, turn off the oven and leave the oven door ajar. Let the cheesecake cups cool in the oven for about 10-15 minutes. This gradual cooling helps prevent cracks.
- Final Cooling and Chilling: Remove the muffin tin from the oven and transfer the cheesecake cups to a wire rack. Let them cool completely at room temperature, which will take about an hour. Once completely cool, transfer the muffin tin to the refrigerator and chill the cheesecake cups for at least 4 hours, or preferably overnight. Chilling is essential for the cheesecake to fully set and firm up.
- Garnish and Serve: Once thoroughly chilled, carefully peel the paper liners off the cheesecakes. Now is the time to add any desired toppings like chocolate ganache, fresh berries, or a dollop of whipped cream. Serve them cold and enjoy!
Tips & Suggestions
Over the years of making these Mini Cookie Cheesecake Cups, I’ve gathered a few tricks and tips that really elevate them from good to absolutely fantastic. These suggestions are specifically tailored for these individual desserts, helping you achieve perfect results every time.
- Room Temperature Ingredients are Non-Negotiable: I cannot stress this enough! For a truly smooth, lump-free cheesecake filling, ensure your cream cheese, egg, and sour cream (or heavy cream) are all at room temperature. Cold ingredients won’t emulsify properly, leaving you with a bumpy batter. Plan ahead and take them out of the fridge at least an hour before you start mixing.
- Don’t Overmix the Filling: Once you add the egg, mix just until combined. Overmixing incorporates too much air into the batter, which can cause the cheesecake to puff up too much during baking and then crack as it cools. A gentle hand is key here.
- Avoid Overbaking: This is another common pitfall. Mini cheesecakes bake much faster than a full-sized one. Look for edges that are set and slightly puffed, but a center that still has a slight jiggle. They will continue to set as they cool and chill. Overbaking leads to a dry, dense texture and those dreaded cracks.
- Gradual Cooling is Key: To prevent cracking, don’t shock your cheesecakes with a sudden temperature change. Leaving them in the turned-off oven with the door ajar for 10-15 minutes, then cooling at room temperature before refrigerating, allows them to cool down slowly and evenly.
- Chill, Chill, Chill: Patience is a virtue when it comes to cheesecake! These mini cups need at least 4 hours, but ideally overnight, in the refrigerator to fully set. This not only firms them up for easy handling but also allows the flavors to meld beautifully. Trying to serve them too soon will result in a soft, messy cheesecake.
- Easy Liner Removal: To get those clean sides when you peel off the paper liners, make sure the cheesecakes are completely chilled. If you’re having trouble, sometimes a quick dip of the bottom of the liner in hot water for a second can help, but generally, cold cheesecake peels cleanly.
- Flavor Variations:
- Citrus Zest: Add a teaspoon of lemon, lime, or orange zest to the filling for a bright, refreshing twist.
- Chocolate Lover’s Dream: Mix in 1/4 cup of mini chocolate chips into the batter, or drizzle with melted chocolate after chilling.
- Espresso Kick: Dissolve 1 teaspoon of instant espresso powder in the vanilla extract before adding it to the batter for a mocha-flavored cheesecake.
- Different Crusts: Beyond mini cookies, consider using crushed ginger snaps for a spicier base, or shortbread for a buttery, delicate crust.
- Topping Creativity: Don’t limit yourself! Fresh fruit, fruit compotes, caramel sauce, chocolate syrup, toasted nuts, or even a sprinkle of sea salt can elevate your mini cheesecakes. Add toppings just before serving for the freshest look and taste.
- For a Crowd: These are absolutely perfect for parties or potlucks because they’re already portioned. You can make them a day or two in advance, making party prep much easier.
Storage
One of the best things about Mini Cookie Cheesecake Cups is how well they store, allowing you to make them ahead of time for entertaining or simply to have a delicious treat on hand. Proper storage ensures they remain fresh, flavorful, and perfectly creamy.
- Refrigeration: Once your Mini Cookie Cheesecake Cups are fully chilled and set, they need to be stored in an airtight container in the refrigerator. This protects them from absorbing other odors in your fridge and keeps them fresh. They will keep beautifully for up to 3-5 days. I usually separate layers with parchment paper if stacking to prevent them from sticking or getting smushed.
- Freezing for Longer Storage: If you want to make a larger batch or keep some for an extended period, these mini cheesecakes freeze wonderfully!
- Freezing Method: After they are fully chilled and set (without any toppings), remove them from their liners. Place the individual cheesecake cups on a baking sheet lined with parchment paper, ensuring they don’t touch each other. Freeze for 1-2 hours, or until solid.
- Packaging for Freezing: Once frozen solid, transfer the individual cheesecakes to a freezer-safe airtight container or a heavy-duty freezer bag. Removing the liners before freezing can save space and make thawing easier. If using a container, you can stack them with parchment paper in between layers.
- Freezer Life: Properly stored, Mini Cookie Cheesecake Cups can be kept in the freezer for up to 1 month.
- Thawing: When you’re ready to enjoy a frozen cheesecake cup, simply transfer it from the freezer to the refrigerator and let it thaw for 2-3 hours, or overnight. You can also let it sit at room temperature for about 30-60 minutes for a quicker thaw, though refrigerating is generally preferred for optimal texture.
- Adding Toppings: Add any desired toppings after the cheesecakes have thawed completely, just before serving, to ensure freshness and the best presentation.
- Serving Temperature: Mini Cookie Cheesecake Cups are always best served chilled. The cold temperature enhances their creamy texture and refreshing flavor.
Final Thoughts
And there you have it! I truly hope you’re as excited as I am about these incredible Mini Cookie Cheesecake Cups. What makes this recipe an absolute standout, in my opinion, is the perfect marriage of a chewy, delightful cookie base with the rich, creamy tang of a classic cheesecake, all nestled into a charming, bite-sized package. They’re not just a dessert; they’re a mini celebration in every single cup!
Whether you’re looking for an effortless yet elegant treat for your next gathering, a delightful after-dinner indulgence, or simply a fun baking project, these Mini Cookie Cheesecake Cups deliver on all fronts. Their individual portions make serving a breeze, and let’s be honest, who can resist something so perfectly portioned and utterly adorable? I encourage you to whip up a batch soon – I promise, they’ll become a beloved staple in your dessert repertoire, bringing smiles with every sweet, cookie-cheesecake bite!

Easy Mini Cookie Cheesecake Cups: Your New Favorite Dessert
- Total Time: 37 minutes
- Yield: 12 servings 1x
Description
Indulge in these delightful Mini Cookie Cheesecake Cups that combine creamy cheesecake with a crunchy cookie crust. Perfectly portioned and irresistibly delicious, they are sure to become your new favorite dessert!
Ingredients
- 1.5 cups finely crushed mini chocolate chip cookies or mini Oreo cookies
- 4 tablespoons unsalted butter, melted
- 8 oz full-fat cream cheese, softened to room temperature
- 1/2 cup granulated sugar
- 1 large egg, room temperature
- 1 teaspoon vanilla extract
- 1/4 cup sour cream or heavy cream, room temperature
- Optional Toppings: chocolate ganache, fresh berries, whipped cream, mini chocolate chips or sprinkles
Instructions
- Preheat your oven to 325°F (160°C) and line a standard 12-cup muffin tin with paper cupcake liners.
- In a medium bowl, combine the finely crushed mini cookies with the melted unsalted butter. Stir until the crumbs are evenly moistened.
- Divide the cookie mixture evenly among the 12 prepared cupcake liners and press the crumbs firmly into the bottom of each liner.
- For a sturdier crust, bake these crusts for 5-7 minutes, then remove them from the oven and let them cool.
- In a large bowl, beat the softened cream cheese on medium speed until smooth and creamy, about 2-3 minutes.
- Gradually add the granulated sugar to the cream cheese, continuing to beat until well combined and fluffy.
- Beat in the room-temperature egg until just combined, being careful not to overmix.
- Stir in the vanilla extract and either the sour cream or heavy cream until just combined.
- Spoon the cheesecake filling over the prepared cookie crusts in the muffin tin, filling each liner about two-thirds full.
- Bake for 18-22 minutes, or until the edges are set and slightly puffed, but the centers still jiggle slightly.
- Once baked, turn off the oven and leave the door ajar, letting the cheesecake cups cool in the oven for about 10-15 minutes.
- Remove the muffin tin from the oven and let the cheesecake cups cool completely at room temperature, then refrigerate for at least 4 hours or overnight.
- Once thoroughly chilled, carefully peel the paper liners off the cheesecakes and add any desired toppings before serving.
- Prep Time: 15 mins
- Cook Time: 22 mins
- Category: Dessert
- Method: Baking
- Cuisine: American
Nutrition
- Serving Size: 1 cup
- Calories: 180
- Sugar: 10 g
- Sodium: 150 mg
- Fat: 10 g
- Saturated Fat: 5 g
- Unsaturated Fat: 4 g
- Trans Fat: 0 g
- Carbohydrates: 20 g
- Fiber: 1 g
- Protein: 3 g
- Cholesterol: 30 mg
Keywords: Ensure all ingredients are at room temperature for a smooth filling. Avoid overmixing the filling to prevent cracks, and chill the cheesecakes for at least 4 hours for best results.