Easy Mini Halloween Pizzas are here to transform your spooky season gatherings into a truly memorable feast! Are you ready to conjure up some magic in your kitchen with a recipe that’s as frightfully fun as it is irresistibly delicious? I promise, this dish will not only delight your taste buds but also spark creative joy in everyone who takes part.
Halloween is a wonderful time for playful ghouls, enchanting costumes, and, of course, delightfully themed treats that bring people together. While candy often takes center stage during this festive period, I believe that savory, interactive dishes hold a truly special charm, especially when they allow for creative expression. These individual-sized pizzas perfectly capture that spirit, inviting everyone to participate in crafting their own edible monsters, mummies, or jack-o’-lanterns. It’s not just a meal; it’s an activity, a conversation starter, and a fantastic way to bond with family and friends during this festive time of year, making memories that last far longer than any sugar rush.
Why Everyone Loves These Spooky Snacks
People absolutely adore this dish for so many compelling reasons. For starters, the convenience is unparalleled – using pre-made mini crusts or quickly cutting your own saves valuable time, perfect for busy hosts. Then there’s the taste: comforting, cheesy goodness that’s a universal favorite, elevated by the sheer joy of personalizing each bite with an array of spooky toppings. The textures are just right, from the perfectly baked crust to the gooey melted cheese and your favorite flavorful additions. Most importantly, these Easy Mini Halloween Pizzas strike the perfect balance between simple preparation and maximum impact, making them ideal for any autumn gathering or a fun family night in. They truly embody the joyful, playful spirit of Halloween in every delicious bite, providing a much-loved alternative to an overload of sweets.

Ingredients:
- 1 pound store-bought pizza dough: I find that using pre-made dough makes these Easy Mini Halloween Pizzas incredibly quick to prepare. Just ensure it’s at room temperature for at least 30 minutes before you begin working with it; this makes it much more pliable and easier to roll out.
- 1/2 cup pizza sauce: Your favorite brand will do! I like a classic marinara-style sauce, but feel free to choose one with a little extra spice if you’re feeling adventurous.
- 2 cups shredded mozzarella cheese: This is our base cheese, crucial for that melty, gooey pizza goodness. Pre-shredded works perfectly for convenience.
- 4-6 slices of provolone cheese: We’ll be using this for some of our Halloween-themed shapes, like our adorable ghosts. Its smooth texture and mild flavor are ideal.
- 1/4 cup mini pepperonis: These little guys are perfect for adding a bit of savory flavor and for creating spooky mummy eyes or other small details. If you can’t find mini, regular pepperonis can be quartered.
- 1/2 cup black olives: Pitted and sliced. These are absolute stars for Halloween pizzas! We’ll use them to craft creepy spiders, watchful eyes, or even decorative borders.
- 1/4 cup green olives: Pitted and sliced. These add a different color and flavor dimension, excellent for monster eyes or unique patterns.
- 1/4 red bell pepper: Finely diced or cut into thin strips. This provides a nice crunch and a vibrant color, perfect for pumpkin stems, monster mouths, or other creative designs.
- 1/4 yellow bell pepper: Finely diced or cut into thin strips. Similar to the red bell pepper, offering another bright color to our spooky palette.
- 1/4 cup thinly sliced red onion: Cut into very thin rings or small pieces. These can be used to create fantastic spider web effects or add a punch of flavor.
- 1 tablespoon olive oil: For brushing our pizza bases, ensuring they get beautifully golden and crisp.
- A pinch of garlic powder (optional): For sprinkling on the dough or mixing into the olive oil for an extra layer of flavor.
- Fresh basil or oregano (optional): For garnish after baking, adding a fresh, aromatic finish to our Easy Mini Halloween Pizzas.
Prepping Our Spooky Toppings
Before we even think about rolling out dough, let’s get all our eerie and exciting toppings ready. This mise en place approach ensures a smooth and fun assembly line, which is key to making these Easy Mini Halloween Pizzas truly easy!
- First, I like to drain and slice all the olives. If you have whole pitted olives, simply lay them on a cutting board and carefully slice them into thin rounds. For black olives, some I’ll slice into thin rings for spider bodies or eyes, and a few I might quarter lengthwise to create spider legs. Green olives I typically just slice into rounds for vibrant eyes. Place these into separate small bowls.
- Next up, let’s tackle the bell peppers. For the red and yellow bell peppers, I’ll wash them thoroughly and then cut them into very thin strips or small, fine dice. The strips are great for creating “pumpkin” stems or adding color, while the small dice can be used for various monster features or simply as a colorful sprinkle. Keep them separate in small dishes.
- For the red onion, our secret weapon for spider webs, I’ll peel it and then slice it as thinly as humanly possible. A mandoline slicer is fantastic for this if you have one, but a very sharp knife and a steady hand will also work wonders. Separate the rings and set them aside.
- If you’re using regular-sized pepperoni instead of mini, now is the time to cut them into smaller pieces. Quartering them usually works best for mummy eyes or small details. Place these in a bowl.
- Now, let’s prepare our provolone cheese. This is crucial for our ghostly shapes. Lay out your provolone slices. Using a small ghost-shaped cookie cutter, if you have one, cut out several ghost shapes. If you don’t have a cookie cutter, don’t worry! You can easily freehand cut ghost shapes using a small, sharp knife. Just aim for a wavy bottom and two little “arms” reaching out. You’ll want one ghost per mini pizza you intend to make with this design.
- Finally, ensure your shredded mozzarella is ready to go, and your pizza sauce is open and accessible. Having all these components prepped and laid out will make the assembly phase a breeze, especially when little helpers are involved!
Crafting Our Mini Pizza Bases
The foundation of our Easy Mini Halloween Pizzas begins with our dough! Getting the bases right is simple but important for a good bake.
- First things first, preheat your oven. For most pizza doughs, a temperature of 400°F (200°C) works beautifully. While the oven heats up, I’ll make sure to arrange my oven racks so one is in the middle of the oven, perfect for even baking.
- Next, let’s prepare our baking sheets. I usually line two large baking sheets with parchment paper. This prevents sticking and makes cleanup incredibly easy. A light spray with cooking spray on the parchment can add an extra layer of non-stick security, though it’s often not strictly necessary.
- Now, let’s turn our attention to the pizza dough. If you’re using store-bought dough, it’s probably come in a ball or a roll. On a lightly floured surface (I use a generous sprinkle of all-purpose flour), gently unroll or flatten your pizza dough. Use a rolling pin to roll it out evenly to about 1/4-inch thickness. You’re aiming for a somewhat uniform sheet of dough from which we’ll cut our mini pizzas. Don’t worry too much about a perfect rectangle; we’re cutting circles anyway!
- Once your dough is rolled out, it’s time to cut our mini pizza bases. I find that a round cookie cutter, about 3-4 inches in diameter, works perfectly for these mini pizzas. If you don’t have a cookie cutter, the rim of a drinking glass or a mug will do the trick just as well! Firmly press the cutter into the dough, twist slightly, and lift.
- Carefully transfer each cut-out dough circle to your prepared baking sheets. Make sure to leave a little space between each circle, as they will expand slightly during baking. I usually aim for about an inch of space.
- Gather the dough scraps, gently knead them back together, and then re-roll them to cut out more circles until you’ve used up most of your dough. This minimizes waste and maximizes the number of delicious Easy Mini Halloween Pizzas we can make!
- Once all your mini bases are on the baking sheets, I like to brush each one lightly with a little olive oil. This helps create a beautiful golden-brown crust and adds a lovely flavor. You can even mix a tiny pinch of garlic powder into your olive oil for an extra savory kick, which is a personal favorite touch of mine.
Assembling Our Ghoulish Pizzas
Now for the fun part – turning our simple dough circles into canvases for our spooky masterpieces! This is where the creativity really comes out for our Easy Mini Halloween Pizzas.
- With our mini dough bases neatly arranged on the baking sheets and lightly brushed with olive oil, it’s time to add our first layer: the pizza sauce. Using a small spoon, spread a thin layer of pizza sauce over each dough circle, leaving a small border around the edge to form a crust. Don’t go too heavy on the sauce, as it can make the pizzas soggy. A little goes a long way!
- Next, we’ll add our base layer of cheese. Sprinkle a generous amount of shredded mozzarella cheese over the sauce on each mini pizza. This is our blank canvas upon which we’ll build our terrifyingly tasty designs. Make sure the cheese covers most of the sauce.
- Now, let’s get into the Halloween-specific designs. This is where we make each of our Easy Mini Halloween Pizzas unique and festive!
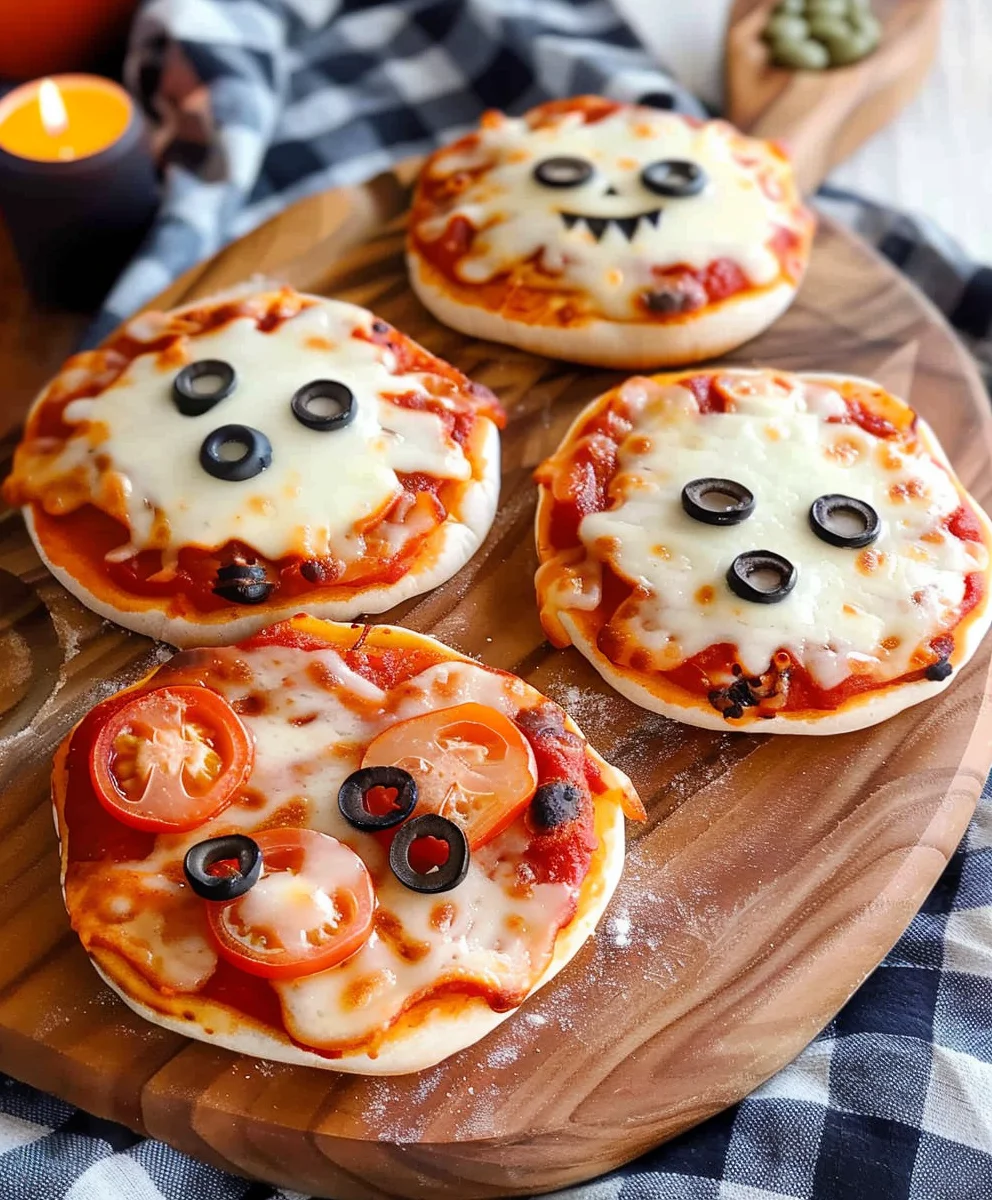
- For Mummy Pizzas: On a few of your cheesy bases, place two mini pepperonis side-by-side near the top – these will be our mummy’s eyes. Then, take small strips of provolone cheese (or if you don’t have provolone, you can tear strips from mozzarella slices) and lay them haphazardly across the pizza, crisscrossing them over the pepperoni “eyes” to create the look of bandages. Leave small gaps so the red sauce and pepperoni show through, mimicking a mummy’s wrapped face.
- For Spider Web Pizzas: On another set of pizzas, after the sauce and mozzarella, take a small squeeze bottle or a spoon to carefully drizzle or dollop concentric circles of additional pizza sauce on top of the mozzarella. Start from the center and move outwards. Then, using a toothpick, start from the center and drag the toothpick outwards through the sauce circles to create a spider web effect. After creating the web, place a few black olive halves or whole olives in the center or on the web to form the “body” of a spider. You can use thin strips of black olive to create eight little legs around the body.
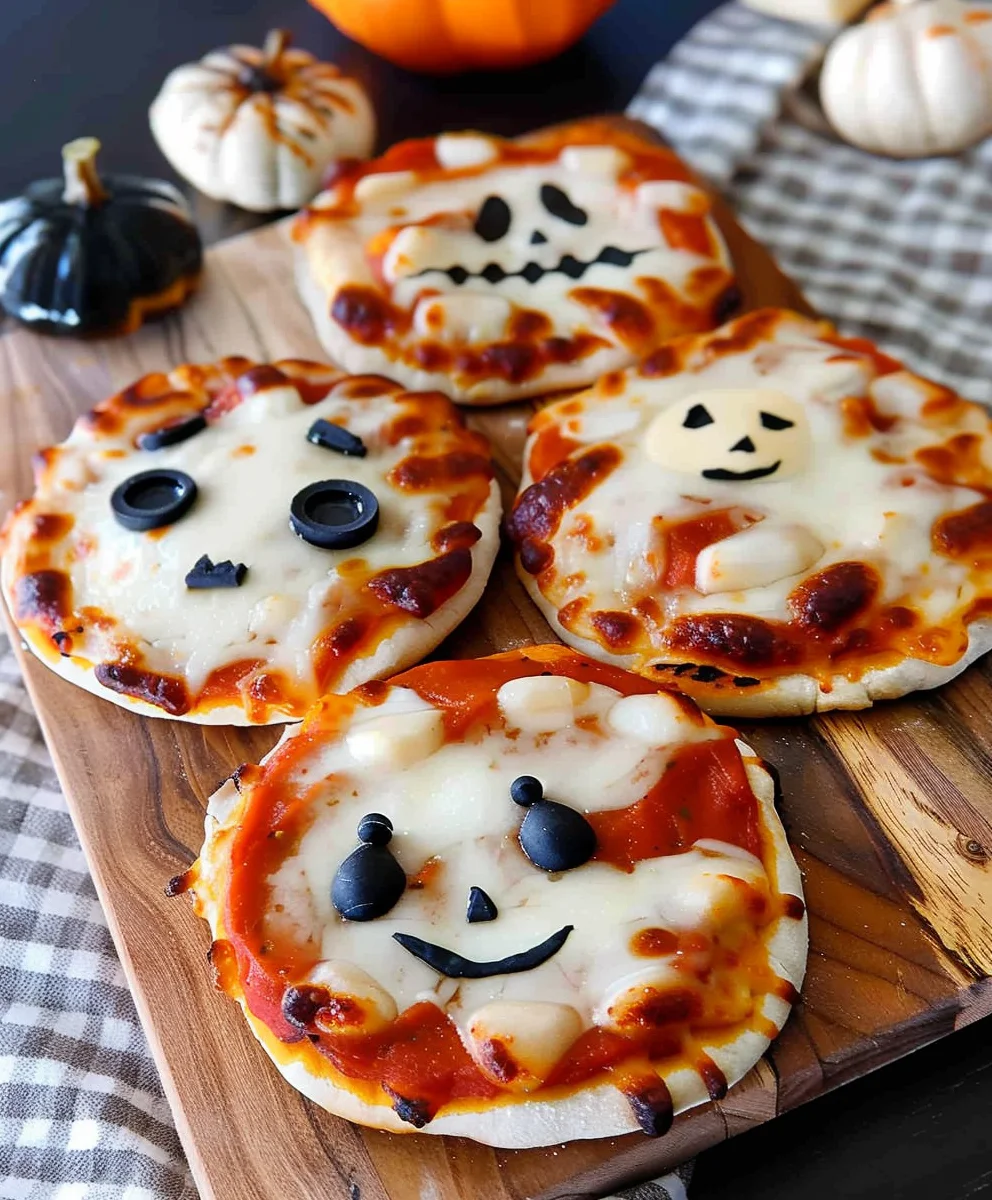
- For Ghost Pizzas: Take the ghost-shaped provolone cheese cut-outs we made earlier. Carefully place one provolone ghost shape directly onto the sauced and cheesed mini pizza. The heat of the oven will melt it beautifully while retaining its spectral outline. You can add two tiny black olive pieces or small pepperonis for eyes if you like, or leave them as ghostly apparitions.
- For Jack-o’-Lantern or Monster Pizzas: Use your thinly sliced red and yellow bell peppers to create eyes, noses, and mouths. Black olives can be used for pupils or jagged teeth. Red onion rings can also form spooky eyes or menacing grins. Let your imagination run wild here! You can make funny monsters or scary pumpkins.
- Once all your mini pizzas are assembled with their various spooky designs, take a moment to admire your handiwork. These Easy Mini Halloween Pizzas are already looking fantastic!
Baking Our Creepy Creations
The moment of truth! Baking these Easy Mini Halloween Pizzas to golden, gooey perfection is relatively quick and simple, but attention to detail ensures a wonderfully crisp crust and perfectly melted toppings.
- With your oven already preheated to 400°F (200°C) and your baking sheets laden with your ghoulishly decorated mini pizzas, it’s time to get them into the heat. Carefully transfer the baking sheets to the preheated oven, placing them on the middle rack. If you have two sheets, you might place one on the middle rack and one on a lower or upper rack, but be prepared to rotate them for even cooking.
- Set a timer for 10-12 minutes. The exact baking time can vary slightly depending on your oven’s calibration and how thick your dough bases are. I always recommend keeping a close eye on them, especially towards the end of the baking cycle.
- During baking, you’ll want to look for a few key indicators of doneness. The crust around the edges of your mini pizzas should be a beautiful golden brown and look crisp. The cheese should be fully melted, bubbly, and perhaps even slightly browned in spots, indicating it’s perfectly toasted. If you’ve used provolone for ghosts or strips, you’ll see them softening and slightly spreading, but still holding their shape.
- If you’re baking two sheets at once, halfway through the cooking time (around the 5-6 minute mark), I recommend rotating the baking sheets. This means swapping their positions in the oven (top to bottom, and bottom to top) and also turning each sheet 180 degrees. This ensures that all the Easy Mini Halloween Pizzas bake evenly and achieve that desired crispiness and melty goodness.
- Once your Easy Mini Halloween Pizzas have reached that perfect golden, bubbly state, carefully remove the baking sheets from the oven. The smell wafting from your kitchen will be absolutely irresistible!
- Let the pizzas cool on the baking sheets for just 2-3 minutes. This short resting period allows the cheese to set slightly, making them easier to transfer and preventing toppings from sliding off. It also prevents any painful burnt tongues from biting into molten cheese immediately!
Bringing Our Halloween Pizzas to Life (Decorating)
While the baking process creates the foundation, it’s often the final touches that truly elevate these Easy Mini Halloween Pizzas from delicious snacks to show-stopping party bites. This step is about adding those little embellishments that enhance the flavor and, most importantly, the festive Halloween spirit!
- Once your pizzas have cooled slightly on the baking sheets and are easy to handle, you can move them to a cooling rack or directly to a serving platter. If any of your designs, particularly the spider webs, need a little touch-up or enhancement after baking, now is the time to do it. Sometimes the sauce for the web can spread a bit, and a fresh drizzle in the center or a gentle drag with a toothpick can redefine the lines.
- For an extra layer of flavor and a pop of color, I love to garnish with fresh herbs. A sprinkling of fresh basil or oregano, finely chopped, adds a wonderful aromatic touch. If you’re using basil, consider tearing a few leaves and arranging them around the “pumpkin” pizzas as leafy vines or on the “ghost” pizzas for a hint of color.
- Consider adding some “blood” splatters! While optional, a very small drizzle of sriracha or a thin red pepper sauce, applied carefully with a toothpick, can give a gory, spooky effect to some of your monster or mummy pizzas. Just a tiny amount goes a long way for visual impact without overwhelming the pizza’s flavor, especially for younger guests.
- If you made ghost pizzas and left them without eyes before baking, you can now add tiny dots of black icing gel or small pieces of black olive to create their haunting gazes. This gives you more control over the final look.
- For the spider web pizzas, ensure your black olive spiders are firmly in place. You can even add a few extra “baby” spiders (tiny olive pieces) scurrying across the web for added detail and creepiness.
- Think about serving presentation. Arranging the different designs—mummies, ghosts, spiders, and monsters—together on a large platter creates an impressive and visually appealing spread. The variety makes each bite an exciting surprise.
- This final decorating phase allows you to truly customize each of your Easy Mini Halloween Pizzas. It’s an excellent opportunity to involve kids in adding their own finishing touches, making it an even more collaborative and memorable holiday activity. The small details really make these pizzas stand out and capture the festive mood.
Serving Up the Spooky Fun
After all that delightful effort in creating these incredible Easy Mini Halloween Pizzas, it’s finally time to enjoy them! This section covers how to best serve them and offers a few tips to make your Halloween gathering a resounding success.
- Once your mini pizzas are fully decorated and have cooled slightly to a comfortable eating temperature, they are ready to be served. I love to arrange them on a large, festive platter. Sometimes, I’ll even use a black or orange platter to enhance the Halloween theme.
- Because these are “mini” pizzas, they are designed to be finger food, making them perfect for parties or casual get-togethers. Encourage your guests to pick them up and enjoy! No need for forks and knives here, unless someone prefers.
- These pizzas are absolutely best when served warm, straight out of the oven. The cheese is perfectly gooey, and the crust is wonderfully crisp. If you’re preparing them in advance for a party, you can par-bake them (bake for about 80% of the time) and then finish them off in the oven just before your guests arrive. This ensures they are fresh and hot.
- If you find yourself with leftovers (which is rare when these Easy Mini Halloween Pizzas are involved!), they can be stored in an airtight container in the refrigerator for up to 3 days. To reheat, I recommend popping them back into a preheated oven (around 350°F or 175°C) for about 5-7 minutes, or until the cheese is melted and the crust is crisp again. The microwave can work in a pinch, but it often results in a softer crust.
- Consider serving these Easy Mini Halloween Pizzas alongside a fun dip, like a creamy ranch dressing or an extra bowl of marinara for dipping the crusts. This adds another layer of flavor and a little extra fun to the eating experience.
- Remember to take a moment to appreciate your handiwork! The joy of making these Easy Mini Halloween Pizzas is not just in the eating, but in the creative process and the festive atmosphere they bring to any celebration. They are always a crowd-pleaser and a fantastic way to add a personalized, spooky touch to your Halloween festivities. Enjoy every delicious, eerie bite!
I hope you have as much fun making and eating these Easy Mini Halloween Pizzas as I do every year. They truly are a delightful and approachable way to bring some festive spirit to your table!
Ingredients:
- 1 pound store-bought pizza dough: I find that using pre-made dough makes these Easy Mini Halloween Pizzas incredibly quick to prepare. Just ensure it’s at room temperature for at least 30 minutes before you begin working with it; this makes it much more pliable and easier to roll out.
- 1/2 cup pizza sauce: Your favorite brand will do! I like a classic marinara-style sauce, but feel free to choose one with a little extra spice if you’re feeling adventurous.
- 2 cups shredded mozzarella cheese: This is our base cheese, crucial for that melty, gooey pizza goodness. Pre-shredded works perfectly for convenience.
- 4-6 slices of provolone cheese: We’ll be using this for some of our Halloween-themed shapes, like our adorable ghosts. Its smooth texture and mild flavor are ideal.
- 1/4 cup mini pepperonis: These little guys are perfect for adding a bit of savory flavor and for creating spooky mummy eyes or other small details. If you can’t find mini, regular pepperonis can be quartered.
- 1/2 cup black olives: Pitted and sliced. These are absolute stars for Halloween pizzas! We’ll use them to craft creepy spiders, watchful eyes, or even decorative borders.
- 1/4 cup green olives: Pitted and sliced. These add a different color and flavor dimension, excellent for monster eyes or unique patterns.
- 1/4 red bell pepper: Finely diced or cut into thin strips. This provides a nice crunch and a vibrant color, perfect for pumpkin stems, monster mouths, or other creative designs.
- 1/4 yellow bell pepper: Finely diced or cut into thin strips. Similar to the red bell pepper, offering another bright color to our spooky palette.
- 1/4 cup thinly sliced red onion: Cut into very thin rings or small pieces. These can be used to create fantastic spider web effects or add a punch of flavor.
- 1 tablespoon olive oil: For brushing our pizza bases, ensuring they get beautifully golden and crisp.
- A pinch of garlic powder (optional): For sprinkling on the dough or mixing into the olive oil for an extra layer of flavor.
- Fresh basil or oregano (optional): For garnish after baking, adding a fresh, aromatic finish to our Easy Mini Halloween Pizzas.
Prepping Our Spooky Toppings
Before we even think about rolling out dough, let’s get all our eerie and exciting toppings ready. This mise en place approach ensures a smooth and fun assembly line, which is key to making these Easy Mini Halloween Pizzas truly easy!
- First, I like to drain and slice all the olives. If you have whole pitted olives, simply lay them on a cutting board and carefully slice them into thin rounds. For black olives, some I’ll slice into thin rings for spider bodies or eyes, and a few I might quarter lengthwise to create spider legs. Green olives I typically just slice into rounds for vibrant eyes. Place these into separate small bowls.
- Next up, let’s tackle the bell peppers. For the red and yellow bell peppers, I’ll wash them thoroughly and then cut them into very thin strips or small, fine dice. The strips are great for creating “pumpkin” stems or adding color, while the small dice can be used for various monster features or simply as a colorful sprinkle. Keep them separate in small dishes.
- For the red onion, our secret weapon for spider webs, I’ll peel it and then slice it as thinly as humanly possible. A mandoline slicer is fantastic for this if you have one, but a very sharp knife and a steady hand will also work wonders. Separate the rings and set them aside.
- If you’re using regular-sized pepperoni instead of mini, now is the time to cut them into smaller pieces. Quartering them usually works best for mummy eyes or small details. Place these in a bowl.
- Now, let’s prepare our provolone cheese. This is crucial for our ghostly shapes. Lay out your provolone slices. Using a small ghost-shaped cookie cutter, if you have one, cut out several ghost shapes. If you don’t have a cookie cutter, don’t worry! You can easily freehand cut ghost shapes using a small, sharp knife. Just aim for a wavy bottom and two little “arms” reaching out. You’ll want one ghost per mini pizza you intend to make with this design.
- Finally, ensure your shredded mozzarella is ready to go, and your pizza sauce is open and accessible. Having all these components prepped and laid out will make the assembly phase a breeze, especially when little helpers are involved!
Crafting Our Mini Pizza Bases
The foundation of our Easy Mini Halloween Pizzas begins with our dough! Getting the bases right is simple but important for a good bake.
- First things first, preheat your oven. For most pizza doughs, a temperature of 400°F (200°C) works beautifully. While the oven heats up, I’ll make sure to arrange my oven racks so one is in the middle of the oven, perfect for even baking.
- Next, let’s prepare our baking sheets. I usually line two large baking sheets with parchment paper. This prevents sticking and makes cleanup incredibly easy. A light spray with cooking spray on the parchment can add an extra layer of non-stick security, though it’s often not strictly necessary.
- Now, let’s turn our attention to the pizza dough. If you’re using store-bought dough, it’s probably come in a ball or a roll. On a lightly floured surface (I use a generous sprinkle of all-purpose flour), gently unroll or flatten your pizza dough. Use a rolling pin to roll it out evenly to about 1/4-inch thickness. You’re aiming for a somewhat uniform sheet of dough from which we’ll cut our mini pizzas. Don’t worry too much about a perfect rectangle; we’re cutting circles anyway!
- Once your dough is rolled out, it’s time to cut our mini pizza bases. I find that a round cookie cutter, about 3-4 inches in diameter, works perfectly for these mini pizzas. If you don’t have a cookie cutter, the rim of a drinking glass or a mug will do the trick just as well! Firmly press the cutter into the dough, twist slightly, and lift.
- Carefully transfer each cut-out dough circle to your prepared baking sheets. Make sure to leave a little space between each circle, as they will expand slightly during baking. I usually aim for about an inch of space.
- Gather the dough scraps, gently knead them back together, and then re-roll them to cut out more circles until you’ve used up most of your dough. This minimizes waste and maximizes the number of delicious Easy Mini Halloween Pizzas we can make!
- Once all your mini bases are on the baking sheets, I like to brush each one lightly with a little olive oil. This helps create a beautiful golden-brown crust and adds a lovely flavor. You can even mix a tiny pinch of garlic powder into your olive oil for an extra savory kick, which is a personal favorite touch of mine.
Assembling Our Ghoulish Pizzas
Now for the fun part – turning our simple dough circles into canvases for our spooky masterpieces! This is where the creativity really comes out for our Easy Mini Halloween Pizzas.
- With our mini dough bases neatly arranged on the baking sheets and lightly brushed with olive oil, it’s time to add our first layer: the pizza sauce. Using a small spoon, spread a thin layer of pizza sauce over each dough circle, leaving a small border around the edge to form a crust. Don’t go too heavy on the sauce, as it can make the pizzas soggy. A little goes a long way!
- Next, we’ll add our base layer of cheese. Sprinkle a generous amount of shredded mozzarella cheese over the sauce on each mini pizza. This is our blank canvas upon which we’ll build our terrifyingly tasty designs. Make sure the cheese covers most of the sauce.
- Now, let’s get into the Halloween-specific designs. This is where we make each of our Easy Mini Halloween Pizzas unique and festive!
- For Mummy Pizzas: On a few of your cheesy bases, place two mini pepperonis side-by-side near the top – these will be our mummy’s eyes. Then, take small strips of provolone cheese (or if you don’t have provolone, you can tear strips from mozzarella slices) and lay them haphazardly across the pizza, crisscrossing them over the pepperoni “eyes” to create the look of bandages. Leave small gaps so the red sauce and pepperoni show through, mimicking a mummy’s wrapped face.
- For Spider Web Pizzas: On another set of pizzas, after the sauce and mozzarella, take a small squeeze bottle or a spoon to carefully drizzle or dollop concentric circles of additional pizza sauce on top of the mozzarella. Start from the center and move outwards. Then, using a toothpick, start from the center and drag the toothpick outwards through the sauce circles to create a spider web effect. After creating the web, place a few black olive halves or whole olives in the center or on the web to form the “body” of a spider. You can use thin strips of black olive to create eight little legs around the body.
- For Ghost Pizzas: Take the ghost-shaped provolone cheese cut-outs we made earlier. Carefully place one provolone ghost shape directly onto the sauced and cheesed mini pizza. The heat of the oven will melt it beautifully while retaining its spectral outline. You can add two tiny black olive pieces or small pepperonis for eyes if you like, or leave them as ghostly apparitions.
- For Jack-o’-Lantern or Monster Pizzas: Use your thinly sliced red and yellow bell peppers to create eyes, noses, and mouths. Black olives can be used for pupils or jagged teeth. Red onion rings can also form spooky eyes or menacing grins. Let your imagination run wild here! You can make funny monsters or scary pumpkins.
- Once all your mini pizzas are assembled with their various spooky designs, take a moment to admire your handiwork. These Easy Mini Halloween Pizzas are already looking fantastic!
Baking Our Creepy Creations
The moment of truth! Baking these Easy Mini Halloween Pizzas to golden, gooey perfection is relatively quick and simple, but attention to detail ensures a wonderfully crisp crust and perfectly melted toppings.
- With your oven already preheated to 400°F (200°C) and your baking sheets laden with your ghoulishly decorated mini pizzas, it’s time to get them into the heat. Carefully transfer the baking sheets to the preheated oven, placing them on the middle rack. If you have two sheets, you might place one on the middle rack and one on a lower or upper rack, but be prepared to rotate them for even cooking.
- Set a timer for 10-12 minutes. The exact baking time can vary slightly depending on your oven’s calibration and how thick your dough bases are. I always recommend keeping a close eye on them, especially towards the end of the baking cycle.
- During baking, you’ll want to look for a few key indicators of doneness. The crust around the edges of your mini pizzas should be a beautiful golden brown and look crisp. The cheese should be fully melted, bubbly, and perhaps even slightly browned in spots, indicating it’s perfectly toasted. If you’ve used provolone for ghosts or strips, you’ll see them softening and slightly spreading, but still holding their shape.
- If you’re baking two sheets at once, halfway through the cooking time (around the 5-6 minute mark), I recommend rotating the baking sheets. This means swapping their positions in the oven (top to bottom, and bottom to top) and also turning each sheet 180 degrees. This ensures that all the Easy Mini Halloween Pizzas bake evenly and achieve that desired crispiness and melty goodness.
- Once your Easy Mini Halloween Pizzas have reached that perfect golden, bubbly state, carefully remove the baking sheets from the oven. The smell wafting from your kitchen will be absolutely irresistible!
- Let the pizzas cool on the baking sheets for just 2-3 minutes. This short resting period allows the cheese to set slightly, making them easier to transfer and preventing toppings from sliding off. It also prevents any painful burnt tongues from biting into molten cheese immediately!
Bringing Our Halloween Pizzas to Life (Decorating)
While the baking process creates the foundation, it’s often the final touches that truly elevate these Easy Mini Halloween Pizzas from delicious snacks to show-stopping party bites. This step is about adding those little embellishments that enhance the flavor and, most importantly, the festive Halloween spirit!
- Once your pizzas have cooled slightly on the baking sheets and are easy to handle, you can move them to a cooling rack or directly to a serving platter. If any of your designs, particularly the spider webs, need a little touch-up or enhancement after baking, now is the time to do it. Sometimes the sauce for the web can spread a bit, and a fresh drizzle in the center or a gentle drag with a toothpick can redefine the lines.
- For an extra layer of flavor and a pop of color, I love to garnish with fresh herbs. A sprinkling of fresh basil or oregano, finely chopped, adds a wonderful aromatic touch. If you’re using basil, consider tearing a few leaves and arranging them around the “pumpkin” pizzas as leafy vines or on the “ghost” pizzas for a hint of color.
- Consider adding some “blood” splatters! While optional, a very small drizzle of sriracha or a thin red pepper sauce, applied carefully with a toothpick, can give a gory, spooky effect to some of your monster or mummy pizzas. Just a tiny amount goes a long way for visual impact without overwhelming the pizza’s flavor, especially for younger guests.
- If you made ghost pizzas and left them without eyes before baking, you can now add tiny dots of black icing gel or small pieces of black olive to create their haunting gazes. This gives you more control over the final look.
- For the spider web pizzas, ensure your black olive spiders are firmly in place. You can even add a few extra “baby” spiders (tiny olive pieces) scurrying across the web for added detail and creepiness.
- Think about serving presentation. Arranging the different designs—mummies, ghosts, spiders, and monsters—together on a large platter creates an impressive and visually appealing spread. The variety makes each bite an exciting surprise.
- This final decorating phase allows you to truly customize each of your Easy Mini Halloween Pizzas. It’s an excellent opportunity to involve kids in adding their own finishing touches, making it an even more collaborative and memorable holiday activity. The small details really make these pizzas stand out and capture the festive mood.
Serving Up the Spooky Fun
After all that delightful effort in creating these incredible Easy Mini Halloween Pizzas, it’s finally time to enjoy them! This section covers how to best serve them and offers a few tips to make your Halloween gathering a resounding success.
- Once your mini pizzas are fully decorated and have cooled slightly to a comfortable eating temperature, they are ready to be served. I love to arrange them on a large, festive platter. Sometimes, I’ll even use a black or orange platter to enhance the Halloween theme.
- Because these are “mini” pizzas, they are designed to be finger food, making them perfect for parties or casual get-togethers. Encourage your guests to pick them up and enjoy! No need for forks and knives here, unless someone prefers.
- These pizzas are absolutely best when served warm, straight out of the oven. The cheese is perfectly gooey, and the crust is wonderfully crisp. If you’re preparing them in advance for a party, you can par-bake them (bake for about 80% of the time) and then finish them off in the oven just before your guests arrive. This ensures they are fresh and hot.
- If you find yourself with leftovers (which is rare when these Easy Mini Halloween Pizzas are involved!), they can be stored in an airtight container in the refrigerator for up to 3 days. To reheat, I recommend popping them back into a preheated oven (around 350°F or 175°C) for about 5-7 minutes, or until the cheese is melted and the crust is crisp again. The microwave can work in a pinch, but it often results in a softer crust.
- Consider serving these Easy Mini Halloween Pizzas alongside a fun dip, like a creamy ranch dressing or an extra bowl of marinara for dipping the crusts. This adds another layer of flavor and a little extra fun to the eating experience.
- Remember to take a moment to appreciate your handiwork! The joy of making these Easy Mini Halloween Pizzas is not just in the eating, but in the creative process and the festive atmosphere they bring to any celebration. They are always a crowd-pleaser and a fantastic way to add a personalized, spooky touch to your Halloween festivities. Enjoy every delicious, eerie bite!
I hope you have as much fun making and eating these Easy Mini Halloween Pizzas as I do every year. They truly are a delightful and approachable way to bring some festive spirit to your table!
Conclusion:
So, there you have it – my absolute favorite recipe for a truly delightful and memorable Halloween treat that promises to bring smiles and maybe a few playful shrieks of delight to your celebration. I genuinely believe that this recipe for mini pizzas isn’t just about creating food; it’s about crafting an experience, building memories, and sharing moments of joy with loved ones. From the moment you roll out the dough to the first bite of a perfectly baked, spooky-shaped pizza, you’ll understand why this recipe holds such a special place in my heart.
Why This Recipe is an Absolute Must-Try This Season:
First and foremost, the sheer simplicity combined with the impressive visual appeal makes this a standout. You don’t need to be a seasoned chef to whip up a batch of these charming, customized pizzas. The process is incredibly forgiving, making it ideal for cooks of all skill levels, even those who might typically shy away from baking. What truly elevates this recipe, however, is its uncanny ability to transform a simple cooking session into an engaging, interactive activity for the entire family. Imagine the laughter and creativity as little hands (and big ones!) choose their shapes, spread their sauce, and carefully place their favorite toppings. It’s an edible art project that culminates in a delicious reward.
Beyond the fun factor, the taste is simply irresistible. Each mini pizza offers that perfect balance of a slightly crisp crust, a savory tomato sauce, gooey, melted cheese, and whatever fantastic toppings you choose to adorn your ghostly or pumpkin-shaped creations. They’re bite-sized explosions of flavor that are guaranteed to be a hit with both children and adults. Furthermore, these aren’t just snacks; they are conversation starters, icebreakers, and the centerpiece of a festive spread. Whether you’re hosting a grand spooky bash, a cozy family movie night with a Halloween theme, or looking for a creative school party contribution, these Easy Mini Halloween Pizzas are an absolute winner. They save you precious time during the often-hectic holiday season without compromising an ounce on flavor or festive fun, making them a practical yet incredibly enjoyable option.
Creative Serving Suggestions and Exciting Variations:
While we focused on the classic Halloween shapes, the beauty of this recipe lies in its incredible versatility. Don’t feel limited to ghosts and pumpkins! You can easily adapt this concept for any holiday or occasion. Think star-shaped pizzas for patriotic celebrations, heart-shaped ones for Valentine’s Day, or even simple circles for an everyday snack. The topping possibilities are equally endless. For our vegetarian friends, consider loading them up with finely diced bell peppers (orange and black olives for Halloween!), mushrooms, onions, or even some crumbled feta or goat cheese for a tangy twist. For the meat lovers, mini pepperoni bats, sliced sausage ghosts, or shredded chicken ‘spiderwebs’ can take your spooky creations to the next level. You could even experiment with different cheese blends – a smoked provolone or a sharp cheddar could add wonderful depth of flavor.
Consider serving these mini pizzas alongside a vibrant homemade marinara sauce for extra dipping fun, or perhaps a creamy ranch dressing for those who prefer a cooler complement. For a more balanced meal, pair them with a fresh, crisp green salad, some crunchy veggie sticks with a hummus dip, or a bowl of hearty tomato soup. They also make fantastic appetizers when served warm on a festive platter. If you’re planning a party, you can even prepare the pizza bases and chop all your desired toppings ahead of time, storing them separately. Then, simply assemble and bake closer to serving, allowing guests to even customize their own mini pizzas at a dedicated ‘pizza bar’ station. This makes party day a breeze and adds another layer of interactive fun for your guests. The adaptability of this recipe means it can truly evolve to suit any palate or dietary preference, ensuring everyone gets to enjoy a slice of the fun.
Your Turn to Create and Share!
I truly hope that reading through this recipe has inspired you to grab your apron, gather your ingredients, and dive headfirst into creating your very own batch of these fantastic Halloween treats. I’m incredibly excited for you to experience the joy of making them, the aroma filling your kitchen, and the pure delight on the faces of those who get to enjoy your culinary creations. There’s nothing quite as rewarding as seeing happy faces light up as they bite into a homemade treat, especially one as fun and flavorful as these mini pizzas.
Please, please, please don’t keep your masterpieces a secret! I absolutely adore seeing your culinary adventures. Did you get particularly creative with your ghost cut-outs or mummy wraps? Did your kids have an absolute blast decorating their own cheesy concoctions? I’d be thrilled to hear all about your experience. Come back and share your thoughts, your tips, or even better, snap a photo of your finished mini pizzas and let me know how they turned out in the comments below. Your feedback and creativity not only make my day but also inspire others in our wonderful community to try their hand at this delightful recipe. Happy baking, and have an absolutely spooktacular time!
Easy Mini Halloween Pizzas
Transform your spooky season with Easy Mini Halloween Pizzas! This fun, interactive recipe lets everyone create their own edible monsters, mummies, or jack-o’-lanterns. Delightful, savory, and perfect for a memorable Halloween gathering, offering a creative alternative to candy.
Ingredients
-
28 oz can whole tomatoes, drained
-
2 cloves garlic, minced
-
1 Tablespoon olive oil
-
1 teaspoon white wine vinegar
-
1 teaspoon dried oregano
-
Salt and freshly ground black pepper, to taste
-
3 10-inch flour tortillas
-
2 teaspoons olive oil (for brushing)
-
4 slices Mozzarella cheese
-
1 slice Cheddar cheese
-
4 large black olives, sliced
-
1/4 cup pizza sauce (optional, for convenience)
-
2 Tablespoons shredded mozzarella cheese
Instructions
-
Step 1
In a bowl, mash drained whole tomatoes with minced garlic, 1 Tbsp olive oil, white wine vinegar, dried oregano, salt, and pepper to make a quick sauce. Alternatively, use the 1/4 cup store-bought pizza sauce. -
Step 2
Preheat oven to 400°F (200°C). Line a baking sheet with parchment paper. Cut 3-4 inch circles from flour tortillas using a cookie cutter or glass rim. Brush tortilla circles lightly with 2 tsp olive oil. -
Step 3
Spread a thin layer of the prepared tomato sauce (or store-bought pizza sauce) on each tortilla circle, leaving a small border. Sprinkle with shredded mozzarella cheese. -
Step 4
Cut Mozzarella and Cheddar slices into spooky shapes (ghosts, mummy strips, jack-o’-lantern faces). Use sliced black olives for eyes, spider bodies, or other details. Arrange toppings creatively on each pizza. -
Step 5
Carefully transfer assembled pizzas to the prepared baking sheet. Bake for 8-10 minutes, or until crusts are golden and cheese is bubbly and melted. If baking multiple sheets, rotate halfway through for even cooking. -
Step 6
Remove from oven and let cool on the baking sheet for 2-3 minutes. Serve warm and enjoy your spooky creations!
Important Information
Nutrition Facts (Per Serving)
It is important to consider this information as approximate and not to use it as definitive health advice.
Allergy Information
Please check ingredients for potential allergens and consult a health professional if in doubt.