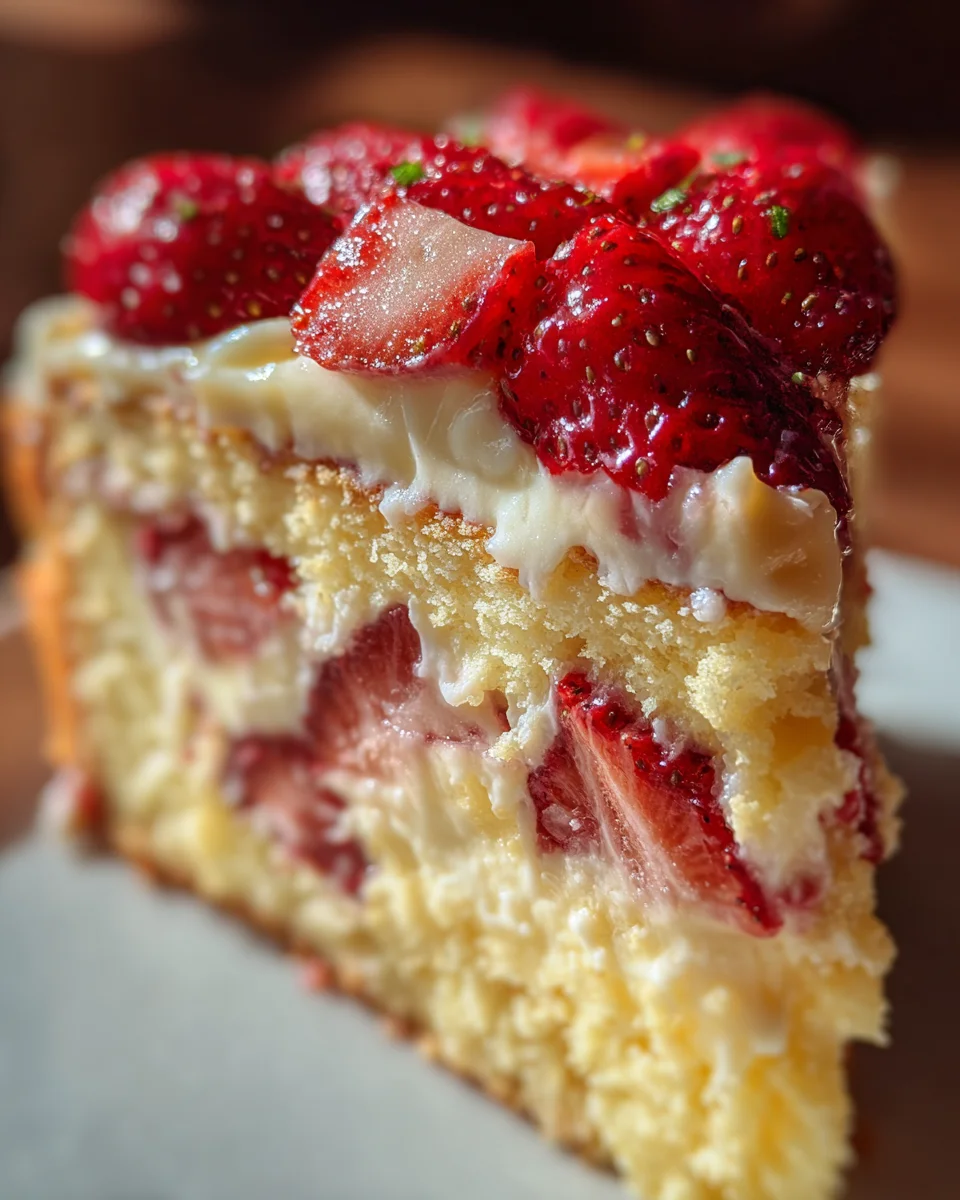
Strawberry Custard Delight Cake Recipe Guide – prepare to embark on a truly delightful baking adventure that culminates in a show-stopping dessert, perfect for any occasion. Imagine layers of soft, airy vanilla sponge, generously filled with a velvety, luscious custard, and crowned with a vibrant explosion of fresh, juicy strawberries. The mere thought is enough to make mouths water!
While this particular combination might not trace back to ancient times with a specific monarch, the pairing of tender cake, creamy filling, and fresh fruit has been a hallmark of celebratory desserts across various cultures for centuries. It evokes a sense of timeless elegance and simple joy, reminiscent of sun-drenched garden parties and cherished family gatherings. This cake isn’t just a dessert; it’s an experience, a sweet tradition waiting to be made in your own kitchen.
Why Everyone Loves This Dessert
People adore this cake for its harmonious blend of textures and flavors. The bright, slightly tart sweetness of the strawberries cuts through the rich, comforting sweetness of the custard, while the tender cake provides the perfect, melt-in-your-mouth foundation. It’s a symphony for the senses – visually stunning, incredibly fragrant, and utterly delicious with every single bite. Crafting this incredible dessert is a rewarding experience, and this comprehensive Strawberry Custard Delight Cake Recipe Guide is here to ensure your success, promising rave reviews from all who taste it.

Ingredients:
-
For the Fluffy Vanilla Sponge Cake Layers:
- 6 large eggs, separated (it’s important that they are large for proper structure)
- 1 cup (200g) granulated sugar, divided into ½ cup portions
- 1 ½ cups (180g) all-purpose flour, sifted meticulously to ensure lightness
- 1 teaspoon baking powder, for that perfect lift
- ½ teaspoon salt, to balance and enhance the flavors
- ½ cup (113g) unsalted butter, melted and then cooled slightly – a crucial step for incorporating it smoothly
- 1 teaspoon pure vanilla extract, a good quality one makes all the difference
-
For the Luscious Vanilla Bean Custard Filling:
- 2 cups (480ml) whole milk, or a mix of whole milk and heavy cream for extra richness
- ½ vanilla bean, split lengthwise and scraped, or 1 ½ teaspoons vanilla bean paste for those beautiful flecks and intense flavor
- 6 large egg yolks (save the whites for another recipe, or use them to make meringues!)
- ½ cup (100g) granulated sugar
- ¼ cup (30g) cornstarch, for thickening the custard to a perfect consistency
- 2 tablespoons unsalted butter, softened, to add a silky finish and prevent skin formation
- Pinch of salt, just a tiny bit to bring out the sweetness
-
For the Fresh Strawberry Preparation:
- 2 lbs (about 900g) fresh strawberries, ripe and vibrant, thoroughly washed and hulled
- 2 tablespoons granulated sugar (optional, for macerating the berries)
- 1 tablespoon fresh lemon juice (optional, also for macerating, it brightens the flavor)
-
For the Dreamy Whipped Cream Frosting:
- 2 cups (480ml) heavy cream (also known as whipping cream), very cold – this is key for successful whipping
- ½ cup (60g) powdered sugar (confectioners’ sugar), sifted to avoid lumps
- 1 teaspoon pure vanilla extract, for that classic, comforting aroma
-
For Optional Simple Syrup (for moistening cake layers):
- ½ cup (100g) granulated sugar
- ½ cup (120ml) water
For the Fluffy Vanilla Sponge Cake Layers:
- Prepare Your Pans and Preheat Oven: Begin by preheating your oven to 350°F (175°C). This ensures the oven is at a consistent temperature when the cake batter goes in, which is crucial for even baking. Generously grease two 8-inch round cake pans with butter or baking spray. Then, line the bottoms with parchment paper circles. Greasing and lining are non-negotiable steps to prevent sticking and ensure your beautiful cake layers release perfectly. You want to make sure your workspace is ready before you start mixing, as sponge cake batter doesn’t like to sit around!
- Combine Dry Ingredients: In a medium bowl, whisk together the 1 ½ cups of sifted all-purpose flour, the 1 teaspoon of baking powder, and the ½ teaspoon of salt. Sifting the flour isn’t just for lump removal; it also aerates the flour, contributing to a lighter cake texture. Set this mixture aside.
- Whip Egg Yolks and Sugar: In a large mixing bowl, using an electric mixer, beat the 6 egg yolks with ½ cup of the granulated sugar until the mixture is pale yellow, thick, and forms a “ribbon” when the beaters are lifted. This ribbon stage means the mixture falls back into the bowl in a thick stream, holding its shape for a few seconds before dissolving. This usually takes about 5-7 minutes on medium-high speed. This step incorporates a lot of air, which is essential for the sponge cake’s delicate texture.
- Whip Egg Whites: In a separate, very clean, and dry bowl (any trace of grease can prevent the whites from whipping properly), beat the 6 egg whites on medium speed until soft peaks form. Gradually add the remaining ½ cup of granulated sugar, one tablespoon at a time, continuing to beat until stiff, glossy peaks form. The whites should hold their shape firmly when the beaters are removed. This meringue provides additional lift and lightness to our “Strawberry Custard Delight Cake Recipe Guide” centerpiece.
- Fold Egg Whites into Yolks: Gently fold about one-third of the whipped egg whites into the egg yolk mixture. Use a rubber spatula and a gentle, cutting, and folding motion. The goal here is to lighten the yolk mixture without deflating the egg whites too much. Once partially combined, add the remaining egg whites and continue folding until just combined. Overmixing will cause you to lose all that precious air you’ve worked hard to incorporate.
- Incorporate Dry Ingredients and Butter: Sprinkle half of the dry ingredients over the egg mixture and gently fold until almost combined. Add the melted and cooled unsalted butter along with the vanilla extract, folding until just incorporated. Then, add the remaining dry ingredients, folding until there are no streaks of flour visible. Remember, gentleness is key! You want to preserve as much air as possible.
- Bake the Cake Layers: Divide the batter evenly between the two prepared cake pans. Smooth the tops gently with a spatula. Bake for 25-30 minutes, or until a wooden skewer or toothpick inserted into the center comes out clean and the cakes spring back lightly when touched. The cakes should be a beautiful golden brown.
- Cool the Cake Layers: Once baked, remove the cakes from the oven and let them cool in their pans on a wire rack for about 10-15 minutes. This allows them to firm up slightly. Then, carefully invert them onto the wire rack, remove the parchment paper, and let them cool completely. It is absolutely crucial that the cake layers are completely cool before you attempt to frost or fill them, otherwise, your beautiful custard and cream will melt.
For the Luscious Vanilla Bean Custard Filling:
- Infuse the Milk: In a medium saucepan, combine the 2 cups of whole milk (or milk/cream mix) and the scraped vanilla bean seeds and pod. Heat over medium heat until small bubbles appear around the edges and the mixture is steamy, but do not bring to a boil. Remove from heat, cover, and let the vanilla infuse for at least 15-20 minutes. This step deepens the vanilla flavor considerably, making our “Strawberry Custard Delight Cake Recipe Guide” truly special.
- Whisk Egg Yolks and Sugar: While the milk is infusing, in a separate medium bowl, whisk together the 6 large egg yolks, ½ cup of granulated sugar, and ¼ cup of cornstarch until the mixture is pale yellow and thick. The cornstarch is our thickening agent and helps prevent the custard from becoming too runny.
- Temper the Egg Yolks: This is a vital step to prevent scrambling the eggs. Remove the vanilla bean pod from the infused milk. Slowly pour about half of the warm milk into the egg yolk mixture, whisking constantly and vigorously. This gradually brings the temperature of the egg yolks up without cooking them. Once combined, pour the tempered egg mixture back into the saucepan with the remaining warm milk.
- Cook the Custard: Return the saucepan to medium-low heat. Cook, whisking constantly, until the custard thickens to a pudding-like consistency. This usually takes about 5-8 minutes. It should be thick enough to coat the back of a spoon. Be patient and keep whisking to prevent lumps and scorching the bottom. Once it’s thick, remove it from the heat immediately.
- Finish and Chill: Stir in the 2 tablespoons of softened unsalted butter and the pinch of salt until fully incorporated and smooth. The butter adds richness and a beautiful sheen. To ensure a perfectly smooth custard, pass it through a fine-mesh sieve into a clean bowl. This removes any potential lumps or bits of cooked egg. Press a piece of plastic wrap directly onto the surface of the custard to prevent a skin from forming as it cools. Refrigerate for at least 3-4 hours, or preferably overnight, until thoroughly chilled and set. A well-chilled custard is essential for the stability and taste of your Strawberry Custard Delight Cake.
For the Fresh Strawberry Preparation:
- Wash and Hull: Gently wash all 2 lbs of fresh strawberries under cool running water. Pat them dry with paper towels. Using a small paring knife or a strawberry huller, remove the green tops and the white core from each strawberry.
- Slice the Strawberries: Slice about two-thirds of the hulled strawberries into uniform ¼-inch thick pieces. These will be used for layering inside the cake. Leave the remaining one-third of the strawberries whole or halve them lengthwise for garnish on top of the cake.
- Macerate (Optional, but Recommended): For an extra burst of flavor and a slightly syrupy consistency, place the sliced strawberries in a bowl. Sprinkle them with 2 tablespoons of granulated sugar and drizzle with 1 tablespoon of fresh lemon juice. Gently toss to combine. Let them sit at room temperature for about 15-30 minutes. The sugar will draw out the natural juices from the strawberries, creating a light syrup that adds moisture and flavor to the cake layers. Drain any excess liquid before assembling if desired, or let it contribute to the moistness.
For the Dreamy Whipped Cream Frosting:
- Chill Your Equipment: For the best whipped cream, place your large mixing bowl (preferably metal) and your whisk attachment (if using a stand mixer) or beaters (if using a hand mixer) in the freezer for 10-15 minutes before you begin. Cold equipment is vital for whipping cream successfully and achieving stiff peaks.
- Whip the Cream: Pour the 2 cups of very cold heavy cream into the chilled bowl. Begin whipping on medium-low speed, gradually increasing to medium-high. As the cream begins to thicken, slowly add the ½ cup of sifted powdered sugar and the 1 teaspoon of pure vanilla extract. Continue whipping until stiff peaks form. Stiff peaks mean that when you lift the whisk, the cream stands up straight and holds its shape firmly. Be careful not to over-whip, as it can quickly turn into grainy butter.
- Keep Chilled: Once whipped, immediately cover the bowl with plastic wrap and refrigerate until you are ready to assemble your cake. Keeping it cold will maintain its volume and stability. This airy, sweet frosting is a perfect complement to the rich custard and fresh fruit in our “Strawberry Custard Delight Cake Recipe Guide.”
For Optional Simple Syrup (for moistening cake layers):
- Combine and Heat: In a small saucepan, combine ½ cup granulated sugar and ½ cup water. Heat over medium heat, stirring occasionally, until the sugar is completely dissolved.
- Cool: Remove from heat and let it cool completely to room temperature before using. You can make this ahead of time and store it in the refrigerator for up to two weeks. Brushing cooled cake layers with simple syrup adds moisture and a subtle sweetness, making the cake even more delightful.
Assembling Your Strawberry Custard Delight Cake:
- Level the Cake Layers: Once your cake layers are completely cool, use a serrated knife or a cake leveling tool to carefully level the tops of each cake layer. This creates a flat surface for stable stacking and a professional appearance.
- Moisten (Optional): If you chose to make the simple syrup, gently brush the cut side of each cake layer with a few tablespoons of the cooled syrup. This adds moisture and ensures the cake stays tender for days.
- First Cake Layer: Place one leveled cake layer on your serving plate or cake stand. If using, dab a small amount of whipped cream underneath the cake to secure it to the plate and prevent it from sliding around during assembly and serving.
- Create a Whipped Cream Border: Transfer a portion of your chilled whipped cream to a piping bag fitted with a round tip (or simply use a spoon and create a border with a knife). Pipe or spread a sturdy border of whipped cream around the perimeter of the first cake layer. This “dam” will hold the custard filling in place.
- Add Custard and Strawberries: Spoon half of the chilled vanilla bean custard filling evenly inside the whipped cream border on the first cake layer. Spread it smoothly with an offset spatula. Then, arrange half of your sliced, macerated strawberries over the custard. Make sure they are in a single layer for even distribution.
- Second Cake Layer: Carefully place the second leveled cake layer on top, aligning it carefully. Gently press down to ensure it’s secure.
- Repeat Filling: Repeat steps 4 and 5 for the second layer: pipe another border of whipped cream, then fill with the remaining vanilla bean custard, and top with the remaining sliced strawberries.
- Top Layer and Crumb Coat: Carefully place the third (if you have one, or the final) cake layer on top. Apply a very thin layer of whipped cream over the entire cake – the top and sides. This is called a “crumb coat,” and it traps any loose crumbs, preventing them from showing up in your final frosting layer. Refrigerate the cake for about 15-20 minutes to set the crumb coat. This makes the final frosting much easier and cleaner.
- Final Frosting: Once the crumb coat is set, retrieve the cake and the remaining whipped cream. Apply the rest of the whipped cream evenly over the top and sides of the cake. Use an offset spatula or bench scraper to smooth the frosting for a clean finish. Take your time with this step to ensure your “Strawberry Custard Delight Cake Recipe Guide” masterpiece looks as good as it tastes.
- Decorate and Chill: Arrange the whole or halved fresh strawberries that you reserved earlier decoratively on top of the cake. You can create a beautiful pattern or simply pile them enticingly in the center. For an extra touch, you might dust the top with a little powdered sugar just before serving. Refrigerate the assembled Strawberry Custard Delight Cake for at least 1-2 hours before slicing and serving. This allows the layers to settle, the flavors to meld, and the cake to firm up, making for perfect slices. Enjoy every glorious bite of your homemade delight!
Conclusion:
Well, my fellow dessert enthusiasts, we’ve reached the sweet finale of our culinary journey, and I genuinely hope you’re as excited as I am about the incredible potential of what you’re about to create. This isn’t just another cake recipe; it’s an experience, a symphony of textures and flavors that truly elevates the humble strawberry and transforms it into something utterly sublime. The Strawberry Custard Delight Cake is, without a doubt, a masterpiece in its own right, and a must-try for anyone who appreciates the finer things in life, especially when they involve cake!
Why is it a must-try, you ask? Let me count the ways. First, there’s the incredibly moist, tender cake base, providing the perfect foundation without being overly sweet. Then, we layer on that silken, rich, homemade custard – creamy, velvety, and infused with just the right hint of vanilla, creating a luxurious contrast to the cake. But the true star, in my opinion, is the burst of fresh, vibrant strawberries. Their natural sweetness and slight tang cut through the richness of the custard beautifully, making every single bite a balanced and refreshing treat. It’s a dessert that manages to be decadent yet surprisingly light, making it suitable for almost any occasion. We’ve gone through this Strawberry Custard Delight Cake Recipe Guide together, exploring each step to ensure your success, and I truly believe the result will speak for itself. It’s a dessert that brings smiles, elicits compliments, and most importantly, provides immense satisfaction to the baker.
Elevate Your Enjoyment: Serving Suggestions and Creative Variations
Now that you’ve mastered the art of creating this phenomenal cake, let’s talk about how to best enjoy it and how you might put your own unique spin on it. While absolutely magnificent on its own, served chilled directly from the refrigerator, there are a few ways to enhance the experience. Imagine a slice alongside a steaming cup of freshly brewed coffee for a delightful afternoon treat, or with a fragrant Earl Grey tea. For a truly indulgent dessert presentation, consider a light dusting of powdered sugar over the top, or a delicate sprig of fresh mint leaves to add a pop of color and an aromatic finish. A tiny dollop of freshly whipped cream, unsweetened, can also provide an extra layer of cloud-like texture without overwhelming the cake’s inherent deliciousness. Serving it slightly chilled allows the custard to set perfectly and the flavors to meld beautifully, offering a refreshing sensation that’s particularly welcome on a warm day.
But don’t stop there! The beauty of baking is in experimentation. While strawberries are truly iconic in this recipe, you could venture into other berry territories. Think about using fresh raspberries or a mix of berries in the summer – blueberries and blackberries would introduce different flavor profiles and vibrant hues. For a more decadent twist, a light drizzle of melted white chocolate over each slice before serving could be absolutely divine. If you’re feeling adventurous, consider infusing your custard with a hint of lemon zest or a touch of almond extract for a subtle, sophisticated variation. For those with dietary considerations, this recipe is quite adaptable; explore gluten-free flour blends for the cake base or dairy-free alternatives for the custard to make it accessible to everyone. The core structure of this cake is robust enough to handle thoughtful modifications, allowing you to tailor it to your personal preferences or the seasonal availability of fruits.
The possibilities for customization are vast, ensuring this cake remains a perennial favorite in your baking repertoire.
So, what are you waiting for? Take this comprehensive guide, gather your ingredients, and embark on this incredibly rewarding baking adventure. There’s immense satisfaction in creating something so beautiful and delicious from scratch, and I promise you, the smiles and appreciative murmurs from anyone lucky enough to taste your creation will make every moment worthwhile. Don’t be afraid to dive in; baking is as much about the process as it is about the glorious outcome. I genuinely can’t wait for you to experience the joy of presenting this stunning dessert.
Once you’ve baked your Strawberry Custard Delight Cake, I’d absolutely love to hear about your experience! Did you stick to the original recipe, or did you put your own creative spin on it? How did your family and friends react? Share your triumphs, your tips, and perhaps even your beautiful photos. Your feedback and stories inspire me and countless other home bakers in our vibrant community. Happy baking, my friends!
Strawberry Custard Delight Cake
Layers of soft vanilla cake, rich vanilla bean custard, and vibrant fresh strawberries, topped with dreamy whipped cream. A show-stopping dessert for any occasion.
Ingredients
Instructions
Important Information
Nutrition Facts (Per Serving)
It is important to consider this information as approximate and not to use it as definitive health advice.
Allergy Information
Please check ingredients for potential allergens and consult a health professional if in doubt.